HOLIDAY DONATION DRIVE - SUPPORT MSW - DO YOUR PART TO KEEP THIS GREAT FORUM GOING! (89 donations so far out of 49,000 members - C'mon guys!)
×


jwvolz
-
Posts
979 -
Joined
-
Last visited
Content Type
Profiles
Forums
Gallery
Events
Everything posted by jwvolz
-
 My eyes are crossing just looking at that Mike. Nice job!
- 179 replies
-
- 8
-

-
- hatsuzakura
- pit road
- (and 2 more)
-
I had zero issues cutting the extensions off before any planking. You have to trust me it will work, and it is much easier to match everything up rather than trying to shape the ply. I'm not sure how the planksheer goes on the Bluenose, but as I mentioned it was easier to install that first, and then replacement stanchions in the pre-cut notches. Everything ends up plenty strong enough and the bulwark planking went on fine. There are some photos of all of this in my log.
-
Thanks Yorky I use a Domanoff serving machine, and use Gutterman thread for the serving.
- 140 replies
-
- 2
-
-
- benjamin w latham
- model shipways
- (and 1 more)
-
I agree 100% on removing the bulkhead extensions. I did that on my Benjamin Latham build. Not only does it ensure consistency (they plywood is a real paint to work), but at least on the Latham it makes fitting the planksheer much easier. My build log has some photos showing this.
-
Good start Bob, looking forward to your build.
-
That looks very nice Andrew. Great work so far.
-
Find thin basswood stock and shim with that. Most kits just aren't perfect in terms of length of bulkheads. Errors just creep into these things from design to laser cutting. Don't sweat it. It will all smooth out once you start fairing the frames. Spacer blocks will definitely fix the keel warpage as well. They're also going to come in very handy when you go to plank the deck, as the narrow planks will lay MUCH better over a solid surface. I did the same on my current Benjamin Latham build if you want to look at my build log for photos. Good start.
-
Thanks Rich. It's a fantastic kit, and the larger scale is nice. I'm really enjoying the build, as it's a nice change of pace from warships. One other though on the decking... You could go with a 1/32" sub deck and then use 1/32" planking material, which would keep you at scale height. Though, using the balsa filler is still likely easier.
- 51 replies
-
- 1
-
-
- Model Shipways
- Baltimore Clipper
- (and 1 more)
-
Good start Rich. While you still can, I'd advise balsa between every bulkhead. It isn't so much for fairing purposes amidship, but to give you a solid surface for deck planking. The deck planks in the kit are likely fairly narrow and will lay much better over a solid surface. It also allows scale lengths and butt shifts without having to worry about landing on an existing bulkhead. See my current Benjamin Latham build log for an example. Even though that kit is 1/48 it has 1/16" deck planks.
- 51 replies
-
- 1
-
-
- Model Shipways
- Baltimore Clipper
- (and 1 more)
-
Great job on the planking!
-
Thanks Bob.
-
Thanks guys, much appreciated. Jason: I guess you hadn't seen it because of the split in the forums by era.
- 140 replies
-
- 1
-
-
- benjamin w latham
- model shipways
- (and 1 more)
-
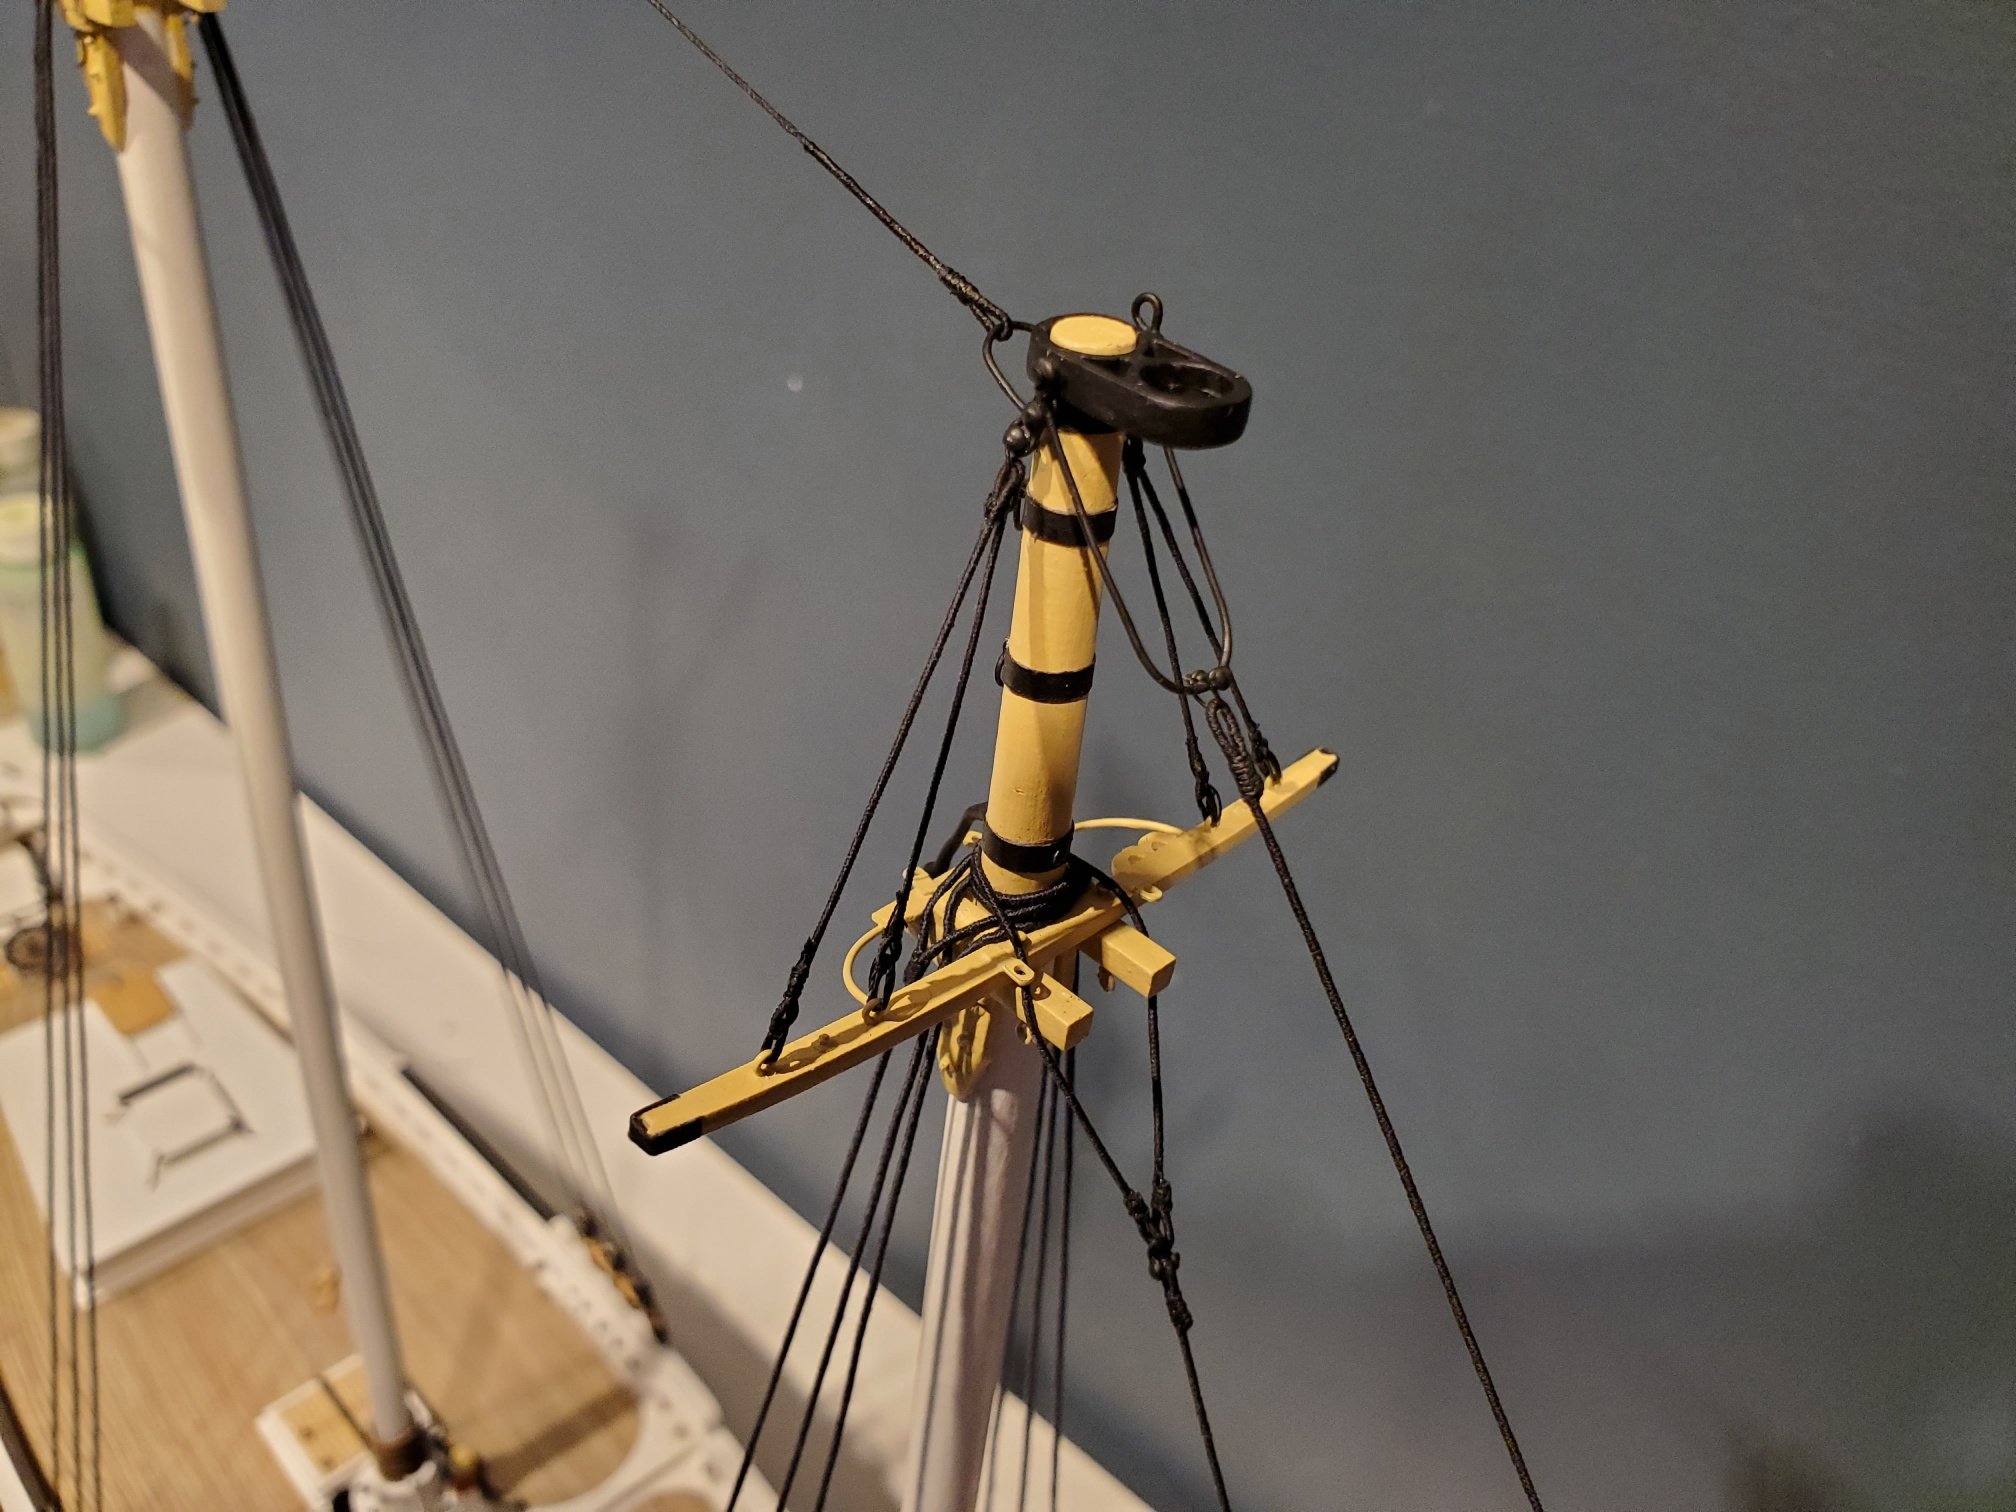
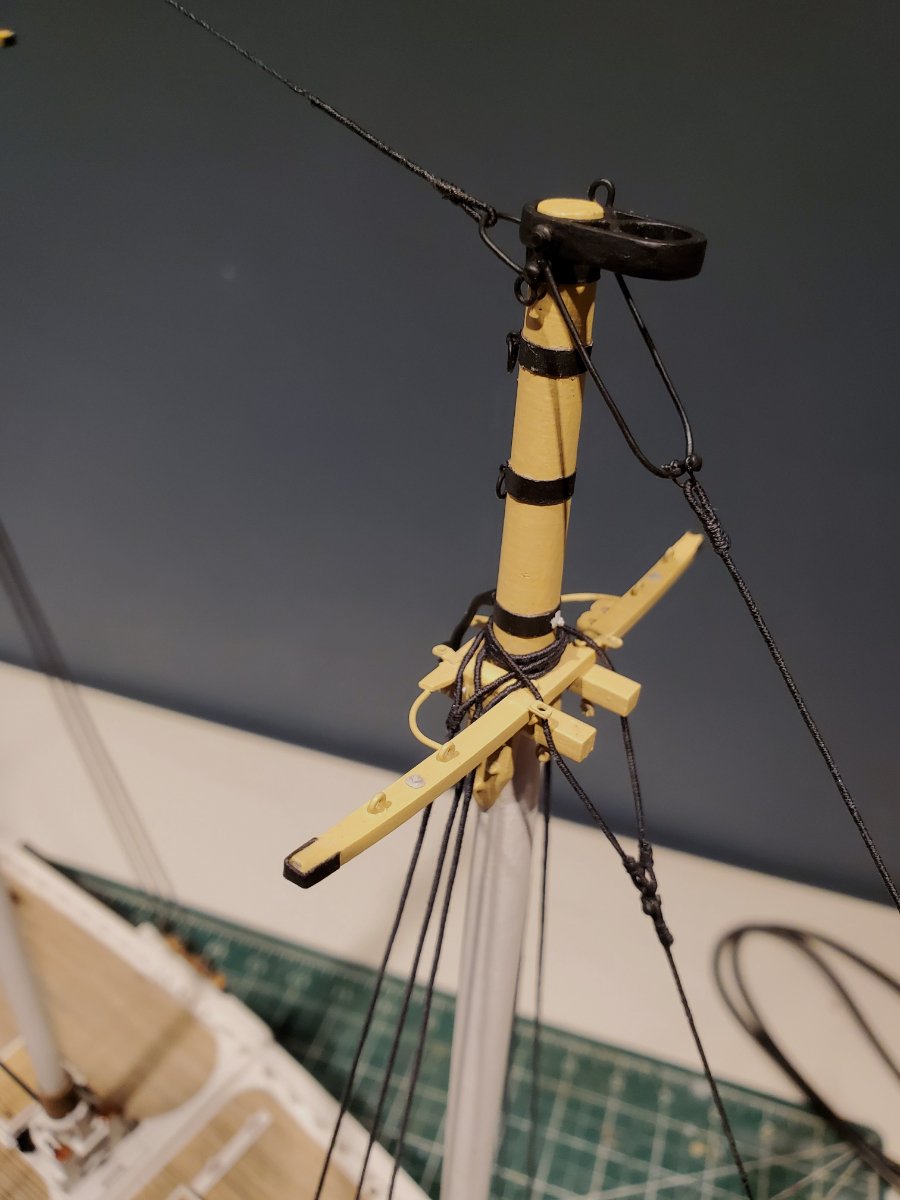
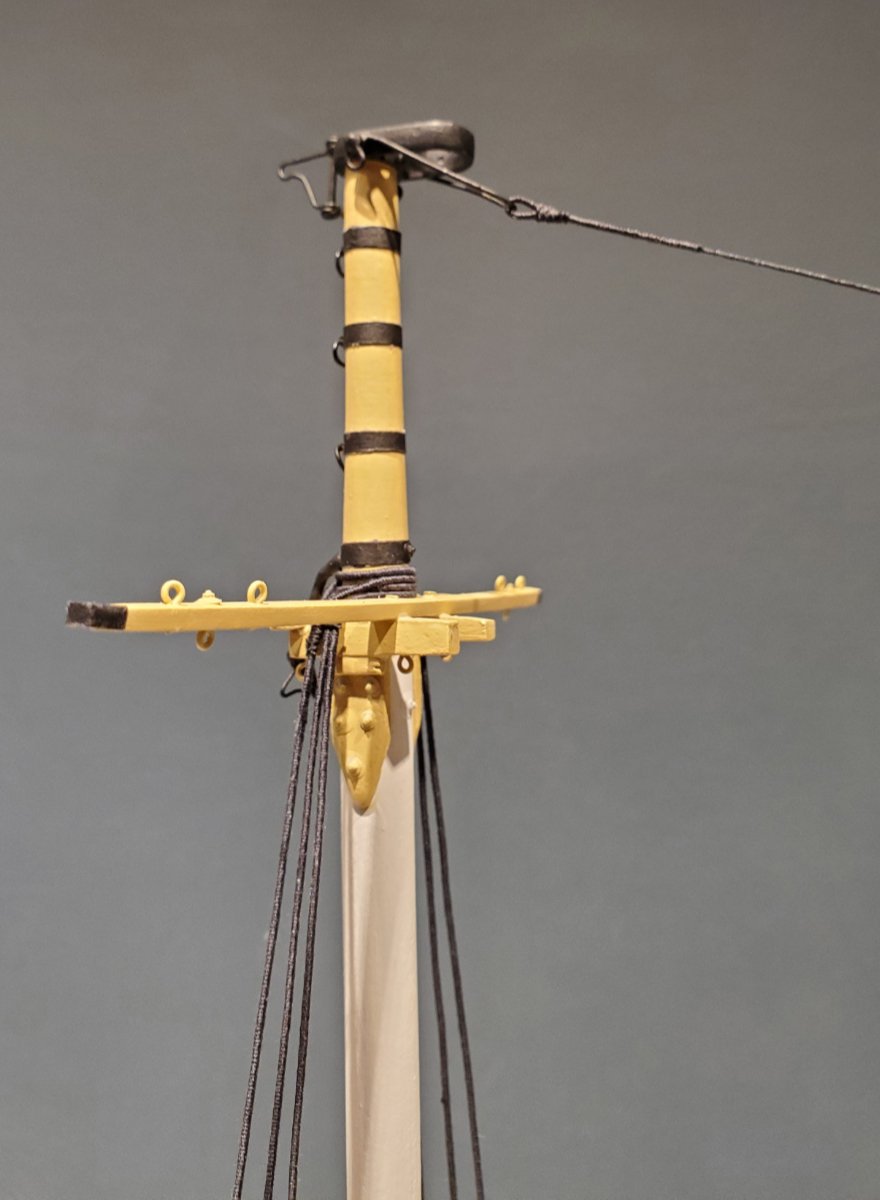
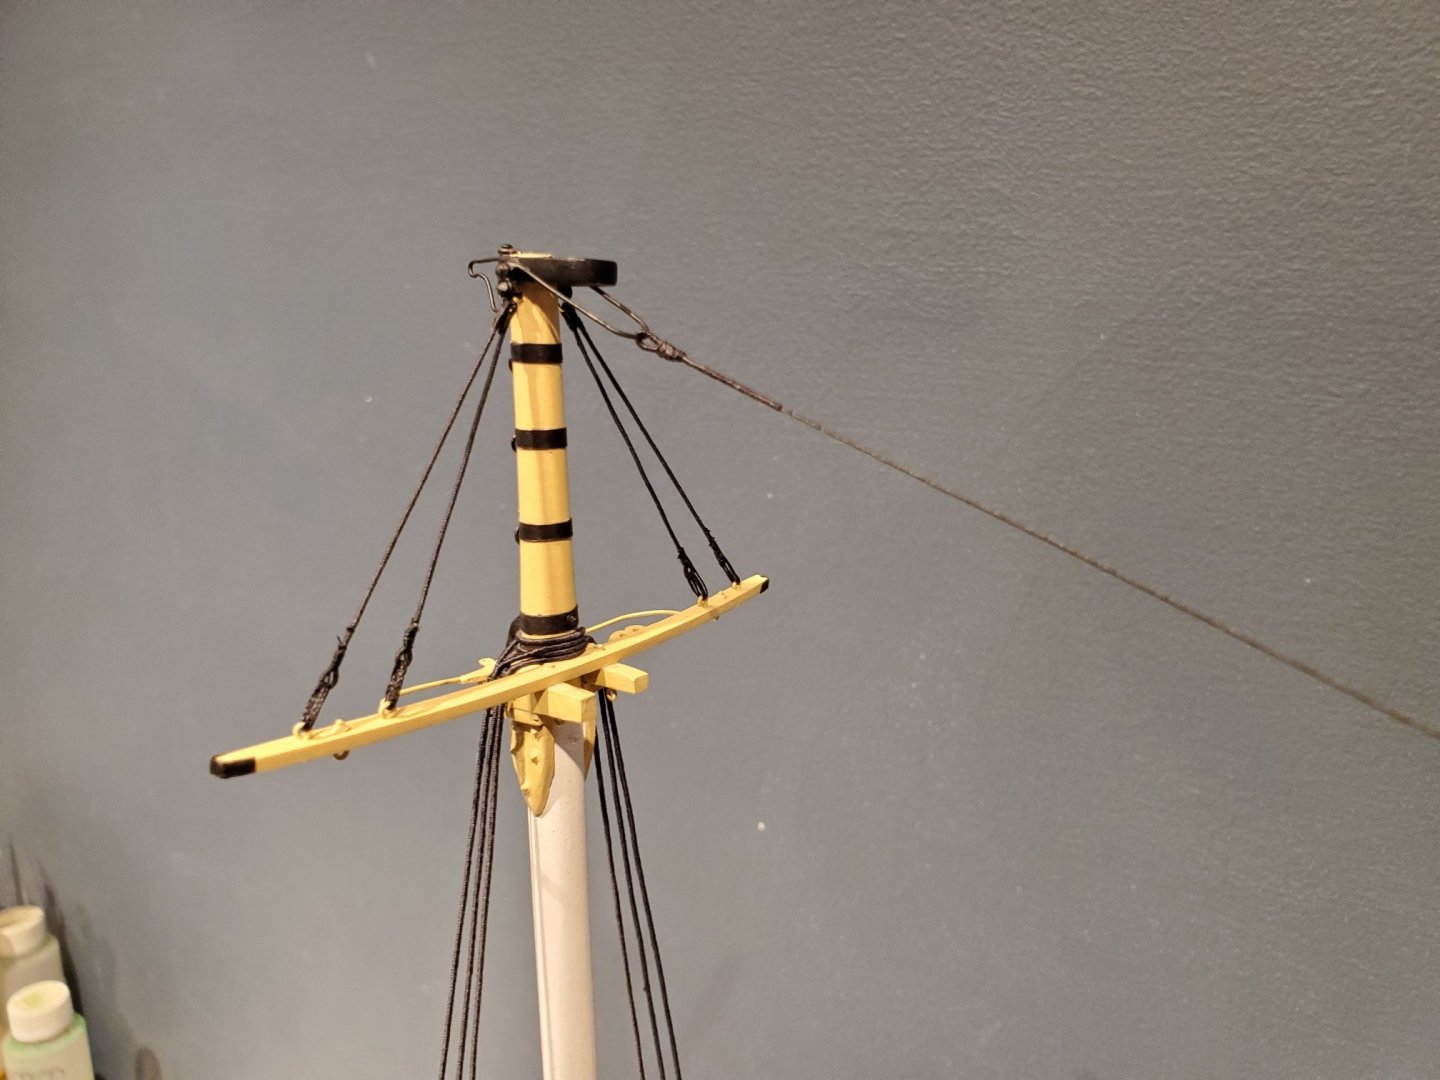
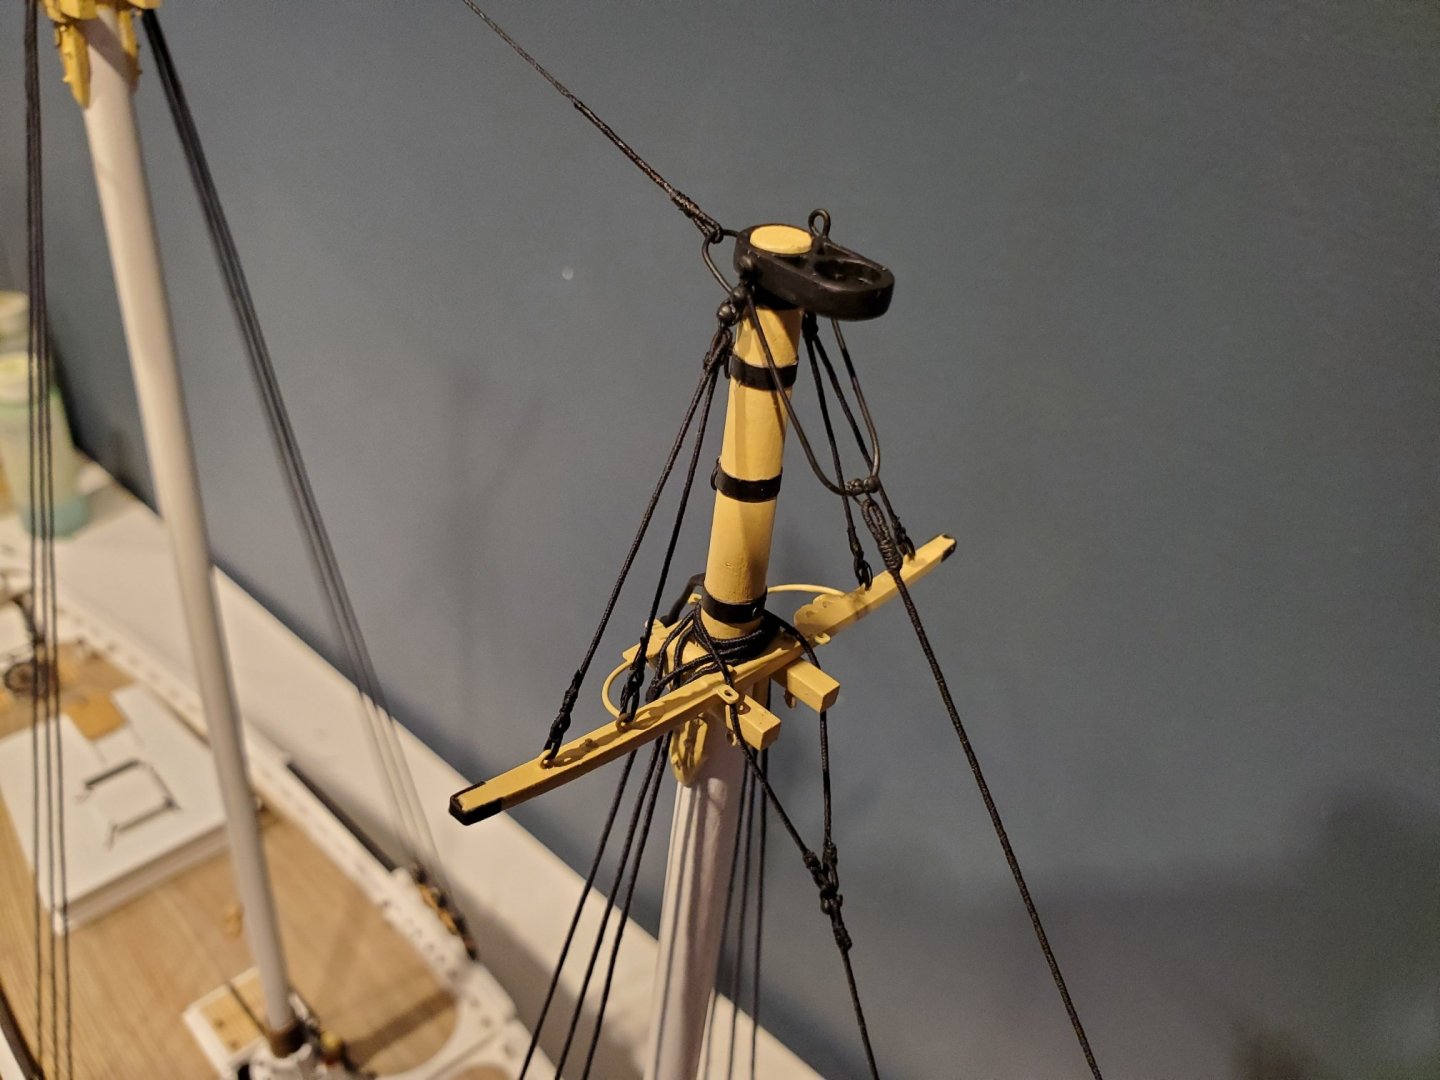
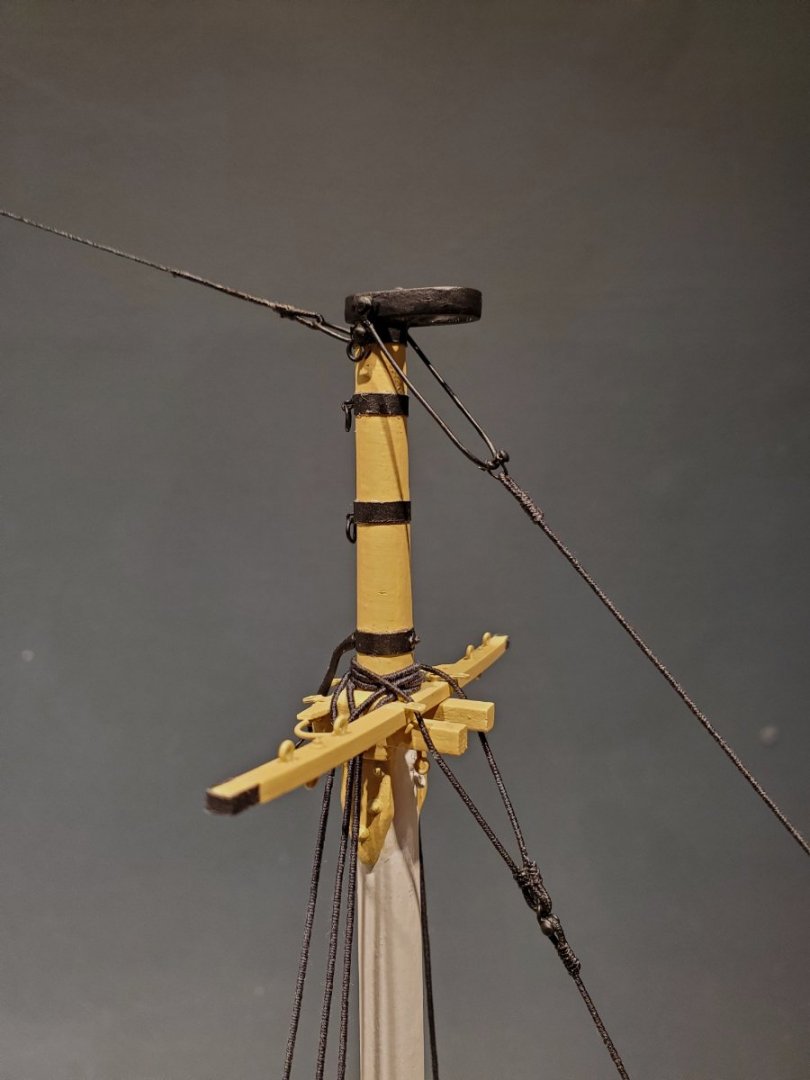
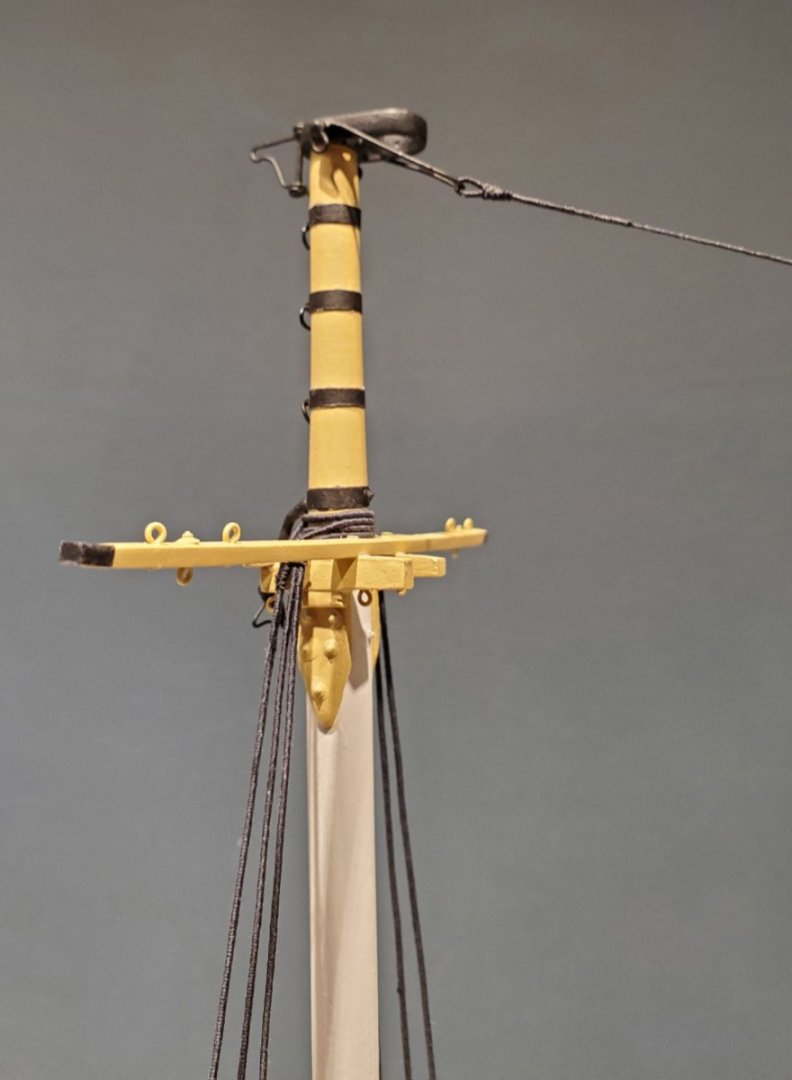
Rigged the spreaders and the spring stay. The spreader lifts are fully served and secured with lanyards. Lots and lots of serving...

- 140 replies
-
- 17
-
-
- benjamin w latham
- model shipways
- (and 1 more)
-
Looks good!
-
She finished up nicely Bob, very well done. Congrats on the build!
- 421 replies
-
- 2
-
-
- caldercraft
- granado
- (and 1 more)
-
Thanks guys.
-
Thanks NovaStorm 👍
-
Worked on the stays and topmast hardware. At least the stays are only served at either end, unlike full length on the shrouds; still a lot of serving. Made shackles from brass wire as well as the topmast crane. Bails for the stay and figure 8 links for the topmast stays are also made from brass wire. The small gray circles in a few of the pictures are Grandt line bolts/washers, used to simulate anywhere a bolt head would be. They add a lot in this scale. You can see them painted in a few of the other photos, especially on the mast cheeks. The Model Shipways plans are very good with this detail.


- 140 replies
-
- 17
-
-
- benjamin w latham
- model shipways
- (and 1 more)
-
Nice job
-
Bluenose II
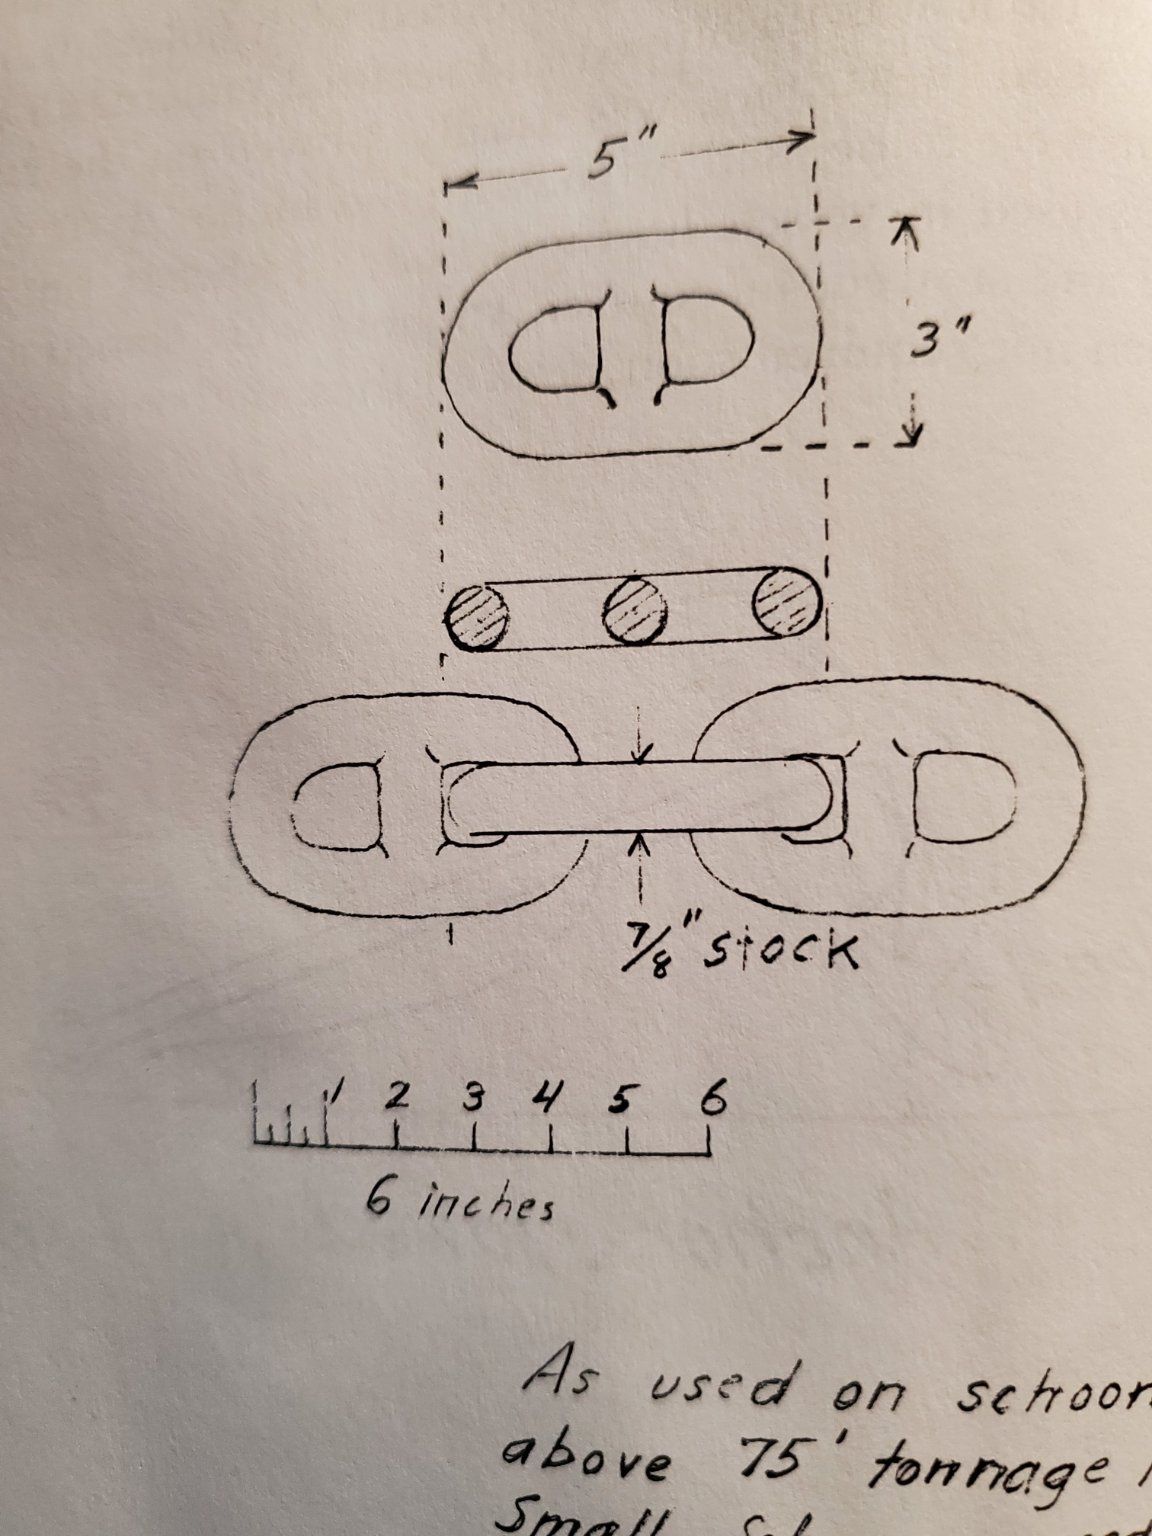
jwvolz replied to massimotocco's topic in Discussion for a Ship's Deck Furniture, Guns, boats and other Fittings
Here you go, from Chapelle's The American Fishing Schooner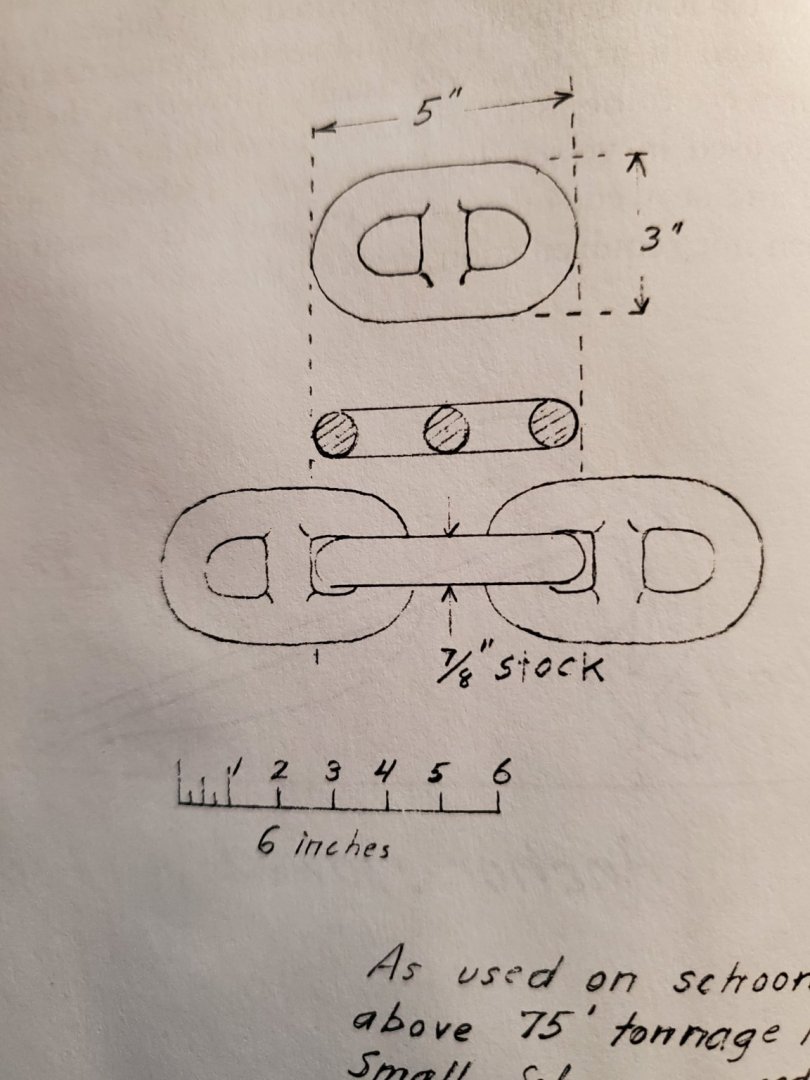
- 1 reply
-
- 3
-
-
I agree with the others saying paint below the waterline. Love the contrast that provides. You can't go wrong either way though Bob. Looking good!