HOLIDAY DONATION DRIVE - SUPPORT MSW - DO YOUR PART TO KEEP THIS GREAT FORUM GOING! (Only 13 donations so far - C'mon guys!)
×


SawdustDave
-
Posts
1,770 -
Joined
-
Last visited
Content Type
Profiles
Forums
Gallery
Events
Everything posted by SawdustDave
-
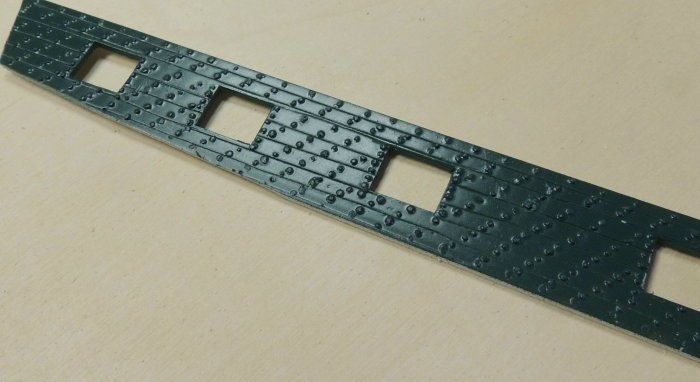
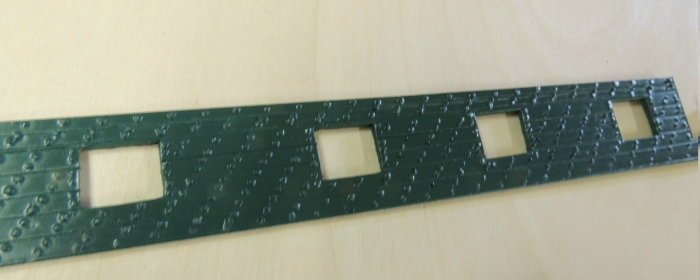
 Thanks Greg.... very pleased with the result. No reason to think they would not work on the wales exactly the same. I should have also noted.... before painting, I used a long sanding block with medium grit paper in order to bring all of the pegs to uniform height. Two coats of spray paint filled in around the base of each peg very nicely and left a nice rounded appearance to the top of the pegs.
- 742 replies
-
- 8
-

-
- constitution
- frigate
- (and 1 more)
-
Good question mate. I doubt it.... those are really tiny bristles. However, I am quite sure the first half of each peg will work just fine at 1:76th scale. Note that the stub is well tapered toward the end. In fact, I only used the skinny end to line the sides of each port.
- 742 replies
-
- 7
-
-
- constitution
- frigate
- (and 1 more)
-
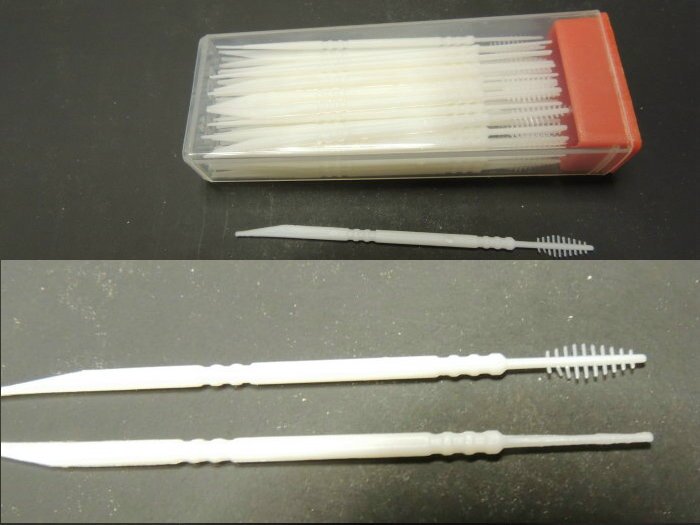
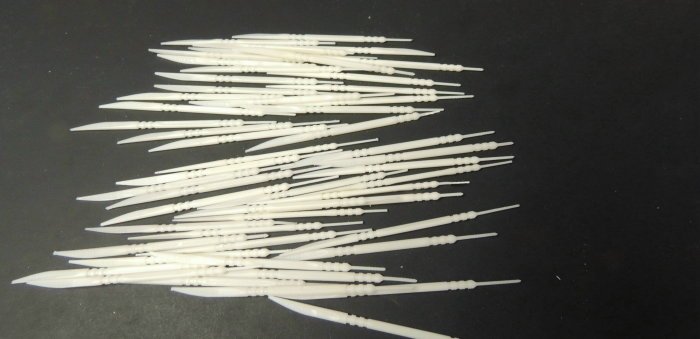
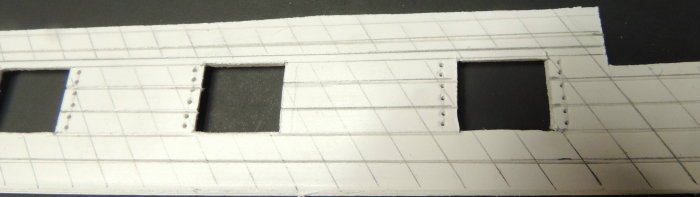
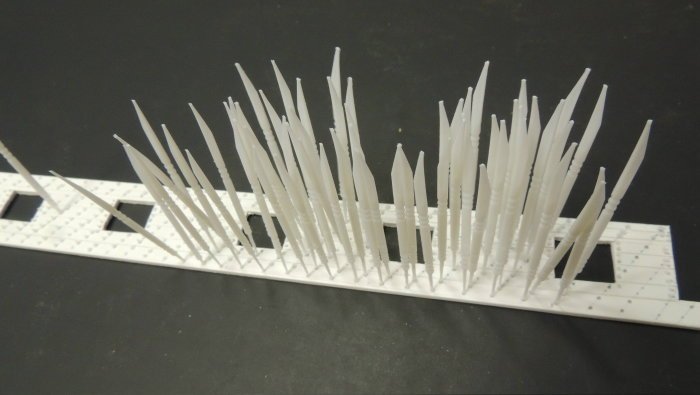
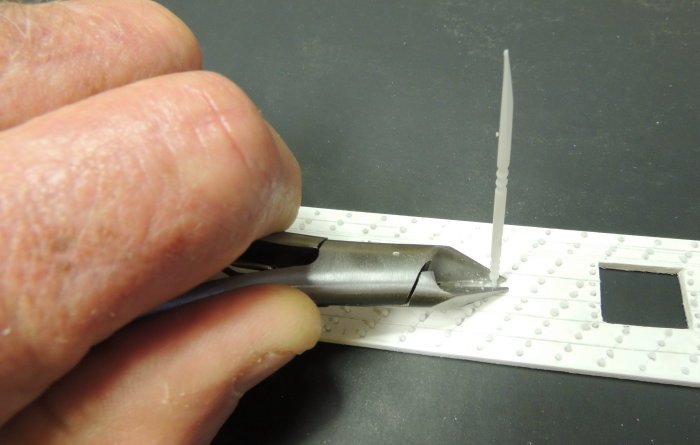
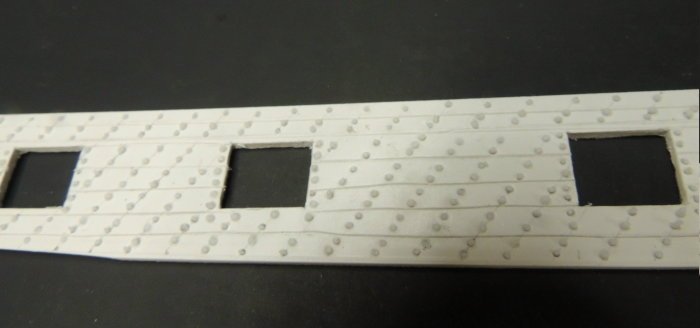
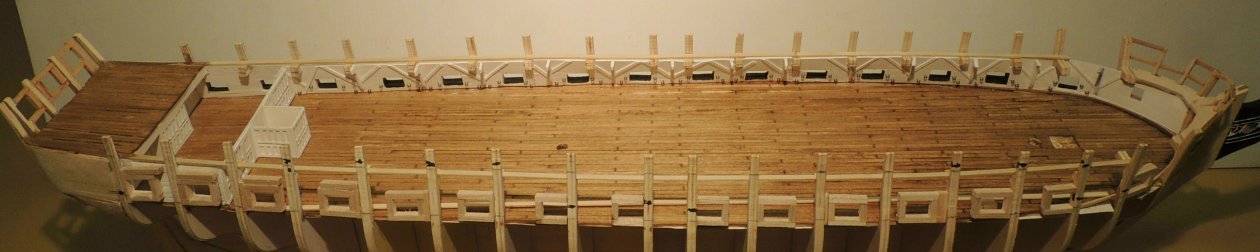
Spar deck bulwarks.... For all you fellow builders of this ship, you are well familiar with the challenge of the bulwarks of the spar deck. More specifically, the thousands of bolt heads so prominently visible from bow to stern. After several failed attempts to create those tiny dimples consistently.... 3D fabric paint, nails, CA gel - you name it - I finally settled on the use of those beautiful little plastic tooth picks with the flossing brush on one end. (used previously on the SOS) After shaving the bristles off (50 at a time), the following steps are tedious, but pretty straight forward.... Marked out the pattern on the white vinyl piece I'm using.... scored the simulated plank lines with a knife.... and began making holes along the pattern lines (two holes per plank). Tipping the peg end with the tiniest bit of CA gel, I inserted the batch of 50 into their holes.... Allowing the "pegs" to dry for about an hour, I snipped them off as close to the surface as I could with these nail snippers. And here's the result before painting.... And here's the result after spray painting with Hunter Green (Satin finish).... Port side completed.... starboard side just started. I did a rough count and came up with just over 3,000 bolt heads for both sides combined.
- 742 replies
-
- 22
-
-
- constitution
- frigate
- (and 1 more)
-
Thank you Moonbug! Our friend Augie is smiling down on you with great pride and love of the outstanding job you have done in his honor. Beautiful job my friend. Dave
- 2,191 replies
-
- 9
-
-
- confederacy
- Model Shipways
- (and 1 more)
-
Port side gun deck bulwarks.... Note, the planks seen laying on the beams are being used for measuring the height of the bulwarks. Eventually, after the gun deck is completed, I will remove these planks and install all of the beams that will support the spar decking.
- 742 replies
-
- 14
-
-
- constitution
- frigate
- (and 1 more)
-
We all tend to forget, our models are viewed by human eyes, usually from a distance of two or three feet Greg. Only an accomplished modeler has a keen eye to understand and appreciate the kind of details we continuously bust our tails to achieve. What's the first question people (non-modelers) usually ask about our models? "How many hours did it take you to build that ship?" For that very reason, I am logging every hour I work on this model..... 352 hours as of this posting.
- 742 replies
-
- 9
-
-
- constitution
- frigate
- (and 1 more)
-
Managed to complete the re-planking of the forward gun deck this morning. In this next photo I noticed some slight sanding swirl marks that came out after staining. The camera is our most reliable critic. I can now go back to working on the gun deck bulwarks.

- 742 replies
-
- 12
-
-
- constitution
- frigate
- (and 1 more)
-
Two of my favorite scratch builds.... Mayflower and Cheerful. Beautiful job sir. Dave
-
Beautiful start Brian. All that careful detail will pay off big time down the road. Believe me, most of us learned this the hard way. Dave
-
Absolutely beautiful work Frank. Congratulations on a fine job. I've never worked up the courage to do a POF model. Really enjoyed catching up on this amazing build log. Dave
- 649 replies
-
- 5
-
-
- dunbrody
- famine ship
- (and 2 more)
-
Hi Ed.... Always such a pleasure and learning experience to drop in and catch up on your incredible Young America. Never cease to amaze me my friend. Dave
- 3,618 replies
-
- 9
-
-
- young america
- clipper
- (and 1 more)
-
Hi Ryland.... What a beautiful clean job! Any way I can get you to come and do my cannon rigging when I get to that point? if not....what if I bring my Connie to Virginia and hang out in your shop while you do my cannons? Amazingly perfect work....not just the guns.... everything so clean and detailed. Dave
-
I feel for you Mark, having just removed a large area of planks already glued in place on my current build. I'm blown away with learning that they actually used planks as long as fifty feet. Never realized that such lengths could have been achieved in that time. Beautiful work as always. Dave
-
Beautiful work on those two launches Bob. I thoroughly enjoyed browsing your log. Congratulations! What's next? Dave
-
What a treat! I don't know if I've ever seen a cleaner build Michael. You have got to be very proud. Thanks for sharing. Dave
-
It's always so much fun to play catch-up on this amazing build Patrick. I can't believe the progress you've made since the last time I dropped in. Your work is such an inspiration. It's like getting an infusion of energy. Thanks for sharing.
-
If we measured our friends by their heart, you...my friend, would be a true giant among men. you never cease to amaze me. Dave
-
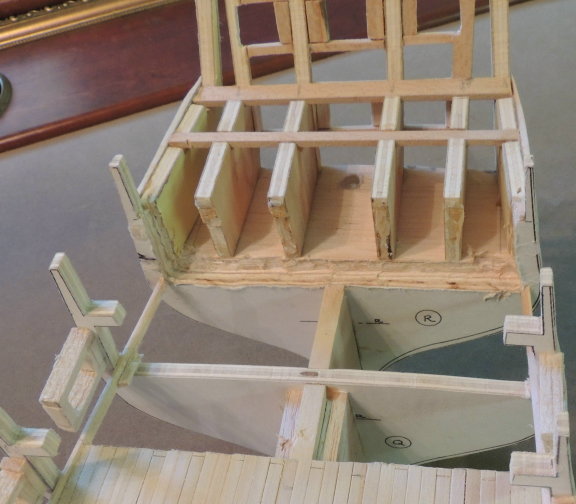
More ripping out.... Before installing the forward bulwarks, I must first remove the original beams from bulkhead A and B. Also, there is a serious issue with the deck planking I have already installed in that bow area. Seen here, I have removed the beams and now should be ready to prepare that bow area for planking the gun deck in that area. First, the top surface of the filler blocks is not the same level as the bulkheads. So I have to rough out that surface to take it down to the same level. Now to carefully remove a number of the staggered planks in order to re-plank the area with the correct pattern of butt joints. This is a good quitting point for the night.

- 742 replies
-
- 17
-
-
- constitution
- frigate
- (and 1 more)
-
Excellent question Tlgoe. After many hours of examining dozens and dozens of photographs, I gave up on trying to get the placement and scale out of all the confusion. So I called the office of the museum and discovered that there is a staff of modelers dedicated to the care of the museum's large scale model. Finally getting in touch with one of the staff shipwright's, he directed me to the source where I was able to purchase a CD containing detailed drawings of the entire ship....including the gun deck. In order for me to use the drawings, I must convert the format of each from PDF to JPG, which allows me to pull them into my graphics package and scale them for my model. Well worth the $14.00 purchase..... at that point I would have been willing to pay ten times that amount.
- 742 replies
-
- 4
-
-
- constitution
- frigate
- (and 1 more)
-
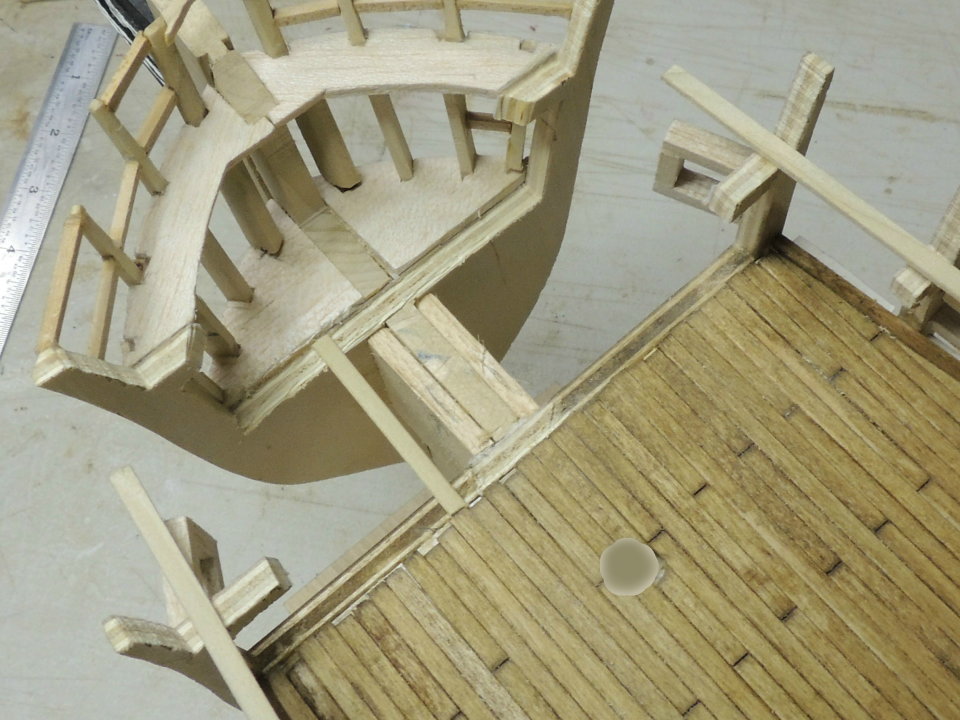
Note, in the previous posting, that some progress has been made on developing the gun deck bulwarks as well. Note the addition of the deck planking on the Spar level directly above the Commodore's quarters, which I will not attempt to create on this model. The Commodore's cabin will remain completely open and will eventually be furnished. At this point, the bulwarks on both sides within the cabin area have been added. Also, the port side bulwarks for the first four gun ports forward from the cabin bulkhead have also been added. I must say, getting the angle of the knees was kinda hit and miss at first. Finally was able to create a pattern after about the fourth cut. Those knees will not be seen entirely since there will be partial decking on the Spar level of sufficient width to mount the carronade placements down both sides. Finally, note, the black lining inside each gun port is actually black construction paper.

- 742 replies
-
- 12
-
-
- constitution
- frigate
- (and 1 more)
-
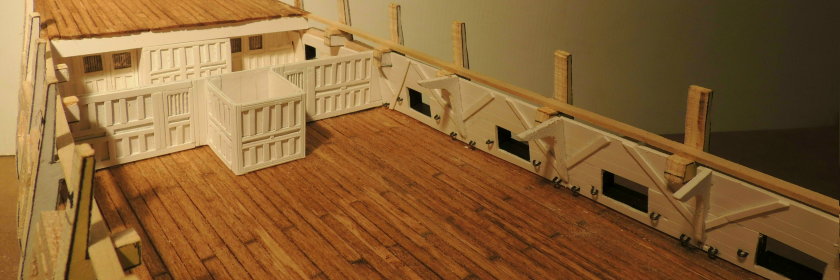
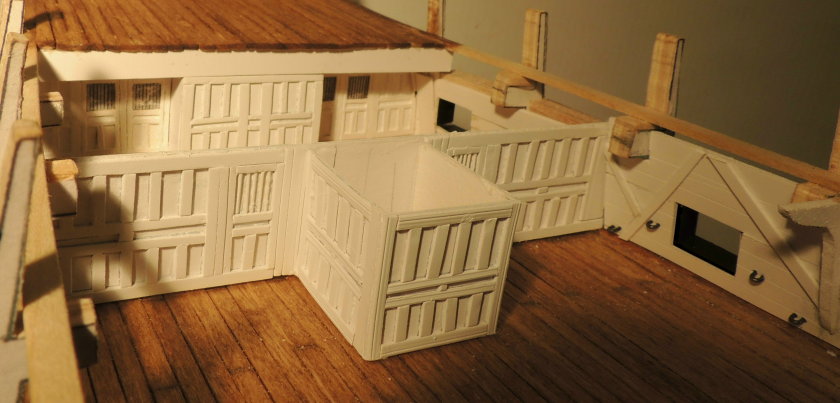
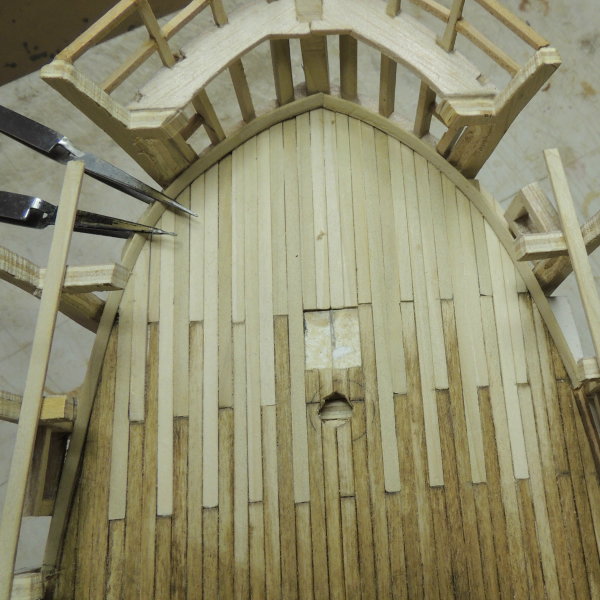
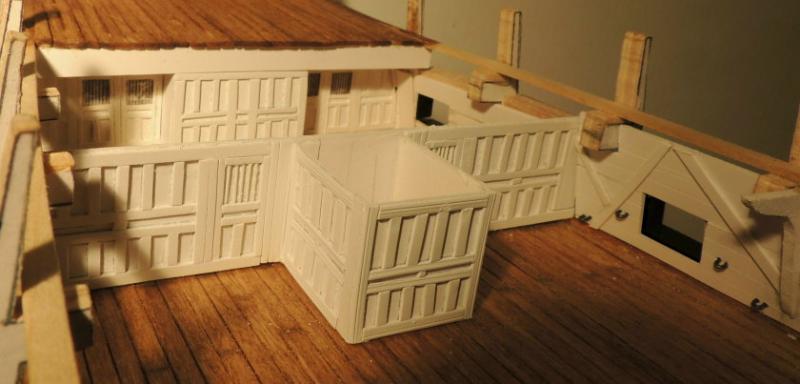
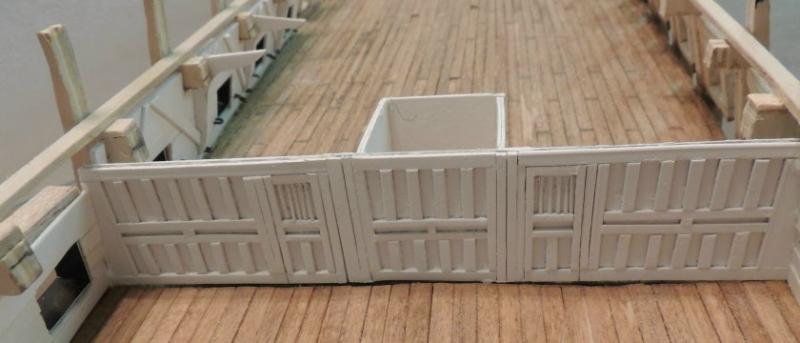
Gun deck paneled bulkhead development.... Thankfully, the availability of plenty of photo's of this ship make it possible to come up with most of what is needed to create her gun deck in fairly reasonable detail. After a full week of working on the development of these paneled bulkheads, they are finally in place. The forward module was particularly challenging due to the fact that I had to be paneled on both sides and includes the attachment of the Commodore's pantry which completely encloses the mizzen mast. Here's that same bulkhead looking forward from inside the Commodore's cabin.... Just looking at these two pics, I discovered two mistakes. One I can fix.... Omitted the door knob's from all of the doors. The other, I'll have to live with.... The tiny spindles in the top panel of each door should be stained wood. As you can see, I painted them white.
- 742 replies
-
- 8
-
-
- constitution
- frigate
- (and 1 more)
-
My guess is that, when removed for battle, the bulkheads would somehow be hoisted and lashed to the overhead beams Mark. Otherwise, where would they be stowed?
- 742 replies
-
- 4
-
-
- constitution
- frigate
- (and 1 more)
-
I say it was a minor setback because it only took me a couple of hours to rip out the problem. Then another couple of hours to repair the rip out. Four or five hours, in the life of a three year project, is just not a big deal....right? The reason for the problem....... Actually, none of the above Pete. The problem comes from the fact that the plans are designed for a kit that does not include the exposed gun deck. That gun port is exactly where it should be. The problem I encountered here only arose from my attempt to create the Commodores Cabin on the Gun Deck. I anticipate I will run into a similar issue in the bow area where I will probably have to remove portions of bulkhead "A" and "B". I'll deal with that when I eventually get to that area.... waaay down the road. Compared to the horrible plans I had to work with on the SOS, the plan sheets for this model are a gift from heaven. This little rip out was a piece of cake compared to the one where I had to rip out both sides and reposition the gun ports of the SOS after I had completed the hull planking. Now THAT was a major setback! Dave
- 742 replies
-
- 7
-
-
- constitution
- frigate
- (and 1 more)
-
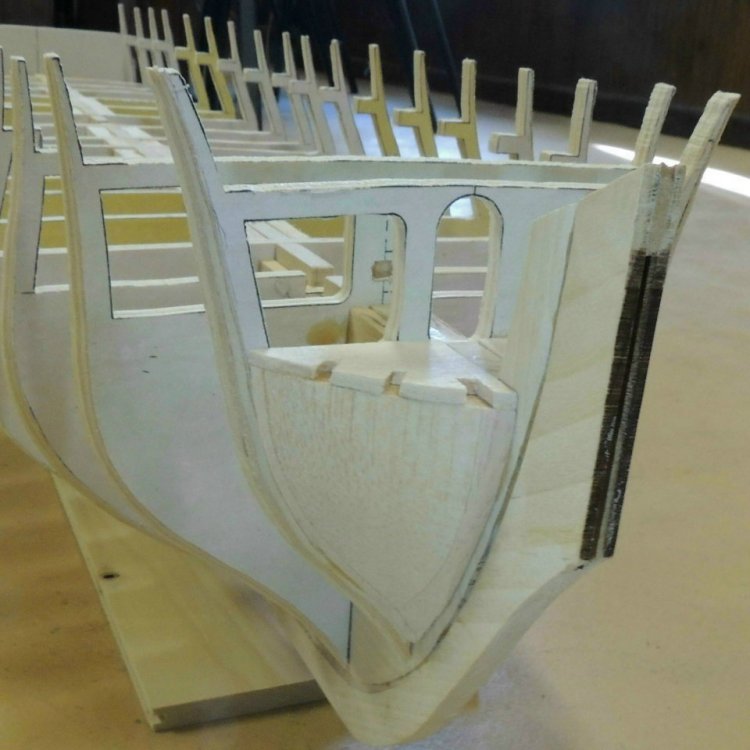
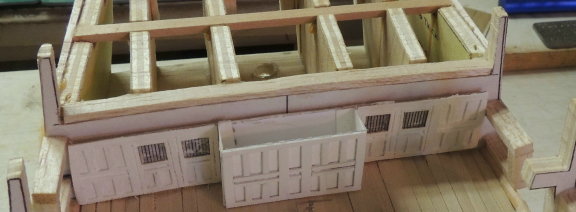
Back to work on the Constitution...... Completed the planking of the gun deck since my last posting. Then began building the aft paneled bulkhead leading to the commodores aft cabin and stateroom. Here's where the fun came to an abrupt halt! I ran into a serious conflict with the location of the aft most gun port being snug against bulkhead "R". The conflict being that there are two cannons on each side of the cabin and the two aft cannons cannot be fitted into that corner with the bulkhead being that close (see attached pic). As seen below, the paneled bulkhead is completed.... dry fitting pic below. The obvious solution is that the bulkhead has to go.... yuk! Not only the removal of the bulkhead, but also the entire deck within the Commodores Cabin area must be ripped out because all of the deck planks butted against that bulkhead. The removal creates an obvious issue with those planks along the base of the new bullhead location. So here's where I am now.... Consider this a minor setback. I really have a hard time visioning one of those guns being fired within that enclosed area.
- 742 replies
-
- 12
-
-
- constitution
- frigate
- (and 1 more)
-
Mostly stiff artist brushes with mineral spirits. It took several cleanings in order to eventually get all the caked dust out of the nooks and carnnys of the decks and from the entire hull. No attempt to clean the dingy sails because I was afraid of the blotching that might occur. I was not about to remove them and have to get into a complete re-rigging. Although dingy, they are a consistent color and appear more "weathered" than dirty. Once cleaned, as much as possible, I simply brushed on a couple of thin coats of wipe on satin finish poly. No stain was used at any point.