Landlubber Mike
-
Posts
4,553 -
Joined
-
Last visited
Content Type
Profiles
Forums
Gallery
Events
Everything posted by Landlubber Mike
-
 Don, a really great start on an interesting subject. That's amazing too that there is such a long, detailed manual - wish more kits did this. Very nice job! The filler blocks was a bit of any ordeal I'm sure, but you have a fantastic planking surface. Can I ask what woods are in the kit? Also, I saw that the bulkheads are hollowed out. I was curious as to why you think that might be, and whether you found that approach to weaken their structural integrity?
- 653 replies
-
- 5
-

-
- trabakul
- marisstella
- (and 1 more)
-
Thanks Jason - glad I'm not the only one suffering from this malady. I'll have a few drinks and slap myself around some to get out of it!
-
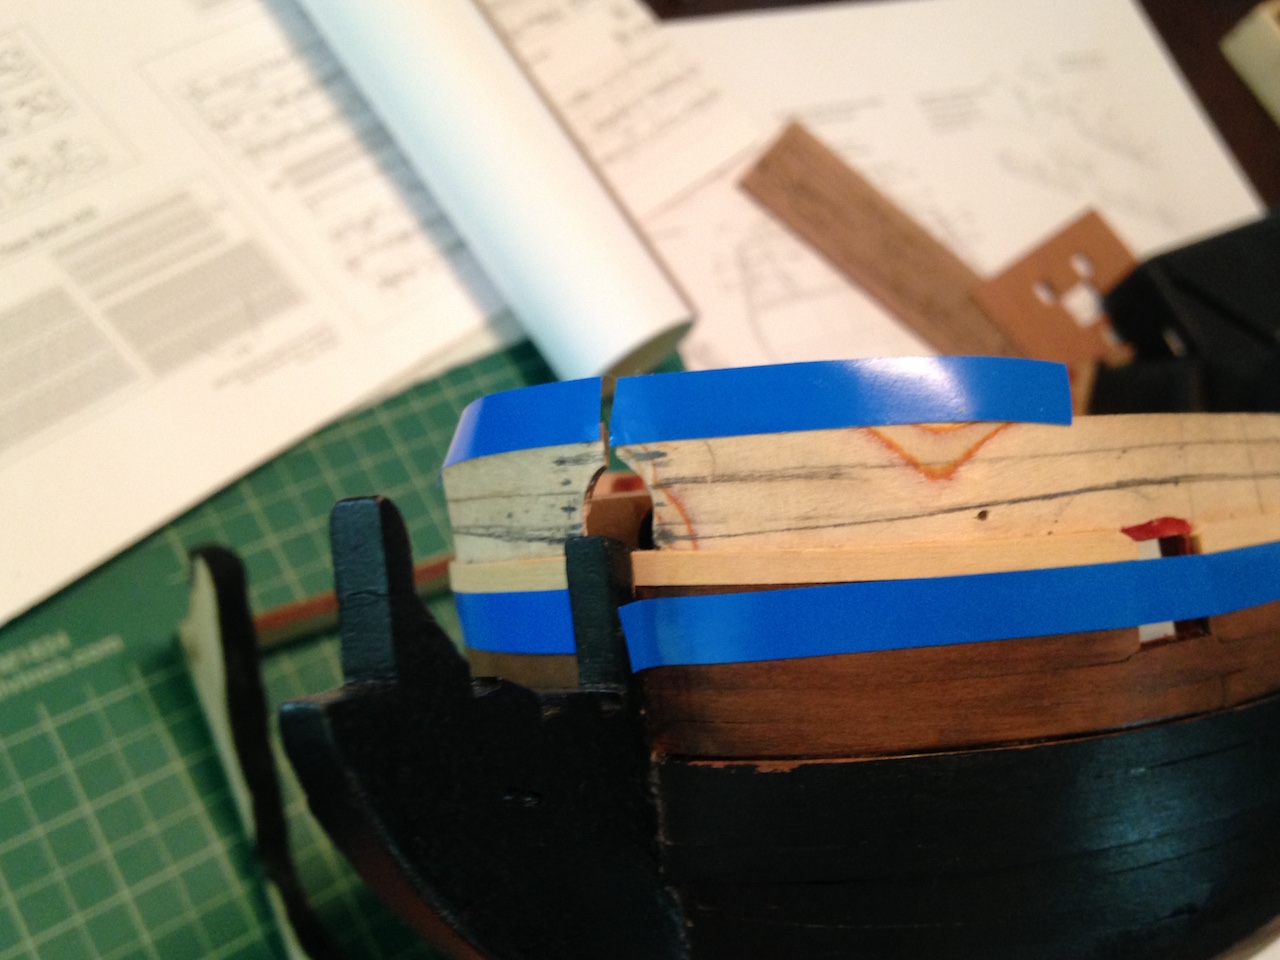
Hey Martin and Spyglass, thanks for looking in. After looking at the many Swan class logs on here, I think my gunport patterns are right in line with the rest of everyone else's. So that's a good thing. Spy, I don't know what exactly my problem is, but it's most likely that I'm just way overthinking things If I was painting the model, things would be much easier - run the waist rail, paint the frieze background, add the friezes, add the sheer rail, and so on. By using stains, I'm trying to measure with precision where the rails need to end up because I'm switching from pear (dyed brown) to boxwood for the friezes (dyed blue) to redheart for the upper area above the drift rail. I've been trying to take exact measurements off the plans, and it seems like there should be very little bulwark above the bowsprit, especially if you look at the NMM plans. Every Swan class on here seems to be on the higher side, especially relative to the NMM plans. My sense is that the patterns do run a little high at the stem, and it's good to see that you also found that you need to take a bit off the "peak" at the stem. Makes me feel like I'm in good company. It would be nice if Amati noted in the instructions and plans where extra material, if any, existed on the gunport patterns. And you're right about my freestyle lines - that's why I broke out the blue tape to at least start with the waist rail. Once I've set that line, I can use a compass to draw the line for the sheer rail and drift rail, since the areas between those rails should be consistent throughout. I think I'm just going to go by feel on this and run the waist rail and other rails where it looks best. The difference between the starboard and port tape lines is only on the order of 1.5mm or so, and much of it will be covered by the headworks anyway, so I'll try to not make myself too crazy on all this.
-
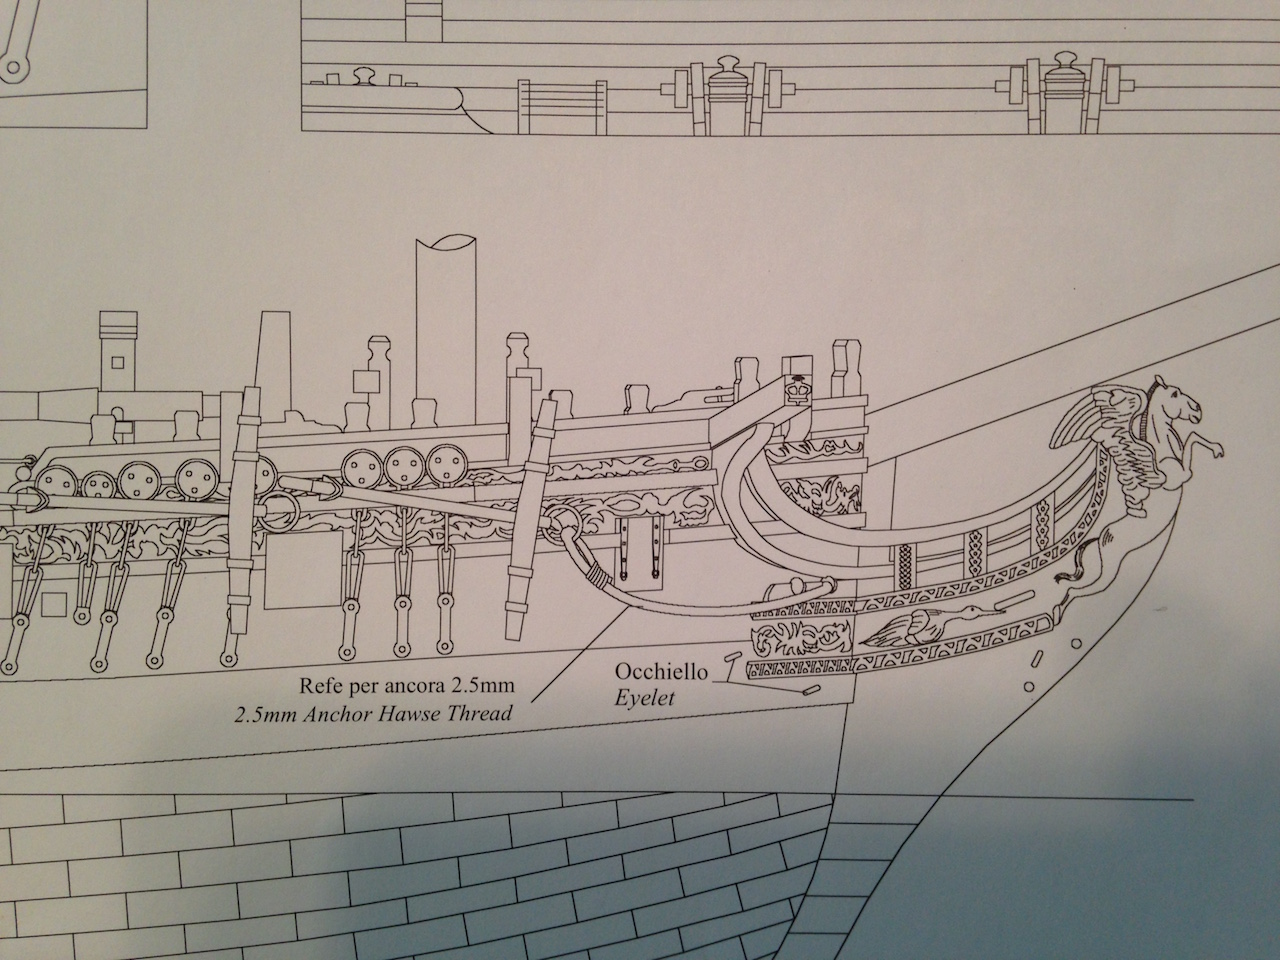
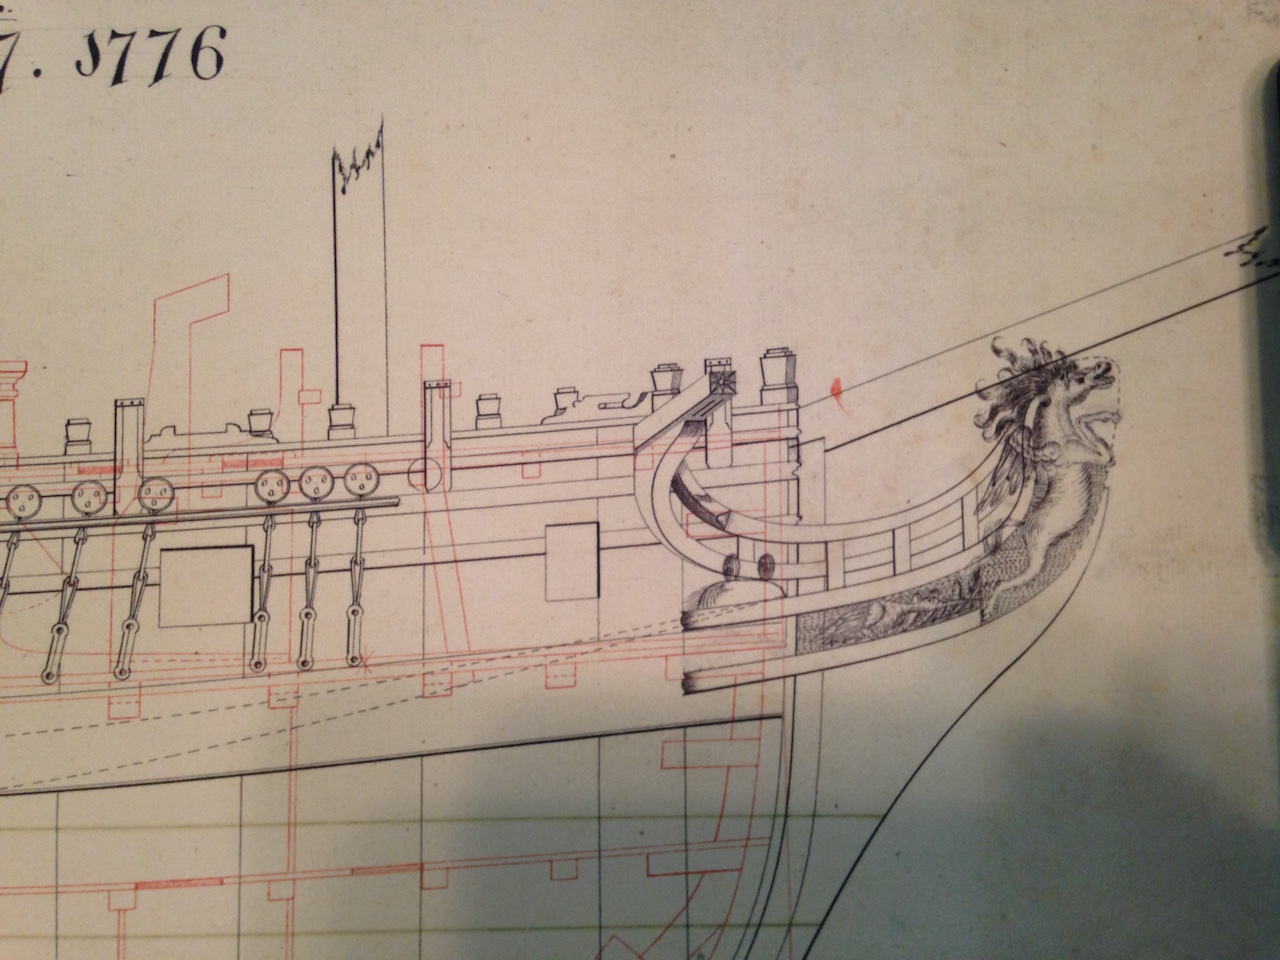
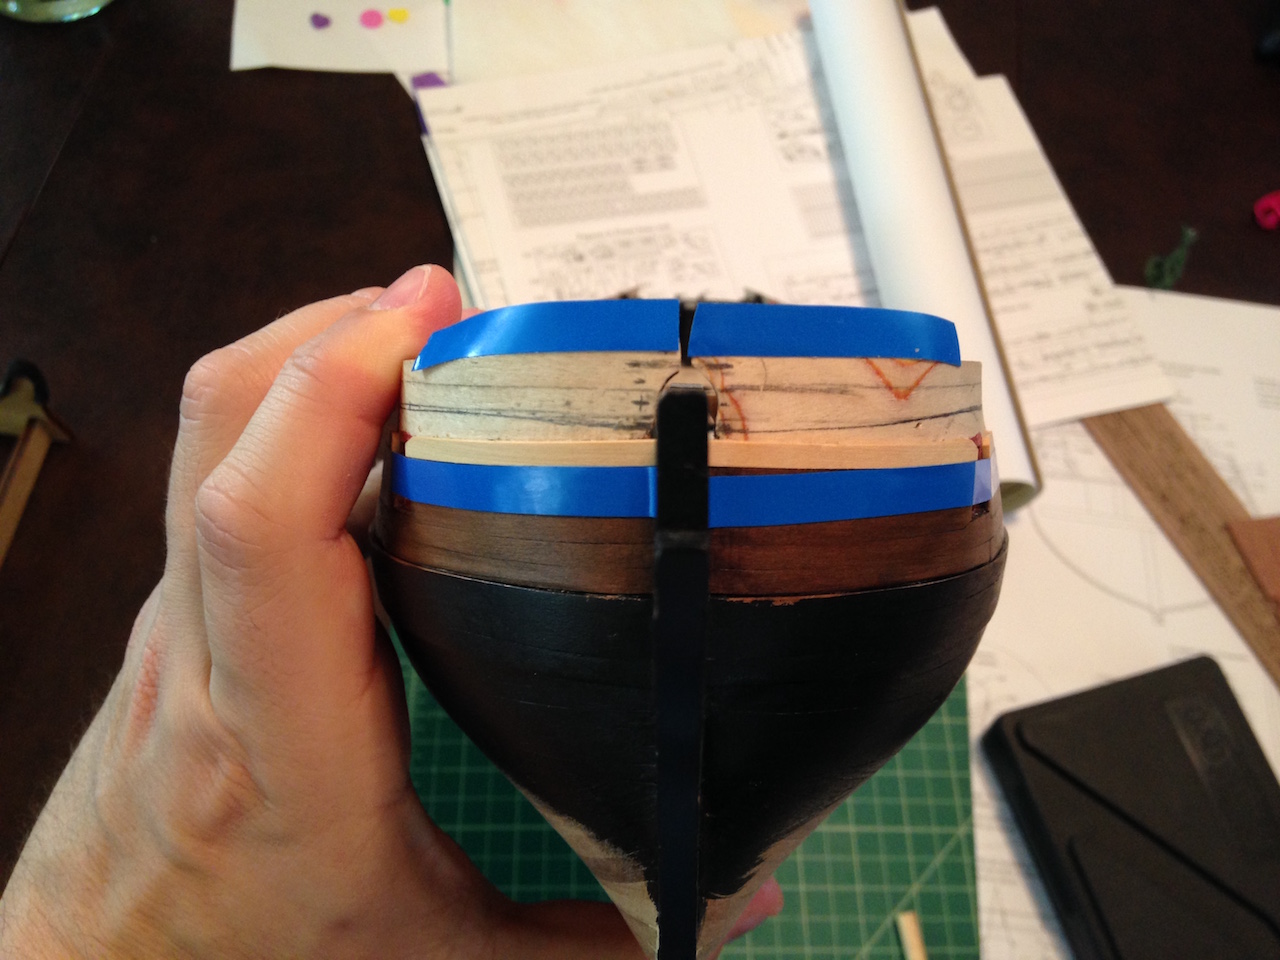
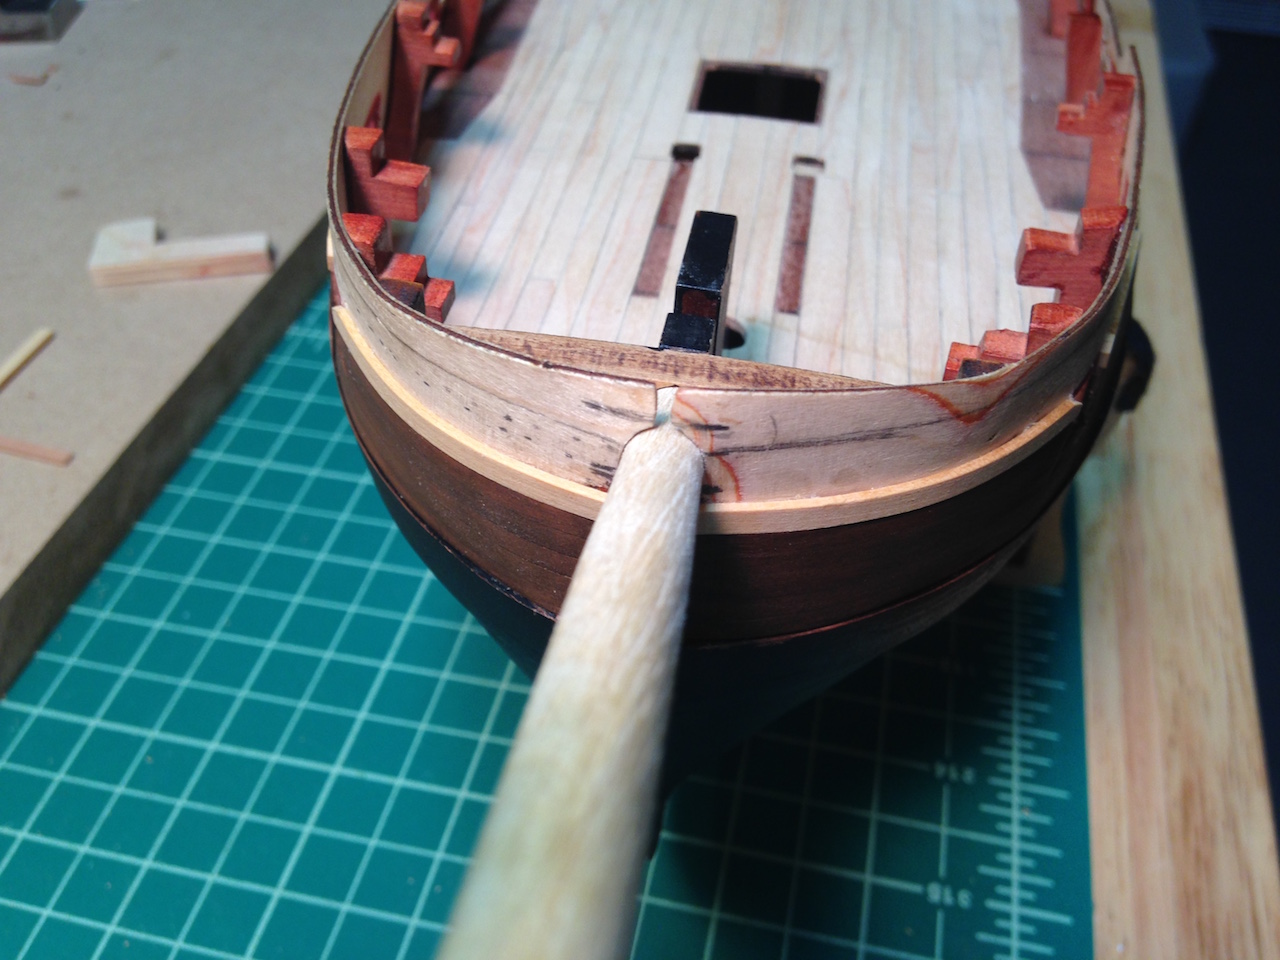
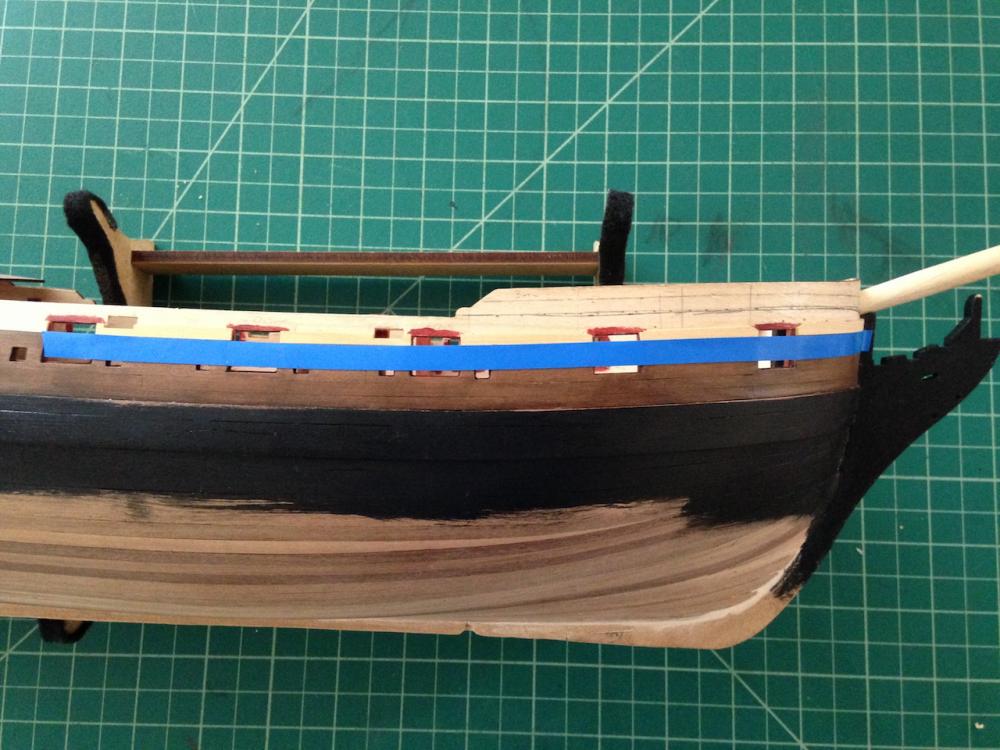
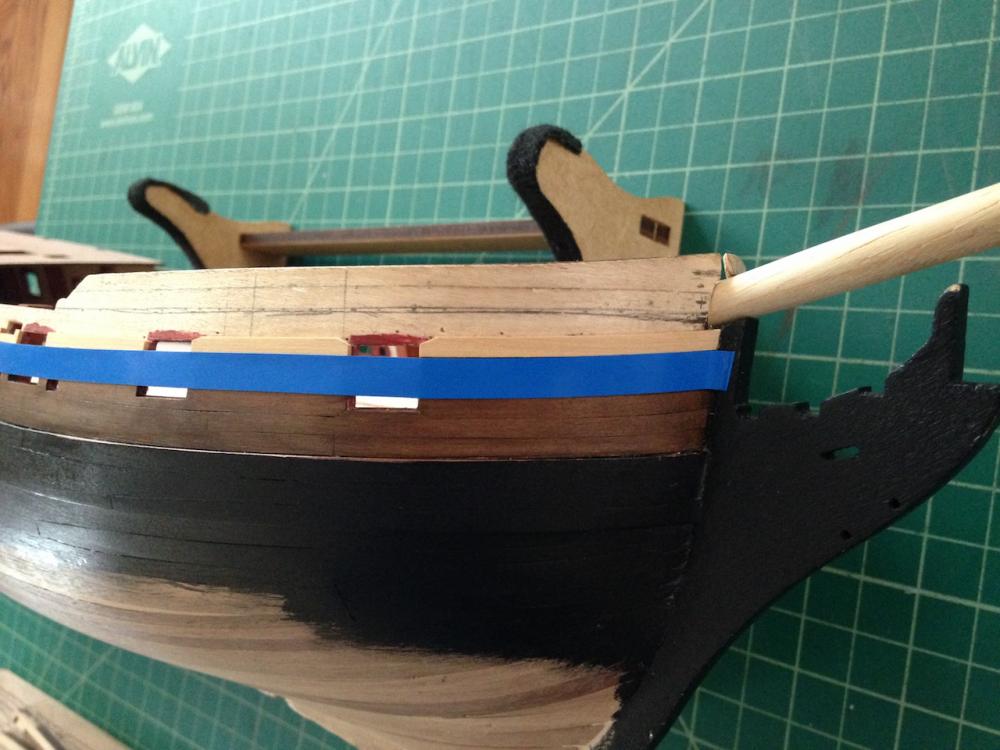
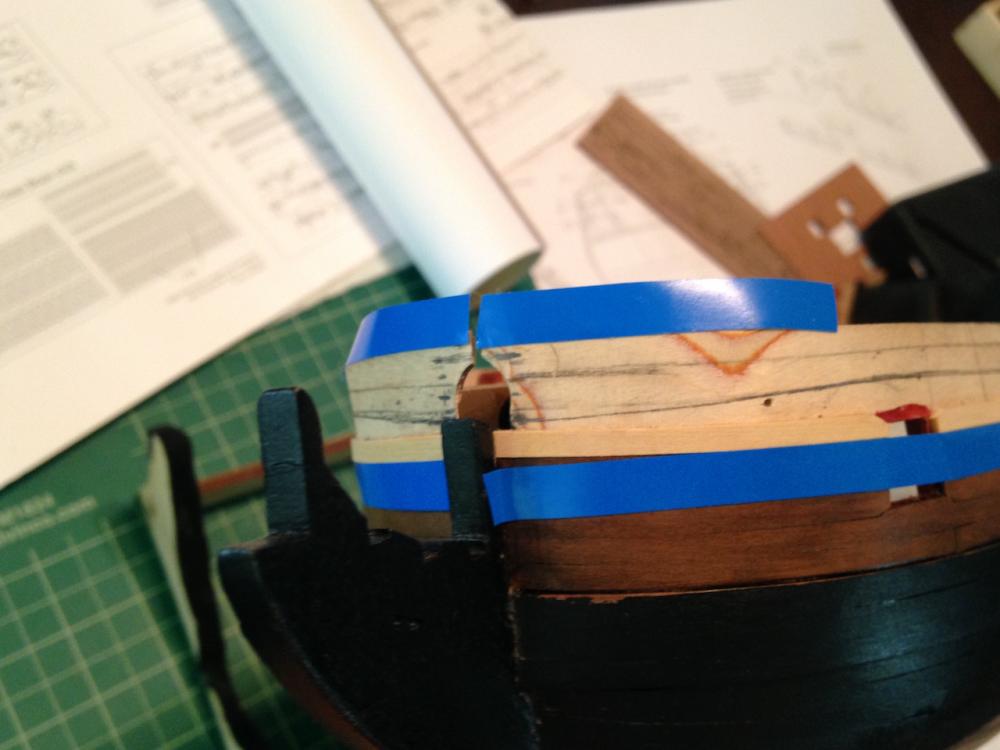
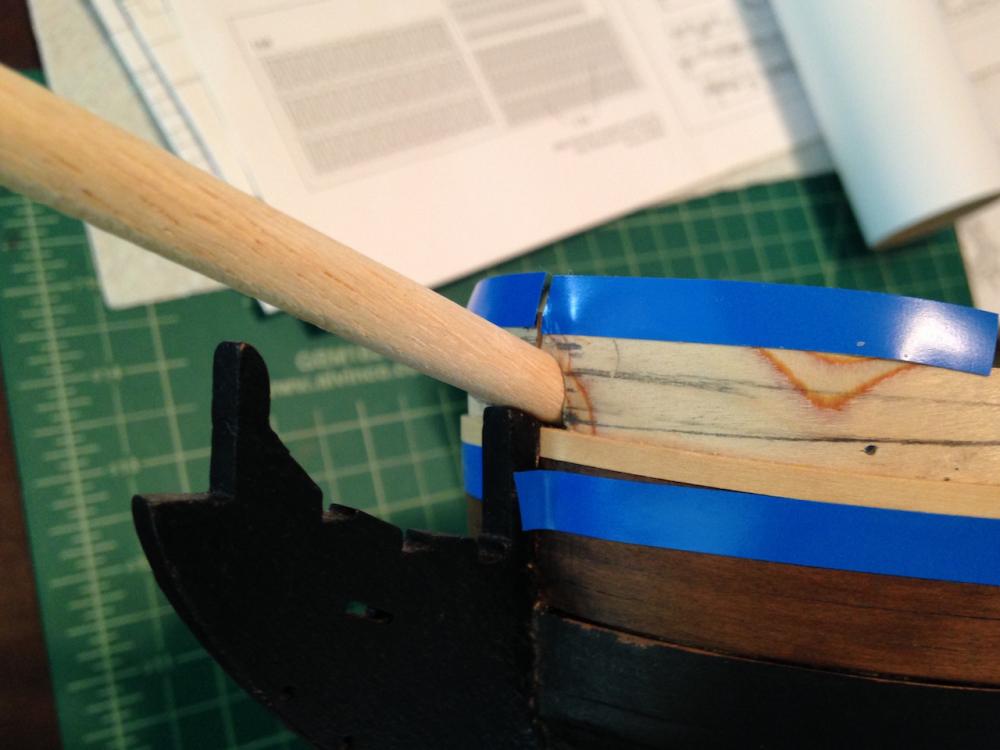
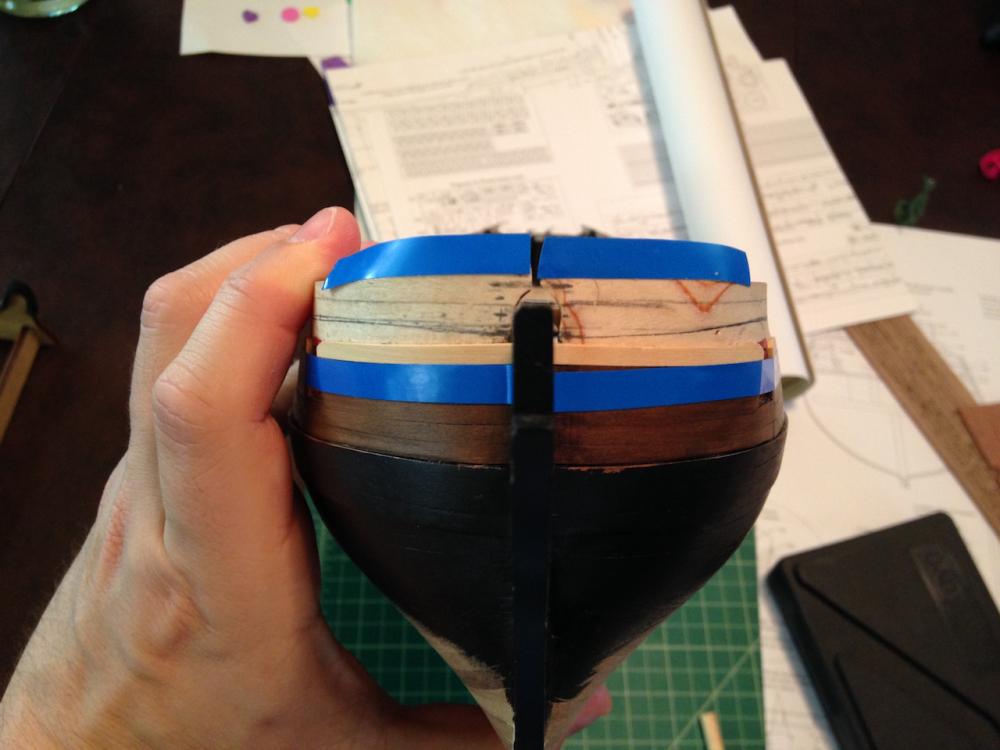
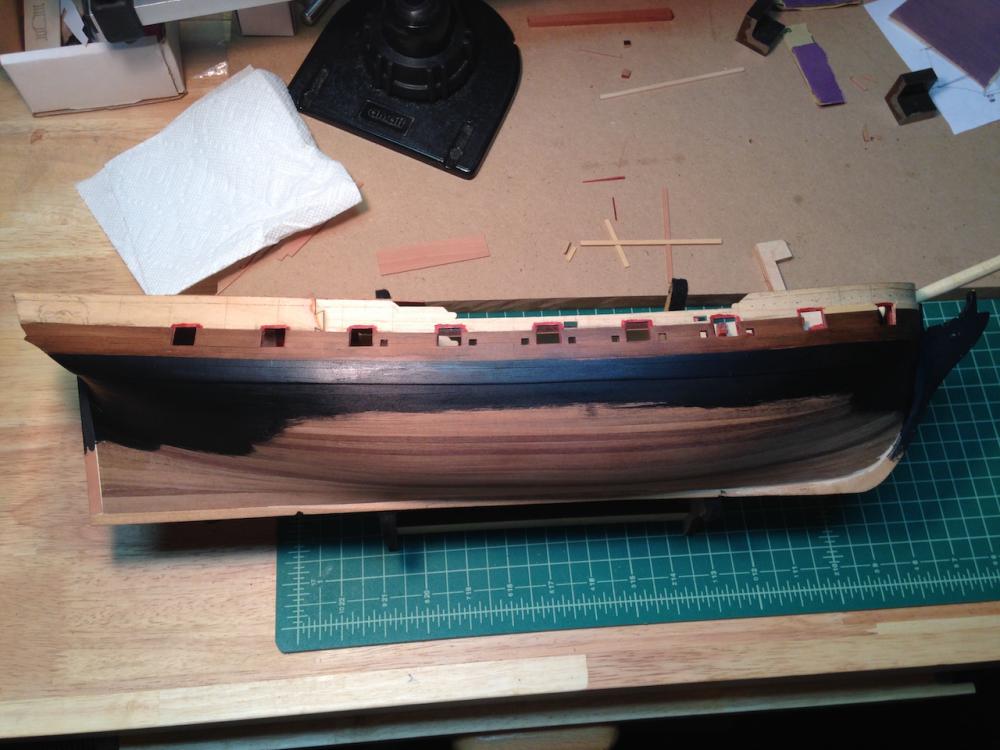
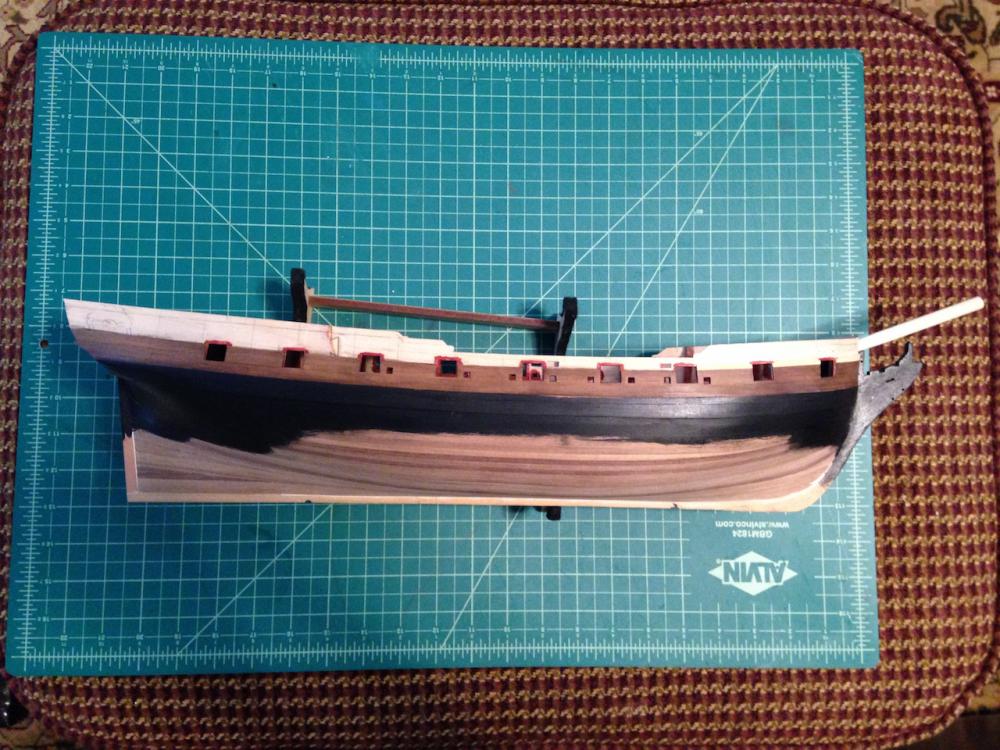
I've been making slow progress on my Pegasus. I completed the first strake of planks for the frieze area - using the TFFM planking pattern, I counted 26 planks per side from the frieze area on up, and so far I've gotten 10 done per side. The next strake is a little tricky as the planks have extensions over the gunport, need cut-outs for the fixed blocks in the waist, and one pair have a scarph joint. I'm using boxwood, which is a really really nice wood to work with. Very similar to pear, if not a tad better to work with. I mentioned earlier that I thought the bulwarks came up too high over the stem. Here is a picture that shows what I mean: Looking at the Amati plans, the bulkwarks should barely extend of the bowsprit - and the NMM plans show and even narrower section of the bulwarks extending over the bowsprit: I ran some masking tape to mark the upper line of the waist rail. Here is the line which matches the run of the planking: Unfortunately, I think this is a little high at the stem. From what I can tell, the top of the waist rail should be approximately 5.5mm below where the top of the stem meets the hull (the lower frieze is about 5.5mm in height, and the top of that area ends right about where the top of the stem meets the hull). So on the port side, I marked where I think the upper line of the waist rail should end up (about 2mm lower), and marked the edge of what should be the top of the bulwarks at the stem as well. This is a good picture to show how the run of the waist rail to the stem under both approaches, as well as how much of the gunport pattern will need to be sanded off: Looking at the hull front on, the line dips slightly on the port side, meaning I would have to sand off the stain in that section. I think the cleanest thing will be to just stick with the planking lines as is, though I think the waist rail line at the stem probably will be a tad high (the line is likely in the middle of both the starboard and port approaches). I could add in a very slight taper to the planking as it approaches the stem to help bring the bulwarks down a little more. I think all this bears out that my initial gut that the gunport patterns sat too high at the stem.


-
Can i live without a BYRNES TABLE SAW
Landlubber Mike replied to shihawk's topic in Modeling tools and Workshop Equipment
I waited for months to see if I could get my hands on a used Byrnes table saw, and had no luck. I ended up buying them new from Jim, and haven't ever regretted the decision. Too many things these days have more complicated and unnecessary configures with multiple parts that just raise the chances of the thing breaking down - Jim's tools on the other hand are built like tanks, and use a very simple yet effective design. I don't get as much modeling time in with work, kids, beer, etc., but I would rather spend the money on good tools that will last a lifetime than buy tools for slightly less that don't have the same quality both in terms of precision and expected lifetime that will end up getting replaced down the road. -
Hi Elijah, I haven't been on MSW much lately. Your careful and thoughtful approach to your build is very commendable! I've found that I probably spend 80% of my time thinking and planning things out, and only the remainder actually building (or finding lost small parts in my carpeting). On the planking, I couldn't find the 3" wide tape that Chuck mentions in his tutorial. I got book tape or something similar that was wide like that, and I just couldn't get it to work. I ended up going with the approach of just using a compass along the adjoining plank edge which I found very easy (though, I imagine the less wide scotch tape should do the trick as well): http://modelshipworld.com/index.php/topic/7267-hms-pegasus-by-landlubber-mike-amativictory-models-scale-164/?p=365802 I'm by no means an expert, but when I set up my planking bands, I tried to fit an even number of standard-width planks at the widest part of the planking band. So, I was using 4mm planks, I would set up 20mm planking bands at the middle of the hull, and adjust them for and aft. The middle of the hull should require little to no tapering/spiling, so it's nice to base the planking bands off that section. I think from your picture above that you have temporarily taped the planks to the hull. One thing to keep in mind is that because the planks will overlap at the joint lines, you'll need to sand the plank edges so that you have a smooth run to butt the next planking run against it. It makes it much easier when spilling or otherwise adding rows of planking. Good luck!
- 701 replies
-
- 3
-
-
- phantom
- model shipways
- (and 1 more)
-
Mill Column for Sherline Lathe
Landlubber Mike replied to mikiek's topic in Modeling tools and Workshop Equipment
Hey Mike, I bought both separately on eBay, and only after they arrived did I realize that there was the mill column attachment. I had a bit of regret after seeing that option, but eventually came to the same conclusion that Grant did which helped me to validate my purchases. If you have space and budget restrictions, and don't mind the inconvenience of reconfiguring the machine, then I think the mill column is a very nice option. -
As with the planking, I think as you're finding out it's better to start from the bow and work your way aft to the stern. Use the deck patterns to help line things up, and run something perpendicular across the deck to make sure that the gun ports are symmetrical. For the "S" curves in the bulwarks, try pinning the gunport patterns in the middle of the patterns as well as at the top and bottom to make sure that the patterns adhere to the curves in the bulkheads. One thing I did was soak the patterns, and carefully flex them to get the patterns to relax to better contour to the bulkheads. As a fallback, you can always sand back the first planking to help improve the "S" curve shape if necessary. I did some of that on my Pegasus and the curves are now much nicer. I remember having a lot of choice words on installing the patterns, particularly at the stem. The hole for the bowsprit didn't seem to match up with the plans and the overall run of the gunport patterns, and I'm still having some questions on whether I need to sand back the tops near the stem a bit because they seem to be sitting a tad high. Like you, I also think that the patterns are a bit long - as I mentioned on my log, it would have been nice if the instructions and plans had pointed out where the extra material was located. On the picture labeled Exhibit A in your post above, it's a bit hard to tell from the picture, but is the bulkhead extension too high for one of the bulkheads? If so, this might be causing your problems with aligning the gunport patterns. It might also cause you problems down the road once you start planking, because you won't have a smooth line between the bulkheads in front and behind it. Since you're redoing the gunport patterns, you might consider reseating that bulkhead if that is the case - I think you will spare yourself some headaches down the road.
-
The Byrnes sander is probably my most used tool. I've tried things like the "sand-it," sanding blocks and the like, but nothing can approach the power tool approach of getting precise straight edges and corners. The Byrnes table saw is probably my next most-used tool. So far I've only used it for cutting planks and some of the deck items, but I'm looking forward to using it to build other things like the gun carriages. Like the sander, the table saw is great for cutting precise pieces with straight edges. When you add things like the taper jig, you can cut things like the stern post and rudder and other longer angled pieces with straight edges where it might be hard to use a sanding block to achieve the same results given the length. I love the table saw, but you have to respect it - turning it on always makes my posterior pucker up a tad. I also have the Byrnes thickness sander, but I rarely use it. I used it on my aborted Lyme build to sand down piece of plywood that I used to replace the warped keel, and use it here and there when my stock wood is slightly thicker than what I need. I saw a video of one of the Russian masters who seems to routinely use it to quickly get a nice finish on completed parts. The Sherline tools are really nice. I bought the mill and lathe used a while back on eBay to save money, and have cobbled together various accessories as well when I've seen deals. Maybe a tad overkill for what I would use them for since I'm not scratch building open-frame models, but after reading TFFM and seeing what people are using them for here, I'm excited by their functionality - if my wife ever asks, I'll just blame Ian for making me feel like I needed them after seeing his detail work on his Unicorn. The mill in particular has a lot of cool features one can use it for. I used to have the Proxxon mini-lathe which was a godsend when I was building the masts and spars on my Badger, but I figured I'd upgrade to the Sherline which is a little bigger and can also do metal. The add-on accessories can also be used on the mill which is a nice touch. The last tool I have is the Dewalt scroll saw, which I bought on Craigslist for a really great deal (a hobby furniture maker near me bought it on a whim at a show, got it home, turned it on once to see if it worked, and then realized he had no need for it). I've used this quite a bit. For the Pegasus, I used it to cut out the bulkhead tops out of redheart. I also recently used it for my Morgan to cut out a new stem in pear. It's also my go-to tool to quickly cut out a small piece of wood that I then sand down to straight edges on the sander (it's easier than resetting the table saw, especially when the rip fence is locked in place and I need it in the future to make repeated cuts in that width). Using the tools has been fun if you're into that sort of thing. Certainly they can be expensive, but if you don't mind used machines, you can get great deals on Craigslist, eBay, etc. Of course there are people that strictly use hand tools and come out with models much better than I can ever dream of approaching.
-
Herb, I would echo what Spyglass said about getting the gunport patterns as close to perfect as possible. They need to be not only symmetrical, but properly placed since things like the wales, rails, etc. use the gun ports as reference points. If you're interested, take a look at my log starting at this page - Spyglass provided some very helpful notes as you can see, which were borne out by my fitting of the patterns: http://modelshipworld.com/index.php/topic/7267-hms-pegasus-by-landlubber-mike-amativictory-models-scale-164/?p=270839 The plans are incorrect in showing the jigsaw joint line between the two pattern pieces as falling on the bulkhead. The jigsaw should sit just behind the bulkhead as you can see on my log. I also soaked and pinned twice before finally gluing it. I found that the patterns didn't really hold their shape too well after soaking/pinning/drying, though the plywood became a little more flexible. Good luck! It's an important step to get right so take your time.
-
Thanks BE. That picture really helps. I must have mis-measured my rail lines, or perhaps my gunport patterns are slightly off from where they should have been installed.I had to open up the bowsprit hole so I think I must have been a bit off. By the way, really clean lines, wow. You really set the bar high for the rest of us
-
Really gorgeous work Mark. Those windows are amazing. Are they one piece? Really precise work with the laser cutter. I've been thinking ahead towards how I will do the windows on my Pegasus, and I think I found the answer - I'll just send the plans to you to do them for me By the way, I think you're ready for carving With all the detail on the model, I think carving would really be the icing on the cake.
-
Thanks Mark. Really great idea. I was using a regular drill bit, and not a milling bit. I thought about doing that, but I will have to sand the block back to get it to fit into the surrounding planking, so I don't know how deep to go with the connection just yet. I was thinking about using a small file once the blocks are installed and sanded back to do so (maybe starting them ahead of installing them).
-
Thanks very much BE. You're right that I should hold off as I can always sand things down later. I couldn't tell from your pictures, but does the area above the drift rail (what you painted red) get progressively taller as you hit approach the stem? From the plans and the NMM plans, it looks like the area stays the same height, but the gunport patterns, at least the way I've installed them, suggest that it's not a consistent width. It could also be that I mismarked my drift rail and other rail lines.
-
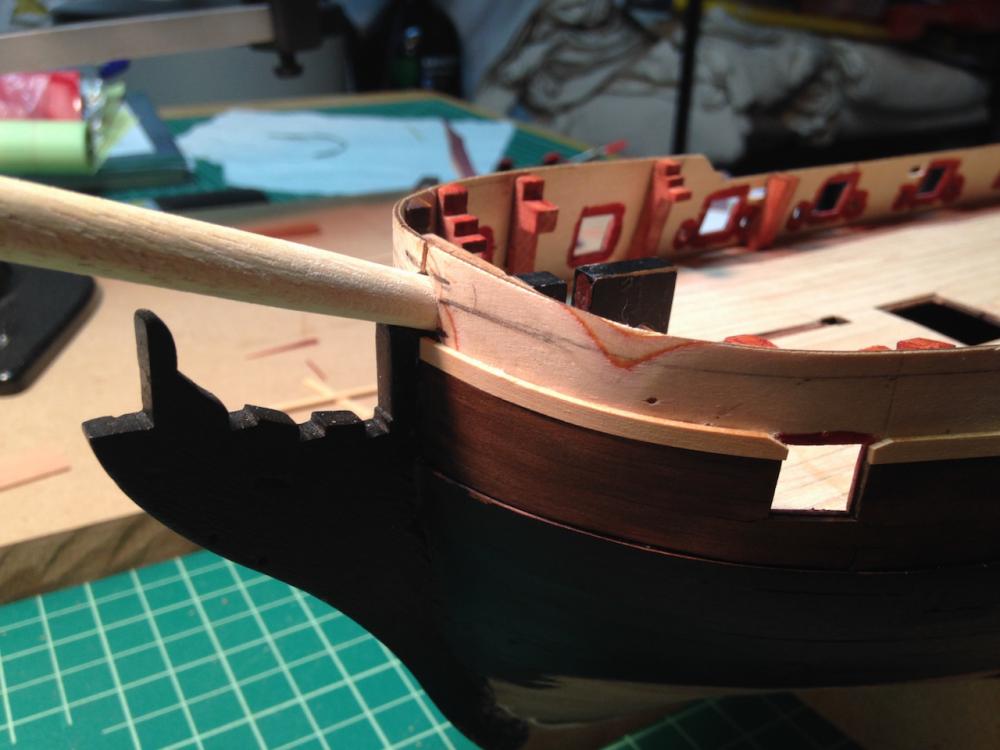
As I have been marking the hull for the lines of the various rails, it looks like I might need to sand back the top of the plywood gunport patterns in the first few centimeters near the bow. It seems like the patterns sweep up a little high at the bow, and so the area above the drift rail under the forecastle ends up getting higher as you approach the stem. I took some pictures which hopefully show what I'm trying to describe: Looking at the plans, I think that area should be the same height throughout. I think it's just a matter of sanding back the plywood pattern a bit near the bow, but before I did, I was wondering if anyone else building the Swan class had this issue? Also, would it be incorrect to have the uppermost plank in that area cross over the line of the stem? I'm thinking of doing to so to get the cleanest line just over the stem, rather than try to match up two plank ends on a very rounded part. Thanks in advance!

-
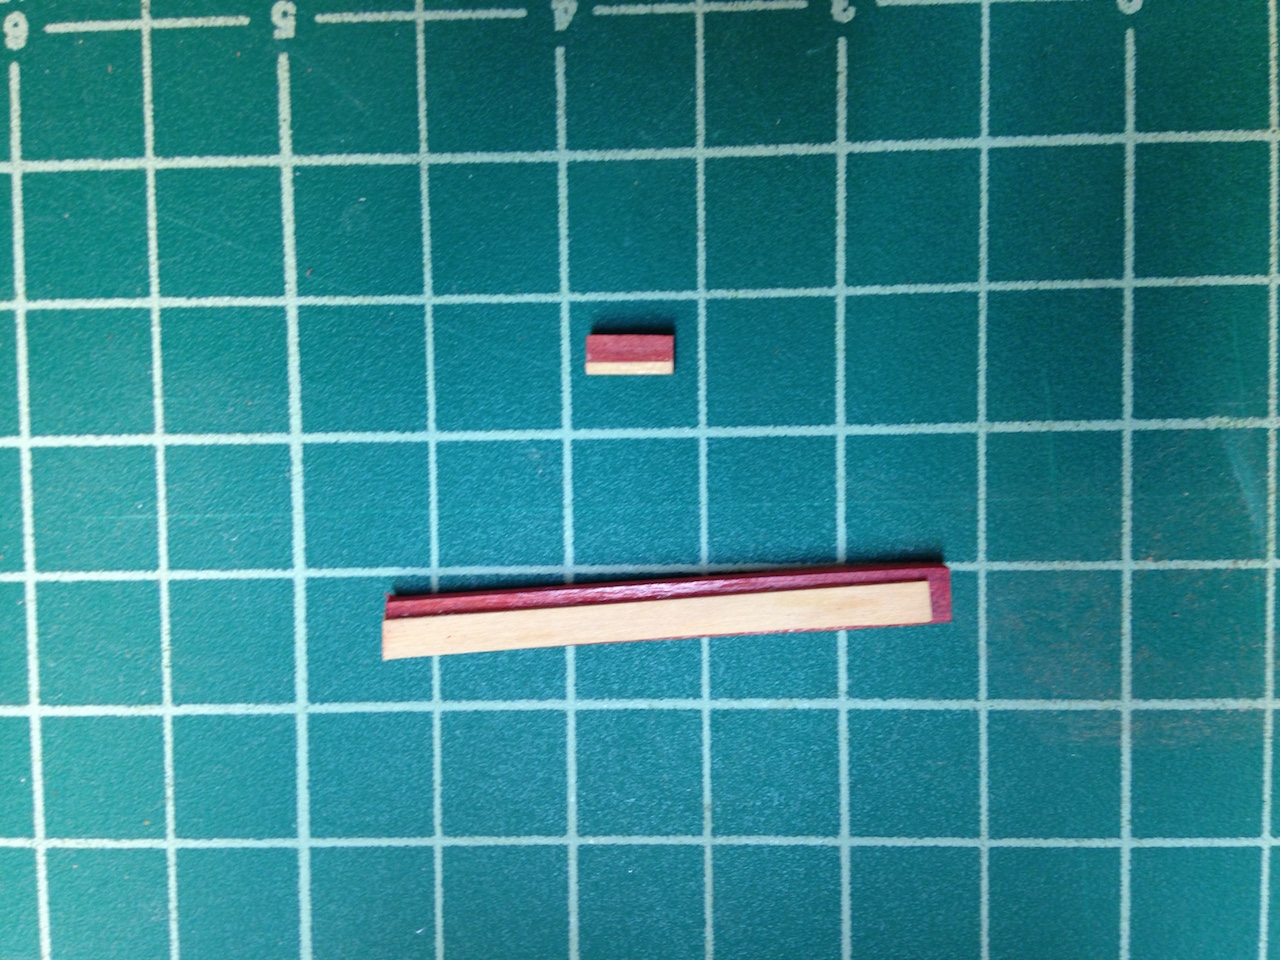
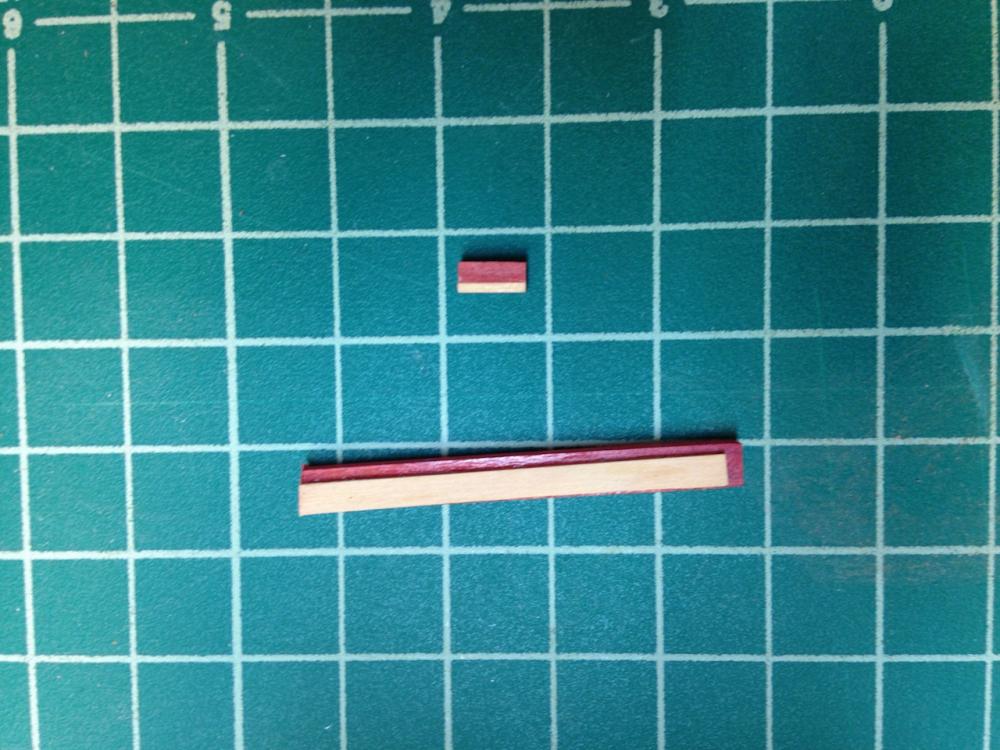
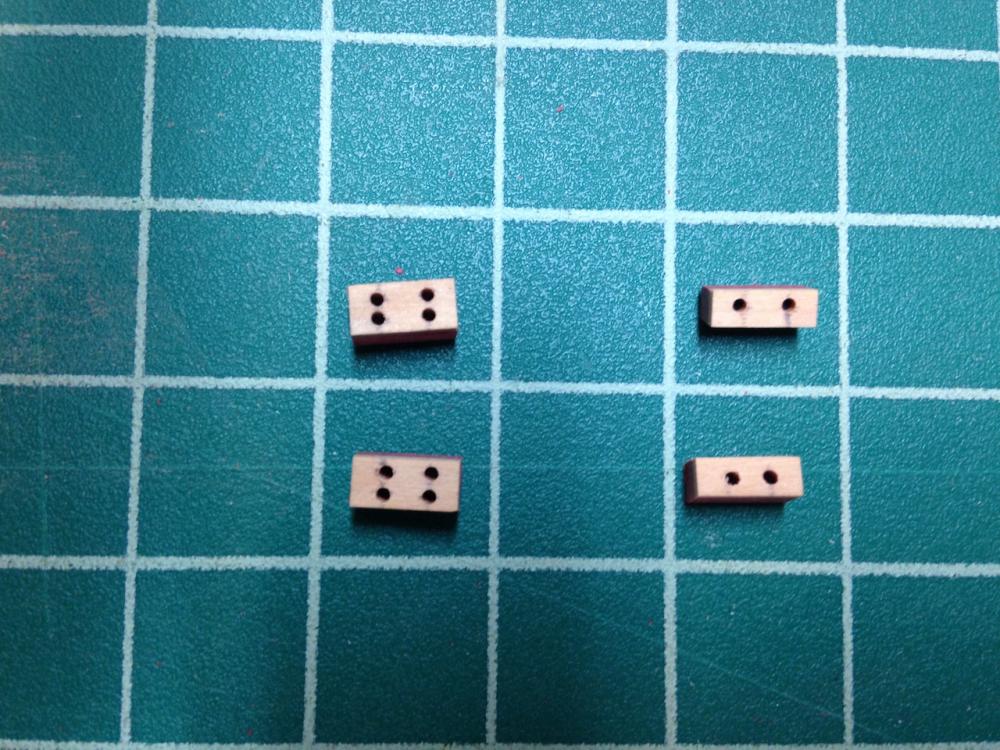
Wow, time flies. It's been a while since my last update, but I've made some slow, steady progress. I'm using the hull planking pattern in TFFM. I've also mentioned that I'm planning to use stains in lieu of paints on the upper hull planking. The hull between the wales and the friezes will be a darker brown, the friezes blue, and the top of the upper hull/bulwarks will be red using redheart. Cutting custom planks and ensuring that the planking runs are correct, along with ending the border planks properly so that I can cover any bleeding of the stains from one section to another with the rails is time consuming, to say the least. It didn't help that my first run above the wales was slightly off, which I didn't see until I had finished most of the second line of planks - it was one of those moments where I considered just dealing with it and moving on, but I'm very glad I removed all the planks and started over. Here are a couple of pictures where I am now. I've finished the first section of the upper hull planking, and stained that section, which was planked using pear, with General Finishes Antique Oak. I'm really happy with the richness of the stain. I was able to get a "walnut" feel without the walnut issues of uneven color, splintering, etc. I did some tests using a pre-stain conditioner, but I didn't like how it ended up muting the richness of the stain. Sorry that the pictures are not the greatest, my lighting isn't very good, especially with it being overcast for the last few weeks. The friezes will be stained using General Finishes Blue Stain. On earlier posts on my log, I had tested it on maple and pear. The maple was too bright, and the pear was a tad too dark. I tried it on boxwood and like Goldilocks and the three bears, the color was just right. So, I'm working on that section now. It's tricky because I decided to add the fixed blocks in the waist. There is a single block just aft of the third gunport, and a double block just forward of the fifth gunport. These intersect the planking lines, so more custom planks will need to be cut to fit around the blocks. Also complicating matters is that I will be planking the inner bulwarks using redheart, so the outside of the block will be in boxwood and the inside in redheart. To account for the depth of the block, I glued a strip of 1mm boxwood onto a relatively thick piece of redheart. From there, I used my Byrnes disc sander to get the blocks down to about 7.2mm in length, 2.6mm and 3.5mm in height for the single and double blocks, respectively, and about 3.5mm in depth so that I had something to work with and sand back to. Then I placed the blocks in my Sherline mill to drill the sheave holes. Was my first time using a mill, and it took a little trial and error to figure out how to work it, but I was really happy with the results. No way I could drill holes that lined up as perfectly as with the mill. I can see using the mill a lot for future work to get this type of precision. I need to clean them up a bit and gouge out a little area between the holes, but they came out pretty well I think. Hooray for power tools!
-
Really amazing job Igor. Can I ask how you did the grating in the bow of the boat as seen in this picture? Is it some kind of mesh?
- 131 replies
-
- 4
-
-
- bottle
- the old man and the sea
- (and 1 more)
-
Hi Nick, my Pegasus is slowly coming along, thanks for asking. I'm finishing the upper hull second planking which is a little tricky given that I'm testing and using stains and taking extra care to get the lines right. I'll post an update soon.
-
Beautiful work Nick!
-
Looks great Doug. The deck will be mostly covered by the time your done with adding all the deck items. Tanganyika finishes pretty nicely, even though it can be splintery.
-
Spiling Tools and Questions
Landlubber Mike replied to daveward's topic in Modeling tools and Workshop Equipment
Frankly, it's not a difficult process, just a time consuming one. Once you get the first couple done, it will be very intuitive and fairly easy. It gives much better results in my opinion than tapering planks - tapering planks still can be prone to clink because the curves of the hull are in three dimensions. I didn't appreciate how much the hull curves until I started spiling planks on my Pegasus. The one issue I found with the tapering method is what do you do when you have to start adding drop planks. In some situations, the drop plank is wider than the standard kit plank width. So, you either have to work with two planks glued together, or buy extra material. So what kit will you be working on? -
Spiling Tools and Questions
Landlubber Mike replied to daveward's topic in Modeling tools and Workshop Equipment
That's what I did - placed the plank on the ship, then traced the line directly to the plank. You can use tape or card stock, but then you have to transfer the template separately to the plank. The method I used avoided that step, and was surprisingly accurate. At first I cut just outside the lines to give myself extra material to work with and sand back, but over time, it was better to just cut on the line. There is always a little sanding you have to do, but I found that if you get the line marked correctly, you should be good to go. Sometimes it was a little tricky holding the plank down to the bend in the hull while tracing the spile line, which is probably why using card or tape can be easier in those situations.