Landlubber Mike
-
Posts
4,541 -
Joined
-
Last visited
Content Type
Profiles
Forums
Gallery
Events
Everything posted by Landlubber Mike
-
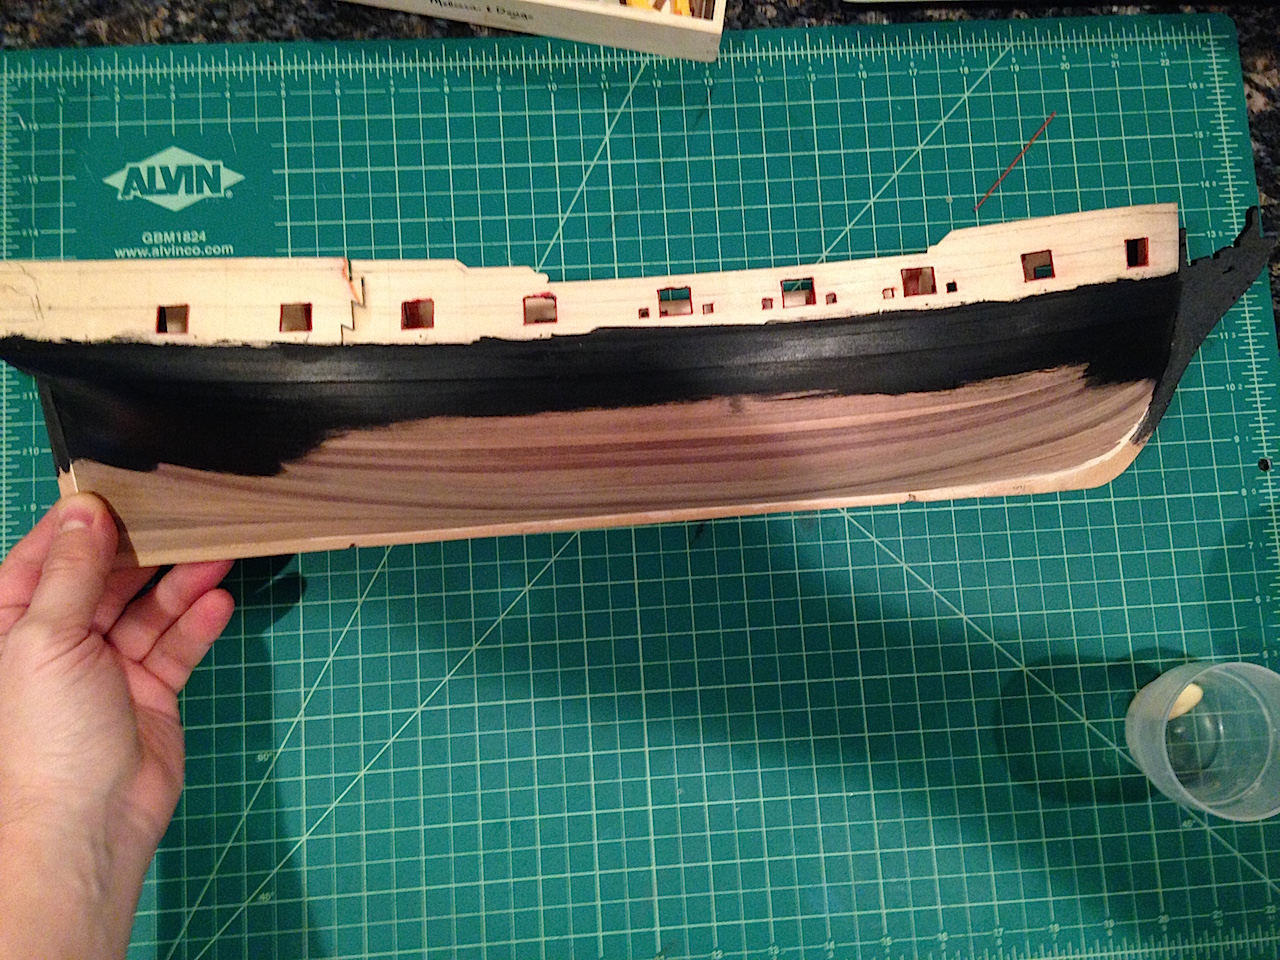
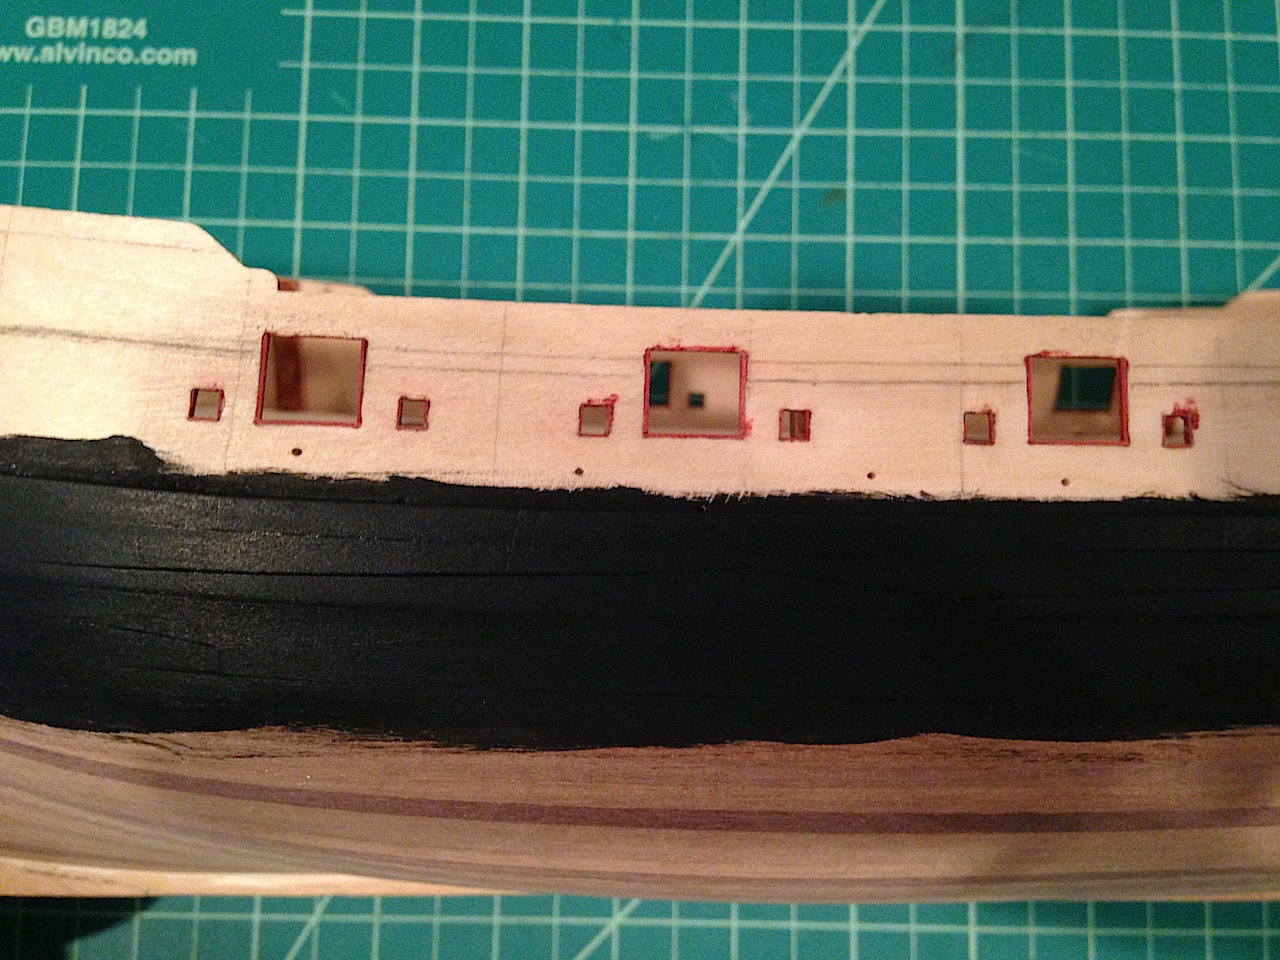
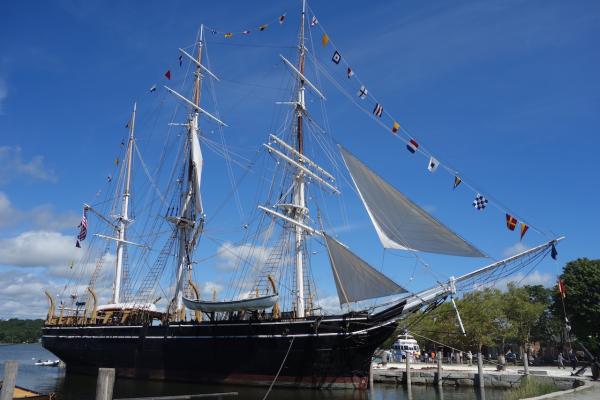
 Now that I've shelved my HMS Lyme for the time being to build it as a future scratch build, I decided to start the Charles Morgan by Model Shipways. I won't get into the politics of whaling, and by building this model I don't mean to glorify that industry, but the ship is a beautiful vessel with a lot of history. It was built in 1841 and made 37 voyages, processing more whales than any other ship in history. It was purchased for Mystic Seaport in 1941, where it currently resides as part of the museum. A couple of summers ago I went to a wedding in Connecticut and took a side trip one day to visit Mystic Seaport and the Morgan with my family. My daughter had a great time going on the "pirate ship." It's well worth a visit if you can get out there, with other ships also as part of the collection. I'm particularly excited to build a model of a ship that I had the privilege of visiting. I was able to take a lot of pictures, which I'll show from time to time on this log (like the ones on this post). My plans for the build: The MS kit is based on the configuration of 1892-1908. I have the Leavitt book on the Morgan, and like the Constitution, the Morgan has gone through various configurations at the stern. I'll probably build the kit based on the kit's configuration, but I might do a little research to see if there is another that I prefer. At one time fake gunports were pointed along its sides which is not a look I want to replicate on this build. Like the Pegasus, I'm planning to paint with wood by either using natural woods or using stains in lieu of paints. The Morgan is primarily black with white accents, the bulkwarks and deck structures ochre, and the deck somewhat grayish. At one time I thought about using African Blackwood for the black areas, but was quoted a price of close to $700 for wood to make the build. A bit pricey, so I think I'm going to go with pear stained black for the black areas. I still need to think about the white areas - I might use holly, or in the alternative, I found a white stain by General Finishes that isn't too garish and covers wood and metal very nicely. The ochre areas will be in boxwood, and for the deck, I have one stain that will give that grayish look - but I might try some of the weathering applications out there to see things come out. My goal is to hopefully show the Morgan in a more weathered state - a little rust on the iron parts, oxidized hull coppering, etc. I also plan to display the model in full sail. There are a number of other great logs out there from which I will shameless borrow from - Texxn5 (John), Bruce Evans, Gerald Spargo, Joe V, Udo K, Scoot and Homer -- among other logs using other kits. They set the bar up high which is a good challenge for me to do the best I can do. In case you are interested, the Morgan underwent a big restoration project a few years ago. There is a real in-depth blog on the Mystic Seaport website which details with great pictures all the work that went into the restoration. It's amazing how these ships were built in the absence of power equipment: http://www.mysticseaport.org/morganblog/ Thanks for looking in!
-
As Mark said, a lot of plywood in hobby sizes seems to be warped. I bought some to replace my Unicorn keel - first from Micromark which was really warped (to their credit, they refunded me my purchase cost) and then a packet of five pieces from a second retailer and most of those pieces were warped as well. When I re-start my Lyme as a scratch build, I'm going to think about MDF. I don't think it suffers any warp issues, and is incredibly solid. MDF was used in my Pegasus kit, and it was great. The only thing I would mention about MDF is that it is very hard to sand yet at the same time can flake if you try to chisel it.
-
Lavery has a nice discussion of the tiller and ship's wheel history and development. Lots of discussion on various developers and their approaches to the tiller and sweep. If you can't make it to the library, let me know and I can see how to get you the information you need.
-
Ian, wow, that tiller cover came out fantastic. Brilliant way to incorporate it into the flag locker construction. Looks perfect! On the tiller sweep, I'm afraid I don't know much about these things. I don't think the Pegasus had a sweep. I just took a peek at Lavery - there is a diagram very similar to the last one you posted above, in the discussion on page 23 regarding the steering on smaller vessels (specifically, Lavery refers to "small 6th Rates and many sloops"). The top down view is almost identical to your diagram, and the profile picture accompanying it shows the tiller above the deck. There is no tackle on the sweep, and probably no rollers, so I bet in that case, the sweep was intended to support tiller and not the ropes. Dafi had some discussion on the tiller sweep here, but I think it was below deck as well. Might be worth a look: http://modelshipworld.com/index.php/topic/8770-thinking-things-throu-the-gunroom-gunner´s-room/
-
Well guys, I've decided to close this build log down and build the Lyme as a complete scratch build. Yesterday afternoon, I had the Lyme plans from the NMM copied and reduced to 1:75, and a set of originals and the 1:75 scale plans laminated. Later that evening, I spent five or so hours comparing the build and the Corel plans against the Lyme plans - a long night that ended in much disappointment. I was pretty encouraged in the beginning that the middle part of the ship was fairly consistent with the Lyme plans. Then I moved to the bow, and realized that the shape of the bow (using the kit keel), and the stem I had scratched earlier, was different from the Lyme bow. The kit's bow is pretty angular, whereas the Lyme's bow was more square. So, I figured I would be replacing the stem and stem post anyway, and would just have to figure out a way to modify the shape of the bow. Not too bad.... Things took a nasty turn when I went to measure the height of the upper deck off of the bottom of the keel. I knew the sweep of the decks in the kit were too high at the stern and so I was hoping that all I had to do was change the angle at the stern and possibly the stem and that was it. So, it would be pretty easy to measure up from the keel on the plans, and take some material from the bulkheads as need be. Big problem though - the height of the Corel kit is a lot higher than what the Lyme plans and even Chapman's plans suggest! I'm not talking by a few millimeters, but as much as 20mm+ from the keel to the bottom of the gunports in some places! With that discrepancy, I don't think I can fix things. It's going to be hard to measure up from the keel, as I don't have a solid reference point to measure from. That, with all the other work I would have to do to modify the kit, I've come to the realization that it would be a lot easier in the long run to build from scratch using the Lyme plans. I have the tools, and it shouldn't be too hard to cut a new keel and bulkheads from plywood. I already cut a new keel one to replace the badly warped one from the kit, so I have a little experience. So a lot of frustration right now, but in the long run, I think this would be the better course. I'll shut this log down and start a new one on the Scratch forum once I get started. I really love the look of the Lyme, and after all the research I've done, it would be a shame not to build it. I'm considering whether to build the Lyme in 1:75 or 1:48 - at 1:75, it's a pretty sizable model at around 3 feet in overall length. At 1:48, I'd have the opportunity to add a lot of cool detail but the model would push 4 feet in length. While figuring this out, in the meantime, I think I'm going to start the Charles Morgan as a parallel build to my Pegasus. I like having another model to turn to when I get fatigue or burn out and need a mental break. Stay tuned! Eventually I'll start a Lyme class build
-
Thanks for the support Ian It will be interesting to see if I can come up with a somewhat decent replica. This afternoon I went and got the Lyme plans scaled down from 1:48 to 1:75 scale, made a few copies of them (for cut outs, templates, etc.) and had one set laminated. Figured it would be a lot easier working off scaled down plans rather than unrolling the original plans every time and converting the scale. The annoying thing is that the Corel plans show the ship facing left, while the NMM plans (and most others I think) have the ship facing right. Looking at the Lyme plans, it seems like at least the kit is very accurate with the distance between gunports 2 and 13 (the kit skips gunport 1). I was very happy to see that. We will see how accurate things are height wise, particularly with the sheer of the various decks which I think are not so accurate. At least for now I feel a lot more comfortable taking measurements off the plans to modify the stern and convert the ship to a rounded bow ship. It's too bad the Lyme didn't have a beakhead bow as it's a pretty neat look. For the stern, I've been looking at Chuck's instructions for the Confederacy (another beakhead ship!). I'm probably going to frame the stern very similarly to how he did the Confederacy, as its stern is very similar to the Lyme. He also has easy to follow techniques on how to frame the gunports and sweep ports. Unlike kits from Caldercraft and Amati which use plywood gunport patterns, Corel has you frame them along the bulkheads. Having gone through the gunport pattern process on my Badger and Pegasus builds, it will be interesting to see how the other technique is. As Ian would say, there's probably going to be a lot of surgery going on here. If you're squeamish, it might be a good idea to hide your eyes
-
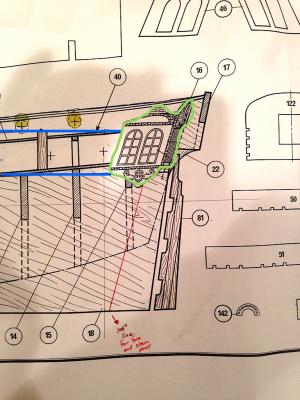
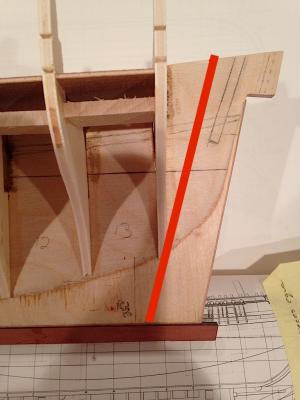
After a little burn out from planking my Pegasus, I decided to switch models and give the Pegasus a rest for a bit. I was going to start a ship-in-bottle scratch build, but a few conversations with my friend Ian on his Unicorn build made me decide to give my Lyme another look. As I mentioned earlier in the log, I got really frustrated with this kit because the various plans did not match up with one another. I'm perfectly fine with historical inaccuracies, but when you move from one plan to another, you would think that the plans should match up. In any event, working on the Pegasus was worthwhile, as I got a little better with my woodworking and modeling skills, and working on the hull of the Pegasus gave me a lot of insight into how to possibly modify the Lyme to improve on the accuracy of the model. So, I took a fresh look at where I was, and with the benefit of the Lyme plans. Having earlier worked using the small scale plans for the Unicorn in the Chapman book, I was a bit off on the width of the keel and stem post (too big). Looking back at my work, and in particular looking at the stem that I scratch built, I'm not as pleased with the work and will just re-do it. It will be a pain, but I don't want to kick myself down the road for not improving on it. The more interesting exercise was trying to figure out the stern of the Lyme and how to modify the kit to accommodate those modifications. The kit is really off in a lot of ways when it comes to the stern - no stern post, stern galleries are way too far aft from the last gunport, wrong angles of the stern, wrong angles of the decks leading to the stern, square tuck stern as opposed to a rounded tuck stern, etc. To get an idea of how wrong I think the kit is, take a look at the following picture: This picture is from the kit plans. The two horizontal blue lines represent a rough estimate of the what the lines of the upper deck and quarterdeck should be (as opposed to the sharply upward sloping lines representing the decks on the plans). The red line is the line that should mark the fore end of the stern post. The red line in the picture is set at 105 degrees, which is what the Lyme plans show. The Chapman plans for the Unicorn may be closer to 103 degrees. Regardless, you can see how far in the false keel would have to be taken in. The green outlined picture is that of the stern galleries - this is where I roughly think the stern galleries should actually be - much closer to gunport 13, a bit lower, and sitting over the stern post. Looking at the picture, I'm almost wondering if the windows in the galleries are too tall, and should be reduced by one row of panes. Now for my Lyme build - here is a picture on how these changes will impact the build: The red line indicates the 105 degree line for the stern post mentioned earlier (it's actually a few millimeters aft where it should be, but bulkhead 15 is in the way). You can see how much of the keel needs to be removed. It's also apparent that the last bulkhead, bulkhead 15, is not shaped correctly and it calls into question the accuracy of bulkheads 16 and 17, which I have not added yet. After correcting bulkhead 15, I think I'll add one more bulkhead to form the lower edge of the stern counter, and to hold stern frames to attach the transom, etc. So a lot of work to do, but I don't think as bad as one might fear. I still have to figure out how to modify the bow to change the ship from the Unicorn's beakhead bow to the more conventional rounded bow of the Lyme, but that's fun for another night Thanks for looking in!
-
Thistle, sorry for not catching your posts. I think the guys above have given you the answers you seek on whether the waist is open or closed. As they say, short answer is that later in the 18th century, ships moved to more of a closed-waist set up. Mid-18th century, the waist was much more open. If you are looking for a more accurate Lyme class frigate, go with the approach taken by Ian and that scratch build I linked above. Aside from historical accuracy, the benefit of the very open waist is that you open up the ship to a lot of really cool detail work. Definitely post a build log on here when you get started and join our Unicorn crew
- 66 replies
-
- 2
-

-
- resolution
- hunter
- (and 2 more)
-
Buying an Expensive Kit and throwing most of it away
Landlubber Mike replied to pirozzi's topic in Wood ship model kits
Hey, did the OP write this after looking at my logs? My first kit was the Badger, which I mostly did from the kit and just added some details like furled sails. I have four more kits stashed away - two I'm working on at the moment (Amati Pegasus and Corel Unicorn), as well as the MS Charles Morgan and the Euromodel FWZP. After those, I should be ready for full on scratch building, and will build Le Gros Ventre from the Ancre plans if rigging cannons on the earlier builds doesn't kill me first. Anyway, each of those four kits I paid significantly below retail, so I don't mind replacing the kit wood or detail pieces with better pieces. I'm not at the level of scratch building yet (even though I have bought the tools for it), but I don't mind spending money for the plans and pieces I will use like the bulkheads and keel. I might end up replacing some or all of the other pieces, but the kit pieces at least are a good template to start with. If I bought the plans and some plywood or MDF to build to bulkheads and keel, I probably would have come close to what I paid for the kit itself. Ultimately, I want a model that I'm proud of at the end, and not one where I wish I had done something differently. As others have mentioned, these are long term projects (especially for me with how slow I build). On a per hour basis, this hobby is incredibly cheap relative to my prior hobbies of playing golf, drinking beer and chasing women - and a lot better for marital harmony now that I'm married -
Thanks very much guys. BE, you're right about the sweep ports in front of both 6 and 7. I missed the one in front of 6 the first time because it sits right between the steps. I spent the day today cutting out and lining the four new ports. Now, it's time to start the upper hull planking. Thanks very much for looking in!
-
Thanks Martin! I'll have to take another look at my plans. I'm pretty sure that the extra sweep port was in front of #7, but I should double-check. What a pain - I'll have to cut a hole and line two more sweep ports. I'm not looking forward to the blocks. I'm considering adding metal sheaves inside them, but I think if I open that door, I might be stuck customizing all the blocks on the build. For the stain, I applied one solid coat, a second very quick light coat, and then some touch ups. I like stains rather than paints because they spread very nicely and don't result in thick spots like with paint. How many did you use? Did you use a sanding sealer? I thought about it, but decided not to as the black has very even coverage. I might explore it with the blue friezes though. I'm not going to fight the redheart. Seems pointless from everything I've read. The russet color is very nice, and not as stark as the bright red of the freshly cut redheart so I think it would work very nicely in the end. For future builds, I might consider sticking with pear and staining it with one of the GF finishes if I want a redder look. The Cranberry Red is a really nice color. Did you have trouble with the capstan darkening too much in the end grain sides with the polyurethane? I found that tung oil darkened the end grain to almost black, but varnish preserved the underlying wood color.
-
Last night while recovering from becoming cross-eyed from adding the sweep port linings, I did some planning and research for the upper hull. Part of the trickiness is the fact that I'm using two different colored stains, one for the upper hull planking in brown, and blue for frieze background. I was hoping that the planking lines would generally line up with the changes in colors, but no such luck of course. So, the plan is to install the brown planks first and stain them, then install the blue planks, and cover up the seam between the two color changes with the various rails. Should work I hope - just need to be careful that the blue stain doesn't bleed too far onto the brown planks. I'm considering adding a super thin gap between the two sets of planks which will be covered by the rails. Fingers crossed. Fixed blocks. It looks like I also need to install fixed blocks in the waist of the upper hull (one single, one double). Tricky, because one side will be the color of the hull planking, and the other, which faces into the bulwarks, will have to be red. So, I think I'll be making the blocks with redheart on one side and pear on the other. Extra sweep port. Quick question on the extra sweep port for you Swan Class builders. From TFFM and the NMM plans, it looks like there is an extra sweep port in front of port 7. The kit has sweep ports fore and aft of ports 3-5. I'm a little confused because I see that BE on his Pegasus and Dan Vadas on his Vulture added extra sweep ports in front of ports 6 and 7, and Martin only added an extra sweep port in front of port 6. I'll probably go with just adding one in front of port 7, because the steps along the side of hull (I forget what they are called) seem to be right in front of the port 6. But, whenever smarter people than me take a different approach, I always try to take a step back and figure out if I made a mistake - which is usually the case!
-
Thanks very much guys, really appreciate it. Ian, you get along just fine with the tools you have so the Byrnes saw isn't necessary. Plus, less chance for you to lose a digit or two - it always makes my posterior pucker up when I turn it on I need to get better pictures. I have resorted to using my iPhone as it is easier than my Sony camera (which has a bigger light sensor) to move pictures to the computer. I'm trying to be very careful on exposing the ship to sunlight because the redheart has already started changing to more of an orangey-brown color. The redheart that is sitting in my basement is as bright red as when I got it from Hobbymill, but over time working on the ship upstairs, the redheart has slowly started turning. I'm not too concerned as I knew that would happen anyway - apparently, even adding a finish to the wood won't stop that process. Everything should mellow into a nice color at the end I would hope.
-
Wow John, congratulations on a gorgeous model! I'm a few years from starting my Morgan, but your model is a great inspiration. I love the base - I'm wondering if I should inquire now about sourcing a piece of the actual Morgan to incorporate in my build somehow... Thanks for sharing the journey with us! Do you have a next build in mind?
- 2,250 replies
-
- 4
-
-
- model shipways
- Charles W Morgan
- (and 1 more)
-
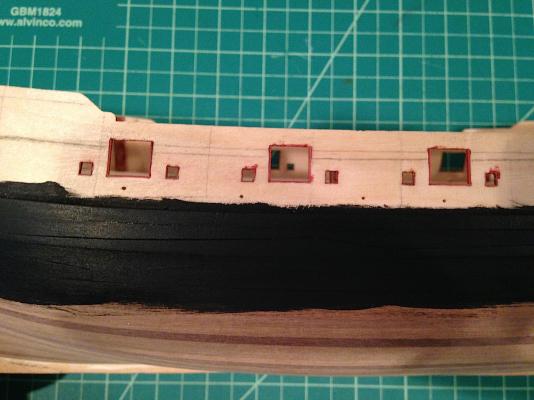
Made a little more progress on the Pegasus the last few evenings. I stained the wales and upper hull below the wales using General Finishes Black Stain. Martin, the stain actually maintained a lot of the definition between the planks, which I was very happy to see. For my Lyme, since I'll be using pear for the bulk of the model, I'll probably go with GF Ebony Dye Stain. It goes on thinner than the Black Stain, which is interesting as I would think by the name that the "Dye Stains" would actually be more like paint when the opposite is actually the case. I went with the Black Stain here because I'm going to be using the stain on a mixture of woods, including the kit walnut for some pieces and the MDF (e.g., the stem), so I needed something that would give an even color across different woods. I also installed the port linings for the gun ports and the sweep ports. I used redheart for the linings, with 0.6mm for the gunports and 0.30mm for the sweep ports -- all cut with my Byrnes table saw which continues to amaze me with its precision. Because they are inset relative to the upper hull planking, I figured I would install them now and then butt the second planking up against the linings. The linings are on the bottom and sides only, so I used General Finishes Cranberry Red for the upper part of the ports. Took quite a while, but it's a nice little touch I think. Probably won't be able to see much of them when the second planking is on, but I figured I would try anyway. I feel like I'm a bit cross-eyed working with such small strips! Next up is to install the upper hull second planking. The drawback of using redheart for the bulkhead extensions is the fact that it's a weaker wood, and a few of them snapped during the hull construction. So, right now my gunport patterns extend out laterally more than they should near the center of the hull at the quarterdeck area. I'm hoping that if I clamp the gunport patters with the quarterdeck support beams while adding the second planking and bulwark planking, hopefully that planking will hold the upper hull in the proper shape. If not, tightly clamping the upper hull planking against the quarterdeck support beams with some epoxy should hopefully get things right (fingers crossed).

-
Ian, that's a real tough dilemma. I would lean towards inserting a brass pin and probably using something stronger like epoxy to glue everything together. I pinned some of the model components on my Badger which seemed to help stabilize things. Could you insert the pin on an angle and drill the corresponding hole into the bulwarks on an angle? Will be tricky, but I'd worry about things popping loose. A dowel could work too, but I think you still might have to angle the insertion piece if the bulwarks splay out as much as you say. In terms of the order in which to install the cannons versus the rail, that's another really tough call. The Badger instructions had you install the cannons too early in the building my opinion - at least for modeler's like me who tend to hold the model in their laps while gluing things to the external hull I had installed the cannons ahead of the various rails on the outside hull, and when it came time to glue on the rails, I popped off the cannons probably close to two dozen times (no exaggeration). I think of myself as a calm, patient guy, but I came very close to turning the model into a flying vessel more than once. I'm sure you've already done this, but think about what kind of access you need to install the cannons and rails. I think I would do as much pre-drilling for both in the beginning, then install the cannons, then the rails. For my Pegasus, I'm planning to do all external hull work, then work my way from the middle of the hull out, saving cannons for as close to the end as possible. Taller things like the bitts I'll probably do after the cannons to give myself as much room to work to set them up. Even though you can do a lot of the cannon assembly off model, they are still a real pain in the posterior.
-
Thanks Ian. I just realized that Perspex is acrylic glass I tried cutting sheets for my Badger case, and had a rough time with it (including slicing open the palm of my hand when I went to crack it along the scored line!). I think if I used a thinner piece of material I'd have much more luck with it. For my Badger case, I ultimately went to an online glass shop to get custom pieces of acrylic sheets cut for me. For scratches, I think you're right that you need some kind of light abrasive to buff them out. I used a spray for acrylic mostly to clean the glass, which picked up a ton of dust electrostatically after peeling off the protective plastic wrap. I think it could buff very minor scratches too, but otherwise you need a special powder as you suggested. The stern lanterns would be another very good application if you can shave down the plug to meet the tapered design (which I believe is either a hexagon or octagon). At that size, it must be much easier to add the wood frame to a plug than try and build the frame and then add windows. I think I shared with you that another option I'm exploring is using the glazing compound used in model railroads and other hobbies. The nice thing is that I think you just add a little dab in the window pane area, and then it flattens and dries. It dries a little cloudy though I think, which is a drawback relative to using something like glass or acrylic.
-
Wow Ian, that came out fantastic! I sorta followed along when you broached the perspex idea to me a few weeks ago, but now I see how brilliant your plan was. Very very nice job - another idea for me to "borrow" Is perspex difficult to work with? I'm intrigued as to whether there are other applications such as windows - it might be easier to start with perspex and glue the window sills, mullions, etc. to the perspex, rather than build the windows, and then glue some sort of glazing material to the window frame. One thing I've seen in models is that the windows always seem to be slightly off as they get installed relatively to one another. If you had a long enough piece, you could do a row of windows and make them all line up and orient precisely.
-
Looking really great Frank - your weathering techniques are superb! Very nice job. Since you're on the home stretch, have you thought about your next build?
-
Hey Herb, welcome back and happy new year. We all take breaks from our build at times Look forward to following your progress!
-
Oh, dental drill bit would be a good option wouldn't they. Mark, thanks for the link to the Lumberyard site - lots of good tips there. I'm not too worried about carving. Larger three-dimensional carvings like figureheads would of course be more complicated, but i think with a little practice and the right tools, the little details that can be made from relief carvings shouldn't be that bad. Frankly, there have been a number of things in this hobby that seem really difficult and too intimidating, but after trying, they aren't all that bad. Spiling, sails, top and butt planking, etc. are some examples.
-
Thanks Martin, that's really helpful information. I'll have to think a little more on how to proceed with the linings. I'm going to use redheart, so at least I won't have to worry about staining such tiny pieces. I like the look of the GF stain but I think you're right that some of the detail is obscured. I'll have to take another look at it. It's tough to do it like the pros if you spile the planks tightly and then try to sand everything back so that it is smooth. I imagine that the pros spile each plank perfectly, so that there is very limited sanding that needs to take place afterwards. I saw one technique from a master who added a very slight bevel to the edges of the planks to keep that tiny bit of separation between them. Anyway, for the upper hull planking, I'm hoping that using a brown stain will darken the borders of the planks to help highlight the planking. Thanks also for the link to Alistair's build. I forgot he modified the quarter badges. Doesn't look like it's too difficult to modify things there - tricky part will be whether do carve the decorations into the stools as one piece, or carve them separately and add them to the stools after. Given that I will likely stain the stools black and use boxwood for the decorations, I'll probably end up doing them separately. If thin enough, hopefully the decorations can be molded around the contours of the stool. I'm trying to figure out when these should be installed, as I want to get clean joints between the quarter badges and the hull, as well the quarter badges and the rails. For me, at times this hobby seems to be 90% planning and prep work, and only 10% actual work. I bought Bill Short's practicum also, and need to go through it. I bought a number of different Dremel bits, but like you, I'm thinking that they might be too large for some of the ultra-fine detail work. I bought some carving bits from a bonsai outfit to use on my bonsai trees, but they also are a little larger (thankfully, i can use the bits from both hobbies interchangeably). What is holding the most promise for me right now is that my brother, who is a dentist, just sent me a number of picks and probes and I think some scrapers. For the kind of detail work he does (he is a root canal specialist), these tools seem to be perfect for very fine detail carving. It's great to be at this stage of the build where I can actually start thinking about and working on the details!
-
Thanks Mark, it's always good to bounce things off other people with more experience before starting something I'm inclined to agree with you on doing the ports and blocks now, especially given that there is a lip for the port lids. Seems easier to install the lining now, sand it back on the exterior hull and bulwarks sides, and then line the exterior hull planking right up to the edge of the port lids. Less fussing about getting clean lines on the port lid linings. I spent some time yesterday looking at the quarter badges. The kit displays them as flat, built up a bit with the decorations that involve 2 or so layers of photo-etched parts. The end result is really nice, but I'm thinking of making the quarter badges a bit more three dimensional, with the upper and lower stools popping out a bit more. The plans don't show whether the quarter badges were flat or not, though TFFM suggests that perhaps only the Vulture was that way. Flat would be much easier, as I think I would have to custom carve the upper and lower stools, especially to add the decorations, and possibly change the windows a bit to account for more of a bow window configuration. The badges don't extend past the edges of the stern transom, so I could probably get away with carving the stools using 5mm pieces of wood. Realworkingsailor did this to nice effect on his Pegasus which you can see here: http://modelshipworld.com/index.php/topic/24-hms-pegasus-by-realworkingsailor-victory-models/?hl=%2Bpegasus+%2Brealworkingsailor The next question is what to do with the kit decorations. I'm very tempted to go ahead and use the photo-etched parts as templates for carving the decorations out of wood (mostly using boxwood). I'm leaning that way because like Blue Ensign, I'm inclined to not use the photo-etched "Norman knights" on the edges of the stern transom and come up with something else. If I'm stubborn enough to not want to use paint (nice thing about paint is that it would keep colors consistent despite differences in materials), then all the decorations should end up in wood. I think with some practice I should be able to carve most of the pieces, especially having the photo etched parts to serve as templates. Further complications though as to what to do with the friezes and figurehead. I might actually go ahead and paint the friezes. I'm really worried about gluing on the friezes and messing up the finish on the wood underneath, since I would be able to cover the extra glue spots with paint. Painting shouldn't be too bad, and TFFM has some helpful tips on what to do (e.g., paint the base color, then accent the highlights and lowlights using other colors). I could also use the transfer paper technique, which I was thinking of using the the name of the ship at the stern. Then of course there is the question of how good at carving will I be when it comes to the figurehead Lots to think about - going down the road of avoiding paints certainly makes things more complicated. Ultimately, this might end up being close to a mostly custom build.
-
A few questions before tackling the upper hull. 1. I was going to cut out a hole in the bulwarks for the quarter badge windows to add a little depth. I also saw on the TFFM plans that there are blocks midway along the hull in the bulwarks. Does it make sense to cut those holes now, and then add the planking around them to get an even finish? 2. Does it make sense to make the holes for the scuppers and anchor cables now, or is it easier after the the final planking is on? Unlike the blocks above, it seems like the holes for the scuppers and anchor cables are easy to drill all at once when the planking is added. 3. Should I frame the gun ports and sweep ports now? Like the blocks, it seems like I can get a cleaner finish around the hull if I start them now. 4. Anything else I should consider at this point? Thanks in advance!
-
Many thanks guys. I spent yesterday finalizing the sanding job. It was 25 degrees F yesterday here - for whatever reason, I seem to always be sanding the hull on the coldest days of the year. Ian, I'll have to give more thought to gluing sandpaper to my mittens to avoid frostbitten fingers Martin, thanks for the tip on the Lee Valley mini chisels. I used them to chisel better definition for the wales at the stem to really great effect. Then, I sanded the hull back with 320 and then 400 grade sandpaper, and the hull is as smooth as a baby's bottom. The moment of truth came last night when I used General Finishes Black Stain for the wales and lower hull. I'll post some pictures later, but it really came out beautifully. I was a bit concerned that the black might be a little different between the pear and the stem (which is MDF), but everything came out perfectly even. The GF stain was very quick and easy to apply, and doesn't bulk up like paint - instead, you get a very nice smooth finish. The nice thing about the GF stains is that they seem to have paint-like qualities in full, even coverage, yet apply in a thin coat like stains. I'm very excited to add stains to the rest of the build. Speaking of stains, I tried out GF Blue Stain on boxwood and compared it to the pear. As expected, it came out a little lighter, but not as bright as when applied to the maple. I'll have to figure out what combination of brown and blue stains/woods to use for the upper hull, but I'm getting excited to see the model take shape.