Landlubber Mike
-
Posts
4,543 -
Joined
-
Last visited
Content Type
Profiles
Forums
Gallery
Events
Everything posted by Landlubber Mike
-
 Looks really great Don. Get that prep work done, and you'll have a great base on which to plank on. Looking forward to seeing how this comes out, it's a cool subject!
- 653 replies
-
- 4
-

-
- trabakul
- marisstella
- (and 1 more)
-
Thanks Martin, lots of fingers crossed when I started what was somewhat of an ambitious plan, but it's all worked out pretty nicely. For a what can be a crumbly wood at times, redheart has some very good properties for this hobby. I was fully expecting it to snap or otherwise crack, but after soaking it in hot water for 20 or so minutes, I flexed it one way then the other to help loosen the fibers, then clamped it to the hull. I couldn't use those pins because I was at the top of the planking pattern obviously, so used an assortment of clamps with scrap wood between the plank and the clamps to avoid indenting the redheart. My limited experience with putting big bends in wood suggests that it's better to go with longer strips than you need - when I've gone with the actual size I need in the past, I've had issues with splitting on even stuff like pear. My sense is that the longer strips help with the leverage factor while apportioning the same stress over a larger area, but I could be wrong. Oh, girls got me a Darth Vader t-shirt and some Star Wars pajama pants, and my 6-year old has been helping me throw a couple of racks of ribs on the smoker, so all is good Thanks Mark. I haven't tried the heat method yet, but it sounds like a good one. I think I bought one of those heating irons from Model Expo when I was first starting, but never used it. I assume the heat steams the water out of the wood and so you don't have to wait as long for it to dry?
-
You too Don, Happy Father's Day to you and all my other friends here on MSW.
-
Thanks very much guys, really appreciate the kind words. I'm glad I ripped out the first planking strake and a half a few months ago - it was a tough decision given how much time I had put into it, but the planks were the wrong size and me trying to taper them was the wrong approach. Don, I think the purpose was to drive me nuts Lots of time was spent trying to ensure that the planking runs would end up precisely where the various colored areas would intersect so that the rails, which are only on the order of 1-2mm. Not much wiggle room! Plus, some of those planks took me a good hour plus to craft, especially the tricky ones around the gunports. Lots of measuring, cutting and sanding by hand in order to get the planks to fit tightly. That being said, I'm really happy with how the deck and hull planking has gone. I still can improve, but I feel like I've gotten a lot better with the planking from my Badger days. Using better wood and having the Byrnes saw to cut custom planks with clean lines has really helped. Some tips I learned along the way that I can share: 1. Soak and pin. I soak and pin the planks around the bow. Let them dry overnight so you don't end up with shrinkage issues down the road. Once they are dry, they keep a pretty good shape that makes it infinitely easier to glue them to the hull. On my Badger I tried doing everything in one go, and things got messy, especially when I tried using CA for quick adhesion. Soaking and pinning is a much better approach. 2. Bevel. I sand in a slight bevel onto the planks which helps give a tighter fit. Even when using 1mm planks, beveling helps. 3. Pin planks along length. I found it's important to pin the planks along their length to ensure that the plank fits tightly against the hull/first planking. I've really liked using these grip pins from Midwest, which have a very narrow pin so they can pierce the first planking very easily, yet have a soft plastic head which doesn't mar the planks (can probably find it cheaper from other sources): https://www.amazon.com/Midwest-Products-Hobby-Craft-50-Pack/dp/B000O8IPXW 4. Use good quality, sharp blades. Working with dull blades is a no-no. Too much risk for slippage and injury (trust me on this one - the red areas on my Badger are probably not exclusively from paint ). I used to use X-acto craft blades but recently tried out Swann Morton blades - the latter are much much better. They hold an edge better, and are much stronger so you don't get the degree of lateral movement you get with X-acto blades. Ian posted a picture of a S-M handle that actually grips the blade to provide even greater stability on my post at the link below, but I haven't been able to find it here in the US. Anyway, I would highly recommend the S-M blades. http://modelshipworld.com/index.php/topic/7267-hms-pegasus-by-landlubber-mike-amativictory-models-scale-164/?p=267612 5. Don't settle. If you aren't completely happy with the plank for any reason, re-do it. Especially if you start getting clinking effects, which will just continue to cause difficulties down the road. It can be a tough decision to make, but in the end, it's usually worth it. I tend to complain about how slow a builder I am, but I'm really enjoying the journey. Waking up this morning and peeking at my build, all that time and work was well worth it. This is a really great hobby It's especially satisfying sharing my and other builds with other Swan-class and other ship builders from all over world. I've learned a ton from many people here on MSW who have been gracious sharing their wisdom and experience. I don't think I would be anywhere near my current level (which is still pretty low on the scale here at MSW) without the internet and MSW. In particular, reading Swan class logs from BE, Alistair, Martin, Nils, RWS, Aldo, and others (as well as logs of other models) pushes me to build the best Pegasus I can.
-
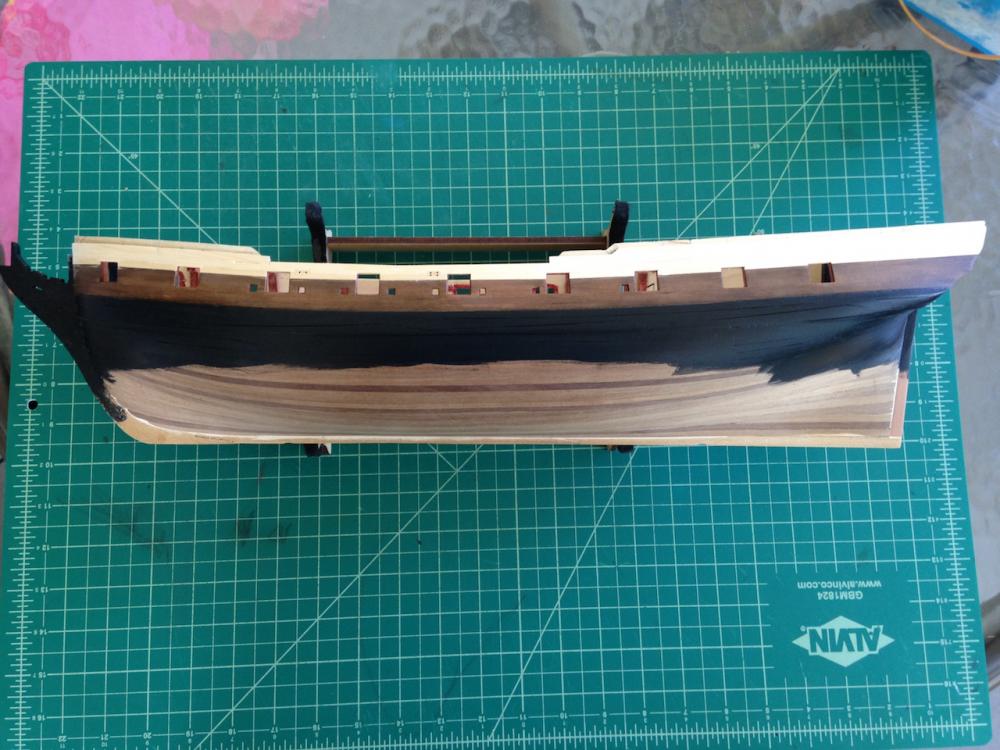
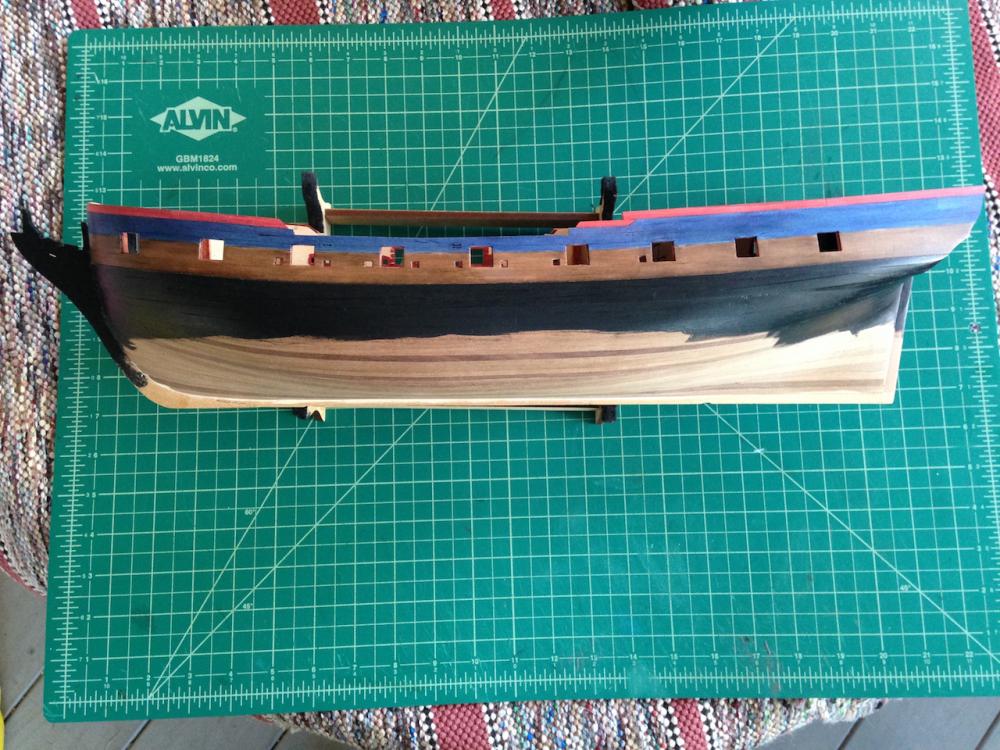
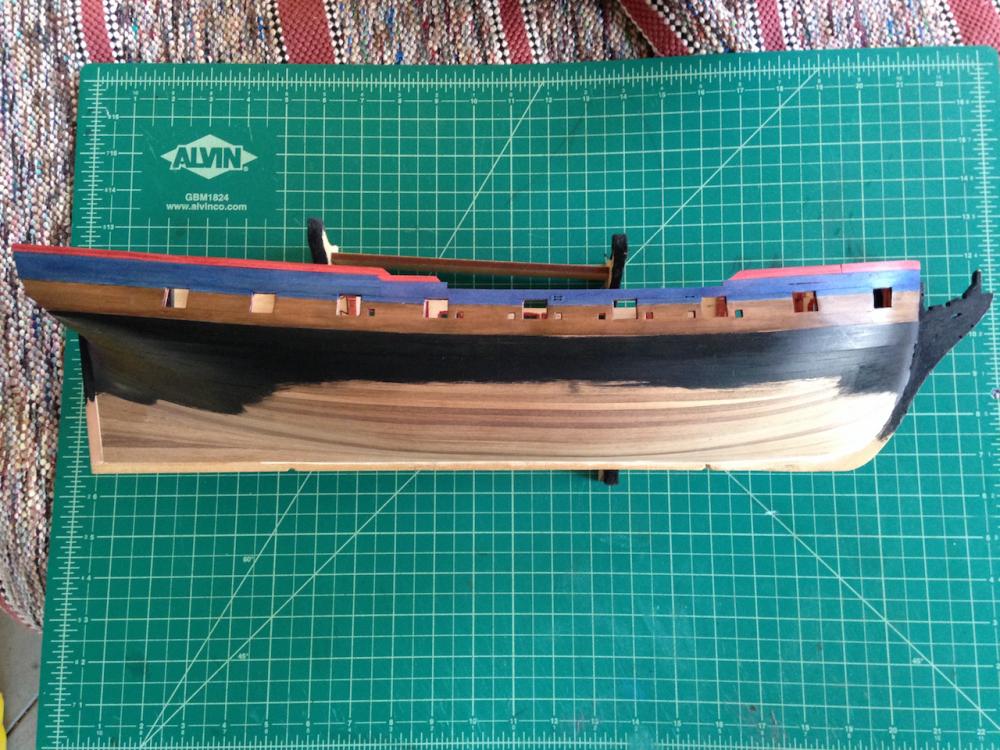
Upper hull is finally completed! Big milestone passed in completing the upper hull planking. Took me a while as I was planking according to TFFM, which had a bunch of oddly shaped planks, and even a scarph joint thrown in for good measure. Because I was using a mixture of woods and dyes, I was also trying to ensure that the planking ended up in such a way that the intersections of the areas would be overlapped by the various rails for a clean look, especially if the stains bled from one area to another or there were other blemishes. For the frieze areas, I used boxwood as I thought it looked best when stained using General Finishes Blue Dye Stain. I loved working with pear, but wow, boxwood is a really nice wood to work with. Here are some pictures after finishing the boxwood planking and installing the fixed blocks: The boxwood looked so nice in its natural state that it was a tough call to proceed with staining the area blue. But, I went ahead with my original plan and added the blue stain, and then added a row of redheart planks to the very top of the upper hull near the forecastle and quarterdeck: For the forecastle area, I had soaked the redheart for a while as one long piece that went around the full forecastle. It surprisingly bent very nicely and didn't give any problems. I thought about keeping that area as one piece, but since I had two planks on the quarterdeck I went with two on the forecastle. I still need to do some touchups, including sanding and otherwise finishing the redheart, as well as ultimately sanding back the planking to the gunport patterns (left a little extra on purpose just in case...), but I couldn't be happier with how this came out. The colors in my opinion complement each other nicely (they should deepen a bit after I apply a finish to it), and I really like that they show the grain and planking lines. There are a few areas between the blue and dark brown that aren't perfect, but like I said, these will be covered with the rails. And while I was very careful to follow the TFFM planking pattern, on both sides of the model, I had a weird extra gap just forward the third gunport. Since that gap will itself by covered by the rails, I didn't worry about it. So, I'm super happy where things are right now, and am pretty burned out by all the custom planking. I might remove the bulkhead extensions at the waist and finish my deck planking, but I don't know that I have the desire to start on the bulwark planking. TFFM has a sample planking pattern that probably won't be too hard to execute, but the thought of fitting more planks right now is not all that appealing. I might switch back to my Morgan build and think about something other than fitting crazy shaped planks for the next few weeks. Looks like I'm approaching the 2-year anniversary of the start of this build. At the rate I'm going, especially since I'm looking to add full sails to the model, I probably have at least a good 3 years left on the build, but likely longer.

-
For PVA which I usually dilute, I use the clear caps that come with the big laundry detergent containers. The PVA of course doesn't stick to it, and it makes for a small, reusable container. With three kids we're always doing laundry in my house, so I have an endless supply of these
- 396 replies
-
- 3
-
-
- Idea
- Bright Idea
- (and 1 more)
-
Drops are looking really nice Mark. Thanks for the tip on the scroll sanders - what a great idea! Best wishes to your wife as well
-
Good luck Ulises - your Royal Louis is gorgeous, and I'm sure this will end up being only a minor, temporary setback. What about making them in wood?
- 786 replies
-
- 4
-
-
- Royal Louis
- Finished
- (and 1 more)
-
David makes a good point. I think it would be hard to spile woods that tend to splinter. Walnut and tanganyika come to mind - the strips in my Caldercraft Badger were hard enough to taper without splitting.
- 701 replies
-
- 3
-
-
- phantom
- model shipways
- (and 1 more)
-
Are you able to slide a knife between the pattern and bulkheads to pry it off? I guess that's the catch-22 with using an adhesive like that - goes on and stays on, but problems if you need to take it off
-
Andy, great to see you back on here! Your Pegasus is a real inspiration as I work on mine. In particular, I'm shamelessly borrowing your color scheme for my build Looking forward to following your Diana!
-
Sorry to join the conversation late. This is a really great topic of conversation Chuck, thanks for raising it and giving the customer some input on possible future product launches. I think for first time kit buyers, the market is pretty well saturated with good beginner kits where the beginner probably cares less about historical accuracy and bashing, but is just looking to get their feet wet and build something out of the box. What is probably most important is for there to be good instructions. When I was getting started in the hobby, I was looking for a beginner kit with very detailed instructions. There weren't too many of those out there at the time surprisingly, but I think that's been changing. I ended up going with the Caldercraft Badger because it had a 65-page instruction manual that was close to what you've done with the practicums. When it came time for my second kit, I was looking for a step up in difficulty, something interesting and historically accurate, and with good quality components. At the same time I wanted to bash the kits to improve on them, so I purchased "used" kits since I knew I would be replacing most of the wood anyway. With a kit under my belt, limited instructions were fine with me. Here's been my experience with some of the kits I bought since the Badger: -- Amati Pegasus: I bought the kit because of the ship's beautiful lines and decorations, the availability of TFFM and plans from the NMM, and because the kit components were of very high quality. The kit in my opinion is A+++ all around. If you like the subject matter, Amati has hit the ball out of the park with this kit. My only quibble is that the walnut planking and walnut laminated sheets had such variation in color that I couldn't use it since I wanted natural finishes on the model. -- MS Charles Morgan: I wanted something different besides the typical 18th century British warship. Great plans, lots of information out there, and you can see the actual ship in person. I'd knock the kit down slightly because the keel and bulkheads are in basswood rather than something stronger like MDF (Pegasus) or plywood, but otherwise I'm very happy with the kit. -- Corel Unicorn: A kit with a lot of promise with available plans from the Chapman Architectura book and the NMM (for its sister ship, the Lyme) that unfortunately frustrated me to the point of dropping the build. Keel was warped. The plans didn't match up with each other or with the parts in many instances. You can certainly build a nice model from the kit, but as you can see from the various logs on here, Corel took a few liberties and the ship is not accurate in many respects. Once I started comparing the ship with the plans, etc., it was going to be too much work to modify things and so I decided I will build a Lyme class ship from scratch in the future. Lots of good suggestions from others above. If I had to come up with my ideal kit, and if you're looking to target the more experienced modeler, I would look to these principles: 1. Good quality frame, plans and detail pieces - MDF or plywood keel and bulkheads, with plans that match one another and the parts. Either include good detail pieces or don't bother including them. Warped keels and bad plans are really unacceptable in my opinion, but they seem to be pretty commonplace. 2. Interesting subject - There are lots of good 18th century British warships out there. After rigging cannons with 2mm blocks, I was very interested in the Charles Morgan for a next build! No cannons, but lots of interesting deck details like the try works, etc. For subjects, maybe another whaler like the ill-fated Essex? A fishing or other kind of working or merchant vessel? Dutch or french ships (I bought the two Euromodel kits in my signature because they were relatively unique offerings in this respect). Something with history, decorations, cool deck items and details? 3. Additional source material - I think as people move onto second, third, etc. builds, the historical piece is almost as interesting as building the model. Plans available from the NMM, or from books like the AOTS series, are great resources to help improve the kit. I think the Pandora can fit this bucket quite nicely, and it also has an interesting history. 4. Option to buy kit components a la carte - Not sure how feasible it is, but I think there would be a market of builders who would buy a kit from a manufacturer if they could buy, for example, the plans, keel and bulkheads, and decorative pieces. Either offer upgraded wood packages or offer the kit without any wood. For me personally, if I'm going to use pear, boxwood, etc., no way I'll buy a complete kit from the manufacturer as I'd rather just wait to buy one off eBay for a big discount and use the savings to buy the wood I want (I bet for some buyers too, the attraction of buying good quality detail pieces from you is a huge incentive to purchase certain kits). Without this option, I think many people will buy from secondhand sources in lieu of buying retail, or they may scratch build what they want. So I'm in if you decide to ever offer an Essex kit with the keel and bulkheads in MDF, great plans, and either without kit wood or the option to upgrade it, and detail pieces for sale on your website You asked about price and build time. I think if you're looking to the intermediate/advanced set, then people get the price and build time factors. Like I said above, I think on price, people might be more apt to buy a kit retail if there was more of an a la carte option. Build time wise, I don't know if people care about finishing a model in a set period of time, unless they were doing it for a job or possibly they were elderly Thanks! Obviously these are idiosyncratic opinions. Sorry for the long post!
-
Very nice work Elijah! Getting that first strake of planks on takes time, but when done right, it makes for a good foundation for the rest of the planking. I've taken a slightly different approach to fitting planks along tricky curves. Spiling really helps, but there's still a need to bend the planks. Near the bow, I usually soak the planks, pin them in place, and let them dry over night to avoid any shrinkage issues. Essentially that helps pre-shape the planks making gluing much easier. Depending on the nature of the curve, how thick the plank is, etc., after the plank has soaked, I'll sometimes manually flex the planks in my fingers a bit to help stretch and relax the fibers in the wood. So far this has served me pretty well on my Pegasus. It stinks having to wait until the plank is fully dry, but having a little patience means the planks go on better and easier, and you avoid any gaps resulting from the planks shrinking if you try to glue them on right after soaking. I haven't tried using curling irons or crimping tools yet, but those are other methods of getting bends into your planks.
- 701 replies
-
- 3
-
-
- phantom
- model shipways
- (and 1 more)
-
Really nice work Ken. Your bowsprit is a work of beauty - the steps on it came out gorgeously.
-
Don, a really great start on an interesting subject. That's amazing too that there is such a long, detailed manual - wish more kits did this. Very nice job! The filler blocks was a bit of any ordeal I'm sure, but you have a fantastic planking surface. Can I ask what woods are in the kit? Also, I saw that the bulkheads are hollowed out. I was curious as to why you think that might be, and whether you found that approach to weaken their structural integrity?
- 653 replies
-
- 5
-
-
- trabakul
- marisstella
- (and 1 more)
-
Thanks Jason - glad I'm not the only one suffering from this malady. I'll have a few drinks and slap myself around some to get out of it!
-
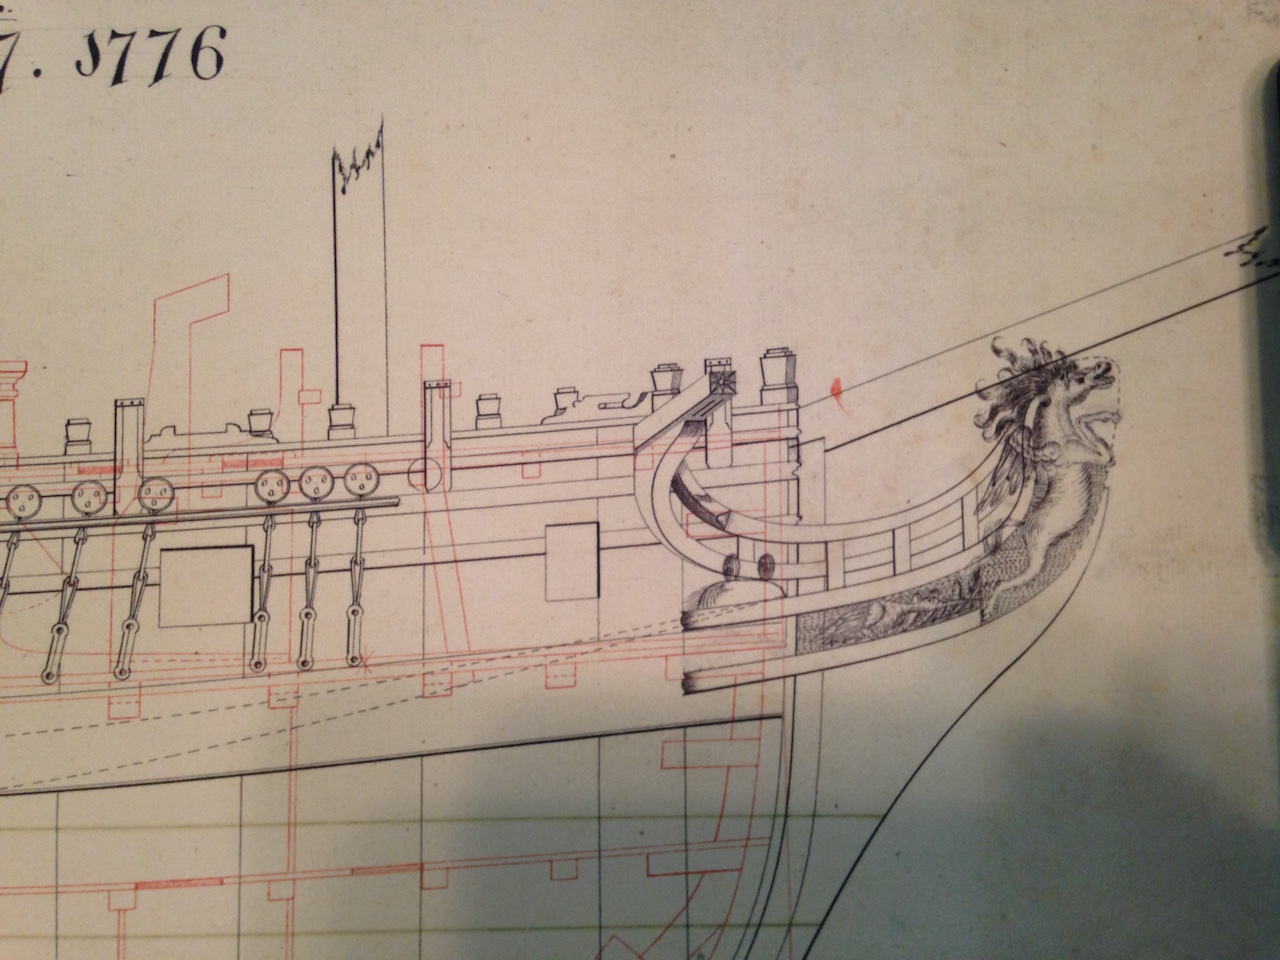
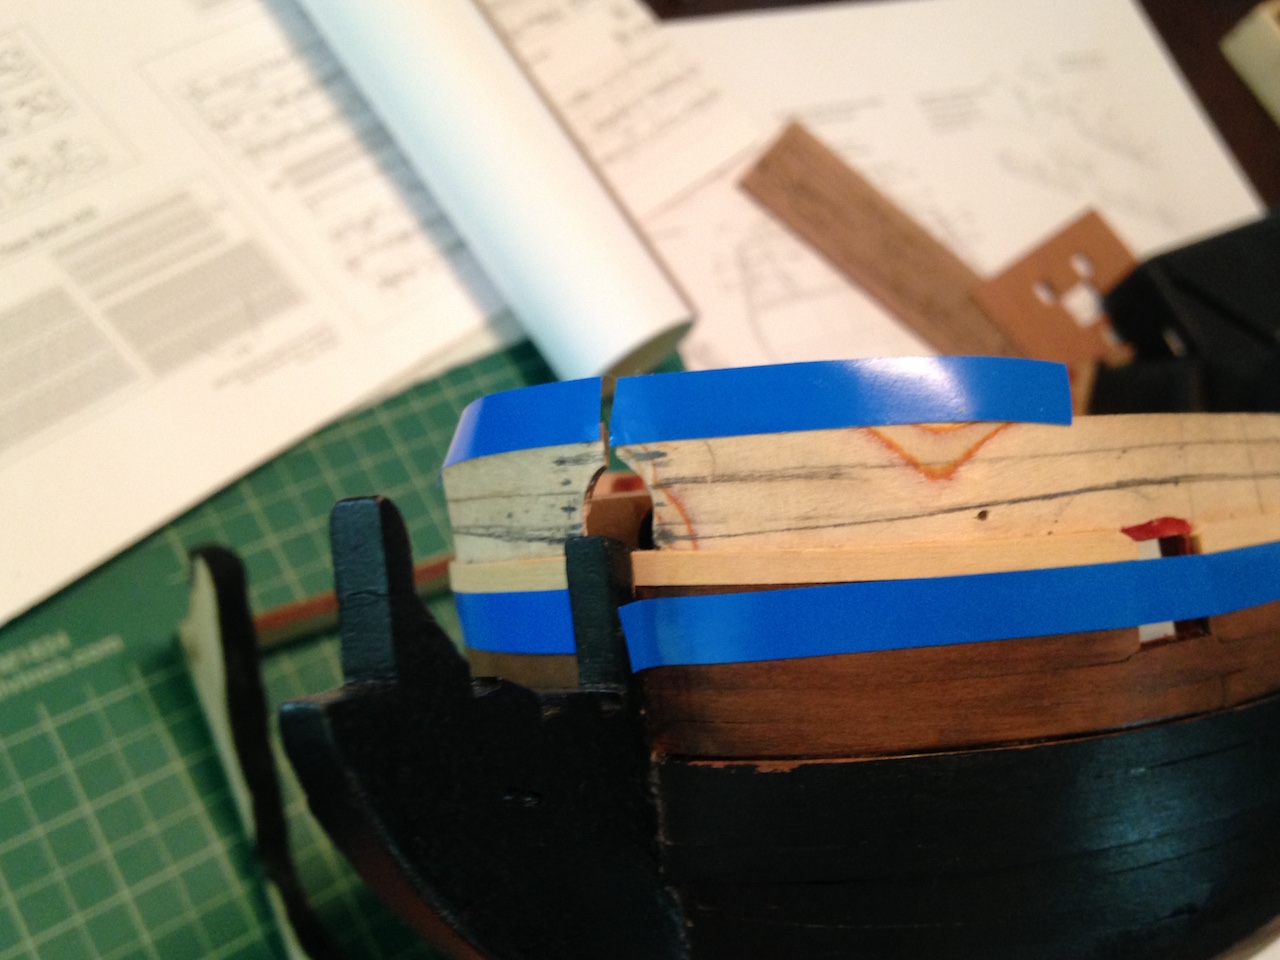
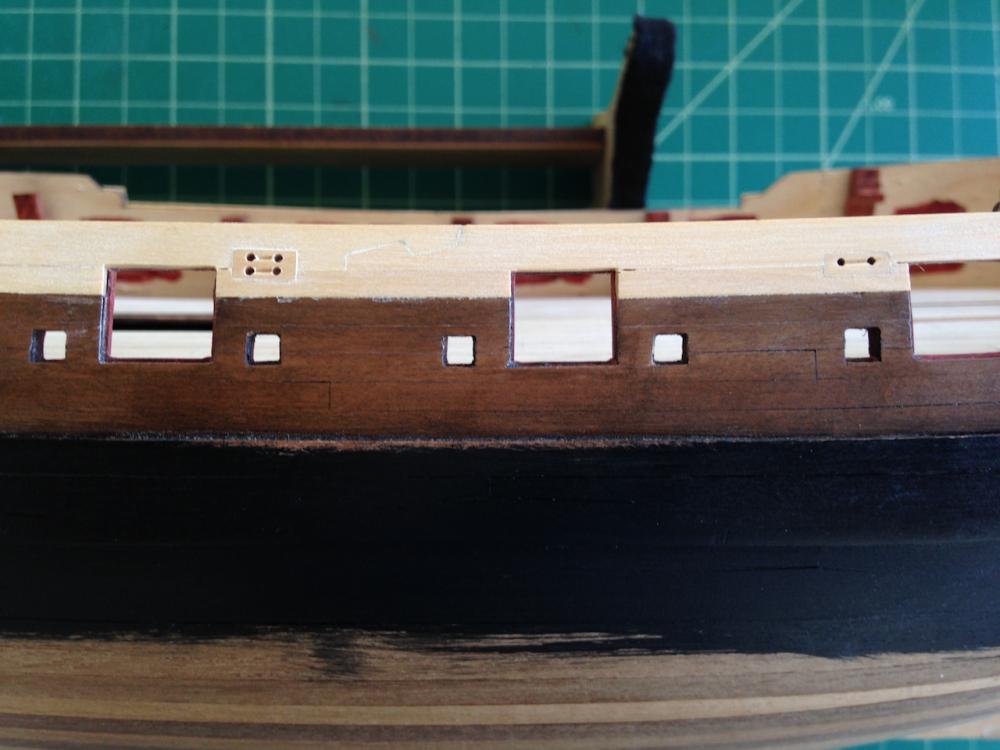
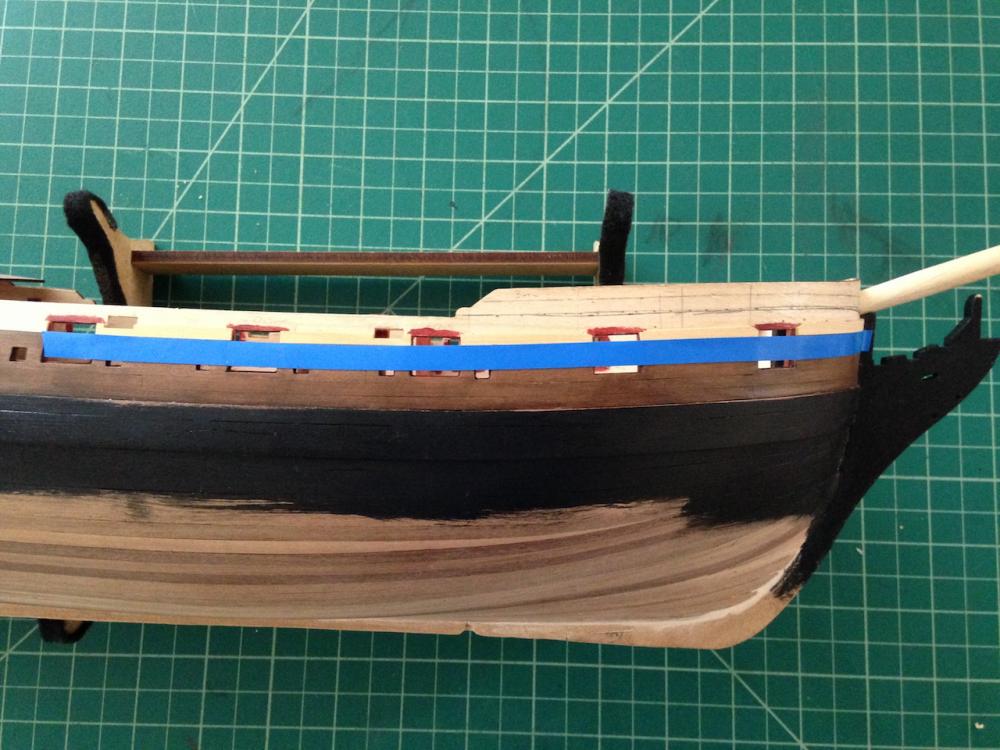
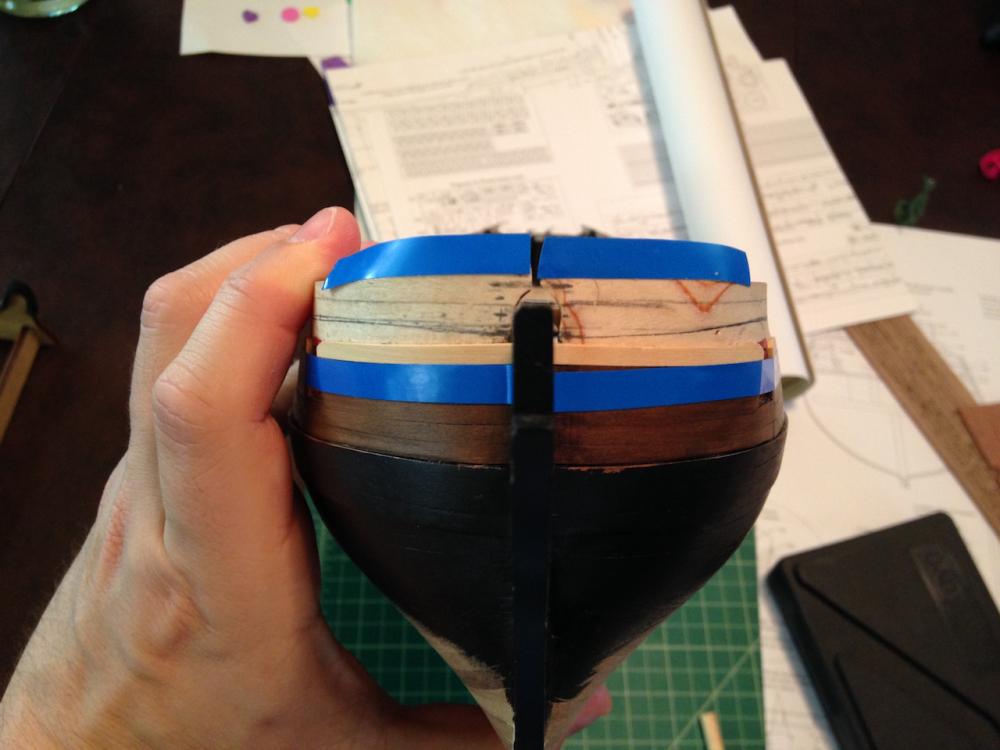
Hey Martin and Spyglass, thanks for looking in. After looking at the many Swan class logs on here, I think my gunport patterns are right in line with the rest of everyone else's. So that's a good thing. Spy, I don't know what exactly my problem is, but it's most likely that I'm just way overthinking things If I was painting the model, things would be much easier - run the waist rail, paint the frieze background, add the friezes, add the sheer rail, and so on. By using stains, I'm trying to measure with precision where the rails need to end up because I'm switching from pear (dyed brown) to boxwood for the friezes (dyed blue) to redheart for the upper area above the drift rail. I've been trying to take exact measurements off the plans, and it seems like there should be very little bulwark above the bowsprit, especially if you look at the NMM plans. Every Swan class on here seems to be on the higher side, especially relative to the NMM plans. My sense is that the patterns do run a little high at the stem, and it's good to see that you also found that you need to take a bit off the "peak" at the stem. Makes me feel like I'm in good company. It would be nice if Amati noted in the instructions and plans where extra material, if any, existed on the gunport patterns. And you're right about my freestyle lines - that's why I broke out the blue tape to at least start with the waist rail. Once I've set that line, I can use a compass to draw the line for the sheer rail and drift rail, since the areas between those rails should be consistent throughout. I think I'm just going to go by feel on this and run the waist rail and other rails where it looks best. The difference between the starboard and port tape lines is only on the order of 1.5mm or so, and much of it will be covered by the headworks anyway, so I'll try to not make myself too crazy on all this.
-
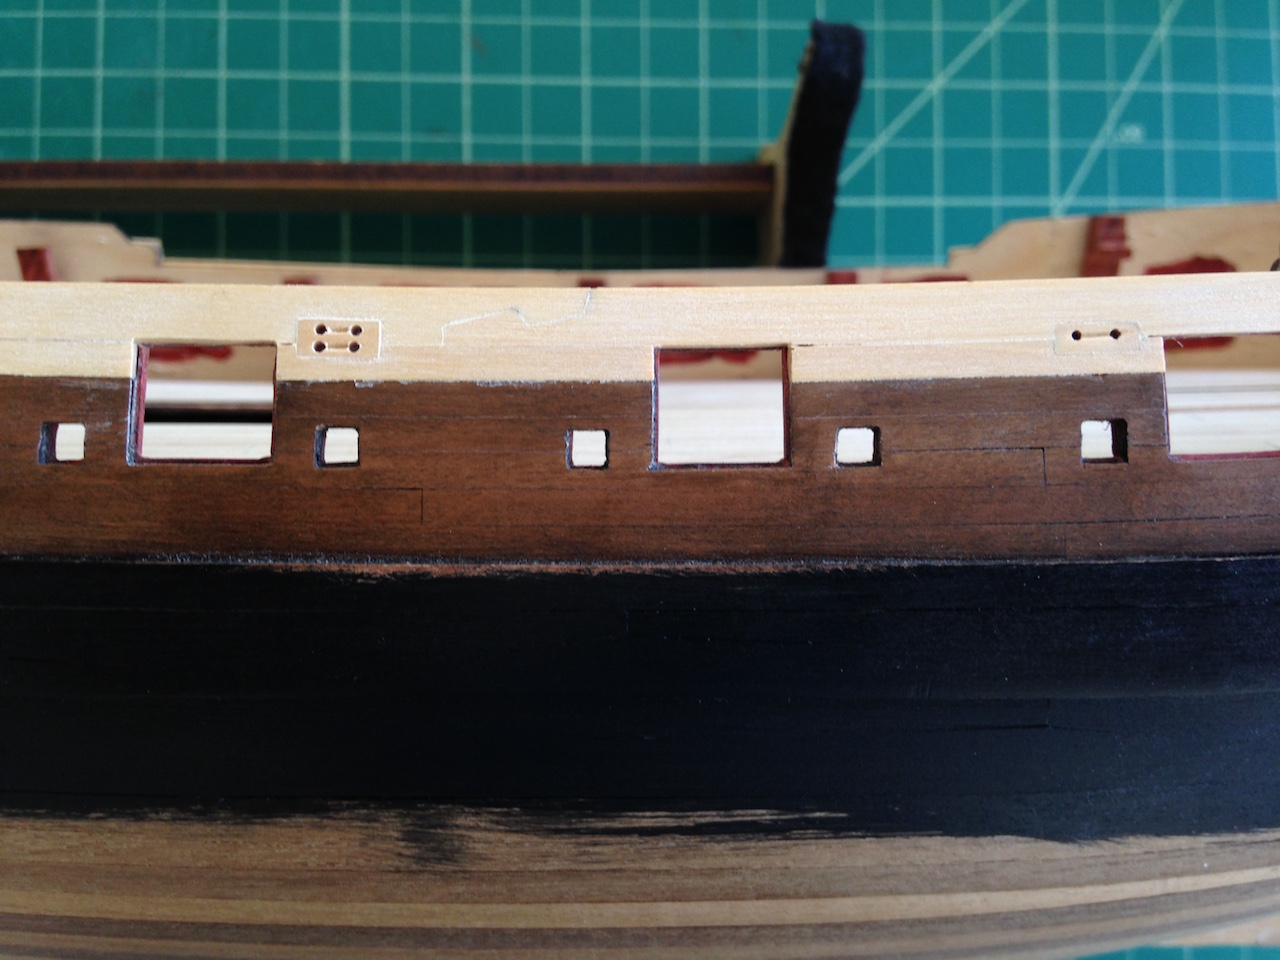
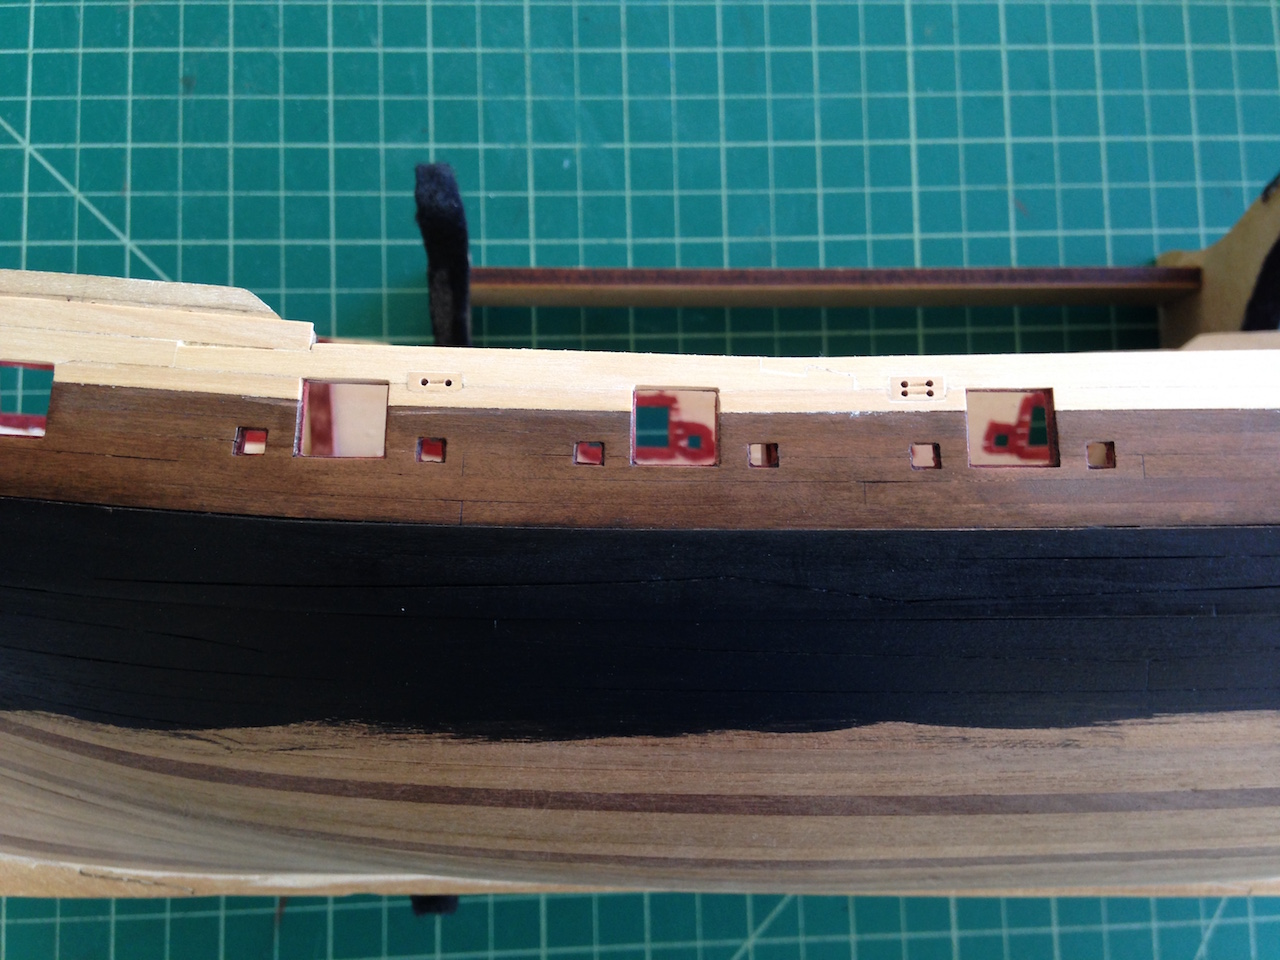
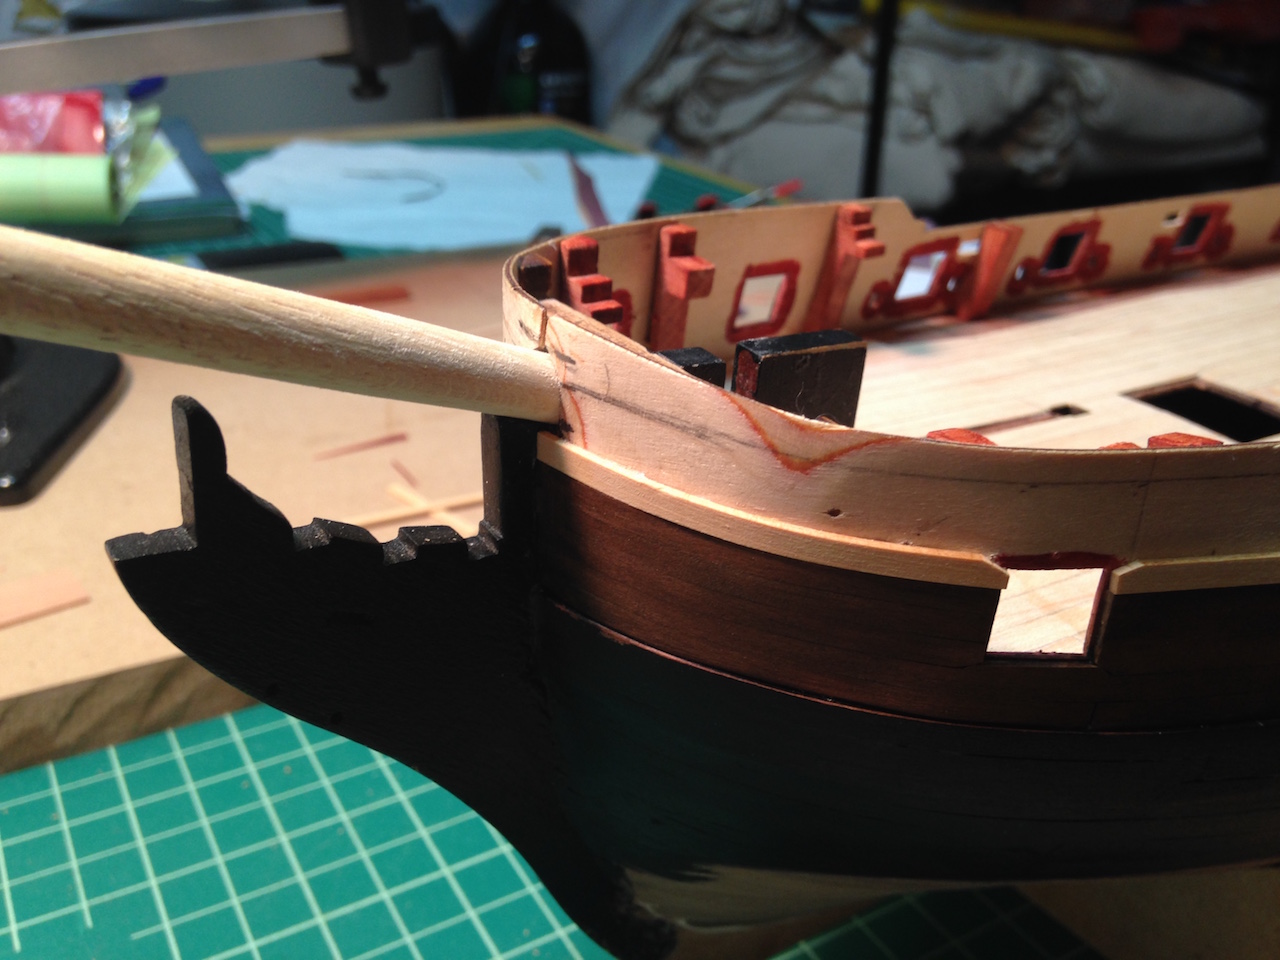
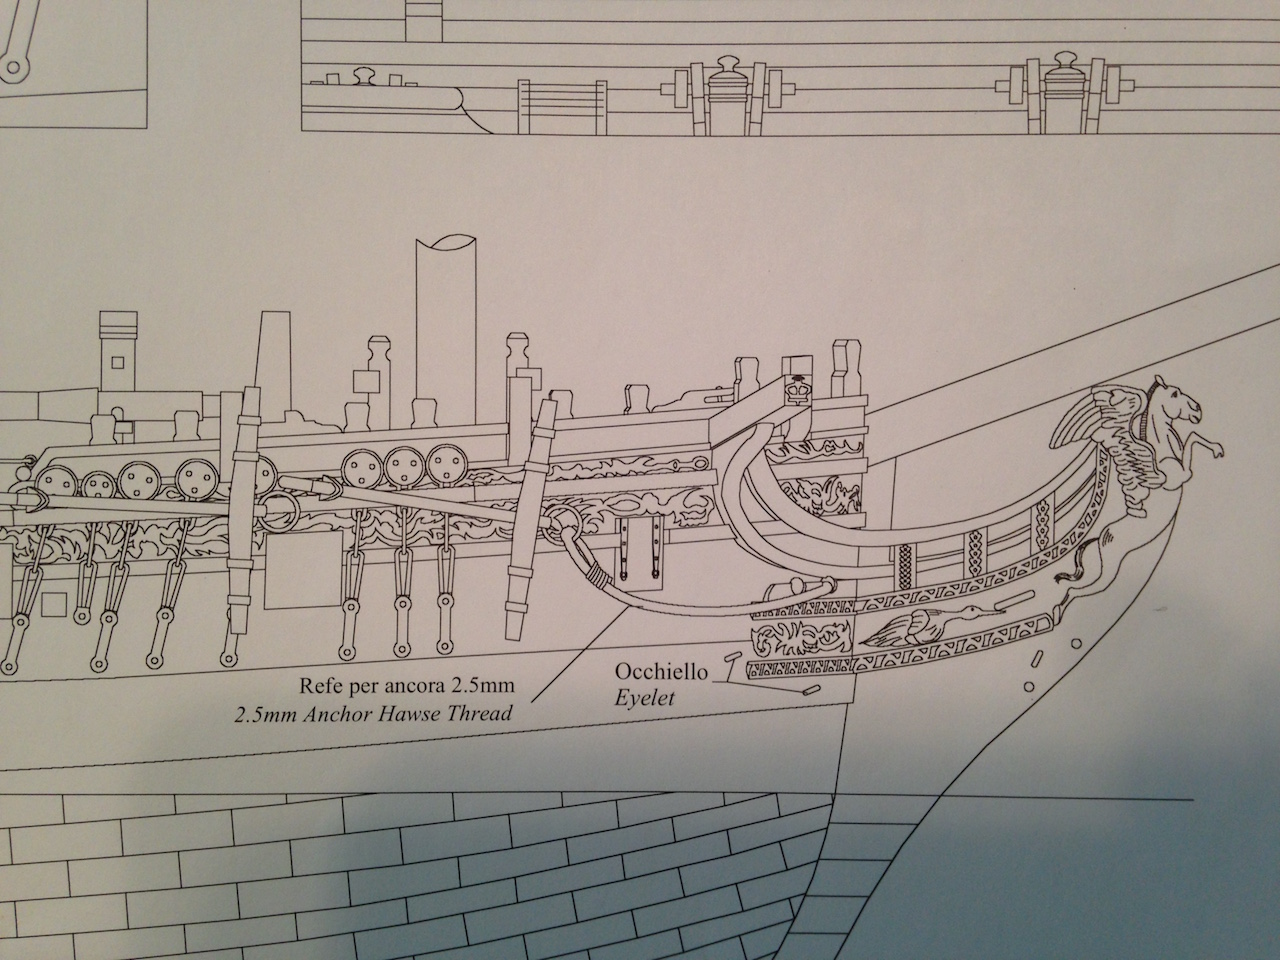
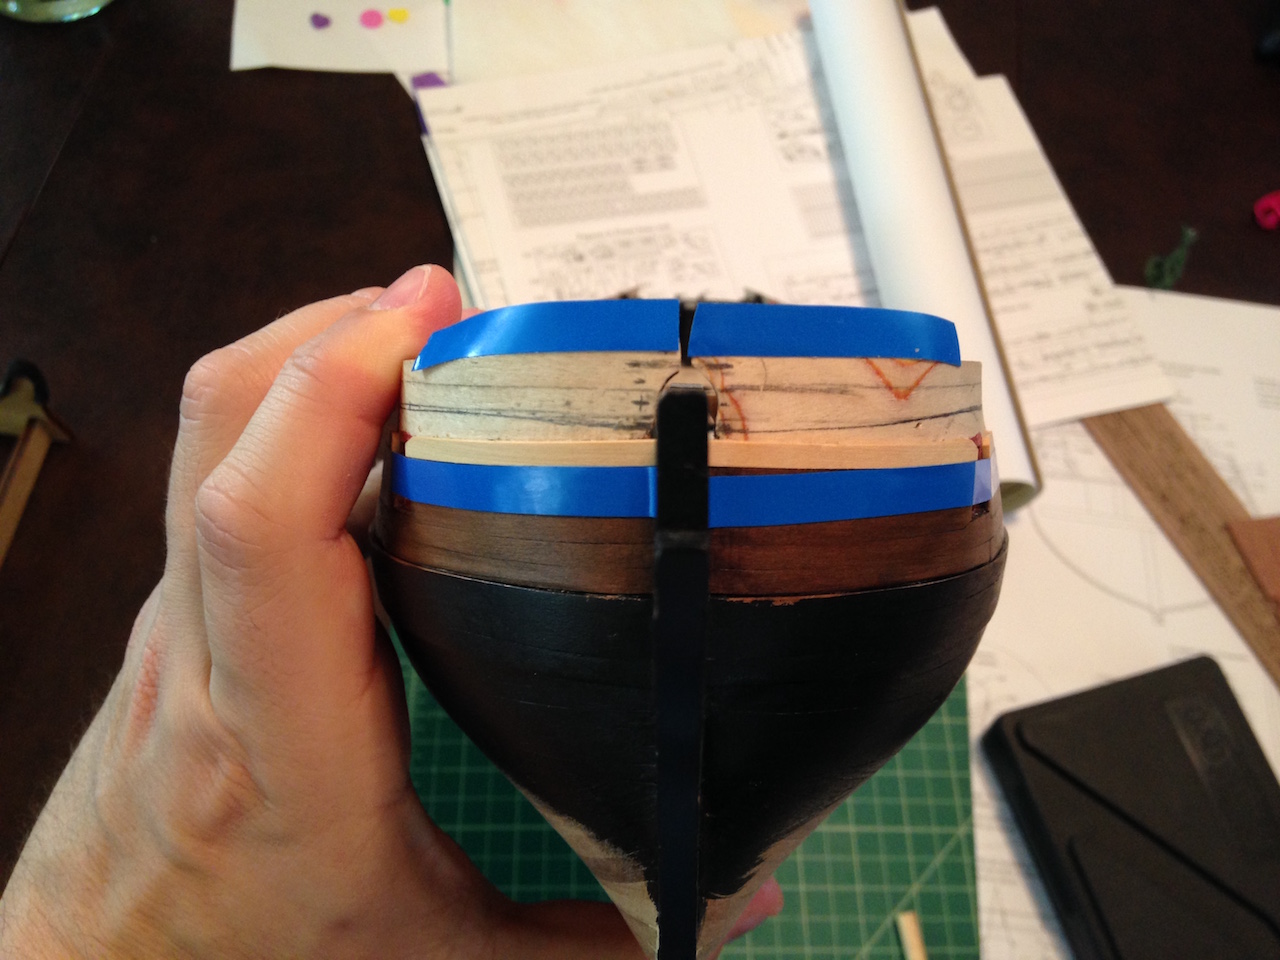
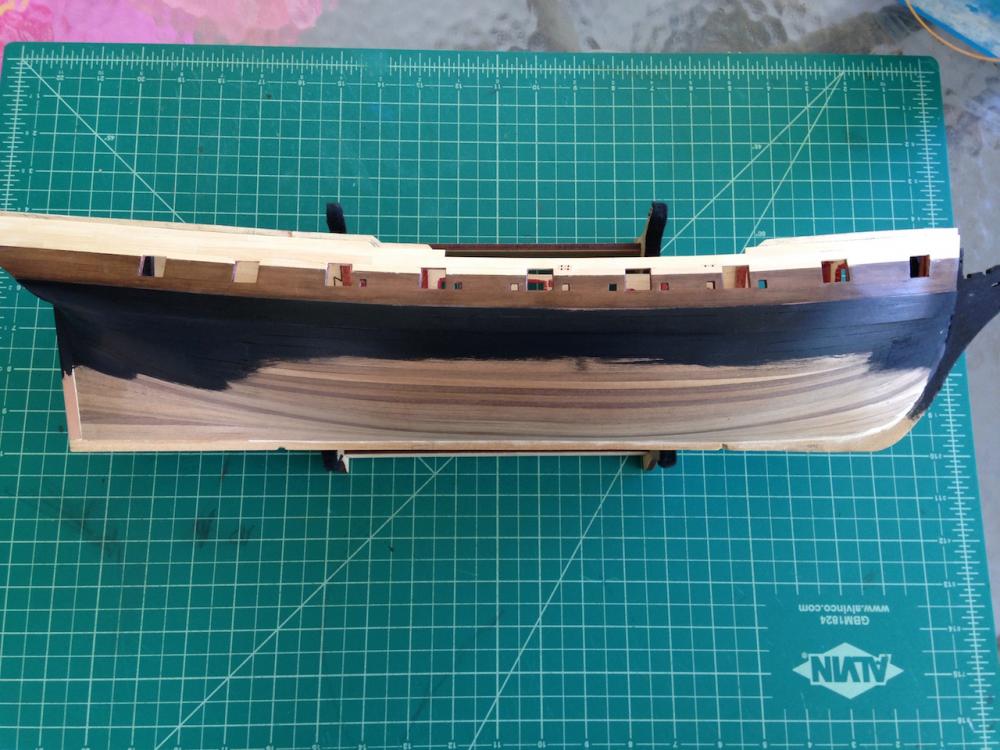
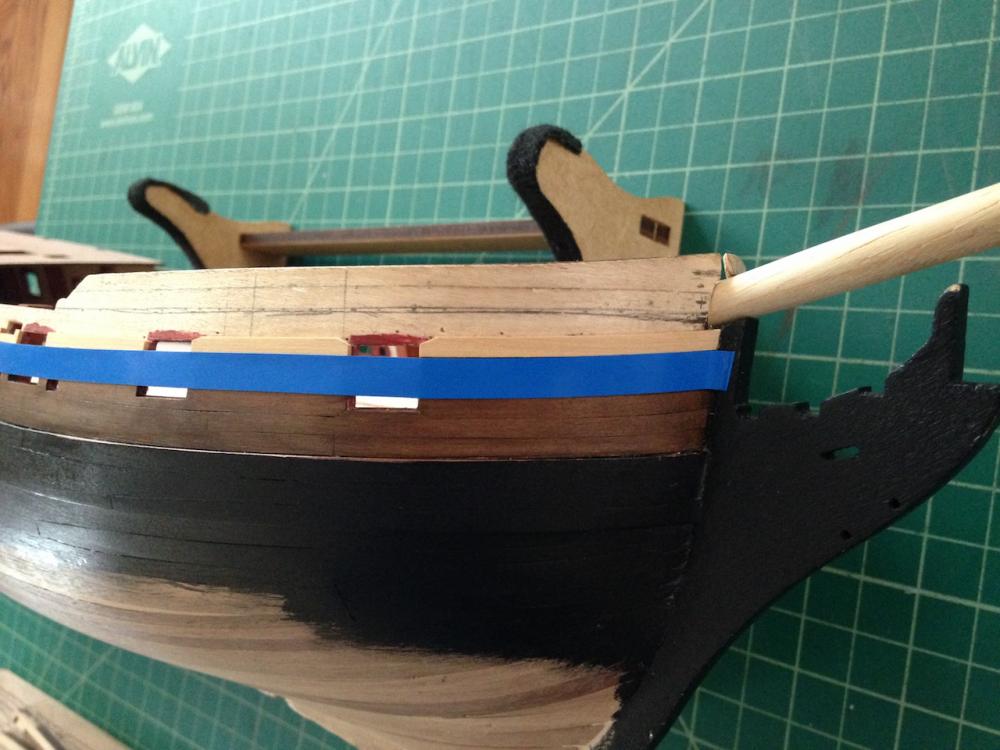
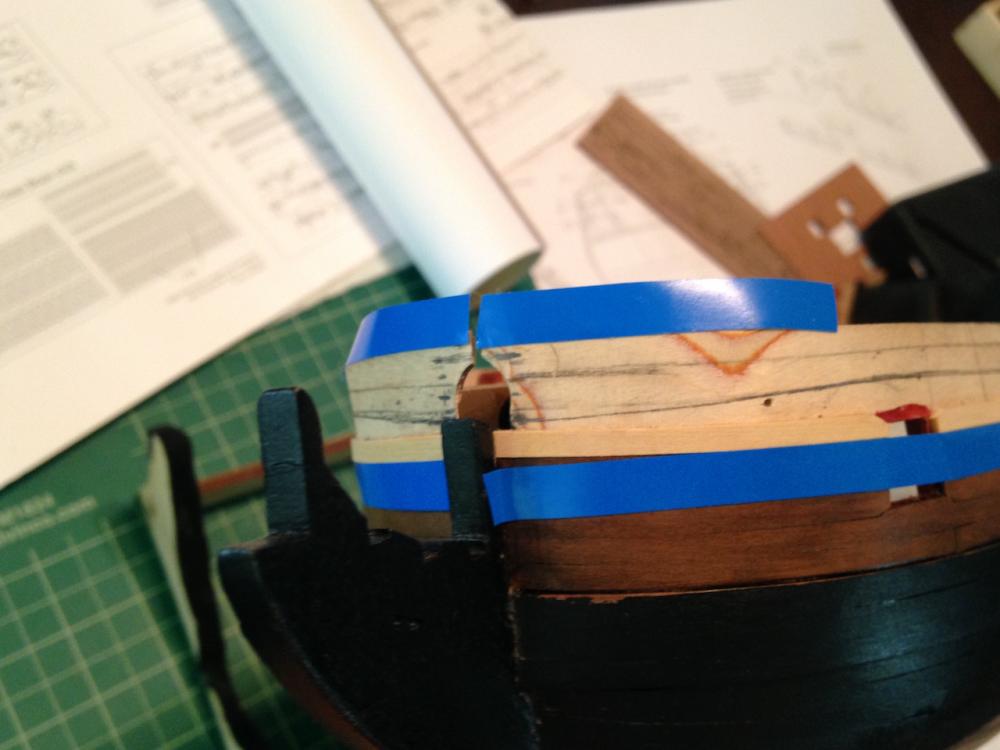
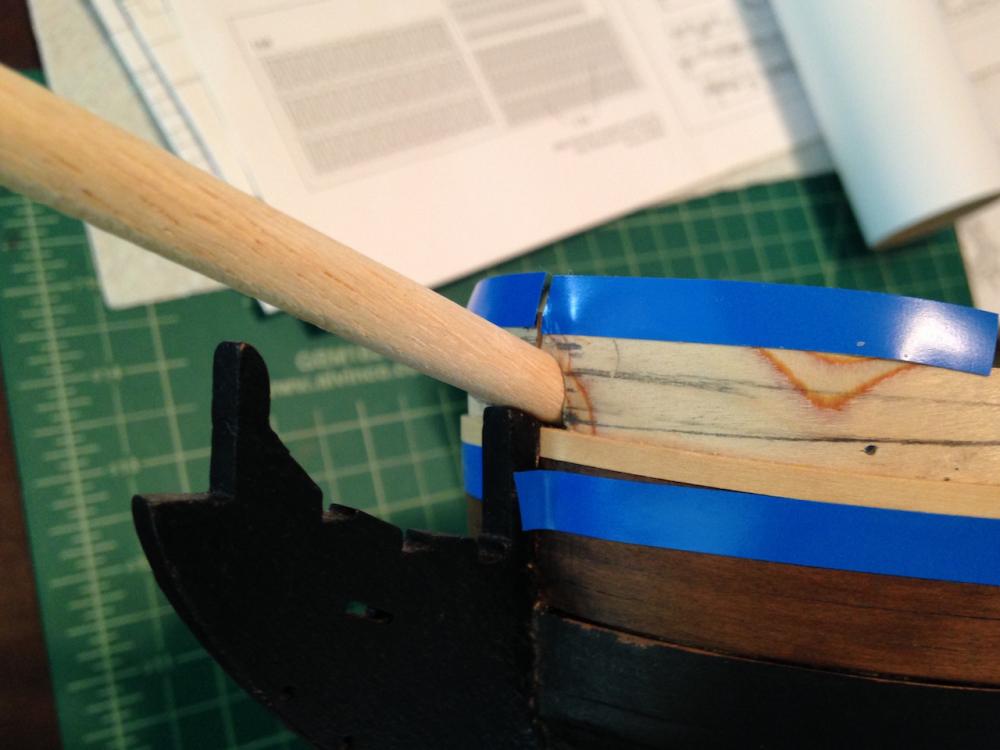
I've been making slow progress on my Pegasus. I completed the first strake of planks for the frieze area - using the TFFM planking pattern, I counted 26 planks per side from the frieze area on up, and so far I've gotten 10 done per side. The next strake is a little tricky as the planks have extensions over the gunport, need cut-outs for the fixed blocks in the waist, and one pair have a scarph joint. I'm using boxwood, which is a really really nice wood to work with. Very similar to pear, if not a tad better to work with. I mentioned earlier that I thought the bulwarks came up too high over the stem. Here is a picture that shows what I mean: Looking at the Amati plans, the bulkwarks should barely extend of the bowsprit - and the NMM plans show and even narrower section of the bulwarks extending over the bowsprit: I ran some masking tape to mark the upper line of the waist rail. Here is the line which matches the run of the planking: Unfortunately, I think this is a little high at the stem. From what I can tell, the top of the waist rail should be approximately 5.5mm below where the top of the stem meets the hull (the lower frieze is about 5.5mm in height, and the top of that area ends right about where the top of the stem meets the hull). So on the port side, I marked where I think the upper line of the waist rail should end up (about 2mm lower), and marked the edge of what should be the top of the bulwarks at the stem as well. This is a good picture to show how the run of the waist rail to the stem under both approaches, as well as how much of the gunport pattern will need to be sanded off: Looking at the hull front on, the line dips slightly on the port side, meaning I would have to sand off the stain in that section. I think the cleanest thing will be to just stick with the planking lines as is, though I think the waist rail line at the stem probably will be a tad high (the line is likely in the middle of both the starboard and port approaches). I could add in a very slight taper to the planking as it approaches the stem to help bring the bulwarks down a little more. I think all this bears out that my initial gut that the gunport patterns sat too high at the stem.


-
Can i live without a BYRNES TABLE SAW
Landlubber Mike replied to shihawk's topic in Modeling tools and Workshop Equipment
I waited for months to see if I could get my hands on a used Byrnes table saw, and had no luck. I ended up buying them new from Jim, and haven't ever regretted the decision. Too many things these days have more complicated and unnecessary configures with multiple parts that just raise the chances of the thing breaking down - Jim's tools on the other hand are built like tanks, and use a very simple yet effective design. I don't get as much modeling time in with work, kids, beer, etc., but I would rather spend the money on good tools that will last a lifetime than buy tools for slightly less that don't have the same quality both in terms of precision and expected lifetime that will end up getting replaced down the road. -
Hi Elijah, I haven't been on MSW much lately. Your careful and thoughtful approach to your build is very commendable! I've found that I probably spend 80% of my time thinking and planning things out, and only the remainder actually building (or finding lost small parts in my carpeting). On the planking, I couldn't find the 3" wide tape that Chuck mentions in his tutorial. I got book tape or something similar that was wide like that, and I just couldn't get it to work. I ended up going with the approach of just using a compass along the adjoining plank edge which I found very easy (though, I imagine the less wide scotch tape should do the trick as well): http://modelshipworld.com/index.php/topic/7267-hms-pegasus-by-landlubber-mike-amativictory-models-scale-164/?p=365802 I'm by no means an expert, but when I set up my planking bands, I tried to fit an even number of standard-width planks at the widest part of the planking band. So, I was using 4mm planks, I would set up 20mm planking bands at the middle of the hull, and adjust them for and aft. The middle of the hull should require little to no tapering/spiling, so it's nice to base the planking bands off that section. I think from your picture above that you have temporarily taped the planks to the hull. One thing to keep in mind is that because the planks will overlap at the joint lines, you'll need to sand the plank edges so that you have a smooth run to butt the next planking run against it. It makes it much easier when spilling or otherwise adding rows of planking. Good luck!
- 701 replies
-
- 3
-
-
- phantom
- model shipways
- (and 1 more)
-
Mill Column for Sherline Lathe
Landlubber Mike replied to mikiek's topic in Modeling tools and Workshop Equipment
Hey Mike, I bought both separately on eBay, and only after they arrived did I realize that there was the mill column attachment. I had a bit of regret after seeing that option, but eventually came to the same conclusion that Grant did which helped me to validate my purchases. If you have space and budget restrictions, and don't mind the inconvenience of reconfiguring the machine, then I think the mill column is a very nice option.