


Landlubber Mike
-
Posts
4,554 -
Joined
-
Last visited
Content Type
Profiles
Forums
Gallery
Events
Everything posted by Landlubber Mike
-
 Looks like another great one! Looking forward to following along Alan - you do great work! By the way, love the Black Cat aftermarket you are using. I've picked up a few of their items for future projects myself.
- 24 replies
-
- 3
-

-
- Eskimo
- Tribal class
- (and 3 more)
-
Weird, I had posted my last reply a while back but it got stuck. Now I see you finished - really great job! Quick build too! Thanks for sharing with the group!
- 42 replies
-
- 4
-
-
- Zulu
- Tribal class
- (and 2 more)
-
What I like to do is run a thin needle with CA to add a good amount to hidden areas - interiors, etc. Seems to work very well. I’ve also done the same with two part epoxy. I’m surprised you can solder such thin pieces of brass without destroying them - very impressive! At some point I’ll have to learn to solder so that I can build up the GLS corvette class aftermarket.
- 42 replies
-
- 4
-
-
- Zulu
- Tribal class
- (and 2 more)
-
Welcome back Jason! Diana is looking amazing!
-
For 1/700, do you need to solder? I’ve always just used CA, sometimes with accelerant for a quicker bind. For things like planes I’ve at times used two part epoxy. i have a 1/72 Corvette class with very heavy PE from GLS. They recommend soldering given the weight of the PE. With the parts so thin in 1/700, I’m really impressed with the results you’ve obtained.
- 42 replies
-
- 4
-
-
- Zulu
- Tribal class
- (and 2 more)
-
Great stuff Alan! Destroyers seem like smaller easier ships to build, but they are jam packed full of stuff on the decks. Makes it tricky to paint. I usually try to build as much as I can before painting, but here as you are doing you have to paint a lot of stuff off the model and then carefully assemble it. It's a bit of a nerve-racking process given how delicate the items are in 1/700. You're doing an amazing job!
- 42 replies
-
- 4
-
-
- Zulu
- Tribal class
- (and 2 more)
-
I think so - these 1/700 models seem to look much better to me in a water dio setting. I believe the Pit Road kit allows you to do full hull or waterline. I didn't add the bottom half yet to the hull in part because I'm still deciding what to do (at 1/700, a full hull isn't very deep) and because having the open bottom allowed me to drill holes from underneath to help get glue between the PE deck and the plastic hull. There were a couple of places the PE deck were not sitting flush, so a hole or two drilled underneath allowed me to get more glue in that spot and with a little pressure, got the deck to fit flush.
- 24 replies
-
- 5
-
-
- Akitsushima
- Pit Road
- (and 1 more)
-
Yes, I think the knock on Trumpeter kits generally is accuracy - not only on parts but on colors. I haven't built a Trumpeter kit, but seems like they build into nice models. Regardless, I like where you are going with this kit!
- 42 replies
-
- 4
-
-
- Zulu
- Tribal class
- (and 2 more)
-
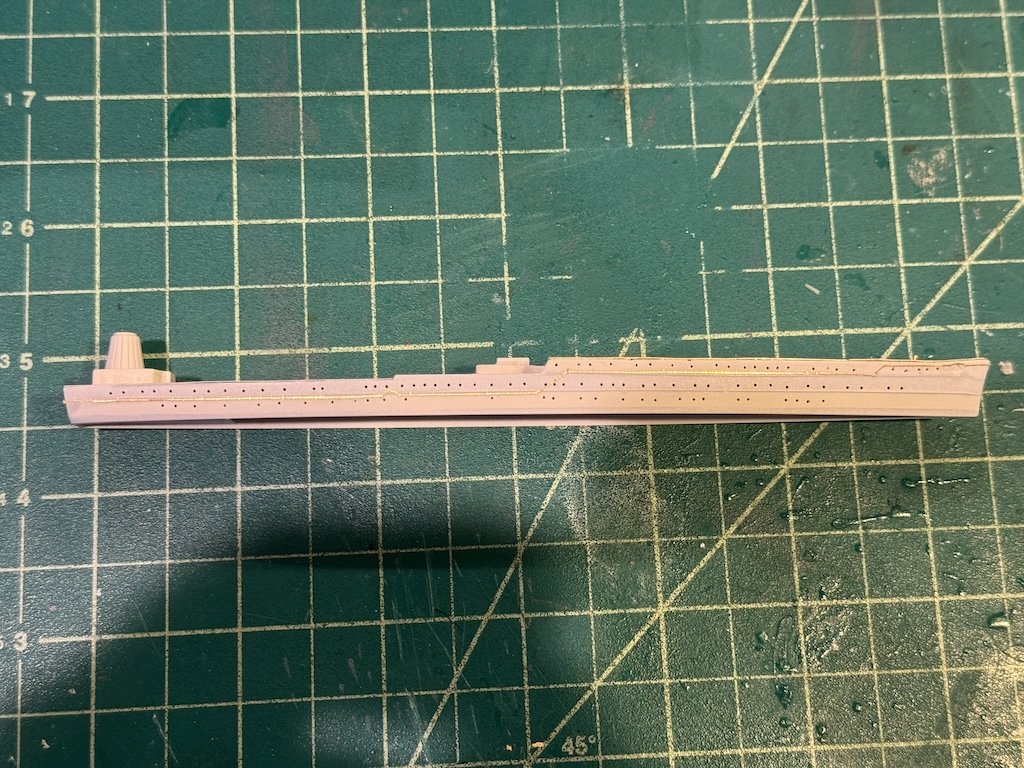
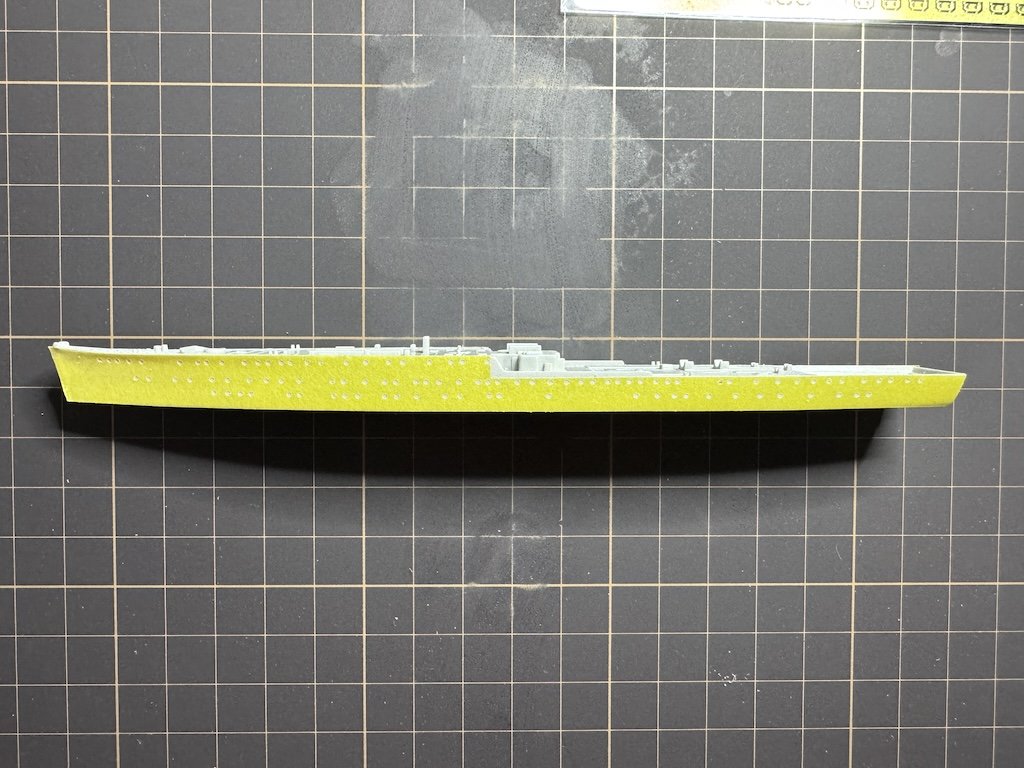
To simulate the hull plating lines, I taped alternating rows using Tamiya flexible tape and then sprayed a fairly medium-heavy coat of Mr. Surfacer 500. Once you remove the tape, you have nice simulated plating lines. I then added the degaussing cables. The Artist Hobby set gives you four pieces for each side of the hull, and then a piece for the stern. The pieces all fit together perfectly. I've been super impressed by the Artist Hobby update set. Everything fits the Pit Road kit like a glove.
- 24 replies
-
- 10
-
-
- Akitsushima
- Pit Road
- (and 1 more)
-
OC, I meant to get back to you on this. A lot of the escort carriers during and after the war were used to transport/carry "stuff" (for lack of a better word). The Copahee I posted above carried back a number of Japanese planes and engines and other parts during the war. I'm assuming the picture in this post shows a similar operation of transporting planes.
- 24 replies
-
- 3
-
-
- Akitsushima
- Pit Road
- (and 1 more)
-
Geez, I fall behind on MSW, look to catch up on current builds, see another log from Chris, and find out it's done. That didn't take long! Really great job as always Chris!
-
Really nice kit of a great subject. Looking forward to following along.
-
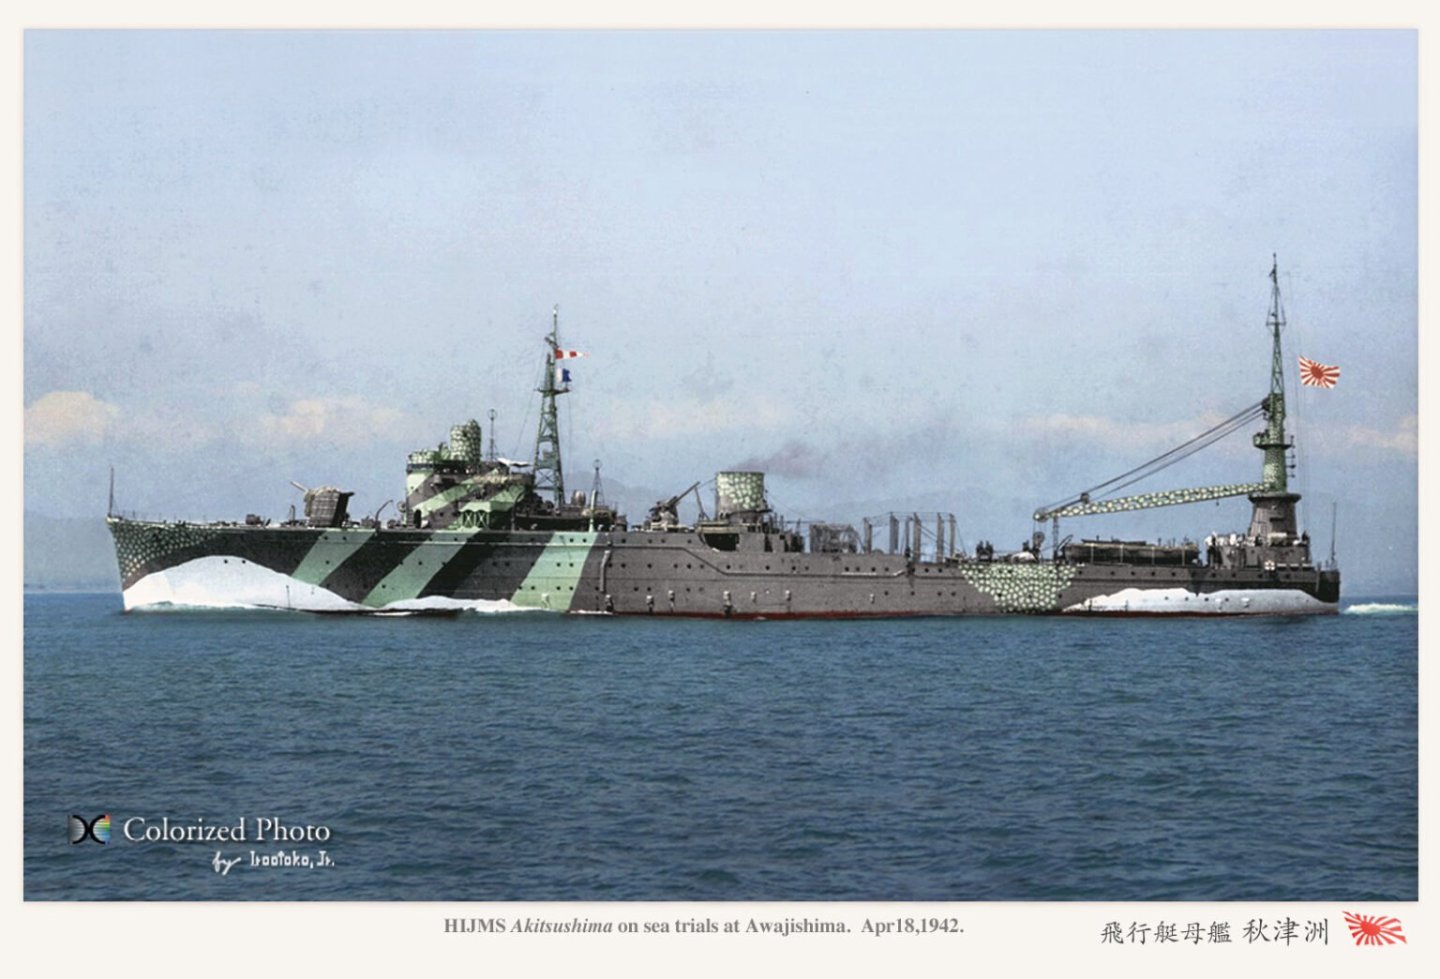
You're moving really quickly on this one Alan - really nicely done! I like the colors you are using, and the camo scheme is really sweet.
- 42 replies
-
- 4
-
-
- Zulu
- Tribal class
- (and 2 more)
-
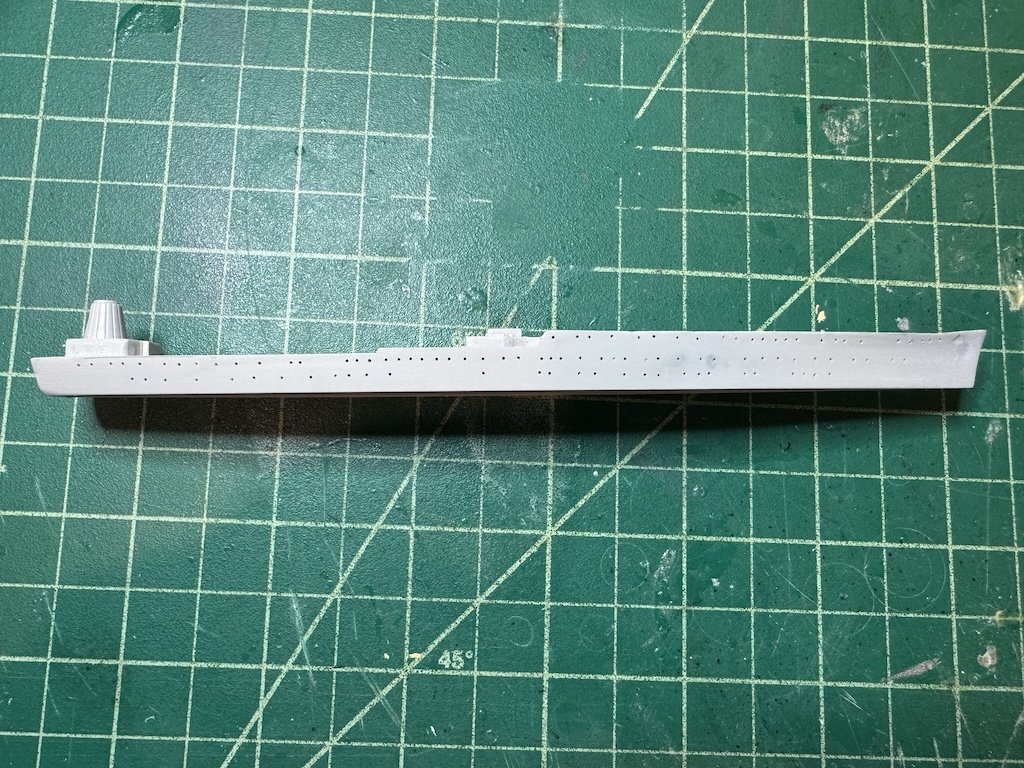
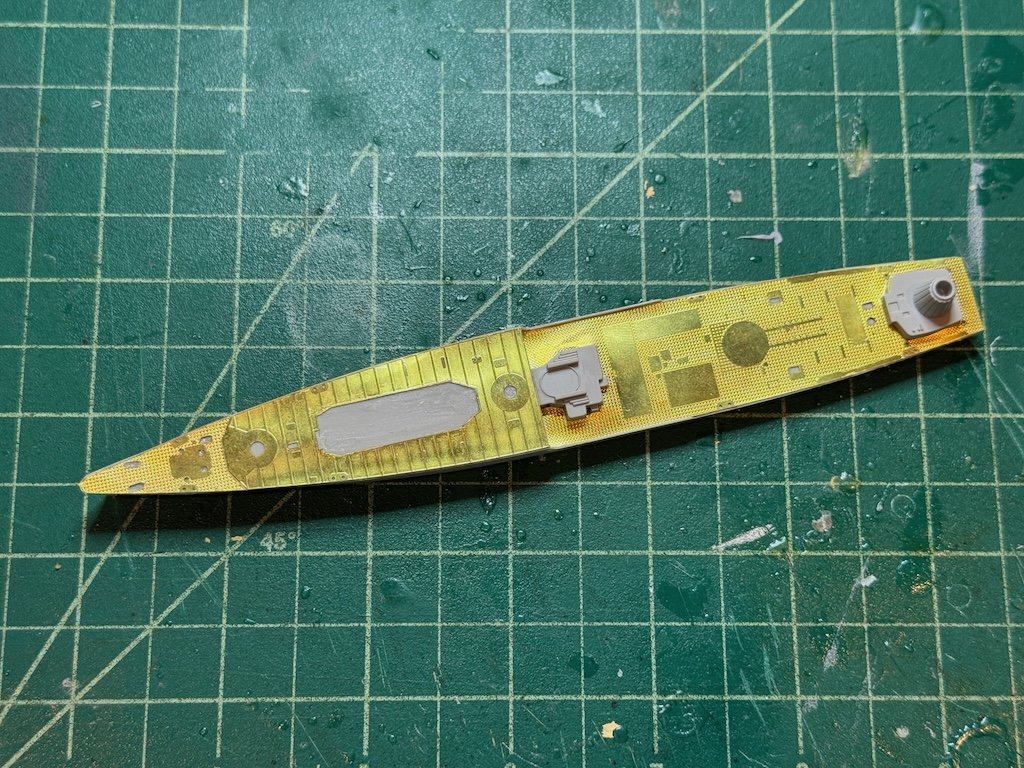
Made some good progress on the Akitsushima past few days. Using the Artist Hobby supplied template mask, I drilled the port holes out with a 0.5mm drill. Having the micromotor really helped to not only drill them quickly, but also fairly cleanly: Removed all deck details which will be replaced by the Artist Hobby set: Added the Artist Hobby PE decks. The fit was perfect on these pieces, really well done by Artist Hobby. Next I think I'll work on the hull sides, adding plating lines and details like degaussing cables and if I'm feeling crazy enough, maybe PE porthole surrounds. Thanks for looking in!
- 24 replies
-
- 9
-
-

-
- Akitsushima
- Pit Road
- (and 1 more)
-
I haven't tried that one yet, but probably should. I use Starboard, which I've also used as a CA finish when turning pens. I learned to wear a respirator when turning pens and applying all that CA - it's nasty stuff.
-
Love your Huron Alan! The camo scheme is really well done! I pretty much only use medium CA for PE. I've tried PVA type glue like Gator's Grip, but I don't really see the attraction. I find medium CA gives me a good 20 seconds to align parts, and if I need a quicker bonding time, I just use some accelerator. What's next?
-
For some reason, I kinda lost interest in finishing these two dioramas over the past few months in part trying to decide what to do with the Opel Blitz truck and in part with the next step of painting and decals. I did turn back to them more recently as interest returned. I mentioned before that the SOL Opel Blitz kit was a total mess with fragile parts, warped parts, etc., so I broke down and bought the Tamiya kit. Wow, the Tamiya kit went together like a dream! Perfect fit, great instructions, etc. I built up most of the kit a few months ago, but then had to figure out how to modify the kit to match the picture in the towing diorama. Today I finish the modifications, which included using brass rod (round and square) and some of the wood planks from a Sol Model Opel Blitz kit. I'm pretty happy with how it turned out. I primed it and the various cab parts tonight, so hopefully can get started on painting it later this week. Thanks for looking in!


- 51 replies
-
- 10
-
-
We really do Kevin! I know people like doing the Yamato and the big flagship carriers and the like, but I really like their converted vessels and auxiliary ships. Very interesting designs! I did break down and recently add three US Navy ships to the collection after finally finding a 1/700 Loose Cannon Langley CV-1. Like a week later, I found a Tom's Modelworks corrected hull for the Hornet carrier, so got a bunch of AM for that one to do a Doolittle raid diorama, and then more recently bought the Tamiya Bogue class that I will do as the USS Copahee - there's a couple of really cool pictures of it bringing back IJN planes and equipment which I will try to model (plus, I love the Measure 33 Design 12A camo scheme): I I found this one as well with the flight deck full of US aircraft, but I think this might be an earlier design given the funnels:


- 24 replies
-
- 6
-
-
- Akitsushima
- Pit Road
- (and 1 more)
-
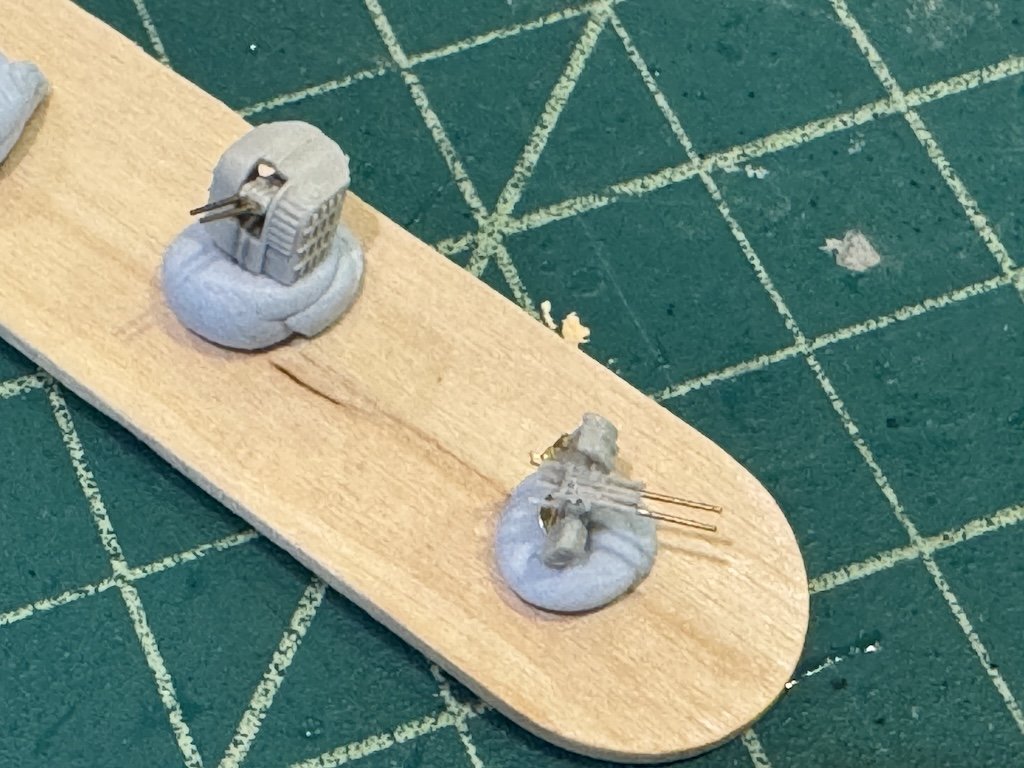
Built the two different types of 12.7cm twin AA guns. The Artist Hobby set gives you the parts and barrels for the right one, and gives you the barrels to add to the kit part for the left one. There's a 25mm twin gun to add as well, but I probably will use an aftermarket gun rather than build it out of PE to avoid the hassle and have more of a 3D look for the barrels.
- 24 replies
-
- 10
-
-
-
- Akitsushima
- Pit Road
- (and 1 more)
-
Thanks Alan! For the hotel, I actually bought this Art Bin plastic carrying case from Amazon. It was able to carry a small cutting mat, the kit and AM, my Optivisor (which I didn't need), and a high powered LED desk lamp (along with a variety of tools). Art Bin: https://www.amazon.com/ArtBin-6917AB-Sidekick-X-Large-Black/dp/B00178HQCE/ref=sr_1_1_sspa?crid=T5TDYNEAAFAJ&dib=eyJ2IjoiMSJ9.6SPDAklrX67sewcL9xrqNhmg740nCsgSkRK8wAV7fnd4sbHQLx458tl382qWRvun572Qr3WDINdiZbdHwFudL0qfd-JOS0tsg9Z8MToRoAxAzlTneF3w7F2djgX6G0y8d1P8sZqXGtvr4mjUM85Q0c0WrUblc8i4g6NzRv0Mq75lFYWFTsRvrSxG4thTB5B1pU-C-w2TKSHEmuikM3HgApRAMtmbMJSpKxwGShSbUmnJrOOdcEgKPod11Zv9sn8QuT0JQldmDcebqQu21pJBRB8E6r8gU963zOW4ClY3ZJM.oRIalhAhGhBUBEwfTvJNYc-47ovsM_QgMRkhfuFzqF0&dib_tag=se&keywords=art+bin&qid=1752543532&sprefix=art+bin%2Caps%2C131&sr=8-1-spons&sp_csd=d2lkZ2V0TmFtZT1zcF9hdGY&psc=1 Desk lamp: https://www.amazon.com/dp/B0B8RZWW8X?ref_=ppx_hzsearch_conn_dt_b_fed_asin_title_2&th=1 I've used the desk lamp for a while now, and I find that with the added light, I don't have as much need for the Optivisor as I used to. I don't really use the magnification lens on this lamp, but I have occasionally in the 9 or so months that I've owned it. It was definitely a necessity in the hotel room as the lighting (as in any hotel room) was really inadequate to do any modeling.
- 24 replies
-
- 4
-
-
- Akitsushima
- Pit Road
- (and 1 more)
-
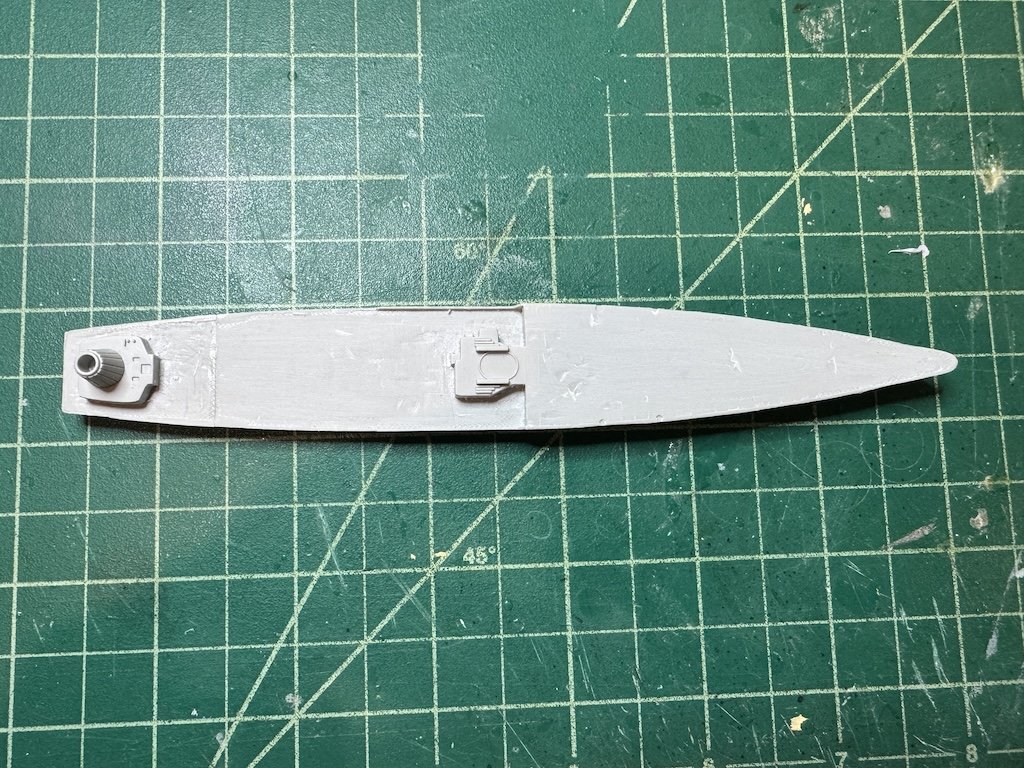
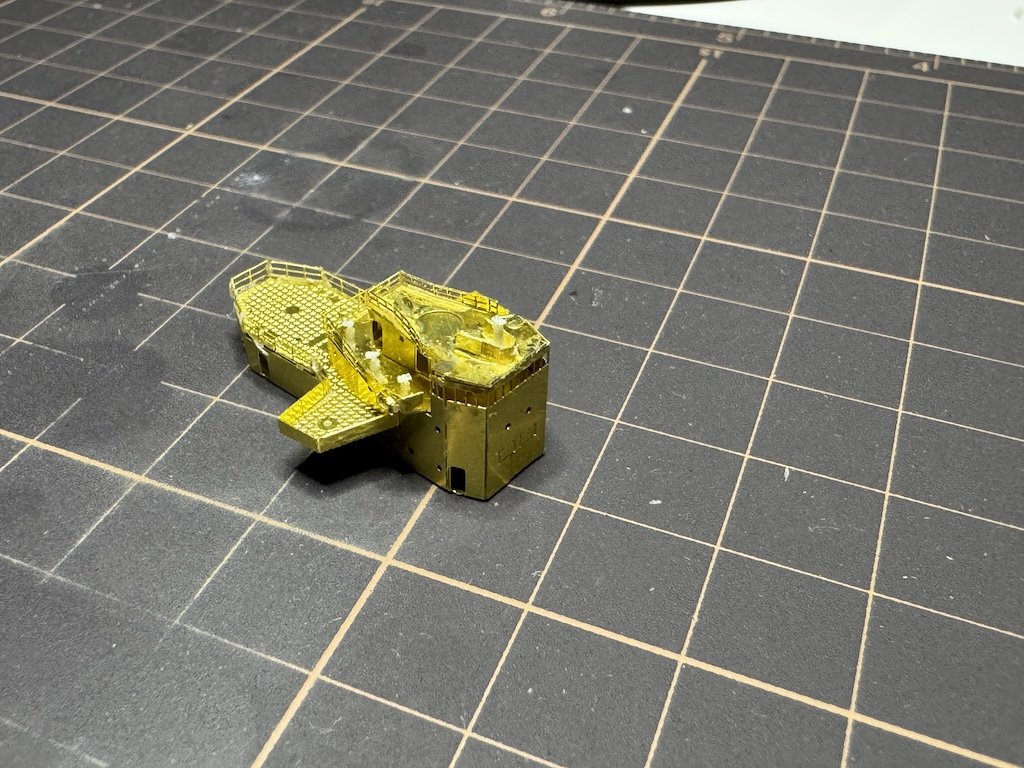
While at the hotel, I actually managed to get quite a bit done. I built up the bridge which is composed of four primary platforms, where three of the platforms are inserted into the main platform. This will replace the kit bridge: I also had time to work on the hull. I removed most of the deck details as they are replaced by PE from the Artist Hobby set. I also started working on the port holes. The kit is missing a lot of the port holes, and some were deep while others were very faint. So, I filled and sanded the sides of the hull and attached the two mask templates. I drilled most of the port holes on one side using a 0.5mm bit, but dropped it on the table and it broke. Of course, I only had one so I turned towards other parts of the build. Thanks for looking in!

- 24 replies
-
- 8
-
-
- Akitsushima
- Pit Road
- (and 1 more)
-
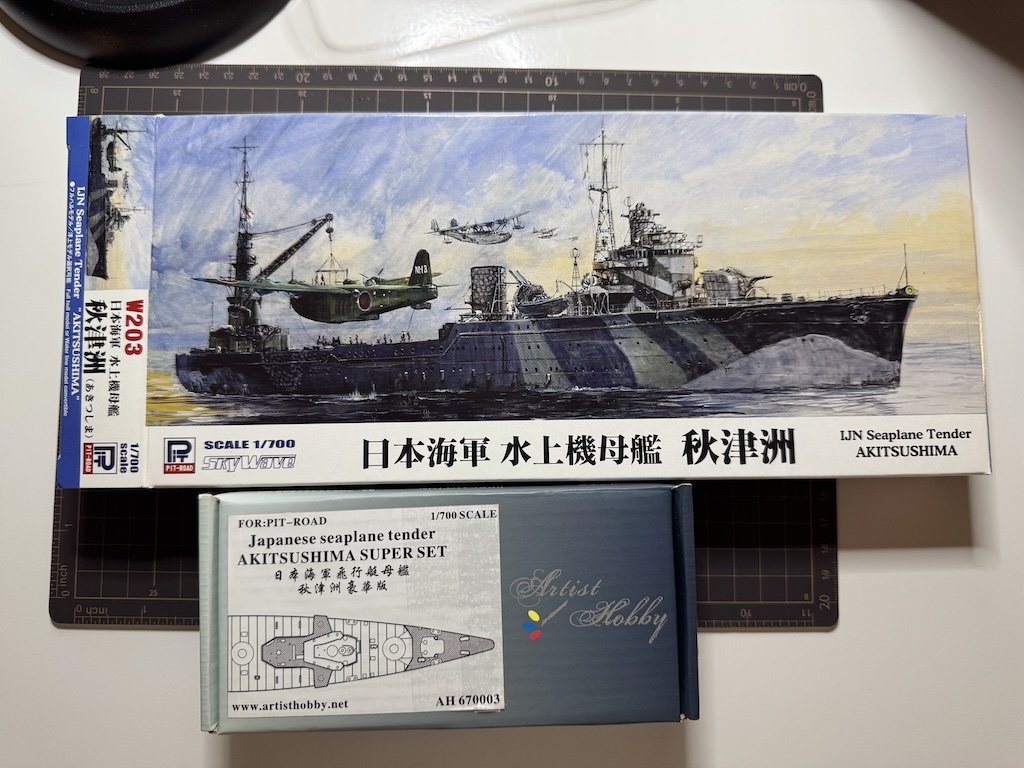
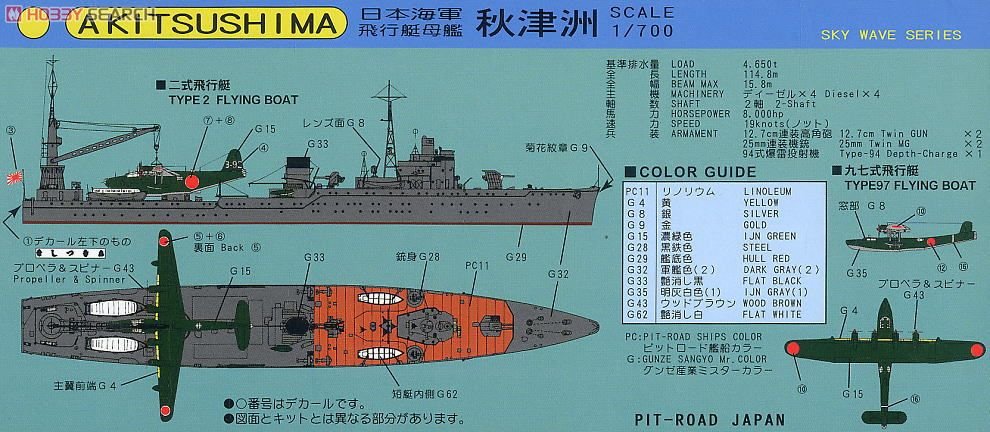
I'm building the ship using the Pit Road kit, along with the Artist Hobby super set. The kit is very nice, but the Artist Hobby set really will take this kit to the next level: The Artist Hobby set not only gives you five PE frets, but also resin binoculars and bollards, brass barrels for two of the guns, and resin parts for the Type 89 127mm AA gun. In addition, it gives you a set of masks, one pair of which provides a template for you to drill the port holes: I should mention that @CDW had a really nice build that can be found below. He used a detail set from Tetra which worked out really nicely. Inspiring build!
.jpg.29fa20d493a588fb6ec203fd8bc7e8a1.jpg)
- 24 replies
-
- 5
-
-
- Akitsushima
- Pit Road
- (and 1 more)
-
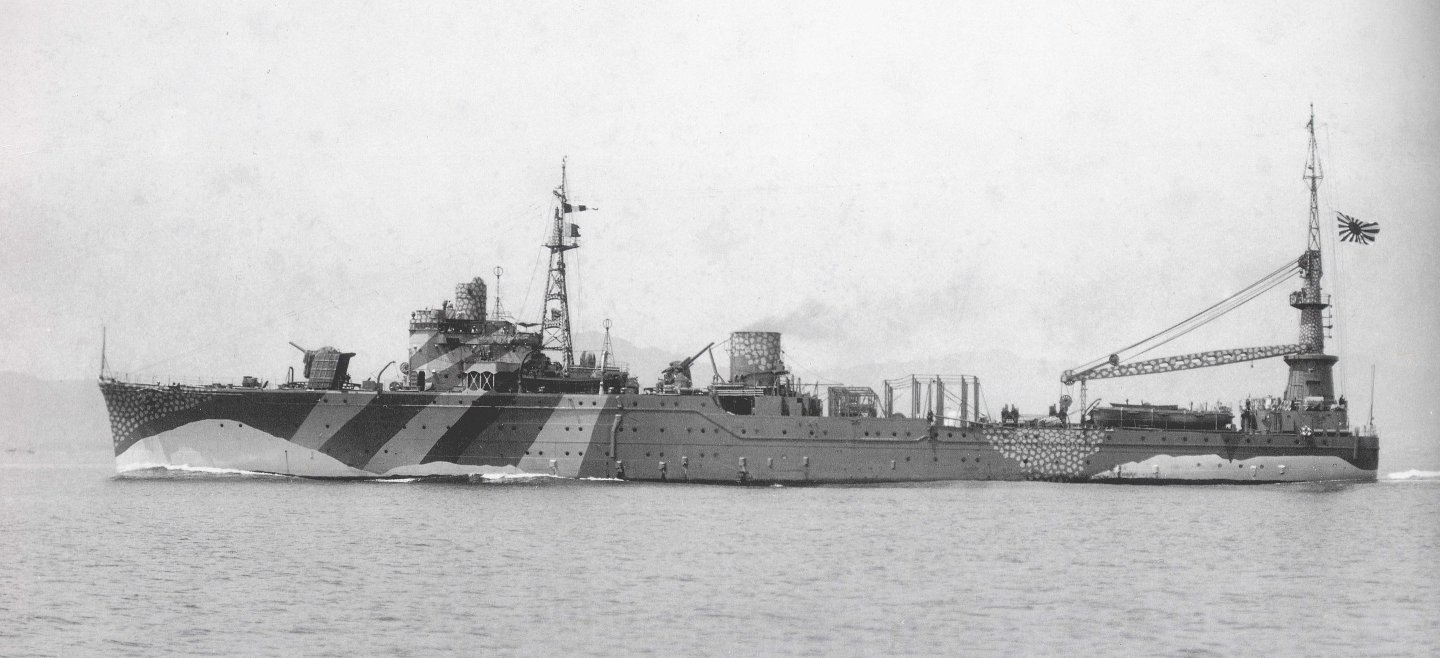
Last week I was away at a showcase tournament with my daughter for five days, and thought that rather than lay in bed watching her TV shows when we were back at the hotel, I would bring a kit to work on. My other 1/700 builds are in the final stages, so I took the kit that was the top of the stash which was this one. This was the first 1/700 kit I bought years ago, as I loved the quirkiness and the camo scheme of this seaplane tender: The ship was completed by the Japanese on April 29, 1942. Like a lot of the late builds, the Akitsushima didn't have much of a history. It was sunk two years later on September 24, 1944. Apparently after taking damage in 1943, the ship was refitted with repair ship facilities because the Akashi (an IJN repair ship I'm building as well) was sunk.
- 24 replies
-
- 7
-
-
- Akitsushima
- Pit Road
- (and 1 more)
-
Looks really great Alan! Nice job on the camo! Guns at 1/700 in PE are a real pain, especially the twin, triple and quad guns. Part of the problem too with them is that the barrels are usually flat, rather than round, so you get more of a 2D look if one should happen to look very closely. I decided to replace the guns at 1/700 scale (and even at 1/350 scale) with pre-made guns that look better than the kit blobs. Adds to the cost of the kit, but saves a lot of aggravation and improves the look. You can find some really nice injection molded sets (at least I think they are) from Fine Molds. And more and more you're seeing 3D printed items from outfits like Bunker Studios, Five Star, and Black Cat. I recently found my holy grail kit - the 1/700 Loose Cannon USS Langley CV-1 for a good deal on eBay. I was excited when it arrived, but disappointed at some of the detail pieces so I ended up getting replacement guns, small boats, rafts, etc. I ended up also getting some of those items for a 1/700 Trumpeter Hornet and 1/700 Tamiya Bogue that I plan to model. You can find these from places like Squadron Hobbies as well as on eBay (usually from Chinese sellers).
