


Landlubber Mike
-
Posts
4,551 -
Joined
-
Last visited
Content Type
Profiles
Forums
Gallery
Events
Everything posted by Landlubber Mike
-
 Looks like a great subject Alan - love the camo scheme! Looking forward to following along!
 -
Great start Alan. You've painted up a nice variety of figures - these Pegaso figures are pretty cool.
-
Looks great Andrew! Really nice progress. I love the two colors used together on this aircraft.
-
Nice Kevin, glad your plan came together! *cue A-team theme music*
-
Nice job Kevin - looks great! Where did you get the stand, or did it come with the kit? Looks really cool.
-
T-90 by Mikegr - FINISHED - AM - 1/72 - PLASTIC
Landlubber Mike replied to mikegr's topic in Non-ship/categorised builds
Nicely done Mike! -
Excellent job as always Dan - very nicely done!
-
Another great figurine Alan, really well done! You're getting good at these.
-
That's looking really good! The Super Metallics are great paints, aren't they? The nose looks really nice.
-
stagecoach by kgstakes - FINISHED - 1/8th scale
Landlubber Mike replied to kgstakes's topic in Non-ship/categorised builds
Nicely done! -
Wow, that came out great Alan! Sorry to have not seen your log earlier. Well done!
-
That came out great!! Really nicely done!
-
Thanks Alan - turns out I was nervous about doing it for nothing. I assumed that the paint would come under the metal stencil since there isn't a perfect seal but it worked very effectively.
- 40 replies
-
- 4
-

-
- Five Star
- Akitsu Maru
- (and 1 more)
-
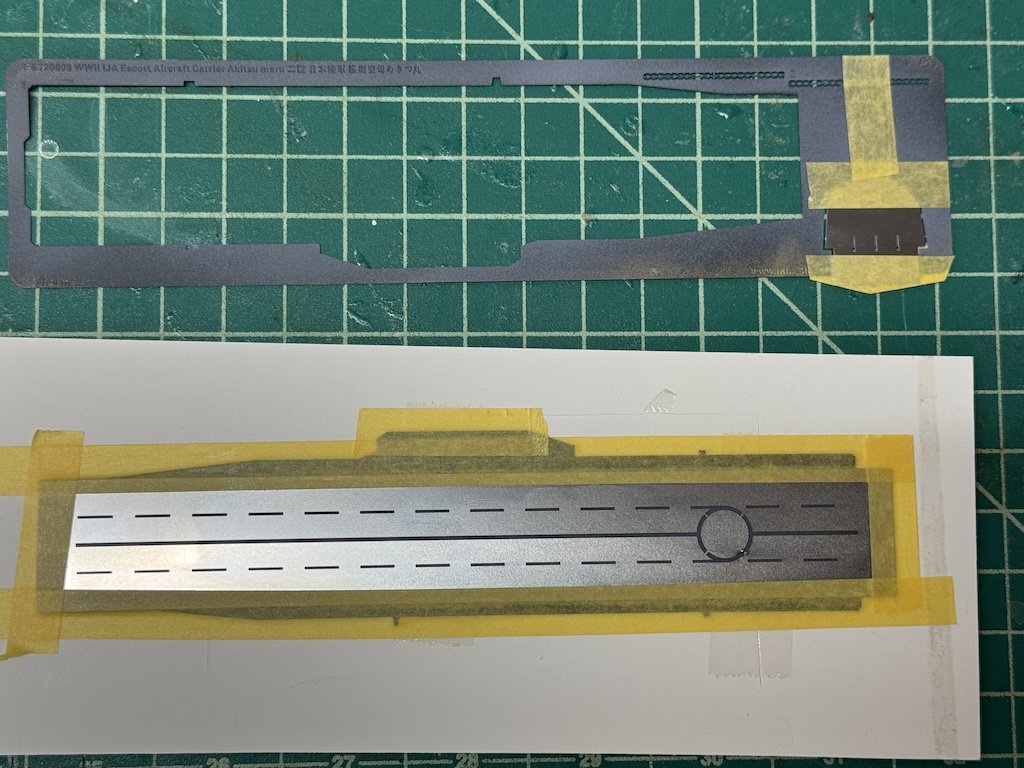
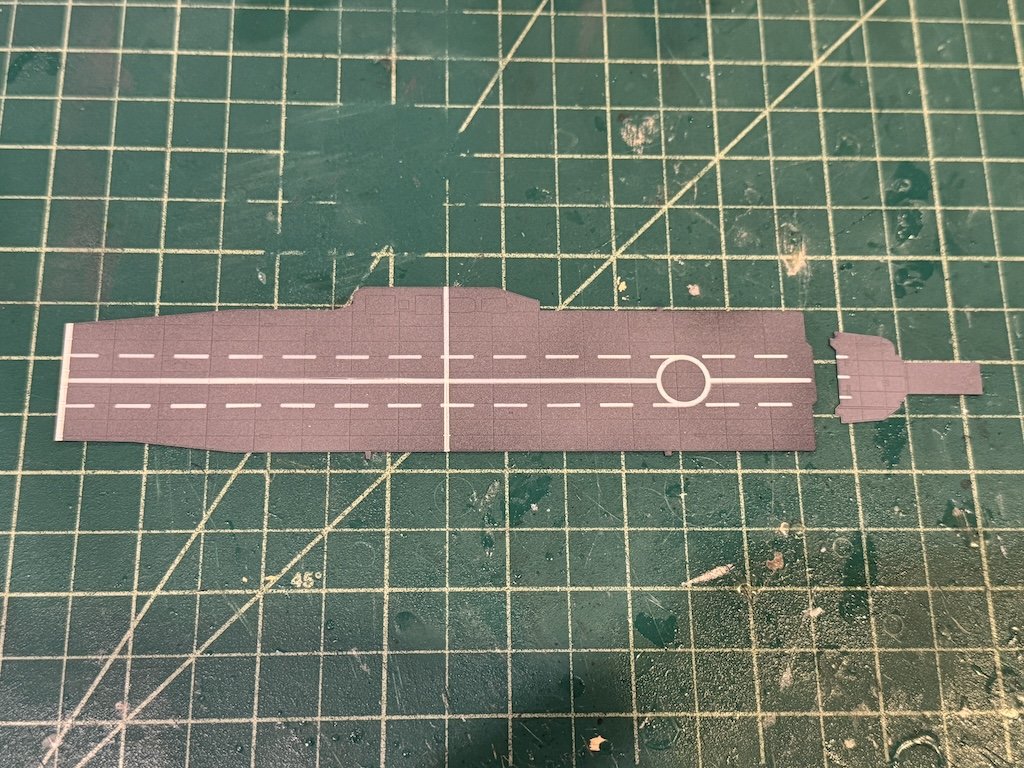
I recently dusted this one off after getting inspired with some 1/700 builds I came across on FB. The Five Star resin/PE kit differs from its Aoshima plastic kit counterpart in that with the PE, it has much better detail than the various plastic parts. On the flip side, this kit is lacking certain details like the girders under the flight deck, winches, small funnel pipes, etc. So, I'm using the Aoshima instructions to help detail the area below the flight deck. To start, the flight deck is going to need a lot of work to add the girders. The easiest way to approach this was to first paint the top side of the flight deck, then flip it order and add the girders and supports. I first primed both sides of the deck with Mr. Surfacer 1500 black, then sprayed Tamiya Maizuru arsenal on the top side of the deck for the gray color. The Five Star kit doesn't give you decals to paint the lines on the flight deck and elevator, but gives you metal stencils: I placed the deck and stencil on a sturdy piece of cardboard, then painted the lines using Mr. Color insignia white. As I was painting along the stencil with the airbrush in one hand, with the other I was pressing the stencil down using a wooden popsicle stick to make sure the stencil didn't lift and give me underspray. Then, after it dried overnight, I taped off and painted the perpendicular lines at the bow and amidships. I was pretty surprised at how well this all worked - all that anxiety for nothing! Next I will clear coat the topside to protect the paint job, tape it off, and then work on the underside and glue on the supports, girders, etc. As all that is in progress, I can finish up the underneath area/hangar deck. I also have to finish up the Ki-76 planes, which are mostly done but just need a few more details to be added. Thanks for looking in!
- 40 replies
-
- 7
-
-
- Five Star
- Akitsu Maru
- (and 1 more)
-
I believe so - it was somewhere near St. Michaels if I recall correctly.
-
Really nice job - cool display!
-
Nice job on what looks like a tough kit!
-
Thanks Mike! Yeah, I had some issues wiring it together in position, and some of the planks had slipped during assembly and gluing - the bow and stern especially gave me fits. I ended up gluing it together, then having to separately remove planks and re-glue to get the bow and stern in alignment. It's a fun kit, something different. It probably took me double the amount of estimated time (40 versus 20 hours) with those issues, and then the painting. I had to sand and then repaint sections multiple times as I kept finding little issues (putty closing the wire holes shrinking, paint went on too thick or too thin, and other touchups). Feel free to reach out when you start yours if you have questions.
-
Hey Glen, I haven't been on MSW much the past few months but just found your log. Wow, what a great job! You're getting very good with these SIB builds! For what it's worth, on the stand, I have a slight preference for #2 as well. I like the concept of #1, but I think I prefer the simplicity of the tree over the stand. Can't go wrong with either approach though.
- 106 replies
-
- 3
-

-
-
- Kentoshi-Sen
- bottle
- (and 1 more)
-
Amazing work Glen!! Really well done! I loved the video too - shows really well what a stellar model this became.
- 301 replies
-
- 5
-
-
-
- Constitution
- Bluejacket Shipcrafters
- (and 1 more)
-
Looking really good Chris!
-
Wow, nice paint job! Tricky but you nailed it! For custom decals, I think someone mentioned this, but you can design decals on your computer and print them out on your printer with special decal paper. I haven't had to go that route, but I can see trying it out in the future. From what I've seen from others, it doesn't sound as hard as it might seem. The one tricky thing is printing "white". You might need a special printer for that. There were these Alps printers that could print white, but maybe others now can print it as well. Maybe an easier alternative would be to design your own stencils/masks for the lettering. You design it on your computer, then get something like a Cricut machine to cut them out. If you don't want to do it yourself, there are outfits out there that can help you like this one below: https://kitmasx.com/pages/custom-mask-requests
