
HOLIDAY DONATION DRIVE - SUPPORT MSW - DO YOUR PART TO KEEP THIS GREAT FORUM GOING! (Only 20 donations so far - C'mon guys!)
×


Martin W
-
Posts
1,412 -
Joined
-
Last visited
Content Type
Profiles
Forums
Gallery
Events
Everything posted by Martin W
-
 We notice, and we'll all be here when you return. Cheers, Martin
 -
Nice work, Jon! It's always worth learning something new, and when the results are as nice as this, it's especially gratifying. Cheers, Martin
-
Great work, Nils. I especially like your use of that rubber band on the yard -- getting those lined up and square can be tricky, but that rubber band seems to work. Bravo! Martin
-
Peter -- By sheer coincidence, I read The Ships of Trafalgar just about a month ago, and I remember the reference to The Pickle. It definitely piqued my interest, and so I'm glad you're posing some rich historical questions in your build. I'm looking forward to more! Cheers, Martin
- 293 replies
-
- 1
-

-
- pickle
- caldercraft
- (and 1 more)
-
Good work, Peter. The nice lines of The Pickle are beginning to show. Martin
-
Very tidy work, Bob. Your skill is matched only by your patience in turning out such exemplary rigging. Cheers, Martin
-
Looking good, Peter! That's a nice smooth hull. Remind me what the top layer of planking is going to be. Martin
- 293 replies
-
- 1
-
-
- pickle
- caldercraft
- (and 1 more)
-
I don't know, Toni, when I zoom in on your stern, those planks look pretty close to being the same width -- and pretty doggone close to perfect. Your point about pulling up the first layer is worth considering (what am I saying?! it sends chills up my spine!). I'm hoping to get a few hours in this evening, and then I should be able to figure how much or whether to pull up. It's supposed to be quite warm this weekend, and my farrier is coming out tomorrow, so tonight will be my one shot for a few days. Cheers, and thanks for the advice. Martin
-
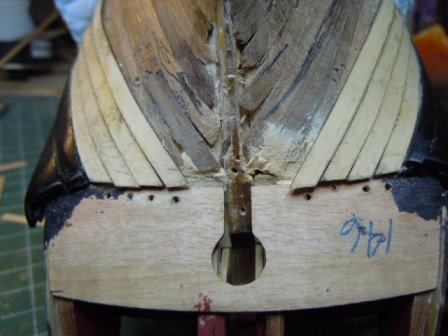
Thanks for checking, folks, your comments are all very helpful and encouraging. BE -- My boxwood planks are 5/32" which I believe translates into a skosh over 4mm (I'm well behind the rest of the world in converting over to the metric system, that blasted Napolean!!). I believe the difference between your stern and mine begins with my wales, which go further under the counter than yours, so that 10 rows here would be nigh on impossible. 1/64" is a tiny amount, but would (theoretically) make the difference. Spy -- The picture I included doesn't show the fact that I have also laid 8 rows of planking from the keel upward, and one of these includes a stealer. If I need to put in another stealer, my guess is that it would be right there at the turn as you suggest. Since the planks from the keel upward aren't tapered, I worry that the stern would look odd having wide planks at top & bottom and narrower ones in the middle. Toni -- 75% of 5/32 would get the plank down to a bit under 1/4 (something like 7/64). If I tapered the last 2 rows that much, would they look too skinny compared to the ones outside? Your suggestion sounds straightforward and much less distressing than pulling up the aft parts of all 4 rows, but I still worry about the appearance of inconsistency. Really, you folks have all given me plenty to think about. My sense now is that maybe I don't need to redo the whole area under the counter. I'm all for having to redo as little as I can get away with -- AND this build is very much a step in the education of my understanding of ship architecture and in the development of my skills, so my primary aim is to get something that looks good and that is at least close to being accurate. Time in the boatyard is tight, but I'll devote at least the next session to some study, trying to come at it with a fresh, unjaundiced eye. Thanks again for the advice. Martin
-
For my top layer of planking, I want to use boxwood, unpainted and uncoppered. Maybe that's a bit too ambitious, since I am figuring out that it means the planking has to look pretty doggone good. And that means that I, the planker in question, have to know how each strake I lay affects those following. I have no problems with going slowly, though pulling up work tends to have a demoralizing effect on my hobbyist's psyche. So here's where I am: I have laid the band that extends from the keel upward, and am halfway through the band that extends from the wales downward (leaving the middle band, which theoretically will be the easiest of the three, since all the real problems will have been solved by then). Because we've gotten some much needed snow here in the prairie (we're in the seventh year of a drought), this past weekend I got to spend indoors and in the boatyard. I've been thrilled with seeing the boxwood slowly move down the hull from the wales. Until I got a reality check: It looked good, until I began to wonder how the 4 remaining planks were going to fit into the space left in the top band (those pencil marks on either side of the stern post are the rough limits between the top & middle bands). In my opinion -- based wholly and solely on aesthetics, since I've found no kind of authoritative statement governing this one detail -- the planks meeting the stern counter should be all of the same width. That means I can't start tapering now, but should have done so from the wales inward. So both sides need to be redone. By my calculation these 5/32 inch planks need only to be tapered by 1/64 inch each. An astonishingly small adjustment, but one that should (I hope, oh, I hope) make all the difference. So, here goes. Cheers, Martin
- 467 replies
-
- 1
-
-
- fly
- victory models
- (and 1 more)
-
Beautiful work, Bill. You are the Master! Cheers, Martin
-
Straight, vertical masts, taut stays -- oh, what a lovely sight! That is exactly what makes the tedium of tying thousands of tiny knots worth it!! Cheers, Martin
-
Jon -- Take all the slack you need, but just don't transfer it to the rigging -- ha! My first exposure to Bob Hunt's practicum was the rigging volume for the Ratt -- it got me through my Prince, and I don't know that anything else wouldhave at that point. And now, with 2 under my belt, my memory is that even 5 hands wouldn't be enough! But at the same time, I found that I could get a rhythm going so that the lines & tension made sense at the level of body memory. I don't mind rigging, but when I'm doing it I really miss working with the wood. Keep at it, pal, everything you've done so far looks great. Cheers, Martin
-
I think moving the shroud off and back onto the model creates a big margin for error. The only way I found to seize deadeyes -- along with all the other knot-tying that goes into the shrouds and rigging generally -- was to get 2 pairs of fairly fine tweezers, and to become very used to them. Once you get to the numerous lines that pass under the tops, you find that you just have to have something smaller than fingers, and longer. It's easy to undrestand why so many people just skip the rigging altogether!! Cheers, Martin
-
Jon -- I can't begin to count the little pieces that I dropped down into the hold of my own Rattlesnake. You're absolutely right that you'll never get it back, but you can always enjoy the rattle it gives your Snake!! The only way I managed to get my deadeyes lined up was to bend a piece of stiff wire -- I used a paper clip -- to the distance I wanted, and then hold the 2 deadeyes together while tightening the shroud to the desired tautness, and clamping the loose end up high enough to the taut end; only then would I wind the line through the 2 deadeyes. And I would still often have to make adjustments. But, on the other hand, there was a long discussion back on MSW 1.0 about whether or not the deadeyes should line up at all, since a working ship would always be adjusting the shrouds. Cheers, Martin
- 974 replies
-
- 3
-
-
- rattlesnake
- mamoli
- (and 1 more)
-
It's good to see you back in the fray of a build! That's interesting research and some sharp thinking about the necessary adjustments. I'm going to be paying attention to your progress. Cheers, Martin
- 293 replies
-
- 1
-
-
- pickle
- caldercraft
- (and 1 more)
-
Beautiful rigging, Bob, the black accentuates the sharpness of your work. I'll second Mobbsie's theory -- here in Oklahoma we use the AC full blast all summer (roughly 10 months), and the heat in the winter, and I watch my rigging go through the same process. The trick is to rig only during the AC season, to avoid bending spars or masts! But that also tells you what's happening with the wood. Cheers, Martin
-
Tea with honey, Nils -- that won't cure your cold, but it should help you rest. Great shots with loads of details. Cheers, Martin
-
Love the crowsfeet, Bob. Did you set up a jig for the euphroes? They look nice and regular in the spacing of the holes. Cheers, Martin
-
Very, very nice, Nils. I like that touch of putting the candle in the lantern!! And I can't help but admire and envy your draughting skills -- your drawings go a long way toward planning everything in advance to plan the sequence of rigging and belaying. In my rigging I've had to lay out narrative plans that help some but not visually. Your build log will always provide other Fly/Pegasus builders with plenty of guidance. Cheers, Martin
-
Toni -- I just can't help but weigh in here on those display cases: wonderful cases for some wonderful builds!! Mahogany, no less -- oh boy, I'm GREEN. Cheers, Martin
-
That's one terrific mouse, Jon. Looking back, I wish I had tried something like your method instead of the wooden version Bob does -- the built-up version really looks great. There's a good chance I could give you a run for the money in the Bad Eyes department. Don't you have an opti-visor? I've become addicted to mine, and have even begun considering getting a 2nd. Cheers, Martin
-
Congratulations Peter This is a beautiful build that has given novices like me plenty to admire and learn from Your pictures show lots of terrific details. You've got to be both proud and (maybe) a bit sad to say goodbye to your lovely "Hipposwan" -- at least as a build. And by the way, I have found Wolfram's book in my library -- in English, I'm afraid, since I'm pretty lazy. Best, Martin
- 431 replies
-
- 1
-
-
- pegasus
- victory models
- (and 1 more)
-
Fine work, Nils. It's those 2 clove hitches that I've always found to be the most difficult, since they're the ones that too often end up being overly taut or slack. You've got your technique down! Cheers, Martin
-
Hi Mike -- Thanks for the compliments, they mean a lot. I'm not planning on very much color at all. I like the decorative friezes that I've seen on other Swans, but I also find myself drawn to the look of an almost entirely boxwood build, even without the "gold" decoration provided in the kit. So this will be a pretty plain Fly. My Rattlesnake build followed the painting in wood mode, which was interesting in giving me experience with the different woods, though when I look at it now, I'm not sure how successful I was. With this build, I have used holly for the planking, and originally thought of ebony for the wales, but was dissuaded from that idea by a number of more experienced folks; and I had also thought of redheart for the gun carriages, but in choosing Chuck's carriages I learned about the Cranberry stain from GF, and will simply do that. So, apart from those details -- and maybe some of the rails -- I'm hoping to stay with the nice warm tone of boxwood throughout (if my supply holds). But I should also mention that I fear I've put additional pressure on myself to get the planking to look as nice as possible, since I'm coppering the bottom. I'll update the log a tiny bit by saying that I have put the poly urethane down on the wales -- 2 coats each side so far. I was unsure about using Minwax wipe-on poly on top of the water-based GF stain, but the label on the stain says it will work, so I did it. The cloth I used for the poly did take up some of the stain, but so far everything seems to be working. Cheers, Martin
- 467 replies
-
- 1
-
-
- fly
- victory models
- (and 1 more)