HOLIDAY DONATION DRIVE - SUPPORT MSW - DO YOUR PART TO KEEP THIS GREAT FORUM GOING! (Only 44 donations so far out of 49,000 members - C'mon guys!)
×


Martin W
-
Posts
1,412 -
Joined
-
Last visited
Content Type
Profiles
Forums
Gallery
Events
Everything posted by Martin W
-
 Looking good, Peter. So, in making the transom bigger, are you planning on some decoration? cheers, Martin
 -
Here you go, Dave: http://modelshipworld.com/index.php/topic/1048-rattlesnake-by-martin-w-mamoli-kit-bashed-164/ I'm not the most disciplined keeper of build logs, so you'll see plenty of details skipped over. I also believe there are some pictures missing; Jon was good enough to recover them and send them to me, but I haven't found the time to put them back in. Still, you might have some interest in seeing someone go through the same process as you. Cheers, Martin
-
Hi Dave -- I just now caught your build log, and have to admire your work. The Rattlesnake is a lovely ship, and Bob Hunt's practicum can guide you through lots of steps in ways that can build your skills. Jon has done a great service documenting all the errors, so heed his word carefully! As for cutting the razor blade, my experience was very close to yours. The 2 biggest problems I faced (on repeated efforts) was cutting the razor blade to a consistent pattern, and getting the width just right. I always seemed to make it too wide for the stock, which resulted in wobbly molding as the wood wandered. Coincidentally, I'm just about to make some molding for my Fly, and am going to try using my mini mill in a set up similar to what Jon has described using the Dremel drill press stand. Good luck -- I can't wait to see more of your progress. Martin
-
Thanks for that, Spy, it's useful information. I had not thought about how high the gallery strip should sit -- I think I had just lined up a curvey bit along the top with the gunport strips. I hadn't thought at all about the windows! Hmmm, now I'll need to look at everything all anew. Cheers, Martin
-
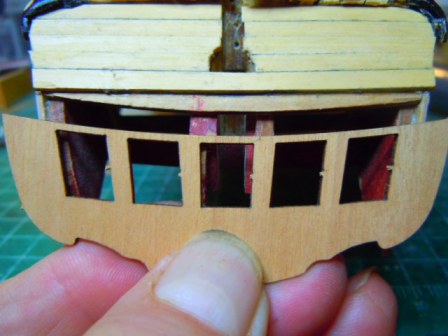
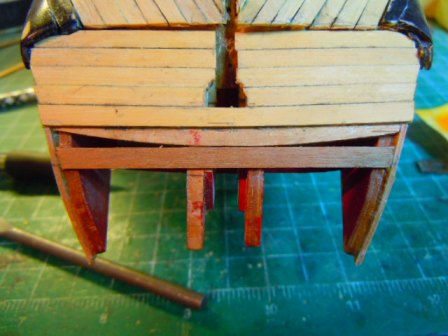
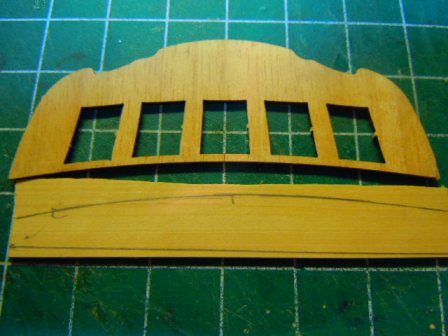
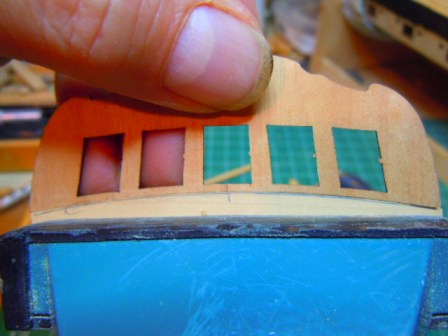
Hi Folks -- I was supposed to build some new steps off the back porch today, but the rain kept me from that tedious job. So instead I put my new Proxxon micro lathe through a few trials, but still the matter of the stern gallery kept nagging at me. In I came and sat at the boat yard. (I'll post photos of my new toy soon!) This is an issue BE mentions in his log: there's sizeable gap between the stern counter and the thin ply strip for the gallery: Planking the counter upward (or downward, since everything is upside down) means that the gap also leaves nothing to lay the boxwood planks on. So I cut a piece of the kit-supplied walnut stripping and glued it in just to give myself a foundation: The next step was to trim a piece of boxwood that would match the curve of the gallery strip. Easy enough -- I simply traced the curve of the strip onto a wide piece of boxwood . . . Then I got out a chisel and trimmed it down (and let me add this -- every time I use these chisels I love them even more: Look out Bounce! You might have some competition! ). And voila -- Nice fit, if I do say so. But then, as I began to think about how this final plank and the gallery strip would line up, I thought I should make sure everything would be level and balanced. The best way to check, I sez to meself, would be to put the quarterdeck in to see how it would all come together. Well, it's tight -- Ohh, nuts. That extension just came off way too easily. But maybe it was for the best, because the "mishap" made me start seriously sighting down the supports for the quarterdeck, as well as the gunport strips, and I realized that I needed to quite a bit of trimming to get everything copacetic here (I have a picture, but for some reason, every time I try to load it, MSW's fire wall blocks it, so I'll ask you to use your mental image of an uneven foundation for the q-deck). I see some filing, sighting, and filing in my future. Let's hope it keeps raining. Onward! Martin
- 467 replies
-
- 2
-

-
- fly
- victory models
- (and 1 more)
-
Looking good, Jon. Now you'll get to start tying everything off on the ship itself, and see just how tight things get. Joking aside, you'll probably want to get used to using some fine, long tweezers -- it's just about the only way to get into the spots under the tops, etc. Cheers, Martin
-
I can't help but notice that Greg's has a halter on to go along with the less flamboyant mane. If the two versions reflect the respective characters, then Ben's is wilder and un-haltered! They are both stunning little works of art. Cheers, Martin
-
Hi Nils -- Yes, she is a beauty. With all her sails, she makes an imposing figure! Cheers, Martin
-
Bravo Bob, Bravo! Yes, this was a challenge, and all of us who avidly followed your build admired your skill and care in resolving all the issues. Not only have you completed a great build, but your log will provide guidance for anyone thinking about taking on the Essex -- if anything, you have improved the kit! Encore Bravo! and good cheer with the Cheerful! Martin
- 1,477 replies
-
- 2
-
-
- essex
- model shipways
- (and 1 more)
-
Hi Jon -- I just got caught up on your log -- those ratlines look pretty good there. That can be pretty tedious going, so you'll be happy when it's done! One trick I learned for getting the deadeyes more or less even is to make a gauge with some stiff wire (I used a paper clip) that you can put into the top sheave hole of the bottom deadeye and the bottom hole of the top deadeye. Then, starting with a very long piece of line for the shroud so that you can double it, pass the shroud around the top deadey; you can then pull the shroud taut around the deadeye and clamp it with an alligator clamp (I used 2 spaced about an inch or two apart to ensure against any slipping). Then you can seize the shroud around the deadeye, and make any adjustments after you pass the lanyard through. I found that it's pretty important to get some diluted white glue on the seizings and lanyards right away, because they all want to slip (since I dyed the line I used for all standing rigging, it tended to have a kind of oily texture that I had to battle against). And it's also important to do the corresponding shroud for the opposite side to keep the tautness without bending the mast. The "good" thing about rigging is that with 3 masts you have plenty of practice on each step. Cheers, Martin
-
That's a good plan, Mike. I think you've worked out a color scheme in which all the differenct shades will complement one another nicely. As for the spiling, well, once I realized that it was something that needed doing, I understood that almost every plank required it in order to lie flat against the hull. But even still, I ended up with several that twist out at the butt joint. Ai yi yi! But this Fly will be docked permanently in my house. Can't wait to see updates on your Pegasus! Martin
- 467 replies
-
- 1
-
-
- fly
- victory models
- (and 1 more)
-
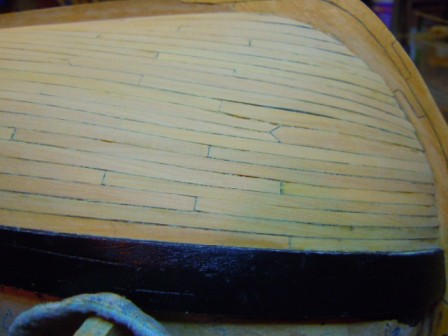
Hi there Mike, it's great to hear from you. I did indeed use pencil between the planks, since it provides the dark edging without much smeaing. As for treenails, my original plan was to put them in, but now I worry they would only highlight all my errors, so I'm giving them some thought. It's also been such a long, long time since I've seen the Fly upright, that I'm getting eager to get to the upper planking. The upside is -- as you point out -- that the shape of the Swan hull is so nice that even my inept planking can't take too much away from it. I like the look of the coppered hulls on other builds, and I definitely want to do that for some future build. But here I'm still trying to stay with the all-boxwood look. And as someone who's really just learning these basic skills, I think I would benefit from keeping as much of this planking in view as possible, in hopes that I will be able to anticipate problems the next time. I'll be looking forward to seeing your own progress! Cheers, Martin
-
Thanks for the nice words, BE & Nils, and thanks for the likes. BE, that's good advice, I'll give it a shot, especially since I currently have a large stockpile of boxwood dust. Cheers, Martin
-
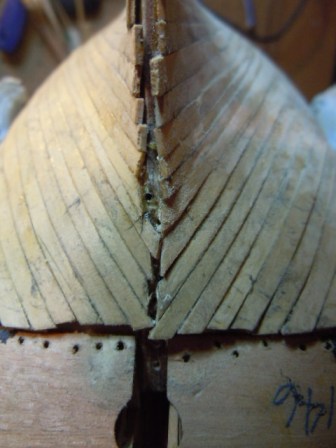
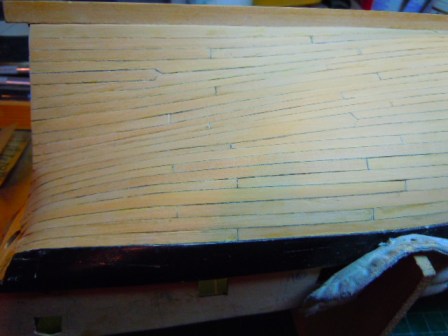
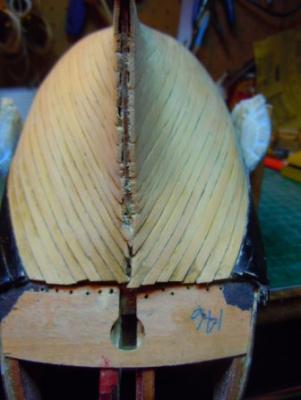
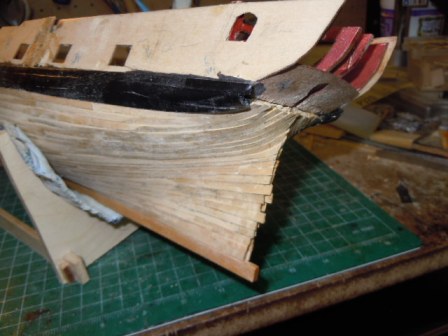
Hello Everyone -- For the past few weeks I've been out in beautiful Taos, New Mexico, sojourning in a little adobe cottage: It was as cute as could be, and pretty luxurious, despite its utter lack of internet availability. I took along the gun carriage kits I'd bought from Chuck some time back, and I thought I'd spend the quiet evenings taking care of the repetitious matters, like drilling the holes for all the eye-bolts. But after getting though about 4, I decided to do a trial with the black wire, and found out that the bit I'd brought was much too big. Instead of progressing on my build, I just watched the sunsets: But now I'm back in the flatlands and have proceeded to sand my hull planking. Before starting the sanding process, I had been able to hope that with sanding all the bulges and gaps would disappear. Oh well, here are some views of the current state. First the bow (port side): Here you can see the drop plank, and the trouble it caused me. Next the stern with stealers: And finally a view of the rudder post: I still need to do a bit of trimming, and golly, I'd really like every thing to look a lot smoother, but I've already worked my way to the 400 grit paper, so I'll have to see. I've also discovered in the sanding process that I'd let glue seep out from between the planks here and there, so that I needed to scrape it off with a dull blade. In doing so, I scratched the boxwood in places that I'm also trying to smooth out. That's it for now -- the workshop is filled with dust, and even my mask doesn't seem to keep everything out of my lungs. cheers, Martin


- 467 replies
-
- 3
-
-
- fly
- victory models
- (and 1 more)
-
Toni -- This is a bit tardy, as I've been out of town, and just this morning picked up my own dear Bounce from the boarder -- but I do have to say that it is sad to hear about Sadie. There aren't many things we do that are harder than deciding when to say goodbye to a friend. Martin
-
Fine looking planking, Peter. Those carronades do indeed look smallish, but the Pickle was also something of a small vessel, right? Cheers, Martin
- 293 replies
-
- 1
-
-
- pickle
- caldercraft
- (and 1 more)
-
Hi Mike -- I just got into town and am catching up. Your progress looks really good, and the lines for the wales look spot on to my eye. Someone suggested to me that using high-grade wood for the wales is something of a waste, since they're stained black, so I ended up using a good bit of wood from the scrap pile, including some holly that was loads easier to bend and shape than the boxwood. And there's nothing wrong with ambition -- challenge your skill level, and you'll only raise it! Can't wait to see how it pans out for you. cheers, Martin
-
Hi Mike -- I did my wales in 2 layers to build them up. In hindsight, I think I would have been just as happy, maybe even happier, using thicker stock and just going through the process once. My 2 cents. Cheers, Martin
-
Fantastic, Bob, really well done. As for drilling the sheave holes in the blocks, that's what I had to do with Lloyd Warner's blocks as well, so it seems to be the nature of the beast. Congratulations! Are you going to use Chuck's lantern? Cheers, Martin
-
That's a nice idea, Jon. I think I might have use wire as well, and then had trouble keeping it straight as I the futtocks in place. Of course, I didn't use music wires. Cheers, Martin
-
Nice start, Peter. How did you get the waterways to make the bend -- scarph joint? Cheers, Martin
- 293 replies
-
- 1
-
-
- pickle
- caldercraft
- (and 1 more)
-
Thanks for checking in guys, and thanks for the kind words. Nils -- No, I won't be coppering. My plan all along has been to build this almost completely out of boxwood, and to keep the boxwood visible. In the end, it will probably be a bit plain, but since I like the color and fine grain of boxwood, it will be ok. And I hope that what I see is indeed the end of the tunnel, and not some ghastly error I'll need to correct!!! Mike -- Well, I started off with TFFM in plain sight, and basically followed it as far as the wales. But that hooked plank at the bow right under the wales intimidated me, since it would have required spiling and fitting at a skill level much higher than mine. I hit on the butt pattern basically by working out a standard length -- which happened to be 4 7/8" (actual length) -- and then I more or less adapted that to the TFFM breakdown. I started at the keel with the garboard strake, and then used the butts on that to set the pattern for the rest of the hull, basically by setting up a chart of the calculated number of strakes on the entire hull (23), and using the chart to set the butts when I started the band moving from the wales to the middle. Surprisingly, the chart ended up being accurate -- my errors came from not calculating individual plank widths accurately. Good luck on planking your Pegasus -- I'll be following your progress. Bob -- Thanks for the warning. I'm using a sanding block with no abrasive on the sides so that I can get fairly close to the wales. Already, though, I've scraped off a bit of the stain -- grrr! Cheers, Martin
- 467 replies
-
- 2
-
-
- fly
- victory models
- (and 1 more)
-
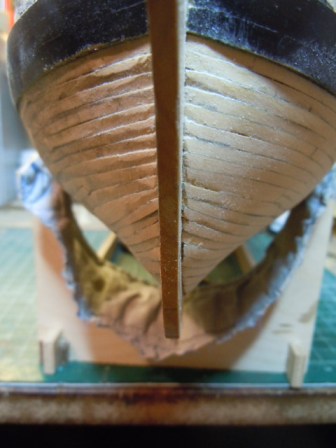
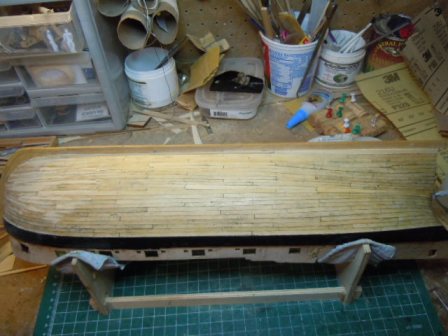
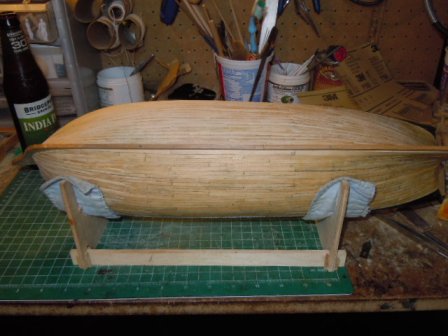
Hello Everyone -- Looking at my notes, I see that I started the first planking back in October, and the second planking in December. Well, yesterday afternoon at 16.44 (CDT -- I'm not sure how that translates into Greenwich Time, 1.44?) I finally laid the last plank. My feelings can best be summed up in the simple, "whew." When I set out, my aim was to learn as much about the necessities of planning ahead, of spiling and of possibly achieving symmetry between the two sides. Ok, I got lots of practice spiling, since virtually every plank at the bow & stern required it, and many of those amidships too. I planned ahead by dividing the hull into 3 bands, and calculating that the bottom, from the keel upward, as well as the topmost from the wales downward would each have 8 strakes, while the middle would have 7. I measured at each bulkheard and plotted the width of each band, and figured the width of the planks passing along those points. Seems logical enough. Logic and reality don't always match. A wee little mistake in, say, strake 3 will grow into a problem by strake 6, and the correction very likely creates another growing problem. Ok, to the pictures. Please feel free to comment (though believe me, I've already muttered "aw, phooey" plenty of times). Don't mind the clutter. Here's the full view from starboard: And here's how Leviathan would see it from the sea-floor: And here's the port bow, where you can see the drop plank. Here's the bow: The port side shows some sanding, while the starboard is still rough. Here's the port stern, with stealer: And this is the sternpost, which I include to show all the folks who offered their advice on maintaining a semblance of symmetry: There's still lots of trimming to be done, so that the whole area looks worse in the photo that it actually is. It's all far from perfect, or even from being very good. At times I wondered if a pair of proportional dividers would've helped with the planning ahead, but their price tag kept me in the wondering mode. I've also considering covering it up with copper, but then decided I should keep it exposed to study for my next project (since I anticipate getting to the planking on whatever that ship will be sometime around 2020). And there's my last 6 months! Our house is covered in dust from renovators (the tile layers generated mountains of white powder), so this would be a good time to sand. But in two days I'll be driving out to beautiful Taos for a 2-week sojourn. I'm thinking of bringing the gun carriage kits along so I can spend the quiet evenings assembling them, and then I'll avoid separation anxiety. Cheers, Martin


- 467 replies
-
- 2
-
-
- fly
- victory models
- (and 1 more)
-
Peter -- I recall drinking some outstanding wines from the Ticino, and in Zurich I drank some whites, but can't recall what they were. Here in Oklahoma, some folks are trying to produce wine, but they haven't worked out the variety that can handles clay soil, little water, lots of heat, and more wind. Switzerland has always been one of my favorite places, and for countless reasons (I remember waking up one morning on a foggy mountainside, hearing the cow bells, and thinking it was as close to heaven as this swab would likely get). cheers, Martin
- 293 replies
-
- 1
-
-
- pickle
- caldercraft
- (and 1 more)
-
Very interesting, Peter. I think the cedar that was once common in buildings here was in fact juniper, and belonged to the cypress family. Most of the big pieces of wood (such as those used in my house) came from the Western Red Cedar, which grew into large enough trees to be logged for lumber. Those have been mostly depleted, since the lumber was sold inexpensively. Here in Oklahoma we have a smaller variety, the Eastern Red Cedar, which is a pest, since its oily wood becomes a serious threat during the range fire season. We mostly cut them down, and then grind them up for garden mulch. So, yes, American cedar is different from what we call the Cedar of Lebanon, a member of the pinaceae family. And frankly, I'll go out of my way to avoid working with American cedar -- it's too soft and splintery, very splintery. I don't know how it would hold up on a ship, though I do recall admiring a canoe that a friend made from cedar strips. Wood is ever interesting. Cheers, Martin
- 293 replies
-
- 2
-
-
- pickle
- caldercraft
- (and 1 more)