
HOLIDAY DONATION DRIVE - SUPPORT MSW - DO YOUR PART TO KEEP THIS GREAT FORUM GOING! (Only 20 donations so far - C'mon guys!)
×


Martin W
-
Posts
1,412 -
Joined
-
Last visited
Content Type
Profiles
Forums
Gallery
Events
Everything posted by Martin W
-
 Thanks for checking in, everyone, and thanks for the likes. Per -- I am setting the linings in as you say, just the thickness of the plywood. The point, according to FFM, is to allow the outer planking to serve as a rabbet for the gunport lids -- as Spy suggests. And Spy, my understanding is that the inner planking goes over the linings, and that's the point of doing the linings first. And now that you mention that about the sweeps, I begin to recall that that's how I did the Rattlesnake. It would definitely be easier. Cheers, Martin
 -
But not only Will You know that there were issues, you'll also know how cleverly you dealt with them. Your progress looks really good. Martin
-
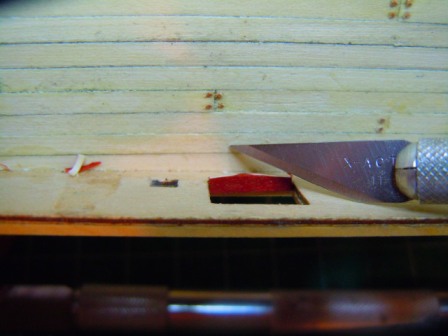
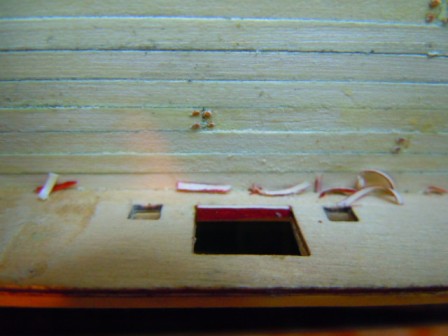
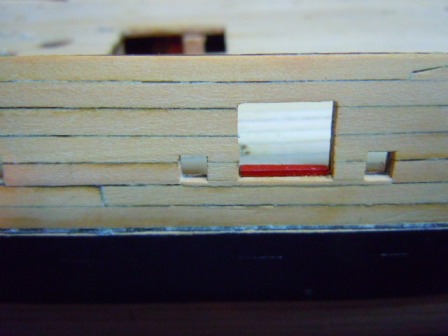
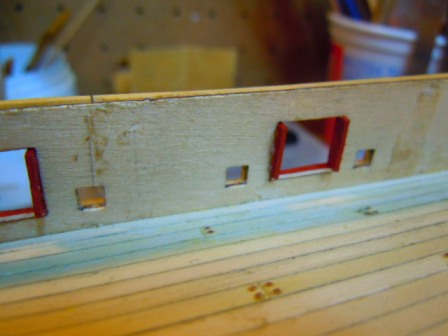
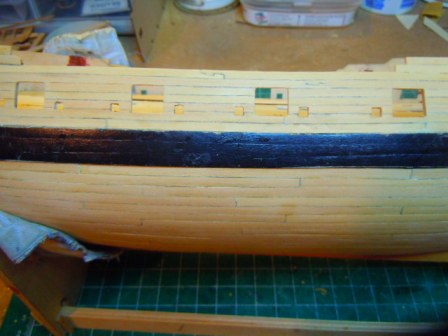
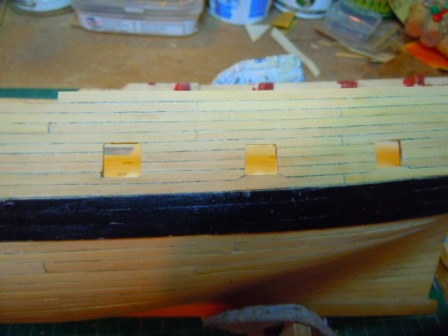
The gunport linings/sills: I found some thin stock left over from my Rattlesnake, and decided that with staining it would work fine. It's 1/16" holly, which means that at a crucial step its softness comes in handy. First I measured and cut the bottom pieces, since the measurements for the 2 side pieces will come from these. After staining them with General Finishes Cranberry, I glued them in. Once the glue dried, I trimmed them flush with the inside of the plywood. This is where it's nice to have a softer wood to trim, since the lining is attached to nothing more than the width of the plywood. I worried that I'd pull at least one lining off, but with a new exacto blade and some luck, I got through them. These shots require the acrobatic vision of a modelling deity looking down from above, since no 1:64 scale shipwright would be able to reach in and down. Here's the more quotidian view from outside: Next I measured and cut each side lining, stained them, and glued them in. Here is a midship port waiting for the two sides to be trimmed: My decision to line all the gunports had more to do with aesthetics than anything -- I simply think they look good lined, and the red makes for a striking splash. But according to FFM, even the sweep ports get lined. We'll see how that works out. Cheers, Martin
- 467 replies
-
- 4
-

-
- fly
- victory models
- (and 1 more)
-
Those gunports look neat, Per. The planking all over the bulwarks also looks very tidy. And we all learn everyday that there's always a lot to do. Cheers, Martin
-
Hi Mike -- These chisels are absolutely only to be used with hand pressure. They really should be considered high quality precision knives for doing the small, detailed work we do. I just bought a sharpening system from Lee Valley; I haven't used it on these small chisels yet, but I did try it out on my full sized bench chisels, and had amazing results. These cheapo tools now have edges sharper than a razor! I fooled around a few minutes on Sunday with a piece of scrap, acting as though I were cutting a tenon in a 2X4 and got very precise cuts. It was one of those moments when the scales you hadn't even known were there suddenly fell off my eyes. I have that exacto chisel, and use it quite a bit, though mostly for the chopping action. Spy -- Thanks for checking in, and for the nice words. They do matter. I'd love to see more progress on your Peg, but your careful and attentive work on the Pickle continues to provide real guidance. Cheers, Martin
- 467 replies
-
- 2
-
-
- fly
- victory models
- (and 1 more)
-
Thanks for that, Mike. I did indeed use GF black stain. It goes on well, as you should know, being a GF fan yourself. I've noticed that plenty of other folks speak highly of the Fiebings, but haven't ever tried it. As for the treenailing, well, I'm of two minds, or maybe one and a half: I think they're good looking, and even add one of those miniscule touches of authenticity & completeness. For my Rattlesnake, I went for the Cadillac look and use contrasting walnut for the treenails on a holly hull; and I did the same for the holly planking here. I had planned on using bamboo on the hull, and with the aim of getting the treenails down smaller than I ever managed with the splintery walnut. But my planking on the lower hull has enough issues that I fear any treenailing would just call attention to this Fly's questionable sea-worthiness. I might still put them on the bulwarks. But I would also really like a break from planking. You might try cutting the top & butt planks with a sharp chisel. Then you can use one plank to trace the pattern for its mate. Once I realized a chisel can cut like a plane -- it's not just a chopping tool after all -- I fell in love with it. It's more manageable than an excacto, and far more accurate than sanding or filing. I mostly use a 1/8 inch dovetail chisel from Lee Valley Veritas. Have a look: http://www.leevalley.com/US/Wood/page.aspx?p=46035&cat=1,41504 Cheers, and I hope you enjoy your T&B planking -- it can be satisfying. Martin
- 467 replies
-
- 2
-
-
- fly
- victory models
- (and 1 more)
-
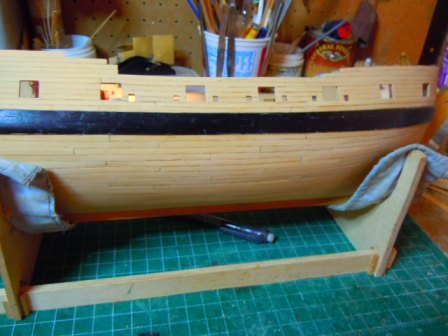
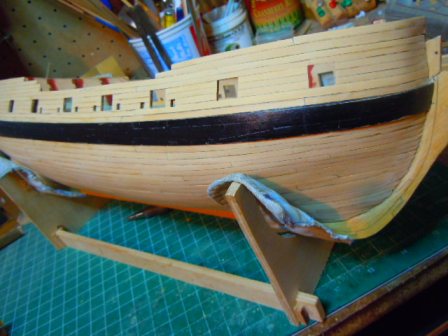
Just the quickest of updates. Planking on the outside is coming to a close (happily). I've pretty much wrapped up the starboard bulwark, and cleaned up the gunports. Here are a few shots. First a full-on view broadside: Next the starboard bow: The Quarterdeck: And here's the one hooked scarph joint for this side: My basic plan held true for this side, more than for the port. A few slight adjustments here and there, but it mostly went smoothly. Perhaps one reason was that the holiday weekend meant that I could spend full afternoons at the task rather than having to come back over several days. Per -- Yes, I'm trying to stay with boxwood pretty much throughout the build. Parts of the wales are holly, since I knew I'd be staining them, and I had more holly at the wider dimension than boxwood. As I think more about those linings for the gunports, I'm again considering holly. I have some remnants from my previous build that are thin strips, and I am testing them with stain to see how red they can get. Cheers, Martin

- 467 replies
-
- 2
-
-
- fly
- victory models
- (and 1 more)
-
Hi Russ -- That wheel is interesting. Could you give us a few details on its construction? What materials did you use? Cheers, Martin
-
Stunning coppering, Peter -- I agree that you should double the guard against possible thieves. And I, too, will be very interested in your project of shortening the launch. Capt Aubrey had some radical notions! Cheers, Martin
-
Mike -- I followed the butt pattern of TFFM pretty closely for the wales. The lengths actually made quite a bit of sense as I worked out the angles of the T&B pattern. It really wasn't as tricky as you'd think, or as I thought before I started doing it. In fact, I felt so cocky that I had dreams of doing the top rows of planking below the wales in T&B as also shown in TFFM, but once I got underway with the spiling that dream faded prontissimo. Really, once you work out what the widest part of the plank will be, and what the narrowist part will be, you've basically conquered the process. A few weeks ago when we were having our bathroom remodelled, the contractor saw my earlier build and spoke flatteringly of it, so I showed him my FLY. When I tried to point out the T&B planking of the wales, I realized that with the black stain, that pattern was virtually invisible. Maybe I slathered the General Finish stain on too thickly. (But it's taken some bruising during this planking.) Cheers, Martin
-
Three cheers for modifications!!!
-
Nils -- I have that Proxxon sander and love it. It works like a random orbital sander, and with those triangular sanding sheets, it can reach into tight areas. It does put out a lot of dust, but that's an indication of how much wood it's taking off. Your work is exemplary. Martin
- 2,625 replies
-
- 3
-
-
- kaiser wilhelm der grosse
- passenger steamer
- (and 1 more)
-
Thanks for the comments, guys. Nils, I appreciate your kind words, and am humbled by the overwhelming evidence of your own craftsmanship. Mike -- You're no doubt correct about the light: my workbench is set up in the safe room (next to the beer fridge), and there's only one bare bulb in the ceiling, and then my work light. I should either put in a new ceiling light or move the model before I photograph it. My point & shoot is a Coolpix, and I honestly don't know if it has a big light sensor or a small one, but I can say that I wouldn't recommend this particular camera to anyone -- outdoors the viewing frame tends to go black, so pictures are a guess. And indoors it always wants to flash. In volume 2 of FFM, page 69, the sills, or linings, or stops (surely there's at least one other term?!) are said to act as a rabbet for the lids. This makes me think that they sit back from the outer planking. The same paragraph also says, "the upper edge of the spirketting should be at the same level as the tops of the lower sill stops. The quickwork will be flush to the inner surfaces of the stops at the sides of the port." So that would mean that I should install these sills/linings/stop/whatever before even starting on the inner planking. It makes sense, Spy, that there would be linings only on the ports with lids. But FFM says that all the ports, plus the sweep ports, get them. Hmm, those sweep ports are pretty tiny, so I'll have to see how things go. The heat has begun here on the prairie, so I'm staying indoors, and will get in some extended planking time. Cheers, Martin
- 467 replies
-
- 3
-
-
- fly
- victory models
- (and 1 more)
-
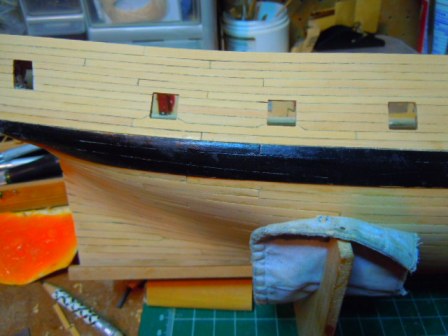
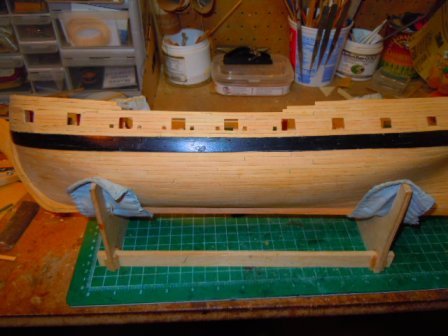
Just a quick update: most of the upper planking is now in effect complete. It goes much faster than the lower planking, since the hitherto hated plywood gunport strip provides a solid base to plank onto, and it's not as geometriclly complicated as a curved hull. After making a few rough calculations, and working out just a rudimentary chart, I figured that the usual 5/32" wide planks used on the hull wouldn't work out up here, creating issues with the vertical spacing of the ports, and the overall space of the bulwarks. So I cut a bunch of my 5/32 strips down to 1/4" and they seemed to work well, with a few exceptions. For the tapers going up to the ports, I had to rely on wider stock, of course, and then shape it with chisels. First a general broadside view of port: (All views are of the portside, because the starboard isn't quite done.) And here's a shot of the bow: Midships: FFM has a fancy hooked scarph joint on the top row here. The butting pattern shown in FFM seems to have continuous planks in places that didn't seem to work out; the window for the Captain's Cabin created an issue as well. So what I'm leading to is that I needed a butt in the second row (actually FFM doesn't have this row), so I put in a hooked scarph there as well. Maybe it's a bit too much -- more in the roccoco mode than the baroque which would have governed the architecture of these beautiful ships, but I bowed to exigency. Finally here's the Quarterdeck: Blue Ensign notes that the two aft-most ports are smaller than the others, and I heeded his comment here, though I do think that last one does need just a wee bit more opening. There's quite a bit of trimming to do, but I'm leaving that till I plank the inside so I can trim both in & outer planks simultaneously. Here's a question: should I line the ports with their sills before I lay the inside planking? I'm thinking that since they need to be stained red, I could save myself some heartache, and since everyone who's done that step has hinted that it tends to lead to a degree of tooth-grinding I'm thinking that I could set them in and plank up to them. Oh, and if anyone has suggestions on how I can get my pictures clearer, I'd appreciate. Criminey, I don't think my hands rattle so much that every shot has to be blurry, but I just can't get them as clear as I see on other logs. Cheers, Martin

- 467 replies
-
- 3
-
-
- fly
- victory models
- (and 1 more)
-
I got my set of FFM one volume at a time, full price from Seawatch. I refer to every single volume -- #3 by Greg Herbert on a scratch build provides plenty of information on basic construction. While rigging my Rattlesnake, I used the rigging volume of FFM so much the pages began falling out. They're all worth the money. In fact, I've started buying some of the books on other ships, mostly scratch build but good books. My two cents. Martin
-
Yes, I know what you mean about giving the ship some weight -- those thin plywood gunports have begun to seen less rinky-dink the more they're planked. I like that shot from inboard of your bulwark planking. It also provides a nice view of your deck planking. Could you give a view of the stern with your alteration for the transom? Martin
-
Hi Per -- Glad you're enjoying the Fly, it's a great kit and a nice looking ship. Your planking is tight and even -- congratulations on that. The gunports all look nice & trim. Is that the kit-supplied lime you're using on th bulkheads? I couldn't quite tell from the photos. I'll be looking forward to seeing your progress! Martin
-
Mike -- Sorry, I think I misread your earlier post. There is indeed an upward sweep toward the stern. I actualy think I did not take my wales up enough (by about 1/16") back there, which resulted in too much of the wales swooping down under the bulwark and to the stern counter. As for the colors you're working out -- I think it'll be a good touch to your build. If you have a waterline marker (they're easy to make if you don't have one), you can put a line on the bulwarks where colors/woods change, and help prepare yourself that way. Maybe. Cheers, Martin
-
Hi Mike -- Glad to see you're embarking on this keystone step. I noticed that upward sweep of the wales on the kit plans, and if you follow the line of the gunport strips, that's what you'll end up with. Because there's a warning in FFM against succumbing to the upward drift -- and it seems to want to happen especially as you're planking from the keel upward -- I worked fairly hard to keep the line of the wales a bit flat. It's not entirely flat, but I measured from the gunports to determine the general placement, and used temporary basswood strips to decide where the wales would actually end up. I sighted the line-up from the broadside, bow, & stern. I still ended up with enough of an upward sweep at the bow to necessitate lots of spiling on those planks just below the wales. But above, the so-called "black" strake and upward -- where I am currently working -- have gone much, much more easily. -- I didn't notice that downward sweep at the stem you mention; maybe it's just where the curvature of the hull actually reaches the part of the bow that flattens a bit? It seems that it's right around BHs 2 - 4 that the most extreme curve happens, and that's where the planks want to bend laterally as well, and consequently where most of the spiling takes place. You might want to go ahead and work out a planking chart, so you'll know how many strakes will fit into the band at each BH, and how much you need to trim each plank to maintain that number. That will also help you avoid having to reduce individual planks below half the common width when you get right up to the stem. The dreaded upward curve will almost certainly lead you to narrow the planks more and more as you work up from the keel and down from the wales. Having just finished my own 2nd planking a month or so ago, I'm still grinding my teeth. Here's the lesson I learned: plan, plan, and plan: then measure, re-measure, and measure again each time you lay a plank to make sure it is the actual width required for that part of the hull. Review your plans and stick to them. Hope this helps a little. Martin
-
YIKES! That circular saw set-up scares me just to look at it. Now I know the truth about you, Nils: you seem like a disciplined engineer devoted to the quiet hobby of ship modelling. In fact, you really like flirting with danger! :o And I thought my chain saw was scary! On a milder note -- the rudder fits nicely. Cheers, Martin
- 2,625 replies
-
- 4
-
-
- kaiser wilhelm der grosse
- passenger steamer
- (and 1 more)
-
Hi Nils -- I've wondered where you've gone, and now I've found you! It's quite a shift to go from the 18th-century Pegasus to this sleek ocean liner, the KWdG. I have just read through your log and am as impressed with your work here as I have been on your other build. I spent half an hour apiece just admiring those propellers! I can't wait to see your engineering knowledge and your building skills come together (with a good splash of imagination as well) on this beauty. Cheers, Martin
- 2,625 replies
-
- 2
-
-
- kaiser wilhelm der grosse
- passenger steamer
- (and 1 more)
-
Help that poor carpenter out, Peter, give him a ladder!
- 293 replies
-
- 2
-
-
- pickle
- caldercraft
- (and 1 more)
-
Well done, Jon. Those futtocks can be agonizingly frustrating, and as you say, at this scale you find yourself wondering why, oh why do I bother with these details? Glad to see you worked out a solution for the hooks, though. I never found a wire both thin enough and stiff enough. cheers, Martin