
HOLIDAY DONATION DRIVE - SUPPORT MSW - DO YOUR PART TO KEEP THIS GREAT FORUM GOING! (Only 20 donations so far - C'mon guys!)
×


Martin W
-
Posts
1,412 -
Joined
-
Last visited
Content Type
Profiles
Forums
Gallery
Events
Everything posted by Martin W
-
 Scott -- I looked through my boxes of remnants last night, certain that I had the cradle from my Rattlesnake kit. I couldn't find it, but I did come across the cradle for my current build, the Fly. Here are the four pieces laid out: You can see how the two end pieces are cut to hold the hull, and the two side pieces are simply the braces for the ends. You can add decoration to the sides, and you can use better wood than this ply that you see here. But overall, this is the basic idea. Hope it helps, Martin
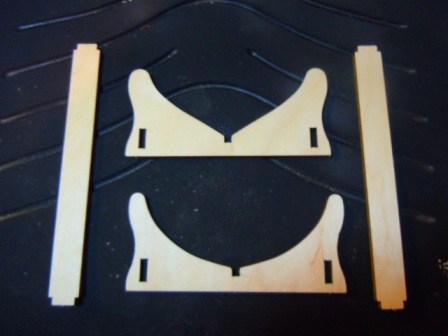
- 264 replies
-
- 1
-

-
- rattlesnake
- model shipways
- (and 1 more)
-
Didn't your kit come with the cradle stand? If it didn't, you probably don't even need the contour gague. Just measure the width of the hull where you want to cradle it, and then cut two matching cradles, with a couple of supports that run fore to aft. You could probably make this from scrap leftover from the bulkheads.
-
Thanks for that, Brian, this looks like a very useful source. Spy, I'm just as surprised about Radio Shack as you are, but I guess people don't build crystal radio sets any more.
-
Well Spy, I checked at Lowe's (there is no Home Depot in my little town), and negative. They do have insulated copper wire, but not in the small gauge I need. I went to the Radio Shack, and they said they had some but were out (and since the chain has declared bankruptcy, I doubt this store will be re-stocking). I'm looking at an online source -- Ages of Sail -- but it's hard to know what they actually are offering. It does seem odd that such an ordinary item should prove so elusive.
-
Spy -- Pretty much all the wire I've seen around here in the hobby stores is sold for jewellery purposes and has a coating that makes it "tarnish proof." I have in fact tried running it through the flame of the soldering device, but not all the coating comes off so that the solder just doesn't hold.
-
So here's a question: I figure the best next step would be to finish sanding the deck, and then lay down a couple coats of poly. Ok. In the meantime, I need to finish assembling all the gun carriages, but they require some wire, both to hold the 2 sides together and for the eyebolts -- plus I need to make the eyebolts & ring bolts along the deck. But I'm having a heckuva time finding some wire. It seems that every where I've looked has coated wire, and it can't be soldered. Suggestions? Cheers, Martin
-
Hi Guys -- Thanks for checking in. BE, to tell the truth, after looking at your chain pumps, I came close to painting mine black; but my overall plan is to keep as much plain wood visible as possible, and as much boxwood as I can. And thanks (twice!) about the fixed block. Jason, thanks for coming by. I've checked out your log on the Snake and have to admire your ability for fine detail -- it's a beaut! Cheers, Martin
-
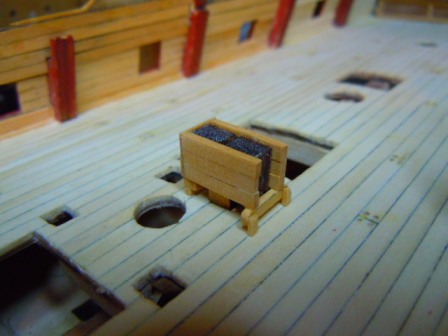
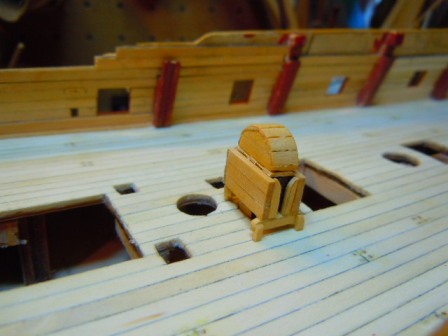
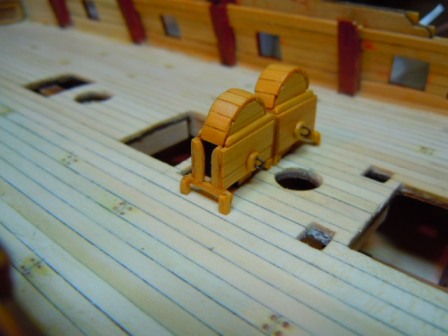
Well, onward to the chain pumps. These I fabricated quite simply (and simply by following BE's lead) through using the kit-supplied forms as the base for a wee upgrade. The upgrade is based on FFM's description of the chain pumps, though mine lacks some of the detail that I'll leave to more experienced masters. First off, here's the kit-supplied form for the cistern, with the tab at the bottom that should fit into one of the square holes in the deck. Since the whole idea of the pumps is to bring water up through a pipe, I'm leaving that tabe to simulate the pipe (let's say, a squarish version of the pipe). The smaller tabs on each side would serve as the feet of the cistern, so I cut those off, and replaces them with tiny versions of those shown in FFM: The pieces of boxwood extend a bit on the outboard side to allow for the pump dale slide (I don't think I'll include the dales). And here's a rough version with the hood added (nothing sanded yet): And here they both are with the drain stoppers added: I haven't worked out the handles yet, largely because my wire supply is low, and it would seem best to fit them out after I put the hatch in permenantly, which won't happen till I get a few coats of poly down (rhymes with holy, as in the scrubbing stones!). Cheers, Martin

- 467 replies
-
- 5
-
-
- fly
- victory models
- (and 1 more)
-
Hi Scott -- It's been way too long since I checked in on your progress. Whoa! it looks great! I really like the sails, and your rigging is well done. Congratulations on the new bathroom. We did that this past spring (and found a squirrel nest behind the old tub ). After the huge mess was cleared up, we were relieved and happy to have a new, bigger, updated bathroom. Cheers, Martin
-
Hi Nils -- I've finally had the chance to catch up on your progress: Whew! there's quite a bit here, plus the close shave with the humidity! This is a great log showcasing the skills of a Master Builder, and for the narrative spills and thrills! Cheers, Martin
- 2,625 replies
-
- 4
-
-
- kaiser wilhelm der grosse
- passenger steamer
- (and 1 more)
-
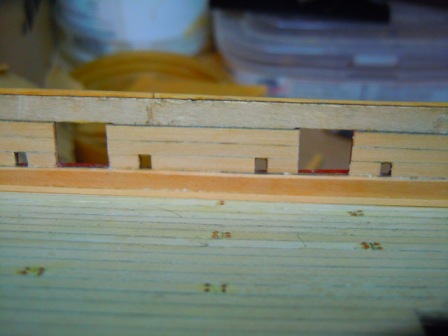
Thanks mog, I appreciate that. The quickest of updates, or maybe I should say correction: To move the aft fixed blocks, I had to pull off a plank -- and on the port side 2 planks. I won't show that ugly scene, but it went better than it might have done. Once I got the new planks in (which covered over the old hole for the mistake fixed blocks), I could go through the process of drilling, filing, and shaping necessary to fit the block. BE, I was very tempted to follow your idea of scoring in the outline of the block, and then drilling in the sheaves, but my planking lines up in such a way that these blocks overlap a seam in the planks. Here's the port side corrected: You can see the clamps over on the other side holding in the new planking. I'll get the fixed block done there tomorrow. Cheers, Martin
- 467 replies
-
- 4
-
-
- fly
- victory models
- (and 1 more)
-
You're confused???!!! Criminey, BE, I really mixed that one up! Somehow when I read "single sheave," I translated that into single hole. And now I can't even find the passage in FFM anymore. I see exactly what you're referring to on page 125, but have lost the description. Well, looks like I'll be getting out the IPA, and I don't mean the potable variety.
-
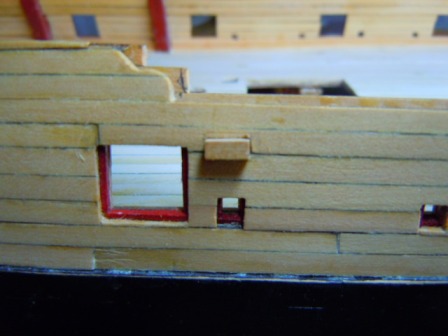
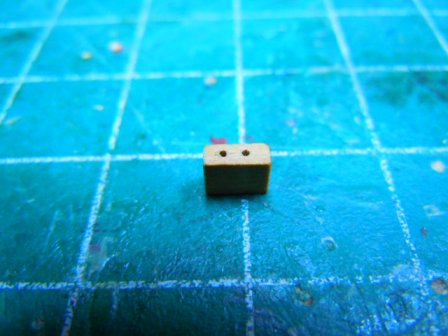
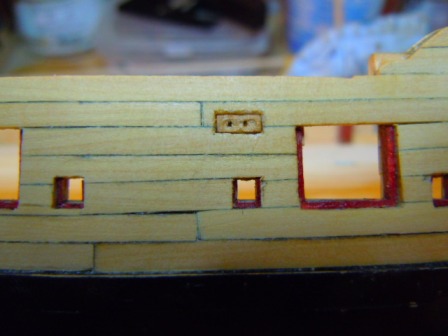
The Fixed Blocks: In the discussion on fixed blocks in FFM, David Antscherl comments that they are a detail many modellers overlook. Well, a reason for that might be because they're kind of a pain. The first step is easy enough: I just marked out the location on the bulwarks in accord with the plan in FFM. (Ignore the gap in the planking!) Next I drilled out the space with a dremel: Using a variety of needle files and ye olde exacto, I cleaned out the area to make a tidy rectangular hole. Applying the exacto to the inside required some maneuvering: Once I got the hole clean, I began fitting the block, which I cut from some 1/6" boxwood and filed down to the dimensions of the hole: Next, I drilled the sheave holes in the block. This step required using my micro mill as a drill press, since I didn't think I'd be able to get the hole straight through doing it by hand. The mill works well, but the set-up took an easy 45 minutes (I'm still figuring it out). I took a wild guess and used a #79 bit, then decided that was too small, so I went with a #75. Then, using a small gouge, I cut a groove into the surface: And then I set it in place: Oops! the aft block is only single sheaved! Feeling like a "block" head, I made the correction, moving the double-sheaved forward, And then making a single-sheaved block for the aft position: In hindsight, I have to think it would have been easier to cut the holes in the plywood gunport strips, and then plank up to them. Almost certainly I'll remember to try that out on my next build to see how it goes. Next up, the Chain Pumps! Cheers, Martin


- 467 replies
-
- 2
-
-
- fly
- victory models
- (and 1 more)
-
And I see you've even put the knobs on the railing!!!! Fantastic.
- 2,625 replies
-
- 4
-
-
- kaiser wilhelm der grosse
- passenger steamer
- (and 1 more)
-
Yes, Nils, that rudder is exemplary. But my jaw dropped when I read that you'll be putting in 350-400 portholes oh my, making that many could take your entire weekend! Cheers, Martin
- 2,625 replies
-
- 3
-
-
- kaiser wilhelm der grosse
- passenger steamer
- (and 1 more)
-
An interesting detail there, Peter. Carronades were small enough that maybe they were loaded without being hauled back? The tiny bit I know about armament seems to include the notion that carronades were considered a major advance not only because of their heavier firing power but because of their convenience. Your sailor had better watch his toes. Cheers, Martin
- 293 replies
-
- 2
-
-
- pickle
- caldercraft
- (and 1 more)
-
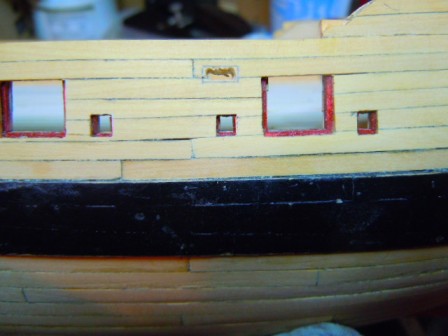
Hi Mike, thanks for looking in. And thanks to everyone else for the likes -- it's always good to get support. Mike, the linings lie inside the external planking, and are therefore just about the thickness of the plywood gunport strip. At first, I just installed the strips, and cut them down to the thickness of the plywood. But then I happened to see some very thin strips in my scrap pile, so I stained those and cut them to length. That ended up being just as easy, and saved the frustration of knocking them out of place while cutting them back. The stock I used for the linings is 1/32" thick. I found some thinner stock that I used for the sides of the sweeps, but ended up thinking that even with that the sweeps look too small lined on 3 sides. Right now the biggest challenge I face is keeping the planks all even at the edge of the gunport so I don't have to file -- filing inevitably knocks off some of the stain. Cheers, Martin
- 467 replies
-
- 1
-
-
- fly
- victory models
- (and 1 more)
-
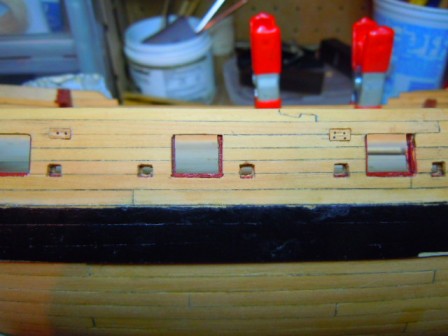
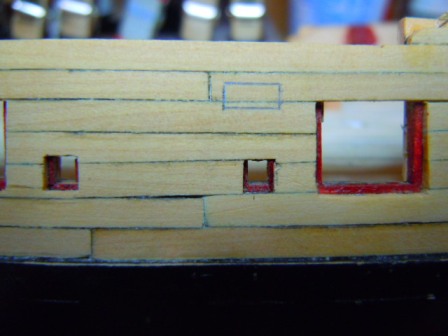
There's been a little bit of progress on the inner planking. In re-reading BE's log, I saw that he whitewashed the captain's cabin to bring in as much light as possible. I have quite a bit of holly strips, so I thought I'd achieve the whitewashing by using those. Here you can see that I've run the holly up to the level of the quarterdeck, above which there will be boxwood. The yellowing on the deck there is -- ahem -- glue. I didn't notice it until looking at this picture, and will scrape it up prontissimo. Every other part of the inner bulwarks will be boxwood. The first concern was how to afix the spirketting, which should be significantly thicker, by almost double, than the quickwork that goes between the ports. FFM shows the spirketting in top & butt planking, but at 1:64 I would have some very narrow planks. I decided to cut a single strip of 1/16" boxwood that would fit up to the gun port linings. Here you can see the contrast between the spirketting and the quickwork: Although you can't tell from this photo, this side's sweep ports have linings on both the bottom and sides. Above the quick work the thicker stock resumes. Now, FFM shows a scarph joint on the plank just above the ports, but in a plank on bulkhead kit model, the planking only extends between the bulkheads and so would not necessarily need jointing. Again, I just ran full-length planks. This shot gives a clear view of the different thicknesses. That thin little strip lying on the deck is what I'm going to attach to the bottom of the spirketting to simulate a waterway. Now that the Oklahoma temperatures are hovering in the upper 90s, I'll be fighting off cabin fever by working in the boatyard, so progress could be enhanced. Cheers, Martin


- 467 replies
-
- 2
-
-
- fly
- victory models
- (and 1 more)
-
Hi Jon -- That's good work on the crowsfeet. I experienced the same problem with the "drill press," in that it didn't equal a real drill press for accuracy. In the end I resorted to a jig that enabled me to drill the holes in the euphroes by hand. But once the crowsfeet go up, you can't tell how accurately you lined up the sheave holes anyway. As for the alignment of the stay, why not just tighten the stay? It does need to be fairly taut -- and over time it will loosen up some, so that if it isn't taut it will sag. Looking over your build makes me remember just how handsome the Rattlesnake is. Cheers, Martin
-
Nice job on that, Per. I'm glad you put the louvers in -- surely that caused you some frustration? When I tried (and re-tried) doing that, I found over and over that every piece that I thought was tiny was actually too big. What are you going to use for door knobs? I used nail heads, and realized they're a mite large. Are you putting hinges in? You could cut some blackened pieces of thin card or paper and glue them in place easily -- they'd contrast nicely with that rich red. Cheers, Martin
-
Great job, Mike, those wales look fantastic, and I'm glad you decided to take on the challenge of carving that aftermost pair of planks. You're absolutely right about the quotient between frustation during the installation phase and the satisfaction in a job well done in the post-installation phase -- if it ain't right, it's never gonna be unless you fix it!! And from what I've heard about ebony, it dulls your tools, and its dust is toxic. Plenty of reasons to avoid it. I had planned on using it for my wales, but went with less troublesome stock. Cheers, Martin
-
That is an intriguing problem, Peter, but you seem to have worked it out. Since the wales served mostly to hold the hull together, why not run the scuppers through them? I don't see how that would weaken them, and they do, as you say, need to serve their purpose of draining the water. Cheers, Martin
-
Very nice work, Nils, that's a beauty. And who's that handsome deckhand holding the ship?
- 2,625 replies
-
- 2
-
-
- kaiser wilhelm der grosse
- passenger steamer
- (and 1 more)
-
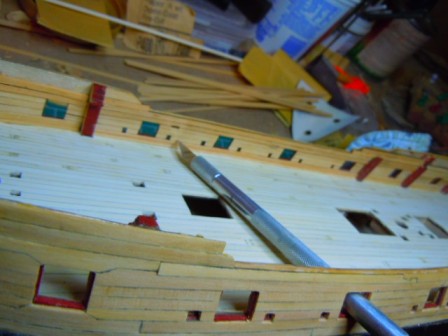
Yeah, right, Spy -- I've followed your progress on both the Pickle and Pegasus long enough to know you seldom take the "easy" way -- you're a consumate perfectionist!! Meanwhile, I used some scrap boxwood to line the bottoms of the sweeps. And what I've realized is that to line all 4 sides, or even 3 would essentially close up the sweep port. I'll post a picture later, but I think I'm going to take a chance of making them look weird by just setting the bottom linings in. Cheers, Martin
- 467 replies
-
- 1
-
-
- fly
- victory models
- (and 1 more)
-
Hey, thanks for coming by, BE & Jimz66. BE -- That's good to hear about the sweep ports, since I cut some thin scrap I had on hand last night, but have been dreading trying to set those little tiny bits in. Maybe I'll follow your inestimable lead and skip 'em. As for the bridle port, I didn't know it was narrower. I just planked up to the opening in the gunport strip. I''ll have to check that out. I do recall from your log that the two aft-most ports are narrower, however, and so they are on mine. Cheers, Martin