
MORE HANDBOOKS ARE ON THEIR WAY! We will let you know when they get here.
×


Martin W
-
Posts
1,412 -
Joined
-
Last visited
Content Type
Profiles
Forums
Gallery
Events
Everything posted by Martin W
-
 Thanks for checking in, guys, and thanks too to the likes. Alistair -- that's a fair comment; my primary reason for taking the tough pathway was that I actually have much more thicker stock than I do the thinner, and either way I had to begin with a piece that was close to 1/4 inch wide. With that twist, and the difficulty of getting clamps around the stern counter, the carving seemed easier (and more fun). Thanks, BE -- if I shine the light on the wales in just the proper direction, then some of the T&Bs show. I've put the first coat of Polyurethane on, and I'm hoping that it will draw some more of that out. But at the same time, that evil, dark force known as My Job has imposed itself between me and The Fly -- more meetings, longer hours, more grumbling. When I got home late last night, there was barely time to open the one beer. Quel dommage! Martin
 -
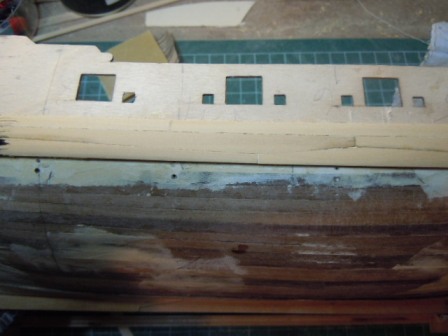
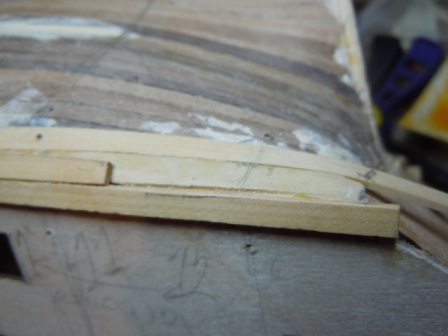
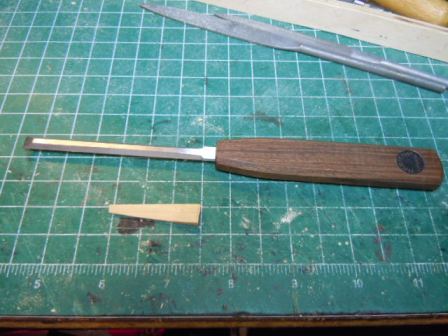
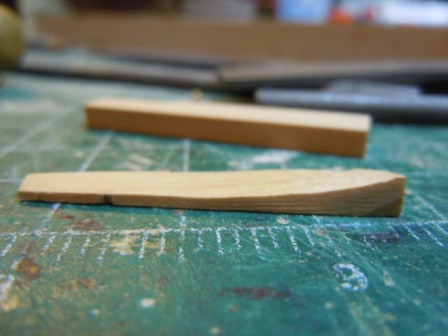
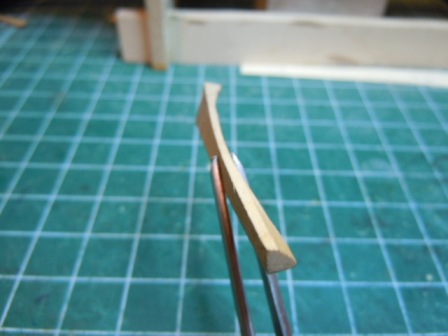
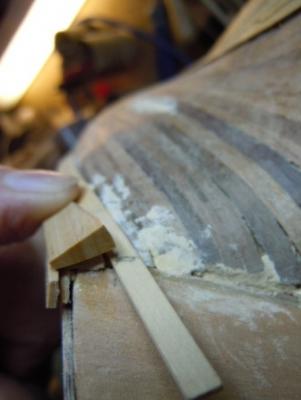
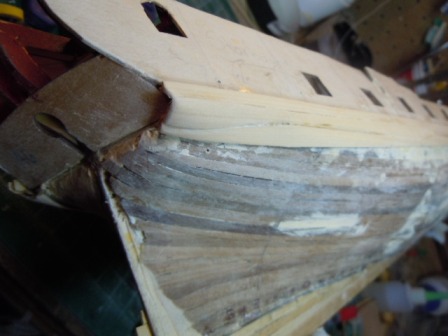
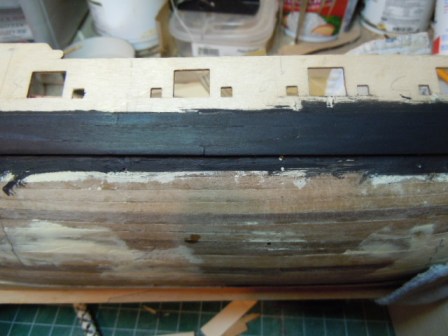
THE WALES For the second layer of the main wales, I decided to try my hand at top & butt planking. The only real problem came right at the bows where I had to spile the planks as well as taper them. I didn't take any pictures of that process, but I do invite you to imagine strings of expletives being mumbled in the boat yard. Here's a shot of said starboard bow: Now, an interesting problem comes at the stern, just where the wales meet the curve of the counter. The middle row of the three that make up the wales has to go through a serious twist as it passes from the side to the underneath of the bow. David Antscherl suggests carving the last plank there, so that's what I did (and what has taken some 3 weeks). First, I cut a piece from some thick stock that would fit the diagonal of the top & butt. Have I mentioned that I got a nice set of chisels for Christmas? In carving the piece, I had to accommodate both the curve taken by the hull at that point, and the twist of the wales. The piece has to take this strange shape to follow the curve and twist as the wales pass from the side to the underneath of the hull. It ends up being thick on opposite corners on the side that will be glued down. I left the other side alone until I'd glued the piece down and gave the glue plenty of time to cure (minimum 24 hours). Here's a trial fit, with plenty of shaping left to go. And here it is after plenty of planing & sanding: The key reason I'd decided to finish the wales off before proceeding with the planking next to it is that I wanted to stain them (I'm assuming "wales" is plural?). LL Mike: your observation that General Finishes stains work like a kind of hybrid seems spot on to me, especially as I'm going through the process now of trying to get an even stain. I like water-based paints most during clean-up, and least when considering its coverage. This water-based "stain" might penetrate the wood the way an oil stain would, but if it does then it doesn't spread as it penetrates. The shot above is after 2 applications, and there are still some white spots that resisted the stain (I'm not sure you can see them, but they're there ). They could be where I didn't get all the glue off, but I sanded all this enough that the glue should be long gone from any surface. And, in looking at this now, I realize I have neglected to put in the treenails. Och! But the T&B pattern disappears enough that I'm tempted . . . . tempted to skip the treenails, which would surely disappear as well. Now onto the rest of the planking, and the question of when to add stealers, and how many can one get away with. Cheers, Martin
- 467 replies
-
- 5
-

-
- fly
- victory models
- (and 1 more)
-
Hi Jon -- This is a good start, and you're wise to use that wire jig to set the distance between deadeyes. I also struggled with that twisting, and generally resolved it by running my thumbnail over the shroud to get any twist out of it, and then making sur the lashing was as taut as I could get it. Probably some of the more experienced folks on MSW have more reliable techniques, but that mostly worked for me. And now you can start looking forward to the real excitement of tying the ratlines! Woohoo!! Cheers, Martin
-
Welcome back -- I'm sure I'm not alone in saying I'll be looking forward to hearing more of your trials and tribulations. Cheers, Martin
-
Congratulations, Mike. It's really when you get the planking on that you can see that you're working on a ship. Swans do indeed have a nice shape. It was between the ply gunport strip and the first plank that I also had to slather on a good bit of wood filler, as well as on the stern counter. You might want to go ahead and put that on so you can see how it fits with the planking. Bravo, Martin
-
Amazing detail, Nils. I'm surprised you can see an end-date, but then I also keep asking myself, how many details can one build include? Terrific, Martin
-
Lovely, simply lovely, Peter. Wonderful details, and tidy craftsmanship. I'm curious about the rudder chain configuration -- who is Herr Zu Mondfelds, and what's his book? Cheers, Martin
-
Bravo, Peter, that's a huge accomplishment! But I didn't know that a ship had a "fuselage" -- maybe the winged horse transforms the hull? Cheers, Martin
- 431 replies
-
- 1
-
-
- pegasus
- victory models
- (and 1 more)
-
Mike -- the question of bleeding stain is intriguing. I wonder if it might be prevented or at least inhibited by putting polyurethane on the stained rows before adding the rows on either side. Hmmm, just a thought, and something I am going to try when I stain my main wales. Cheers, Martin
-
Hi Mike -- Glad to see you're moving along. As I understand it (and I will in no way claim any sort of expertise), the 1st planking not only provides the continual base for the 2nd (and so, sanding and wood filler can work wonders), but it also helps to recognize where the challenges lie. So gaps or clinker effects can be corrected, and can help you to see where you need to trim & spile. Stealers & drop-planks are permissible, but it seems one should avoid them if possible through planning ahead and spiling. Since you had the foresight to buy sheets of boxwood from Jeff, you can take care of the bow & stern quite expeditiously with easy-to-learn spiling. Did you mark out separate bands along the hull with battens? Doing that can really help you to see a few rows ahead, and to anticipate the width of your planks in each band so that you don't end up with some fat and some too thin lying next to each other. There are some good tutorials on planking on this forum, and at the recommendation of Toni Levine, I have just bought Jim Roberts' Planking the Built-Up Ship Model from ModelExpo. All of these provide good explanations of spiling and of the rules for adding stealers & drop planks. Cheers, Martin
-
Hi Mike -- On the first planking I didn't worry about that corner too much. But that is where the main wales go (at least on my build). I followed David Antscherl's suggestion of starting with a piece of fairly thick stock and planing it down to a shape that can accommodate the sharp curve there. My wales seem to be a bit lower than those he shows -- and from looking at the builds by Alistair & BE, and from following the kit instructions, I take it that that lower position is right for the kit. At least that's what I've told myself. I'm just about to start on the corresponding part on the port side, and when I finish, I'll post an account. Cheers, Martin
-
Mike -- this looks good. My planking at the stern goes through that same twist to the vertical. On the first planking it wasn't too hard, but getting the boxwood to bend & twist that much has required much longer soaking and has induced more mistakes (surely, my planking plans can't be at fault!). Glad to see you're still at it. Cheers, Martin
-
Fine work, Bob. I think the tedium of the ratlines comes from trying to tie them all to a consistent tension, without too much droop and without bowing in the shrouds. You've got it down. Terrific. Martin
-
Hi Nils -- Sorry I haven't responded to your question. I used a Dremel set at the lowest speed, and with a flex-shaft attachment (the handle part is fairly comfortable, light, and easy to maneuver). I got my micro-burrs from Livesay's, which has a very large selection. That's the set-up I used for the carvings on the stern & head of my Rattlesnake. As I've been working intermittently on the stern carving of the Fly, I've started off by doing a mockup in modelling clay, just so I could see how the figures should look, and so I could work out any problems before they led to errors on the wood. Non-power tools are still a must, however. Along with an opti-visor and good lighting. Cheers, Martin
-
That figurehead is indeed beautiful, it complements the fine and numerous details of the head. Exemplary! Martin
- 1,477 replies
-
- 1
-
-
- essex
- model shipways
- (and 1 more)
-
Nice work, Jon. The pictures show the tops' details well, and to good effect. You've done an outstanding job, maestro! Martin
- 974 replies
-
- 1
-
-
- rattlesnake
- mamoli
- (and 1 more)
-
Hi Mike -- Like you, I skipped out on the filler blocks at the bow, and have had no real problem getting the planks to lie properly. At the stern, though, it was in shaping the filler blocks (along with staring at the NMM plans for long stretches) that I was able to get a sense of how everything supposedly comes together back there. I left a kind of bevel, but in bending the planks have found that it's a hard one to tuck into because of the severity of the curve along with the twist of the planks -- especially those lower down. I also have found that anything like a bevel takes away the base to glue the planks onto. Sanding those danged bulkheads is tedious to say the least (and dusty -- I gave myself a cough that took weeks to hack out of). I fashioned a curved sanding stick out of a thick dowel that helped get the shape I had theorized. Its thickness also helped expedite the process. I think one reason for the popularity of the Swan class is that the hull has a very pretty shape with nice full curves. Cheers, Martin
-
Great work on the boat, Scott. Now that's a task that will really make your eyes cross, so you might even find the rigging to be a relief. Cheers, Martin
-
Prosit Neujahr, Nils! I'll be looking forward to watching your progress in 2015! Martin
-
That's an interesting observation on the GF stains, Mike. They are quite thick, much more so than any other stain I've worked with, but I had written that off to the fact that they're water-based rather than oil. The hybrid explanation would also possibly account for the uneven coverage that my picture revealed (still, the truth is that sloppiness on my part played the dominant role, but since I treated the stain as though it were an oil and that it would soak into the wood, I just slapped it on). I'm still planning (hoping) to keep as much wood as possible unstained/unpainted and in its natural tones. The wales will be stained black with GF stain, though I've been intrigued by discussions on other logs (eg Chuck's) where people use a very thin paint and apply lots of coats -- I believe Chuck even said he put on 30. That thread has instilled a bit of an anxiety in me that perhaps gluing the strakes around the wales could cause the water-based "stain" to bleed. Alistair, thanks for checking in, and a Happy New Year to you. Even without your steady log updates, I still check back on your earlier postings frequently to see how you solved various problems. Here's hoping you get to hear lovely bird songs every day! Ahoy back, JPett -- glad you got a tickle out this -- lots of times as I'm gnashing my teeth I have to remind myself that I'm doing something that I truly do enjoy. I hope 2015 is a good modelling year down there south of the Red River. Now, where'd I put that party hat? Martin
-
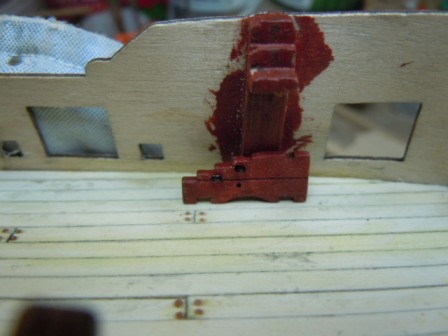
Mike -- In regard to the conversation we've had (largely on your log) about dying the wood vs bulkheads, I wanted to post the picture I promised comparing the dyed bulkhead with the dyed gun carriage bracket. Voila: Well, as you can see, I have proven myself a liar, as the two tones shown here aren't so far apart after all. Really, though, without the light shining directly on them, the bulkheads seemed to look much darker. (And without the light, and without the macro setting on the camera, the dye jobs looked much better -- YIKES, I'd better do some touch up. ) Cheers, and Happy New Year to Modellers everywhere! Martin
- 467 replies
-
- 2
-
-
- fly
- victory models
- (and 1 more)
-
That's an interesting detail with the hook on the traveller. The picture of it in use with the sail makes it understandable, though. Fascinating to see it all come together. Cheers, Martin
- 431 replies
-
- 1
-
-
- pegasus
- victory models
- (and 1 more)
-
Good cheer to all the Crew! Love the look of your boat, Nils. The oars lashed together, and the felt are nice touches. Martin
-
Hi Mike -- Just thought I'd mention that I dyed the bulkhead extensions on my Fly, using the Cranberry from General Finishes that looked so good on the boxwood gun carriages. Well, you're right, it doesn't match, since my bulkheads are all ply, and the outer layer is a dark walnut color that took the dye as a much deeper red, almost maroon. I'll post a photo when I can get away from my day job. Cheers, Martin
