-
Posts
1,622 -
Joined
-
Last visited
Content Type
Profiles
Forums
Gallery
Events
Posts posted by hof00
-
-
Really, really good!!
I have been following along, it's been quite a journey, probably more so for yourself. 😀
Cheers and Regards,
Harry.
- Canute, GrandpaPhil, Old Collingwood and 3 others
-
 5
5
-
 1
1
-
9 hours ago, keelhauled said:
Additional comments on the position of the cro-jack Sheets on the pin. I was recently in Australia and got to spend time on another tall ship. I spoke to one of the crew about the topic. He said that it made sense to him and that the cro-jack doesn't usually have that much stress on it since it isn't usually used in heavy weather. He said that it should only take three or four hands to to comfortably to pull the the sheets when setting the sail since the bulwark fairlead is being used. To adjust the sheet in fair weather it would only take one hand. He made his point by handing me the sheet and asking me to adjust it. I couldn't believe how little effort it took. I could have done it with one hand. He said he wouldn't be concerned with belaying that line to a pin if it was large enough to accept it and the sail plan reference to belaying to a pin sounded correct to him.
best,
Marc
Hi Marc,
Happy New Year!!
Good to see you back.
I was wondering how you were getting on with your awesome build.
Hoping to see more updates soonish.... No pressure!! 😀
Cheers and Regards,
Harry.
-
3 hours ago, rvchima said:
I haven't looked in for a while and missed some fascinating discussion about the paint scheme and catch guards.
Hi Rod,
Thanks for looking in!!
Things still very slow for myself to be expected although I'm throwing all the physio sa the right side as I can!! 😀
Got my eyes tested also as I found it very difficult to see detail and place correctly. (I think that the Sub-Assembly phase was assisted, in no small way, by my "Diopter" flu resent lamp.
I hope to have my new "Specs" next week, it will be a huge bonus!! 😀
So, hopefully some updates of consequence soon.
Cheers and Regards,
Harry.
- Canute, Old Collingwood and mtaylor
-
 3
3
-
2 hours ago, ted99 said:
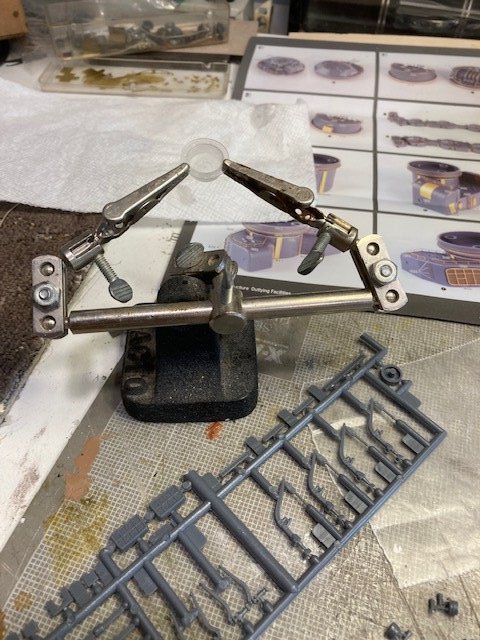
One thing that has done a lot to improve my assembly of the little things is to find ways to make up for not having a third hand in the middle of my forehead. I have found that the little cups for CA really need to be kept from skidding around. Micromark has a holder for their little red cups, but I've found that it's difficult to reuse the micro mark cups after the CA sets. The CA sticks to the red cups. I found some clear plastic cups on the Walmart site for holding eye makeup adhesive that releases the cured CA very easily. I'm using the shown tool to hold the cups still. It also lets me tilt the cup slightly allowing me to put less CA in the cup and still get a "load" on the applicator tool.
Hi Ted,
Nice solution!!
Have you tried to use a "Tea-Light" candle with a hollow cut into it? (Medium Drill Bit)
CA seems to take a long time to go off in the hollow.
I guess what works for you is the best solution. 😀
Cheers and Regards,
Harry.
-
16 hours ago, Joe100 said:
I love a good paint scheme discussion! Gets my blood flowing! As for yellow, I say the ship never had yellow paint applied. I can post way, way more on this but if anyone is really interested, shoot me a PM and I’ll send you more than you’d ever want to know. Red on the other hand, well I’ve been persuaded to the red camp recently. There are photos of the ship showing the turrets being repainted in an odd shade which is thought to be red. We know the KM experimented with red in the Baltic, and it’s very likely BS had red turret roofs for at least a short period of time.
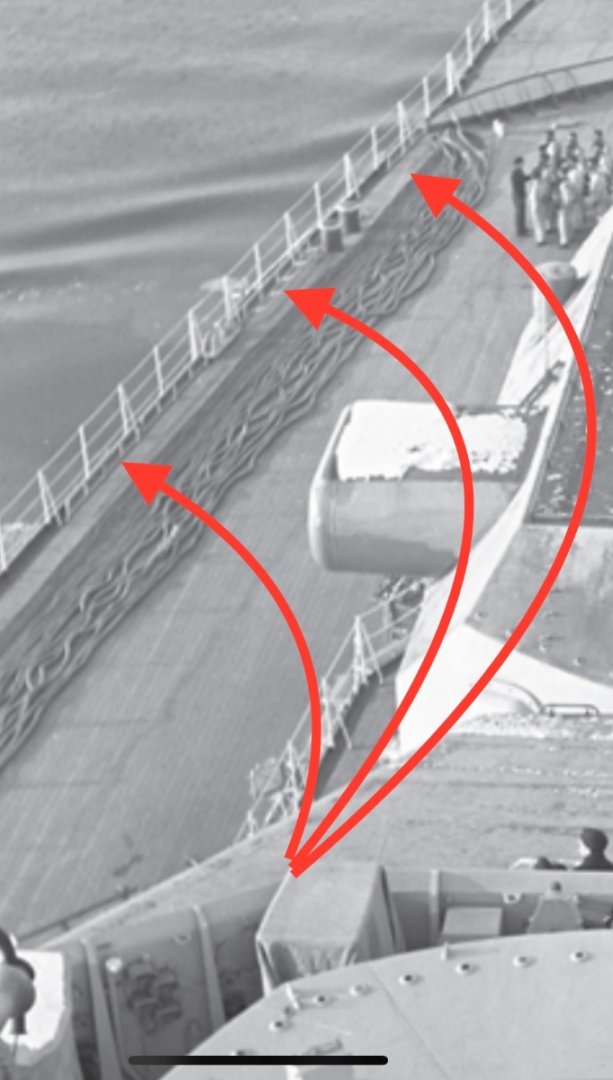
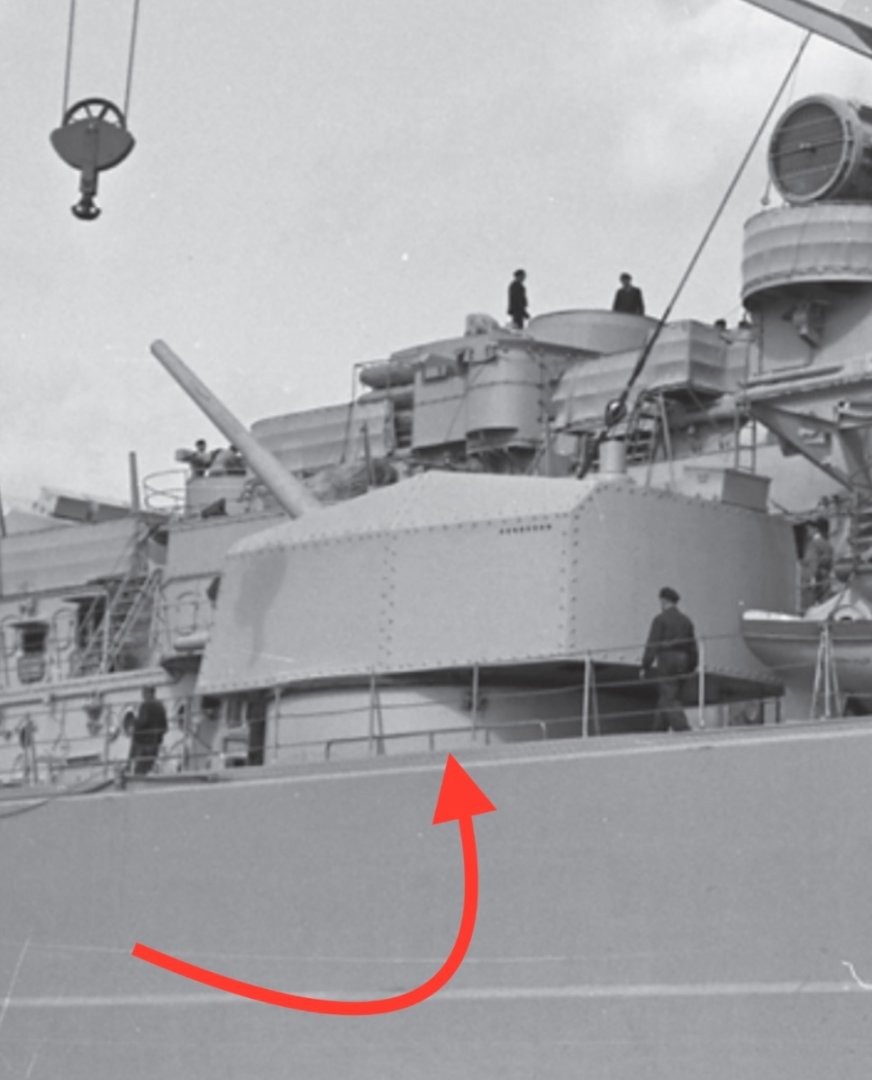
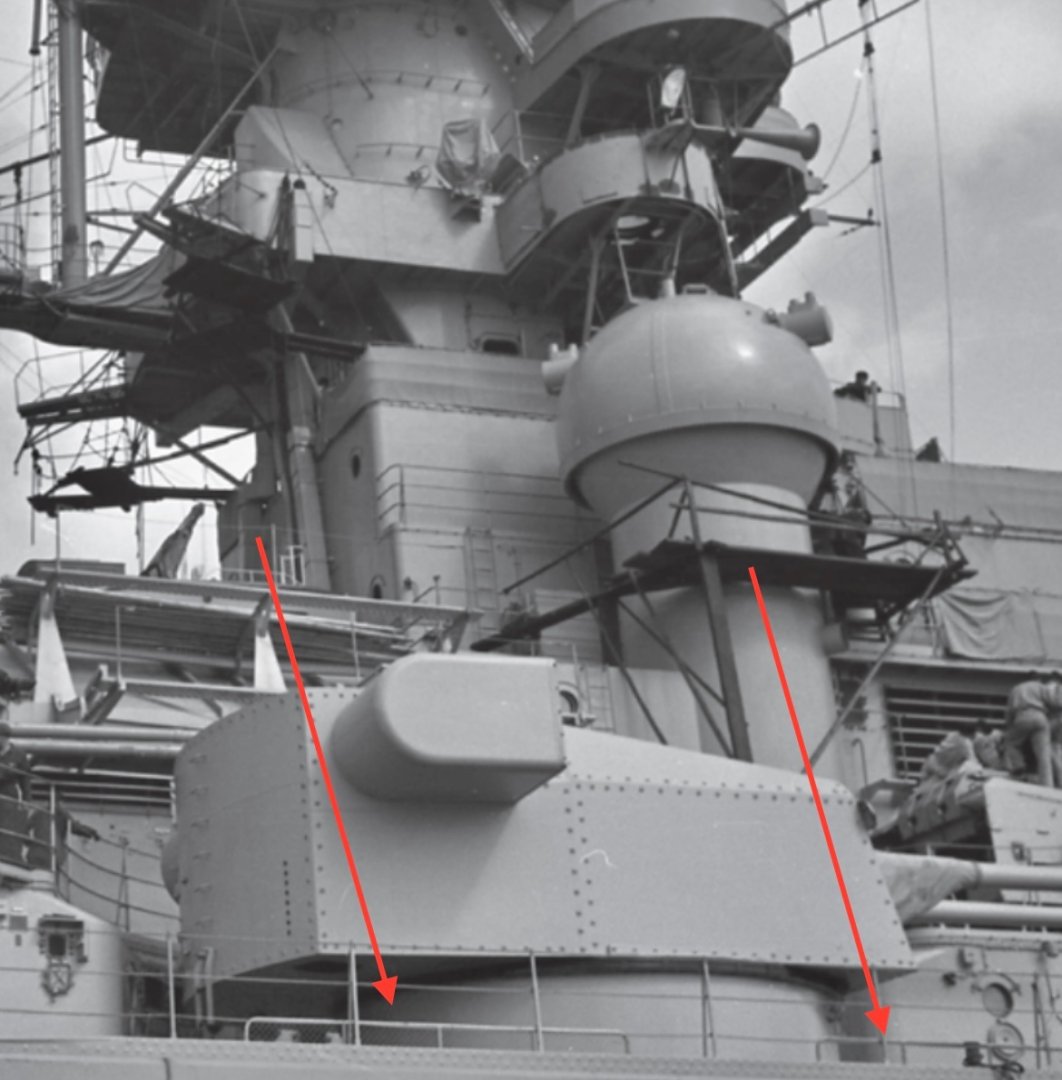
Now onto your question Harry. Those guards were there to catch the secondary charge casings from the 15” guns and the 5.9” guns. Most folks don’t realize that the KM used a secondary brass cartridge in their guns. These were ejected onto the deck from two ports under the main and secondary turrets. I’ve never seen a single model of Bismarck in combat depicting these, and there would have been dozens rolling around on deck! The reason they used these catch grids was because in combat, the railing around the edge of the ship was laid flat. This was because it would have been ripped off and destroyed with the firing of the main guns. There are many photos of the railing laid flat, easy to find.
As for rigging them on your model, they were permanent fixtures so they should be there. Here are the photos of them on the ship:
Hi Joe,
Thank you for the excellent information and photos!!
I'll ensure that I install the Guards/Grids.
Since the Gutters are so narrow, the Guards will have to be at the very edge of the Decking, no problem. 😀
Pictures really do speak volumes!!
Cheers and Regards,
Harry.
- mtaylor, Old Collingwood and Canute
-
 3
3
-
On 1/10/2023 at 5:41 AM, Ian B said:
Just a quick one..when did she loose the yellow ?
On 1/10/2023 at 5:49 AM, Canute said:The Baron's letter stated he couldn't confirm if the turrets were ever yellow.
Hi Gentlemen,
I personally am happy with the Dark Grey Turret tops and in the only publication that I have to hand, "Kagero Super Drawings In 3D," they show just this.
I guess there are many iterations that could be.... As I am too well aware, many Ship Kit, (Inc. Plans, Publications), information is open to discussion or erroneous.
Please do not let me dissuade you from further discussion of the subject and please continue to use this thread, I find it fascinating.
Anyway, I have a question for the forum as well,
The subject is "Interference Grids," (Snips" attached), that the "Kit" wants you to install at various points along the Main Deck Rail. (The Grids are supposedly to catch used Shell Casings.")
I am wondering if I can get away without these as they occupy the Main Rail Gutter. (Incidental have never seen these in any documentation.
(Maybe they were "Unshipped" when not in use?)
It's not that I want to get away with not installing stuff, I am aiming for something that is not too "Cluttered." (This is the same doctrine that I'm going to use with the Accommodation Ladders, I am not going to install them "Shipped" as in my mind, it clutters the lower superstructure. I received some excellent plans from Joe regarding construction and placement of these items, amongst other detailed drawings. (All I have to do is "Prototype these when I gain a bit more movement, soon I hope, I'm starting to go Stir Crazy....😀)
Cheers and Regards,
Harry.
- Canute, Old Collingwood and mtaylor
-
 3
3
-
4 hours ago, Joe100 said:
A note on her final paint scheme. I disagree with the Draminski book in that she had yellow turret roofs. I believe in the book he states this is speculative. The speculation comes from one of the few survivors to be picked up by the Germans, Otto Maus. The Maus debrief was mistranslated after the war and this is where the yellow comes from. You can read the original German and it’s defiantly not what he’s talking about. The yellow was specified in the orders for Rhine Exercise but likely never carried out. I habe 4 signed letters from 4 people who were on board that day, one being The Baron himself, who states categorically NO YELLOW.
The swastikas were painted over on May 21, around 1-3pm and were never repainted.
Hi Joe and Happy New Year!!
Good to know that the morning of May the 21st is correct!! (HOF's Bismarck 😀)
Interesting letter also, many thanks!!
Cheers and Regards,
Harry.
- mtaylor, Old Collingwood and Canute
-
 3
3
-
18 hours ago, Old Collingwood said:
Just don't be tempted to over brush it while the sol is working as the decal is at a Really Delicate stage (even if you see any wrinkles - they will flatten out by them selves as the sol shrinks down on to the deck) Just apply a layer of Sol the leave it to do its stuff - then let it dry fully (may need several hours) and re apply if you need to.
OC.
5 hours ago, Canute said:It all depends on how thick the decals are. Some are very thin and need 1-2 coatings of SOL; others are very thick. I have a bottle of something called Solvaset. Its the last setting solution to use and only on very stubborn, thick decals. There were a few model railroad companies that printed very thick decals and the Solvaset was the only thing that worked. Like OC says, put down a coating and walk away. Let it dry before reapplying more solution. 😉
Thanks once again Gentlemen,
The advice is invaluable especially with the fact that I have had no real experience with Decaling since my teens. (More than a couple of years ago.... 😀)
From memory, the blurb that came with the Decal Sheet mentioned that the Decal was printed on 2.0 micron carrier film, does this sound about right?
Anyway, I think the I am pretty much done with the "Micro-Sol." after about seven applications, I am not going to push my luck any further I feel that things are about as good as I can get them.
I guess the order of the day will be to put some Matt/Semi clear to seal ant protect before installing Anchor Chains/Hatches.
Cheers and Regards,
Harry
-
-
2 hours ago, BobG said:
You're getting there little by little on this big project, Harry. Wishing you all the best in 2023!
Thanks for your kind words Bob.
Things would move a little faster if I could use my right arm properly. 😀
(I feel this is slowly improving with the amount of "Physio" that I'm throwing at it.)
All the beast for you and yours for the new year also.
Cheers and Regards,
Harry.
-
14 hours ago, Old Collingwood said:
Micro set and sol are your buddies - keep applying till your happy.
OC.
Thanks OC.
I am not 100% happy with the Fore Desal where it goes over the Anchor Chin Decking.
I feel the edges are not "Sharp" enough. (I have given these parts about 3 "Doses" thus far.)
Do you think that extra applications of Micro-Sol will do the trick?
Having never really used this stuff I don't know if I'll get a nasty buildup of this product.
Cheers and Regards,
Harry.
-
13 hours ago, Ian B said:
Looks fab....makes her look even more menacing...
Thanks Ian,
Interesting excerpt from AOTS. (I am assuming)
Unsure about the Yellow Turret tops.
I agree that the markings make Bismarck more "Menacing."
(I like to say "Purposeful." 😀)
I am happier having the markings rather than a big slab of Grey....
May not be 100% historically accurate but never mind.... No one will ever know apart from real Bismarck aficionados or those on this wonderful site!!
Cheers and Regards,
Harry.
- Canute, mtaylor, Old Collingwood and 2 others
-
 5
5
-
Hi All,
Small update:
A small update is better than none....
(I got the Bow/Stern "Air Recognition Markings" on.
This process worked o.k and I can now see the valur of Gloss Polyurethane as a "Grounding for the Decals.
I also rate the "Micro-Set."
The Decals are still drying and I may go over the Bow Decal with "Micro-Sol" later. (It depends on how the Decal dries over the raised Fore Deck areas.
I am reasonably happy with my efforts today and am preparing the Stern Hatches for installation hopefully tomorrow.
Initially, I liked the Deck without the Decals but am coming round to the idea that it adds a bit of color. 😀
Cheers....HOF.
Photos:
-
6 hours ago, Ian B said:
Hi.. I am still confused about her markings, the AOS says it had them blanked out as per the instructions breaking out through the Denmark straights but had the markings and yellow roofs of the main turrets reapplied before the final show down..I can't see how they had time to repaint!
Hi Ian,
From my understanding, the "Full Baltic Stripes, (Superstructure), were removed prior to May 21st and the Deck Markings Greyed out just after this as were the Hull Baltic Stripes leaving the Bow/Stern Waves and leaving just the White remnants of the Stripes on the Water Line.
I have not done enough research as yet to be 100% accurate.
(Joe100 is a superb source of information with respect to Bismarck.)
I guess they had many crew to paint things. 😀
Cheers and Regards,
Harry.
- mtaylor, Canute and Old Collingwood
-
 3
3
-
On 1/1/2023 at 9:27 AM, Old Collingwood said:
A few options there Harry - place the swastika first then the covers and either paint the covers the same colour as the swastika or paint it Grey, as I asume the swastika is a decal - or is it to be masked and painted?.
If its a masked painted swastika then I would place the covers first and just paint over them.
OC.
On 1/1/2023 at 9:39 AM, James H said:I would paint the swastika first, using masks, then add the hardware over it and paint.
BUT, Amati have supplied the kit with the last known iteration before it was sunk. At that time it had no swastikas. They were painted over.
On 1/1/2023 at 9:44 AM, Kevin said:Thank you OC, James and Kevin for your responses.
I have had a PM or two with Rod (rvchima) with reference to his build. (Thanks once again Rod.)
Rod advised Decals first and then Hatches followed by a paint touch-up.
I made up a tracing paper template for the Hatch positions first.
I have separated the decals from the sheet and carefully trimmed to the Decal edges and Test fit with the template, looks about right.
I painted Gloss Polyurethane on the Rear Decking, (I'll do the first), and I'll let this cure overnight. Ill affix the Decal with Mirco-Sol and do the Micro-Set after this.
(It's been a very long time since I played with Decals....😀)
With regards to your replies above, paint and masks I did consider but purchased Decals from "Custom Hobby Decals" anyway as I felt it was a little too late in the game to be worrying about major paint works.
I am well aware also that the Ship had her markings painted over on May 21st 1941 I had already painted the Baltic Stripes on the Hull and I did not wish to have a huge Grey stripe across the Decks. 😀
So, I guess the model will be representative of early morning, May 21st 1941 before the crew got out the paint. 😀
In the last couple of days, I attempted to fix the Stern Anchor Chain in place, I did not like the result so removed and will attempt again after Decaling. (Just as well I have plenty of small chain as the kit did not provide very much....)
Anyway, enough from me today. I'll post some photos as soon as I have something decent progress to share. 😀
Happy New Year to all!!
Cheers and Regards,
Harry.
- VitusBering, gjdale, Kevin and 4 others
-
 7
7
-
Hi All,
Starting to get back into things ever so slowly....
I have a question for the Forum:
I have a group of four Hatches on the Rear Deck, (PE), should I attach these first and then the Swasticker over the top and hopefully let the "Mark-Fit" do its' thing or decal first and add the Hatches and paint these items afterward?
If someone could find the time to come back to me with opinion or advice, it would be very much appreciated.
(Maybe it's simpler to omit the Decal?)
The area in the "Snip" is Greyed out.
Cheers and Regards,
Harry.
- Canute, Knocklouder, mtaylor and 3 others
-
 6
6
-
4 hours ago, WhiteWolf said:
I was planning on just what you said. Letting the rigging hold the masts in place just for the purpose of wiggle room.
 I'll poke around on here too, before I get there, and see what others say.
Thanks for the tips!
Hi Chap,
I think that I may have picked this up from Mr. Earls' BN practicum many years ago??
Anyway, the method is what I have used in all of my ships, thus far inc. Cutty Sark.. (The only exception thus far is Bismarck.)
Your BN is looking great, keep up the good work!!
Cheers and Regards,
Harry.
-
Nice One!!
When you get to stepping the Masts are you going to fix, (Glue), in position or let the Rigging do the securing?
Myself, I let the Rigging, (Shrouds/Stays), do the securing, gives a bit of "Wriggle" room and enables a Mast to be replaced if these ever break without performing major surgery.
My opinion on the matter and there a probably others more learned than myself who may be able to proffer an alternative.
(You could post a query in this forum under "Masting, Rigging.")
Looking great!!
Cheers....HOF.
-
Hi there,
No travesty at all....
In my mind, the modelers choice, after all, it is your own piece of maritime art.
Cheers.... HOF.
-
-
Hi Chap,
Looks pretty good from where I'm sitting!!
Cheers....HOF.
- Knocklouder and bcochran
-
 2
2
-
2 hours ago, rvchima said:
Take care Harry. Get better and finish the Bismarck soon.
Thanks Rod,
I hope to be able to do something soonish....
The weight machine seems to be helping stretch the muscle/tendons out. Movement is slowly returning. 🙂
Cheers and Regards,
Harry.
- Old Collingwood, Canute, mtaylor and 1 other
-
 4
4
-
1 hour ago, bcochran said:
I used to say you have to destroy a lot of kits before you complete one you are willing to show off. It's kind of like folks who tell you how much they won at the casino, but never tell you how much they threw into the slots between winnings.
Hi Chap,
I am looking forward to your continued perseverance with your project!!
I too have had paint issues with my Pen Duick. I used Vallejo paints and then a clear lacquer to get that "Shiny" finish. The lacquer was too "Hot" and crazed the paint. It took quite some time to carefully remove what I thought, all the lacquer. As it happened, the new paint also reacted with the lacquer that I hadn't removed, so, I had to do it all over again.... 🙂
Live and learn I guess....
All the best and following with interest.
Cheers and Regards.
Harry.
-
Hi All,
Putting "Feelers" out for a 1/32 Arado AR 196 kit....
Does anyone out there have one in thier "Stash" that they would be willing to sell or trade?
(I'm thinking that an Arado would be a nice display addition to my 1/200 Bismarck.)
(For trading purposes, I have a Tamya 1/350 Bismarck with Gold Madal PE, 1/350 Dragon Z Class Destroyer, a Fletcher Class Destroyer, Tamiya and a 1/250 Frigate, HMS Bligh. All new in box.)
(Also on my "Bucket" list is a 1/32 Swordfish and a Hasegawa 1/16 Sopwith Camel but the Arado is at the "Top.")
Cheers and Regards,
Harry.


![DSC_0800[1].jpg](https://modelshipworld.com/uploads/monthly_2023_01/730338803_DSC_08001.jpg.9e006fd45274843a008657a8bfff3887.jpg)
![DSC_0801[1].jpg](https://modelshipworld.com/uploads/monthly_2023_01/1662006562_DSC_08011.jpg.c73fc6489333011f9c84a15c0ff65532.jpg)
![DSC_0802[1].jpg](https://modelshipworld.com/uploads/monthly_2023_01/933467464_DSC_08021.jpg.02f65b45082b9ebb1c8d898ce2892d5b.jpg)
![DSC_0803[1].jpg](https://modelshipworld.com/uploads/monthly_2023_01/2014606274_DSC_08031.jpg.d6d3dd1db6973444a3e946661e4d1616.jpg)
![DSC_0804[1].jpg](https://modelshipworld.com/uploads/monthly_2023_01/1858524283_DSC_08041.jpg.73912e778798f8f7ffb286319c45449f.jpg)
Bismarck by hof00 - FINISHED - Amati - 1/200 - Partworks
in - Kit build logs for subjects built from 1901 - Present Day
Posted
Hi All,
Small update:
Been working on the Anchor Chains.
I have the Main Anchor Chains in place, but I am not going to secure these until I get the small Chains attached, hopefully tomorrow.
I had issues with the small chain provided, 50 - 100mm, (2 - 4 inches), not nearly enough.....
I had a go at chain I had left over from my Cutty Sark, installed and not happy at all.
What to do? Silver Chain from the local Jewler, same dimensions as the kit supplied chain.. (NZD 15.00)
Next issue, how to Blacken? The Chemists, (Drug Store?), I visited did not have "Liver of Sulfur," they are not the Apothecaries of old and do not have jars of stuff any longer.
I tried Hydrogen Peroxide, not much joy.
The Internet suggested Squashed Build Eggs, Bleach and other stuff. 😀
I chose a bit of Bleach and left the Silver Chain soaking overnight. this resulted in a very nice patina.
Next, how to install? (I include photos of my workings.)
Beading Wire on the Chain ends so I could maneuver things through Eye Bolts. The kit supplied tiny PE bits to attach the Chain to but I figured that I would not be able to impart any tension.
Beading Wire to attach the pieces of chain together, once done, offer up to Bow Anchor hole, install Eye Bolts, CA and tension.
I'll touch up and trim the excess tomorrow also.
Well, that's how I dealt with this aspect. 🙂
I'll do the same for the Main and Stern Anchor Chains.
Cheers.... HOF.
Photos: