


hof00
-
Posts
1,631 -
Joined
-
Last visited
Content Type
Profiles
Forums
Gallery
Events
Posts posted by hof00
-
-
Hi Chap,
Coming along very nicely indeed!!
I did drill a hole so that the Tiller/Rudder works. The method I employed started with a small drill bit working up. (You don't need to go through the entire thickness as subsequent bits will follow the small hole.)
Anyway, as you stated, this is not really necessary. 🙂
You are indeed lucky to have a more "Supple" King Plank.
Happy Joggling!!
Cheers....HOF.
-
-
Hi All,
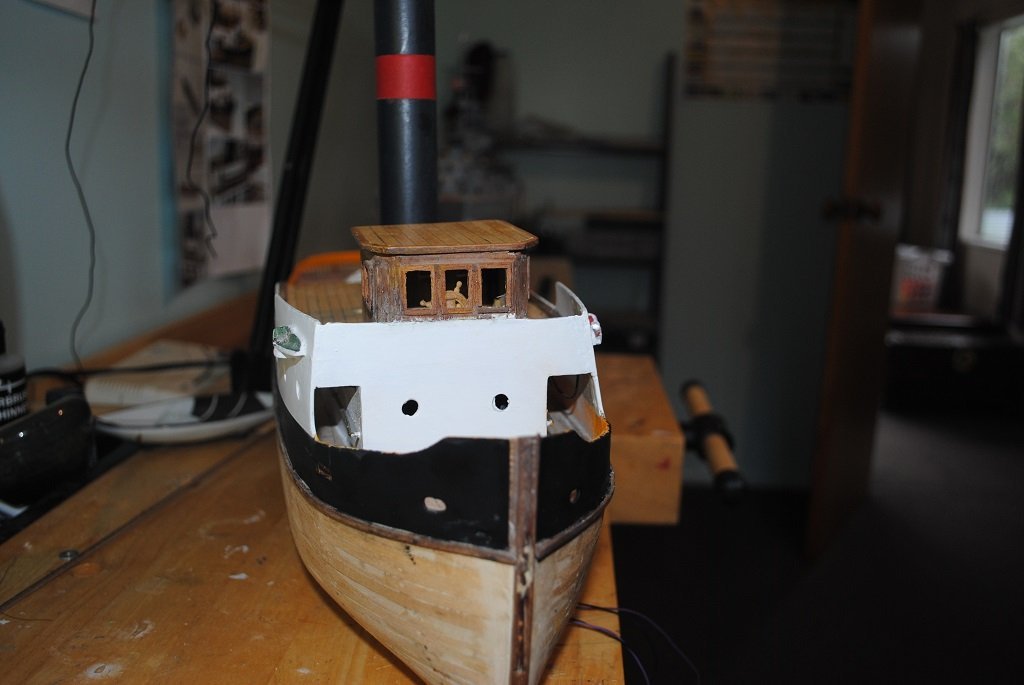
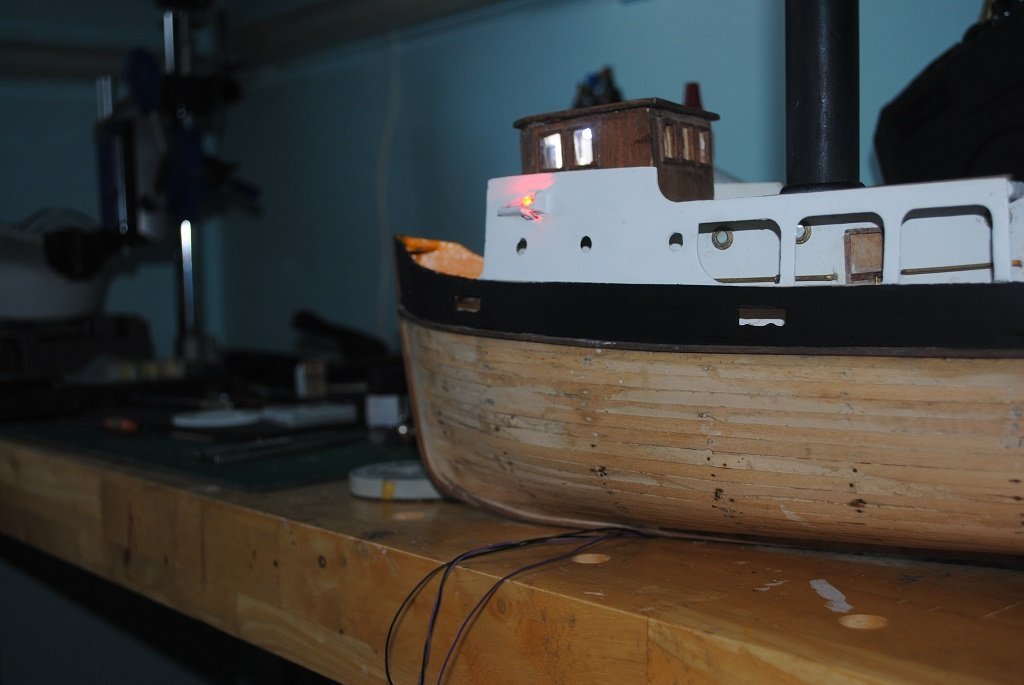
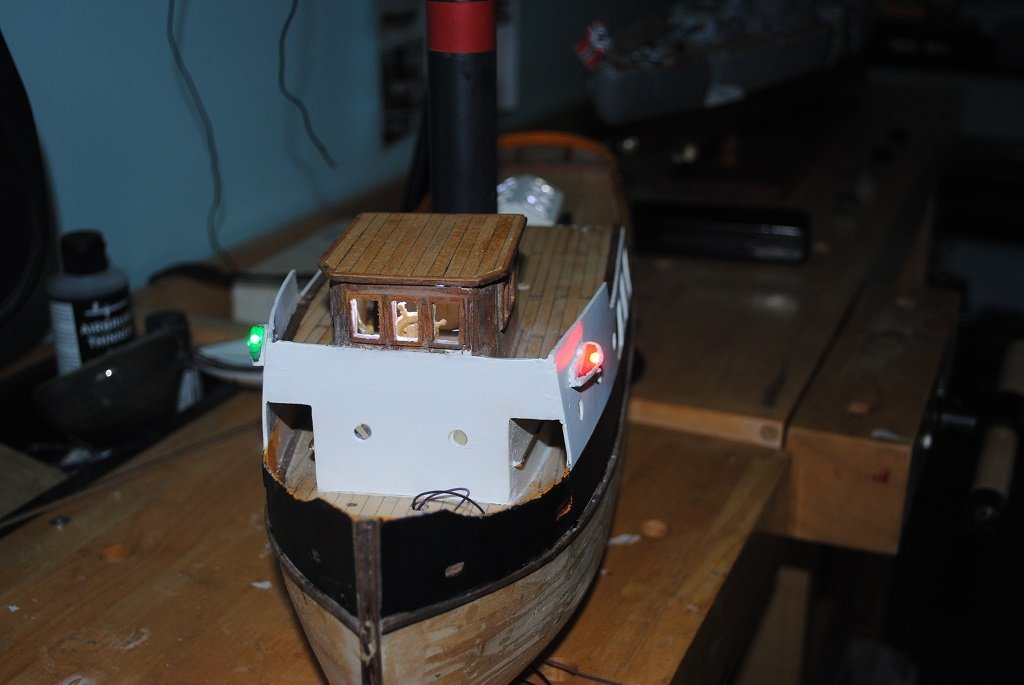
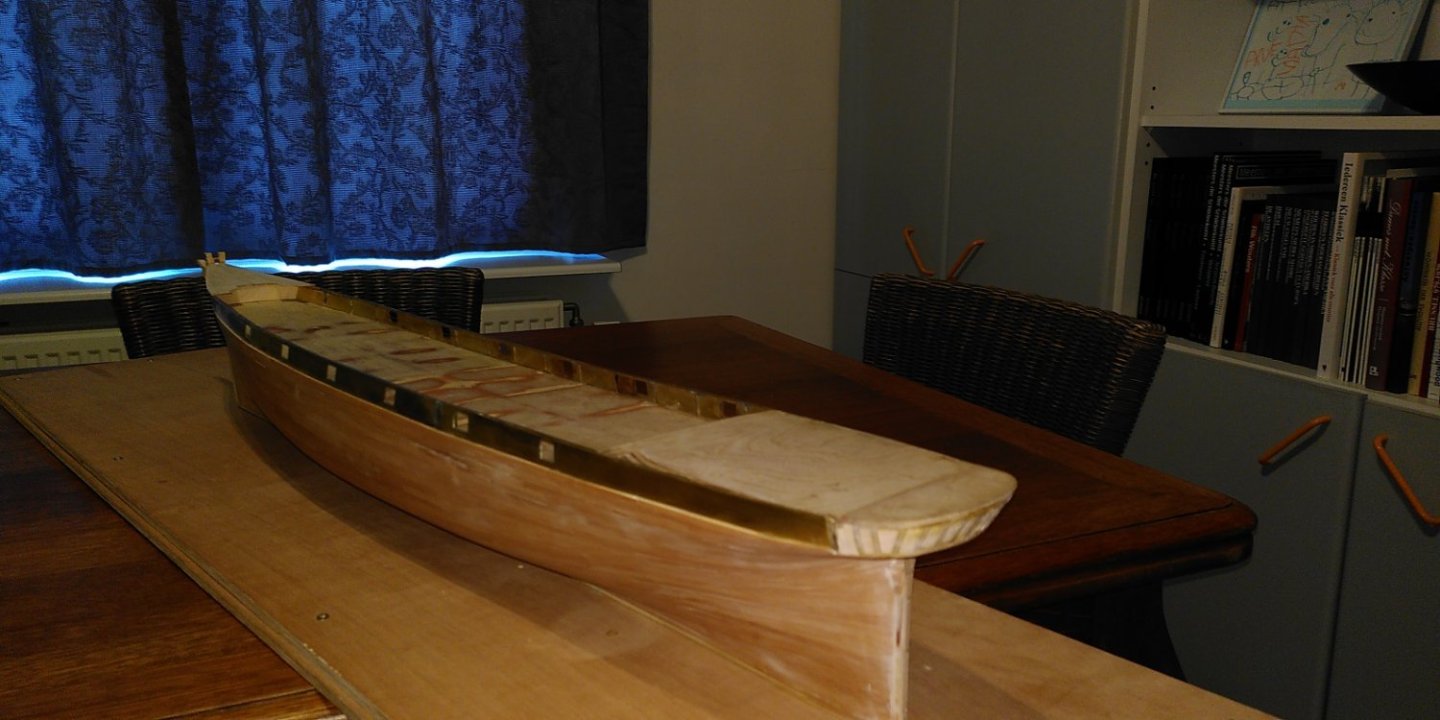
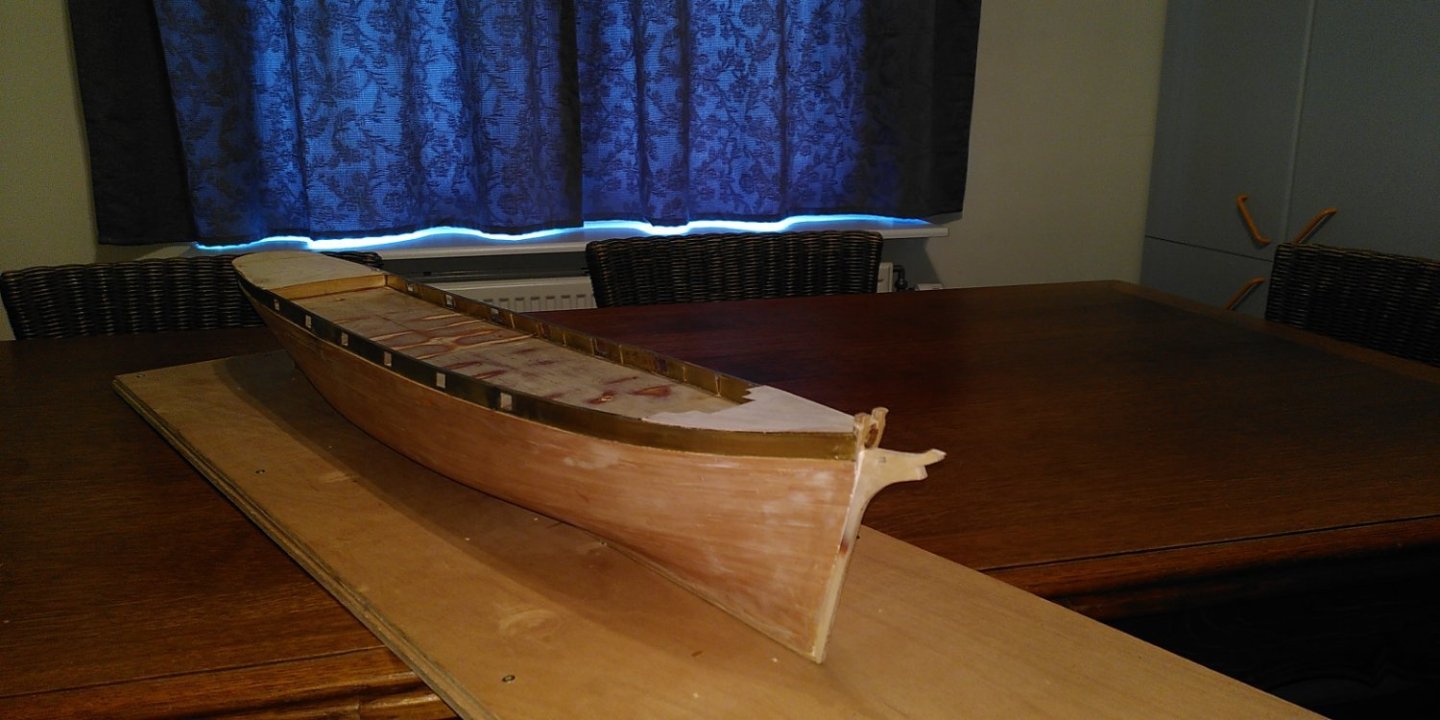
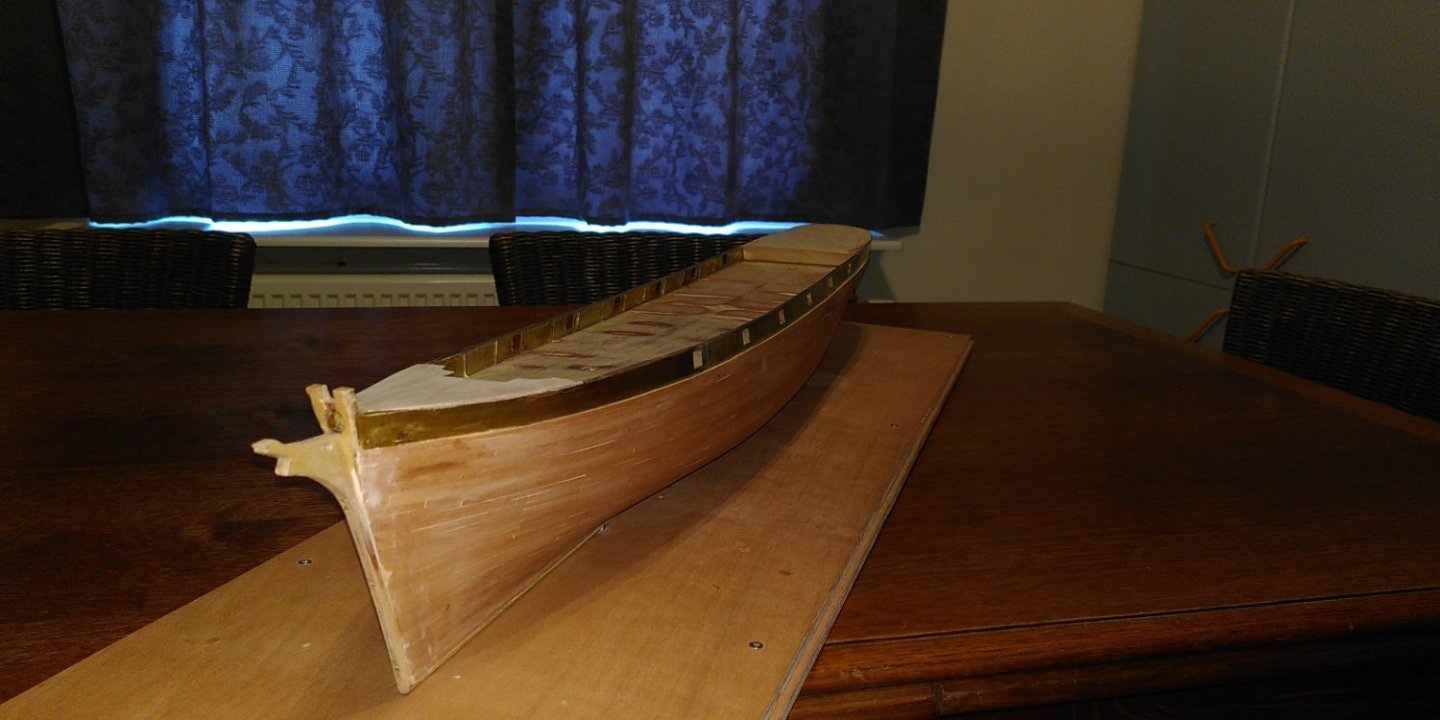
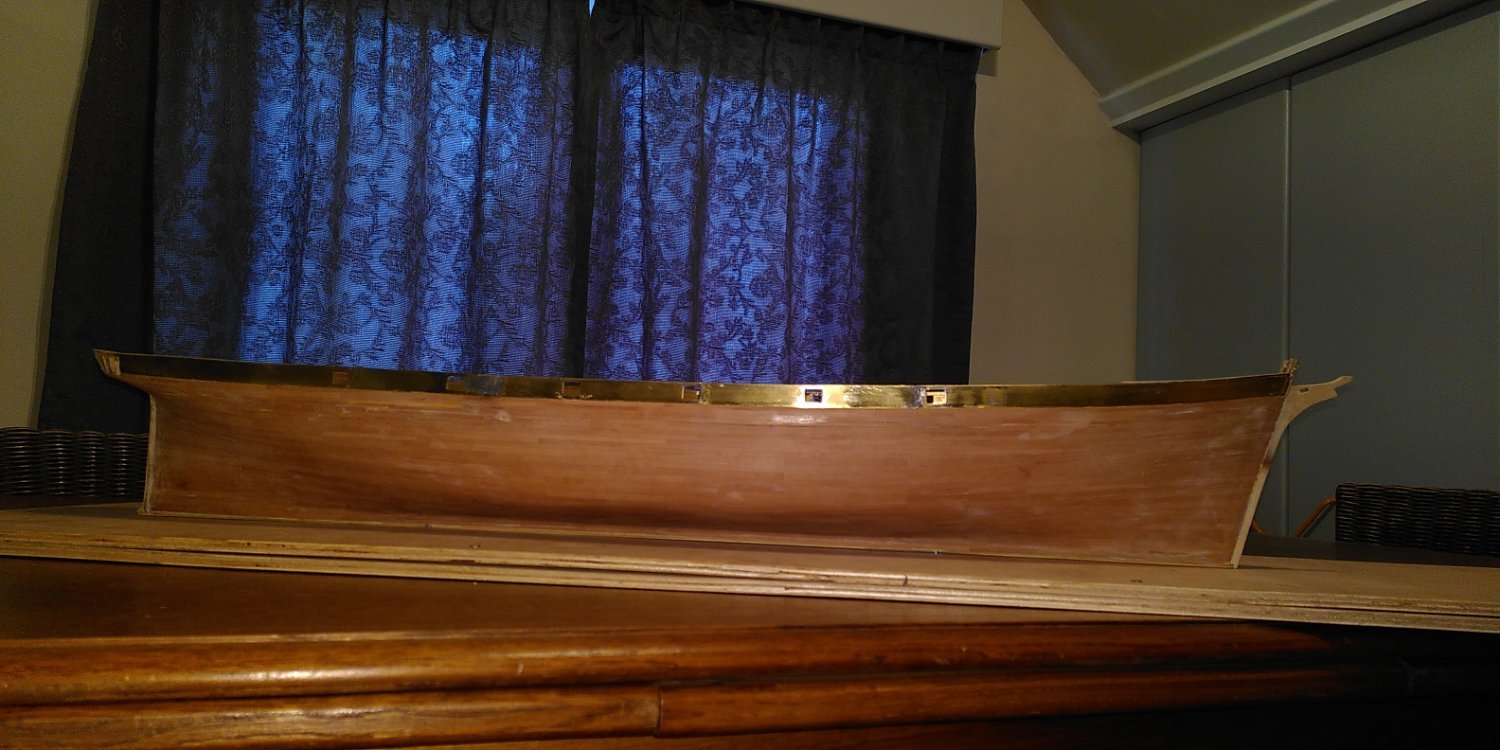
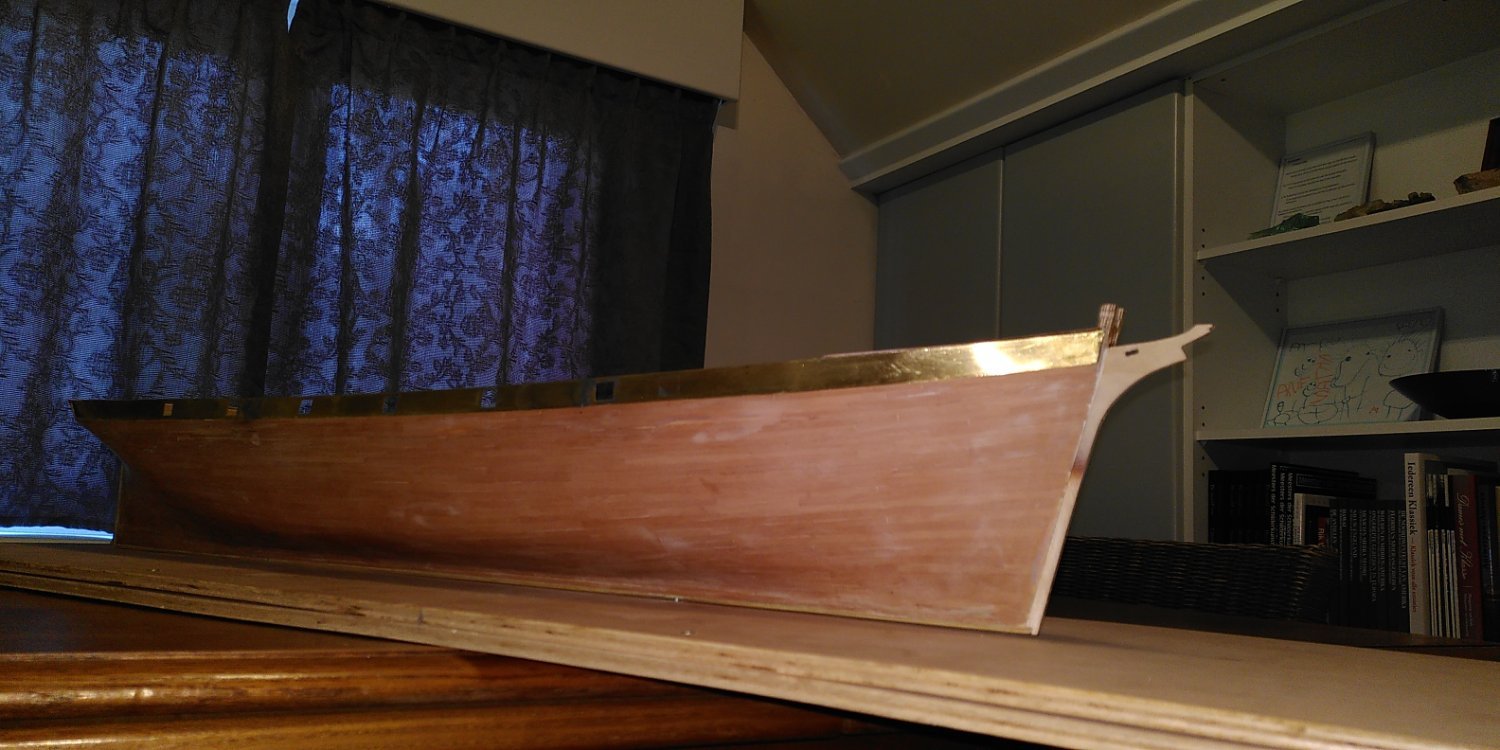
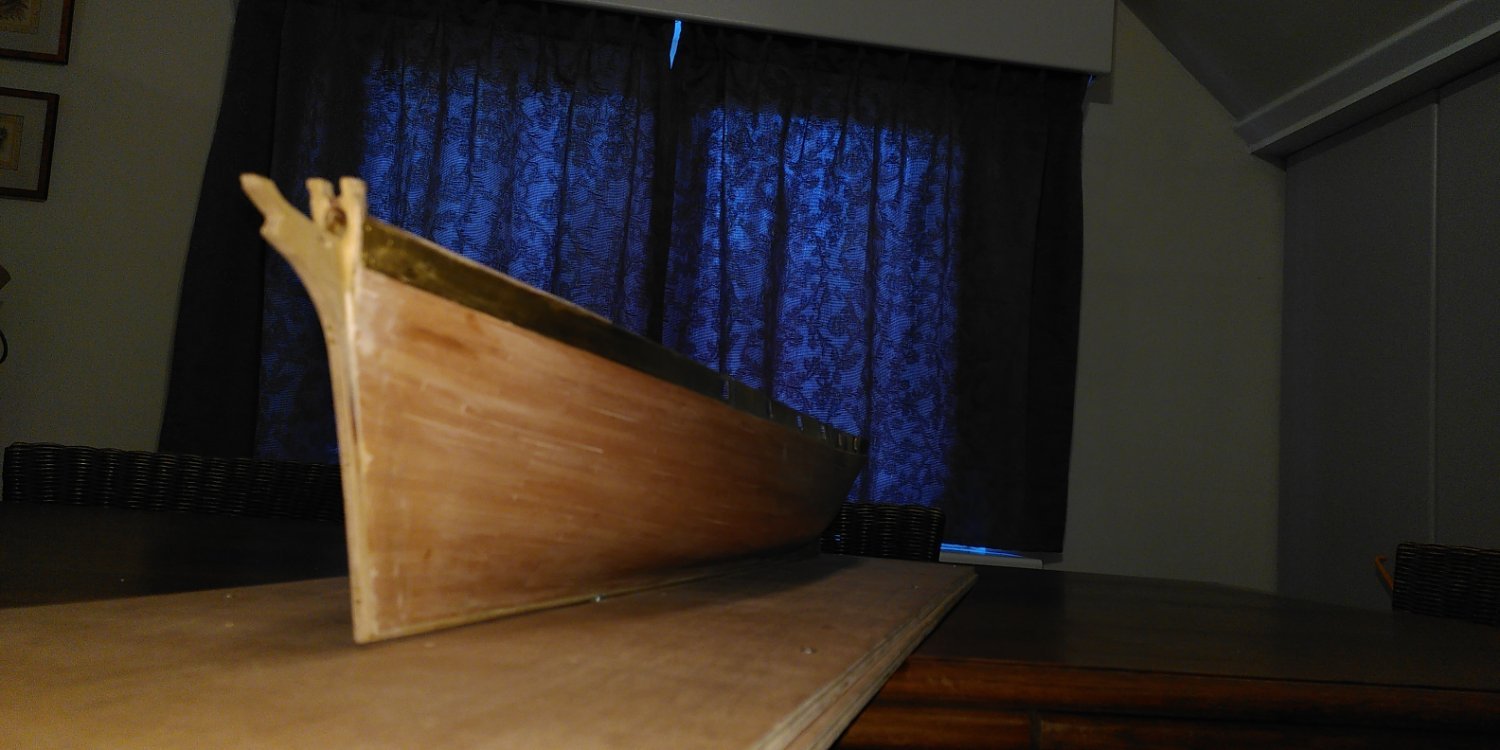
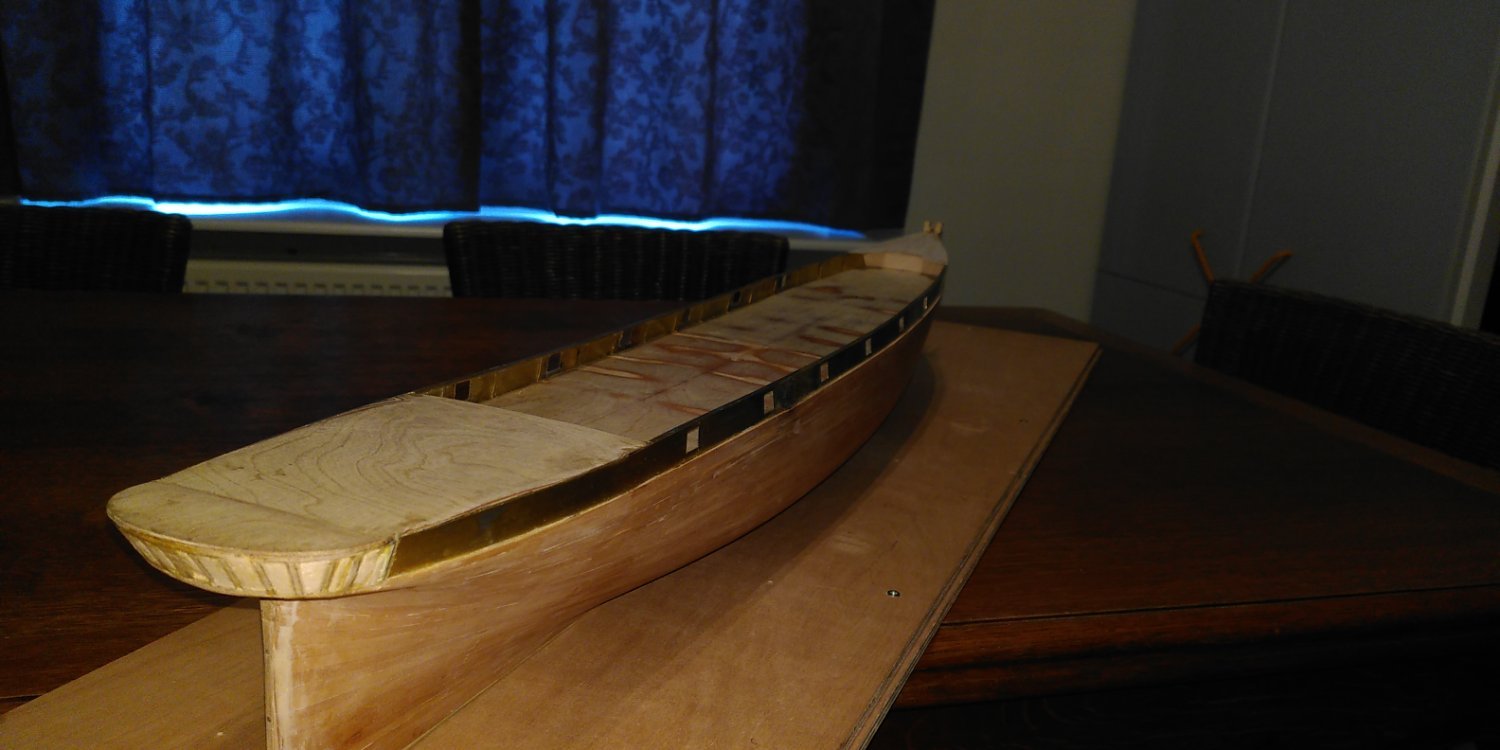
It's been some time since I did anything on my much-sidelined Sansom tear-down and re-build.
(I had to decide if it was worth progressing or not.)
After the Bismarck, I pulled this out to give me a little relief from the intensive nature, the complexity and tiny parts.
I have pretty much re-painted everything and have had to resort to brush painting everything, Airbrushing would involve far too much masking.
The LED's still work and I have made up a Mast with LED's attached although I need to adjust this "Prototype" to conceal associated wiring.
I also need to construct some "Cans" for these lights, I thought small lengths of Brass Tube with small cut-outs to allow the light to escape.
(I also need to give the Wheelhouse roof a bit of attention.)
Next tasks will be to fit Bulwark Stanchions and Railings, Paint touch-ups and a coat Matt clear.
Cheers....HOF.
Photos:


- yvesvidal, VitusBering and Paul Jarman
-
 3
3
-
Nice!!
Lots of hard work there....
Cheers....HOF.
-
45 minutes ago, rvchima said:
Harry,
You did it! Congratulations on a beautiful model. I really enjoyed following your build log. You got started before I did, and I got a lot of good information from you. Please let me know when you start something new so I can follow along.
Rod
Thanks Rod,
It turned out o.k. a few errors along the way, never to mind.
The 1/200 Trumpeter version, in my cupboard is tempting, more complex.... 🙂
At the Mo, I'm trying to work on my Sanson re-build with lighting. I'll post some photos soonish depending on progress.
Wot are you working on?
Cheers and Regards,
Harry.
- Canute, mtaylor and VitusBering
-
3
-
5 hours ago, jpalmer1970 said:
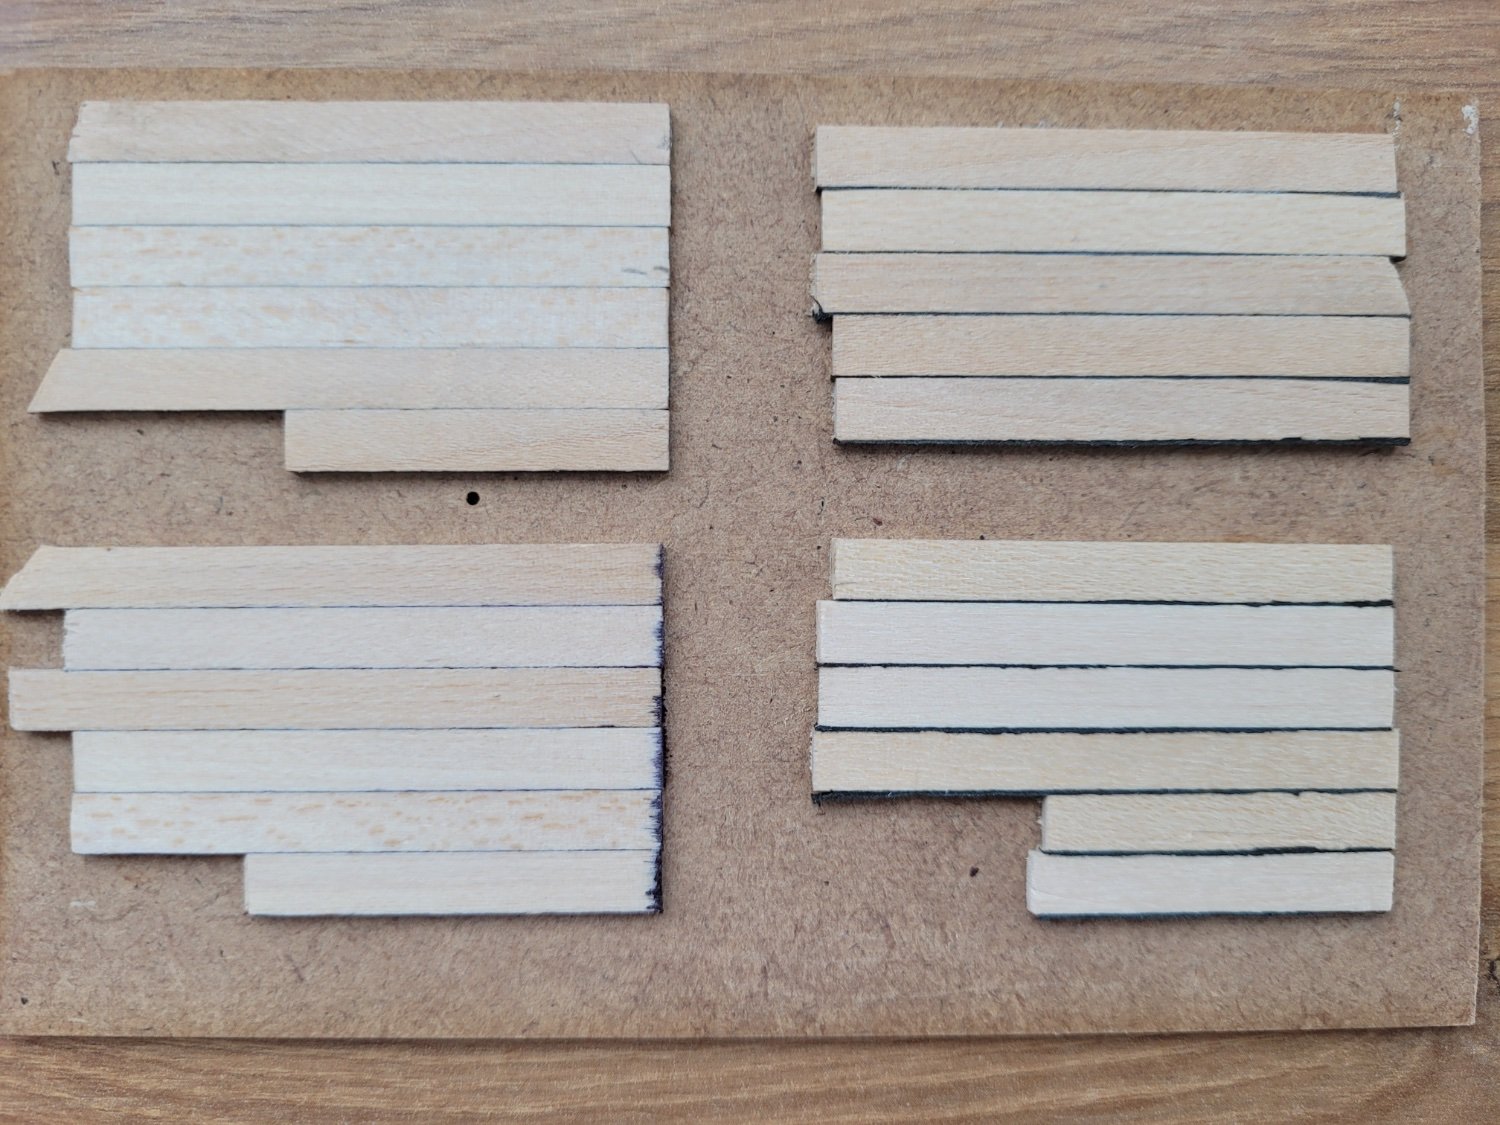
Whilst waiting to get an opportunity to work outside to continue with the fairing of the frames I spent some time considering the planking of the deck. On my previous build of HM Cutter Alert I simulated the caulking between the deck planks using a pencil along the side and end of the plank. I wanted to see how different methods of doing this compared so I put together a little trial of four different caulking alternatives.
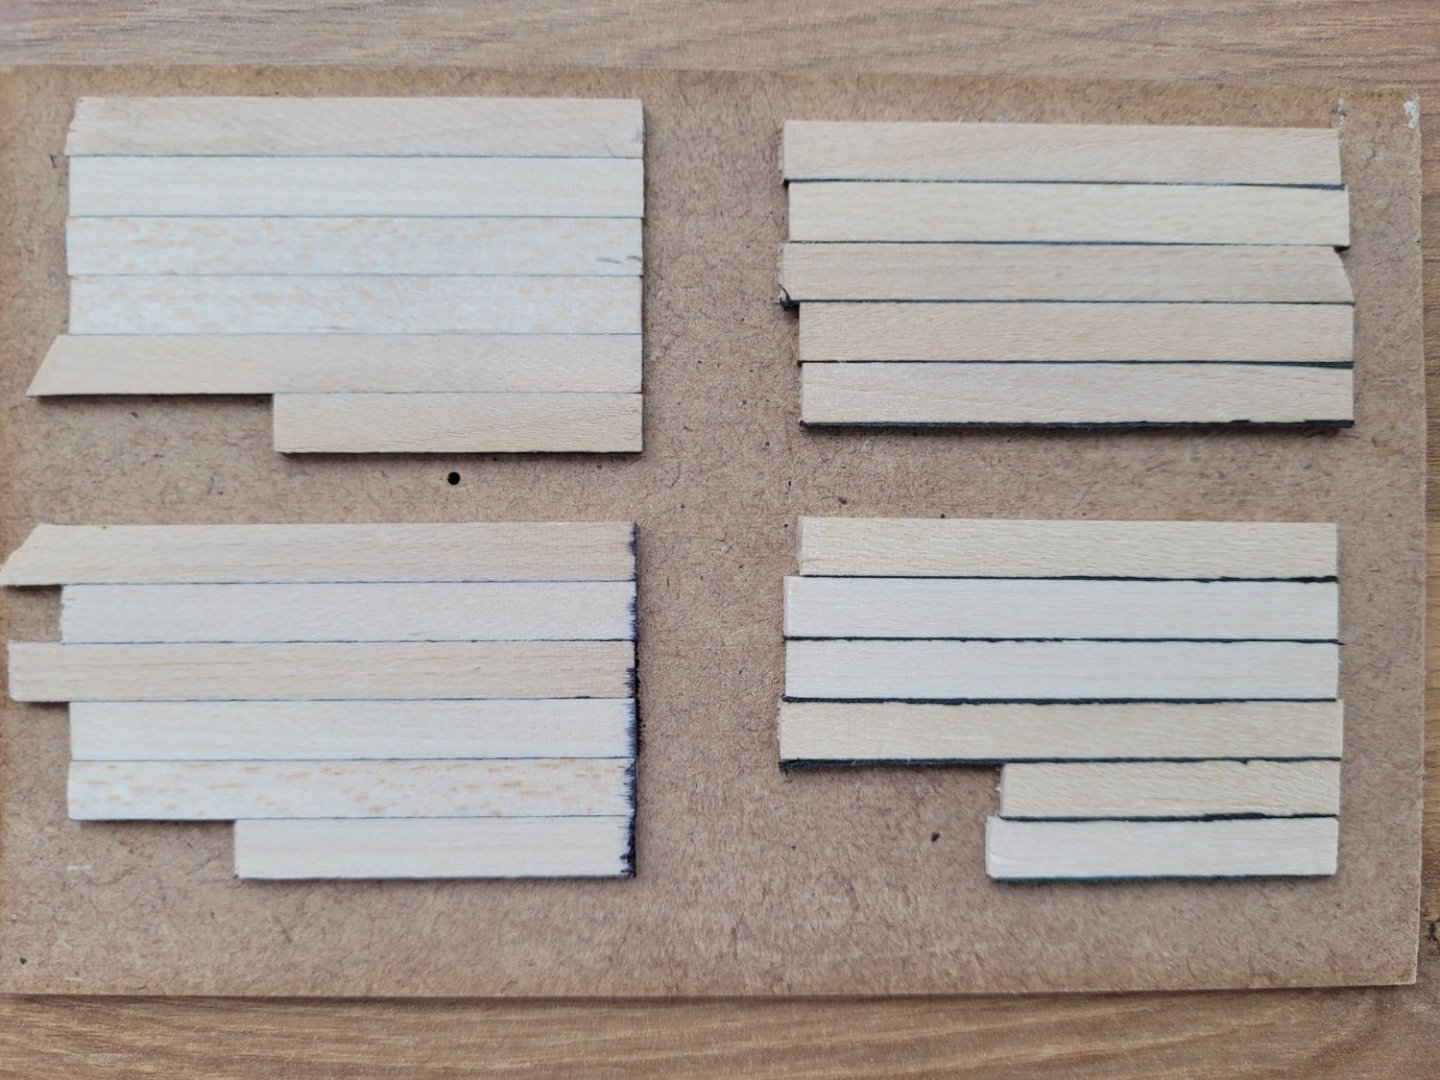
The caulking in the planking in the top left was done using a pencil as per Alert, the bottom left option used the same method but with a black marker rather than a pencil. For the top right trial piece I cut thin strips of black paper the same height as the planks (1mm) and glued these to the sides of the planks prior to putting the planks together. Finally with the bottom right section I again used black paper but cut this oversize and then trimmed it down to the plank height after the planking had been completed.
It was obvious from the outset that there was going to be a problem with the black marker at the ends of the planks where the grain was open – there was some very obvious bleeding of the ink that took place there which doesn’t look good. Of the two black paper trials it was also apparent that cutting the strips to the exact size of the plank height prior to gluing made for a neater appearance compared to trimming the paper down to size afterwards. The black paper certainly gives a more definite appearance of caulking than the pencil mark, at least at this scale – the planks I used for the trial were pieces of 5mm wide limewood. However, I am planning on using much narrower planks on the deck of the model and it is possible that the black paper would become a little too overwhelming at that scale so I have yet to decide on whether to use pencil or paper when I get to that stage. I will repeat this trial with the deck planks of the actual size I will be using later on I think.
The deck planking provided with the kit comprises 3mm wide ramin. As I mentioned in a previous post even at 3mm wide the deck planks are very oversized compared to the planking of the real Pen Duick deck and I want to scale these down to give a more realistic appearance to the model. At the widest point of the deck the kit plans show thirteen 3mm wide planks are needed on one side of the centre line. Photos of the actual Pen Duick show that there are about forty planks in that same space so planks of 1mm wide would be much more representational for the model. I think working with such narrow planks would make the job of joggling them into the king plank a lot trickier so I decided to compromise on 2mm wide planks.
I decided the easiest way to cut down the deck planking from 3mm to 2mm was with a #11 blade and with the plank clamped to my cutting mat and a metal straight edge as a guide for the cut. I experimented with three or four planks and found that it was very difficult to for me to get a consistently straight cut along the whole plank length. I also tried the same setup with some limewood planks and found that they cut much more easily and consistently so I think there must be some difference in the wood density or grain which makes the ramin more difficult to cut in this manner. Unfortunately, I don’t think I have enough of the kit supplied ramin to cover the whole deck with 2mm planks given the percentage of wastage I am going to encounter in the resizing process. If I could guarantee that all the planks could be cut down to size correctly then I should be ok but I don’t think that is going to happen. Given that the deck planking is suck a key feature of the model I decided not to risk bodging it with the resized ramin and so I have ordered some 2mm wide limewood to use instead.
3 hours ago, Thukydides said:You might want to also add whatever finish you are doing before you commit to one method or another. The calling lines were much more visible for me after i added WOP than before.
Personally I like the slightly more subtle look of the pencil lines.
Yup, I did the "Pencil" Caulking on my PD, not so much "In your face" as a Sharpie.
In my experience, to stop any Sharpie bleed, use Sanding Sealer first.
I guess it's all a matter of personal preference. 🙂
Cheers....HOF.
- Knocklouder and Thukydides
-
2
-
3 hours ago, BobG said:
That's one big, impressive model, Harry! Congratulations on completing such a complex project with such a fine result. I've enjoyed the ride and look forward to following your next project.
Thanks Chap!!
It was quite complex. The Trumpeter BM looks to be even more so.
Just tinkering with my Sanson re-build at the mo. (Something a little simpler.... 🙂)
Cheers and Regards,
Harry.
-
9 hours ago, stuglo said:
"am working on the handrails. It's all done with 0.2 mm black monofilament line,"
Was it easy to fit the CONTAINMENT rails after handrails, or better to do these first?
Your build is an excellent one. My painting with spray cans was OK for the hull but excessive for the deck fittings. Probably my inexperience and lack of patience.
Hi Chap,
Thought I'd chime in.... 🙂
I have just completed my Bissie, I am unsure what Rod did with his Interference Grids but in my experience, these are mounted first. (Mine were at the very edge of the Decking with the Main Deck Railing running along the "Gutter."
The Railing I found to be difficult....
I'll let Rod reply to his method of installing these.
Cheers....HOF.
-
4 hours ago, LeoM said:
Oeps, I notice that it is more than 6 months ago since I last posted some progress on my Cutty Sark. Not that I have been working constantly on her, but the brass bulwark caused more scratching behind the ear than I expected. To tell the truth there were more than 526 planks to be laid on the 2nd layer. But having polished the hull the best I could, it is a joy to feel the lines of the hull 😄
And now I will have to start on the 2500+ copper plates 🤔


Hi there,
Looking really good!!
Are you intending to Plank inboard of the Bulwarks?
Cheers....HOF.
-
Hi Ian,
Looks like your Airbrushing skills are not too bad!! 🙂
So, Wots your next task on your radar?
(BTW I pulled out the Trumpeter version to have a scan of the kit and Mk1 PE. I ordered a Pontos PE upgrade to embellish the MK1 stuff.
I'm not going to "Dive In" just yet but am very tempted....)
Cheers....HOF.
-
-
-
11 hours ago, gjdale said:
Congratulations on finishing a fine build HOF. Despite the many challenges along the way, you have produced an excellent model - one that you should be rightly proud of.
6 hours ago, VitusBering said:Very, very nice.
6 hours ago, ccoyle said:Congratulations! That's a suitably impressive-looking model!
5 hours ago, Kevin said:very nice indeed, well done, I love, thanks for sharing yr journey with us
5 hours ago, CDW said:Such a beautiful Bismarck. Wonderful. I admire your tenacity and the finished product. Completely outstanding.
Thank you all very much!!
I reckon that I can do better hence looking at the 1/200 Trumpeter Bismarck.
The only problem is the size of these things.
Making the Cabinets is not the issue, its' where to put them.... 🙂
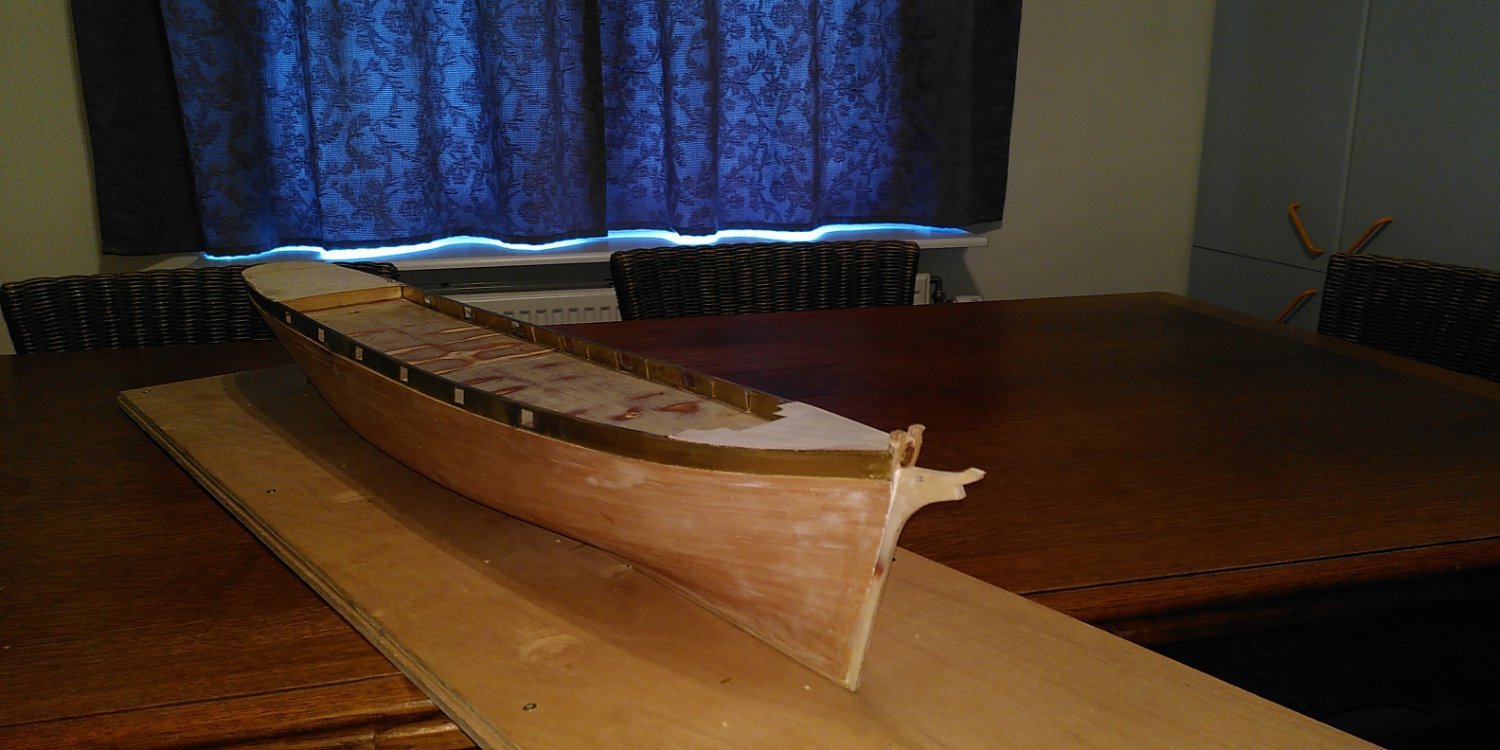
I think that I should put some effort into the Sanson that is not too, too far away from completion.
Cheers and Regards,
Harry.
-
-
-
Hi All,
I have decided to call time on the Bismarck and say "Finished."
Final touch-ups completed today and a couple of coats of Satin Clear.
I did not get to deploying Accommodation Ladders, oh well....
Hawse Drums were re-wound with A/L 0.25 Black Thread, much better, Anchor Buoys also re-wound and fitted.
I guess an interesting build for me, my first Ship with "Guns" and a great PE primer having never dabbled in the medium before.
It's not perfect but should pass muster, I guess that's part of building with 1.5 arms!! 🙂
Would I do it again? Definitely!! I'm sort of gearing up to have a good look at my Trumpeter version with MK1 detail PE.
I have issues with some items included in the kit contents but they got resolved o.k.
Many thanks to all that have hit the "Like" thingy, much appreciated.
A few of those I wish to thank for thier input and knowledge, well you know who you are, rvchima, Rod, joe100, Joe and many others that have from time-to-time offered ideas or constructive criticism. 🙂
Last but definitely not least, my lovely lady, for assisting completion for this old Chap with one and a bit working appendages.
So, some photos in no particular order....
I almost forgot to mention, the Color/Camo scheme is for this day in history May 21 1941. (I believe that the Stripes/Stern Wave was removed shortly afterward.)
Cheers....HOF.
![DSC_0551[1].jpg](https://modelshipworld.com/uploads/monthly_2023_05/DSC_05511.jpg.2e41f41e951aa128913d676e60fec83c.jpg)
![DSC_0552[1].jpg](https://modelshipworld.com/uploads/monthly_2023_05/DSC_05521.thumb.jpg.842a0039384d8c4607eeb4cdebf27615.jpg)
![DSC_0553[1].jpg](https://modelshipworld.com/uploads/monthly_2023_05/DSC_05531.thumb.jpg.5fd71e86da467e68ef5f94a978ae6106.jpg)
![DSC_0554[1].jpg](https://modelshipworld.com/uploads/monthly_2023_05/DSC_05541.thumb.jpg.233ab625f77a6e4b82cef24020cb38dc.jpg)
![DSC_0555[1].jpg](https://modelshipworld.com/uploads/monthly_2023_05/DSC_05551.jpg.fe8160d92d8b8fdb01f2b1f52ac065ad.jpg)
![DSC_0556[1].jpg](https://modelshipworld.com/uploads/monthly_2023_05/DSC_05561.thumb.jpg.e490f4e906e29ad0d4b25cd03e11e7a5.jpg)
![DSC_0557[1].jpg](https://modelshipworld.com/uploads/monthly_2023_05/DSC_05571.jpg.2e9c1b6cab4633d7e3a0e69e25d37b4e.jpg)
![DSC_0560[1].jpg](https://modelshipworld.com/uploads/monthly_2023_05/DSC_05601.thumb.jpg.cef800da9d0d06da1464698f45e93236.jpg)
![DSC_0561[1].jpg](https://modelshipworld.com/uploads/monthly_2023_05/DSC_05611.jpg.c51b05fca4df047f9dbe21bc0eba8754.jpg)
![DSC_0562[1].jpg](https://modelshipworld.com/uploads/monthly_2023_05/DSC_05621.jpg.ff9e6a1d56269799f6e17e9565fe18a7.jpg)
![DSC_0563[1].jpg](https://modelshipworld.com/uploads/monthly_2023_05/DSC_05631.jpg.9561f4b3badb702e02ef34ae5a66bd3c.jpg)
![DSC_0564[1].jpg](https://modelshipworld.com/uploads/monthly_2023_05/DSC_05641.jpg.7a9f0e02f02ffb75515a56ad8e54ab78.jpg)
-
3 hours ago, jpalmer1970 said:
Thanks HOF. Yes, i have put some tape on the edge of the deck in an effort to protect it from any wayward swipes during sanding. There is a lot of wood to remove from the keel pieces but the plan is to take it slow and steady and not muck it up! I also plan to joggle the deck planks into the king plank. I am toying with the idea of reducing the deck planks from 3mm to 2mm wide so that it will look a little more like the deck of the real ship but we'll have to see whether I can do that consistently to all of the planks, as it will be very obvious if some of the planks are wider than others.
I guess if you reduce the thickness of the Decking Planks, you'll need to check if your kit provides enough stock.
Have you looked at obtaining 2.0mm wide planks?
(M<y experience with A/L stuff is that they usually provide more than enough material, not so with my PD Kit.... 🙂)
Yup, Joggling will look really good, I did this on mine with a bit of trial/error.
The Mahogany for the King Plank/Coamings/Etc was very brittle in my kit with the only way to prevent wastage was to use a very fine saw blade across grain.
Looking forward to your "Fairing" work.
Cheers and Regards,
Harry.
- BobG, Bryan Woods and jpalmer1970
-
3
-
15 hours ago, jpalmer1970 said:
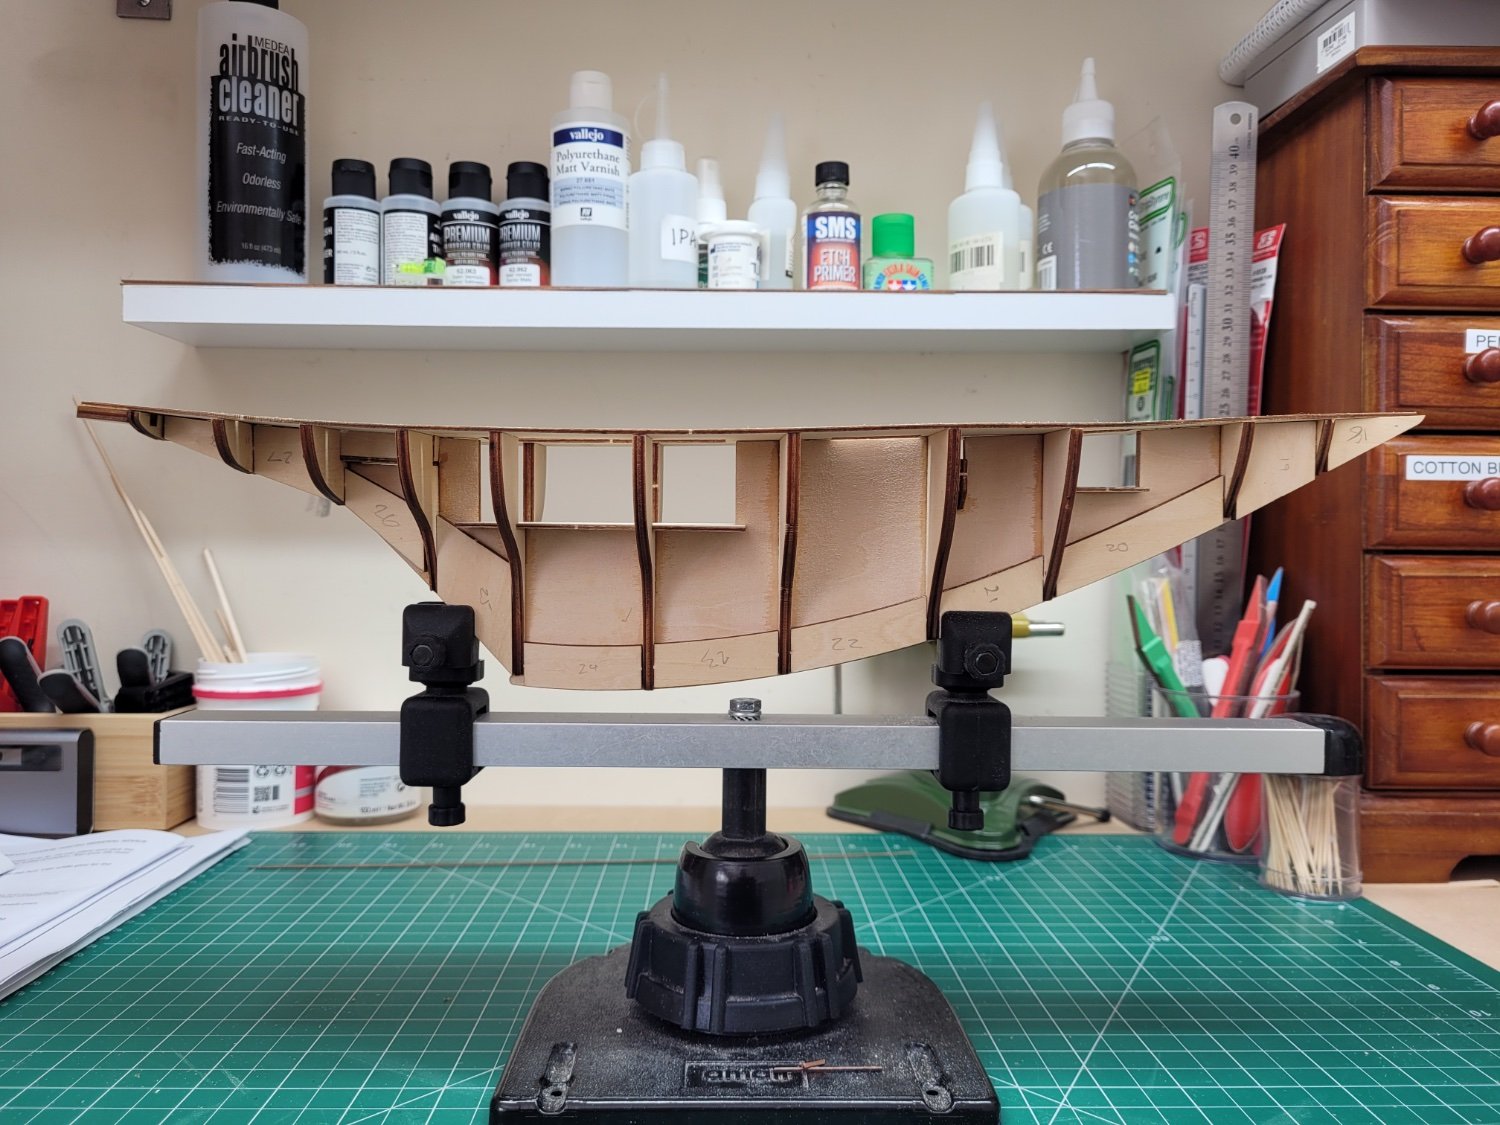
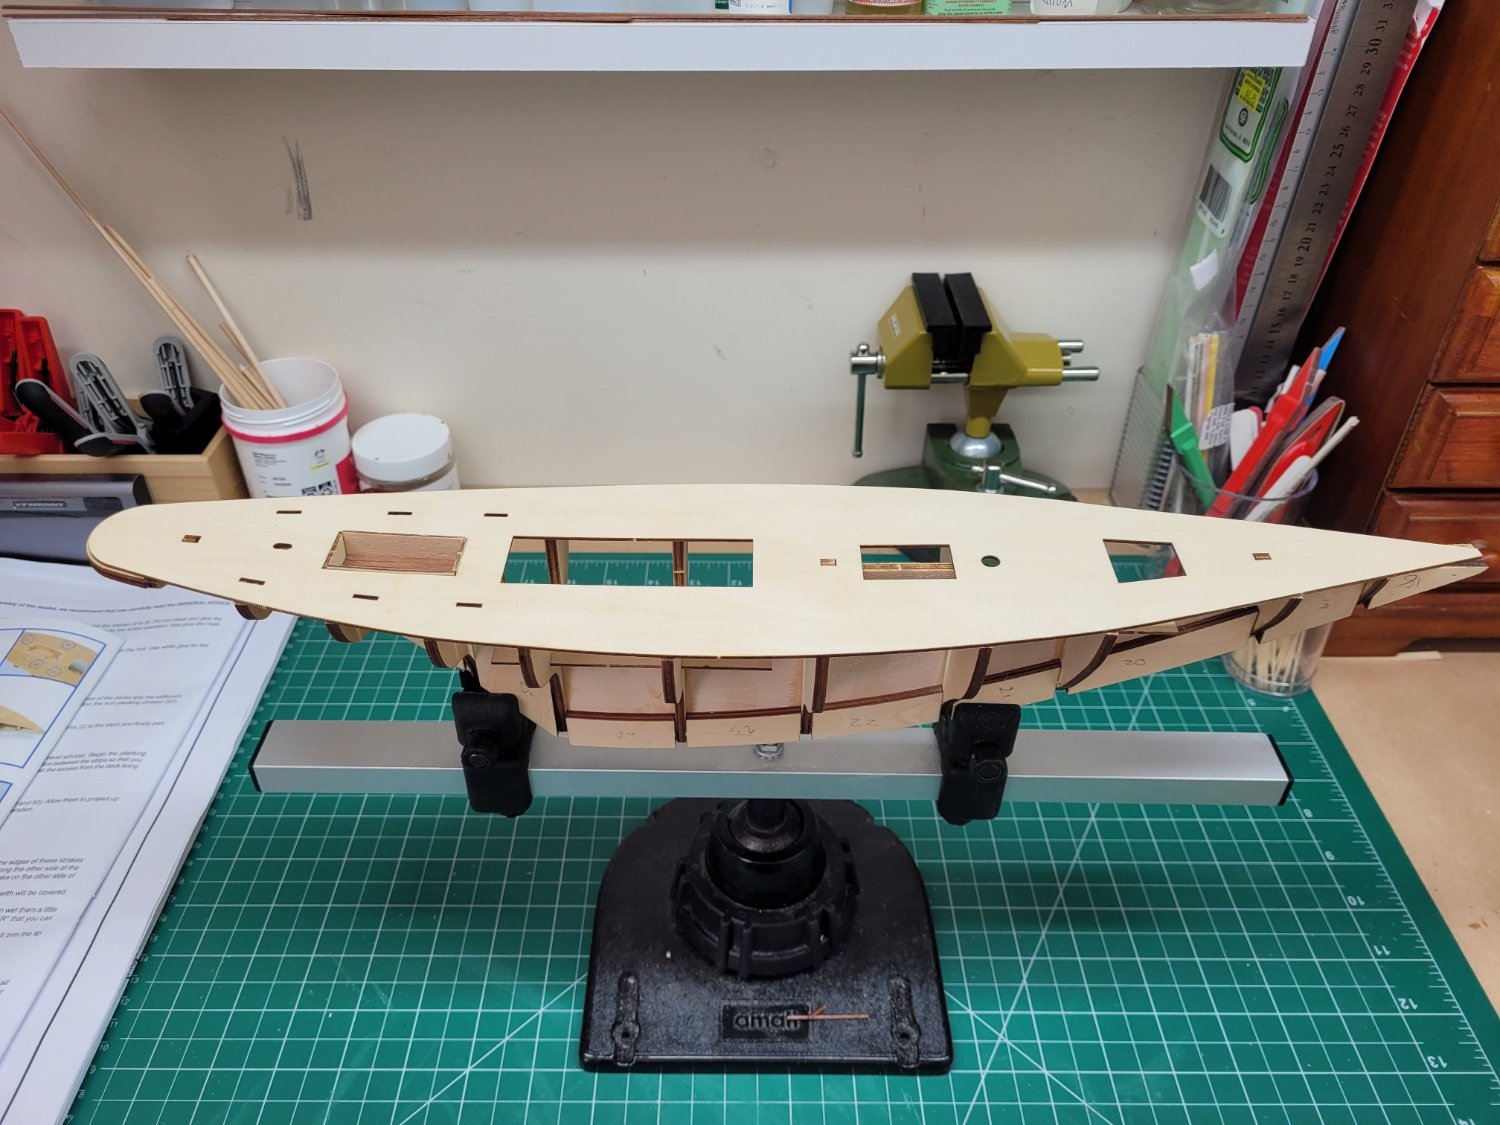
Today’s task was to fit the keel stiffeners, parts 18-28, on either side of the false keel. The written instructions merely indicate that these need to be glued either side of the keel but as @BobG pointed out in his log there is more to this than the instructions suggest. A careful look at the plans indicates that whilst the forward two pairs of stiffener pieces (18-19) and the rear four pairs of stiffener pieces (25-28) are sited flush with the bottom of the keel, the five middle pairs of stiffeners are actually located 1mm up from the base of the keel. I found a scrap of plank 1mm thick and used this as a shim to correctly gauge the positioning of these parts when gluing them into place.

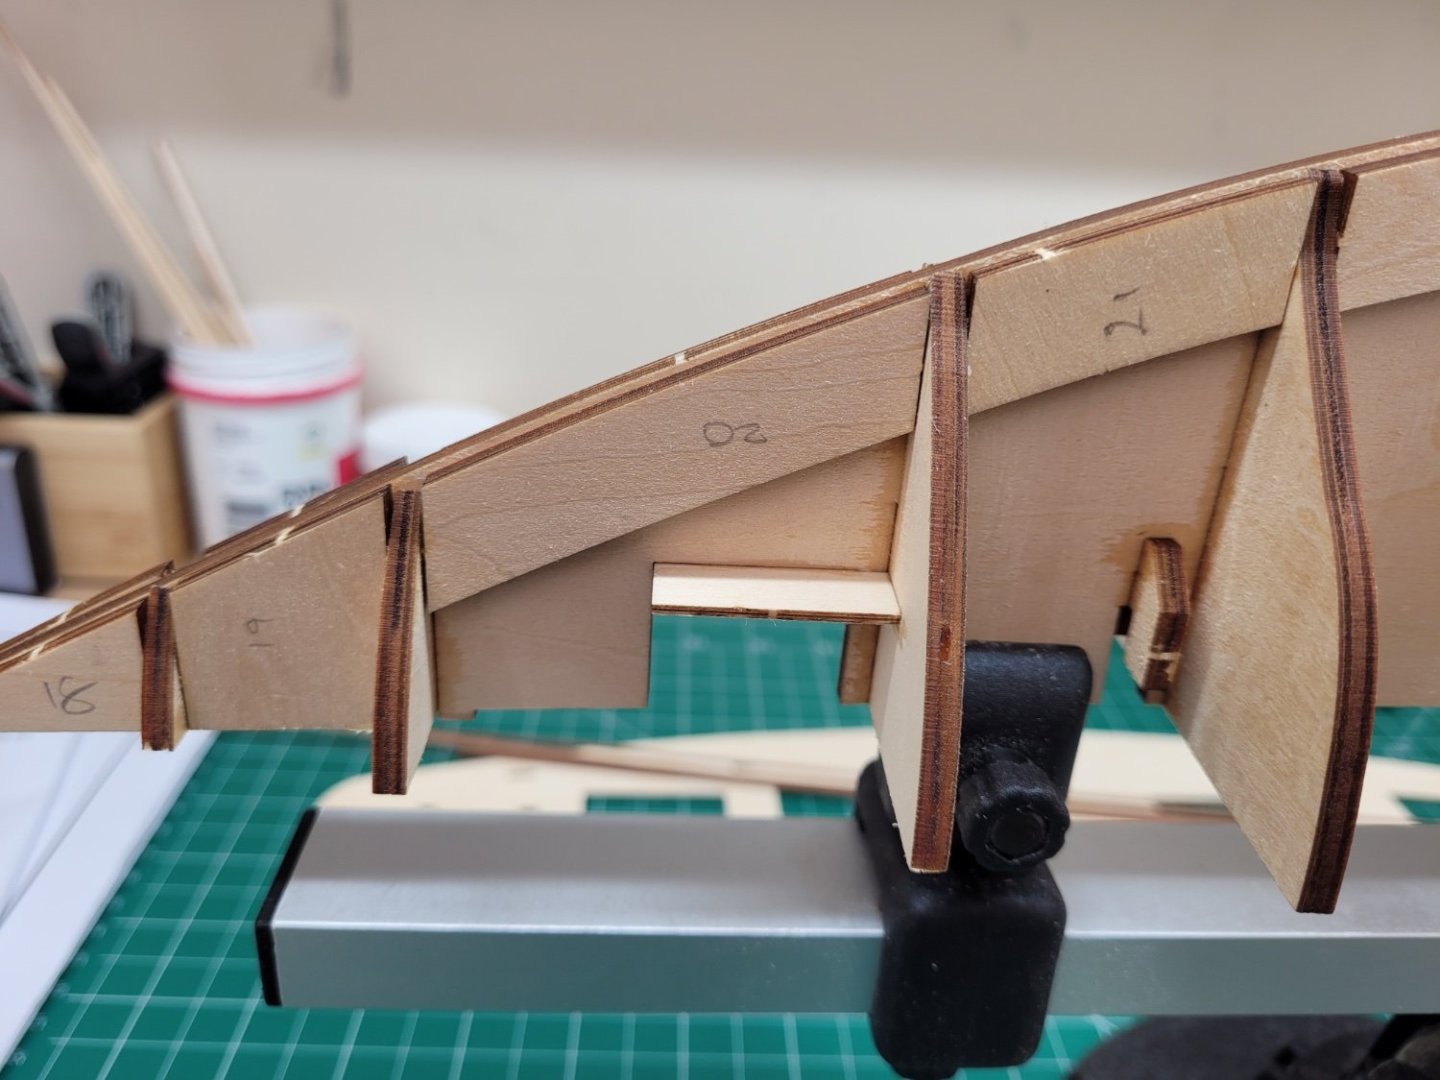
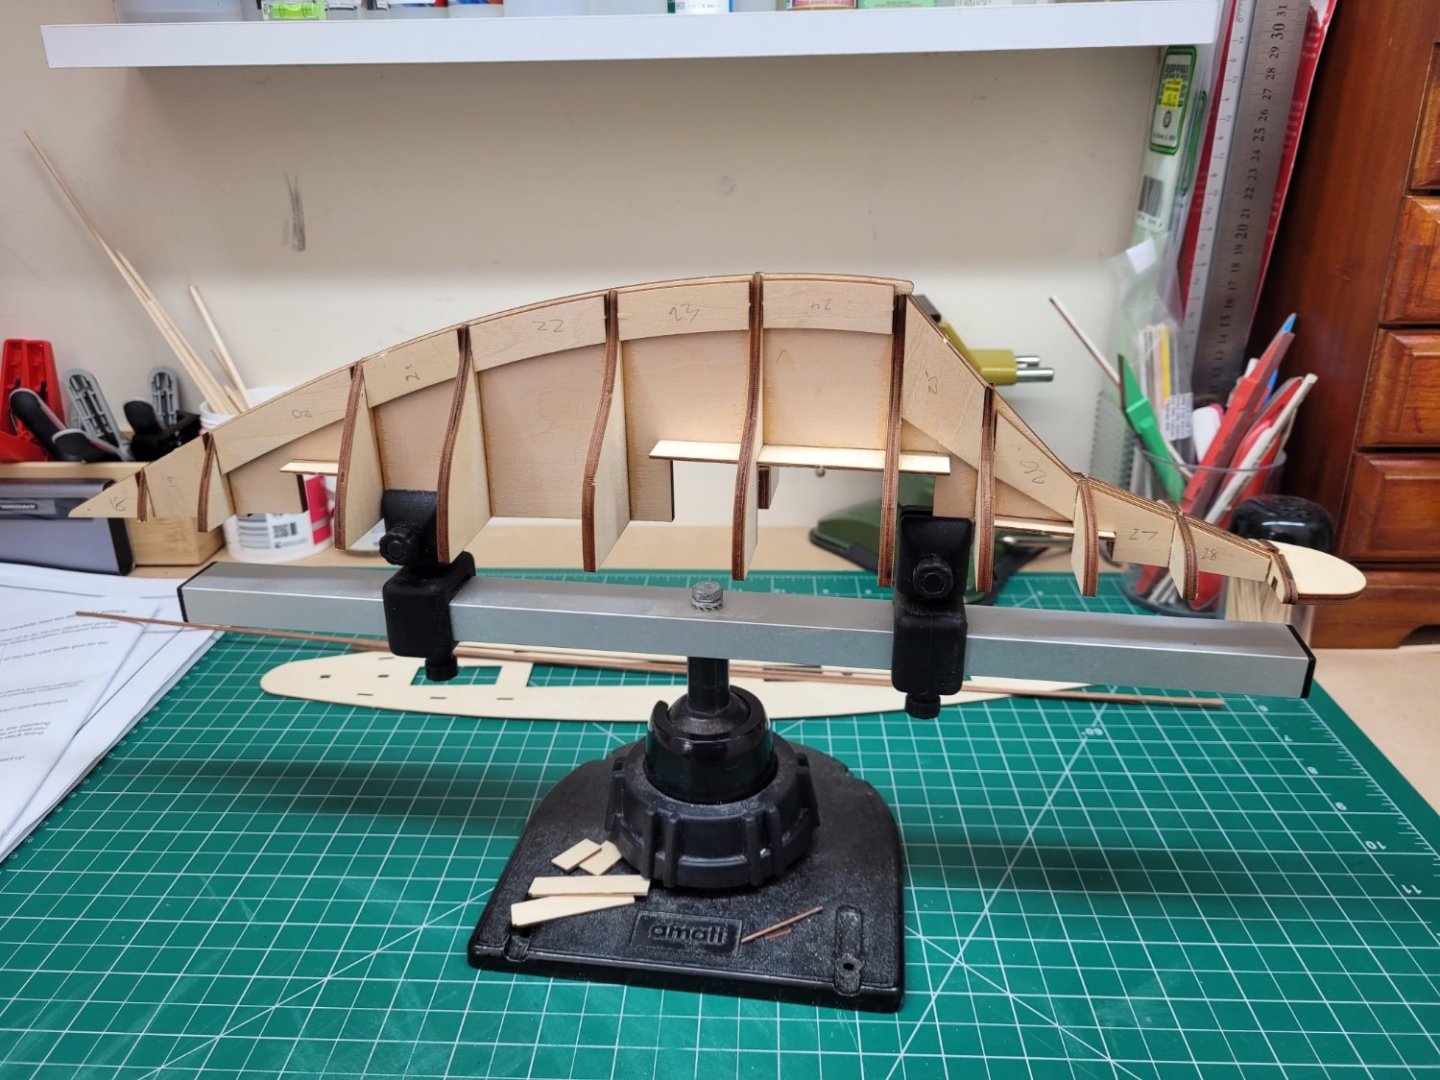
The next step in the instructions is to glue on the plywood deck and then frame the steerman’s hatch or cockpit. The cockpit floor and sides are planked with mahogany later in the build but it seemed to me that it would be easier to plank the floor of the cockpit now before the plywood deck was glued onto the frames. There are a variety of mahogany strips included with the kit and the instructions suggest using the 1x5mm sized strip for this. However, I was not very keen on using these as the strips in my kit are very mottled and the grain pattern is quite prominent. This strip is also later to be used for the framing of the deck hatches and I would prefer to have something different. I had previously purchased some 1x6mm mahogany strip and this is much less mottled and altogether a nicer piece of wood. However, being 6mm wide it is wider than the kit suggestion and so I decided to trim my strip down to two 3mm wide pieces. I then used this to plank the floor of the cockpit – I think the 3mm wide planks give a much better scale effect that the 5mm wide kit suggestion.
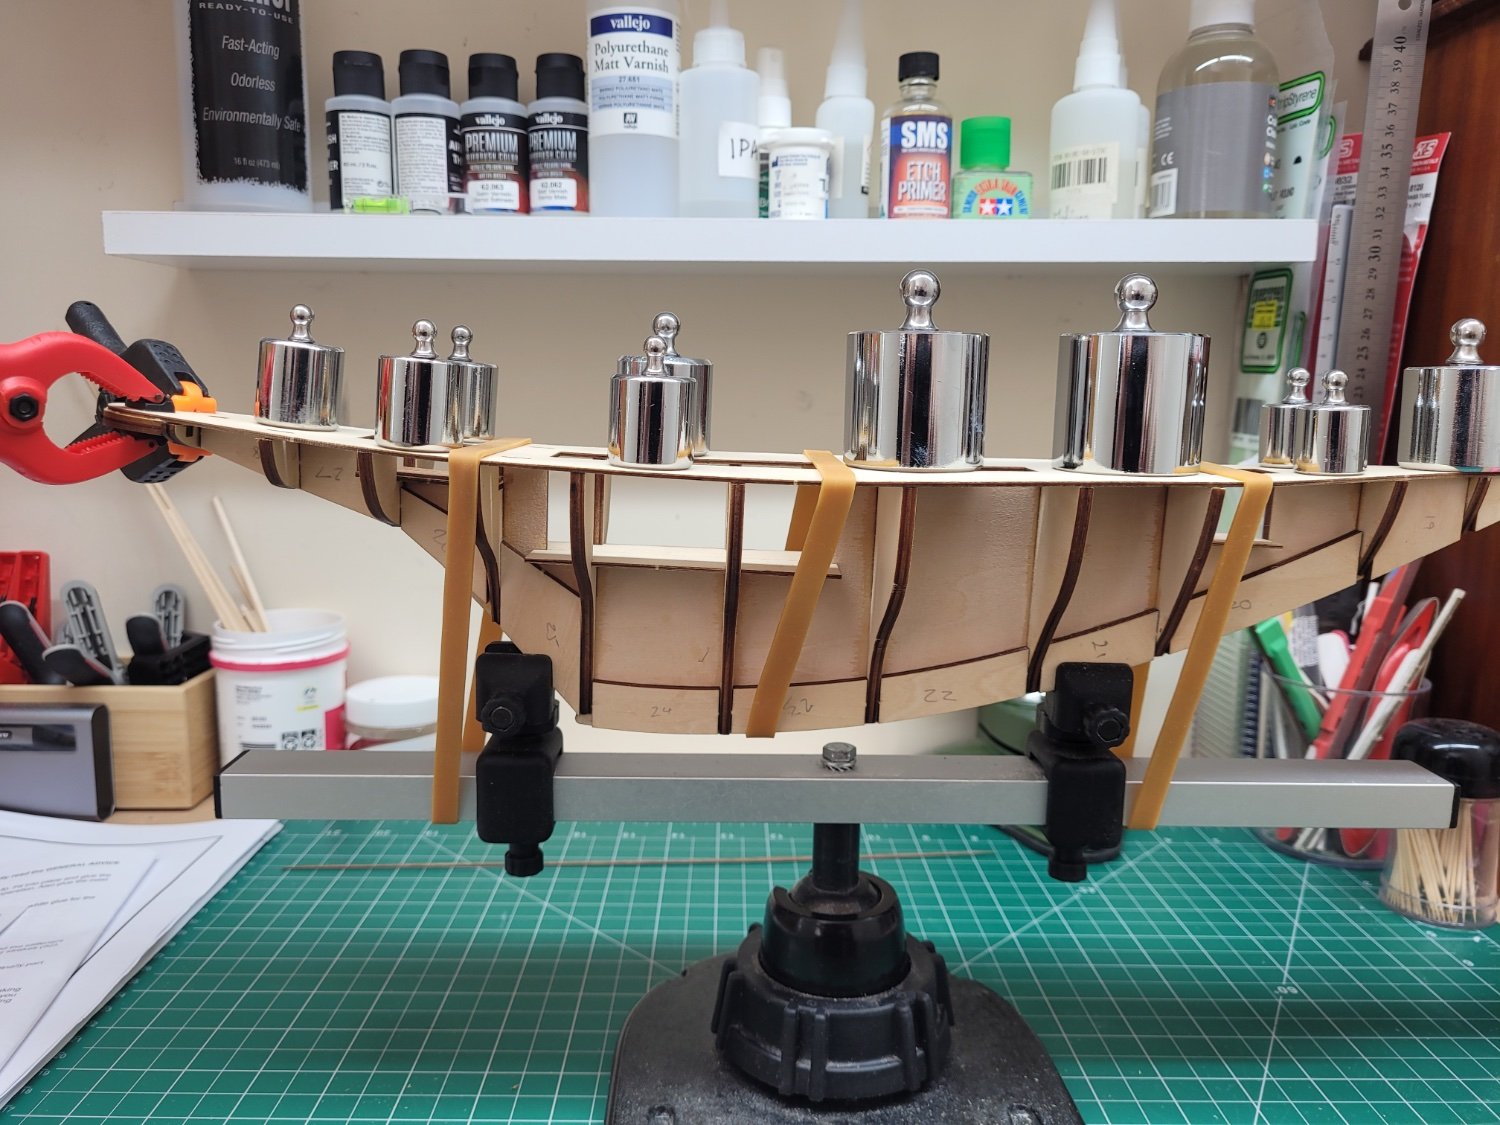
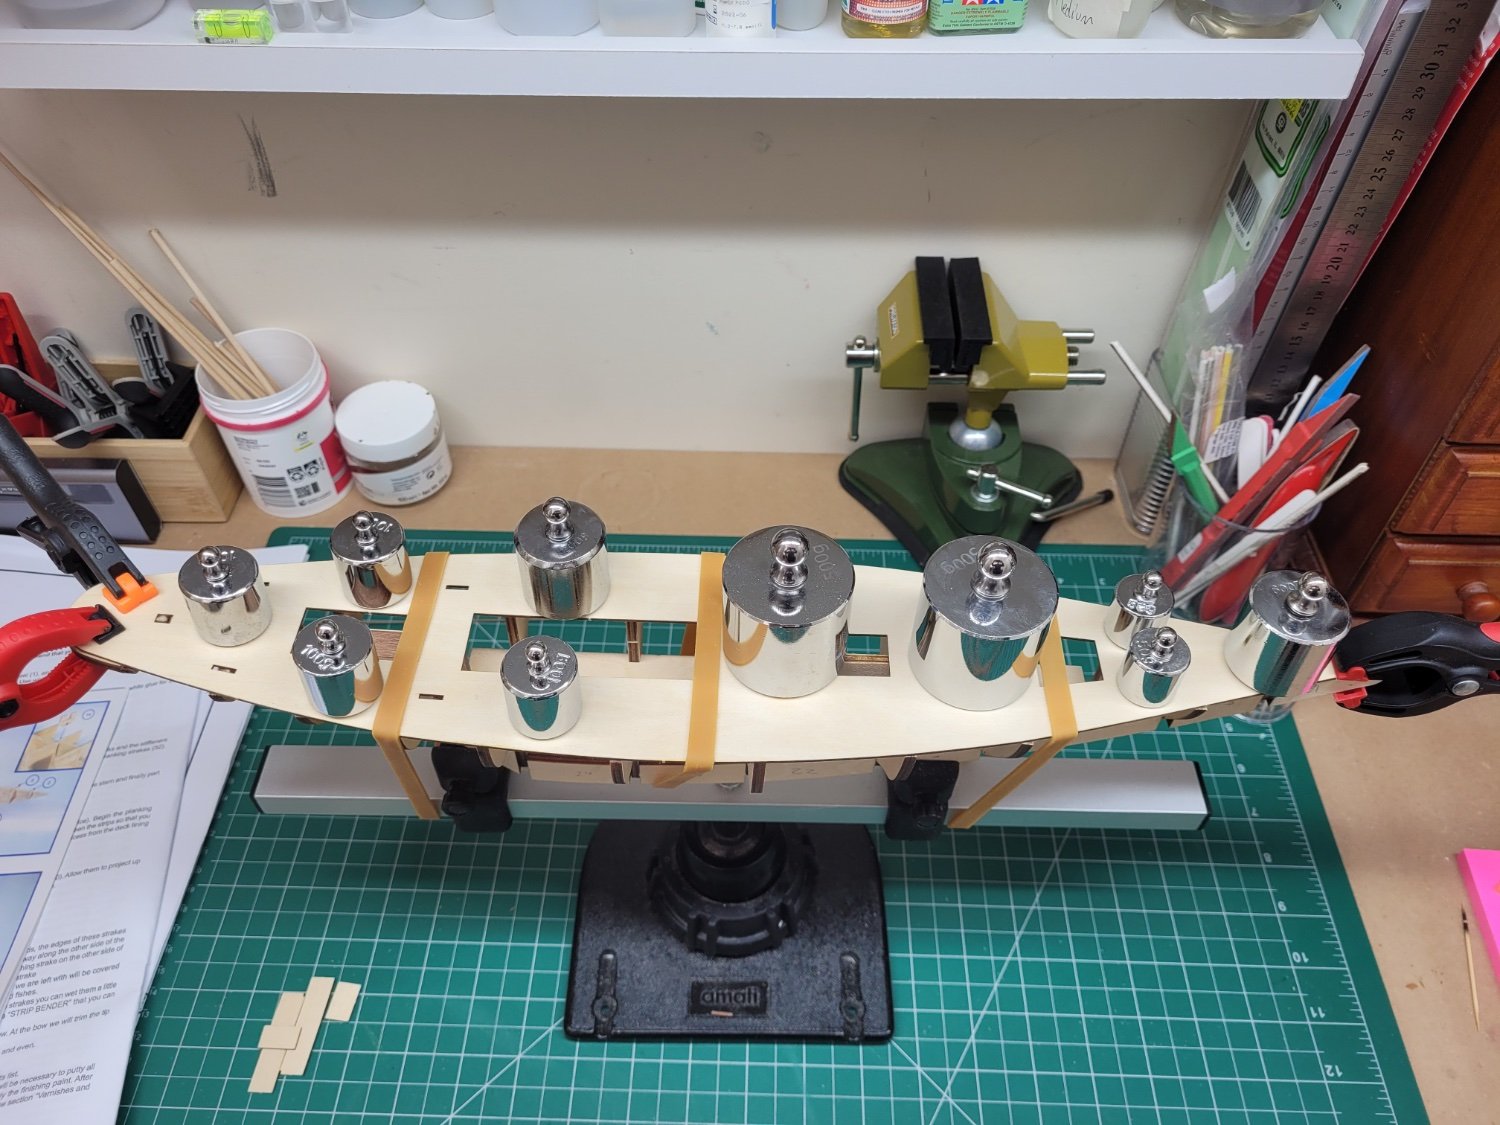
After planking the cockpit floor I then gave the top of the false keel a quick run over with a sanding block just to make sure the plywood deck would sit nicely across all of the frames. I used PVA glue on the frames and false keel and set the deck in place, securing it with elastic bands and small weights to ensure a good solid fit across all of the frames.


Finally, the walls of the cockpit were glued into place. All is now ready for fairing of the frames.

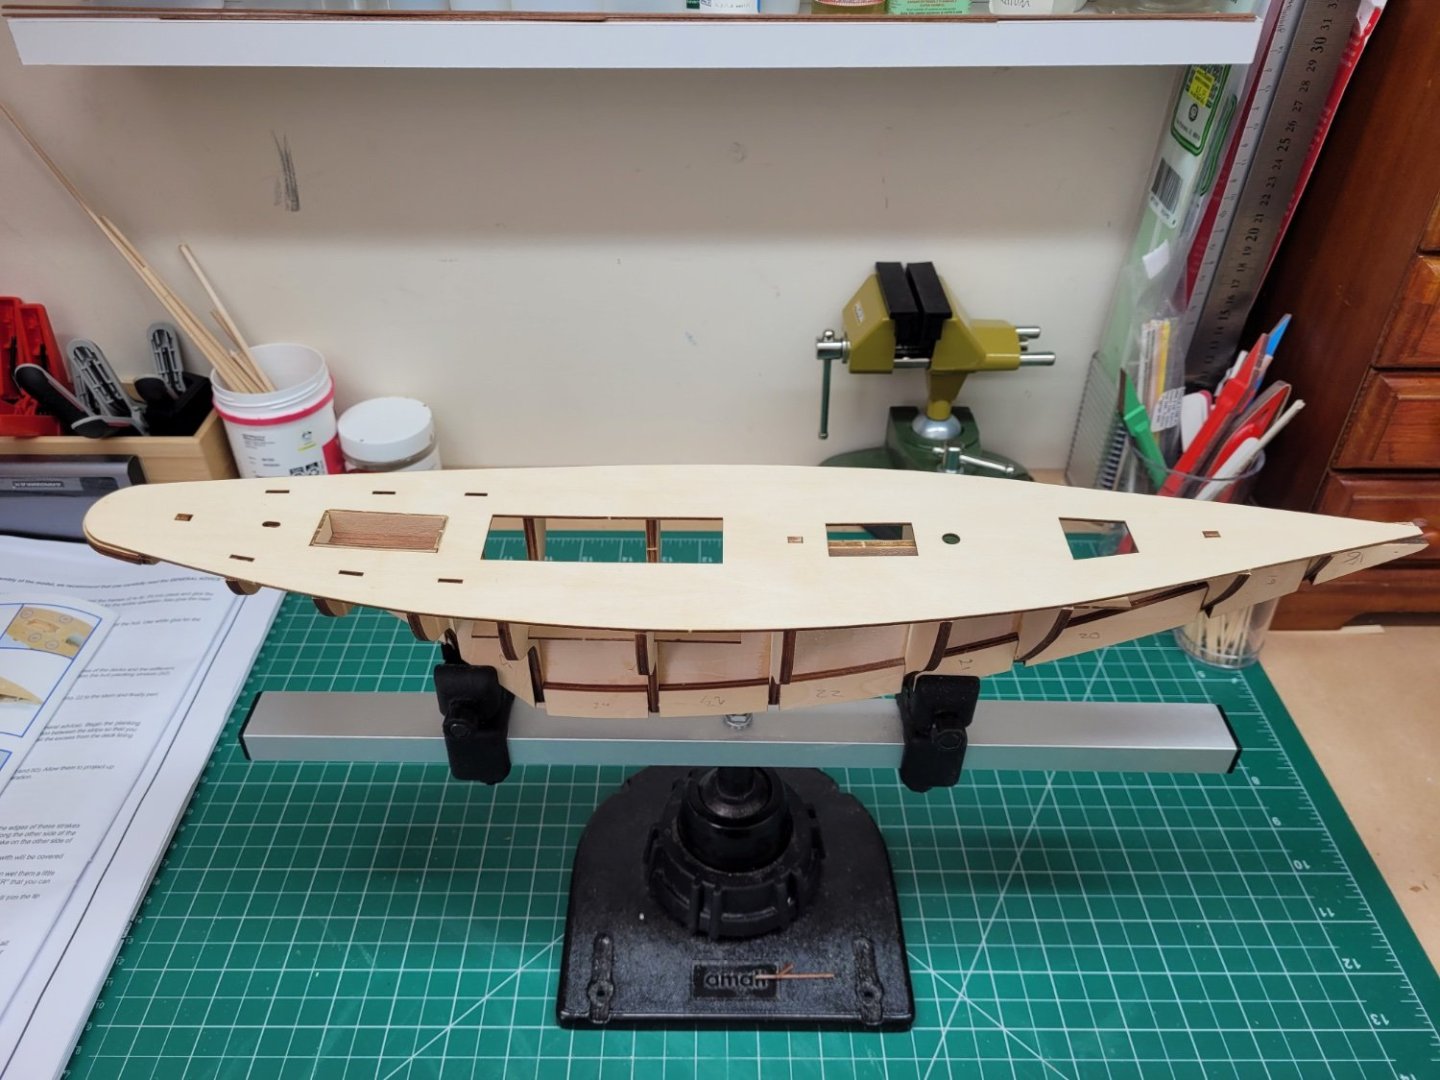
It may be a short while before I get the fairing completed as I can really only do this outside, which means I am limited to whatever spare time I can find at the weekends to work on it, but hopefully it will be done in the next couple of weeks. In the meantime I may be able to start on some other sub assemblies or having a trial go at the best way to approach the decking.
Hi There,
looking good!!
Fairing the Bulkheads took me quite a while primarily due to the "Doublers."
Take your time and try not to take anything off the False Deck!! 🙂
Decking you'll find interesting I am sure, just have a think about the steps necessary and the sequence.
Are you planning to "Joggle" the Deck planks?
Cheers....HOF.
-
-
21 hours ago, Ian B said:
Been looking on line for deck masks for the swastikas..can't find anything in 1/200 .saw one but no stock. Any suggestions?
I might have to do a tricky masking job...just want to be lazy 😂
Hi Chap,
If you want to do Decals, I got mine from Custom Hobby Decals in "The West Island", (Australia 🙂)
From memory, about NZD $25.00
There is a Red Background option available but best to drop them an E-Mail if you require that.
The advantage here is that you get all the Pennants/Arado Stuff as well.
Cheers....HOF.
-
8 hours ago, Knocklouder said:
Good luck on your journey, hope it works out for you .

Ditto!!🙂
- VitusBering and FrankWouts
-
1
-
 1
1
-
Nice!! 🙂
Brings back some memories.
Happy to try and lend a hand if needed.
I'll follow along. also.
Cheers....HOF.
-
Hi Ian,
I used Vallejo Light Grey 71.050 and Sea Grey71.049 (I don't know if they are 100% historically correct)
Baltic Stripes are Black and White.
One person who could most definitively answer is @Joe100
I guess you could have a test "Off-Ship" with a selection first.
"Scale Effect" probably needs to be factored in?
Are you going the "Full Monty" Baltic Stripes?
Cheers....HOF.
-
6 hours ago, CDW said:
Generally speaking, I find acrylic paints peel more easily when masking over them than lacquers. With any plastic model, it's good practice to first wash the plastic in a mild dish detergent before assembling and then wipe it all down with alcohol before painting to remove any oils from handling it but no, I don't think there is anything inherent in Trumpeter plastic that resists paint.
2 hours ago, AlanDavison said:Always best to prime before applying top coat as it (a) shows any imperfections in surface finish which can be remedied and (b) gives a good foundation for your top coat. There are lots of surface primers out there mostly in spray rattle cans.
Many thanks Gentlemen,
I have taken your advice very firmly on-board!! 🙂
Cheers and Regards,
Harry.


![DSC_0552[1].jpg](https://modelshipworld.com/uploads/monthly_2023_05/DSC_05521.jpg.3a9f1714c235b05f419459346b006108.jpg)
![DSC_0553[1].jpg](https://modelshipworld.com/uploads/monthly_2023_05/DSC_05531.jpg.4d9a4cdd1bb52ccc668bf7ea6cce9c5e.jpg)
![DSC_0554[1].jpg](https://modelshipworld.com/uploads/monthly_2023_05/DSC_05541.jpg.0f5c5dbab495155d119bc77903b88039.jpg)
![DSC_0556[1].jpg](https://modelshipworld.com/uploads/monthly_2023_05/DSC_05561.jpg.b5da21d66e52a62ea909e1e3e50a2aa4.jpg)
![DSC_0560[1].jpg](https://modelshipworld.com/uploads/monthly_2023_05/DSC_05601.jpg.6ec26a98b8ec68b281b4a0eeca0ef2fe.jpg)


Pen Duick by jpalmer1970 - FINISHED - Artesania Latina - 1:28
in - Kit build logs for subjects built from 1851 - 1900
Posted · Edited by hof00
Hi Chap,
Looking really, really good!!
Cheers....HOF.