


hof00
-
Posts
1,654 -
Joined
-
Last visited
Content Type
Profiles
Forums
Gallery
Events
Everything posted by hof00
-
 Thanks Chap.... I'll see how it turns out.... Wheelhouse looks better, have mounted and put a Wheel and Telegraph in there, no "Acetate" windows Onward and Upward? Cheers....HOF.
- 118 replies
-
- 2
-

-
- sanson
- artesania latina
- (and 1 more)
-
Ditto to the above comments.... Awesome Build!! Wot's next? Cheers....HOF.
-
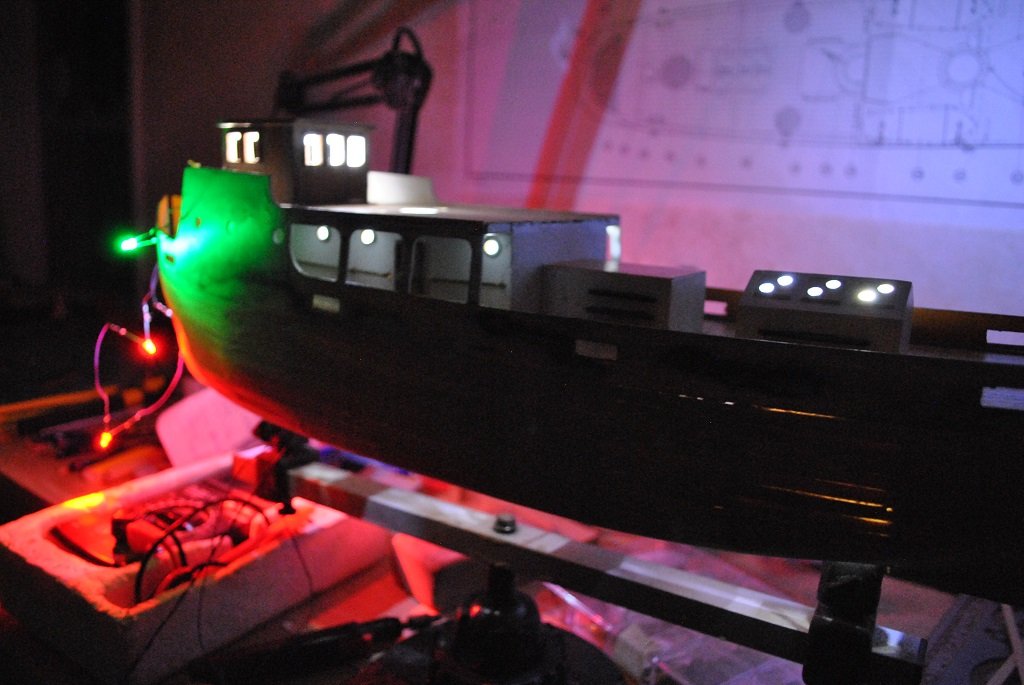
Thanks Chap, Can't dull them down, Deckhouse and associated LED's are firmly affixed. As stated to Carl, the Nav. lights/Masthead lights should be better after the Brass Shrouds go on them. (Another challenge I guess.) Thanks for the suggestions/Ideas, very much appreciated!! That's wot the Forum is all about. 🙂 Cheers and Regards, Harry. (HOF)
-
Hi Chap, I have contemplated this, "The Scrapyard," more than once.... 🙂 I think that I just have to carry on for the mo and see where it lands. Yup the "Christmas" lights are a little bright but should tone down a bit after the Brass Shrouds/Covers go on them. The other LED's are a little bright also, never mind, I cant do much about it, I'd have to re-engineer the Resistor N/W, (Again), and the LED's under the Deck are pretty firmly affixed with CA, so, to late, too bad.... (It is what it is....) I guess time will tell, I have to "Persevere" for now, and if the lights if it gets too much, well, the afore mentioned "Scrapyard." (Don't want to do that, the last resort....) (I'd love to do something else but I'm a one Model type of Chap 🙂) Your humor, (Levity), and constructive criticism, is very well received!! 🙂 Keep it up!! Cheers and Regards, Harry. (HOF)
- 118 replies
-
- 1
-
-
- sanson
- artesania latina
- (and 1 more)
-
Hi Chap, Looking really good!! I like your "Light" mounting solution. Cheers....HOF.
-
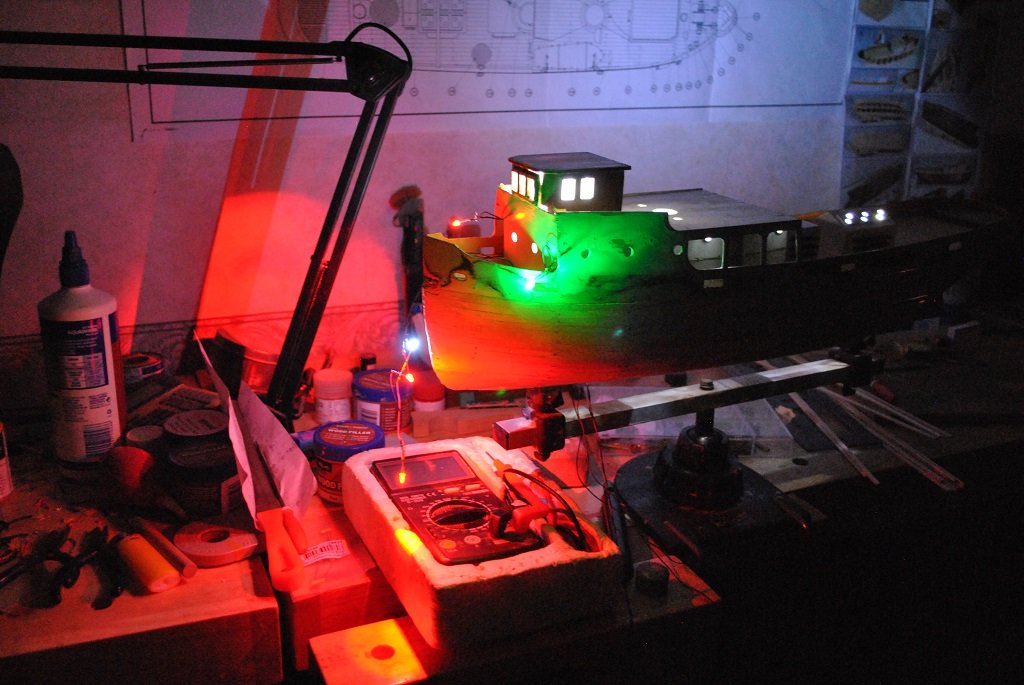
Thanks Carl.... 🙂 I think your probably right!!! O.K. a few photos.... In the dark it looks like a Christmas Tree.... The White/Red/Red LED's on the Bow are for Masthead Lights. Anyway, a work in progress.... (Keep in mind, this a "Tear-Down/Re-Build") At least things are reasonably "Stable" and reasonably confident that it won't combust.... Cheers....HOF.

- 118 replies
-
- 2
-
-
- sanson
- artesania latina
- (and 1 more)
-
Small update, Have now completed a "Stable" Resistor N/W, one that will hopefully not Combust the Ship!! Many Hi Intensity LED's of differing Forward Voltages/Currents and sized Resistors as best I can. I have "Burnt-In" the N/W over a few hours, over the past couple of days, parts of the N/W get warm but not burning hot!! All 17 LEDs seem to be o.k. (A bit bright, maybe not 100% scale, but no problem.) (10 Deck Houses, 2 Wheel House, 2 Navigation, 3 Mast Head) I'll attempt to take some Photos after the Sun goes down, and after the (Abyssinians), Cats are fed. (It's been a bit of a mission....) I think that the next step will be to complete the Wheel House, Navigation Light "Boxes," install and complete the first Planking before, sealing the Circuit inside....) As previously stated, once the Planking is done, I cannot access the Resistor N/W, if "Lights go out," there's sod all I can do about it. 🙂 Cheers....HOF.
- 118 replies
-
- 1
-
-
- sanson
- artesania latina
- (and 1 more)
-
Thanks Paul.
-
Hi Chap, Yup "Wood" ship models have been described to me, in the past, as the "Pinnacle" of modelling. Got a Build Log/Photos? Yup, from what I have seen, the A/L Bounty is a challenge, so is your current build, (I'm scared of Clinker stuff!....) Many years of Plastic Modelling here also and I have a :1/72 Wolfpack" U-Boat and 1/200 Bismarck waiting in the wings.... I do however prefer the wood stuff. After "Sanson" I'll be looking at the Flying Cloud, (Mamoli), Maybe.... (I love the Clippers, they are fairly easy to build, (Hull is "Pointy" but complex Rigging.) Great to make your acquaintance!! (And a fellow NZ Citizen. ) Have a great weekend!! Cheers....HOF.
- 118 replies
-
- 1
-
-
- sanson
- artesania latina
- (and 1 more)
-
Not to mention, Stocking up on "Heaps" of Cat Food, Wine and Cigarettes!! Sounds like a great weekend to "Cab-Out" indoors. Cheers....HOF.
-
Hi Chap, Wanganui is not off the Radar.... Yup, the LED's are are a bit of a Pain in the B..t .. (Too much Cabling....) I thought that I'd try and improve after the Tear Down.... In fact, I should have just continued with the Base Ki, maybe. Maybe, the Fibre Optic approach would have been better, one or two light sources.... Live and Learn I guess. The "Jaycar" Bods do On-Line ordering, I am sure, or, you could try "Element 13", formally Farnell. Nice to "Bump" into a fellow NZer!! 🙂 Wot are you working on? Cheers and Regards, Harry. HOF)
- 118 replies
-
- 1
-
-
- sanson
- artesania latina
- (and 1 more)
-
Hi Marc, I am a little confused as to "Campbell's Plan." (Always have.... Are they one and the same?) Is this the same as the Cutty Sark Preservation Society's" plans? I don't understand the relationship between the two, if any. between the "Campbell" thingy and the Cutty Sark Preservation Society's" plans I used the Cutty Sark Preservation plans for Rigging/Blocks/Belaying. Longridge leaves a lot of gaps, if you have plans with his publications, you'll need to "Blow them up!" Cheers and Regards, Harry. (HOF)
- 525 replies
-
- 1
-
-
- cutty sark
- mantua
- (and 2 more)
-
Hi Chap, Looks better than my attempt a few years ago.... The Deck Planking looks great, Joggling is superb!! Personally, (My opinion), is that with the Garboard Plank, not so important with a Double Planked Hull. Your first planking will be a base and strength component for the second. After first cover, the Keel is next after sanding/tapering the Hull to accept the Keel width. (A/L doctrine?) If you are planning to paint the entire hull, maybe planking/filling/sanding will suffice? Don't know.... Your Call, your piece of Maritime Art and something that you will need to be happy with. 🙂 (I'd be happy if my first attempt was as good as yours!!) I had a go at the "Garboard" thingy on my BN II.... (Didn't work out all that well for me but I was in in learning mode. (Probably in a hurry to see how it was going to look.) My Planking for the second cover left some things to be desired also, Tapering was a bit extreme in places. Filled/Sanded and Painted, it worked out in the end.) There's quite a bit of information on the Garboard on this site. Maybe good practice to try this for builds down the road? Can't see any warp in the False Keel, looking really good Sir!! 🙂 (A quote for you, "There is no such thing as a bad ship model, only better ones!!" I think that your build is great thus far, a "Better one.") Cheers and Regards, Harry. ((HOF)
-
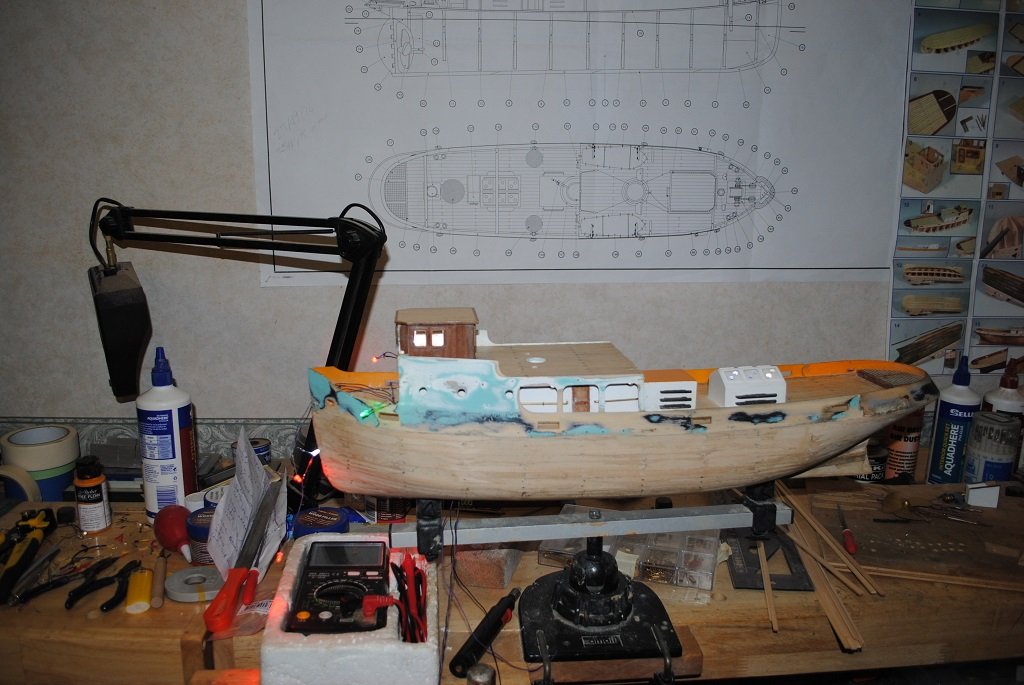
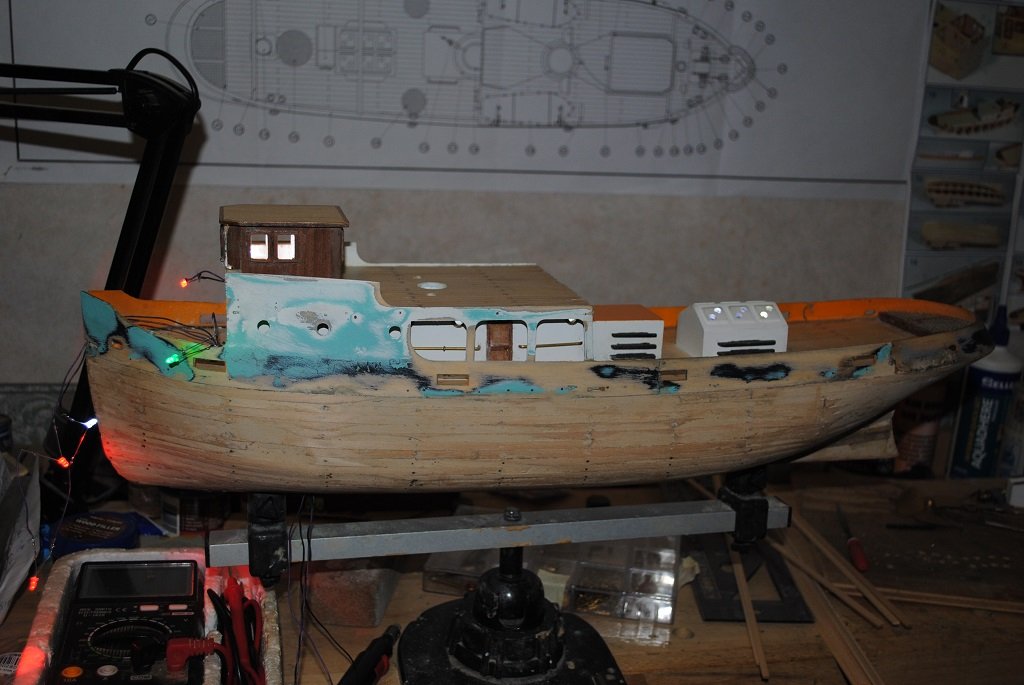
Thanks Chap, Still working on the Resistor N/W. Build/Test/Repair.... a couple of LED's failed, probably due to incorrect Resistance the first time around. So, new LED's purchased today and hopefully get everything operational tomorrow.... Got to get on to completing the 1st Planking!! Cheers....HOF.
- 118 replies
-
- 1
-
-
- sanson
- artesania latina
- (and 1 more)
-
AMT was the thing here.... Tamiya F1 Cars were also very much the thing growing up. (Have I grown up?) As I have said previously, Brings back memories.... (Don Glartis comes to mind.) Go for it Drenis, I'm loving it~!! Cheers and Regards, Harry (HOF)
-
O.K. a Joke.... (Something for your Children/Grandchildren?) How many Elephants can you fit in a little Red Mini? Four, two in the front, two in the back. How do you know if an Elephant has been in your Fridge? One set of Footprints in the Butter.... How do you know if two Elephants has been in your Fridge? Two sets of Footprints in the Butter.... How do you know if three Elephants has been in your Fridge? Three sets of Footprints in the Butter.... How do you know if four Elephants has been in your Fridge? A little Red Mini parked outside!! Apologies but I just couldn't resist it.... Sorry Denis/Carl, on with the build....
-
Awesome Build/incredible detail!! Watched your past builds, just fantastic!! I'm in awe Sir!! Cheers....HOF.
-
Small update, Re-Built the Resistor N/W,, (Third time lucky? 🙂) Anyway, 1W resistors and hopefully matched, (As close as possible with commercially available components.), with the forward Voltage/Current of the different LED's. (Tested some LED's/Resistor combinations, no issues thus far....) (Hopefully, no combustion!! 🙂) I'll solder it all together tomorrow morning. (I hope that's the end of it....) I can then complete things. Woodwork/Planking/Miniature Joinery. Cheers....HOF.
- 118 replies
-
- 2
-
-
- sanson
- artesania latina
- (and 1 more)
-
Complete? I guess so, otherwise it wouldn't be in the "Gallery." Awesome build Sir, and I echo Denis, damn fast from "Whoa to Go!!" (I'm hoping to "Plagiarize" your Sanson build, at least take some initiatives.... 🙂) (I think, your Sanson is the only one on this site.)) Enjoy your Holiday!! Cheers and Regards, Harry. (HOF)
-
Thanks Marc, We live in hope!! (Struggles I guess....In the hope of creating something we are happy with.) 2 - 4 Planks per side for the first cover but want to try and get the circuitry reliable and stable first. 3rd attempt, it happens, no problem, I have the luxury of a little time.... (If I can't "Nail" it this time, it will be a boring, "No-light" Tug Boat build. 🙂) (I think if I attempt lighting in the future, it might be it'll be Fibre, (No Stuff/Sod All) (In all reality, it's probably got it's own challenges/issues, I guess I'll find out one day.) Cheers....HOF.
- 118 replies
-
- 1
-
-
- sanson
- artesania latina
- (and 1 more)
-
Thanks again Glenn/Carl, Had a look at the typical Forward Voltage and Current of the LED's I purchased, Quite a range of differing values.... (I think I'll go safe with 1 Watt components.) (BTW I think this is the very first time I have asked for assistance, and the assistance/advice was very much forthcoming!! 🙂) I'll keep the Lighting in the Hull, (After testing of course). but will need to redo my Resistor N/W to supply correct Voltage.... 🙁 If things get "Hot" again, I'll remove the Power and go with a build minus lighting. (Don't want a spontaneously combusting model!!) Hopefully, no discernable heat!! (Won't be an issue to ascertain what wiring what goes where, I, thankfully, traced/extended the wiring/cabling after the first "Oops.".... 🙂) Off to Jaycar tomorrow!! (Need some more "Veroboard" also.) Cheers and regards to yourself and Carl for the help/advice, much appreciated!! Harry. (HOF)
- 118 replies
-
- 1
-
-
- sanson
- artesania latina
- (and 1 more)
-
Thanks Carl/Glenn, I'll do some further "Experimentation" before sealing any circuitry in the Hull. Much appreciated!! 🙂 Cheers....HOF.
- 118 replies
-
- 1
-
-
- sanson
- artesania latina
- (and 1 more)
-
Yup, Nice Denis, Used to do this stuff a "Few Years" ago. Certainly brings back fond memories, Plastic Kits were relatively cheap, and, I could afford these things after some time on my "Paper Round." Good on you!! 🙂 Cheers....HOF.
-
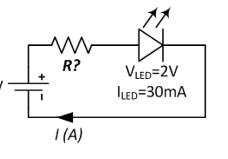
Here you go.... 12 Volt power supply, 570 Ohm Resistor, maybe 2.2 Volts forward Voltage for the LED's I guess that if I increase the Resistor Wattage, it won't heat as much. All LED's are in Parallel with the +/- Rails, so in essence mimic the below. (My last resort, remove lighting and complete the build.) Any advice, much appreciated. Cheers....HOF.
-
Hi All, I need some help, if possible.... Thought I had things sorted with LED Illumination,, "Sanson.." Not quite.... I have wired 15 Hi Intensity LED's for this build, (18 eventually with the Mast Head lights.) The LED's are connected in Parallel, 12V supply, 570Ohm, 1/4 Watt Resistor for each LED. LED's power up o.k but he Resistors are getting very, very "Hot" after 30 seconds or so. My fear is that Sanson will "Combust!!" Does anyone have some "Fixit Gems?" for what should be done? What would a probable fix be? The circuit is simple, Positive Rail, 570Ohm Resistor, LED, Common Earth. Rail... (I guess Forward Voltage of the LED is about 2.2 Volts) Any Ideas? My thoughts are that the Circuit is "Gobbling" as much Voltage as it can, maybe 1/4 Watt Resistors are not going to "Cut It." (Not keen on Series Connected LED's, one goes, so do the rest....) If I can't Fix, I'll just have to do without LED's (LED's are a bit of a mission, I think in future Fibre Optics) (I messaged "Tecko" for his take on things also.) Cheers and Regards, HOF..