
HOLIDAY DONATION DRIVE - SUPPORT MSW - DO YOUR PART TO KEEP THIS GREAT FORUM GOING!
×


hof00
-
Posts
1,642 -
Joined
-
Last visited
Content Type
Profiles
Forums
Gallery
Events
Everything posted by hof00
-
 Awesome!! With a Capital"A!!" (I've been lurking and watching, Bismark/Hood, absolutely stunning Sir!!) Cheers and Regards, Harry.
 -
Thanks Richard, Much appreciated!! I'll run with this for the mo. 🙂 Cheers....HOF.
-
Hi All, Has anyone had any experience with the 1/72 Revell Wolfpack VIIC U Boat? I have had this in storage for a few years and went on-line to order the "Pontos" super upgrade kit, Wooden Decks, Etc. I had a good site a couple of years ago for a Build Log, but cannot now tor the life of me, find it.... Any ideas/sites? Feedback appreciated!! Cheers....HOF.
-
Alclad Paint
hof00 replied to hof00's topic in Painting, finishing and weathering products and techniques
Thanks Gentlemen for your responses!! I'll be utilizing some Clear-Cote after re-spraying the components. Cheers....HOF. -
Hi All, Has anyone had experience with Alclad Paint? Been using "Polished Brass" with component5s of A/L Sanson. It would appear that the medium, once dry, does not take too kindly to handling.... Thinking of an Acrylic Lacquer to protect. Any ideas/experience? Cheers....HOF.
-
Cheers Ears!! (As some would say here.... :-)) HOF.
- 118 replies
-
- 1
-

-
- sanson
- artesania latina
- (and 1 more)
-
O.k. After some "Soul Searching" and not wish to start anything new, I had a good look at the progress thus far.... (Not that anything has been done for a few months.) I have, in the interim, purchased a new Compressor, with a Tank and Regulator. Since this is also a "Tear Down" and "Rebuild" there is some trepidation, should I Just shelve it and do something else? (Rhetorical question, I guess) I also had attempts at "Glazing" Portlights, my Punches were not good enough.... Tried Clear Silicone also but have now opted for no glazing, no stress.... 🙂 Regarding "Alclad" in my experience, the finish doesn't take kindly to "Handling." Is this others experience? Anyway, onwards/upwards.... Cheers....HOF.
- 118 replies
-
- 1
-
-
- sanson
- artesania latina
- (and 1 more)
-
Hi Chap, Yup, my Bluenose II and Mare Nostrum have the "Upside Down" Fish Tank, no frame. I started building Wooden Frames to carry the Glass. (As mentioned, New Zealand is an actively "Seismic" country....) (Happy to post you some pictures of these.... Secured on a Rimu Base by "Earthquake Putty." (Rimu, pronounced Ree-Moo, is a native NZ Timber, my favorite, all my cabinets are constructed of this stuff. The timber has a very "Warm" glow.... Quite rare and very difficult to get hold of....) I went to a Glass company, with the exact dimensions required, they gave me an awesome Upside Down "Fish Tank" and you cannot see the joins.... (Look for a company that can offer adhesive transparent stuff for your glass, you wont have tears if a side breaks, just a couple of cracks.) I'll Txt the company tomorrow to request the product name. Anyway, this is about you and your awesome work!! (I'll get my Trumpeter Bismark underway one of these days....) Dust is the ultimate killer for an otherwise awesome Model.... Cheers....HOF.
-
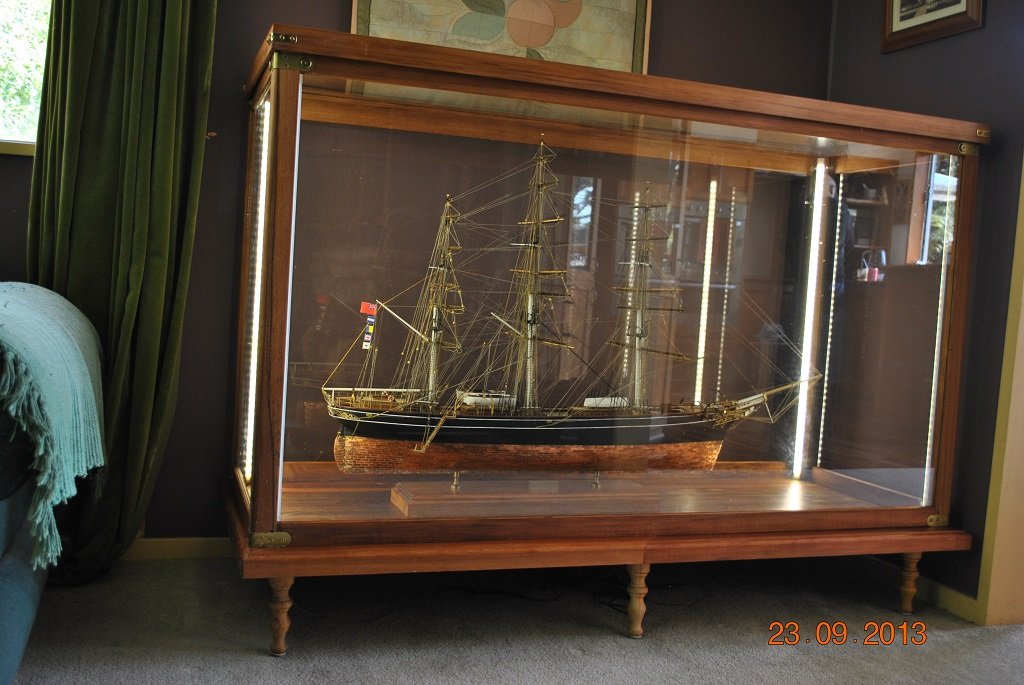
Hi Ya, My experience is that Glass is the preferred medium for Display Cases.... I lean to glass supported by a wooden frame. The Cutty Sark was a case in point, Very large glass panels, four Sides and Top. I designed the Cabinet so that I could remove any panel if necessary and also six Short legs to keep the centre of gravity as low as possible. (Earthquake insurance, so to speak, and to date, its been through a few Inc. a magnitude 7.8) Glass thicknesses: Sides - 4.0mm Top - 6.0mm (Tempered Glass top to stop energetic Cats falling through!!) I got a chap in to put a clear adhesive plastic coating on the interior sides so if the glass suffers a failure it's not going to shatter, God forbid!! The Completed Cabinet weighs in at about 50kg. Acrylic would be lighter but the glass is so easy to clean.... The other consideration that I had was UV Light exposure, keep it out of direct Sunlight.... (Here's a picture, Not quite the Bismark, but might give you some ideas for your Cabinet options?) Anyway, each to their own.... Cheers....HOF.
-
Good luck with this subject!! I have been tempted many times to purchase this rut never had the courage. (I've got stuff "On The Hop" anyway.) Happy to follow along!! Cheers....HOF.
- 105 replies
-
- 1
-
-
- thermopylae
- sergal
- (and 2 more)
-
Nice Chap!! Plans, (Mantua/AL), don't show Main Royal/Sky Sail Backstays, but, I'm sure your aware of this....) Braces: There are a couple of Mizzen Braces that terminate on the Lower Mainmast just under "Hounds." Double Blocks, not Single, as shown on plans.... Apologies, probably teaching you to suck eggs.... 🙂 Cheers....HOF.
- 525 replies
-
- 2
-
-
- cutty sark
- mantua
- (and 2 more)
-
Hi Chap, Absolutely awesome work!! I have a question for you and others that are attempting your Build.... I have this model in storage plus the MK1 detail stuff. How come you didn't use the Deck Recognition Transfers? (Maybe I'm incorrect?) I believe there are products that ensue Decals adhere to complex contours. Dumb question.... Cheers....HOF.
-
J3 Piper Cub by Steve 12345 - FINISHED - 1/4 scale
hof00 replied to Steve 12345's topic in Non-ship/categorised builds
Nice work Chap!! Need to ask the challenge if you "Cream" the Cub.... (You can't cream a ship model.) As I said many months ago, I used to do this stuff some years ago, but, the piloting skills left much to be desired. A lovely model, I hope that you will get some great flying time!! (Also hope that you'll get some time back into Ships/Cabinets soonish!!) Cheers and Regards to all!! (I guess the four stroke sounds great!!) Harry (HOF) -
Yup, Agree Chap.... I've got a 1/200 Bismarck, Hull complete. The detail is good but I wanted more, so, went for the Trumpeter version with MK1 detail set. (God knows when I'll get to that....) I also have a 1/8 Fokker DR1 partially built , (Partworks/Hatchette) Its expensive to purchase this way but I guess that it gives an "Opt Out" if your not enjoying things. For both kits, I've got all the "Bits" and I've seen some really nice RC Bismarck's on a German Web Site, Casting no aspersions, I think their kits aren't too bad not too bad, Amati? Anyway, following the build, looks pretty damn fine at this juncture!! Cheers....HOF.
-
Hi Chap, Your probably better off in Aussie. (Warmer) It's getting rather "Chilly" here.... Cheers....HOF.
- 525 replies
-
- 2
-
-
- cutty sark
- mantua
- (and 2 more)
-
Hi Chap, Looking at your build, I have one word, "Outstanding!!" The detail is absolutely superb. I thought my version of this kit was good, and, I was happy the outcome but yours just takes it to another level altogether!! Cheers....HOF.
- 525 replies
-
- 4
-
-
- cutty sark
- mantua
- (and 2 more)
-
Hi Greg, An awesome international build!! Just one question, are you leaving COG and Popeye behind in the rapidity of your build? Cheers....HOF.
- 1,090 replies
-
- 7
-
-
- showcase models
- vendetta
- (and 2 more)
-
The Crew look a little more "Comfortable" now!! Awesome work Chap!! Cheers....HOF.
- 82 replies
-
- 4
-
-
- boat
- lak-design
- (and 1 more)
-
So, a question regarding "Blast Bags" did you drill them using a small drill first or just go with the "Max" diameter? (This is another one I've got in storage for a "One Day" thing, Inc. Mark 1 Detail stuff.) My compressor needs a "Tank" to provide some definition. I've got a 1/350 Tamiya, a 1/200 Part woks one but I think the Trumpeter version is the ultimate. Following your build with interest looks awesome!! Cheers....HOF.
-
Thanks Chap, Yup, a bit of "Digital Dust" so to speak. (Doing some career searching....) Hopefully get some done this long weekend. Cheers....HOF.
-
Good Evening Mr Osmosis, I have built this version, it worked out o.k. Have a look at Mr J Earl's website, helped me heaps!! (Google) Heaps of photos if you require. (got mine on E-Bay also after a short bidding war many years ago.) Enjoy!! Cheers....HOF.
- 22 replies
-
- 2
-
-
- bluenose ii
- artesania latina
- (and 1 more)
-
Nice work!! I have this Model in the Closet, thinking about a Radio conversion.... Any ideas/links? Cheers....HOF.