


GuntherMT
-
Posts
2,213 -
Joined
-
Last visited
Content Type
Profiles
Forums
Gallery
Events
Posts posted by GuntherMT
-
-
Does this mean that the planking plan for the Armed Virginia Sloop (1768) is incorrect? It shows what I think you are discussing where the planks cut into the margin plank. Should it use the hook and scarphed method instead?
-
I see what you are talking about, and you can fix that by adding a plank that's wider in the middle. Instead of just making the plank narrower at one end or the other, make if full width at the point where it will hit the 'bottom' of the V, and then angle it to the appropriate length at each end. You just sand and work it until it fits snugly into the V, and if that makes the next planking strake narrower, because of filling the V, not a big deal. You can also correct this way across multiple strakes if needed.
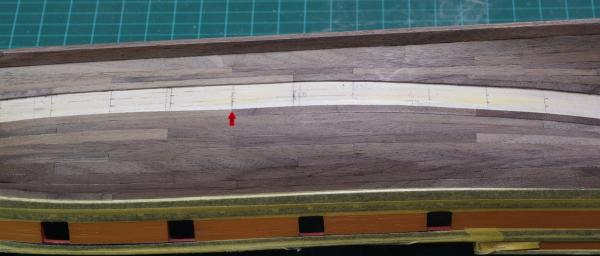
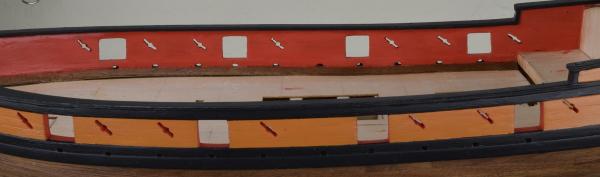
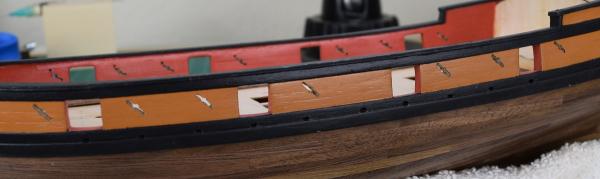
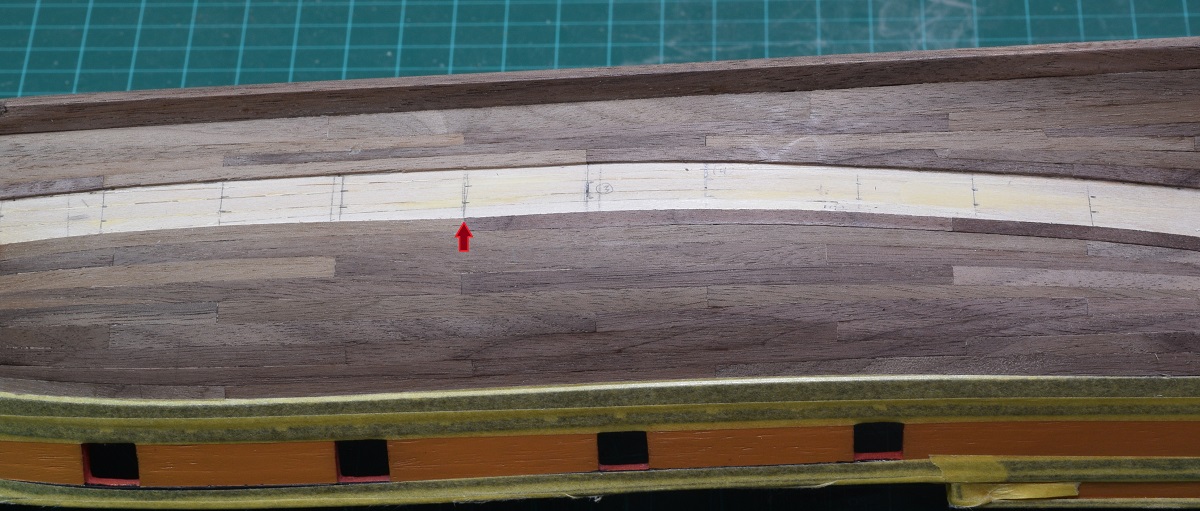
Because I'm horrible at explaining, I doodled on some pictures that hopefully will help you understand what I'm talking about. I had this exact same thing on my ship, and hopefully you can see the 'v' in the planking here:
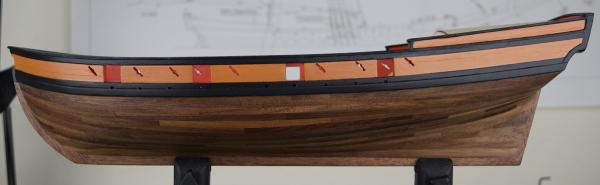
I corrected this across 2 strakes using the 'wider in the middle' planks as seen here on the finished hull:
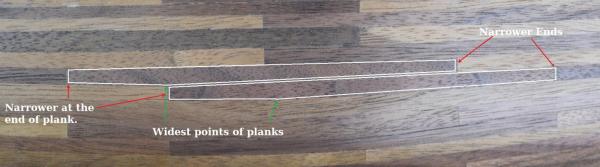
I sort of tried to paint in the shape of the planks to make it clearer, while leaving the edges clear to see the actual planks. Due to the curve of the hull, and angle of camera the 'top' edge of these planks doesn't look straight, but that edge is actually left completely untouched except for sanding it smooth, so you end up with a plank that actually has 5 edges, 2 on the bottom, 1 on the top, and of course the ends.
Hopefully this makes sense and helps.
-
-
So I found this picture on Facebook of all places, and thought you might find it interesting (or inspiring!). It's my new desktop background.
Click for huge-ish:

- augie, lb0190 and popeye the sailor
-
 3
3
-
Nothing at all wrong with joggle planks, drop planks or stealers. The planking looks great.
-
-
Bravo! Congratulations on a job well done, and a ship that you can display proudly.
-
Wow.. that's quite a series of posts/updates, and some fantastic workmanship and problem solving. You and many others here on MSW continue to raise the bar for how to build kits. Not sure I'll be able to achieve many of these things (like that sheave!) for some time, but it's awesome to see how you are doing things like this.
-
-
I think that I'm out of scale with these testing laynards, so I'd like to ask you what size of rope do u use for the laynards as the best indicated ratio for the deadeyes and shrouds?
Thanks in advance.
Stergios
Stergios,
On the Carmen I looked at all the pictures of actual ships (real or reproductions) I could find with Google image search, and then used the highly scientific method of "the size that looked good to me" based on the relationship of the shroud size vs. lanyards based on all the photo's I'd looked at.
At the end of the day, nobody is going to be measuring your line, so if it looks good, it is good!
-
Nigel,
For the final plank, to prevent that last one to being too narrow, when you get down to 2 planks remaining, just split the difference, even if it makes that next to last plank narrower than was planned.
If you go with a system where you use a planking fan to transfer the plank widths in bands with a tick strip, you shouldn't run into that situation, as you'll be trimming each strake to match the marked widths.
-
Thanks to everyone for the kind comments and encouragement, and for all the likes.
--
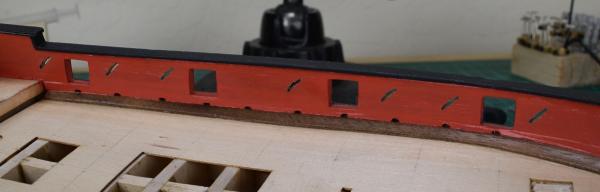
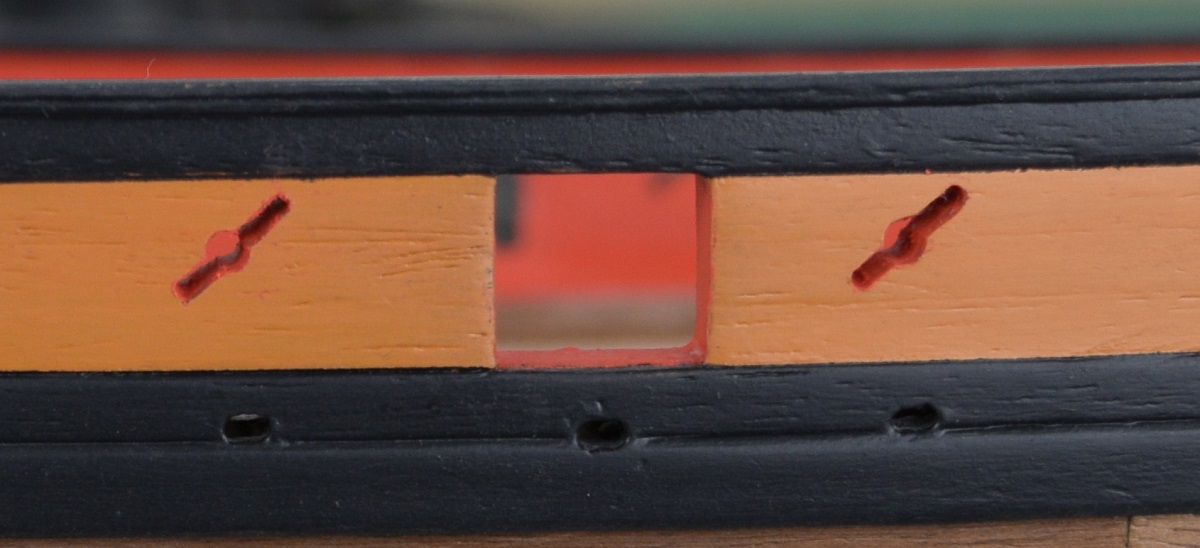
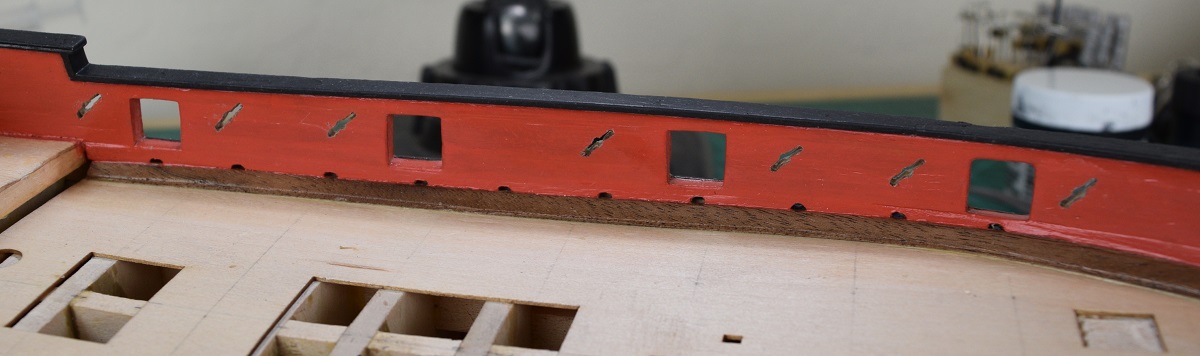
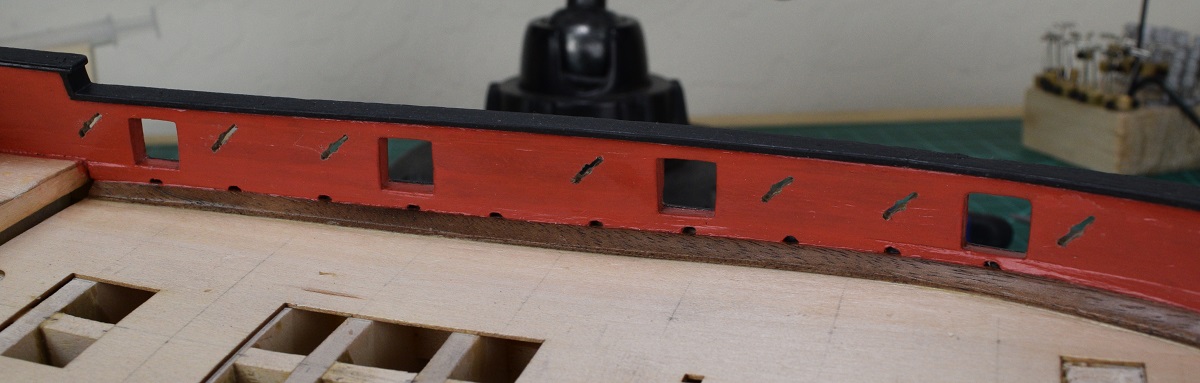
I'm done with the sweep ports. Not because I'm particularly happy with how they came out, but because I kept trying to make them better and was at the point where I think I was starting to make things worse, rather than better. So I reached the 'good enough this time' point and called it done.
A few of them came out pretty good, but there are a number that under the stare of the optivisor or macro lens, make me.. unhappy. Oh well.
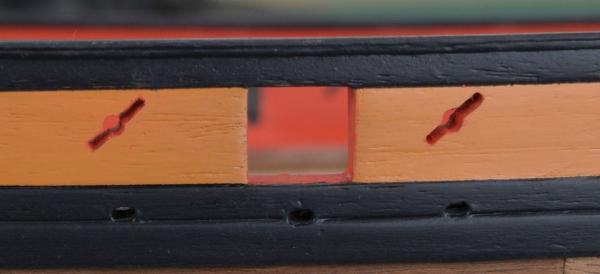
Close up of a pair of decent ones, before touch-up painting.
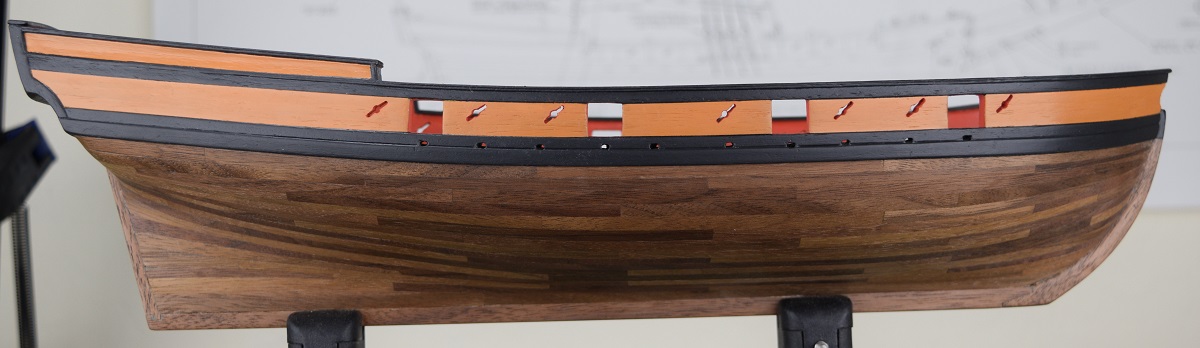
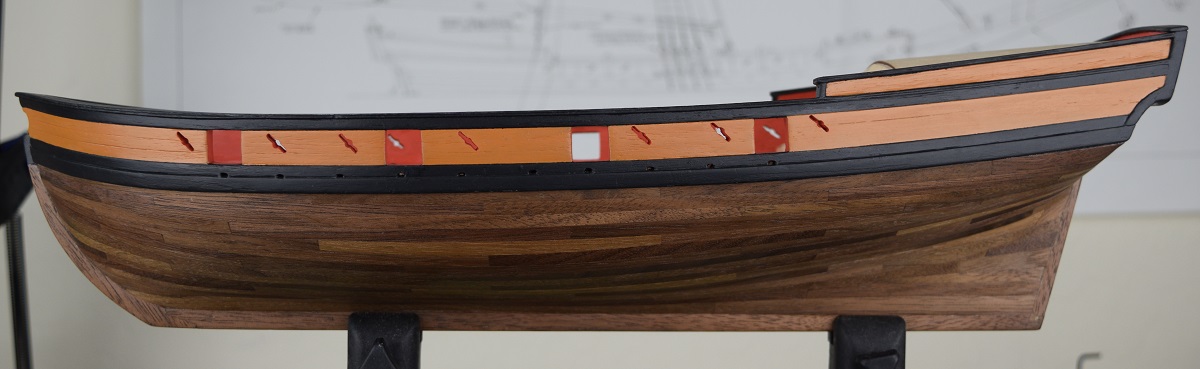
And some generic shots of both sides.


Now I get to start on what I hope is fun and interesting, building the deck furniture so that I can plank the deck!
- egkb, Ryland Craze, riverboat and 11 others
-
14
-
I vote for a log also, as the more modern style ships are a rarity here, and I enjoy seeing how they are built, even if there isn't one in my current build queue, you never know what might be in the future!
-
Very nice looking ship, of a subject that most of us in the ol' USA probably never heard of before! Thank you for sharing.
-
Pretty much what Joe said. I use a Nikon D3300 DSLR, but for my first build I just used a Canon point and shoot and it worked quite well for build log photo's. In addition I've seen some really spectacular build log photo's (see Dubz build logs!) taken with an iPhone - the tiny lenses on cell phones and tablets are surprisingly good at taking photo's very close.
-
I think I may have a new criteria for kit buying. Does it have odd shaped sweep ports (i.e. not square)? If yes, run away!
The entire time I'm working on these I'm deathly afraid of slipping and making a mistake that will wreck hours or days of work. I'm halfway home, and managed to get them ok looking, if not great, but also managed to mess up all three colors of paint so more touch-up will be coming down the road. Shocker!
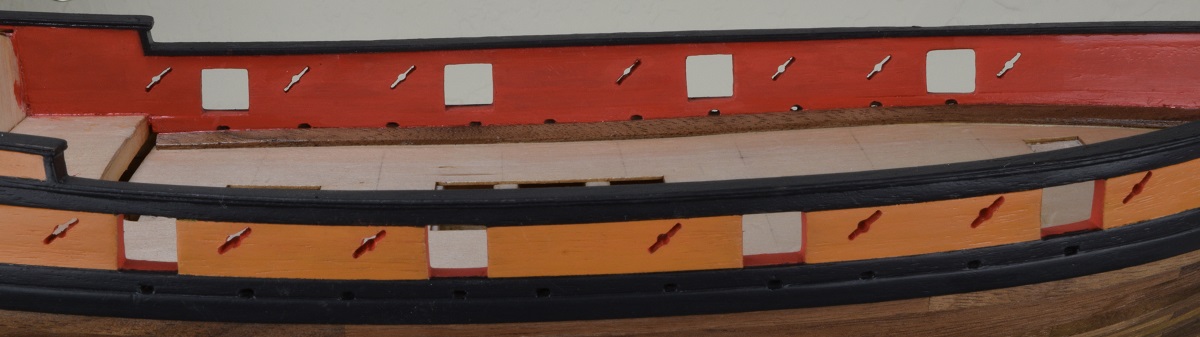
Will finish up the starboard side ports tomorrow. Here are the port side sweep ports, obviously not painted yet.


I did these by first transferring the center point for each port by making a direct tracing of the plans, and just taping that tracing to the bulkhead and using a sharp point punch to mark. I did this while the bulkheads were masked, inside and out with masking tape for doing the black paint touch-up.
I then made a small brass jig with the center and end holes in it, and then positioning the jig over the center punch marks and drilling the three holes with a 3/64" drill (actually 1.2mm, but that's only 0.01mm off). I then came back and drilled the center hole with a 3/32" drill. I connected the holes with a small X-acto saw while it was still masked.
After finishing the touch-up work on the black paint, I removed all the masking, and enlarged the connecting line between the holes with a #10 X-acto blade, working very slowly and shaving a tiny bit off at a time, doing first the outside, then the inside, and then working to open up the middle to connect them evenly.
The port farthest aft is pretty lopsided, but the rest came out decent.
- KenW, Salty Sea Dog, NMBROOK and 12 others
-
15
-
Congratulations on the completion of a beautiful ship.
Best of luck on negotiating your next one!
-
Very nice looking project so far Cathead. I've had very good experience with MS as well, and have actually got 3 more MS kits on the shelf already waiting for my attention. There are so many interesting looking kits out there though, I'd really love to get some of the Midwest small kits, and maybe a Dusek run-about, but I keep forcing myself to not become one of those people with 20 years worth of kits in a stack in the closet!
Love the job you've done on this style of planking, and look forward to watching your progress!
-
Looks to me like you are doing a bang-up good job on the planking Nigel. I don't have any real feedback I can offer as I've only just today finished the planking on my 2nd ship, so I'm quite new at this, but from everything I've read, you just use stealers and drop planks as needed to make things work, and don't worry too much about whether that matches up with the plans or someone elses build, as long as the results are good.
In your case, the results are looking quite good! Planking does seem to be one of those things that takes a good amount of time to get right, but it's also one of the most visible things on the finished model, so the time spent here is worth it. I don't track my time in a log, but I'm sure the amount of time I spent on my planking would be scary if I did!
-
I have to say, that your little buckets are amazing. Thank you for sharing the technique used to construct them.
-
Looking sharp Brett, very close to the finish line now.
-
That's quite a stout holder you have built there, were you expecting the boat to be made out of depleted uranium?

Progress on the model is looking good.
-
Nice looking ship Keith.
The round parts are called 'pin collars' and I got these at Micro-Mark:
http://www.micromark.com/pin-collar-set,9549.html
I'm sure they (or something like them) could be found elsewhere, but even with the price I don't regret getting these, as I use them more than almost anything else for clamping of the planking.
-


Armed Virginia Sloop by GuntherMT - FINISHED - Model Shipways - scale 1:48
in - Kit build logs for subjects built from 1751 - 1800
Posted
Thank you all for the kind comments and likes. Helps motivate me to move on when things happen like today. Today.. I managed a true facepalm while making my very first coaming.
So the coaming frame calls for walnut that is 3/32" thick x 1/4" wide, but the actual walnut in the kit is actually only 1/16" thick, 1/32" too thin. So I decided I'd improvise, and I cut some matching pieces of 1/4" walnut from the .030" planking and glued it to the 1/16" walnut to make a laminated piece that was almost exactly 3/32" thick. Worked great, and I moved on to adding the inner 3/64" pieces that the cover planks would rest on later.
I put it all together and on my very first try it looked really good. The next step is to bevel the entire edge of all 4 faces of the coaming to be 1/32" narrower at the top than the bottom. I focused intently on doing this right, as of course if this goes wrong the entire thing is garbage, so when I finished it, I was really quite happy, as it looked like it came out much closer to perfect than I could possibly have expected for my first try at one of these...
Right up until I went to look at how the planking would fit, and realized that I had beveled the edges upside down...
Oh well, it was a practice run! That's my story, and I'm sticking to it.
This is why wooden boats take so long to make!