


GuntherMT
-
Posts
2,213 -
Joined
-
Last visited
Content Type
Profiles
Forums
Gallery
Events
Posts posted by GuntherMT
-
-
Looking great! If you don't mind sharing, where did you source the decals?
-
I have Alexey's Serving machine as well. Just played with it so far, as it will still be a while before I get to the rigging on the AVS. I've just used dry graphite to lubricate the squeaky bits and it worked fine. Very happy with the craftsmanship and received it in about a week, and the shipping from overseas is included in the pricing.
-
Very nice! How did you cut out the letters?
I am also interested in how you cut out the letters if you would be kind enough to share!
-
I use a visor with a built in LED light that I rarely use (the light, not the visor - I use the visor all the time), and 4 changeable lenses with different magnification powers. I use it for many 'up close' tasks.
I originally got one of those combination lamp/magnifiers, but I have problems keeping things focused in it as it doesn't seem to play well with my prescription glasses, so I got the visor and it works great for me. Because of the prescription glasses, I can't really do the cheap drugstore reading glasses trick that a lot of guys seem to like.
-
Ah, so it was the false keel (center piece that runs the length of the ship) that was sanded too far back. Shimming should still work fine, just build it up and sand it back to where it needs to be. Glad it seems to have worked for you.
Is the warped deck you are talking about actually glued down to the frame? If it's not, then making sure you get the shape of the top of your frame right, and then securely attaching the deck to the frame (keel and bulkheads) should take care of it.
-
-
Very small update, as I haven't done much work on the ship the last couple of weeks, just had a busy schedule and other things going on.
For anyone interested I added an 'index' to the first post in this thread, so if for some reason you want to find a specific point in the build, it should be much easier now.
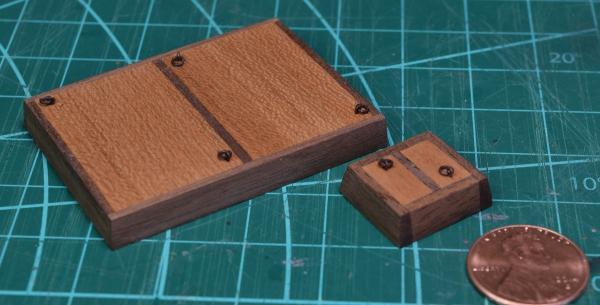
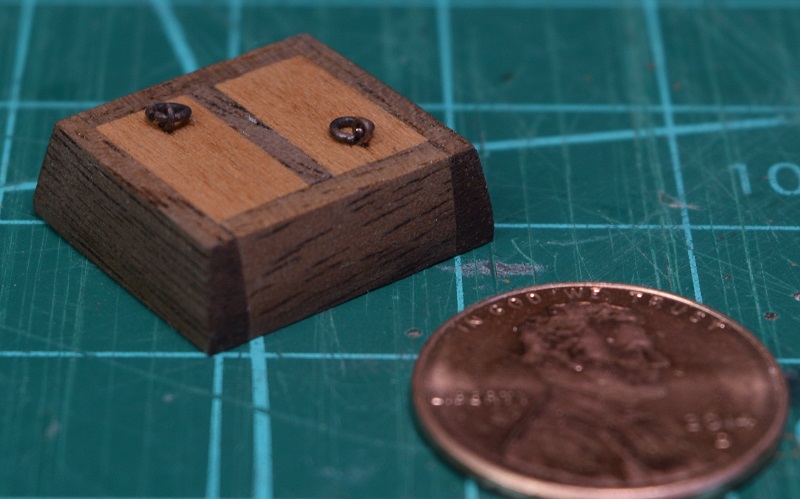
I've gotten the main hatch, and the scuttle port completed - I am using cherry for the planking and the kit walnut for the coaming, I think it makes a nice contrast. The hardware was chemically blackened.

- Dimitris71, KenW, Ryland Craze and 18 others
-
 21
21
-
When you say you removed too much from the framing, are you referring to the forward bulkheads? If so, you can just shim them up with strips of basswood, and then sand them back as needed. Wood is cool, you can use glue and add to it, not just remove it!
Here is a link to the post in my build log showing how I used basswood to shim my bulkheads so you can see what I mean:
Take care,
- edmay and CaptainSteve
-
2
-
This is the carpet that resides beneath my feet as I build my model, probably the worst blend of wood colours I could have, I dont exaggerate when I say I've lost easily an hour looking for tiny parts I've prepped to fit. Well my solution, maybe others, get a hoover preferably Henry type ( best) and put a breathable thin cloth over the entrance to the hoover, make a well in the cloth and fasten the hose back on, hoover away and bingo you will find the part, without ( and we all have) cutting a full bag open.
Hope this helps
My solution was considerably more drastic. I ripped out the carpet and put in a maple hardwood floor.

Your solution is magnitudes cheaper!
-
Looks like a great start Grant, quite nice to see a very different sort of boat being built.
How do you like working with balsa pieces for the framing? I don't care for balsa as it's so soft, but I've not built a kit with any included, only used it for filler blocks (which I've switched to basswood for).
Looking forward to watching the planking go on!
-
Welcome aboard Frank.
You can put any text you like between photo's by simply typing the text you want, placing the cursor where you want the picture to be, and then clicking the "Add to Post" for the photo. Then with your cursor after the newly inserted image (it will be text saying 'attachment: name' enclosed in square brackets), keep typing whatever you want after the image. Repeat as needed. You can add as many photo's in a single post as you like (or at least I've never hit a limit), but you can only upload 10 of them with a single click.
Have fun with the dinghy, I'd like to try some of these little Midwest kits in the future, they look like fun.
-
Moving swiftly on to the wales....
What does anyone use for gluing second planking ? The manual says use medium CA, but I've previously just used PVA, using push pins to hold down the edges of the planks so there are no holes. The only drawback is that it takes longer as you can only fit one plank at a time (one per side I usually do). Have to say I really don't like CA, and prefer to avoid it if I can - at least for for large areas and where there's a choice
I use PVA only, and it doesn't slow me down at all. I build each plank section to fit, and PVA tacks up quickly when applied in very thin coats to both pieces and then set with moderate pressure. Except for a few oddly stressed pieces right at the stem or stern, I never stopped specifically to let a piece dry, I just worked on making the next piece, and when it was ready, removed the pins holding the previous piece and glued.
I actually made a short time-lapse video of my final planking band in my AVS log (last page or two of it currently) showing the progress. It was done over two days, but only about 6 hours total in that time lapse.
The glue technique was learned from someone else here on MSW - apply a very thin layer of PVA (I use Tite Bond original) to the plank, set aside. Apply a thin layer of glue to the hull where the plank will go (I use a syringe for this), and use a piece of scrap to spread it out and remove all excess. By this time the layer on the plank should be almost dry (only takes a few minutes). Put the plank in place, and then apply moderate pressure (as much as you think you can safely apply) with your fingers and the plank will stick in place almost as quickly as using CA. Use pins as needed to hold in place for more complete drying, and start shaping your next plank. Repeat.
-
Hmm heat gun - that's something I hadn't considered - something else to try - do you use just a normal DIY-type gun, or something smaller ?
Missed this question earlier Alan, sorry about that. I just use a generic heat gun I got for 17 or 18 bucks off of Amazon.
This one actually - http://www.amazon.com/gp/product/B006Z9LUDG/ref=oh_aui_detailpage_o00_s00?ie=UTF8&psc=1
-
Let's see what math says!
Start with the diameter of the cannon balls:
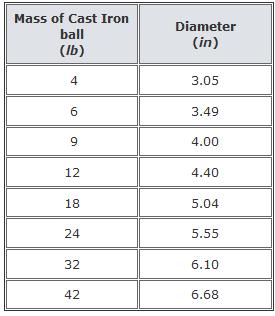
Then do math!
Confederacy had 6lb and 12lb guns, and the scale is 1:64 (3/16" = 1').
Convert 1:64 to a decimal gives .015625 (1/64).
6lb = 3.49" diameter x .015625 = .0545" in diameter at scale = 1.384mm
12lb = 4.40" diameter x .015625 = .06875" in diameter at scale = 1.74625mm
- UpstateNY, GLakie, yancovitch and 3 others
-
6
-
Hi Brian, and thanks. The line is Amati line. The junk in the AVS kit is worthless. I used Syren line for my battle station, and ultimately that's what I'll use going forward. Expensive, but looks great. Unless I buy a Byrnes rope walk.......
Dave
I agree about the MS kit line. I've got Syren line already for my AVS, and will probably stick with it rather than dealing with trying to make my own in the future.
-
Nicely done Dave. I need to get off my butt and back to work on mine.
On your fuzzies - what rope was it that you were getting the fuzzies from (I can see it in your close-ups)? The terrible rope in the kit is some sort of nylon, so I can't see how that would fuzz up. Did you have some extra you used from another source?
-
I used nothing but PVA for my 2nd planking Medic. If you are patient and make sure everything fits right, you should be able to do just fine without using CA.
As far as steaming goes - just use whatever works to make your planks fit. For many of my 2nd planking I used nothing. For some I just used heat, and for a few at the stern I used both water and heat (effectively steaming). I just played it by ear and used what worked for the specific plank I was working with.
Good luck, looking forward to seeing how nice you make it!
-
-
-
Awesome work on the wheel, it looks much better than the kit wheel. I've been pondering trying to scratch a wheel for my AVS, but I'm not sure yet whether I'll make the attempt on it. It is only my 2nd kit, and if I keep adding new 'things' I'll never finish it!
- GLakie and keelhauled
-
2
-
Gorgeous, anyone would be proud to display that.
- mort stoll, robnbill, GLakie and 1 other
-
4
-
Great workspace Joe. I am definitely going to be visiting Ikea to add furniture to my workshop at some point in the not terribly distant future. They really do have some stuff that is great for outfitting work areas, at quite reasonable prices in comparison to 'real' workbenches from wood working stores.
It's also nice that they have almost everything available in many different finishes so you can match things to your work area if you want.
-
You can find a nice write up of this workbench in NickvN's Hermione La Fayette build log, starting with this post - http://modelshipworld.com/index.php/topic/2649-hermione-la-fayette-by-nickvn-artesania-latina-second-wooden-ship-built/?p=221634
He got it as a gift and shows some very nice pictures and speaks about it during later posts in the logs (within the next page or two, easy to find just scrolling through).
Hope that helps out!
-
I successfully used the water/PVA/sawdust filler method on the Carmen and it worked great. I highly recommend you try Keith's suggestion - I think you'll be happy with the results.
An alternate way is to make a filler/putty out of sawdust and pva/water and apply it like filler, then sand it when it's dry. I used a dremel tool with a sanding drum and some pieces of scrap planking to make a bunch of sawdust to make matching filler this way.

Bluenose by mrcc - Billing Boats - 1:75
in - Kit build logs for subjects built from 1901 - Present Day
Posted
Thanks Julian