


russ
-
Posts
3,086 -
Joined
-
Last visited
Content Type
Profiles
Forums
Gallery
Events
Posts posted by russ
-
-
-
Ron:
Nice details. I like the edge detail on the seat. Your use of hand tools always gets me thinking.
")
As for the mast step, I would go ahead and make a new one. You might find the other one, but it would take longer than it would to make a new most likely.
That is how these things always work for me.
Russ
-
The stirrups are those vertical lines that hold the foot ropes (the lines that hang below the yards) to the yard. Lashing the heels of the booms means simply wrapping the thread around the inboard ends of the studding sail booms (parts 165, 167,169) and the yards so that the booms do not move.
Russ
-
-
-
-
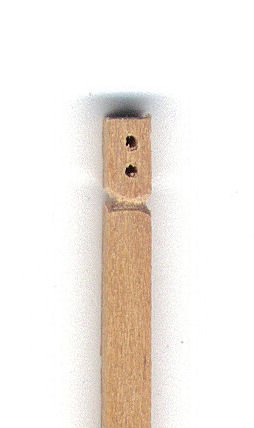
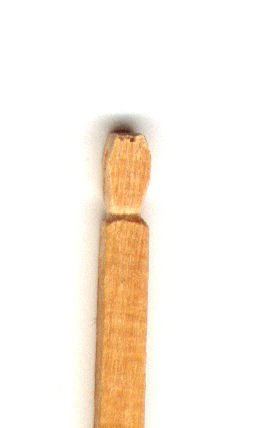
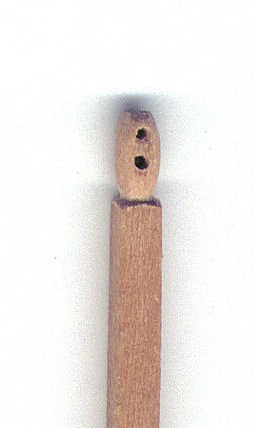
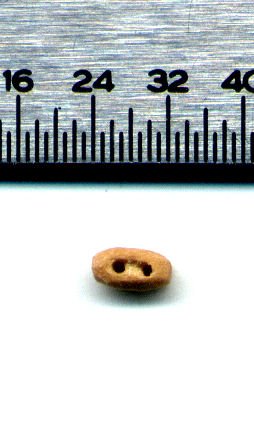
I am not sure if there is a tutorial, but I make small scale blocks by carving and shaping them on the end of a strip of boxwood. I layout the length of the block and then drill holes for the sheave with a drill bit in a pin vise. I use a variety of 4 inch jeweler's files to shape the block and details before cutting if off using a small razor saw in a hobby knife handle. The razor saw blade is shaped like a typical number 11 blade except it has saw teeth. Go slowly cutting the block off the stick. Too much pressure will send the block flying into the next dimension, never to be found.
This method is much like what Harold Underhill described in Plank on Frame Models. It takes some practice, but once you get the hang of it, you can make several blocks in one sitting. Not long before you have several small jars filled with enough blocks to rig a model.
Russ
-
24 minutes ago, frankwil said:
I guess what I implied, and what the word means to me from reading different things on this site, is using a plank width wider than what you have in the kit. I totally understand the shaping and tapering aspect of it, and would never try planking anything (except a wall) without using these in some form. I was just hesitant to go outside my comfort zone on my first big ship build. But, fear not, for I have taken a trip to the local hobby store and purchased some sheets of 1/16" basswood that are very close in thickness to the 1.5 mm thick planks that are in the Mamoli kit, and am in the process of lining out the hull using Chuck Passaro's tutorial/pictorial. After druxey's encouragement, and I started to actually grasp the whole concept, I decided to take the plunge - because I don't want a crappy looking hull. I'll post some pics of the progress as I go along.
That is a good decision. You can spile and taper your planks to fit perfectly using wider sheets. I have used basswood sheets this way and had good results.
Russ
- frankwil, mtaylor and pontiachedmark
-
 3
3
-
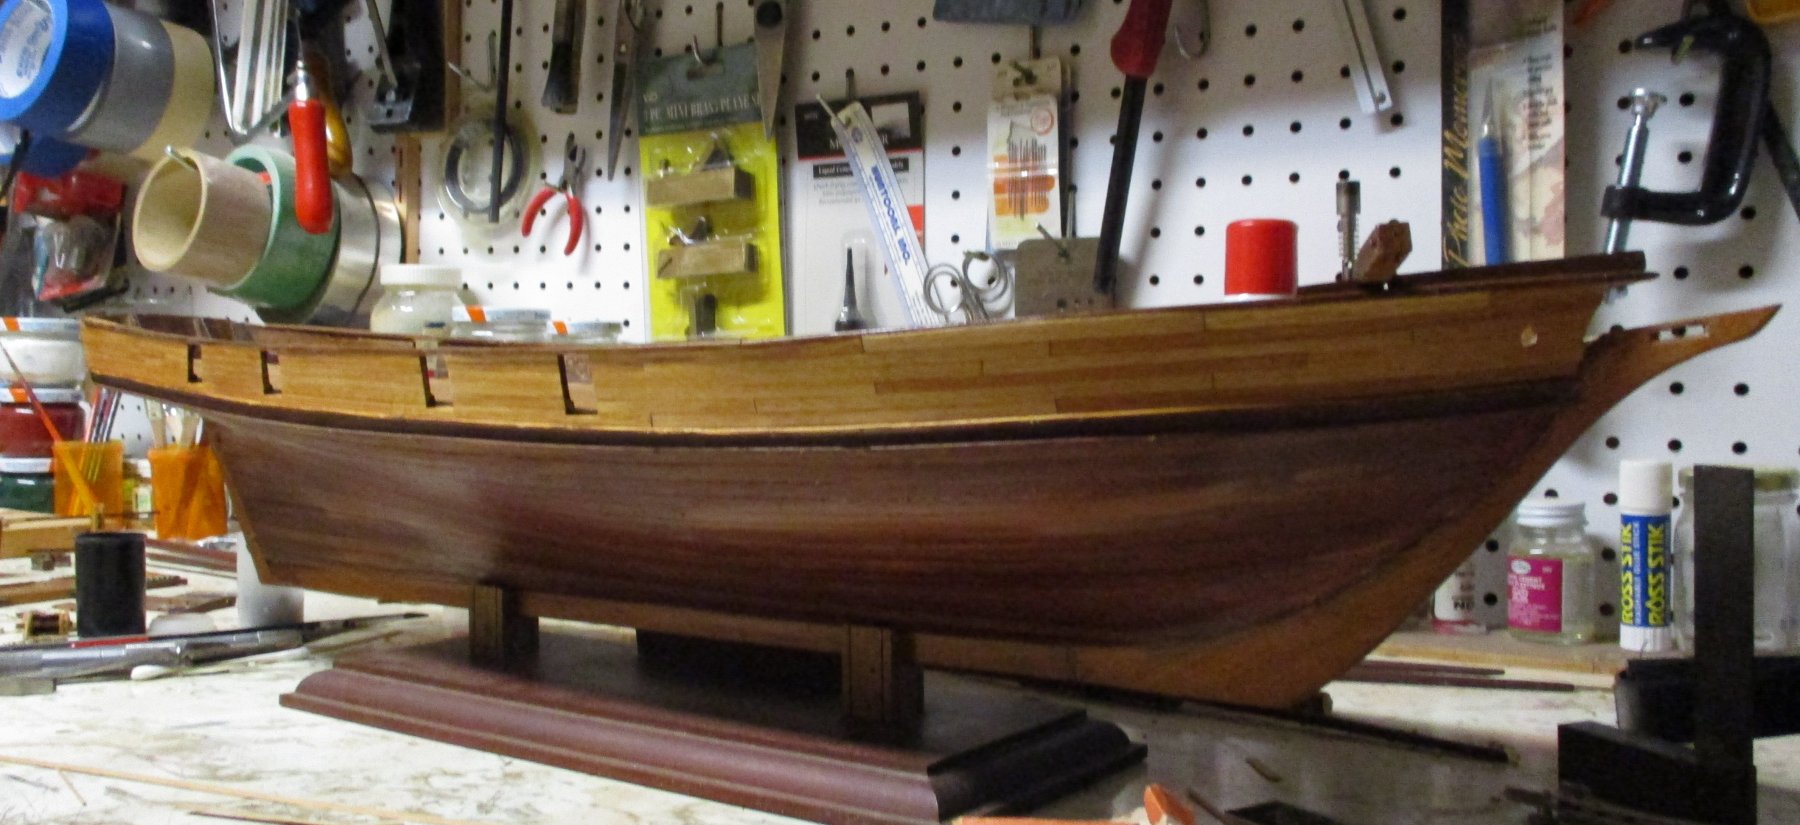
The straight strips in a kit can be spiled and tapered a bit to get a solid and good looking planking job.
I am currently restoring/repairing a model of a Baltimore Clipper from a kit that was built about 30-35 years ago. Everything was glued with some sort of cyanoacrylate, probably a gel type glue. It had the thin veneer strips over the plywood surface on the bulwarks. They were laid on straight with no tapering or spiling. The result was awful with raised edges everywhere. Add to that the CA had failed almost everywhere.
I am replacing the veneer strips with similar strips I have collected over the years. I am spiling the edges to create a smooth planed surface along the bulwarks. I am also tapering as needed to make everything fit better and look neater. These strips are your typical kit veneers, about .020" thick. I am using a sanding stick to spile and taper, but emory boards could be used. It is not a quick process, but the results, while not great, are gratifying.
Here are some shots where you can see a little of the original planking (it came off in my hands) and some of the work I am doing to replace it. I am using carpenter's glue rather than CA.
The first and last photos show my work while the second and third are of the original planking.
Russ


-
5 minutes ago, BETAQDAVE said:
Speak of the devil! I just got a new catalog from Micro-Mark in the mail today sporting another new offering called the Doctor DRYBooth. For a mere $199.95 you too can own this 10 5/8" w. x 18" h. x 8" deep metal box. (basically a small oven) Claims it will cut painted part drying time in half. I don't know about you but with just a little patience I believe that I'll just save the $200.
")
Exactly.
-
Ken:
Your model looks great. Nice work turning it into something special. For my part, I vote for fully rigged, but then....I always vote for fully rigged.
Russ
-
Sometimes it is something even simpler, just a quick jig for a simple task that I can make myself in a few minutes. Nothing to wonder at, but it beats spending the money and then waiting for it arrive.
Problem solving is one of the things I like about modeling.
Russ
-
-
Mike:
Have fun. She looks great and I look forward to seeing more progress.
Russ
- Kusawa2000 and mtaylor
-
2
-
I totally agree with what has been suggested. If that is the finished garboard, it extends too far up the stem. You will run out of room for the rest of the planks to fit at the bow. I strongly suggest you take it off and give it another go with the end of the garboard sitting much further down. Good luck.
Russ
- paulsutcliffe, druxey and mtaylor
-
3
-
Ideally, that would be the way to do it. However, please check the other side against your pattern to make sure it is exactly the same. It would not be unusual for there to be some differences from starboard to port. If your garboard pattern works for both sides, you are doing excellent work.
Russ
-
Dave:
When I get the Micromark catalog, I sometimes find something to order from them. But, often times, I see something that gives me some inspiration for a simple shop tool/jig I can make myself.
Russ
- mtaylor, pontiachedmark, BETAQDAVE and 3 others
-
6
-
Dave:
Each of us has a comfort zone for this type of situation. Feeling confident in my ability to make a small slice, I would cut the rabbet a shade deeper. However, Mark is right about sanding. That would also address the situation. You could even sand the end of the plank before gluing. Just hold it flat on the bench and use a sanding stick to dress the end of the plank slightly before gluing. The question is, with which option do you feel more comfortable? Answer that, and you will know what to do. Good luck with your model.
Russ
- Canute, CaptainSteve and mtaylor
-
3
-
Your dead eyes look pretty good. I would not go any larger, though. Nice work.
Russ
-
Your model is coming along very well. Nice work.
On the deadeyes, please proceed carefully. The kit supplied deadeyes are probably very close to scale. The 3 mm deadeyes you bought might work, but keep in mind, the larger the diameter, the more difficult it will be to get the required number of deadeyes to fit into the space provided. The deadeyes on a ship this small would not be very large. The 3 mm diameter would be equal to about 9 inches on the actual ship. That is bordering on out of scale. I hope it works for you. It is a nice looking model.
Russ
- moreplovac and lmagna
-
2
-
There is also John Earl's Bluenose II practicum. It was the Artesania Latina kit, as I recall, but his methods are well worth looking at. I do not have his website handy, but it was free to look at.
Russ
- Canute, mtaylor and thibaultron
-
3
-
Looks very good. I will be interested to see the rest come together.
Russ
-
Dave:
Another good method would to use a tick strip. Just a piece of paper or cardboard where you can mark reference lines. Lay the strip onto your plan and transfer the top of the profile former (for instance) onto the strip and then transfer the reference line at one of the frame locations. Now, lay the strip onto the profile former piece, lining it up with the same frame location and the line for the top of the profile former aligned with the top of the profile former piece. You can then transfer the reference line mark onto the profile former. Repeat at several frame locations and you will have marks through you can strike a line for the reference line. This is easier to do than to explain and it is very accurate, provided you take the time to accurately transfer the marks. make sure your pencil is SHARP.
Russ
-
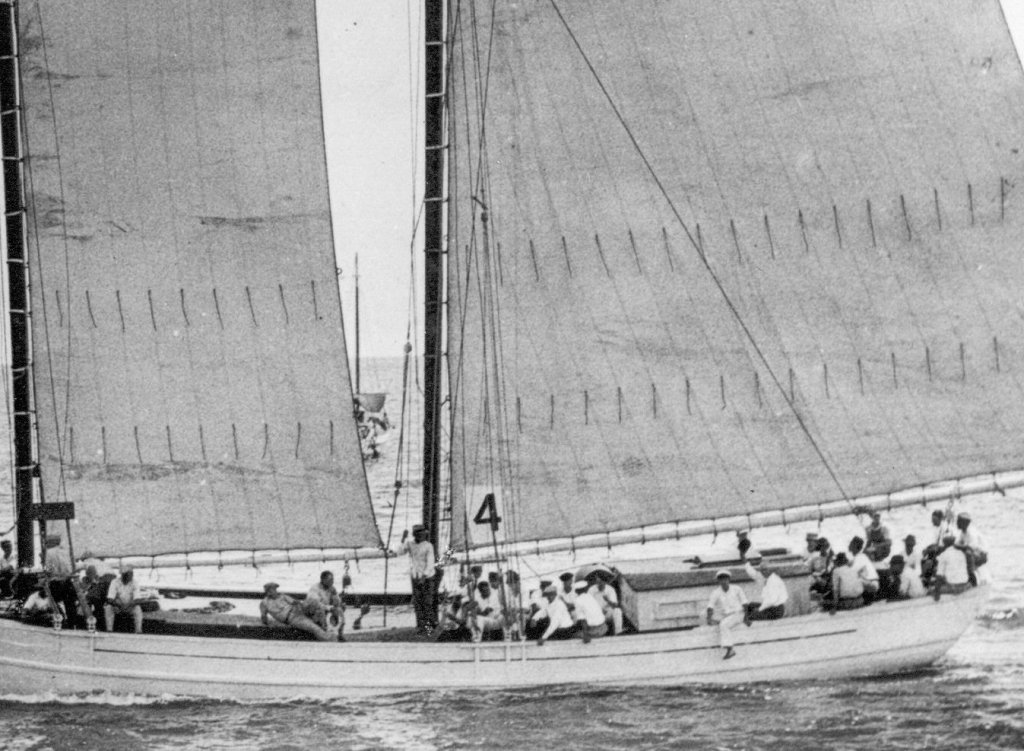
Here on the Gulf Coast, there would have been a rod bolted to the upper aft end of the board and led through the deck. To the upper end of the rod was attached a block and tackle, the upper block of which was secured to a pendant that led to the main mast head. The tackle was handled from the deck. The centerboard tender would control the board per the captain's orders.
Here is a crop from a 1920s photograph that shows the typical centerboard arrangement.
Russ


Hannah by jct - FINISHED - somewhere between 1/72 ish and 1/60 ish scale
in - Build logs for subjects built 1751 - 1800
Posted
I have made gratings in that same method and they looked very good. Mine were at 1/48 scale so your smaller scale results are certainly impressive. I used a slitting saw blade, probably about 1/32" saw kerf when slicing them off on my 4 inch table saw. I had a few break, but not many. Yours look very good. Nice work.
Russ