Cathead
-
Posts
3,522 -
Joined
-
Last visited
Content Type
Profiles
Forums
Gallery
Events
Everything posted by Cathead
-
Is the implication that the iron decorations are pre-Christian (e.g., pagan Norse)? If so, the man and woman might well represent the first humans formed from ash and elm wood in Scandinavian creation mythology. It's also interesting how three of the curved straps end in a split design that's mirrored on the ship's sternpost. To me those look like serpent mouths, also a strong symbol in pagan Norse beliefs.
-
 Good luck! I'm a bit burned out on tiny kits at the moment...
- 9 replies
-
- 1
-

-
- Cutty Sark
- Mini Mamoli
- (and 1 more)
-
Very nice. Thanks for sharing your work and experiences.
- 86 replies
-
- 1
-

-
- king of the mississippi
- artesania latina
- (and 2 more)
-
Those hinges are bizarre. And you're sure they're the only J7 parts provided? And are they all meant to be mounted to the one fitting you show there? Also, based on the shadows, the set with holes looks thicker than the set without. Are they actually different?
-
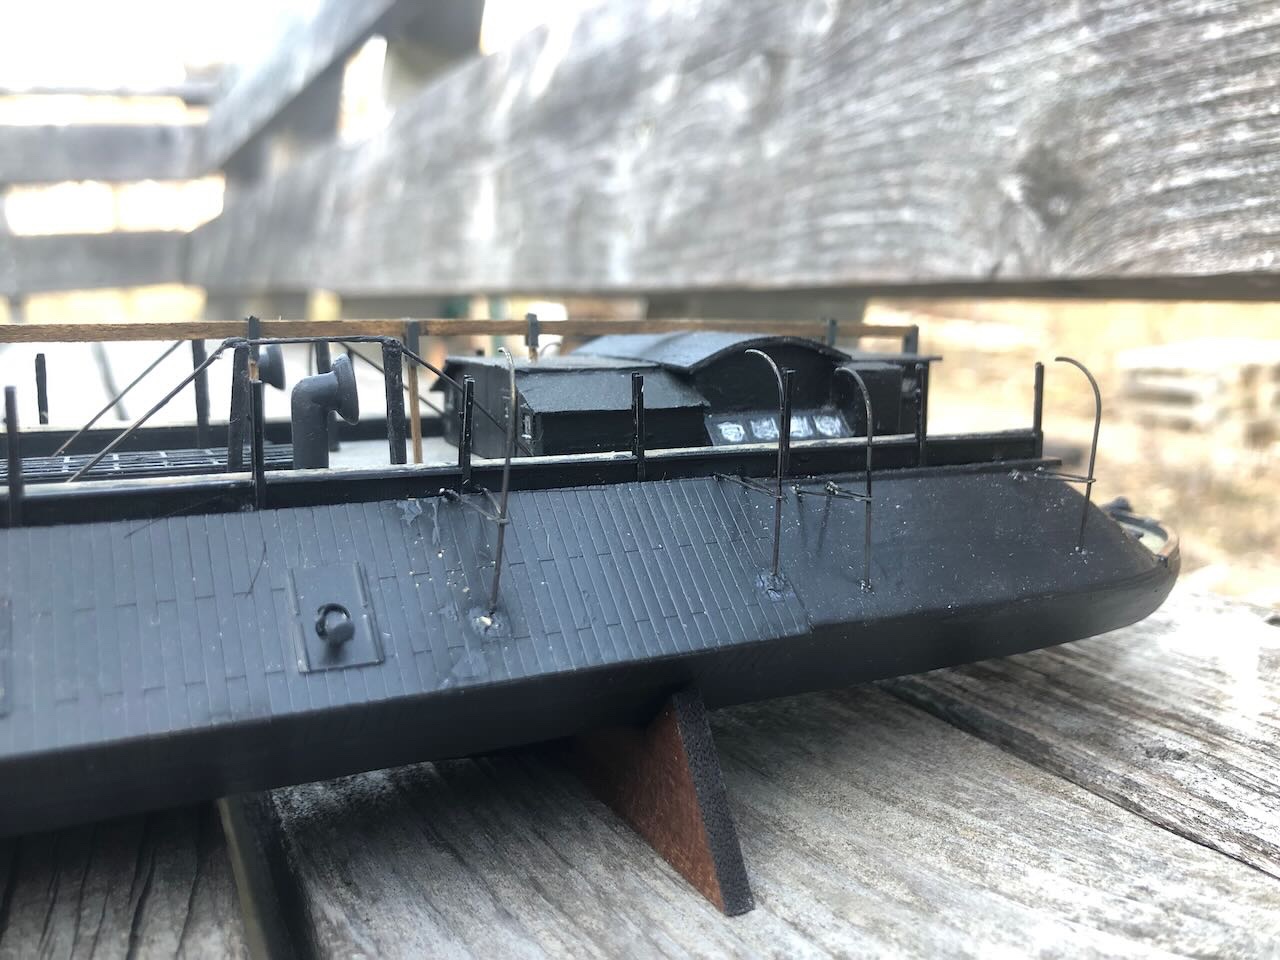
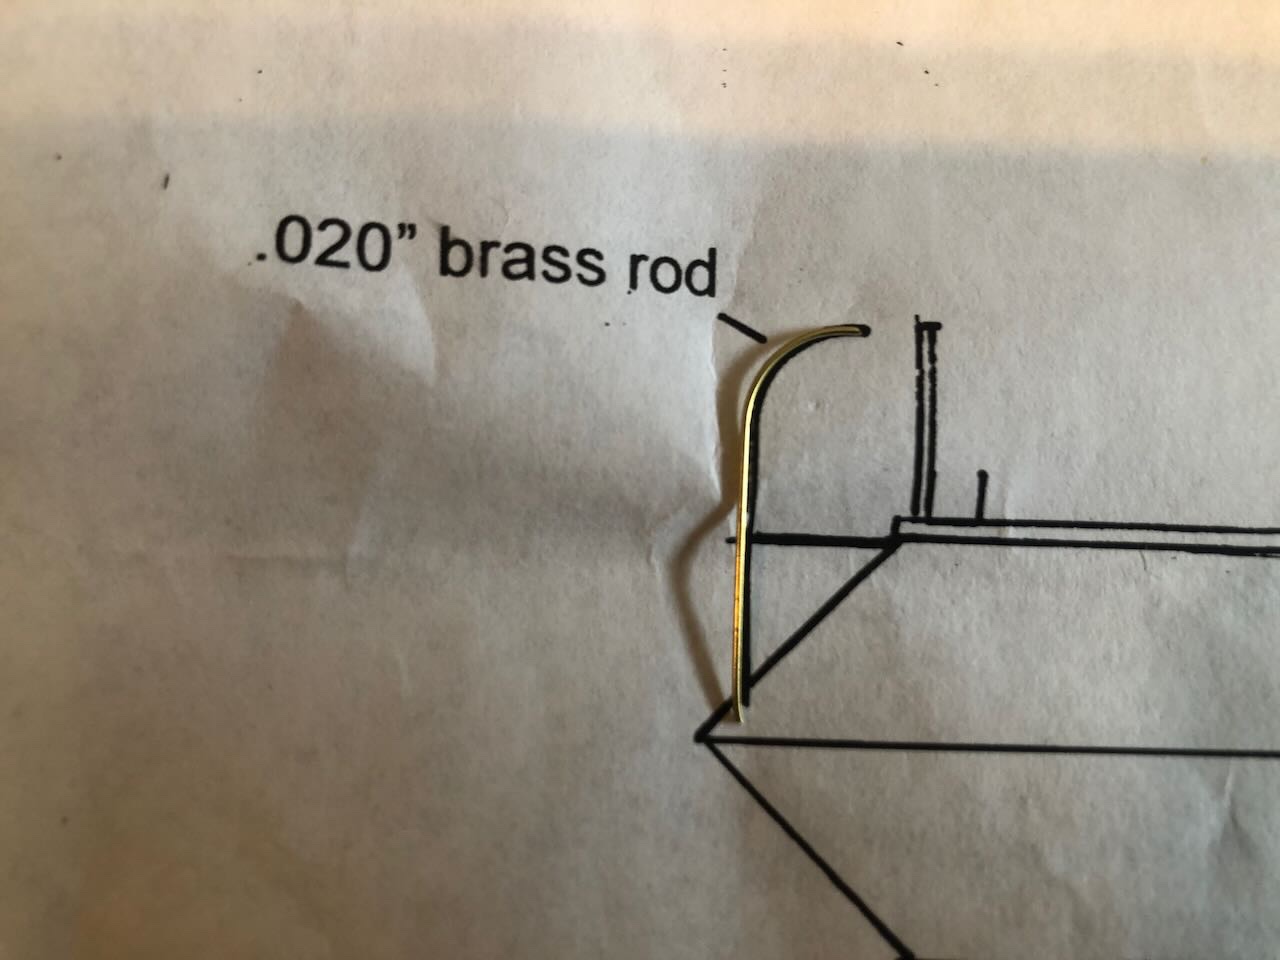
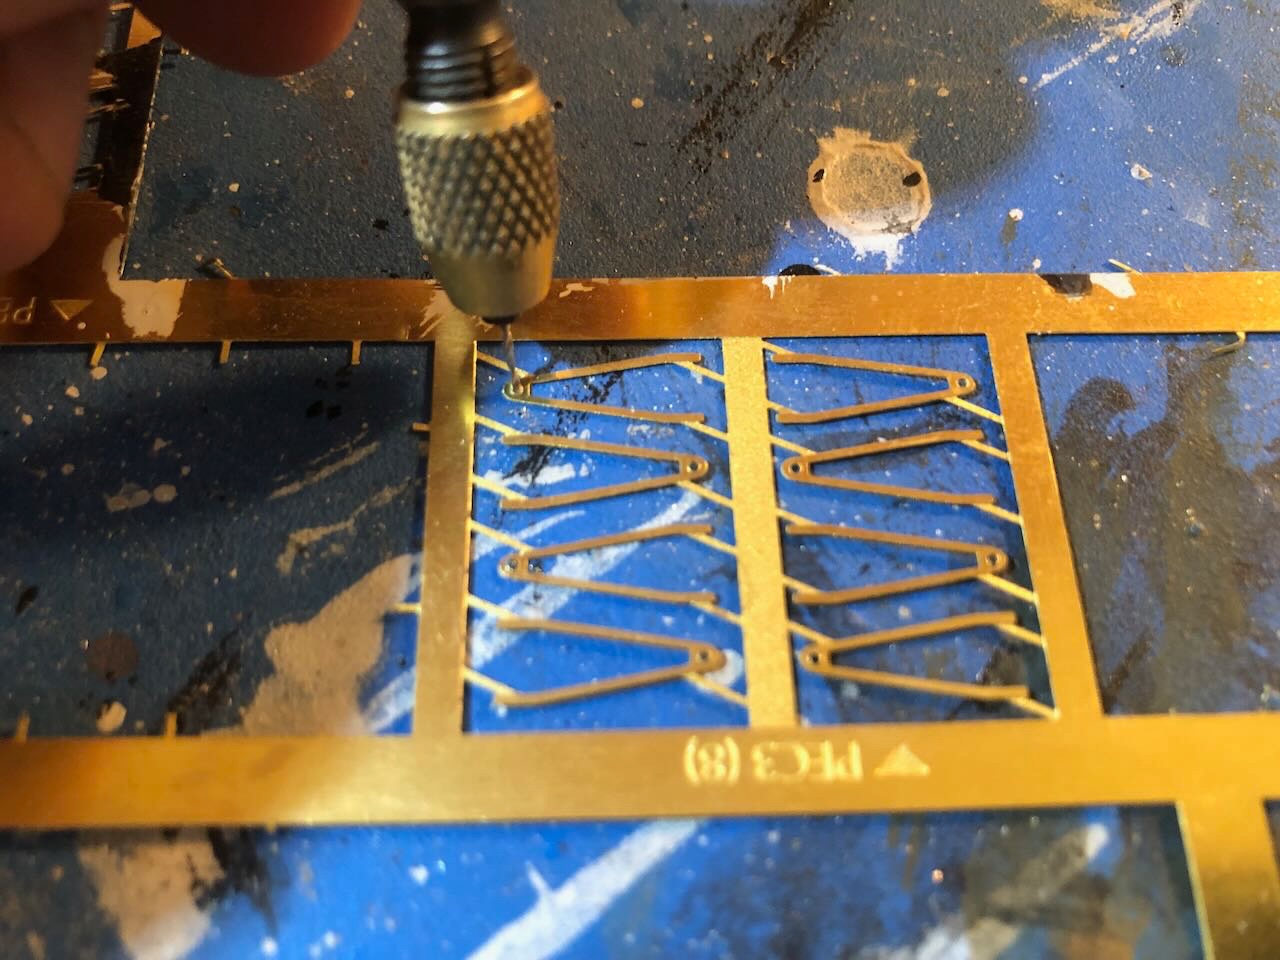
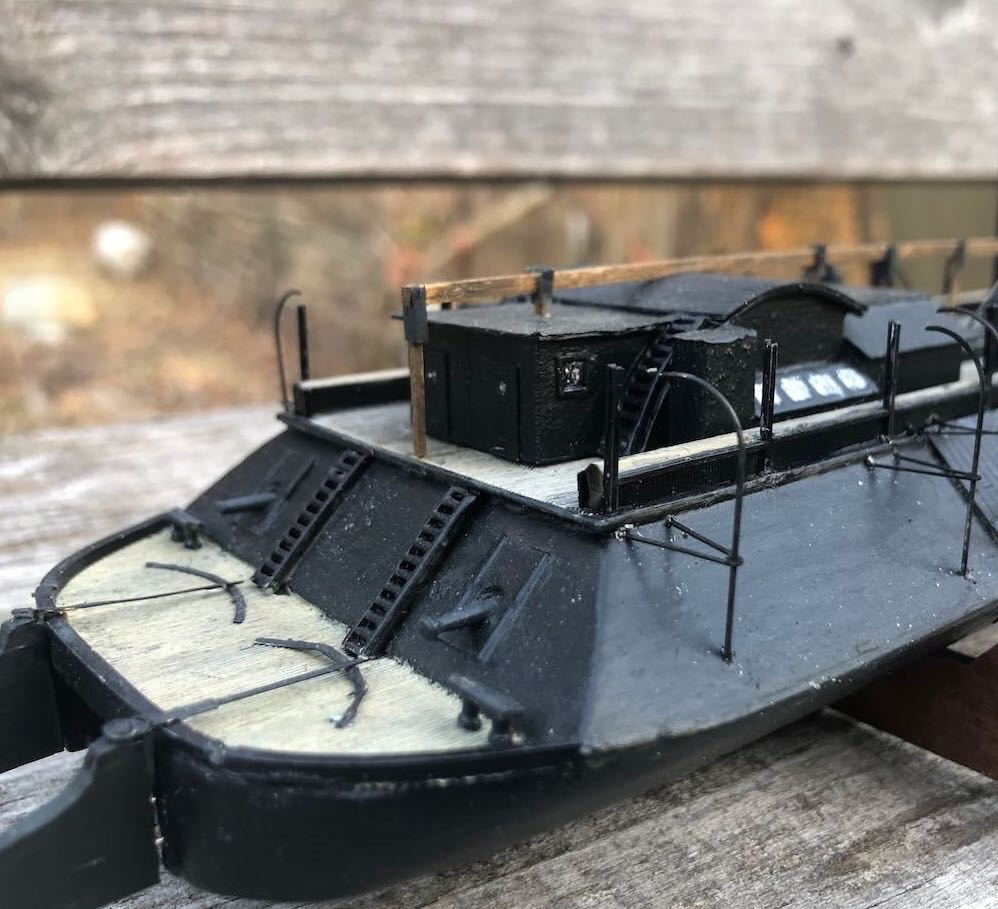
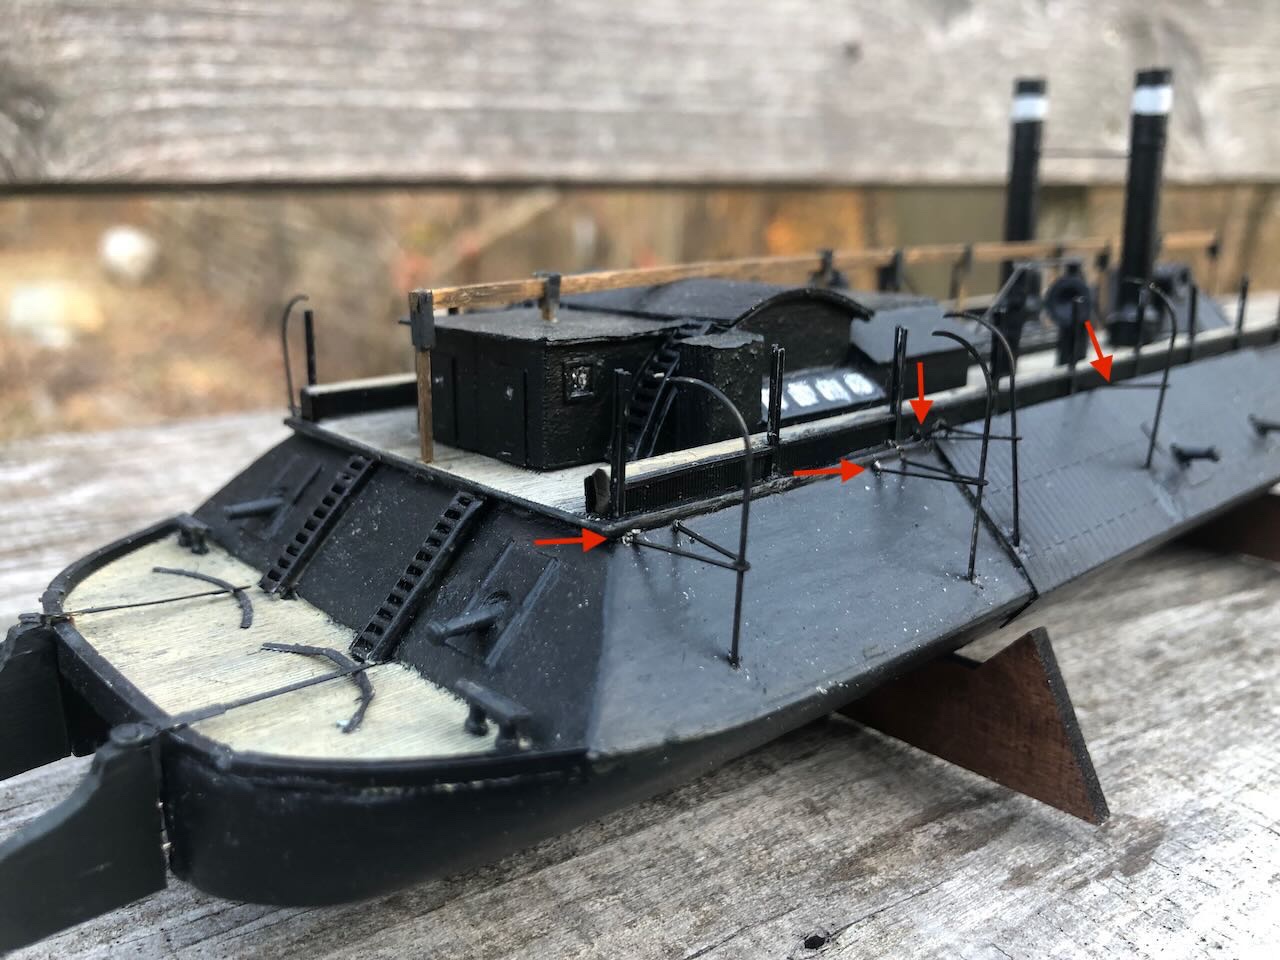
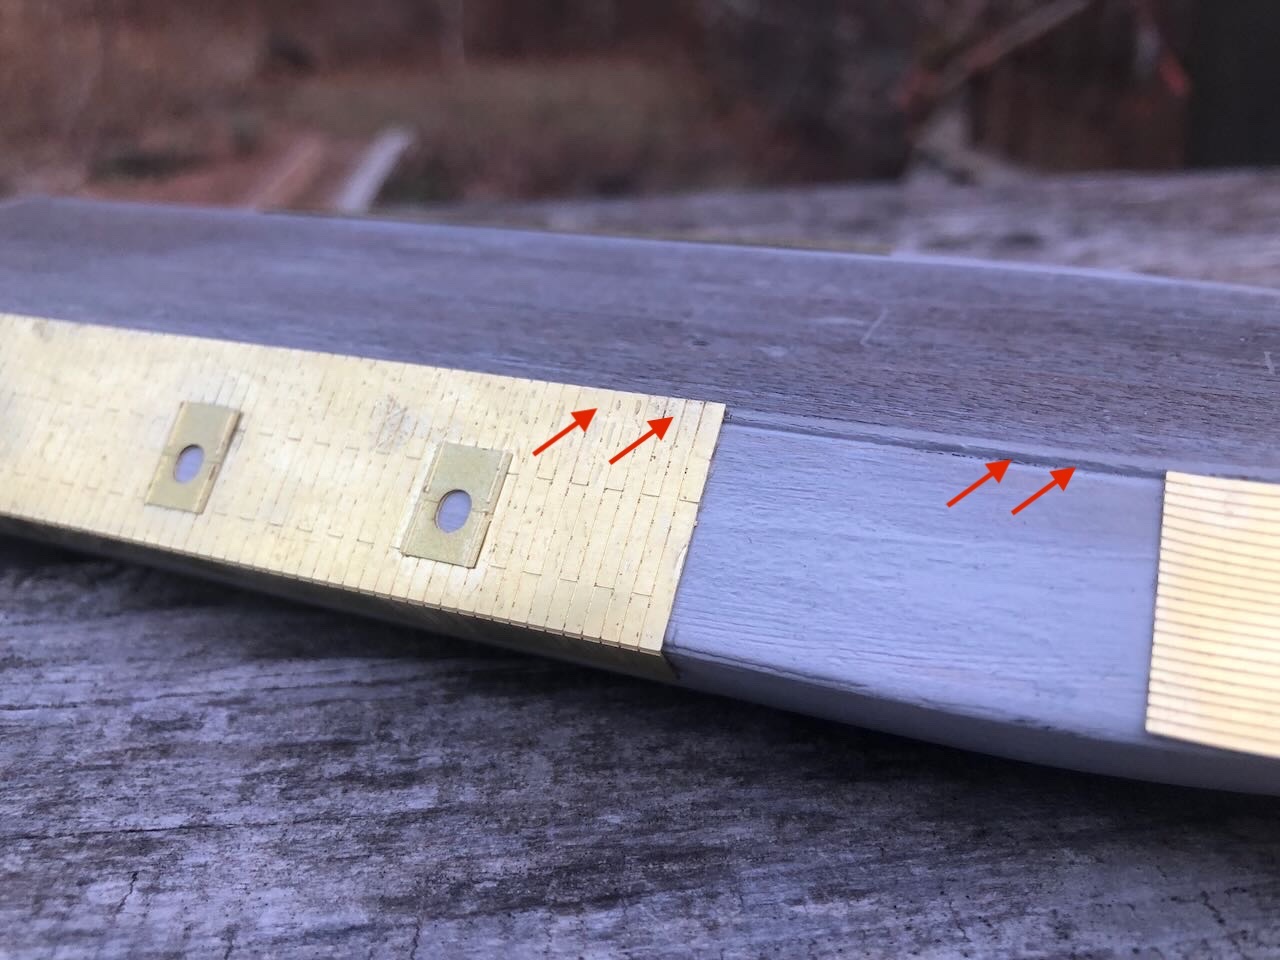
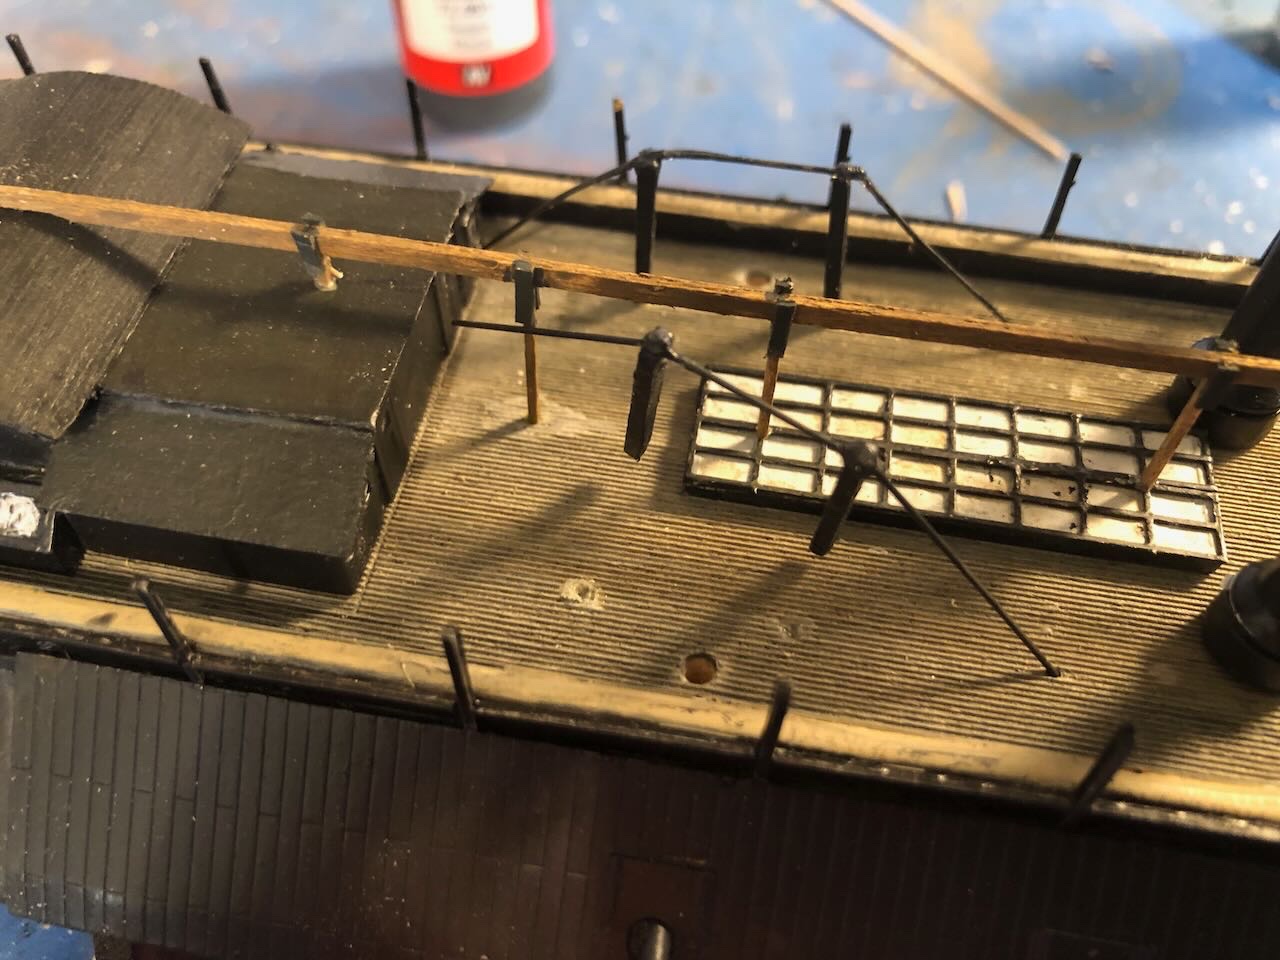
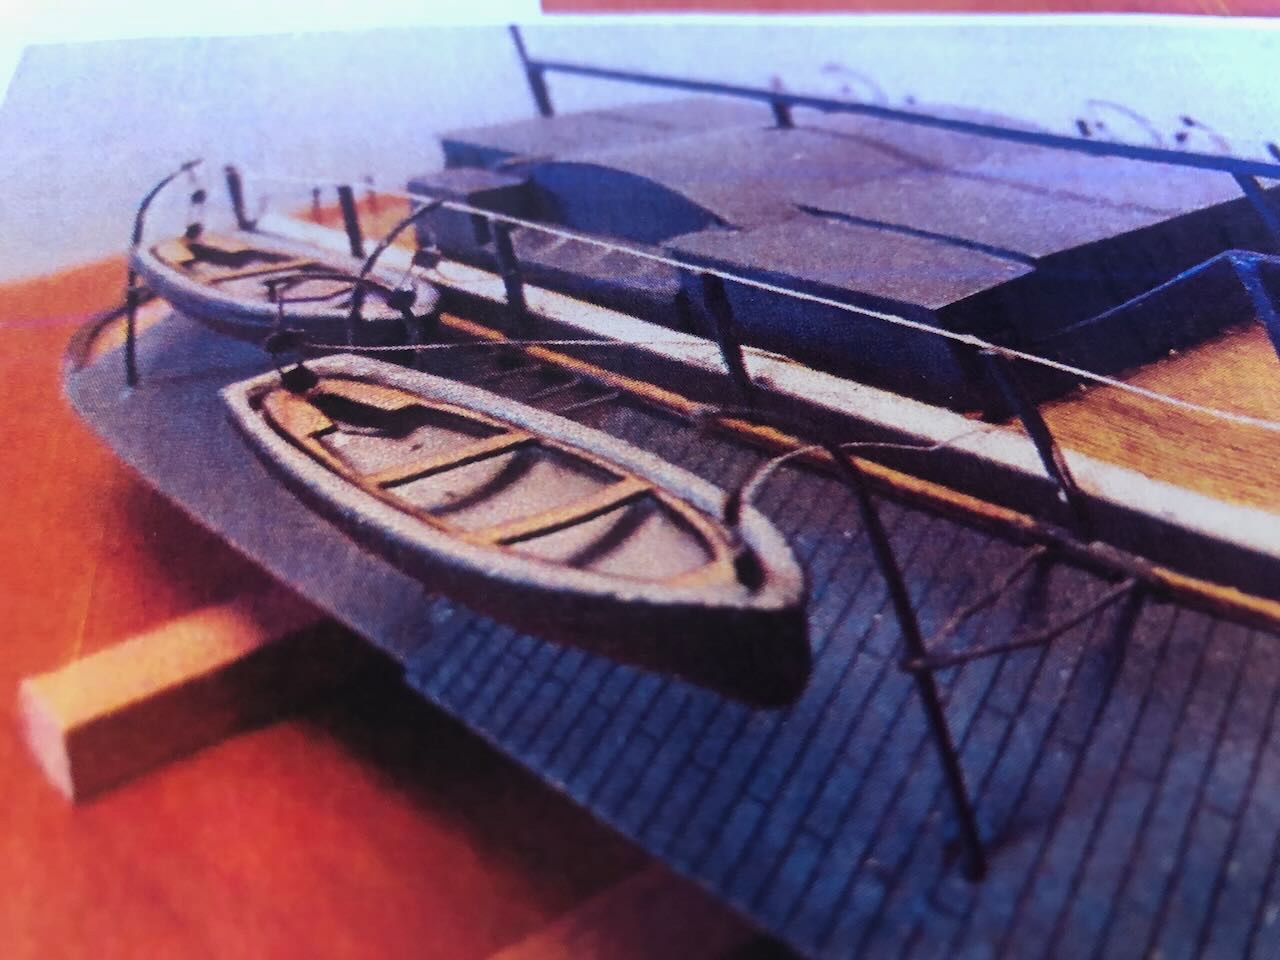
OK, so I spent most of the afternoon yesterday struggling with the davits. They're made from two parts: photo-etched horizontal braces and brass rod that you cut and bend to match the plans: According to the instructions, the brass rod should pass through the hole in the brace, forming a support. At this point I had learned not to trust such statements and checked; sure enough the hole in the PE wasn't big enough to accommodate the provided rod, so I carefully drilled it out wider while the braces were still in their frets (to minimize damage or warping to these fragile pieces). Hence the drill in the photo above. I chose to blacken these parts rather than paint them. This is actually another learning point: the kit instructions consistently tell you to paint everything, never to blacken even basic brass or pewter parts. I followed that at first, but it became a real problem because paint just keeps chipping off, even over primer, and glue doesn't stick as well. I wish I'd ignored the instructions and blackened everything, including the armor. I blackened the guns and was much happier with the outcome, so did the same on the davits. Anyway, you're supposed to drill pairs of holes in the side of the casement, right where the top of the casement joins the upper deck, to hold the horizontal braces. When those are installed, you drop the davit down through, mark where it hits the sloping side of the casement lower down, drill a vertical hole there, then assemble the whole thing. Seemed reasonable, and the back two went together ok since the soft wood is easy to drill into. These are still very delicate, though. But the front two, that was another story. Here the casement side isn't wood, but the PE brass armor, which is much harder to drill through. I did some test tries on leftover brass fretting and found that my hand drills and bits didn't work well; they just skittered off the surface and/or took a really long time to get anywhere. And keep in mind that, for the davit, you're needing to drill at a 45º angle through a painted brass sheet (risking damage to the paint) on a model already covered in fragile detail that's hard to hold steady. There's no way I trust myself to use a power tool on this delicate model at this stage. Another looming problem related to both my earlier mistakes and related kit flaws. You might recall that the side armor was far taller than the wooden casement provided; see this photo from earlier in the build: It's supposed to tuck under the lip of the upper deck, but the wooden casement is too short (or the brass is too tall) and instead the armor stuck up past the entire deck. I couldn't control this because the armor was pre-scored for that 90º bend around the hull lower down. The only solution would have been to cut the entire armor sheet down, and I didn't have the tools to do that because I wasn't expecting to need to do that much alteration of a kit I thought would be well-designed. Remember also the terrible fit of the forward armor? My attempt to cut down that piece sort of mangled it and I couldn't envision doing a long, straight cut to the top of the thin armor without destroying it. So I left it as it was, sticking up above the deck, figuring that once everything was painted it would sort of blend in and nobody but an expert would really notice. That was now revealed to be a big mistake, because now the armor stuck up past the joint between the deck and casement where the holes for the davit braces were supposed to be drilled. So now instead of easy drilling into wood, I was faced with difficult (maybe impossible for me) drilling into thin brass at a 45º, like the davit situation already described above. Below, I marked up an earlier image to demonstrate this. The arrows show how the overly tall armor sheet blocks where you're supposed to drill out the support holes for the braces (this is the forward part of the hull, where there are no davits, but it makes the geometric point): I honestly thought I'd destroy the model if I tried to drill these holes into the brass, based on test runs on leftover material. So I decided just to mount the braces higher, overlapping above the top edge of the armor. They wouldn't be level with their partners, but I decided it wouldn't be all that noticeable to non-expert viewers of a dark corner of my display cabinet. This sensible (lazy?) compromise turned out to be a nightmare. Without mounting holes to provide stability, it was nearly impossible to get these tiny brass pieces to stick to a sloping brass surface. Over and over again I mounted them with tiny drops of quick-setting CA, let it harden, only to have them break away when trying to insert or adjust the davits. And getting the davits to mount in a nice vertical fashion with the curve in the right direction while a tiny bead of CA hardened was equally daunting. I did this over and over and over again, each time ruining a bit more of the painted surface. In the photo below you can see all sorts of glue drips and paint chips from these efforts: I finally got them more or less in place and stopped for the day. I'm not at all happy with them and I have a feeling they're going to break loose again as soon as I try to rig any boats on. This was definitely a combination of kit flaw and my own shortcomings as a modeler. I haven't developed a feel for working with metal yet and it really shows. But this is also far from the "beginner" kit it's advertised to be, and really doesn't seem to be well-thought-out. Even if the armor had been the right dimension (or I'd been able to cut it down) to allow the upper braces to be drilled into wood, you'd still have to drill vertical holes into sloping brass armor for the davits. One improvement could have been that the PE could have included a little dimple at the right locations to guide a drill (either now or pre-drilled before installing the armor), or even just a hole to let the drill through to the wood below. So that's as far as I got before giving up in exhaustion. No idea what'll happen when I try to rig heavy pewter boats to these. Wondering if I should just glue the boats to the hull instead of having them dangle loosely off the davits like the instructions say to do?

- 113 replies
-
- 10
-
-
- Cairo
- BlueJacket Shipcrafters
- (and 1 more)
-
That would make a ton of sense, thanks! It would still be nice for the plans to be consistent and/or for the instructions to explain proper positioning options.
- 113 replies
-
- 4
-
-
- Cairo
- BlueJacket Shipcrafters
- (and 1 more)
-
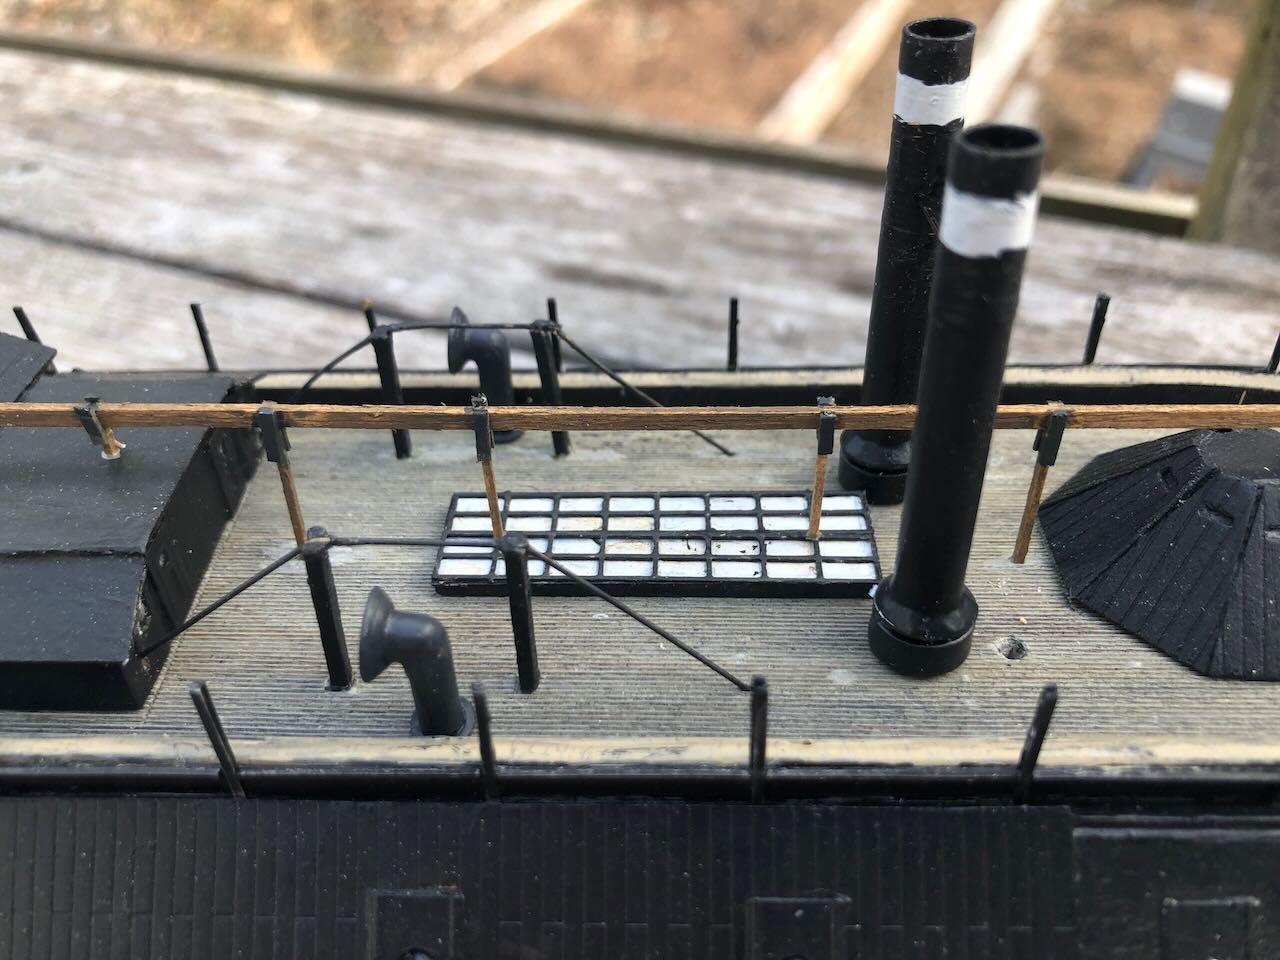
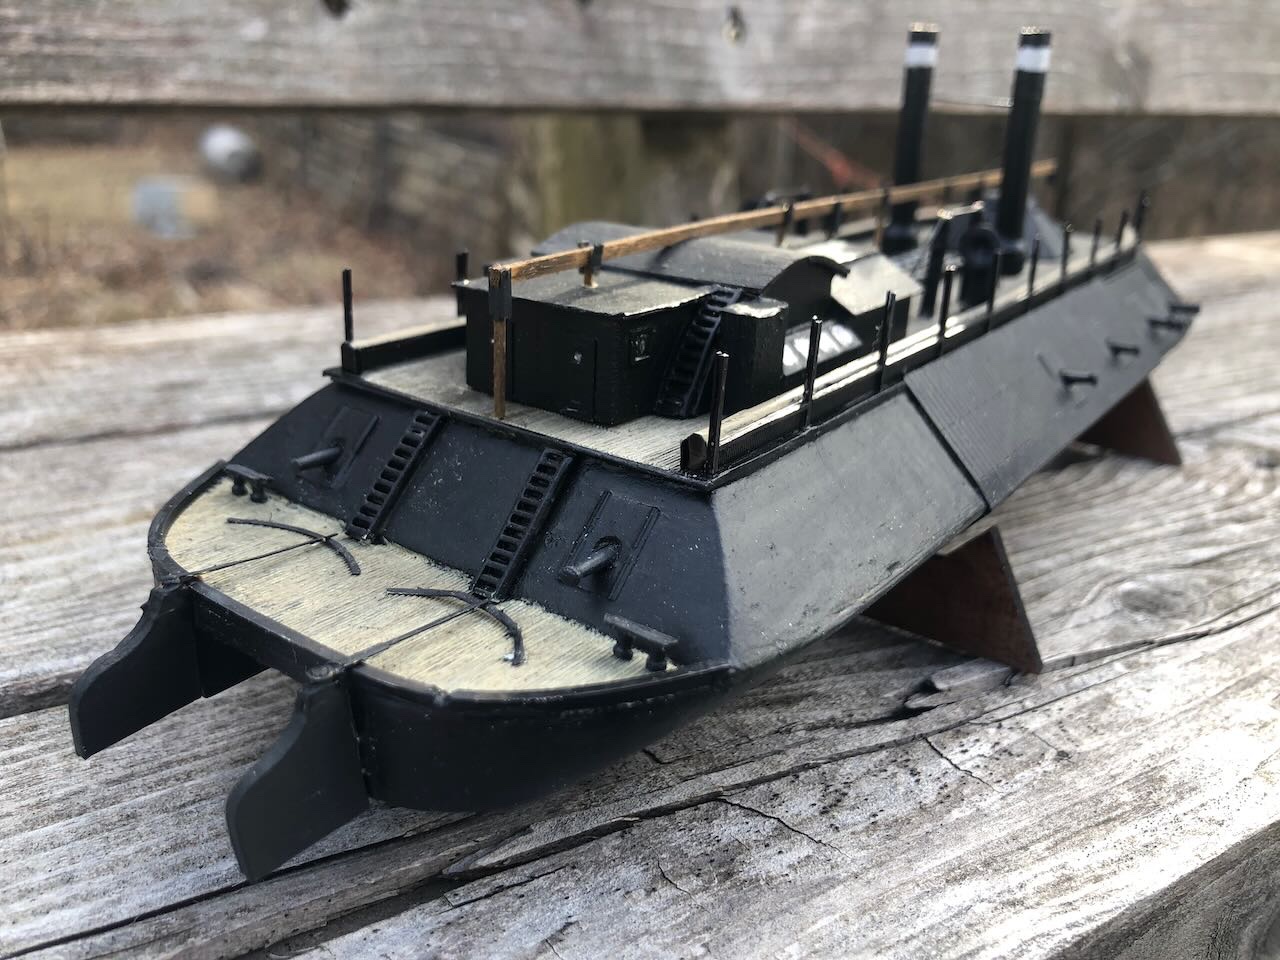
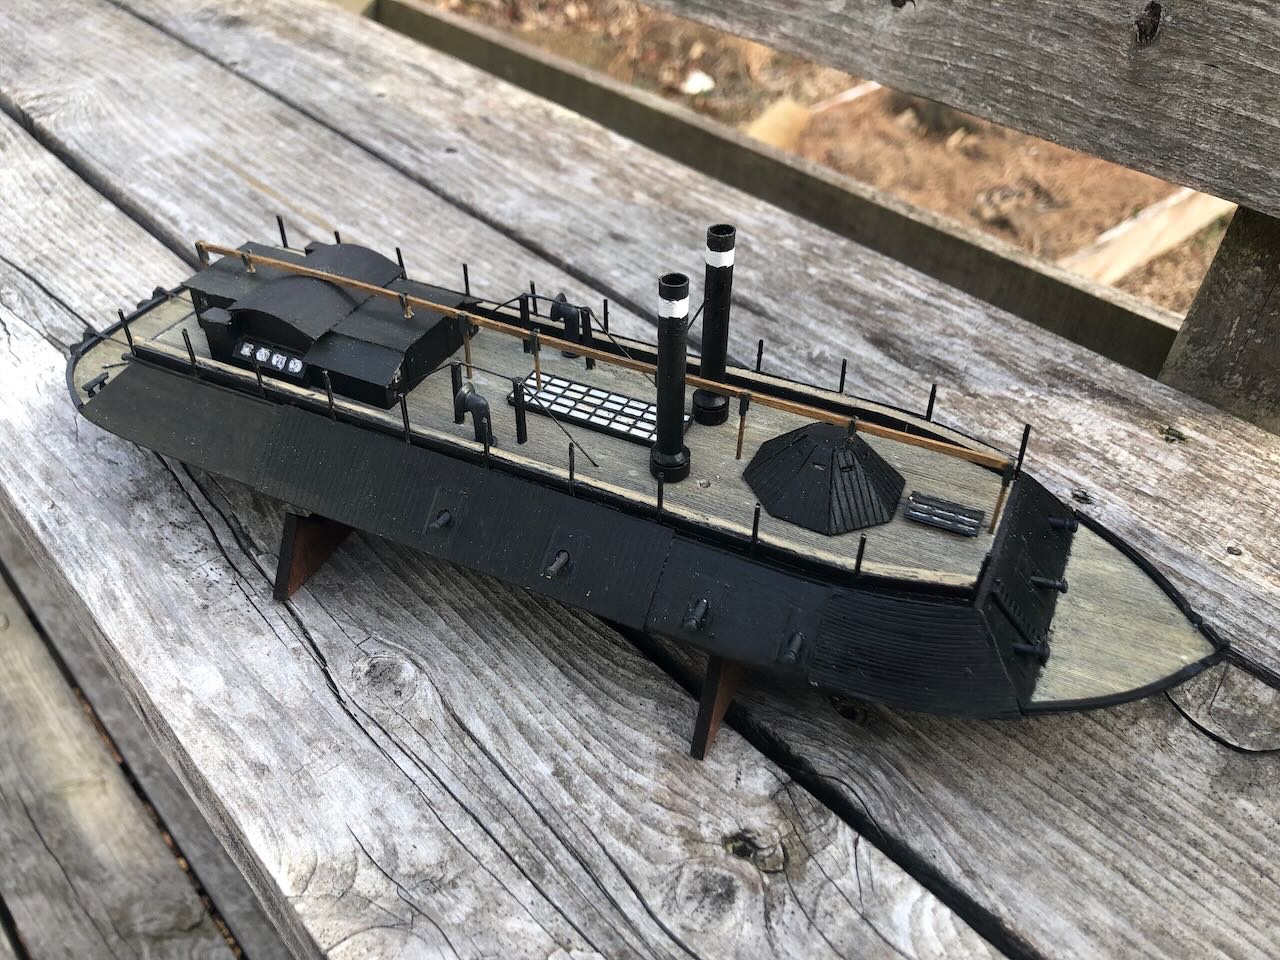
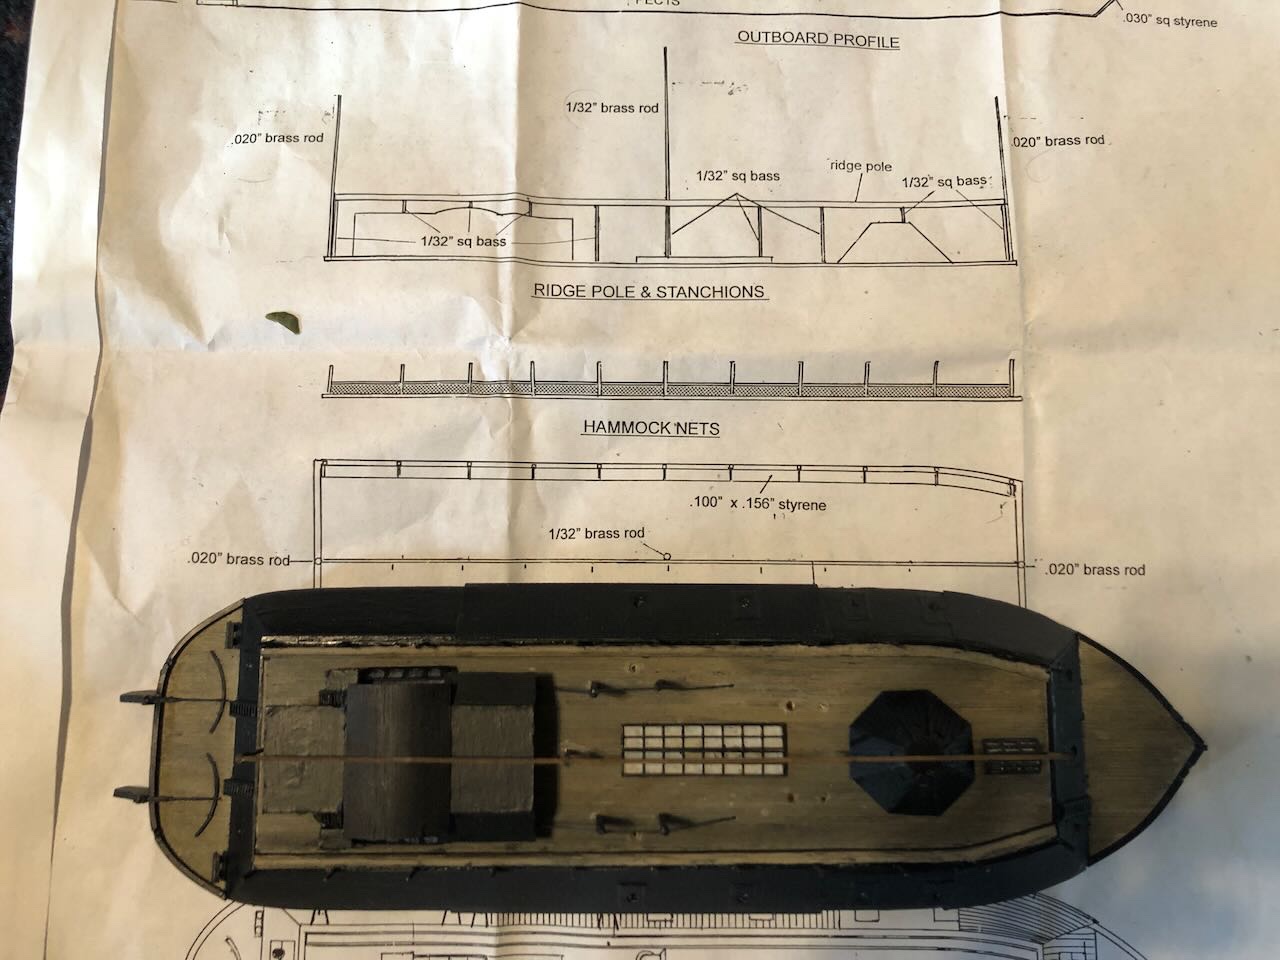
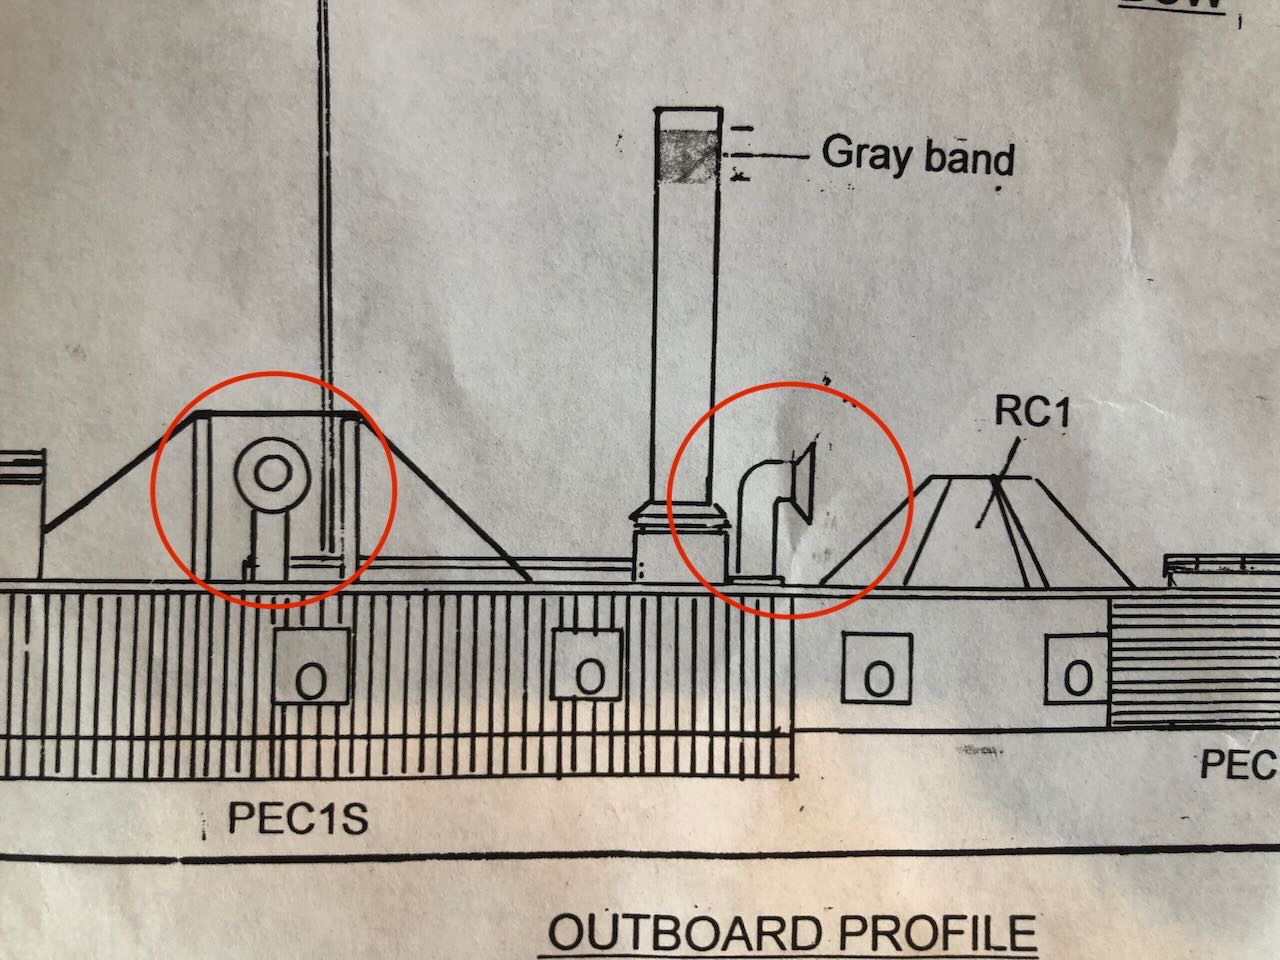
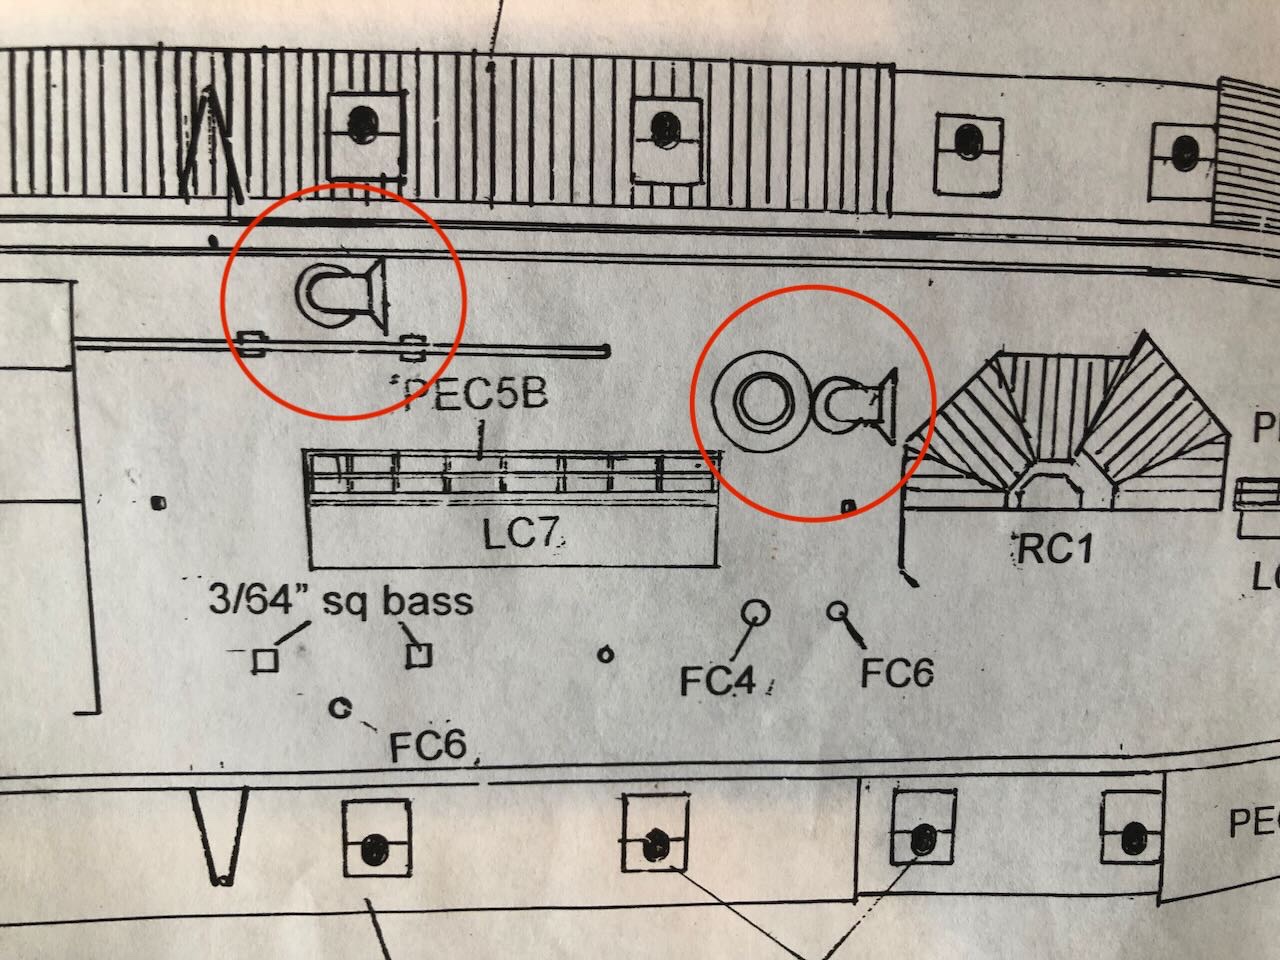
OK, it's been almost a month. I did a little more work, then got frustrated again (and busy) and just stopped even thinking about it. It's a little daunting to come back and even try to pick up the threads. I keep discovering problems with the instructions and plans. For example, the length of the upper deck as shown on the plans doesn't match that of the actual model, meaning the dimensions one might take off it can't be trusted: And the plans are inconsistent on the orientation of the four cowl vents (big L-shaped stacks shaped like the business end of a tuba). In one place the rear ones are shown facing outboard while the forward ones face ahead, and in another place all four are shown facing ahead: Not only that, but either arrangement is inconsistent with the blueprints shared with me by @mbp521, which show the forward ones facing outboard and the rear ones facing aft, completely different from the kit: I decided to follow the latter example as it seems more trustworthy, but it's another example of the ongoing sloppiness in this kit that just causes angst and confusion. Speaking of which, installing these cowl vents created yet another problem. The castings have smaller pegs molded into the bottom so they can slip into holes drilled in the deck and be held in place. So far, so good. The instructions have you drill these holes before adding other details on the deck. Sensible. So I drilled the stated 1/16" holes in the right places, but did not install the vents until once I'd done other fiddly stuff like the bracing rods. Only then did I discover that the pegs on the castings were far thicker than 1/16" and did not even come close to fitting in the pre-drilled holes. I tried filing down the pegs but this took forever and I couldn't get them to fit. So I tried to ream out the holes a bit more with a file, and of course broke the delicate bracing rods: I managed to get this repaired and eventually got the rear cowl vents installed. But this was maddening. I should have test-fit the cowl vents when I drilled the holes, but stupidly trusted the instructions to be right. I haven't dealt with the forward ones yet. I also went through and carefully added the rest of the vertical stanchions that support the long center beam (the shorter ones that extend down to the pilot house, central skylight, wheel housing, and so on). These came out pretty well, with their associated tiny "metal" brackets that are a significant upgrade on the kit. I also added the cannons, which went pretty smoothly although I had to ream out a couple pre-drilled holes with a round file. So here's what the model looked like three weeks ago, the last time I did anything with it: The last steps involve various rigging lines (fiddly but probably not too big a deal) and some very, very delicate details like the boat davits and some railings that consistent of tiny fine brass pieces. I honestly don't know that I can do these right, they don't even look good in the official photos in the instructions. I'm feeling no motivation whatsoever to try to deal with those davits, and a much stronger inclination to just declare the darned thing done and stick it in a dark corner of the display cabinet. I want to write up a long review of all the kit's failings (and to be fair, some of my own) but that feels like a huge time sink when I have so many other more fun things to do with limited free time. EDIT: Writing this shamed me, a few hours later, into taking a stab at the davits. Stay tuned.
- 113 replies
-
- 6
-

-
-
- Cairo
- BlueJacket Shipcrafters
- (and 1 more)
-
Very pretty so far. Given your interest in researching and improving the kit, you might be interested in this reference I stumbled across when researching a possible Beagle build (so far on indefinite hold). It's a research paper on the boats Beagle carried, and while its online version is behind a paywall, you might be able to find a copy in a university library (or have them find you a copy) or contact the authors to ask for a copy (this often works for all sorts of research papers). The Beagle’s pups: small-boat surveying expeditions in South America
-
This looks awesome. I love Baltimore clippers, and wish this had come out before I struggled so much building a terrible Corel kit. Will be fun to see this coming together.
- 80 replies
-
- 5
-
-
- Grecian
- Vanguard Models
- (and 3 more)
-
That motor will certainly add visual interest.
-
Huh, never heard of this company before, what's your sense of how the kit stacks up against other manufacturers?
-
I resemble this remark to an extraordinary degree.
-
What a well-done and distinct model. It'll be a joy to display and answer questions about! Thanks for sharing.
- 84 replies
-
- 2
-
-
- Statenjacht
- Kolderstok
- (and 1 more)
-
It's not so much for waves as just to support the hull itself. These were riverboats and anything beyond the smallest waves would have been catastrophic for them. But even in calm water the hulls weren't capable of supporting themselves. The weight of the sternwheel hanging off the end would have broken them in half, and the long, narrow hulls would never hold up on their own without extraordinary amounts of internal bracing. That wasn't done because it would make the hulls too heavy for river navigation, and too rigid because often they did need to flex (such as when encountering sandbars). In a way, these were more like Viking longships in that the hulls were lightweight and flexible, but since they (a) were much bigger and (b) had to support machinery and heavy loads that longships didn't, they needed extra support, and iron rods have a much better strength/weight ratio than lots of wooden bracing. Plus, as you noted, the turnbuckles allow the bracing to be adjusted. Cleat, if you're confused by all this, it doesn't help that this kit bears only a passing resemblance to any real-life steamboat (realism-wise, it's the equivalent of a cartoon pirate ship), so don't think about it too deeply! At the level of this kit, the idea is to run some dark line over the top of the poles (I'd suggest filing/cutting a thin slot across the end of the dowel), simulating the iron rods that would run between metal plates on each pole and down into the hull.
- 132 replies
-
- 2
-
-
- King of the Mississippi
- Artesania Latina
- (and 1 more)
-
Ouch, that’s scary! Glad to see you figured out a fix. Deck itself looks nice.
- 158 replies
-
- 1
-
-
- chaperon
- Model Shipways
- (and 1 more)
-
Great upgrade! For what it’s worth, my pedantic side wants to note that those were usually called stages in steamboat land. They look really good.
- 86 replies
-
- 1
-

-
- king of the mississippi
- artesania latina
- (and 2 more)
-
Railings are definitely one of the most frustrating part of any steamboat build. A jig seems reasonable.
- 132 replies
-
- 1
-
-
- King of the Mississippi
- Artesania Latina
- (and 1 more)
-
USS Cairo by Zetec - FINISHED - 1/50 scale
Cathead replied to Zetec's topic in - Build logs for subjects built 1851 - 1900
Great choice for a unique and interesting model. Will be fun to see how you progress. -
That's a wonderful model. Nicely balances clean workmanship with artistic attractiveness. I hope you have a proud place to display it.
-
Your wooden kit progression - go big, or keep learning/practicing?
Cathead replied to Esap's topic in Wood ship model kits
Not all wooden ships have PE. I'm one of those who hates working with metal, and there's a fair argument that I just haven't learned how to do it properly. But I think the broader point here is that starting small and/or dabbling also lets people learn what they're good at or not, and what they like to do or not. I've learned over and over that I'm happiest working in wood, and that's helped me focus (for the most part) on projects I'll enjoy. There's a fair counter-argument that learning new skills helps keep the hobby fresh, but it's still worth learning/knowing your strengths and weaknesses. -
Timber-framed outdoor kitchen - Cathead - 1:1 scale
Cathead replied to Cathead's topic in Non-ship/categorised builds
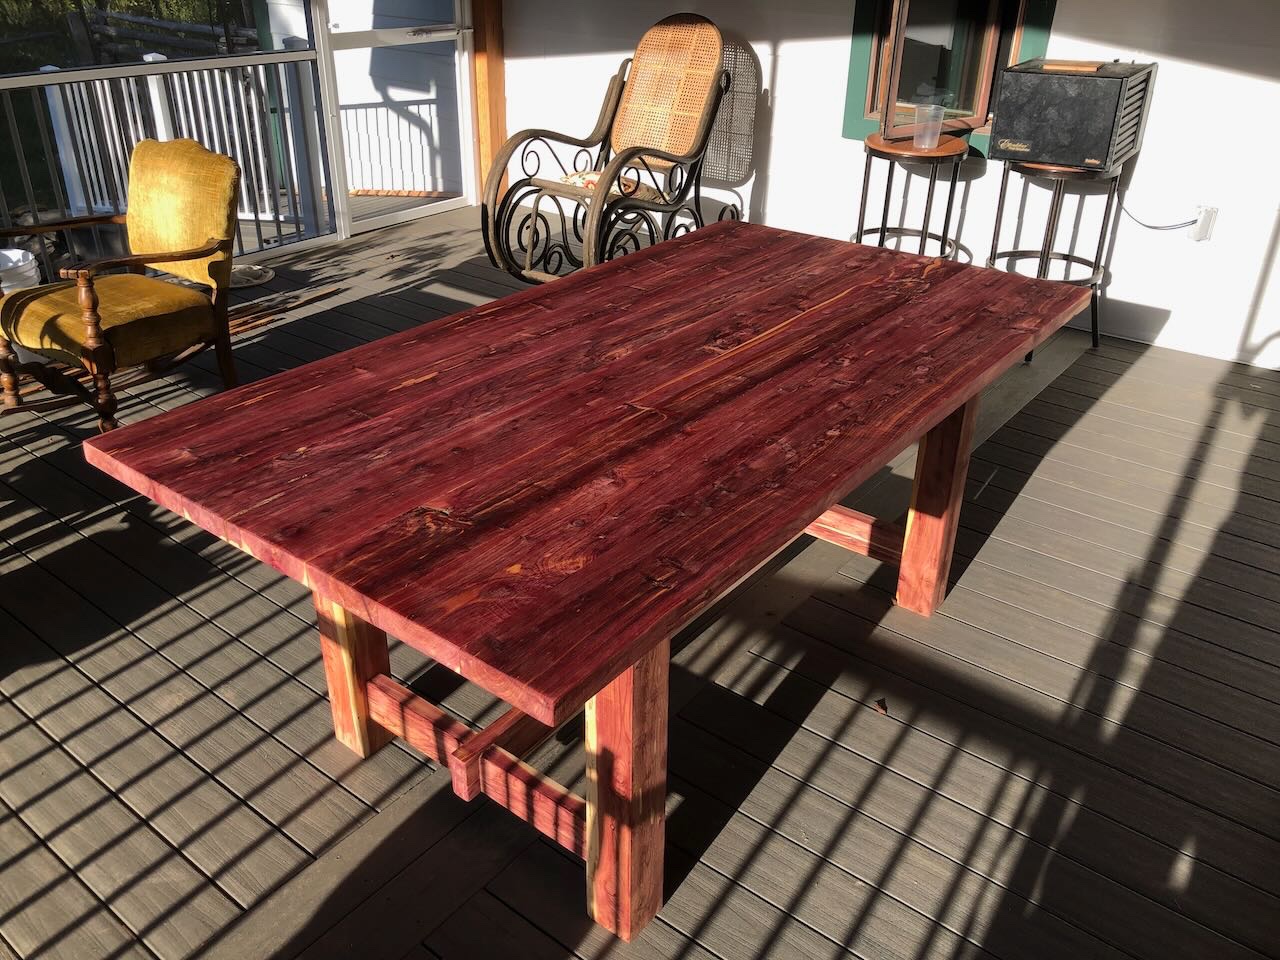
Jack, all the wood is Eastern Red Cedar, which we harvest and mill on-farm. Its sapwood has that brilliant purple hue when it's freshly cut, but it quickly weathers to the dull orange you see on most of the structure, and eventually to grey with sufficient direct sunlight. You can preserve some of the color with wood oil, for example in this table I built from the same material (photo repeated from earlier in the thread): Paul, beans would be an option but we'd rather plant a perennial vine that will take up long-term residence, rather than something we'd have to restart every year. That'll also speed up the shade production, since an established vine will create shade as soon as it leafs out, rather than waiting for a new vine to climb up the trellis again. And we don't want to do grapes because we don't want to draw lots of birds into a food-handling area. We have plenty of garden space and trellises for beans (we grow our own full annual supply of dried beans as well as green beans). So it'll be something hardy and flowering.