Cathead
-
Posts
3,522 -
Joined
-
Last visited
Content Type
Profiles
Forums
Gallery
Events
Everything posted by Cathead
-
If it wasn't clear, that was a World Cup joke, not any sort of comment on your language skills!
-
Welcome! Might want to be gentle with the English members for a few days!
-
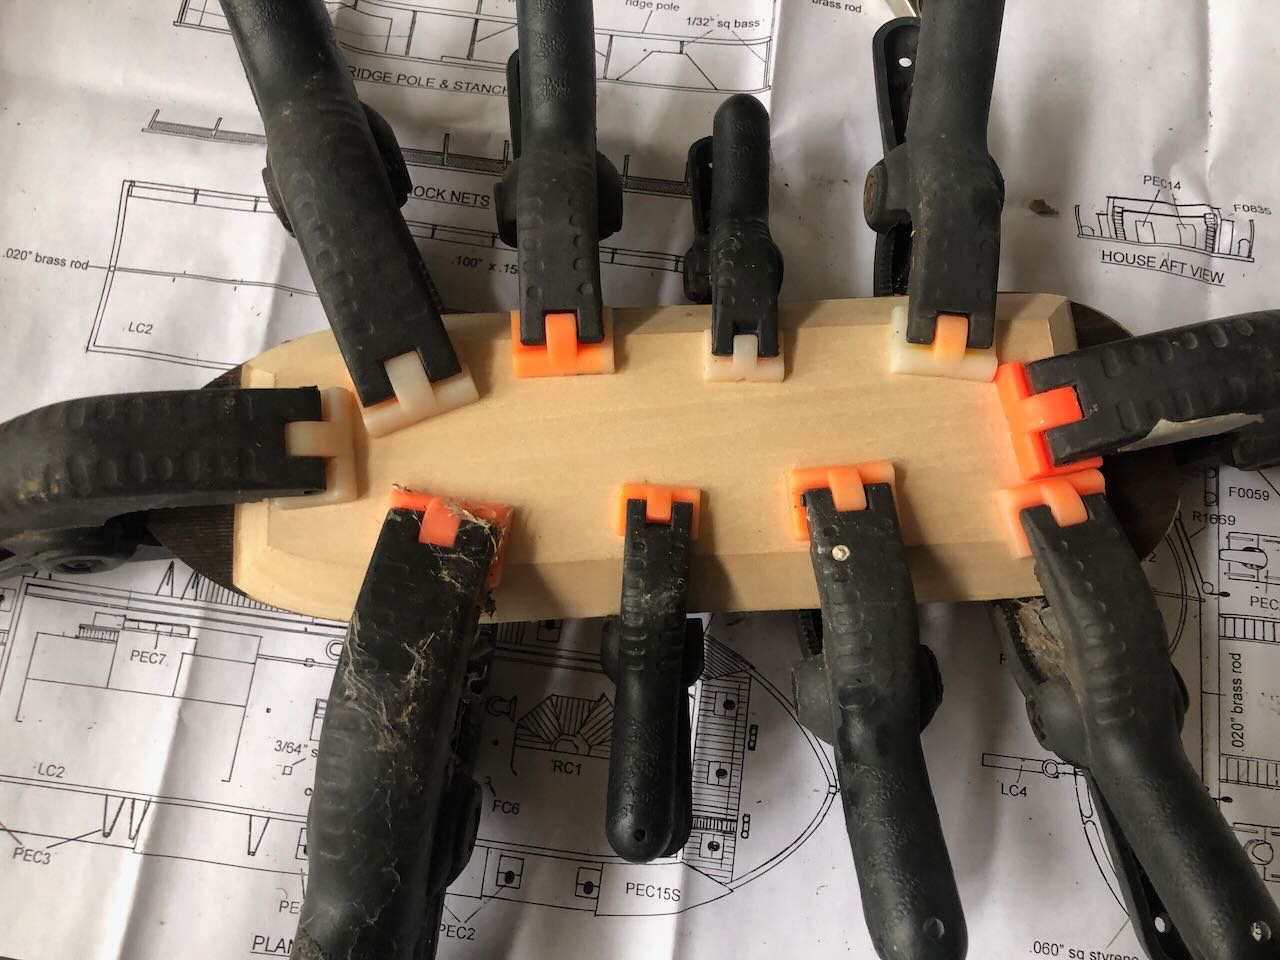
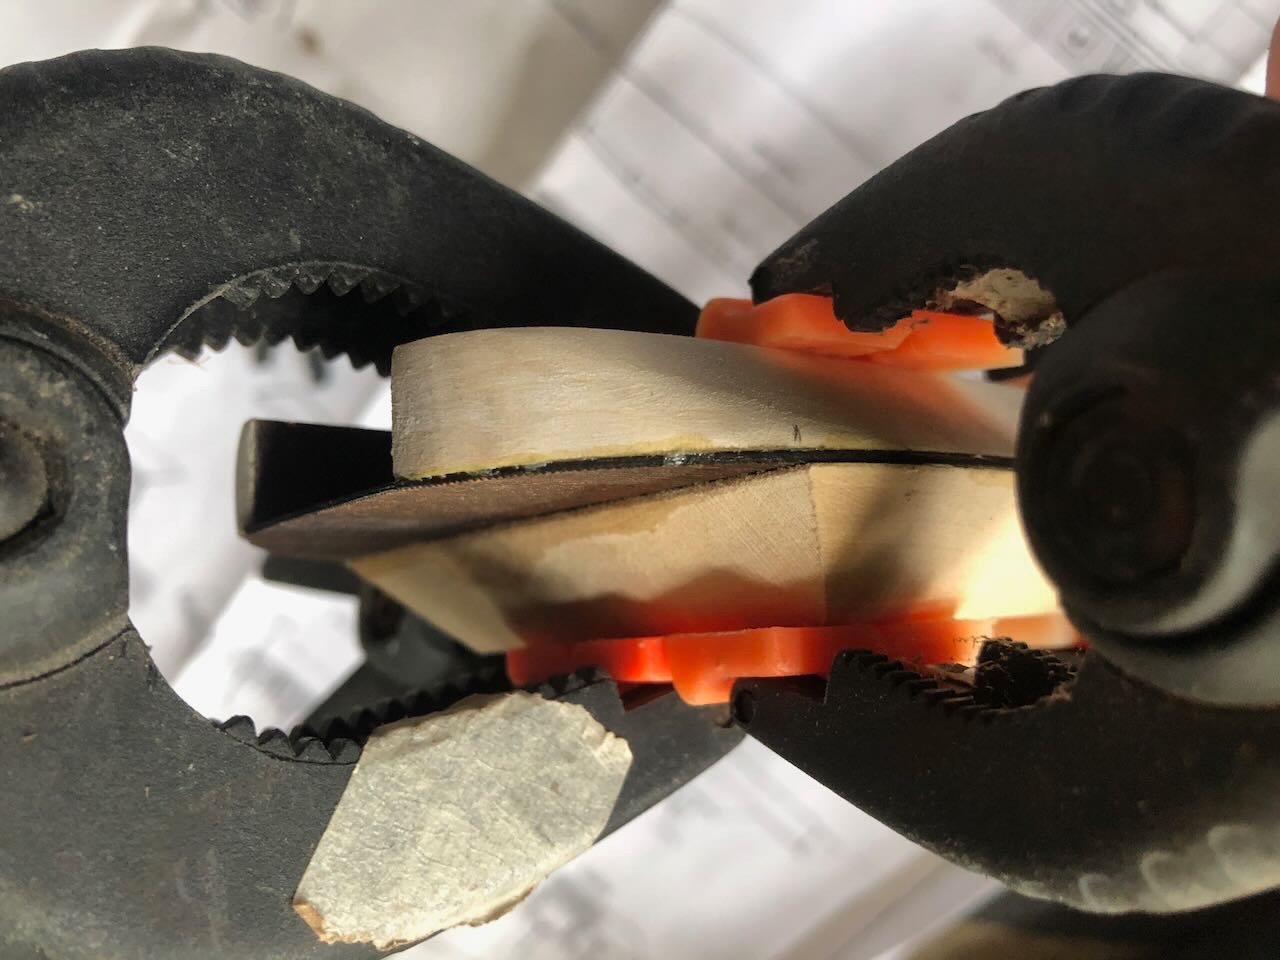
 I agree that bending around a solid item is good practice, even if you can't find one with just the right radius. Getting a rough pre-bend in the wood makes final adjustment easier and safer. Nice work!
- 158 replies
-
- 1
-

-
- chaperon
- Model Shipways
- (and 1 more)
-
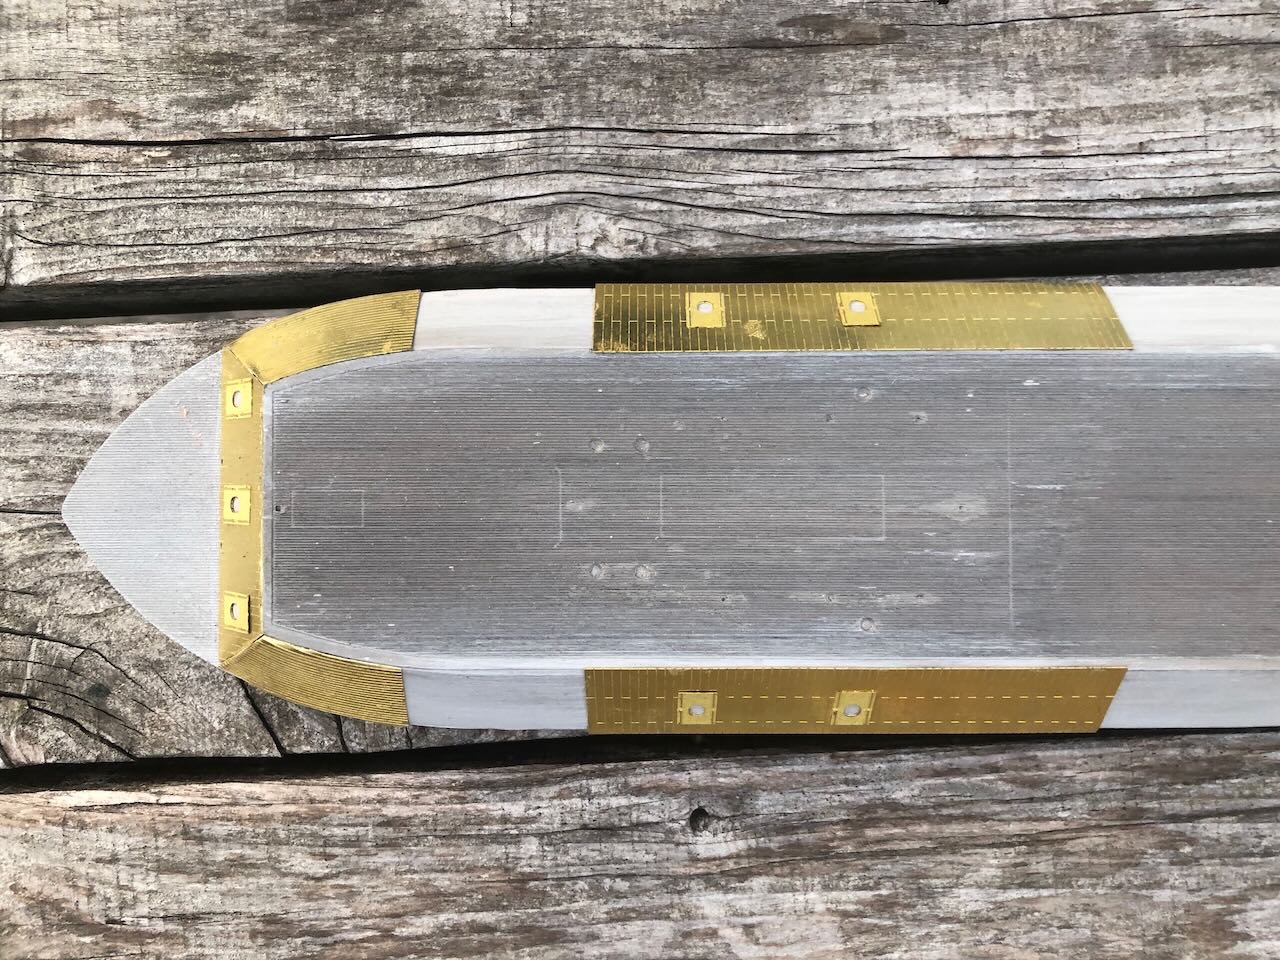
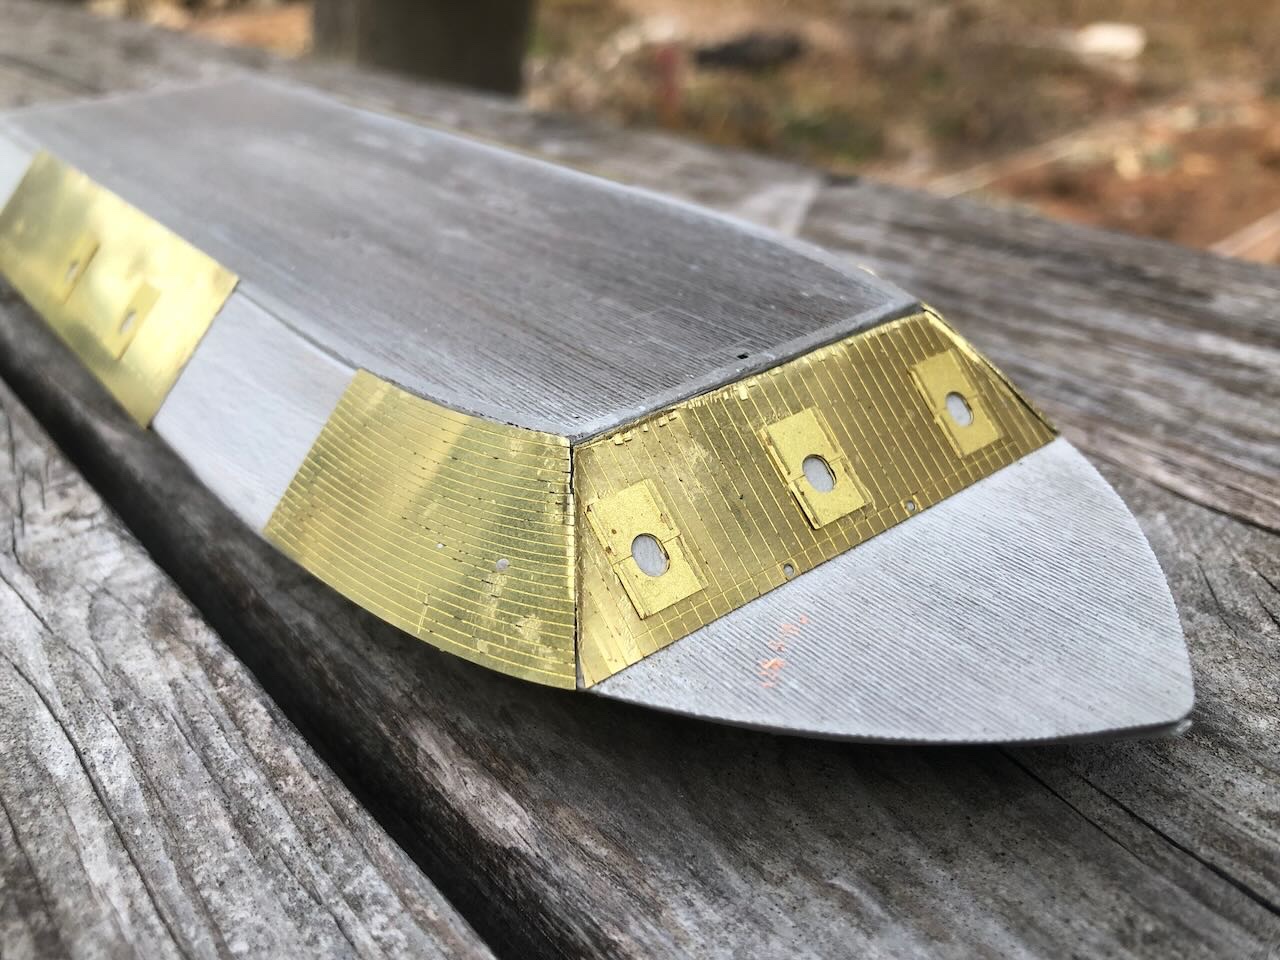
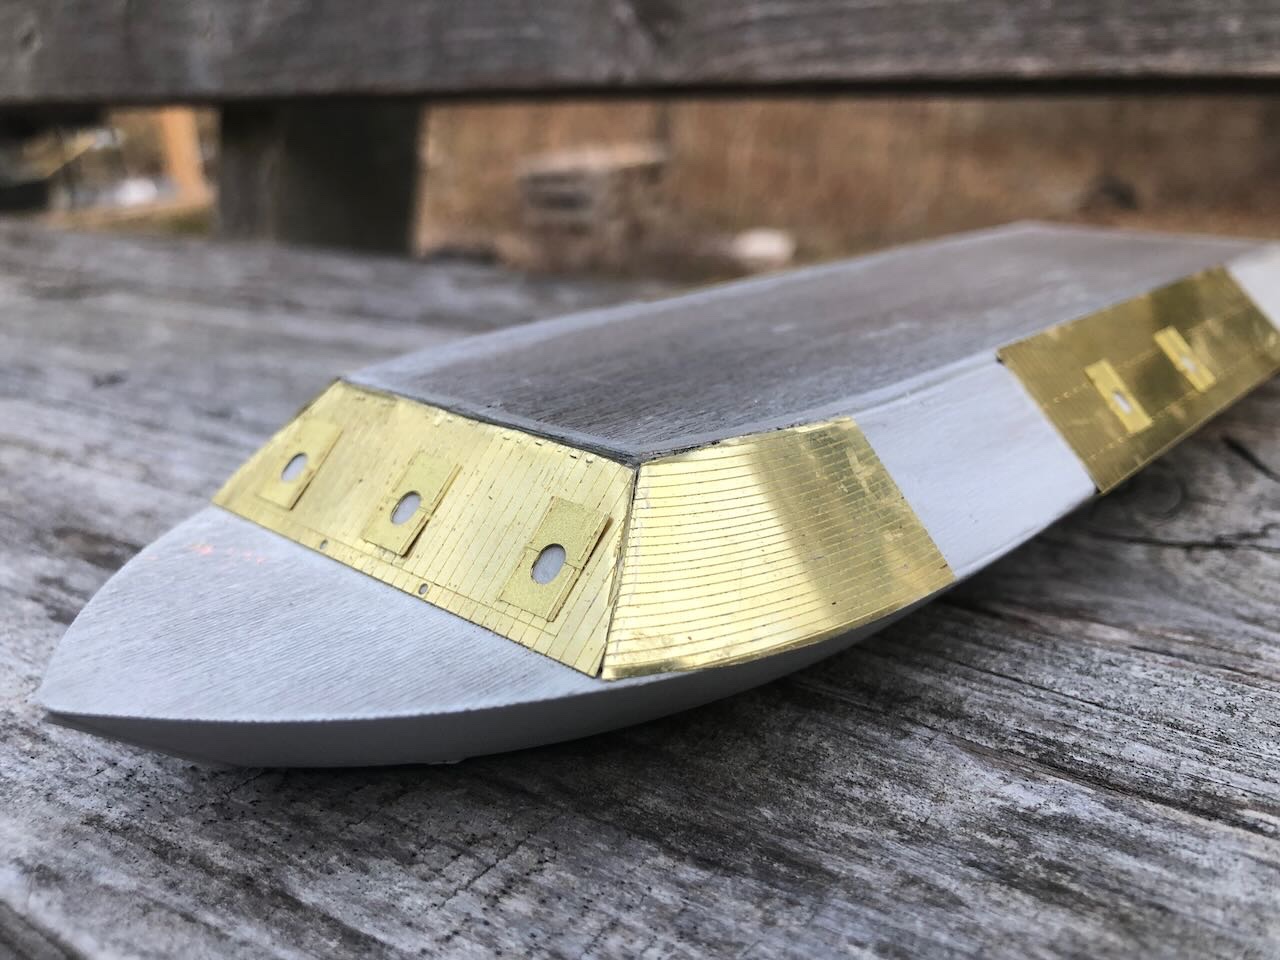
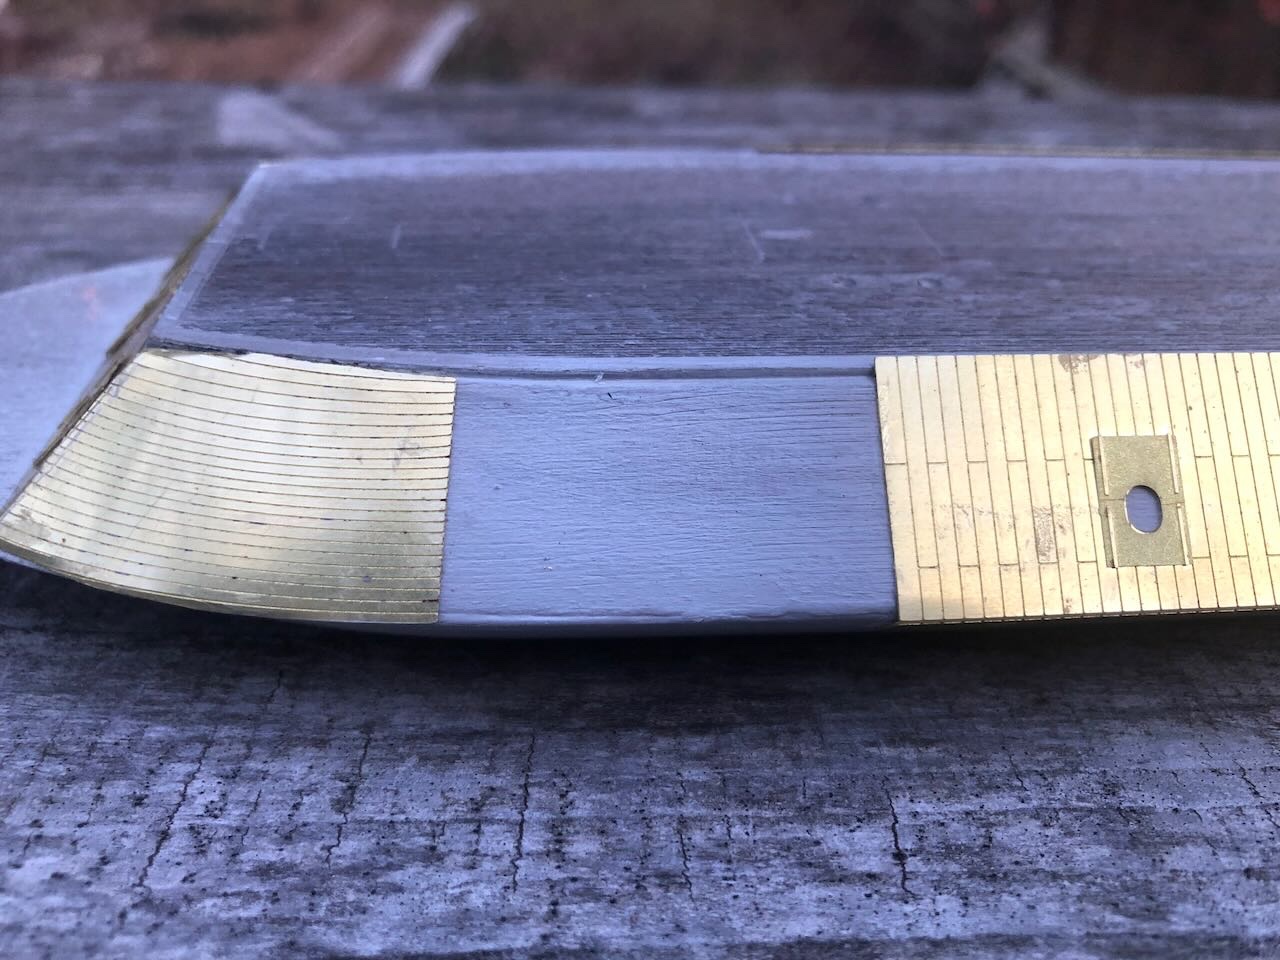
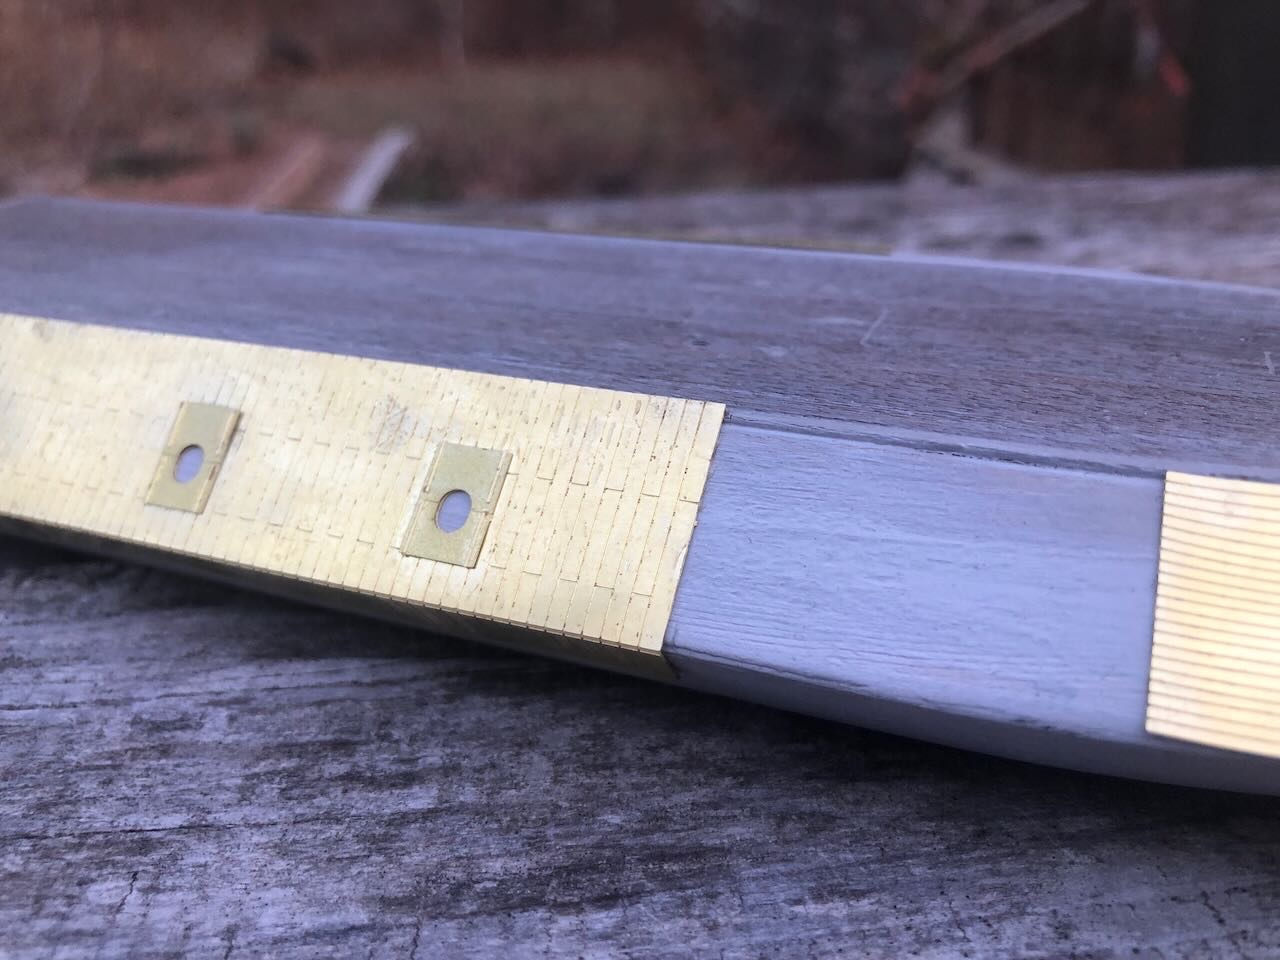
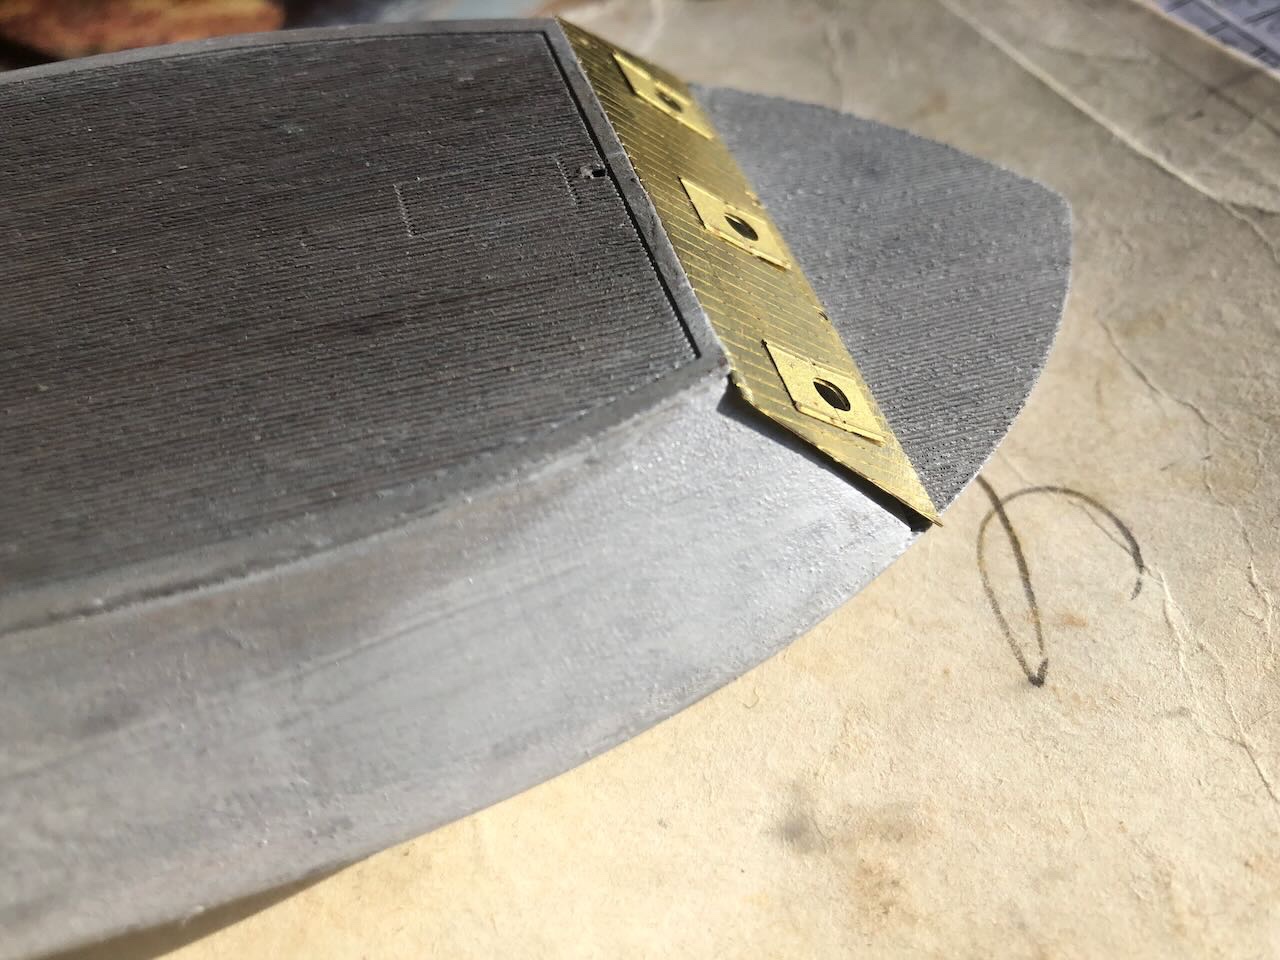
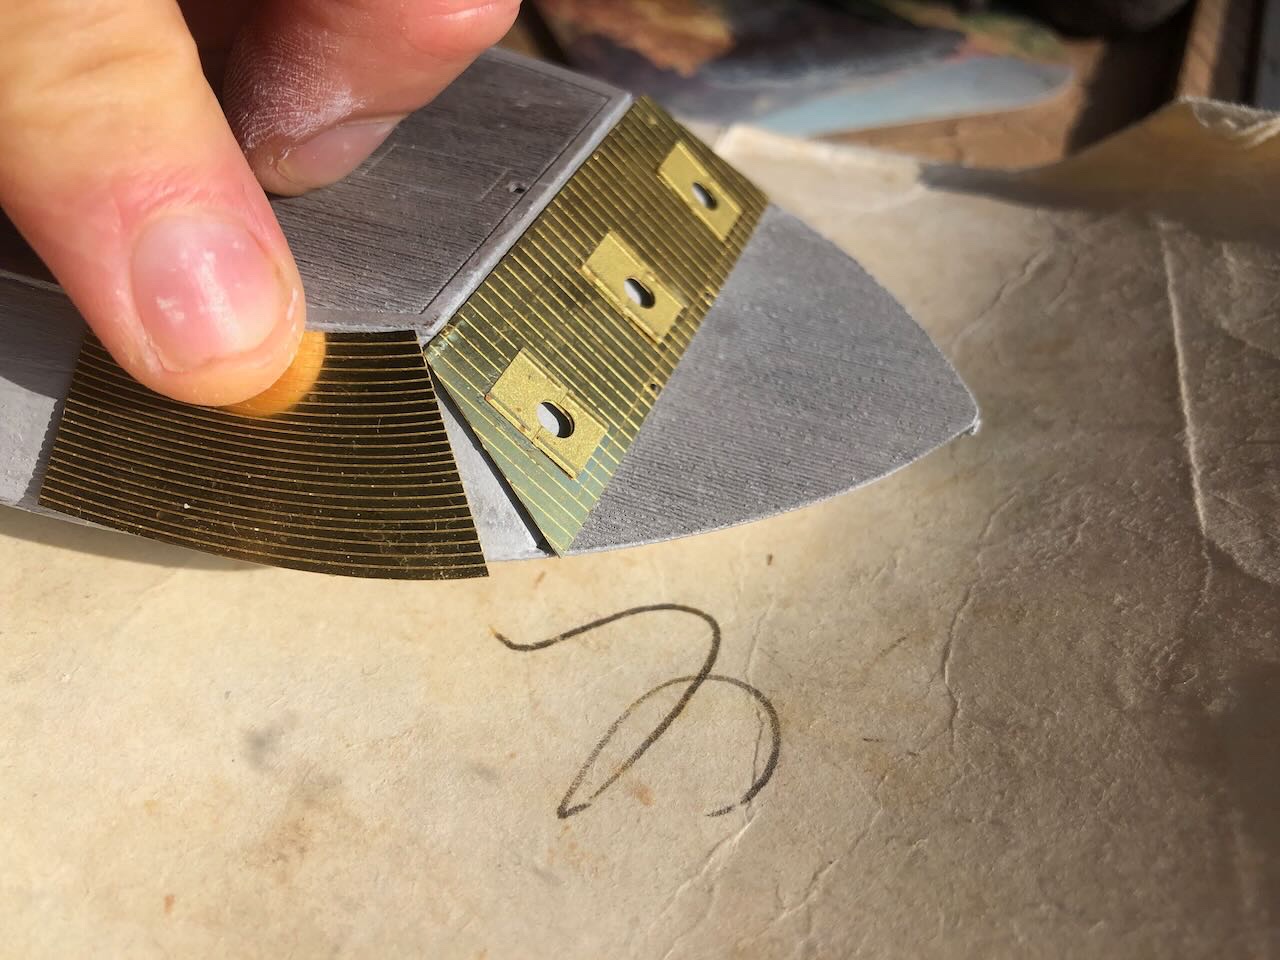
So I was in a stubborn, toddler-like "but I wanna work on my model NOW" mode after posting that. I remembered that I had a pair of model-railroad rail nippers, and decided to see if those would cut brass sheet. Definitely not ideal, they bent and mangled the edges as I worked, but I just went ahead anyway, and with some careful filing and flattening got a moderately workable result. You can see the mangling, but I think the bright brass makes it stand out more than when it's all dark and weathered. I had to cut and file a lot of material to make this fit reasonably well. This will definitely be a "view from a few feet away" kinda model. As you can see, I also added the side armor. This needed to be bent carefully in a 90º bend where it wraps from the casement onto the hull. I clamped the pieces between two metal squares and that worked pretty well. Another example of odd instructions, though, they tell you to glue the gunports to these armor sheets before you do the bend. But that makes an uneven surface in the clamp, and one of the gunports came off. I can't see why you wouldn't just glue the ports on after the sheets are bent, or even after they're on the model. Another problem was that the side armor came out at a different dimension than the front armor; it sticks up further past the hurricane deck. I think it's supposed to tuck in under that deck. I had no control over this because the bend happens along a pre-scribed line. I was not about to try and cut/clip a smooth line off the entire top of these long side armor sheets, so I just ignored the disparity and again hoped that paint and weathering and distance will obscure it. But it's another odd inconsistency about the kit's design. The hull and casement are just too small to allow the brass sheet to fit properly.
- 113 replies
-
- 7
-
-
- Cairo
- BlueJacket Shipcrafters
- (and 1 more)
-
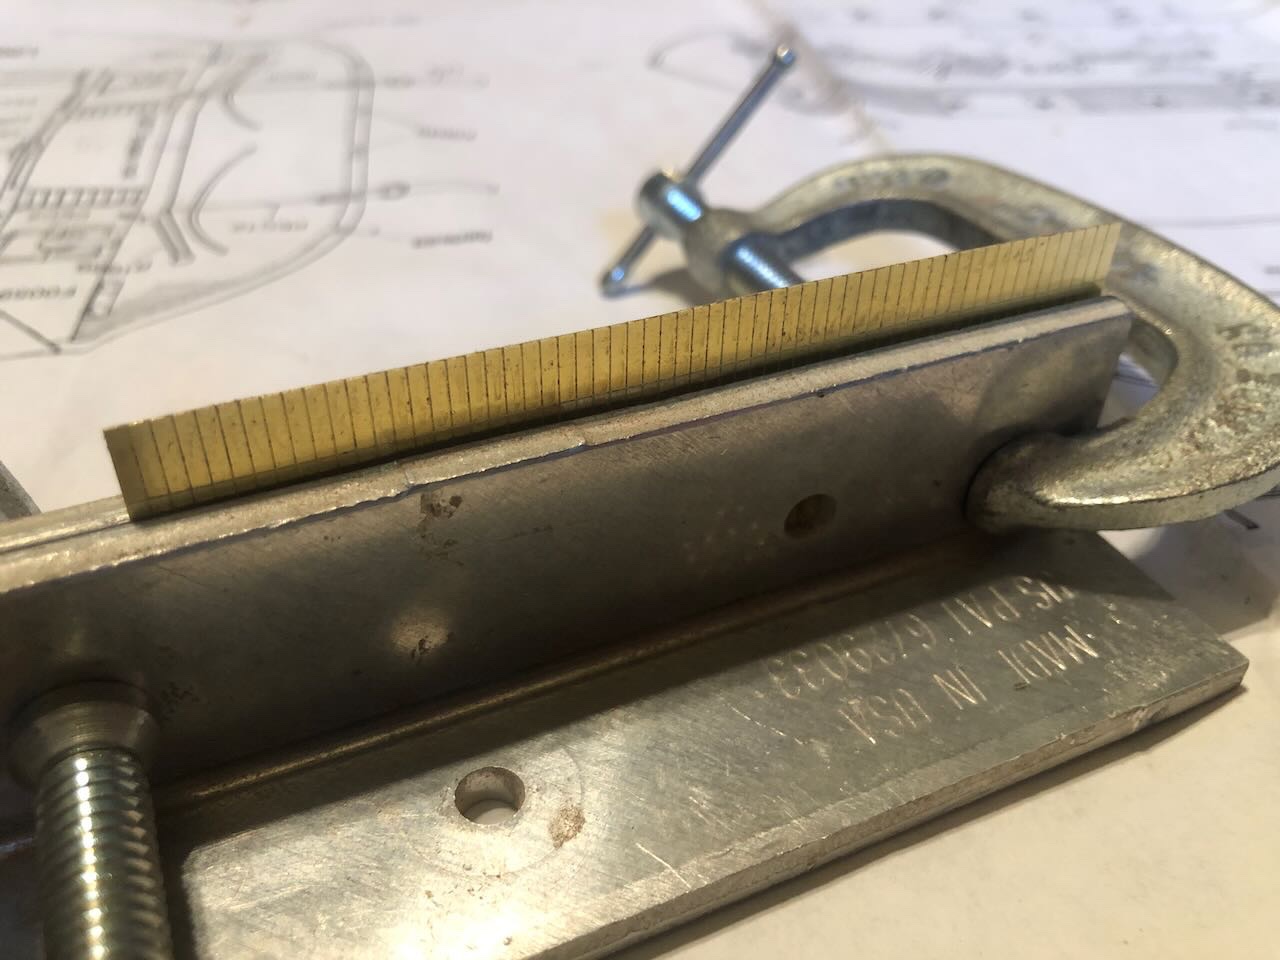
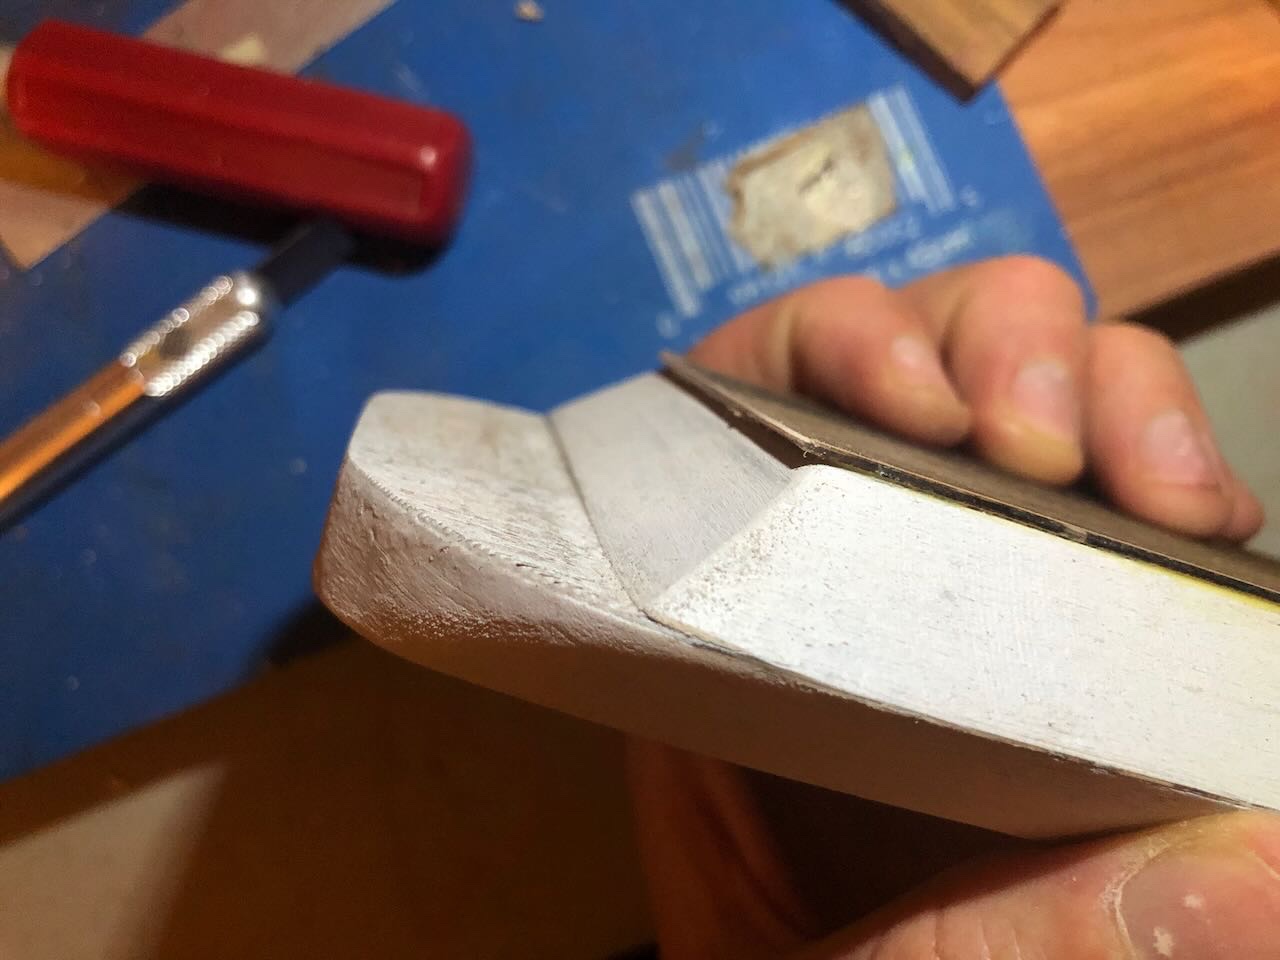
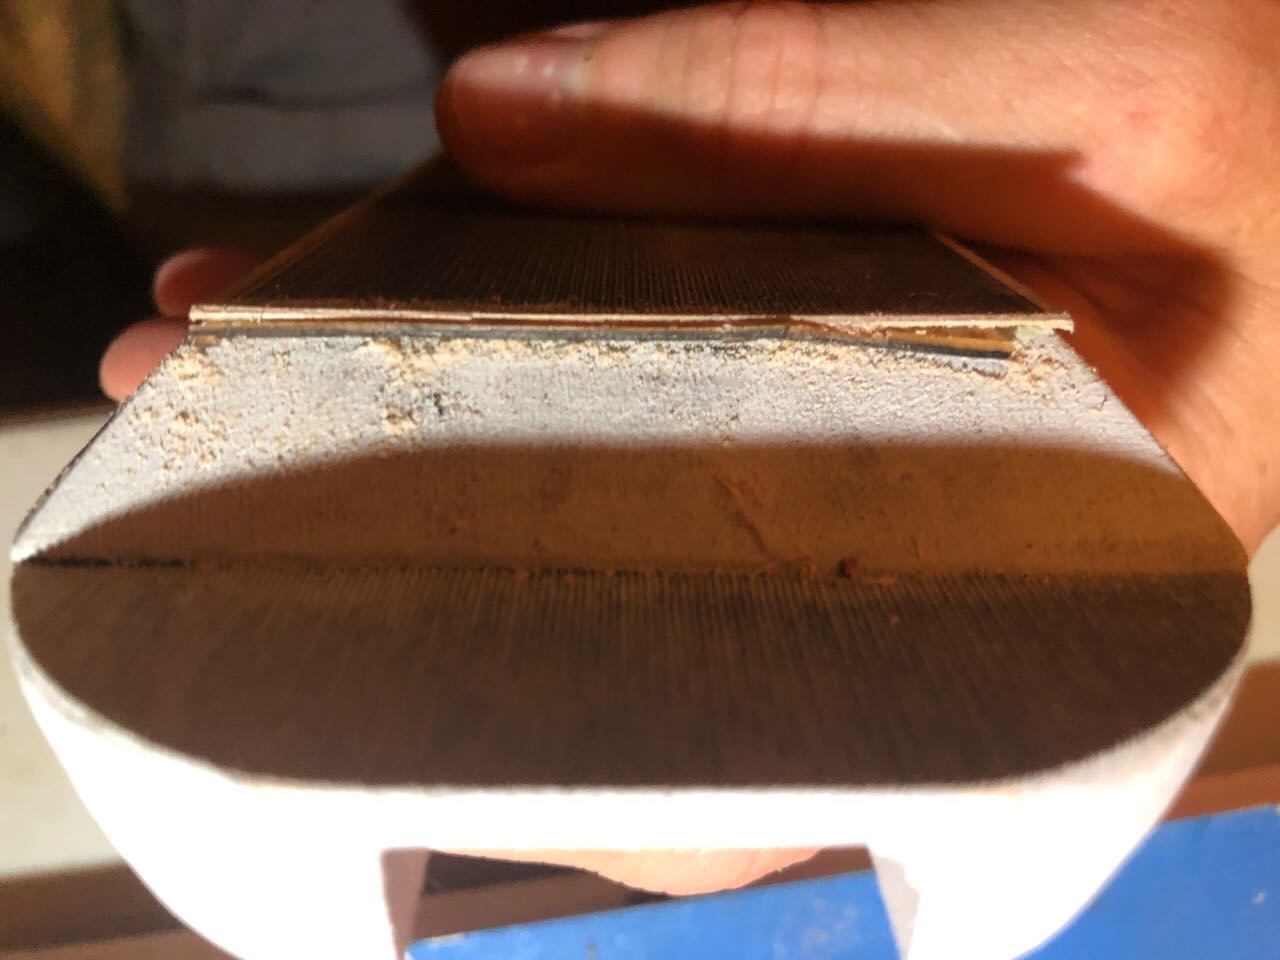
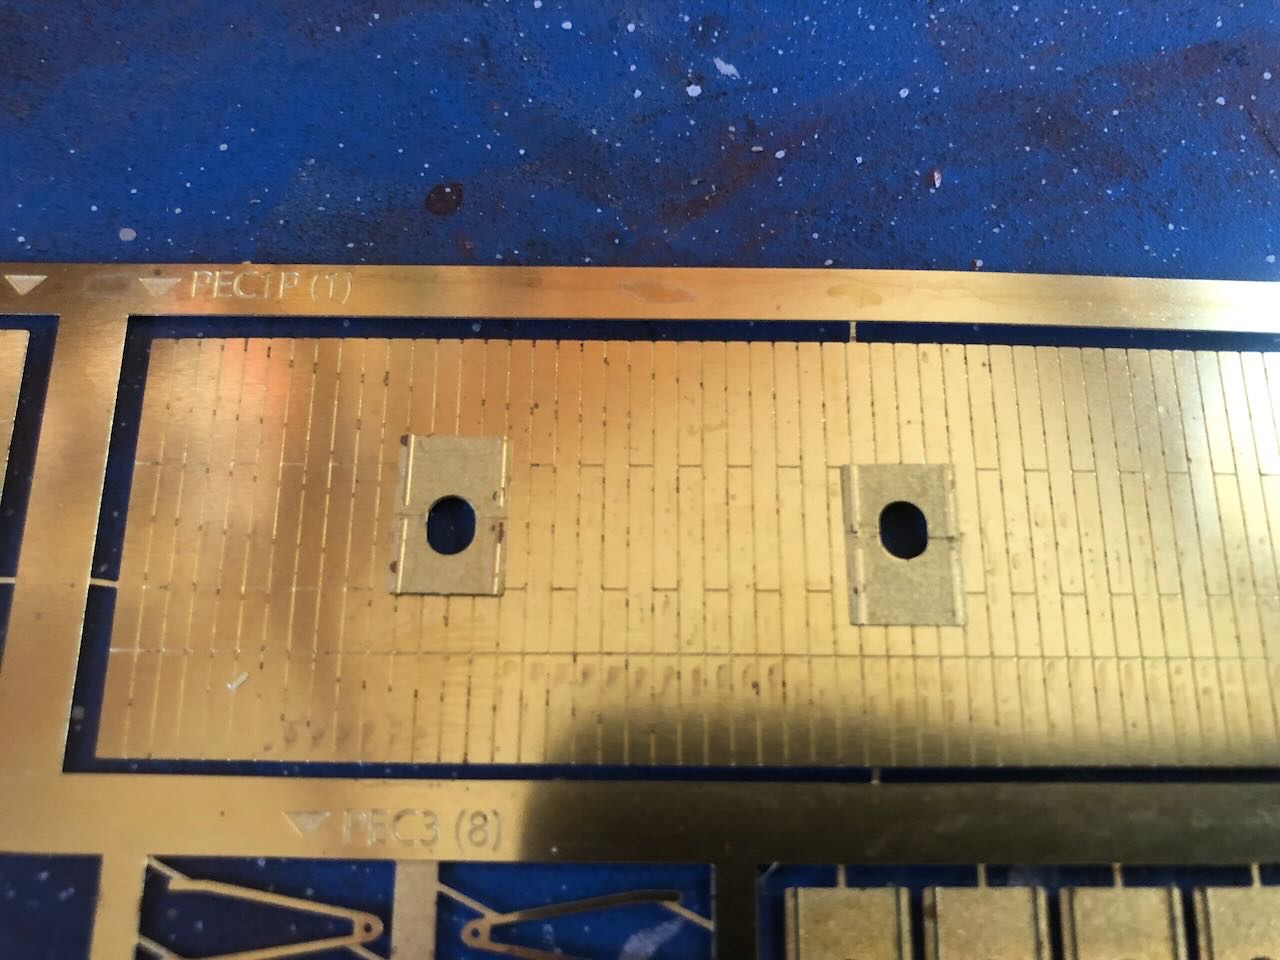
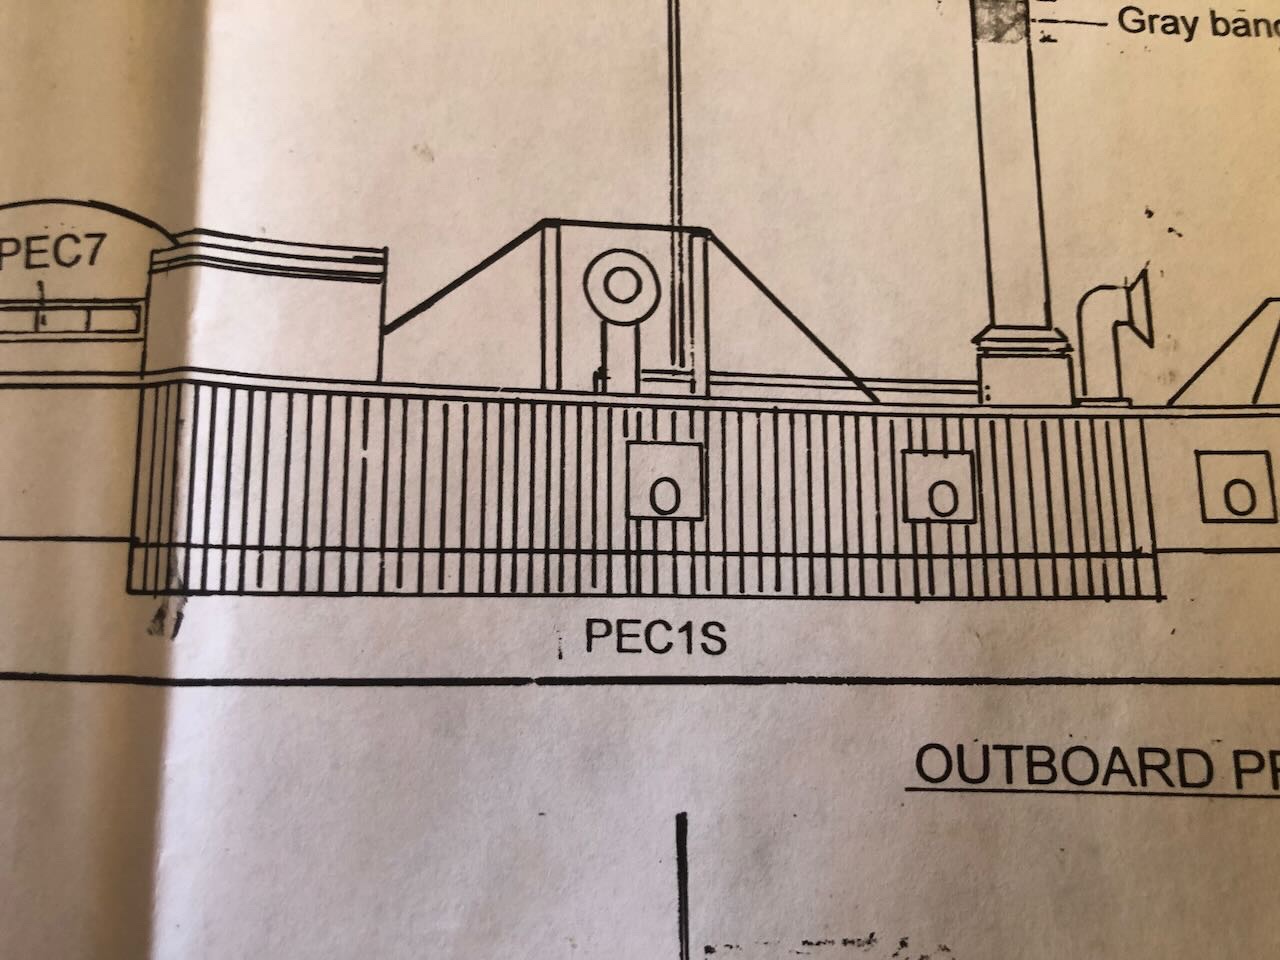
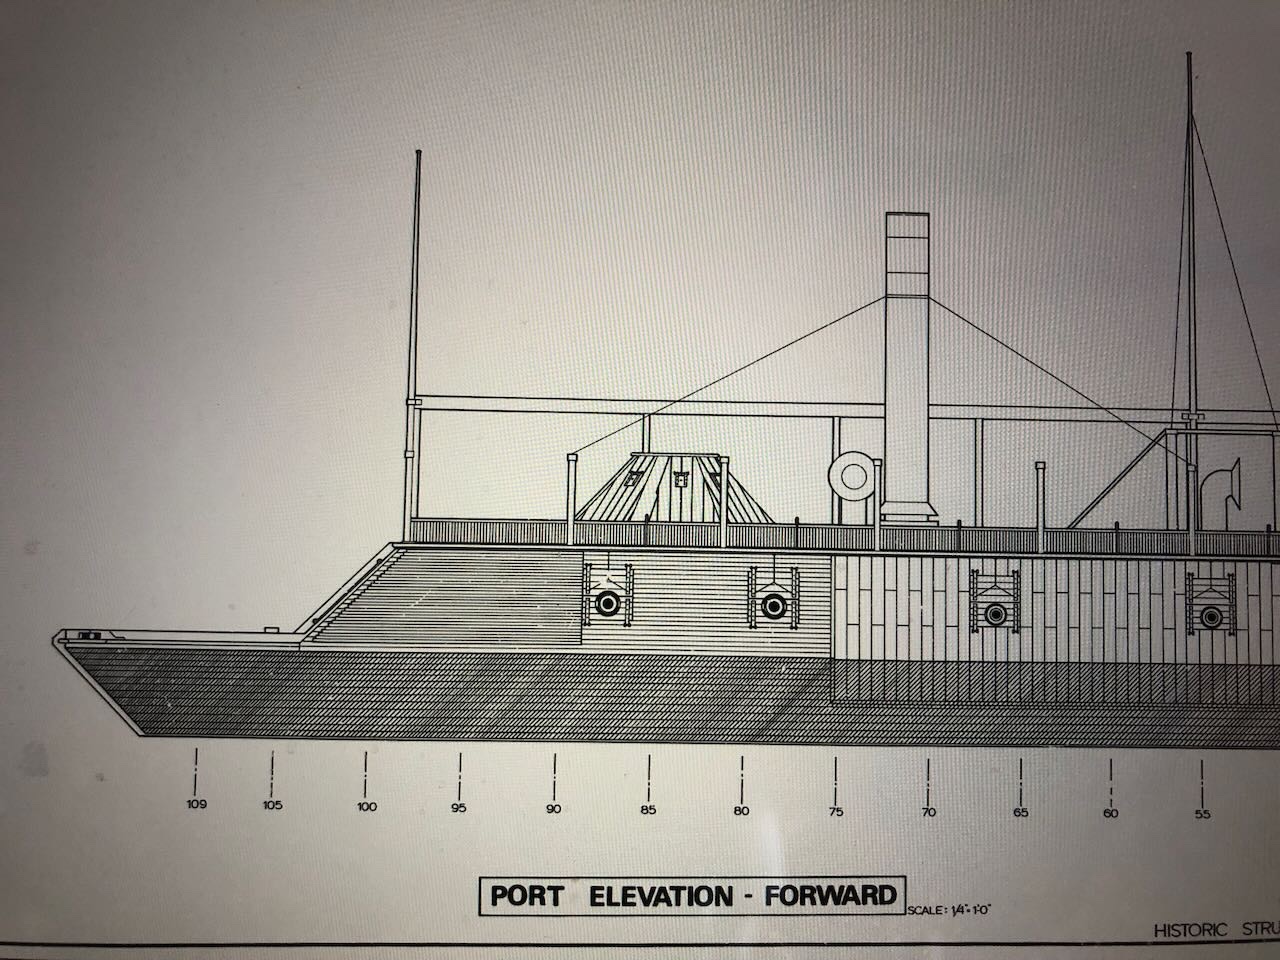
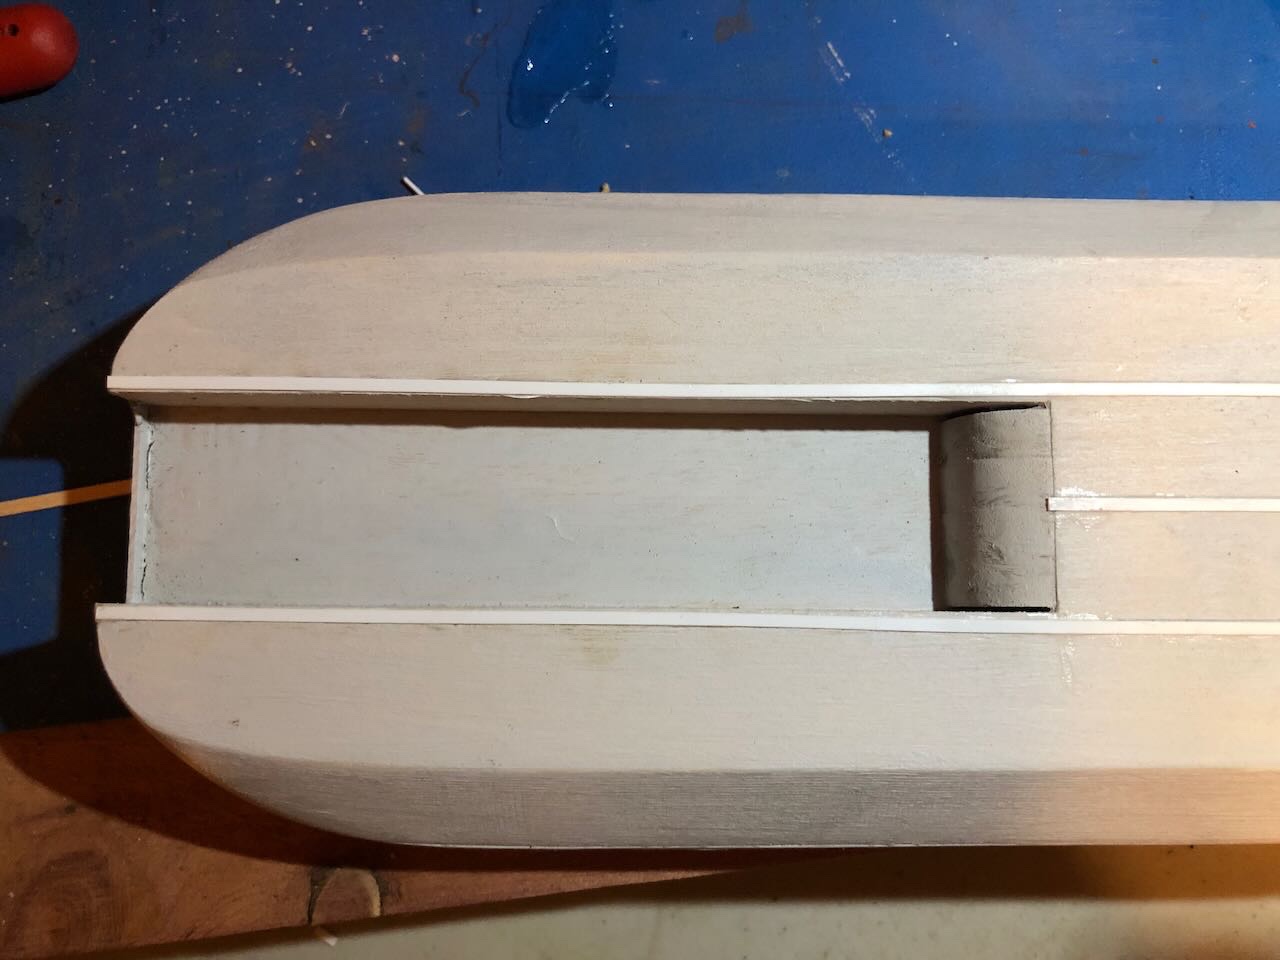
Tried to make further progress this morning and started getting frustrated. The instructions are vague and poorly organized, many parts seem to have a sloppy fit, and it's just not that fun to work on. I can't imagine how this is supposed to be a "beginner" kit. For example, the hurricane deck is far too long for the casement provided. If you line up the bow end with the casement, this is how far it sticks out at the stern end: But this isn't easily fixed, since the deck has a border all around it, and if you just trim the deck to length you'll lose that border and it'll look weird. I tried anyway, and ended up damaging the very thin ply it's made out of, though I was as careful as I could be. I sanded it smooth as best I could. It's still too long, but I don't dare take any more off without ruining the appearance from above. The hurricane deck is also too narrow for the casement provided. There's a clear rim on both sides where the casement doesn't meet the deck. It doesn't seem like it would be hard to machine the casement to a closer dimension in the production end when the shape of the laser-cut deck is already known. Sanding down the casement to eliminate this on both sides would mean removing a LOT of material by hand, and would change the angle of the sides. I'm just going with it. Next frustration was vague instructions on how to place the gunport lids on the armor. All they say is "line up the ovals in the lids with those on the armor". OK, but the lids aren't symmetrical. So which way do they go (test fit shown below): The plans are no help: I consulted the far more detailed plans shared with me by @mbp521, which clarify that the taller end goes up: Next problem, trying to dry-fit the forward and side armor. Neither is even close to the shape/size of the provided casement. The forward armor is too tall and too wide with a noticeably different angle at top: While the side armor is laughably different from the provided casement: These are supposed to fit with a smooth seam between them. The instructions blithely say "trim to fit". OK, how do I do that, I don't have metal-cutting tools. This is supposed to be a beginner's kit. It's one thing to nip metal off thin sprues or file down small nubbins, it's another to cleanly cut an inch of brass without any damage to the piece. @rcmdrvr mentioned using "photo etch shears" when facing the same problem in his log, but I don't have any of those. It never occurred to me I'd need to literally cut the pieces apart to make them fit. I don't think I trust a razor saw to do this without damage. Thoughts?

- 113 replies
-
- 6
-

-
-
- Cairo
- BlueJacket Shipcrafters
- (and 1 more)
-
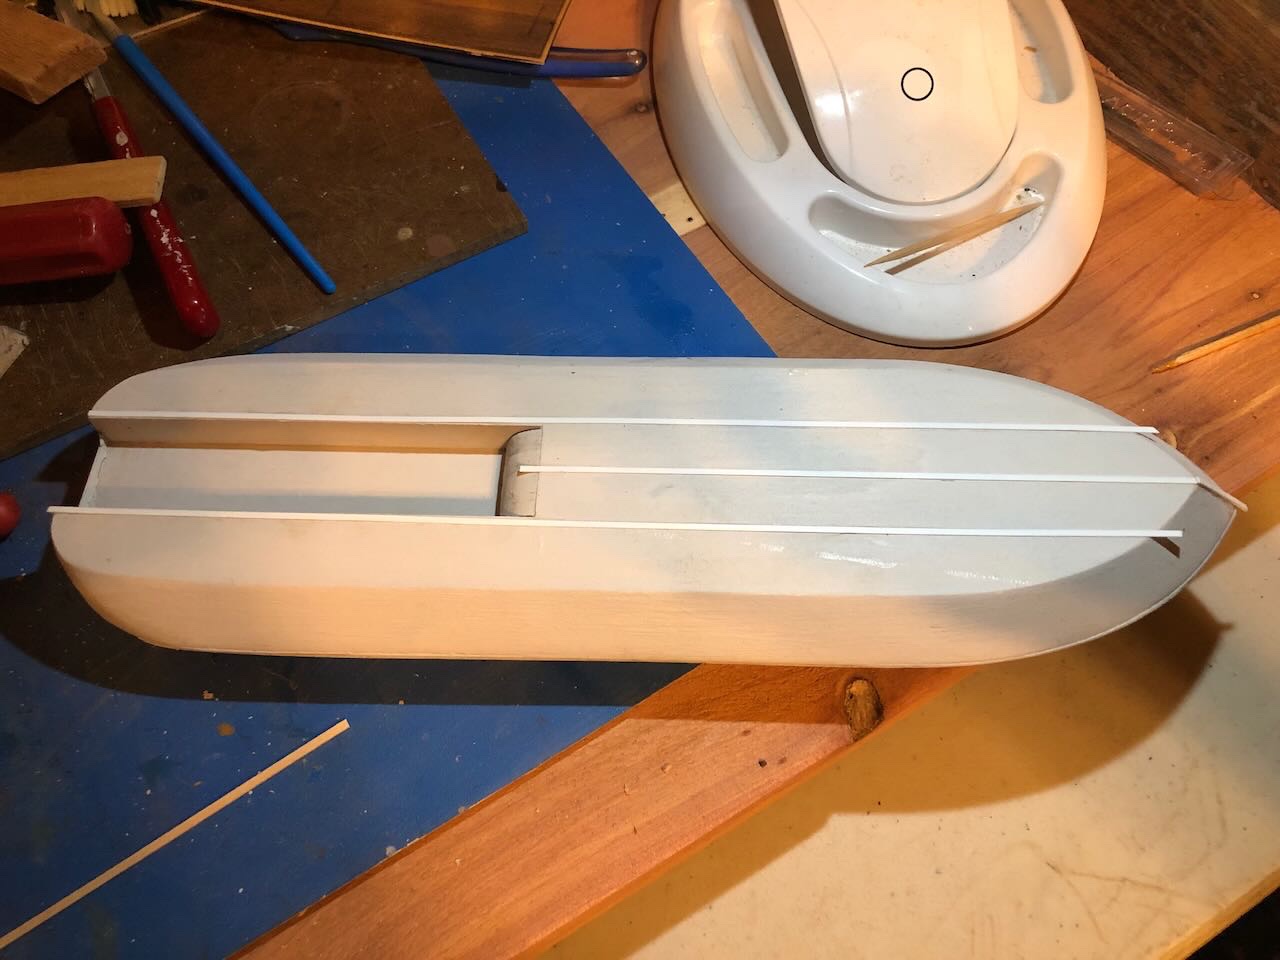
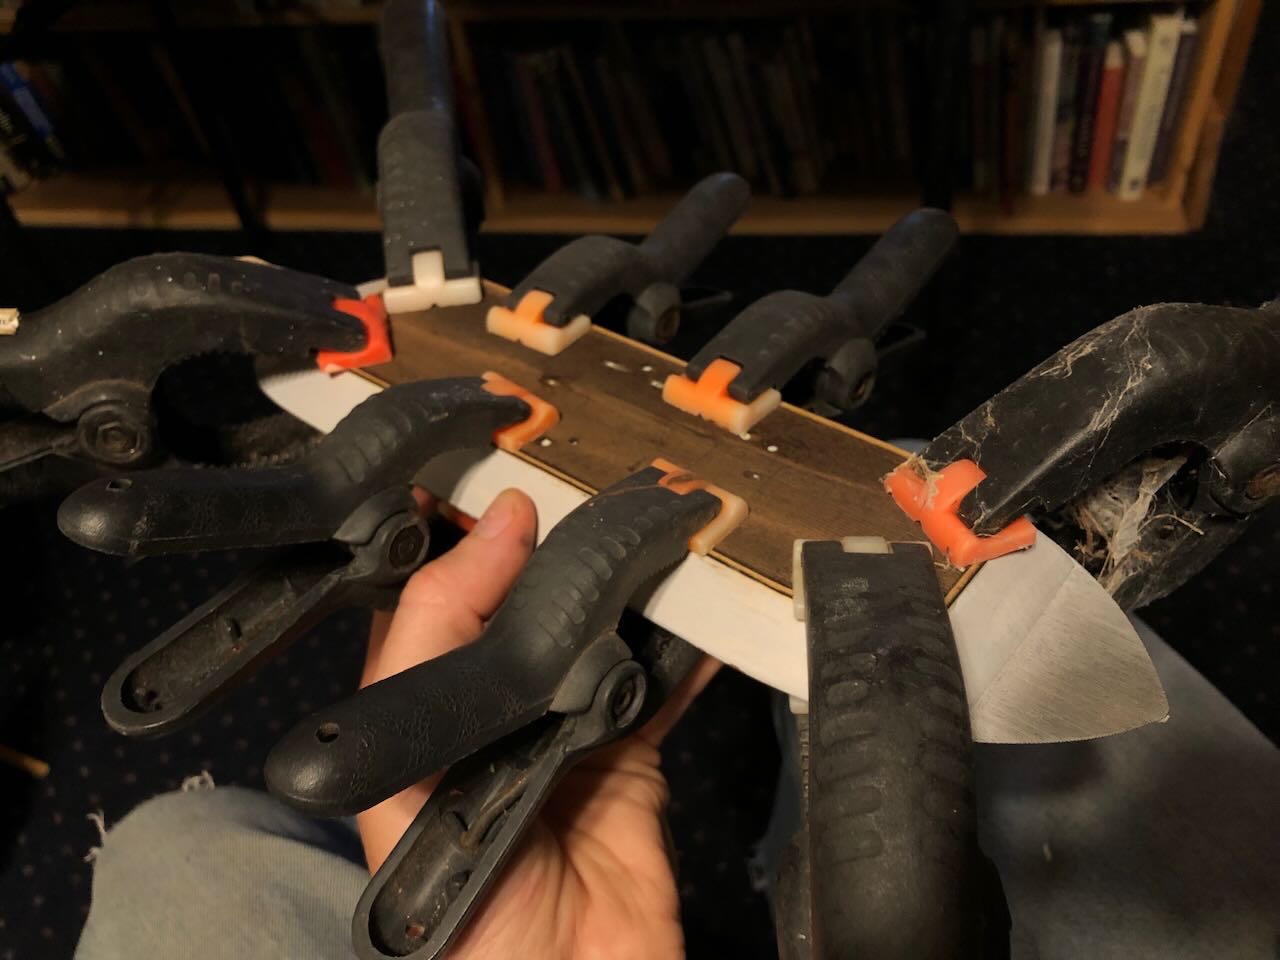
You won't believe this, but I actually got something done on this model! Following the instructions, I primed the hull/casement assembly. I've always used Model Expo paints in the past, I'm used to them and a creature of habit. But I'm out of paint and needed some different colors. This time I switched to ordering some Vallejo primer and colors from MicroMark. I quite like this primer, it's brushable and seems to do a nice job. Here's the first coat: If you're wondering, I gave the deck some primer even though the instructions say to mask it, because I intend to paint it near-white and then weather it down, since I don't like the dark laser burn effect on the scribed decking and I think the decks would have been kept holystoned and pretty bright, not a dull beaten-up color. The next step is to glue some very thin styrene strips to the hull to simulate keels and stem. This is pretty fiddly at this scale, especially trying not to get glue all over the place while a super-thin strip flops everywhere. Think I managed ok. You can see one glue streak that will get sanded off and re-primed. Another coat of primer will help cover some mistakes, and these are on the bottom anyway. Next step in the instructions is to glue on the hurricane deck, so I spread wood glue across the casement top and clamped it solidly in place. Next up is starting to work with the armor. I have next to no experience with etched metal so this will be interesting. Thanks for your patience in this glacially slow build log.

- 113 replies
-
- 10
-
-
- Cairo
- BlueJacket Shipcrafters
- (and 1 more)
-
Honestly, that does have a cool style to it, it looks more authentic than you led us to believe.
-
Try for an angry goose. Anyone who’s been up against one of those will know that berserkers weren’t just Viking legends.
-
Timber-framed outdoor kitchen - Cathead - 1:1 scale
Cathead replied to Cathead's topic in Non-ship/categorised builds
Keith, interesting thought. Initially we were just going to lay some gravel and/or wood mulch there and haven't gotten to it yet, but that was before we made that the butchering area. It's worth considering now that we've shifted operations there, we could dig that out a bit and layer in more gravel. We'll give it some thought. -
Timber-framed outdoor kitchen - Cathead - 1:1 scale
Cathead replied to Cathead's topic in Non-ship/categorised builds
Patrick, it depends on where you live. In general I would guess that much of the US is far more open and rule-free than most of Europe, but there are urban areas that would probably feel very similar to you. And the US is a huge and diverse country that devolves a lot of power to its states, and they do to their counties, so there's a lot of room for variation. I mean, my state of Missouri alone has six times the land area of Belgium and a very wide range of landscapes from rugged mountainous terrain to flat prairies to rolling farmland. Population-wise, we're half the size of Belgium but have counties ranging from a million people to less than two thousand. Hunting permits are regulated at the state level, but vary by county. As far as I know, every state requires some kind of permit, but they're not difficult to acquire. Rules vary widely on how many deer you can take, what kind, etc. depending on local/regional conditions. For example, in some parts of Missouri there are limits on how many deer you can take but in my county there are none (more specifically, unlimited does, still limited to two bucks). Given that I saw twelve of the darned things just yesterday morning, that's good. Also here in Missouri, the first two landowner hunting permits are free and after that they're $7. Which is fine since the funds go to support our very highly regarded Conservation Department. Fees are different if you're not hunting on your own land (we have extensive public lands open to hunting here in Missouri) but they're still affordable and accessible to residents. It's a lot more expensive if you're from out of state, but that's fine with me. As for processing yourself, did you mean it's banned at the national level, or that you can't do it in your specific location? In the US, local regulations might prevent you from processing an animal in certain settings (like the front yard of an urban house) but there's no basic national/state restriction on the right to do so. If anyone tried a rule like that in the rural US it would be universally disdained and ignored. As for the kitchen, again it depends on where you live. In general, the more urban the more restrictive, and the more rural the more permissive. My county does not require permits for structures below a certain footprint, such as this kitchen. Such freedom cuts both ways; it's nice to not go through layers of bureaucracy, but there's also a risk of neighbors doing obnoxious things. For example, in a neighboring rural county with no building rules, someone built a giant horse barn and arena right on their property line very close to another house, and the dust/smell/noise caused major problems for the adjacent house and undermined their property value and resale ability, leading to some nasty lawsuits. No rules works best when everyone's a respectful good neighbor, but it doesn't always work that way. -
Timber-framed outdoor kitchen - Cathead - 1:1 scale
Cathead replied to Cathead's topic in Non-ship/categorised builds
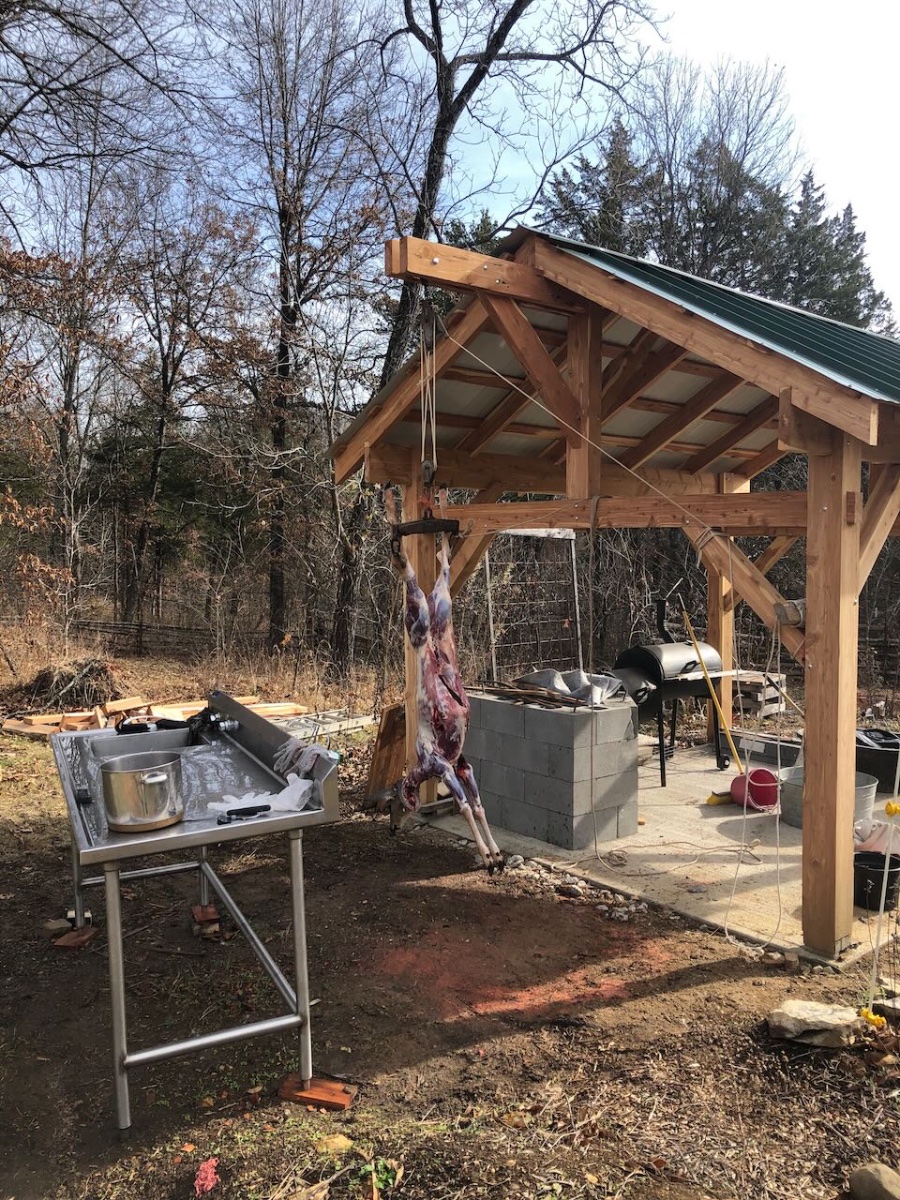
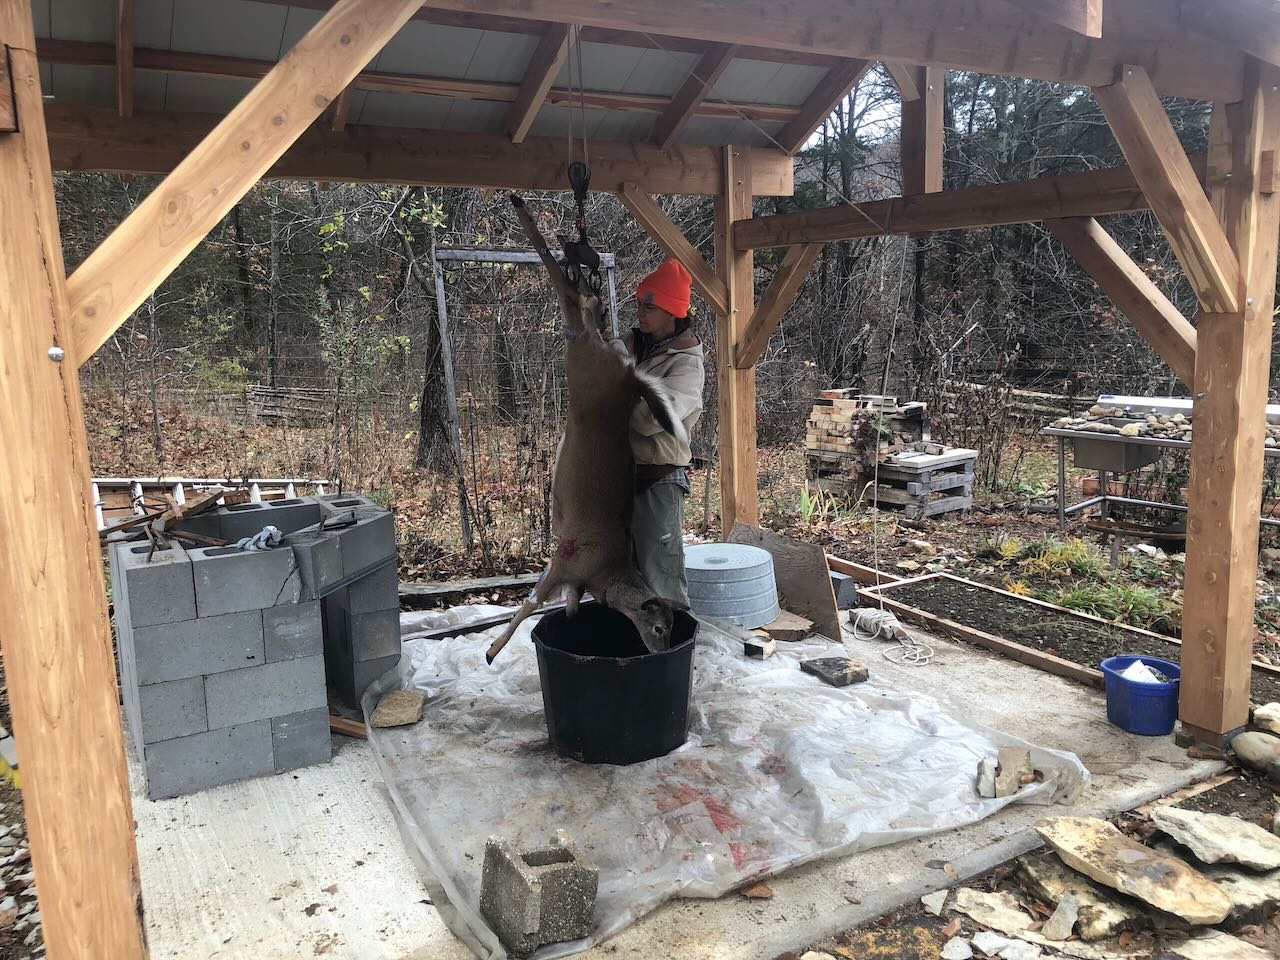
Got deer #2 this morning and achieved proof of concept for the new processing davit added to the kitchen in the last post. Works great to hang just outside the main structure, more room to work and easier to clean up. Still waiting on the right combination of warm weather and sufficient free time to get back to building the grill and oven, but at least the structure is starting to earn its keep.

- 131 replies
-
- 12
-
-
Roger, glad to see progress, I can't complain given my own glacial pace currently. Metal working seems like nuclear physics to me, in awe of those for whom it seems so effortless.
-
I can't help wondering what I wasn't told about a similar-looking piece of athletic equipment...
- 227 replies
-
- 12
-

-

-
Now I'm thinking this needs to be the MSW equivalent of those stupid social media "challenges" and see how many people can post a picture in their build logs of them working in formal clothes (suit or dress). Especially if it's deadpan and no hint why.
-
"Period Model Boat Manual" sounds like an AI-translated Chinese knockoff of the Nautical Research Journal.
-
Bruce, I'm particularly amused that you're posting all of these above the signature line "stay safe"!
- 227 replies
-
- 11
-
-
-
I'd say that the tribute this model represents far outweighs any fleeting disrespect. Especially in a country where outright abuse of the flag code (e.g. clothing) is rampant, especially and ironically among the most self-professed patriotic. Brief rant aside, yet another seminar in modeling. I wonder if your methods for making such a lovely draped flag would be a good fit for a short article in the Nautical Research Journal? We so often see waving flags, so rarely draped ones.
-
Nice job, nice finished presentation. Good to see people continuing to benefit from this kit.
-
Thanks for writing this up, it's been useful to have some advance knowledge of possible pitfalls as I proceed at my current glacial pace.
-
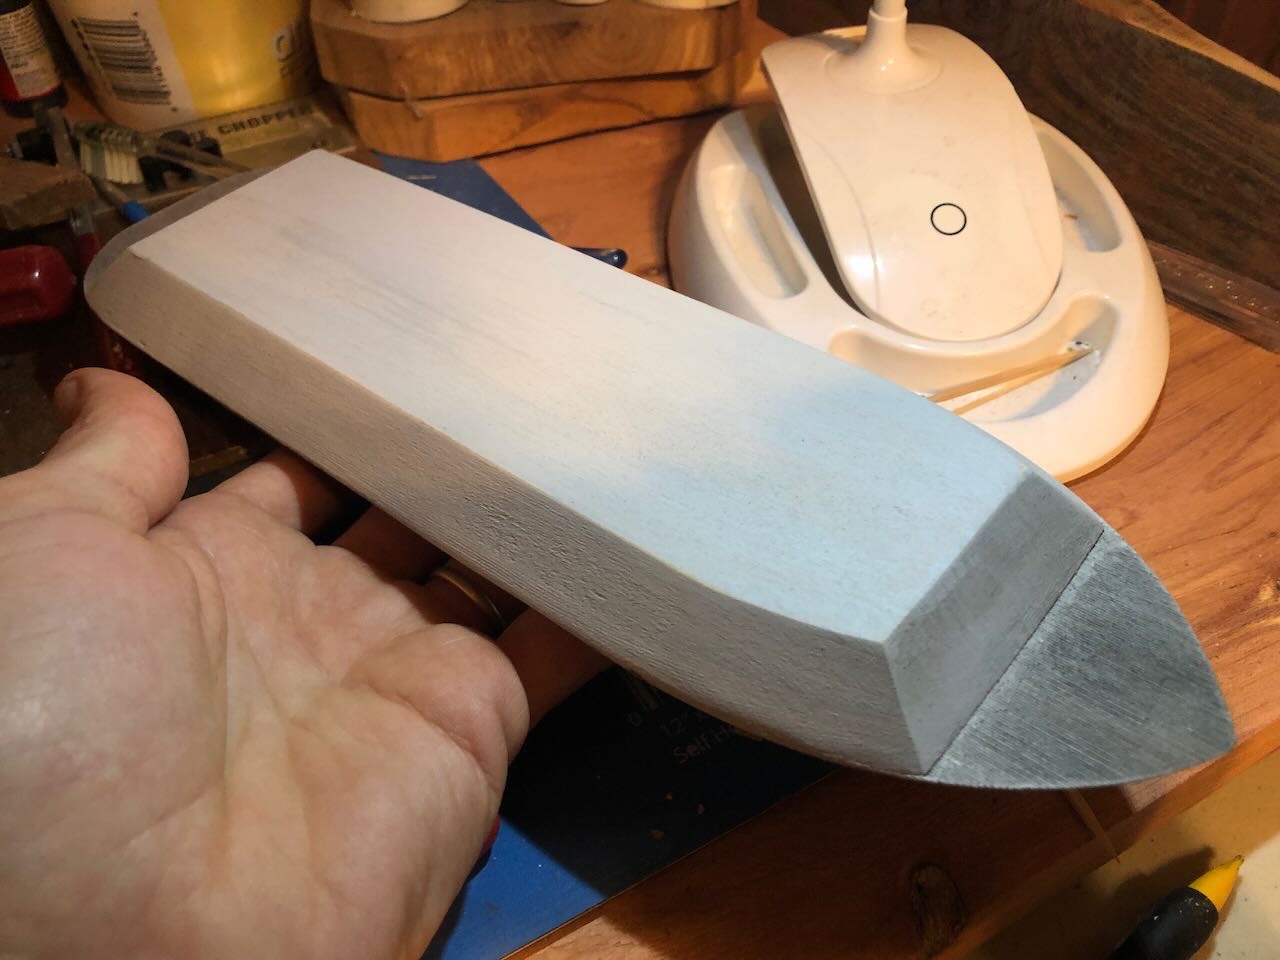
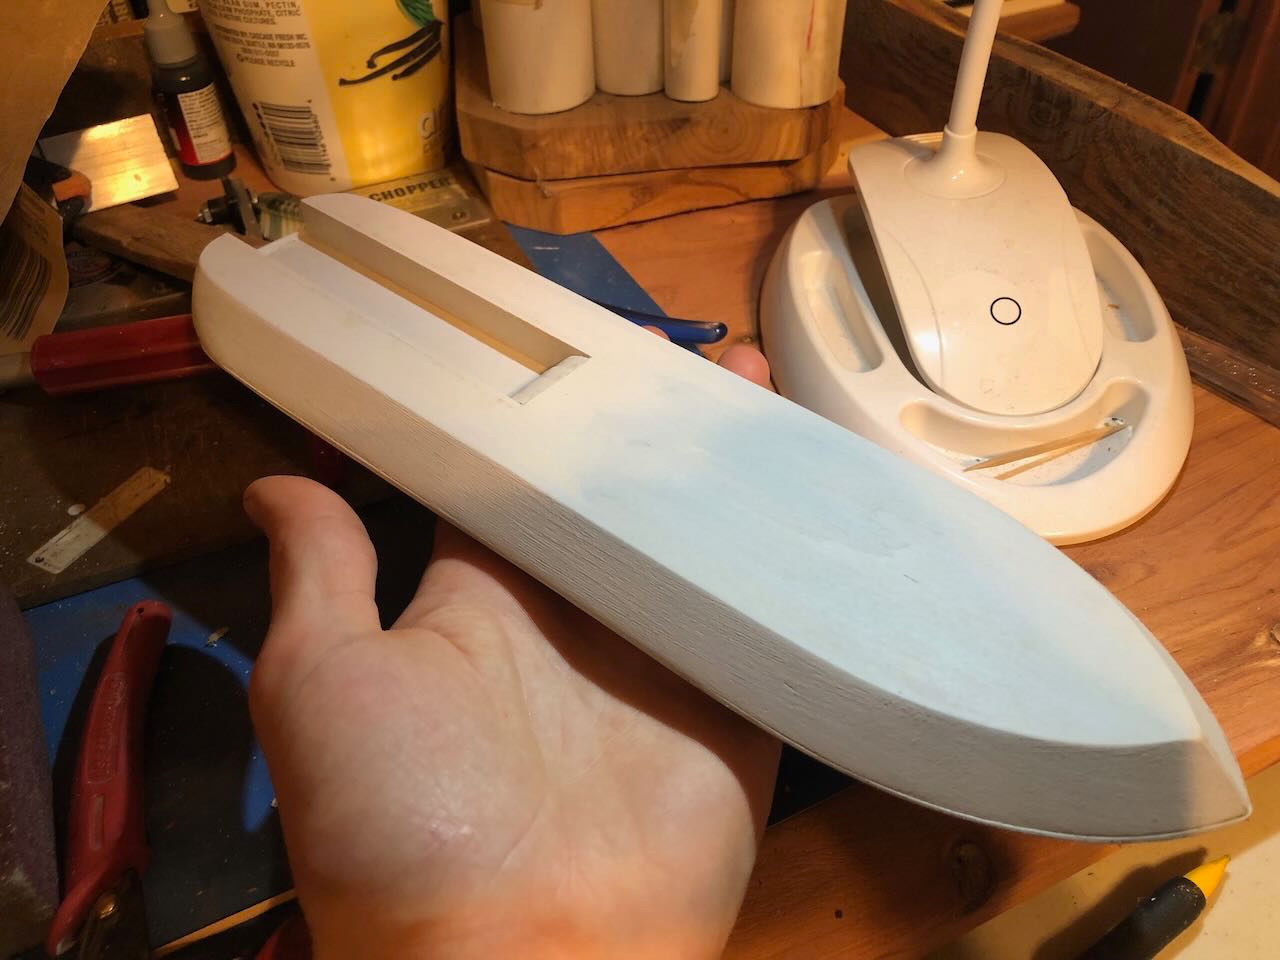
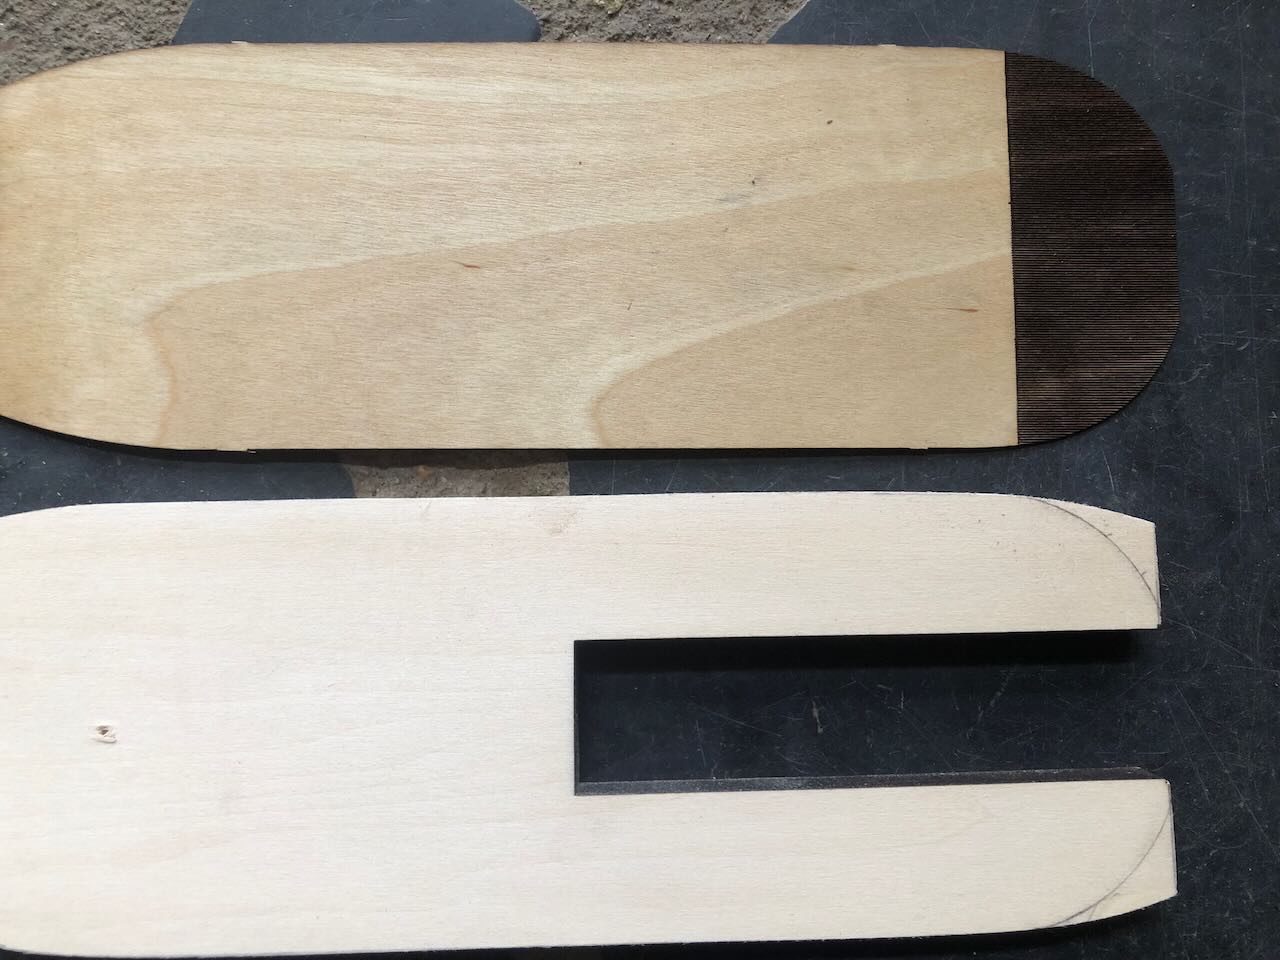
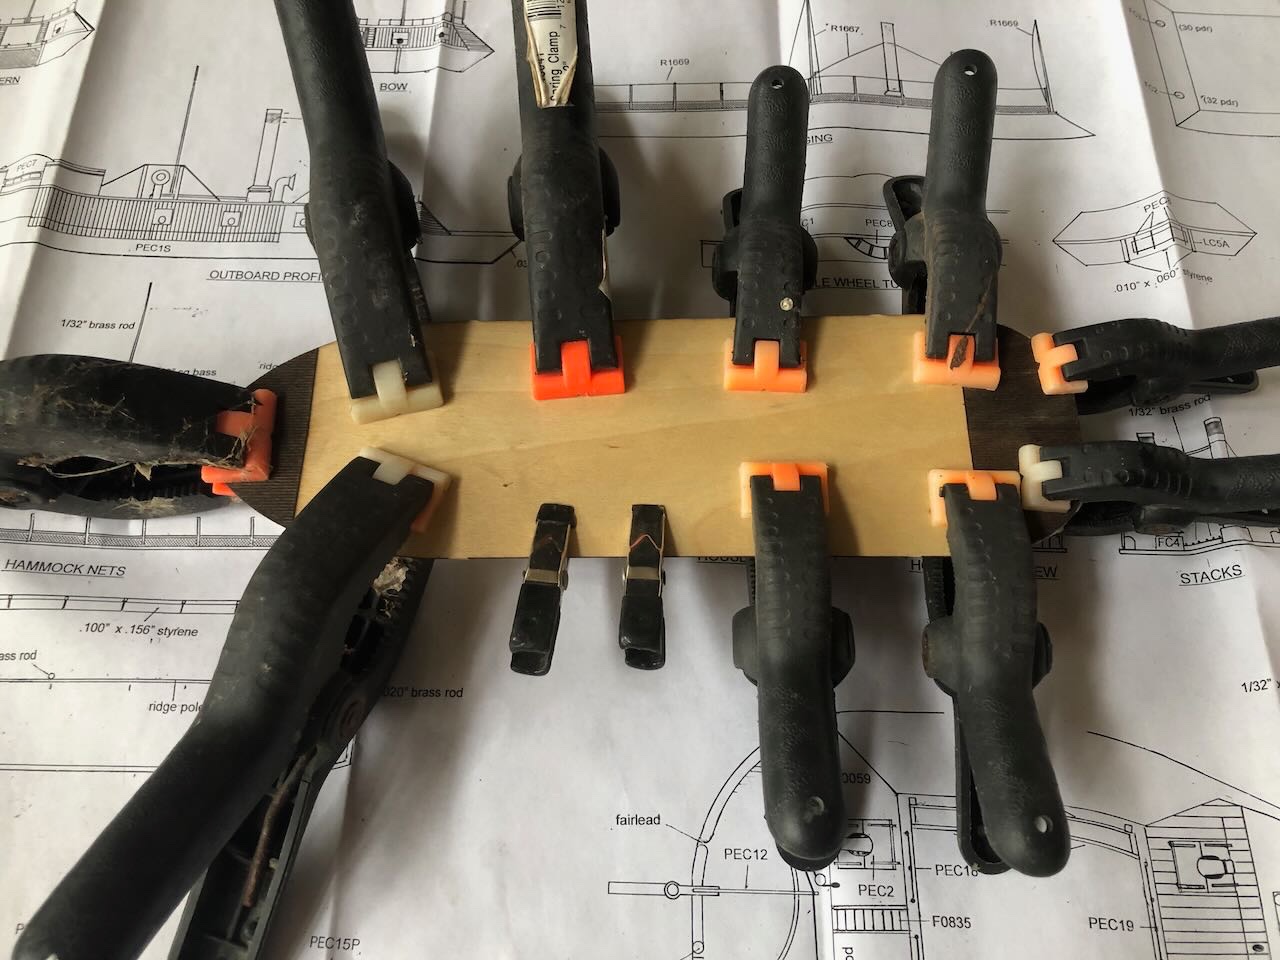
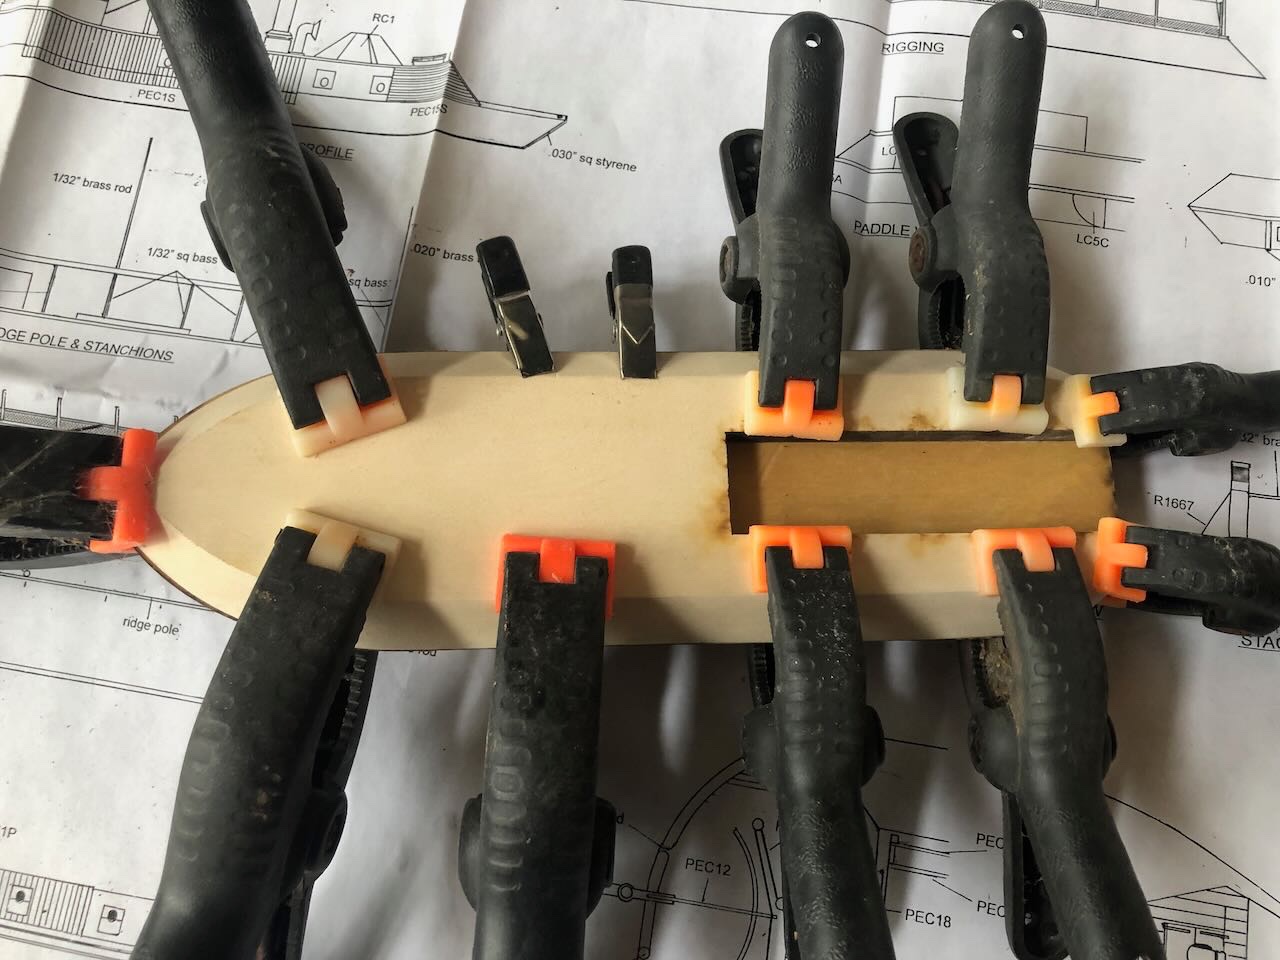
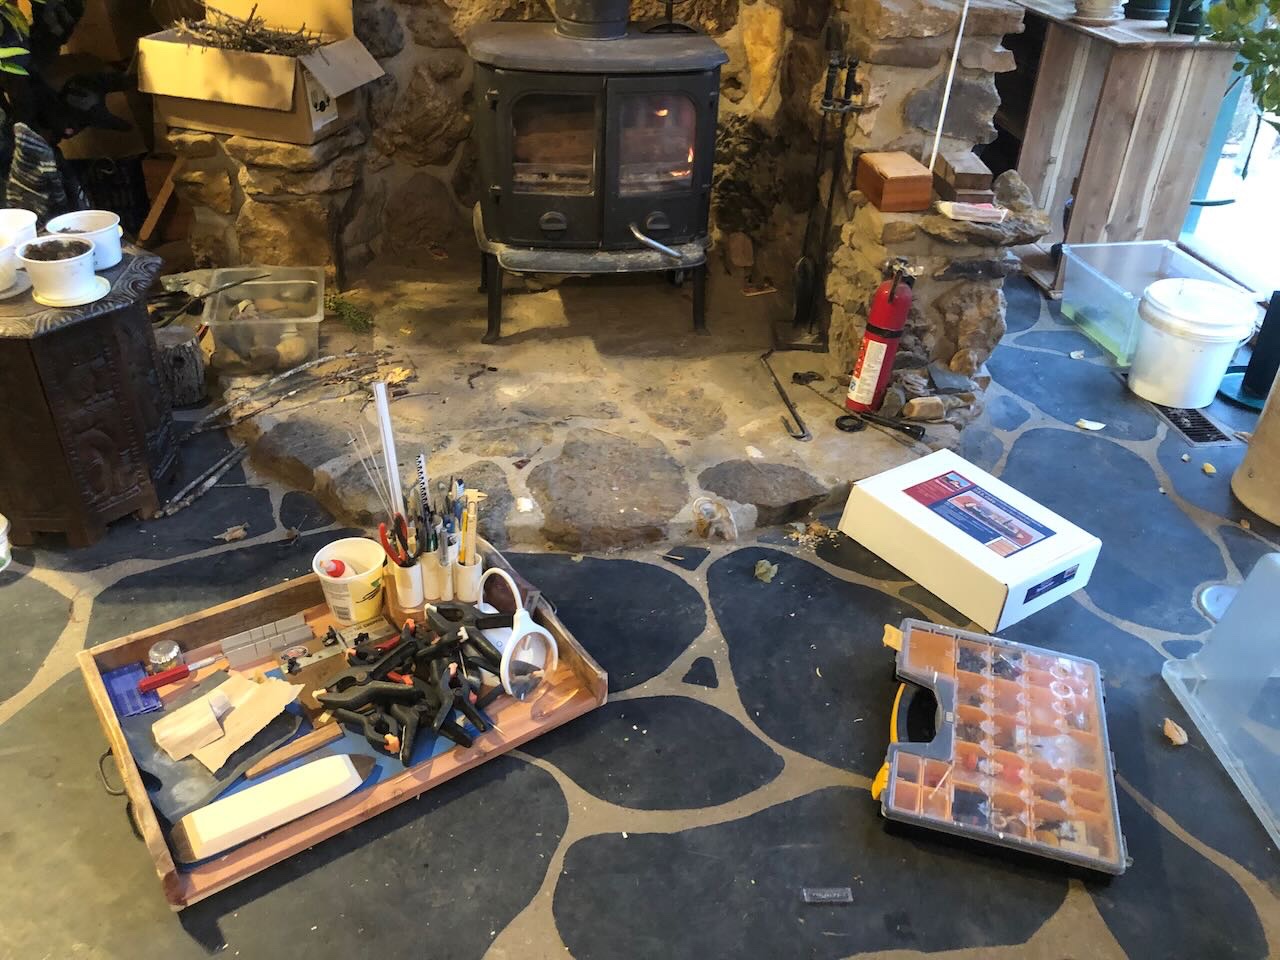
Well, I was right about the 3-4 weeks, here it is almost exactly a month since my last post and I finally got back to this project today! It was a quiet, cold day, so I brought out my portable work tray and set up in front of the wood stove. The kit instructions tell you to glue the main deck onto the hull, then glue the casement onto the main deck, all before doing any shaping. I didn't feel comfortable with that, so I traced the deck onto the hull and then did the initial shaping before any gluing. They say to do all the shaping with 220 sandpaper, but given the amount you need to remove from the stern, that seemed unnecessarily fussy, so I used a sharp knife to rough in the shape: I then finished off the smooth curve with sandpaper (forgot to take a photo at this stage). @mbp521 was kind enough to share a detailed set of digital plans with me, and these were invaluable in checking my work since the instructions are very limited and have almost no useful drawings of the intended steps. Honestly, the instructions are rather hard to follow and I've been reading them over and over just to make sure I don't miss or misunderstand something. When I got the hull the way I wanted it, I spread a thin layer of wood glue onto the upper surface and clamped the deck down real good: Once that had set, I did the same with the casement: The bit of spreading wetness you see there is from me using a wet swab to clean up a bit of glue that oozed out. Here's the completed hull-deck-casement assembly, after some more sanding: In the closeup photo I can see a bit of a curve at the lower front of the casement that I might try to level out. Didn't notice it in person, and it'll be covered by armor plating anyway. Not all that much progress, really, but it feels great to be back at work on a model after so long (since last February). Thanks for sticking with me.
- 113 replies
-
- 8
-
-
- Cairo
- BlueJacket Shipcrafters
- (and 1 more)
-
Timber-framed outdoor kitchen - Cathead - 1:1 scale
Cathead replied to Cathead's topic in Non-ship/categorised builds
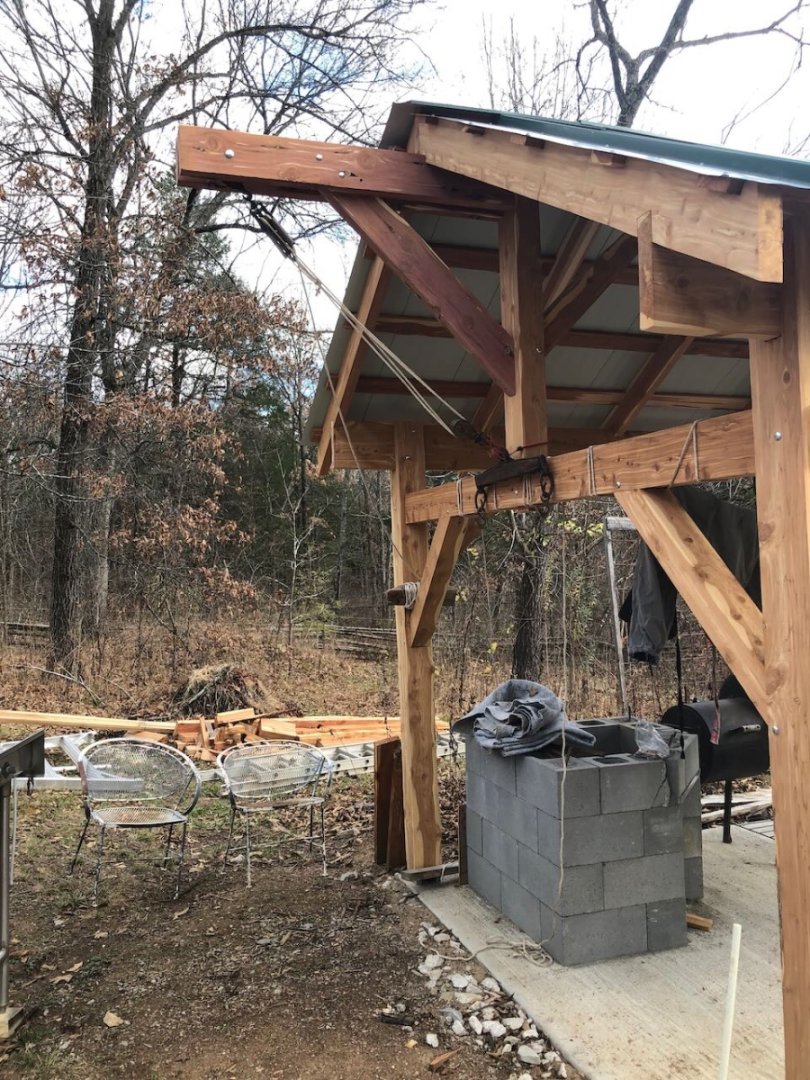
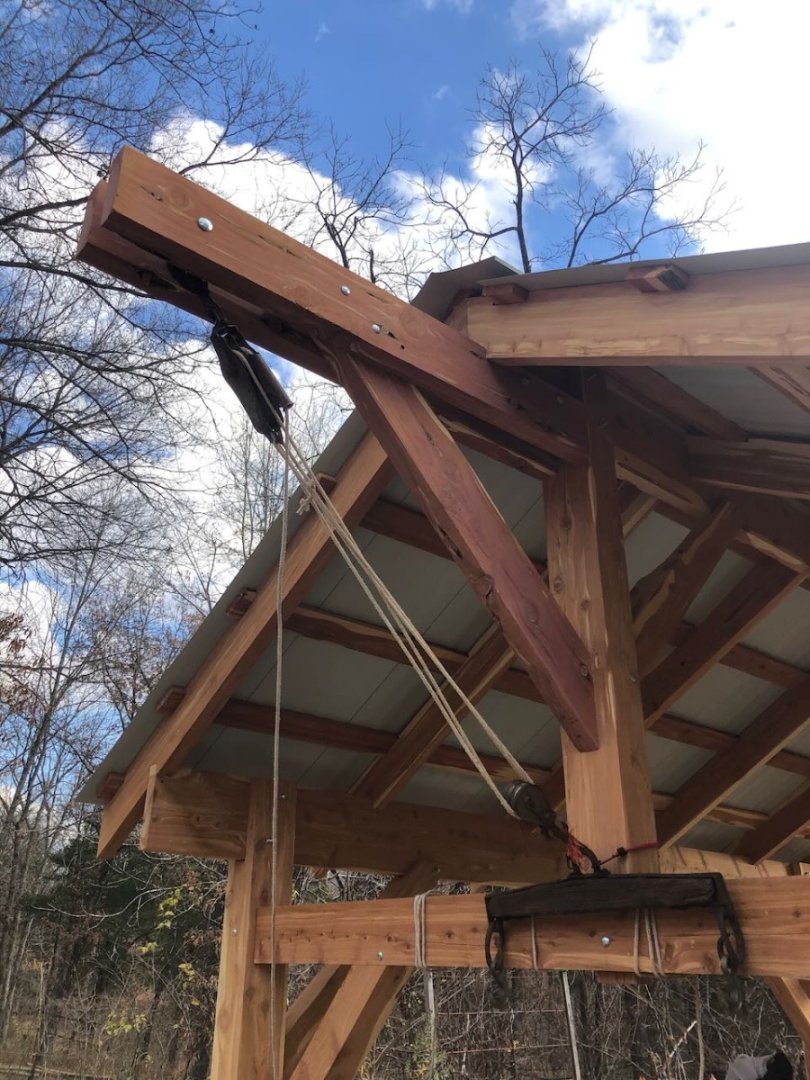
No progress on the oven. We went on a 16 day camping/hiking trip down into the Ouachita Mountains of central-western Arkansas. The weather in our region was glorious and warm for all of that, would've been perfect for pouring a concrete slab and finishing up the oven, but we weren't home. Then just the other day a major cold front blew through, dropping us from a record high over 80 ºF to below freezing now. Going to be near or below freezing for at least the next 10 days, so all the oven work is on hold. I did get my first deer of the season, allowing us to inaugurate the kitchen building for one of its intended uses, as an improved butchering site. We used to just hang deer from a tree, but were looking forward to hanging (and working) within this structure. Here's me with the harvest and Mrs. Cathead starting on the skinning. However, we decided after this that we needed to change plans. It just isn't going to work to process deer in here once the oven and related grill are built. Not only won't there be much space, but it'll be pretty hard to keep the nicer food-prep surfaces clean when we have to hose off carcasses and so on. In our heads the work space was larger than it is in practice when a big animal is hanging there. Plus it'll be hard to fully clean the floor of drippings and droppings. So I came up with a new solution, influenced by a discussion of ship's boats and davits on @mbp521's beautiful USS Cairo log (discussion starts with this post). I built an extension of the main roof beam that acts like a davit for a block and tackle, that will let us hang carcasses securely from the building, but outside of the main food prep area so mess isn't a problem. This way any mess and wash water just drains into the ground, and we realized we don't really need roof cover because I don't hunt (and thus don't do initial butchering) on rainy/snowy days. At worst we can hang a tarp or sheeting along the side of the kitchen to keep mess away from the cooking areas while processing. And we can always still hang a dressed carcass under cover for a few days if the weather is good, when mess isn't a problem anymore. Notice how I've got the block & tackle secured to the king post using a bungee cord? That was especially influenced by the Cairo discussion regarding whether/how tackles were secured on Civil War ironclads. This way I can leave the gear out without wind whipping it around and tangling it. Now I just need to get another deer! If/when we get a warm spell, oven-building will go back on the agenda. Until then, thanks for reading.
- 131 replies
-
- 14
-
-
Crack a riverboat whiskey for that accomplishment!
- 238 replies
-
- 4
-
-
-
- Robert E Lee
- steamboat
- (and 3 more)