Cathead
-
Posts
3,522 -
Joined
-
Last visited
Content Type
Profiles
Forums
Gallery
Events
Everything posted by Cathead
-

Timber-framed outdoor kitchen - Cathead - 1:1 scale
Cathead replied to Cathead's topic in Non-ship/categorised builds
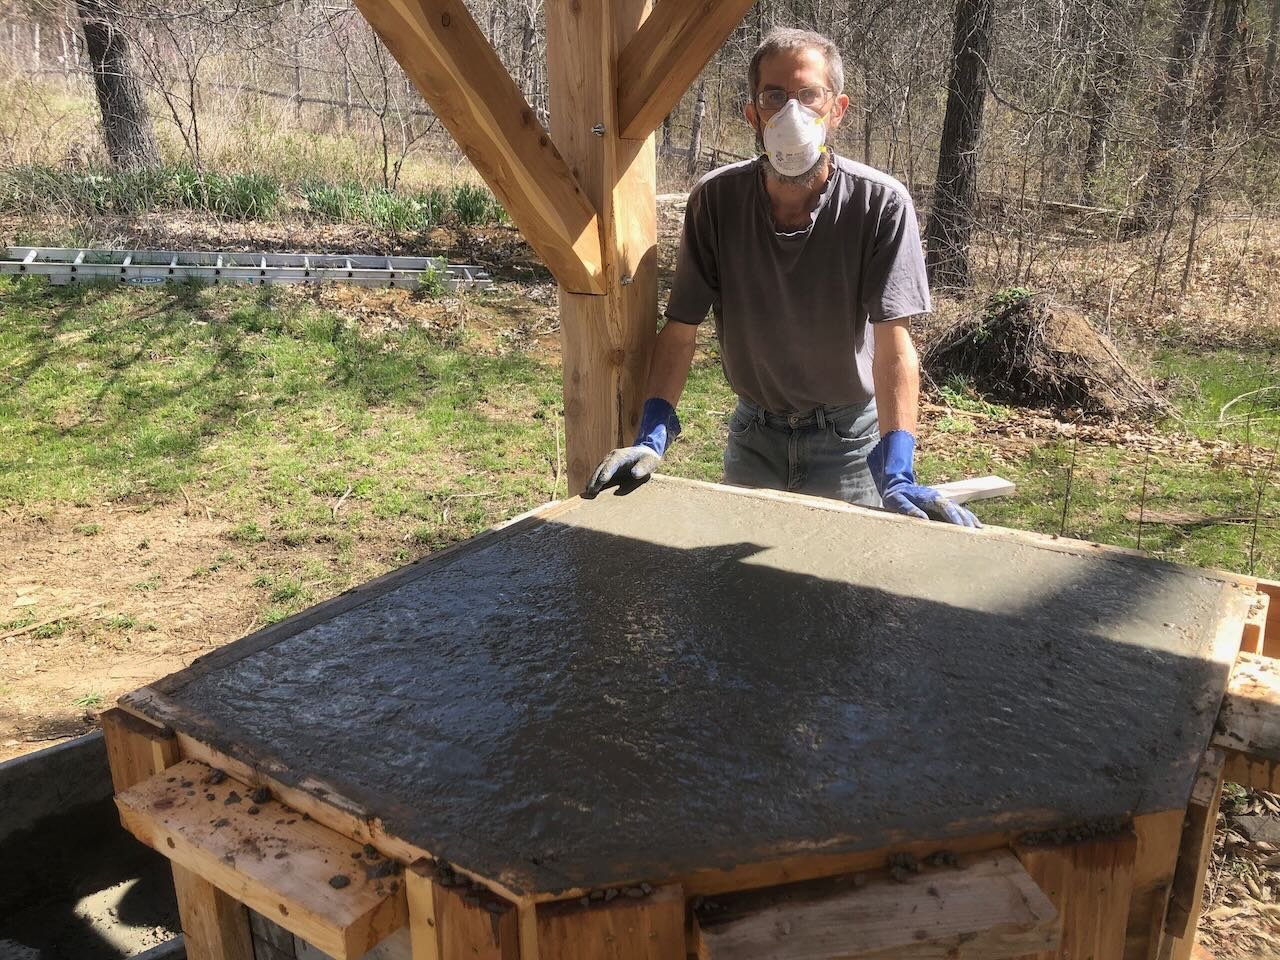
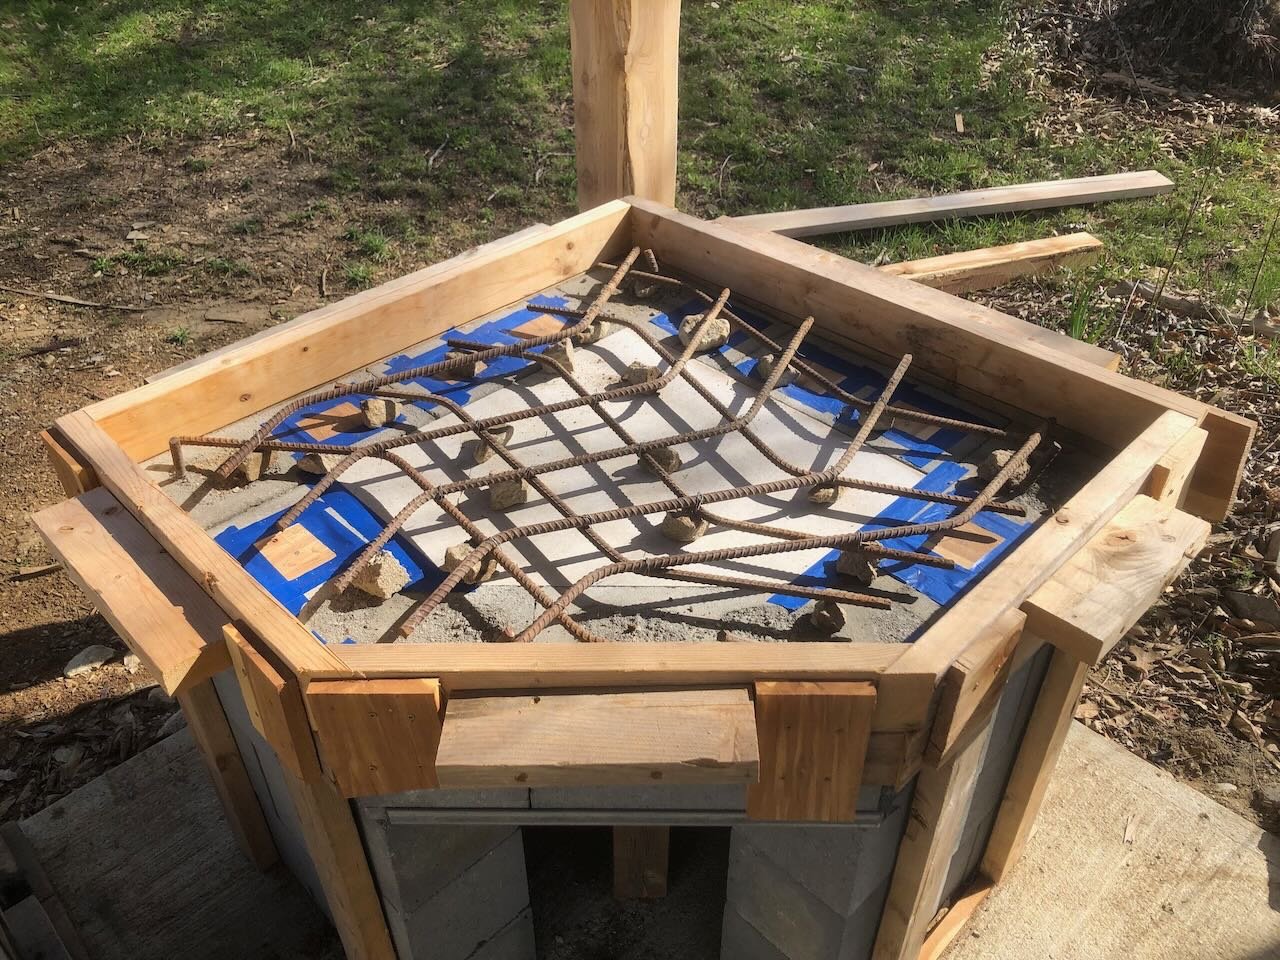
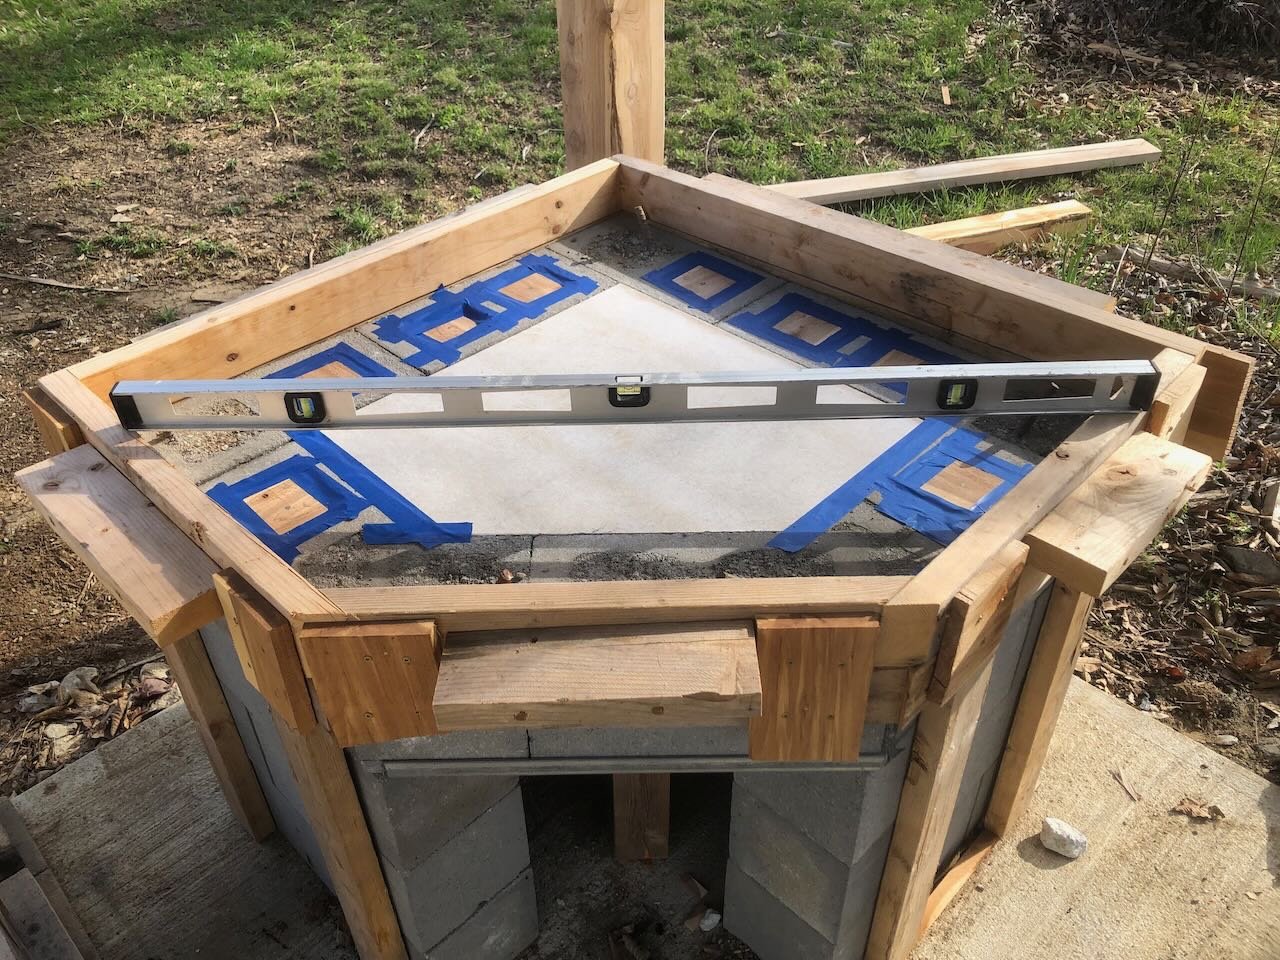
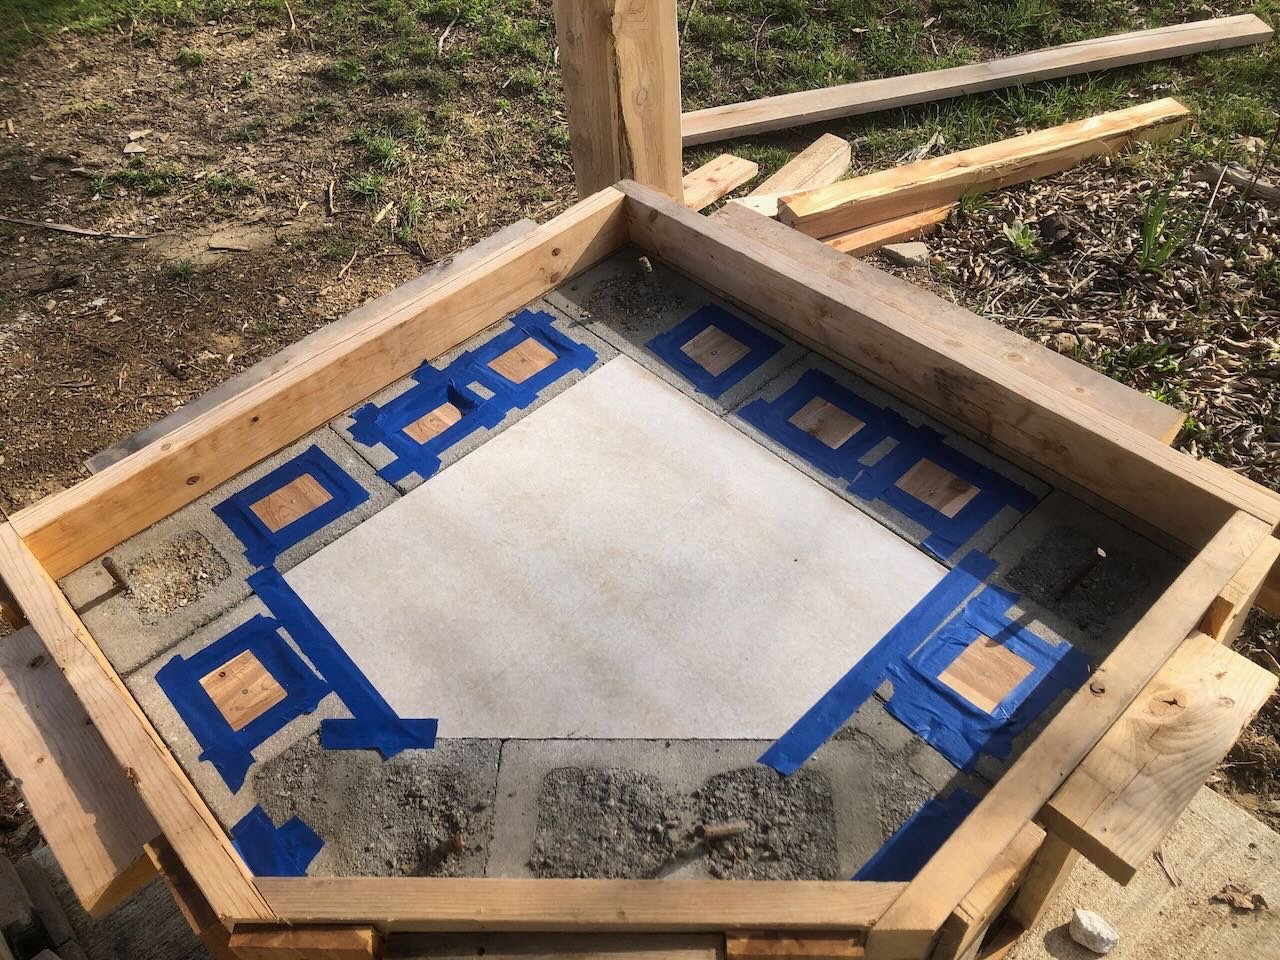
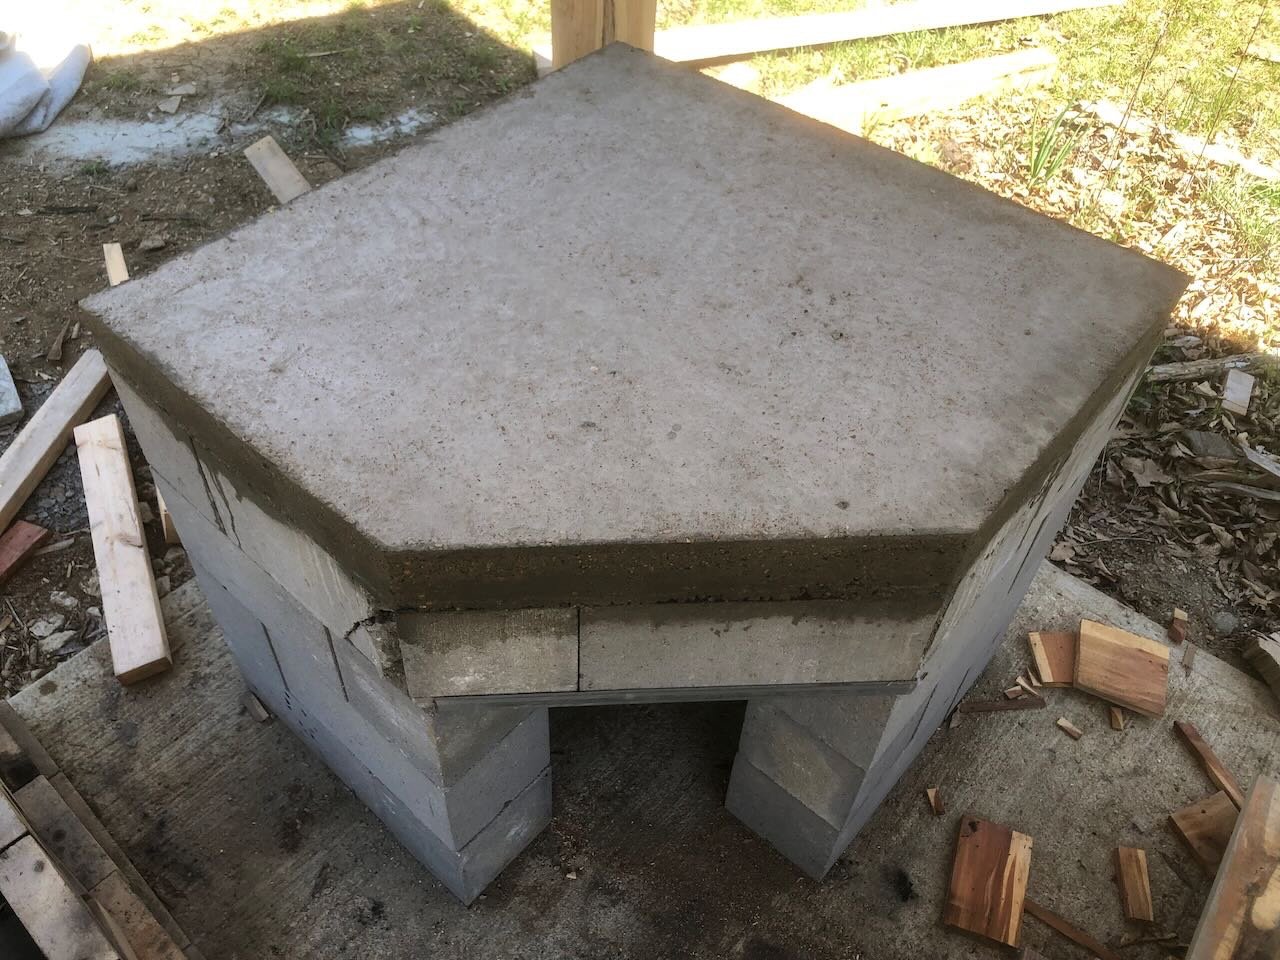
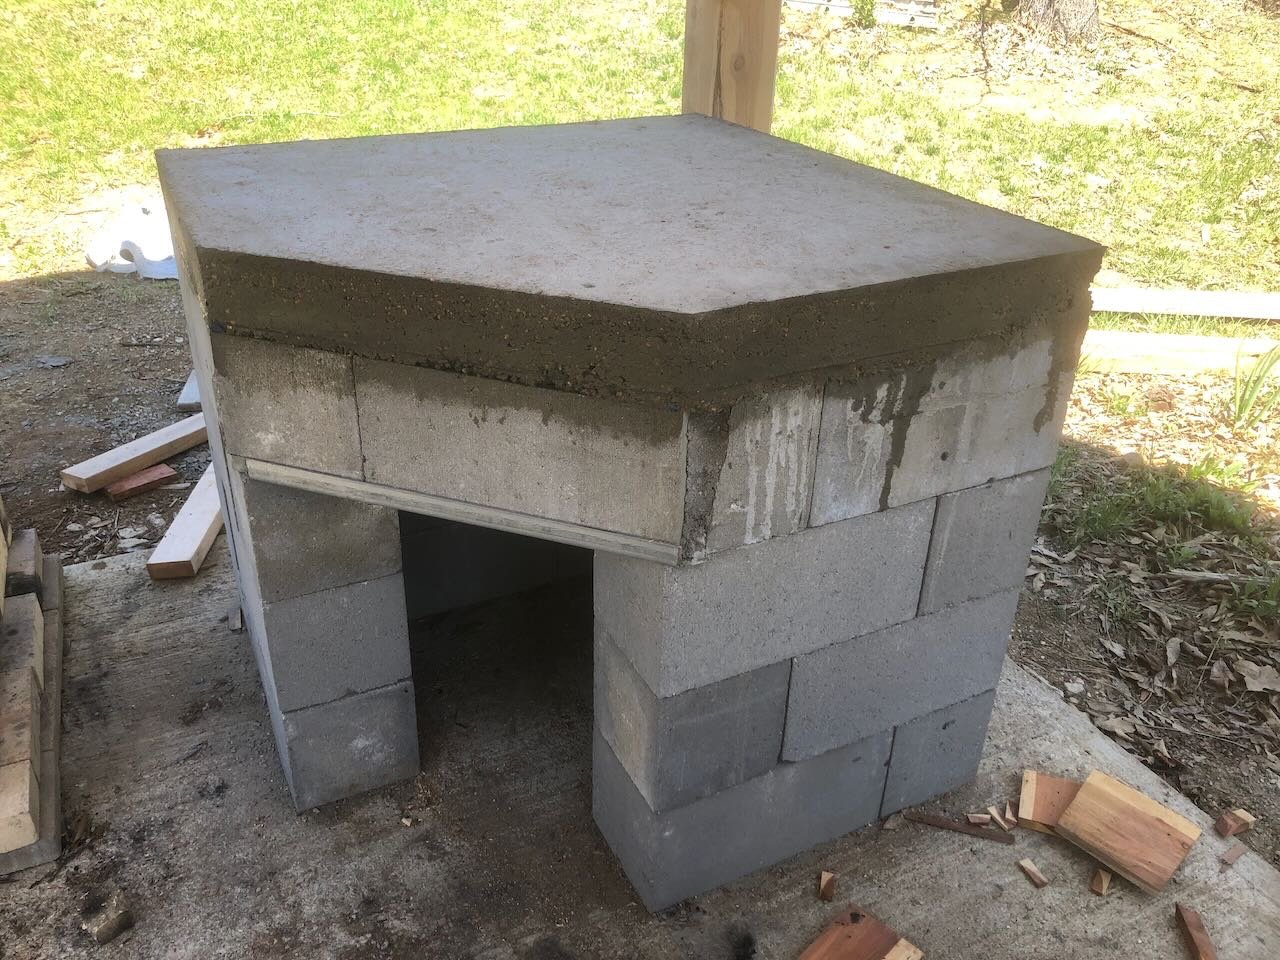
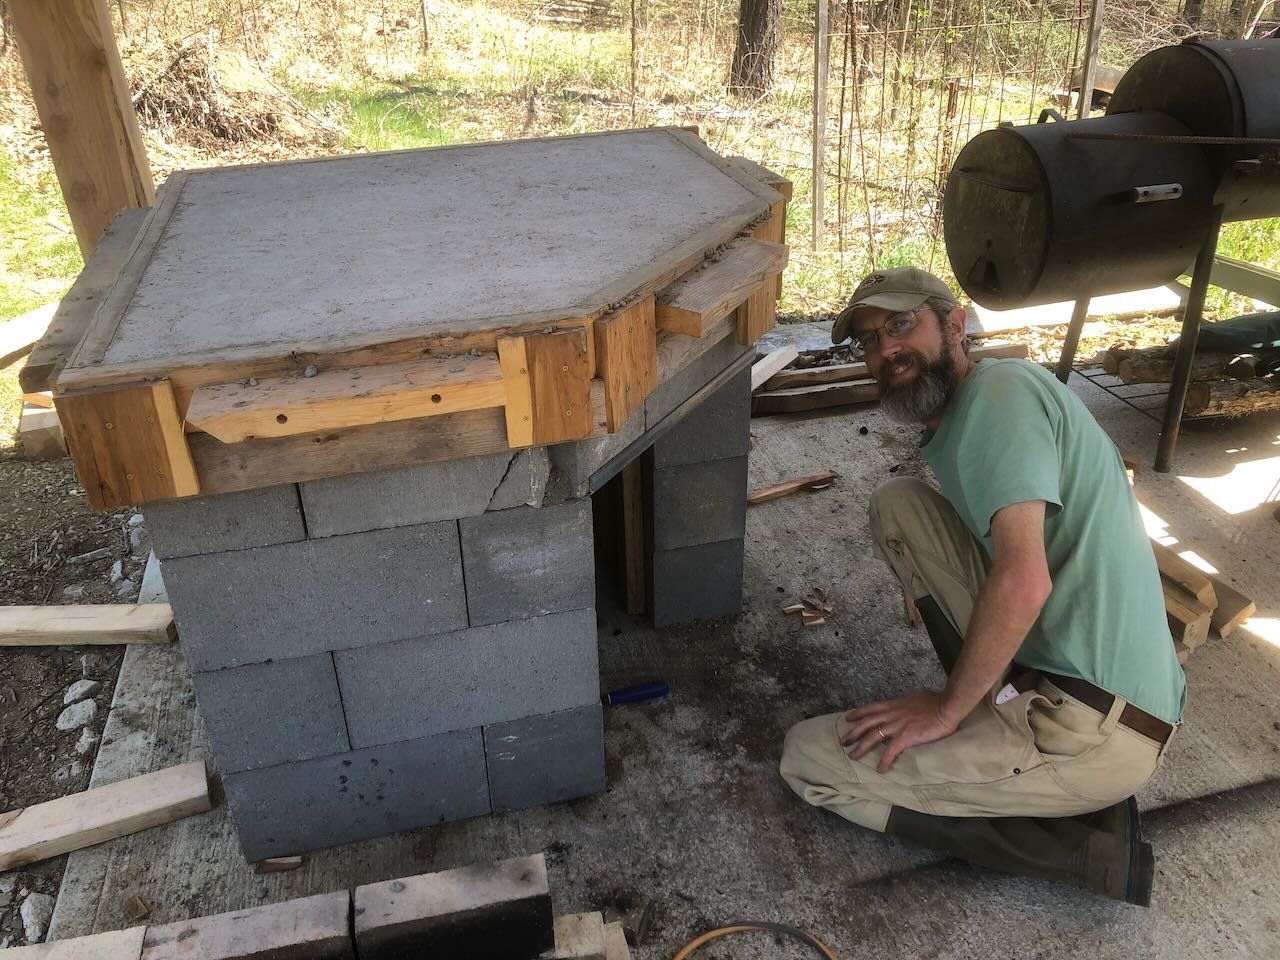
A major milestone! This week was the first since fall that we had warm enough, consistent enough weather to pour the concrete hearth that sits atop the foundation. On Monday morning, we took a break from other work to mix and pour the 6.5 bags of concrete required. As a reminder, here's how the foundation has sat all winter waiting for this moment: First I cut a piece of backer board to fit snugly in the opening, and taped all the remaining seams: I then re-checked that everything was level and adjusted the supports as needed (very little was required, it was quite tight and stable): Then a network of rebar was laid and wired together to strengthen the concrete. These were salvaged from a dump pile on our farm that pre-dates us; they were the perfect length for this job! Finally we started mixing the concrete by hand and shoveling it in. When we reached full, I compacted the mix and planed the surface smooth. Here I am with the finished surface, still wearing my mask to keep out the concrete dust since it's a pain to take on and off with rubber gloves on. I was thrilled to finally get that thing off, they give me headaches. At this point, we let the concrete cure for a couple days, moistening the surface occasionally. By this afternoon, it was time to remove the wooden forms beneath and around the hearth. I started by knocking and prying away the vertical supports on the outside and inside of the structure: And then disassembled the screwed-together form itself, revealing the hearth. We wet the newly exposed edges just in case a bit more moisture was needed now that they were exposed to air. We'll let this cure a while longer before taking the next step, but this is major progress! We have a busy couple weeks coming up, which is convenient in this sense, then it'll be time to start assembling the oven itself atop this surface. Just a reminder, the entire outer surface of this structure will be sealed with stucco, so it doesn't matter what the edge and seams look like (of the blocks or the hearth). Thanks for looking in. Hopefully updates will start coming more regularly from now on!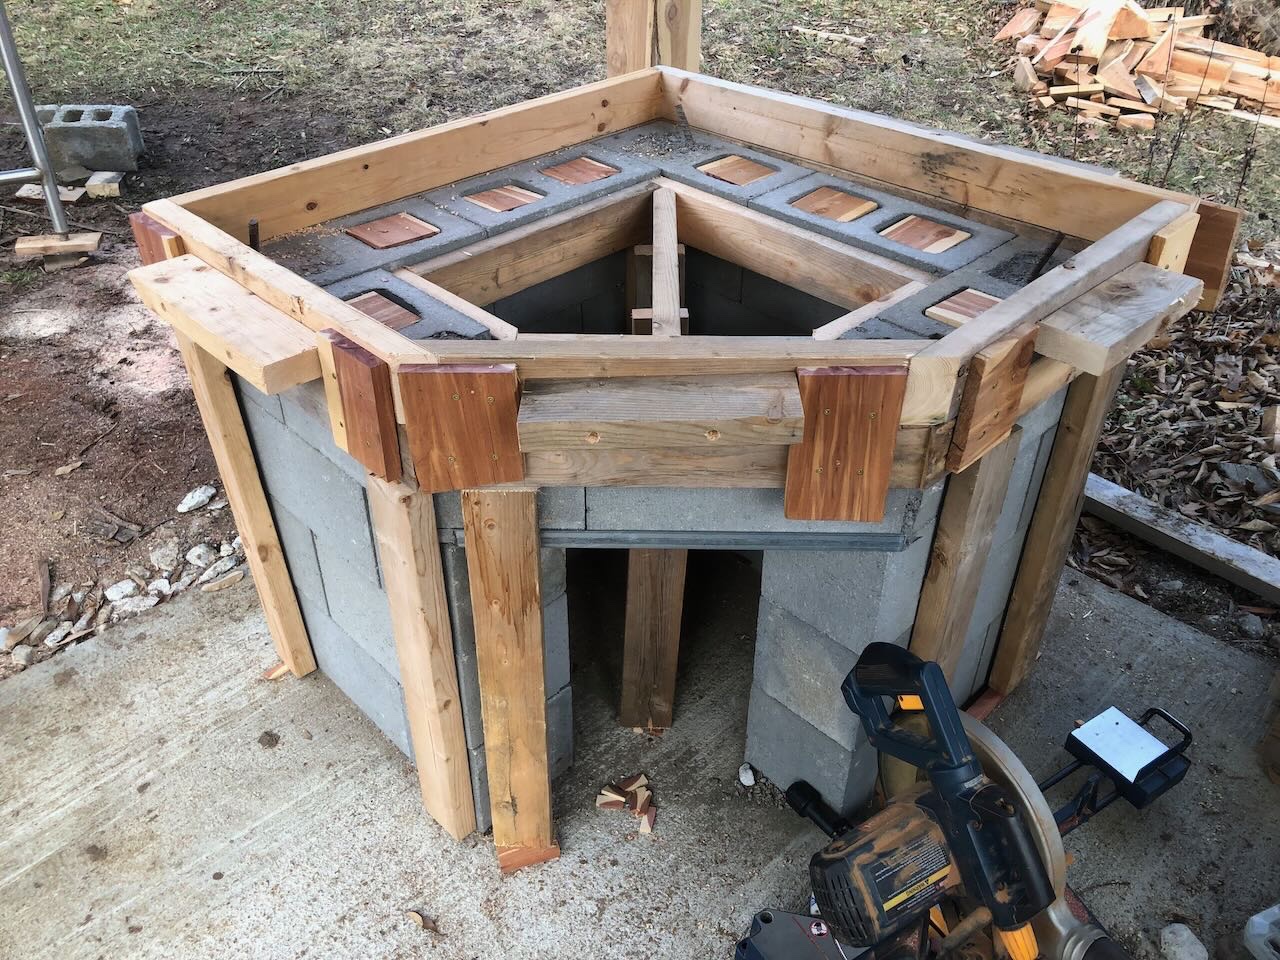
- 131 replies
-
- 11
-

-
Dave, I just stumbled across your log, which shows wonderful workmanship. I can't wait to see how the masts and rigging progress. I'm also sending you a PM since we appear to live very close to one another!
- 53 replies
-
- 1
-
-
- Speedy
- Vanguard Models
- (and 1 more)
-
Thanks for the update! Lots you're dealing with, glad you're coming out ok on the other side. Those are some tricky hull shapes for sure.
-
@MrBlueJacket Thanks for reading. As a self-employed small businessperson myself, I recognize how hard it is to please everyone and to take criticism (whether justified or not) of something you've sunk your soul into. The new larger-scale Cairo sounds like a fantastic project that will be far more likely to do justice to this amazing vessel. I look forward to seeing how that develops. Especially since I think interior cutaways are an underused niche in kit-making.
- 113 replies
-
- 8
-

-
-
- Cairo
- BlueJacket Shipcrafters
- (and 1 more)
-
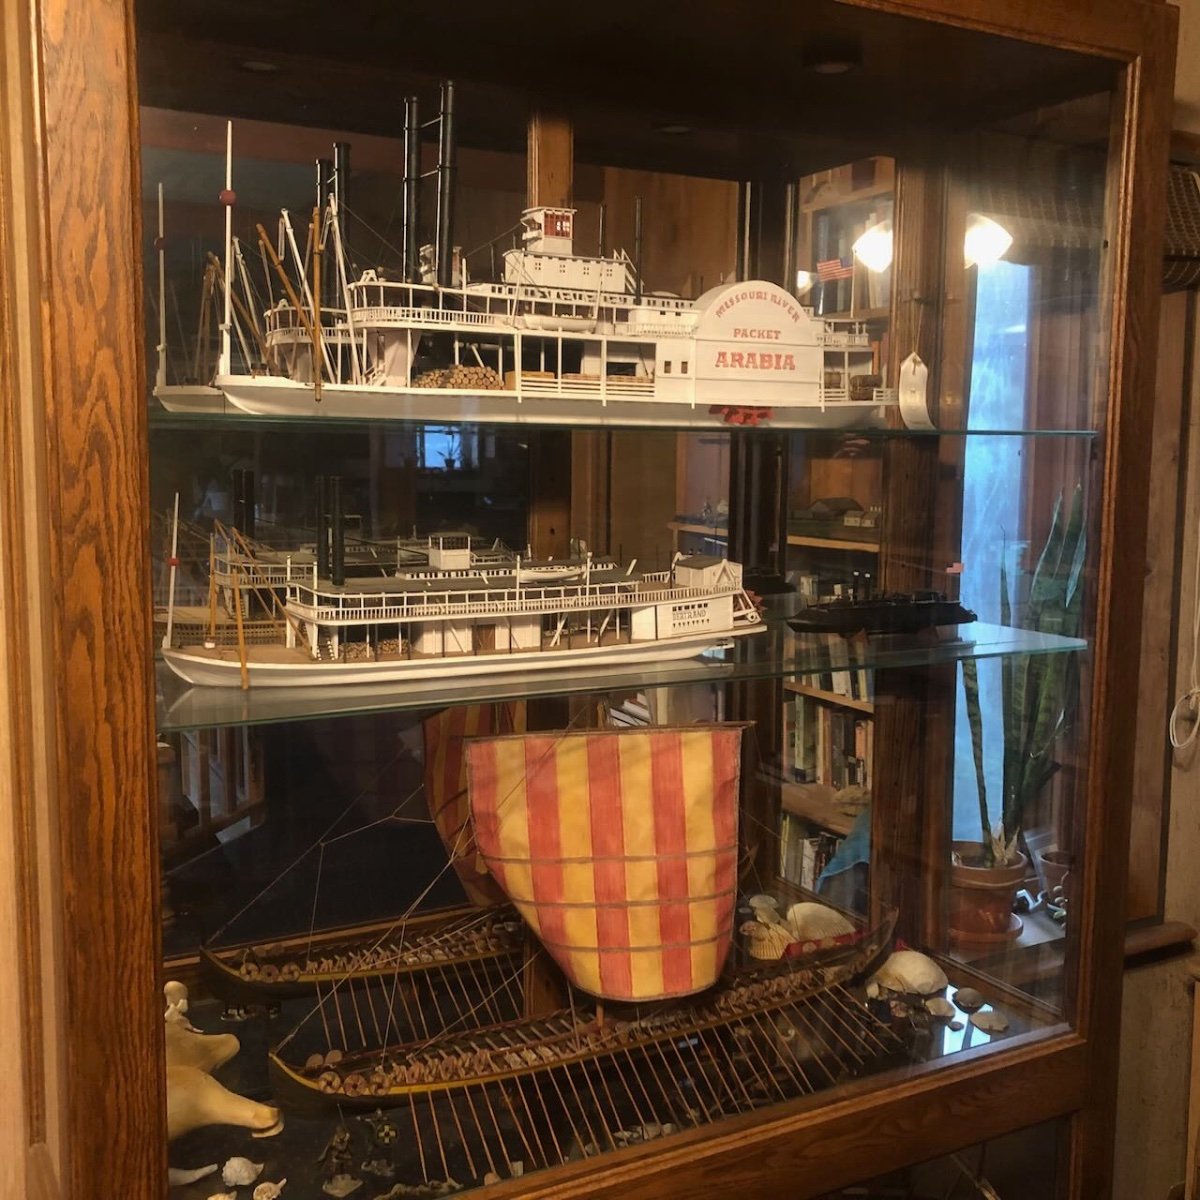
Thanks, Brian & others, for the feedback and uplifting comments. Yeah, I hadn't conceptualized how the dark coloration would interact with the other two white vessels. It really hides the model. Not that that's necessarily a bad thing. I'm pretty sure I know what the next project will be, but there'll be a delay because we're still in the process of DIY renovating the downstairs bedroom where I intend to set up a permanent workspace (partway through floor tiling at the moment) and then I need to design and build a new work space. DIY house projects can feel good but it can be really hard to fit them into busy schedules and this one has been dragging along.
- 113 replies
-
- 5
-
-
- Cairo
- BlueJacket Shipcrafters
- (and 1 more)
-
Dust masks and respirators.
Cathead replied to Bill Hudson's topic in Modeling tools and Workshop Equipment
CA fumes give me a headache, I try to avoid that stuff as much as I can. -
Thanks, Mark. It's definitely easy for kit flaws to undermine a build. I'm just too bloody stubborn to give up! Plus I'm enough of an environmentalist to have a really strong aversion to trashing something. I should clarify, for those who aren't necessarily familiar with my past projects, the two other steamboats are scratchbuilt and the Viking longship is a heavily modified Dusek kit (see links in my signature).
- 113 replies
-
- 7
-
-
- Cairo
- BlueJacket Shipcrafters
- (and 1 more)
-
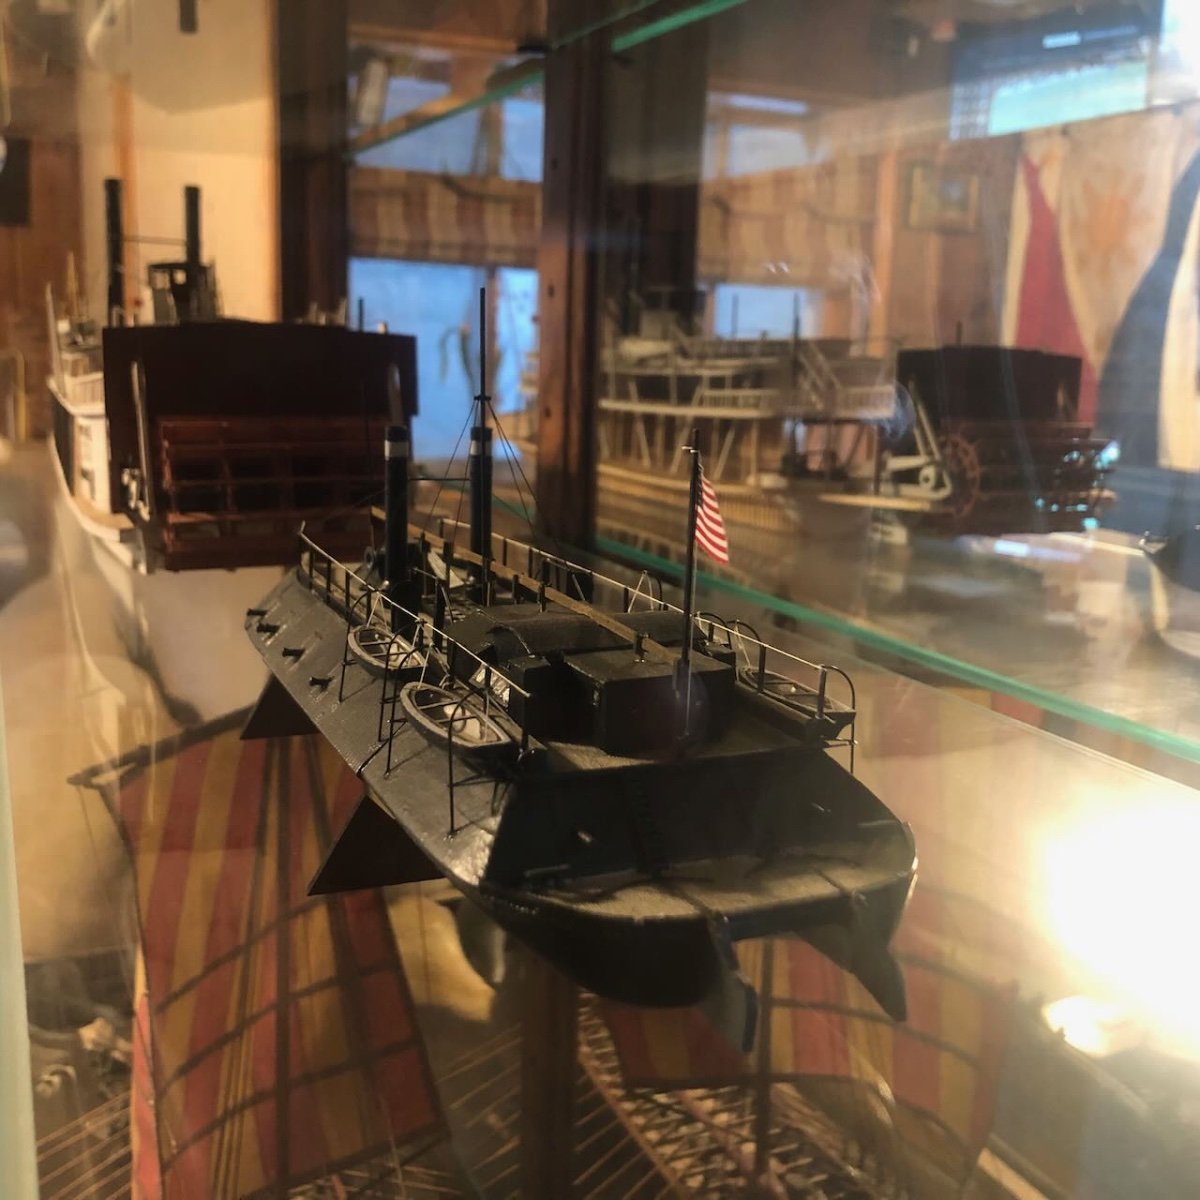
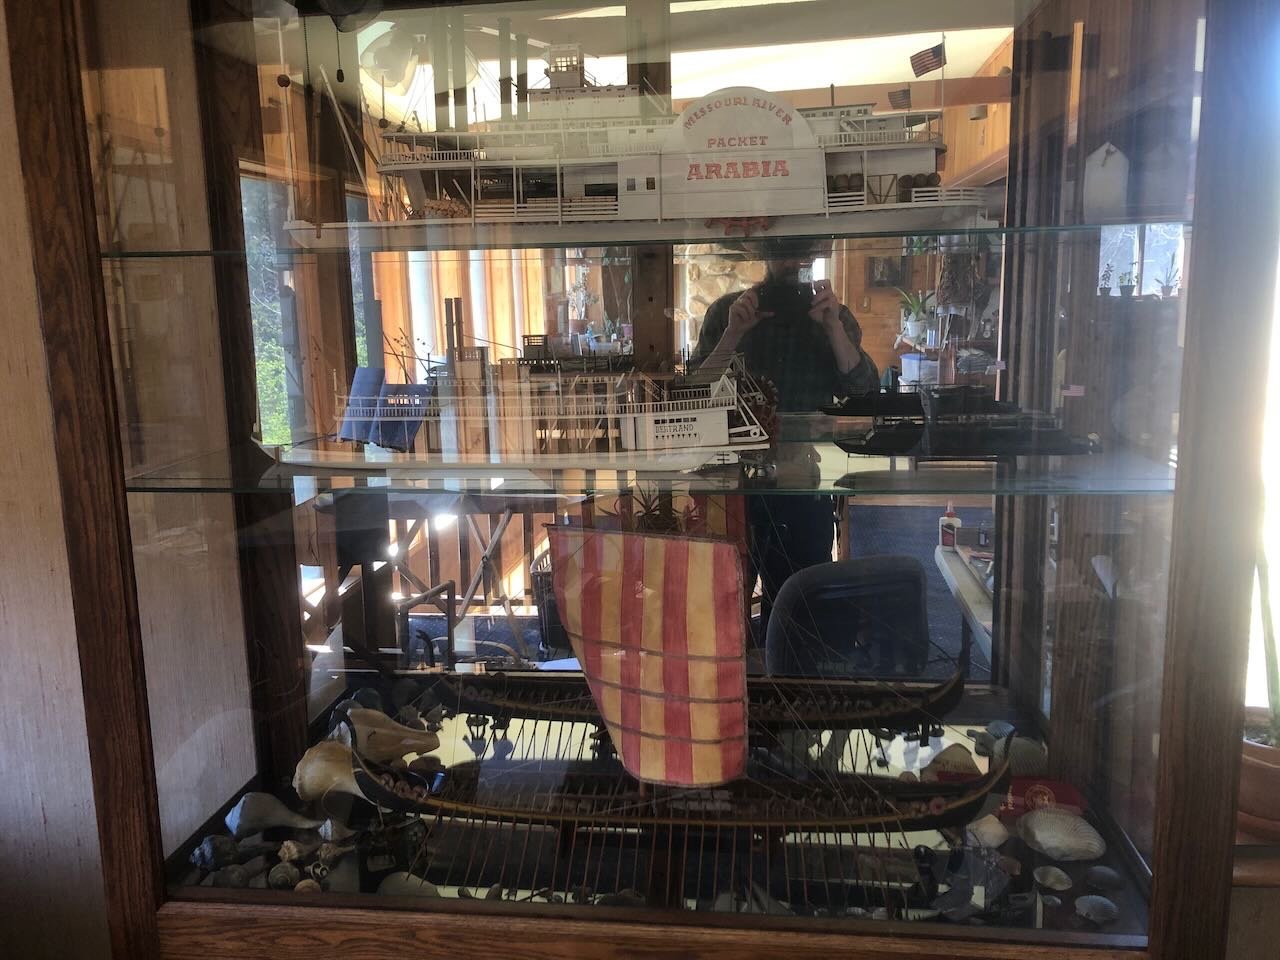
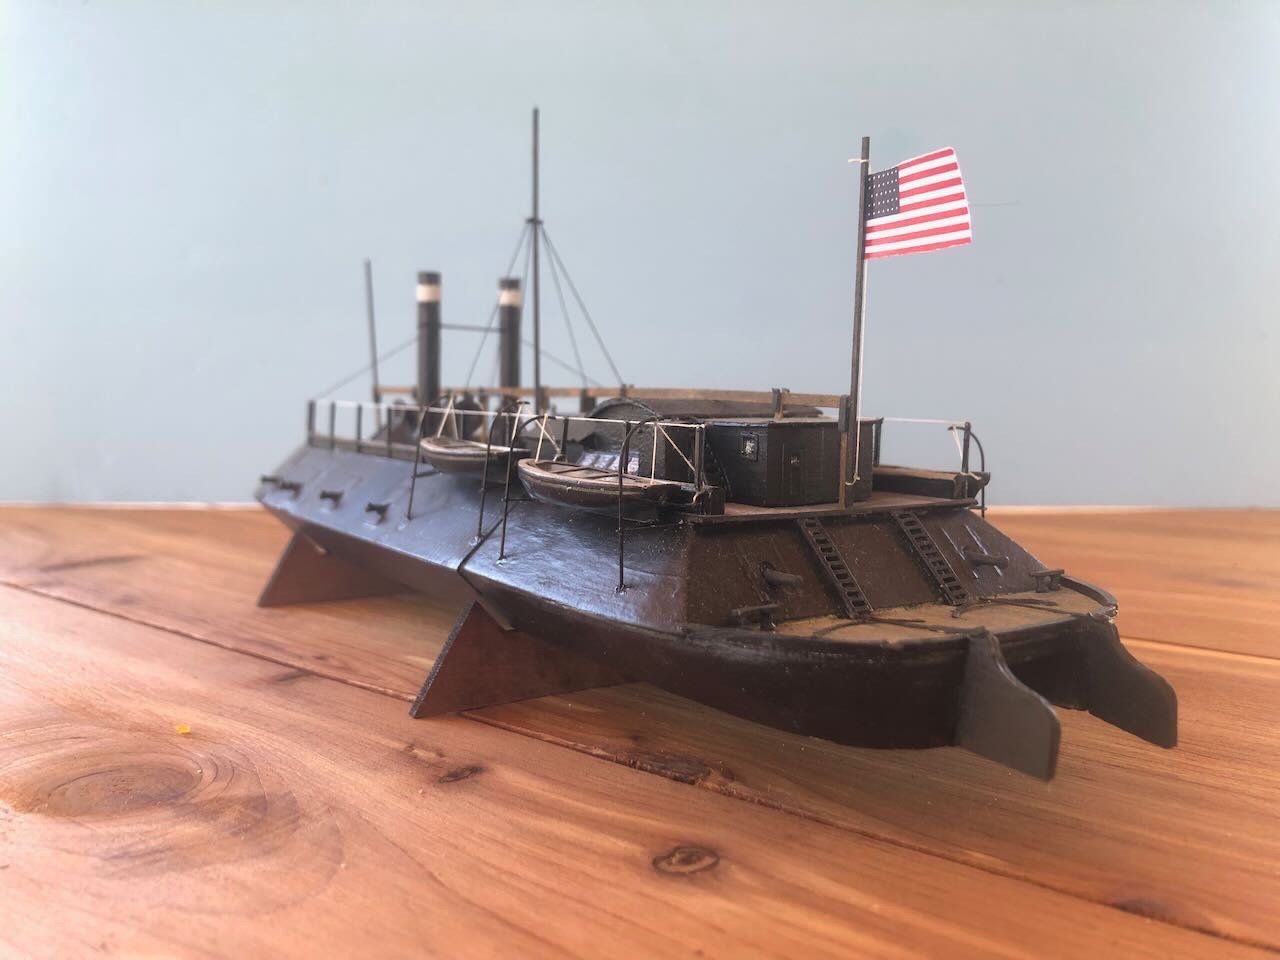
OK, with night falling, here are a couple more photos of the finished model in the display cabinet, with fewer reflections. I also want to correct an omission in the earlier posts and say Thank You so much for those who stuck with this build log. It can't have been the most fun, with me complaining a lot and the result being not that great. But having community support makes such a difference, it adds so much to the model-building experience. Hopefully the next project will be more fun for everyone!


- 113 replies
-
- 12
-

-
-
- Cairo
- BlueJacket Shipcrafters
- (and 1 more)
-
Dust masks and respirators.
Cathead replied to Bill Hudson's topic in Modeling tools and Workshop Equipment
I hate wearing masks (yes, pre-covid) because they quickly give me headaches. Something about the air restriction (and if they're not restricting your air, you're not wearing them right). They're a miserable experience for me after about 10 minutes. But I still use them for anything over light hand-sanding. Sawdust just isn't good for the lungs and it's not worth the complications. I also try to do heavier sanding outdoors whenever possible. Also, as noted above, some woods are more hazardous than others. -
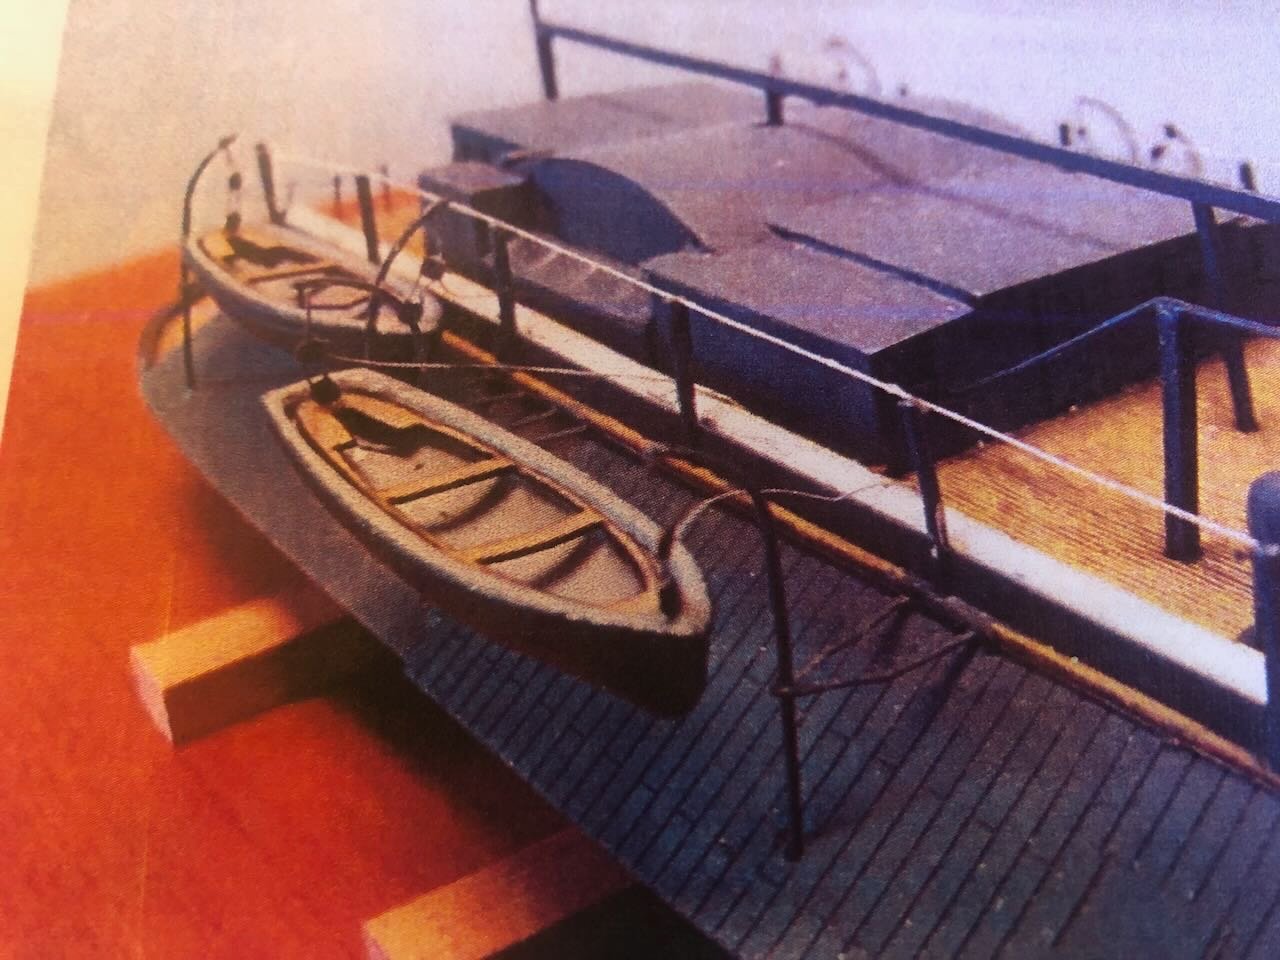
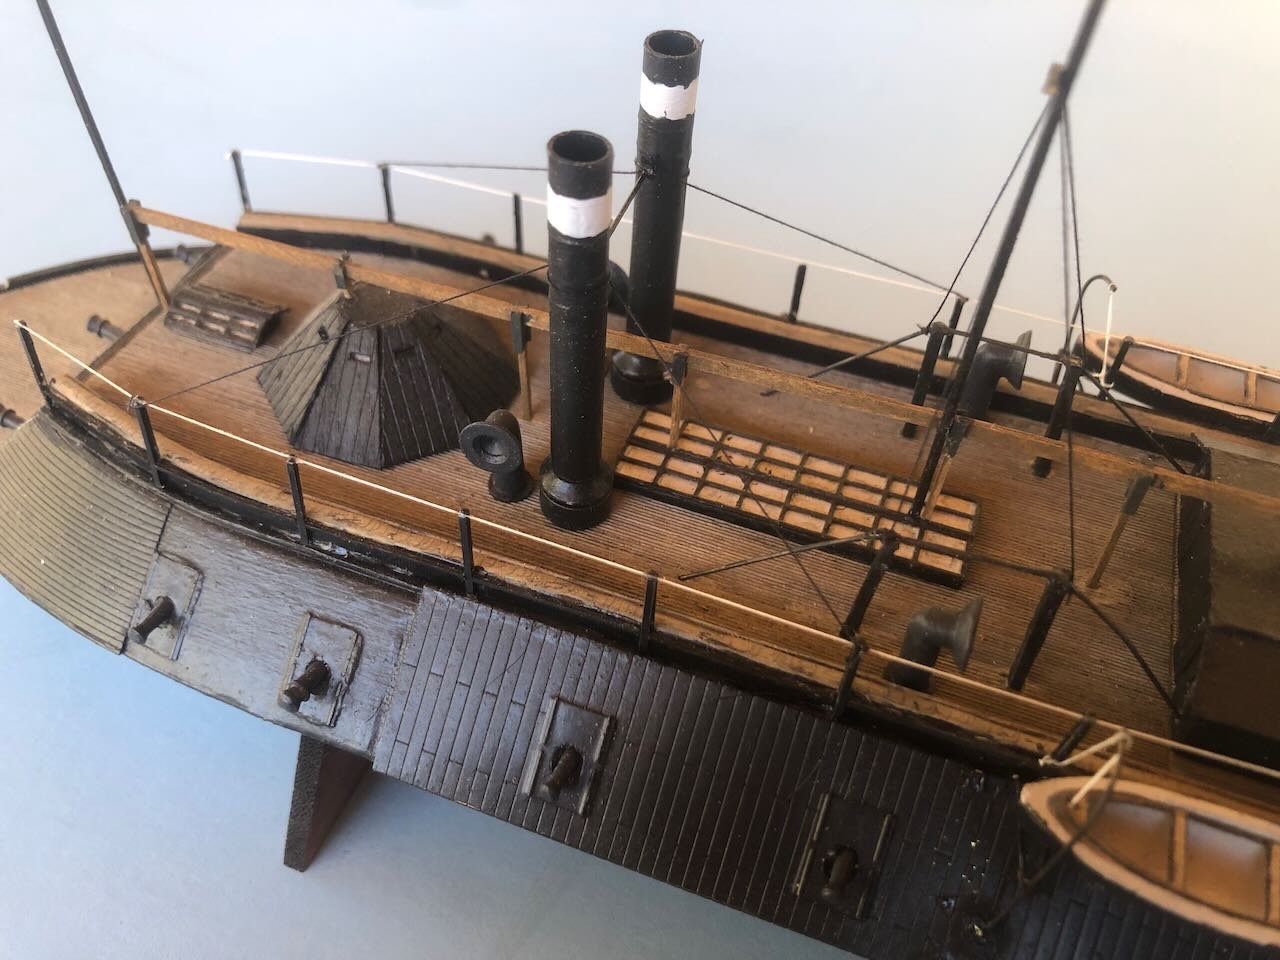
Here's a semi-brief wrapup of this project. This kit was not a good choice for me at the time I chose it. I was in a busy and somewhat stressful period and wanted a simple, enjoyable kit that I wouldn't have to think about too much. Instead I got a very fussy kit with problematic instructions, dubious part quality, a small scale that was more difficult to work in than I expected, and a mistaken impression of its level of difficulty based on how it's marketed. I think I enjoyed this build less than any I've ever undertaken. Some of my bad experience was my fault; I can identify places where I could have read or planned more carefully, worked with more care, or asked for more guidance on how to do things right. At times I barreled through rather than stepping back. I was not on a good head space during some of this, and the kit made this worse rather than helping me relax/decompress. This goes back to the idea of a mismatch between kit and desire. Other builders might well be able to do really neat things with this model. I was not one of them during the time I was building this. Other aspects I think can be fairly laid at the kit's feet. A core problem I've come to recognize is that the kit doesn't present a consistent level of detail. For just one example, there are super-detailed etched brass armor pieces that are meant to be glued right over a plain wooden block that looks nothing like the fine planking that should be there. The same is true for the deck structures, some of which are carefully detailed (pilot house) while others are just sanded wood blocks (aft wheelhouse). This creates cognitive stress in trying to figure out how to build the kit to a consistent standard. I also found numerous cases where parts were of inconsistent quality. To be honest, even the photos provided of the completed model from BlueJacket aren't very impressive; you can see the highly variable level of detail and quality in the kit, which just makes it look strange. For example, the super-delicate boat stanchions look uneven and cheap even in their model, as does the very low-quality-looking rigging job and the basic plywood inserts simulating boat thwarts; the contrast with the highly detailed brass armor is striking and distracting. Here's a photo from the instructions (also note the terrible quality, which isn't helpful to the builder). If even BlueJacket can't make their own model look better than this, maybe I shouldn't feel so bad about the quality of my work. The instructions were also very primitive and difficult to follow; as an educator and professional editor, it's easy for me to see how such things can be improved, but I've approached many model companies with a bid to help upgrade their instructions and have always been turned down (including BlueJacket). This kit's instructions were a classic case of what's known as Curse of Knowledge, meaning that experts tend to be very bad at placing themselves in their listeners'/readers' shoes when trying to explain something. In this case, the instructions read more like notes on what the kit designer did, with a lot of assumptions, rather than actual instructions for someone who's never seen these materials before and doesn't understand their context. Even allowing for my own faults and mistakes, I'd have trouble recommending this kit to any builders but those who are very experienced and willing to take on a challenge. What I ended up with was well below my usual personal standards for a model. I've built frustrating kits before (see my Corel Ranger and Dusek Viking longship) and was capable of turning their myriad faults into a much more detailed and accurate product that I was proud of. I was not able to accomplish that with this kit, which looks and feels to me like it came together at the level I was building things in high school. Oddly, for a kit that's pretty recent, this felt like a kit from several decades ago, with its poor instructions, odd mix of simplistic and highly detailed parts, and somewhat slapdash approach to accuracy and consistency. If I'd gotten this as a bargain on eBay as a historic kit, maybe I'd feel differently. But when I pay full price for a newly developed kit, from an American designer/manufacturer, I expect something up to the standards of modern kit making. And that's not what I got. I'm sad about this review, because I want to like and recommend small businesses like BlueJacket. But I really don't think this kit presents their best foot forward.
- 113 replies
-
- 9
-
-
- Cairo
- BlueJacket Shipcrafters
- (and 1 more)
-
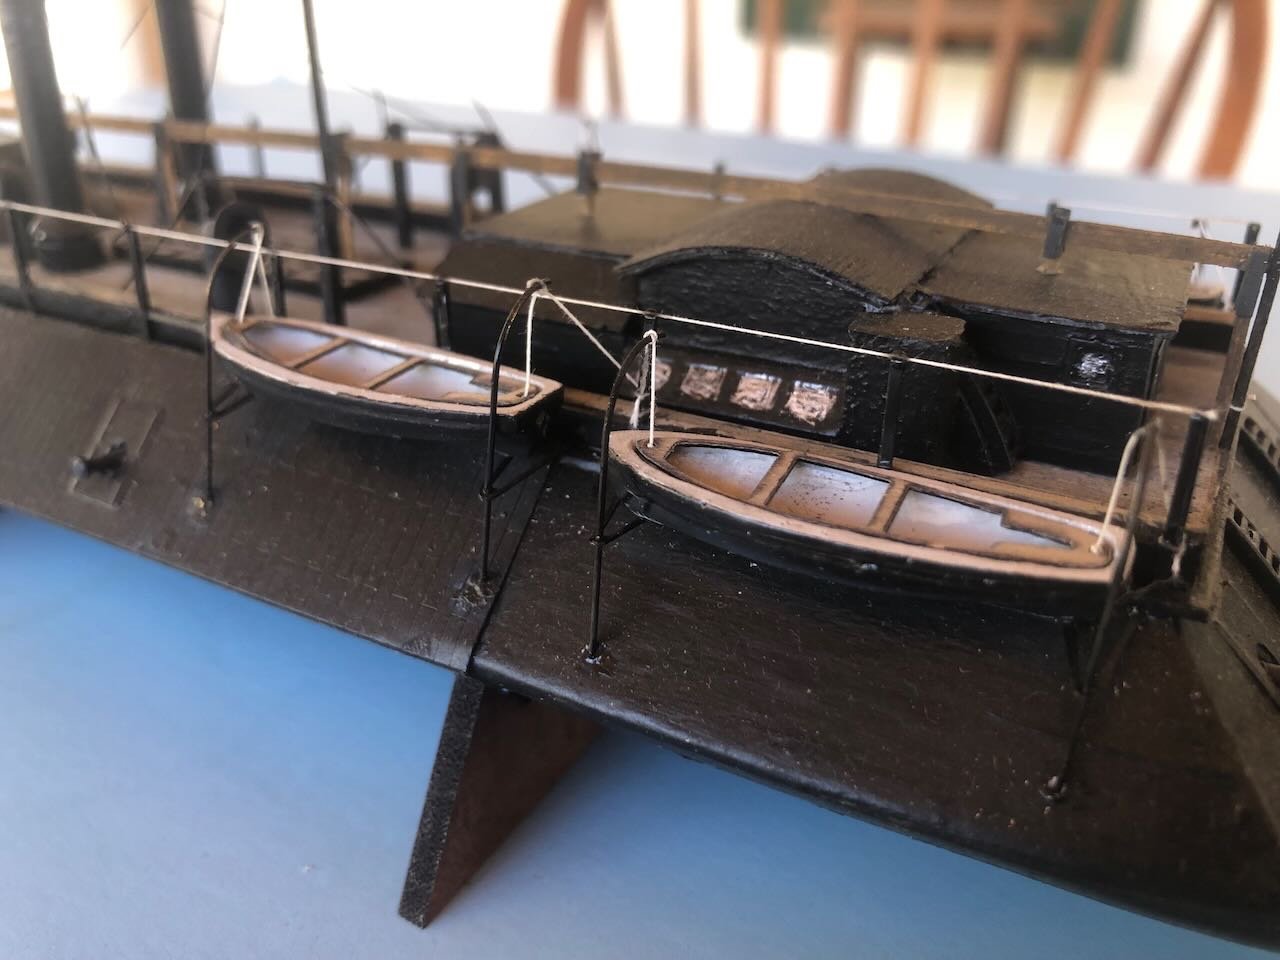
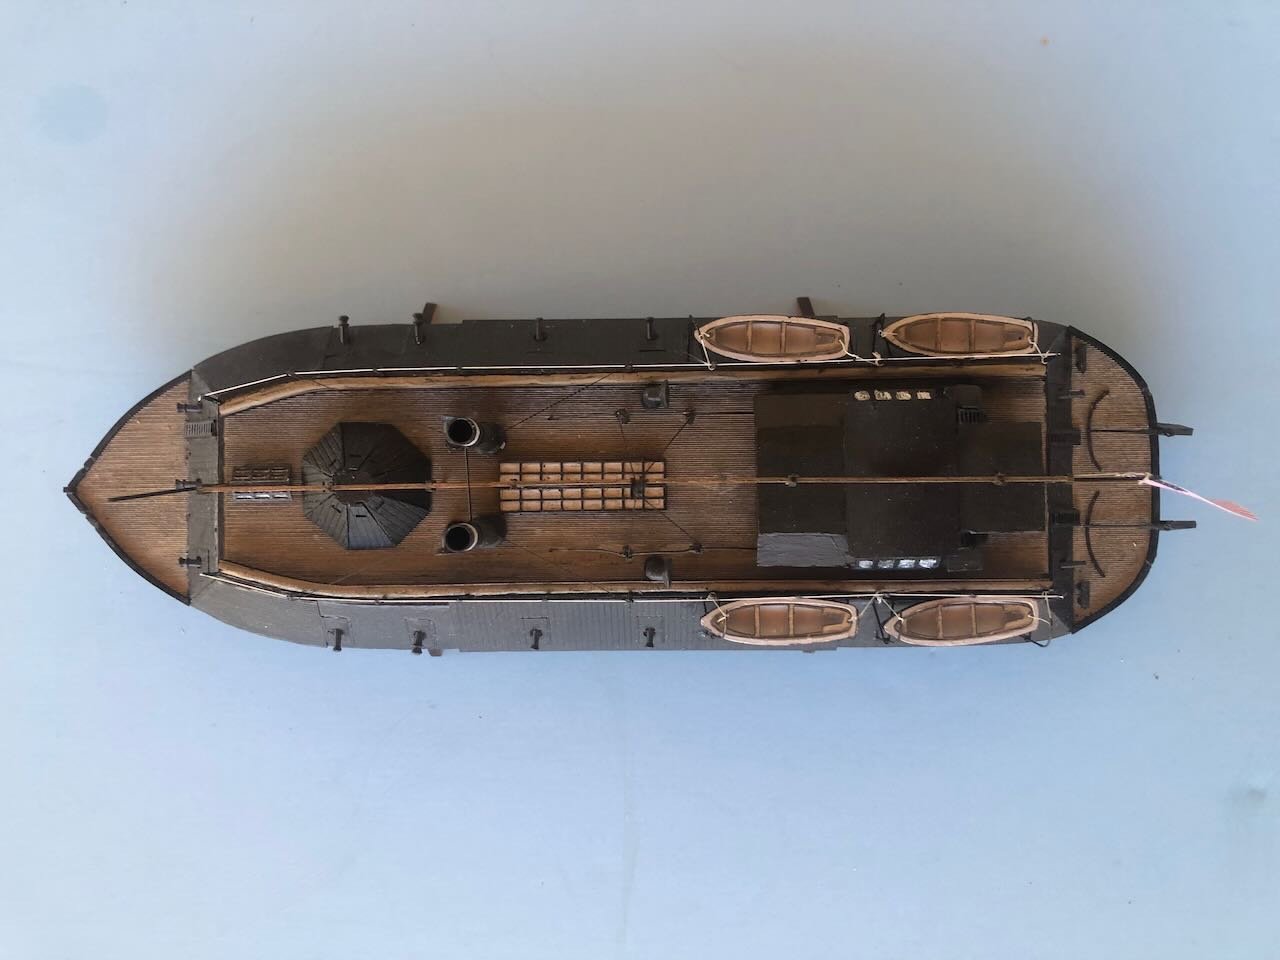
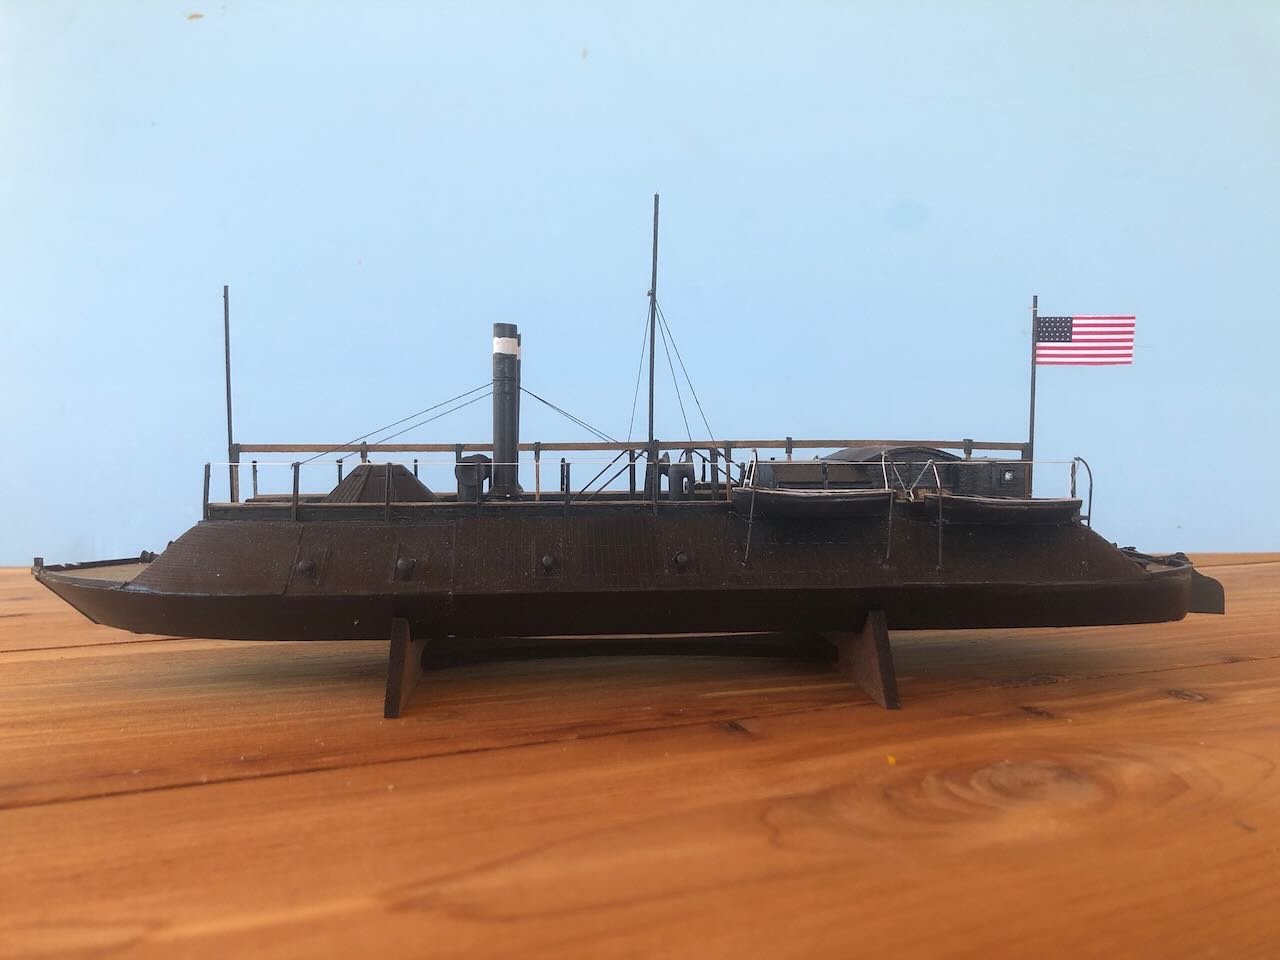
Last post February 26; you can tell my enthusiasm/motivation has been at its low ebb! That and spring always creates a pulse of competing time sinks. But I have been pecking away at the final details. Having accepted that this will be a display model meant to look ok from a certain distance, meant to convey the idea of the Cairo rather than any sort of specifically accurate recreation, I did some bare-bones finishing that gives it a completed look from a certain distance. For the boats, I ended up gluing them directly to the stanchions. The kit has you simulate boat rigging with a brass piece cut to resemble lines and blocks, but I didn't use these. For one, they're so delicate that I damaged several of them with even light handling. Second, they were sized for the original stanchion layout that I was unable to replicate. So with my stanchions in different positions, pre-sized brass lines/blocks didn't fit right. I just did the most basic simulation of some kind of boat rigging using white line. I have no illusions about the accuracy or functionality of this; it's just meant to create a visual idea of boat rigging when viewed from a distance. None of the rest of this model holds up to close scrutiny, so why go overboard trying to make this to a higher standard? Then I added some basic rigging overall; support lines for the stack and central mast, that sort of thing. I decided to leave a variety of other details out, like rigging for the tillers, because I didn't think I could do it justice and I just plain didn't want to. I wanted to be done. So here's what the final pseudo-Cairo looks like. She's now placed within my display cabinet, behind the Bertrand, looking a bit odd at such a small scale than the others, but that's ok. Daylight makes it hard to photograph that case given all the reflected light; I'll take another shot in the evening when the models will show up better.

- 113 replies
-
- 8
-
-
- Cairo
- BlueJacket Shipcrafters
- (and 1 more)
-
Recommended pins for planking?
Cathead replied to Capella's topic in Modeling tools and Workshop Equipment
I've never used pins to plank a hull. You can buy or bash all sorts of useful clamps that do the trick without compromising the plank. -
As you say, this is a really attractive model, my eyes were drawn to it when I saw the display version at BlueJacket years ago. Looking forward to seeing how you progress.
-
Looks like fun, and a great prototype. Neat legacy to start your grandson off with, too!
- 144 replies
-
- 1
-
-
- HMS Speedy
- Vanguard Models
- (and 1 more)
-
EDIT: In the time I took to write the comment below, other discussion rendered part of it moot. Still posting in case it helps nudge discussion toward any further clarification. For example, sales or credit card receipts might help you figure out what he bought and when. It would be really helpful to have more information. You know more than we do about the context. Was this something he was building from scratch, or from a kit of some kind? Many of the parts you show look kind of like they came from a kit, though it's possible he was fabricating all the parts. You mention "plans of various ships" but your wording is unclear; did he leave any documentation at all (notes, plans of any kind) to imply what he was working from? Or do you mean you've been looking at ship plans online to try and match what he'd built? There had to be some kind of documentation, unless he was making up the entire design in his head as he went along. Maybe files on a computer? An old kit box lying around? Do any other relatives (spouse, sibling, etc.) have any memory of him ever talking about what he was building? He'd clearly been working on it for some time, there's a decent chance he talked to somebody about a project this large and dedicated. I know you said cognitive issues were involved, and you imply that the Bismarck claim is suspect because of that, but it's not clear whether that developed during this project (e.g. he told someone early on what his original plan was and only later became confused) or prior to the project (e.g. it was begun when he was already suffering confusion). You say it's "clearly not the Bismarck", but how do you know that? What's your reasoning or evidence? This isn't a challenge, but again a request for more information/context. With respect, others on here might be better qualified to judge whether or not it's the Bismarck, so it would help to understand on what basis you made that decision. Any details you can provide would be helpful because otherwise anyone on this end is working entirely in the dark.
-
I definitely know the feeling of taking a break from any given project, especially when something frustrating happens. Enjoy your other projects!
- 132 replies
-
- 1
-
-
- King of the Mississippi
- Artesania Latina
- (and 1 more)
-
That's a lot of scrolling! Can't wait to see the result. I've seen your work, luck isn't a factor.
-
PM sent, don't want to take this thread any further off course!
-
Sorry if that came across too personal, it was meant as a broader statement. Too many people aren't taught the robust history over here, and too often "American" is used in only its narrowest sense. It's telling that in Latin America they pointedly use "Norteamericano" to refer to European-Americans to distinguish from the broader sense of "American" as a hemispheric concept. Was not intended as any sort of attack or criticism on you or any other member. Speaking of your wife's Alaskan heritage, my grandfather (proud Minnesota Norse and a strong reason for my interest in Scandinavian history) served as a minister in southeastern Alaska and worked closely with the Tlingit community in the area (as did my grandmother, a nurse). That time was one of his most treasured of all he did in his long life, he loved the area and the people. I still have a beautiful piece of indigenous artwork commissioned for and given to them as a parting gift from the community, passed down to me knowing my own interest and time spent in Alaska and BC.
-
If you want deeper New World history, just get out of the mindset that history began with European colonists. Go visit the extraordinary mound cities along the Mississippi River, such as Cahokia, or areas of the Southwest like Chaco Canyon or Mesa Verde. And that's not even counting the vibrant history in Mexico and Central America. You could even go up to L'Anse aux Meadows to get some 11th century European history.
-
Coincidentally, I'm currently rereading my favorite scholarly book on the Viking age, Children of Ash and Elm (a gift from my wife a few years ago when I was building my longship). I ran across this passage last night, which seemed quite relevant. This is describing pagan great hall architecture from excavations in Sweden: "Providing the best picture yet of what such a building might have looked like, dozens of iron spirals were found along the wall lines and clustered around the doors – the smallest the length of a finger, the biggest as long as a forearm...Even more exciting was the ironwork decoration on the doors: more spirals, flat against the wood, along with volutes and other patterns, the whole resembling medieval church doors (clearly, that tradition was much older than previously thought). And then there were the door hinges: actual spears, hammered into a curve round the door posts, laid so their blades would have rested flat on the door surfaces, the points toward the centre. The entry to the hall was thus through a portal of weapons, bringing to mind the description of Odin's own residence, Valhöll." - p-98-99
-
Luckily there's no history of Christians reinterpreting pagan imagery to suit their narrative.