HOLIDAY DONATION DRIVE - SUPPORT MSW - DO YOUR PART TO KEEP THIS GREAT FORUM GOING!
×


kurtvd19
-
Posts
3,026 -
Joined
-
Last visited
Content Type
Profiles
Forums
Gallery
Events
Everything posted by kurtvd19
-
 Brian: The Cyclopedium book is available from the Howard Steamboat Museum in Jeffersonville, IN. Alan also wrote the The Western Rivers Engineroom Cyclopedium - both are must have books for the steamboat modeler. Not expensive. Kurt
- 133 replies
-
- 3
-

-
- chaperon
- model shipways
- (and 2 more)
-
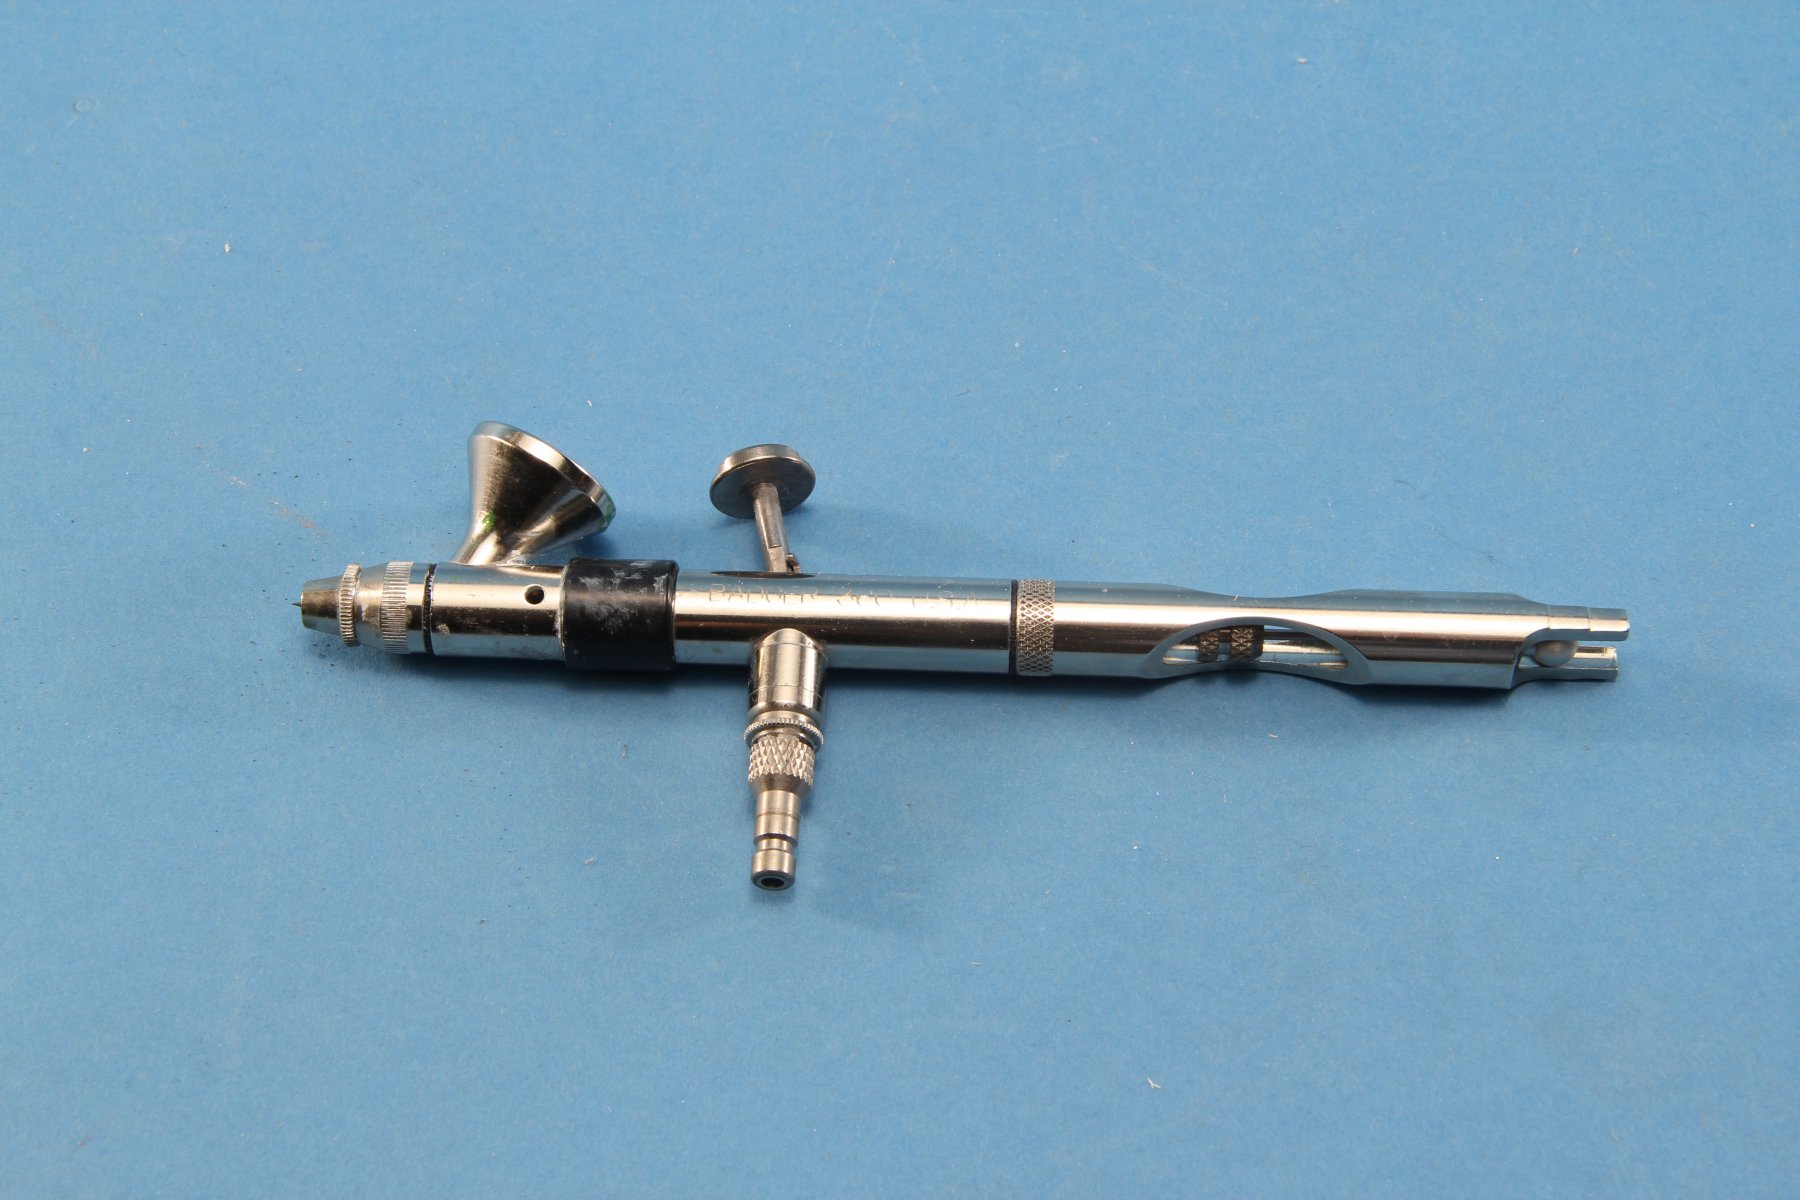
Floyd: Go ahead and try Badger on Friday afternoon but being good Friday they may close early or not be open. But if Jesus (that is their repair techs name - not a play on Good Friday) is working he will get to the bottom of it. Bubbles mean you have to tighten up the fittings - but they are delicate. Use some beeswax (a staple in all airbrush users tools) on the threads of the air regulator and nozzles pieces up front. As shown in the boxed area to the left side of the drawing there are three parts with threads that can use the beeswax. Also, make sure the tiny little tip (50-0391, 2 or 3) is in place. This gets lost by many. Be sure the needle moves freely and that it is fully forward - do not force it as the tip can split or deform if force is used. Try turning the airbrush upside down and use an eyedropper or pipette to drop some water into the siphon tube connection and spray. It should spray just fine if the internals are ok. If it doesn't spray then I am stumped. Kurt

- 133 replies
-
- 5
-
-
- alert class
- tugboat
- (and 1 more)
-
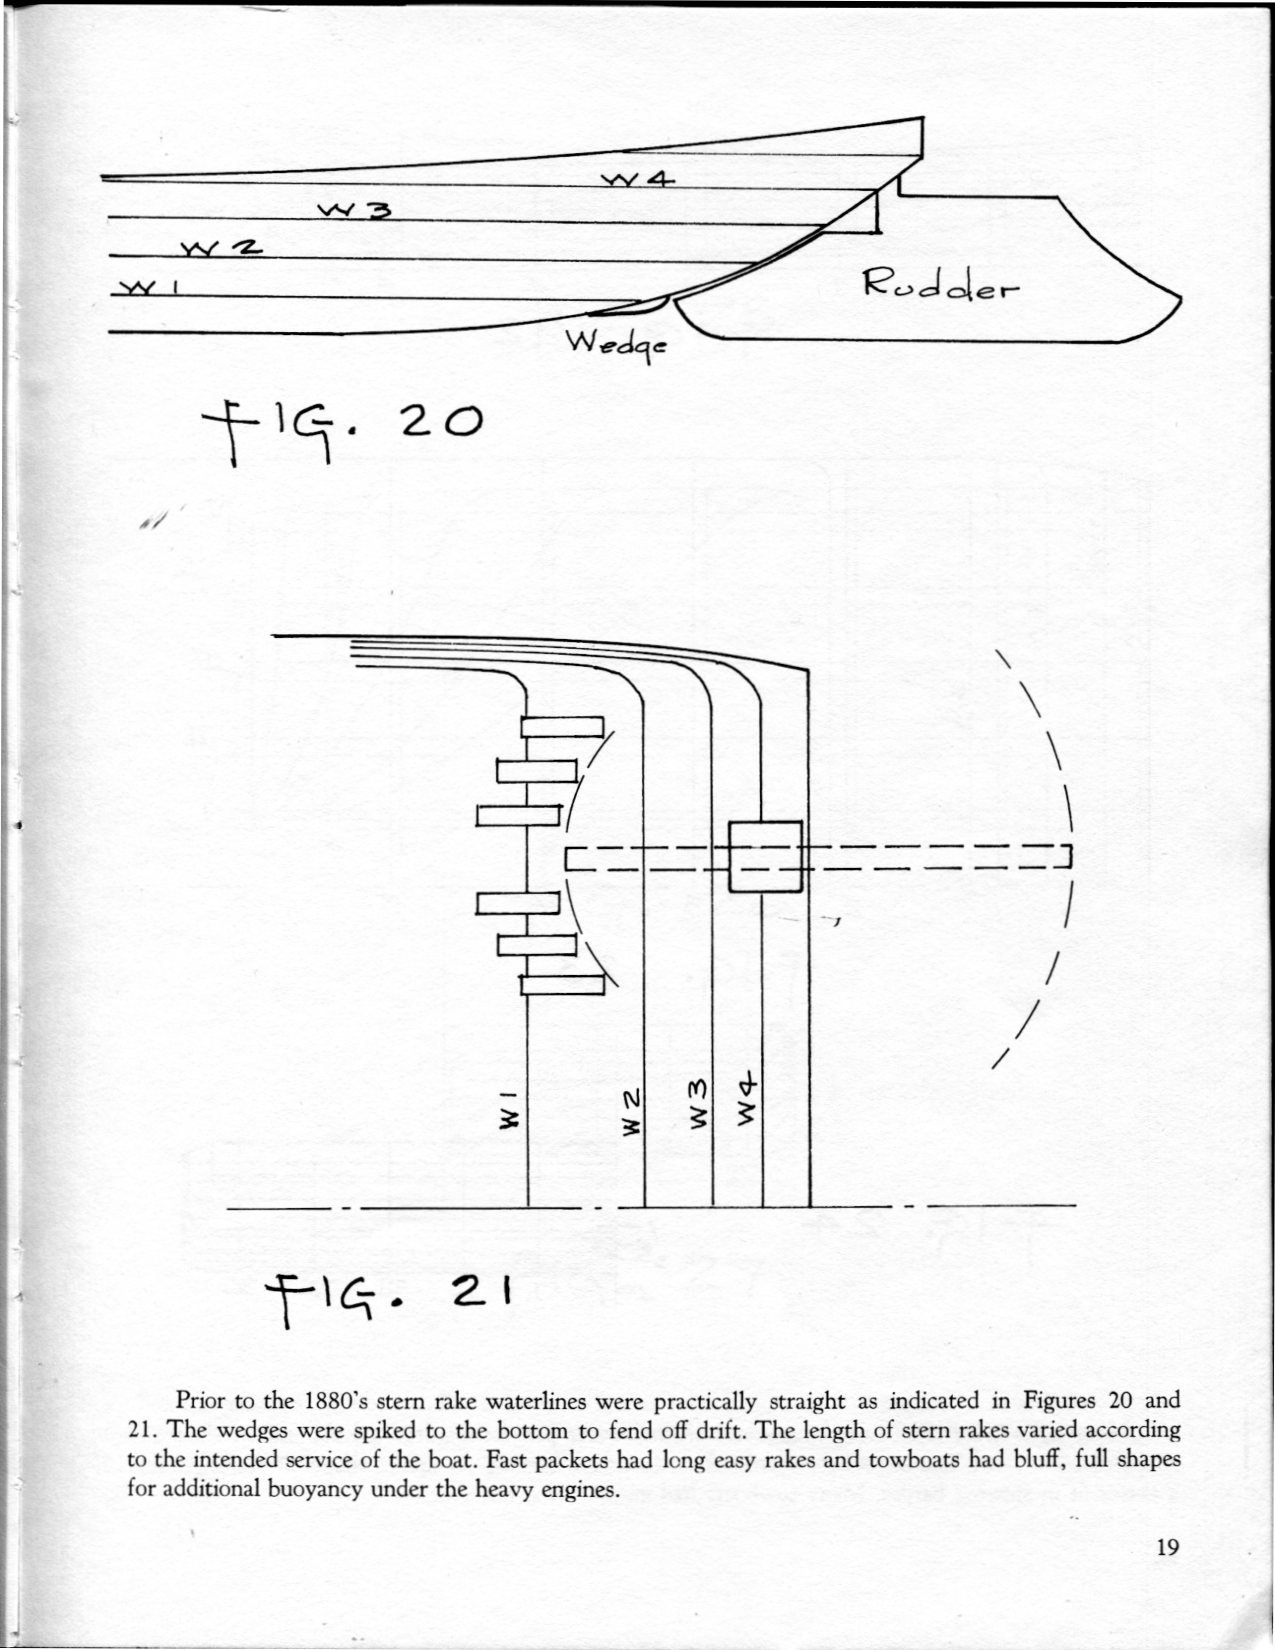
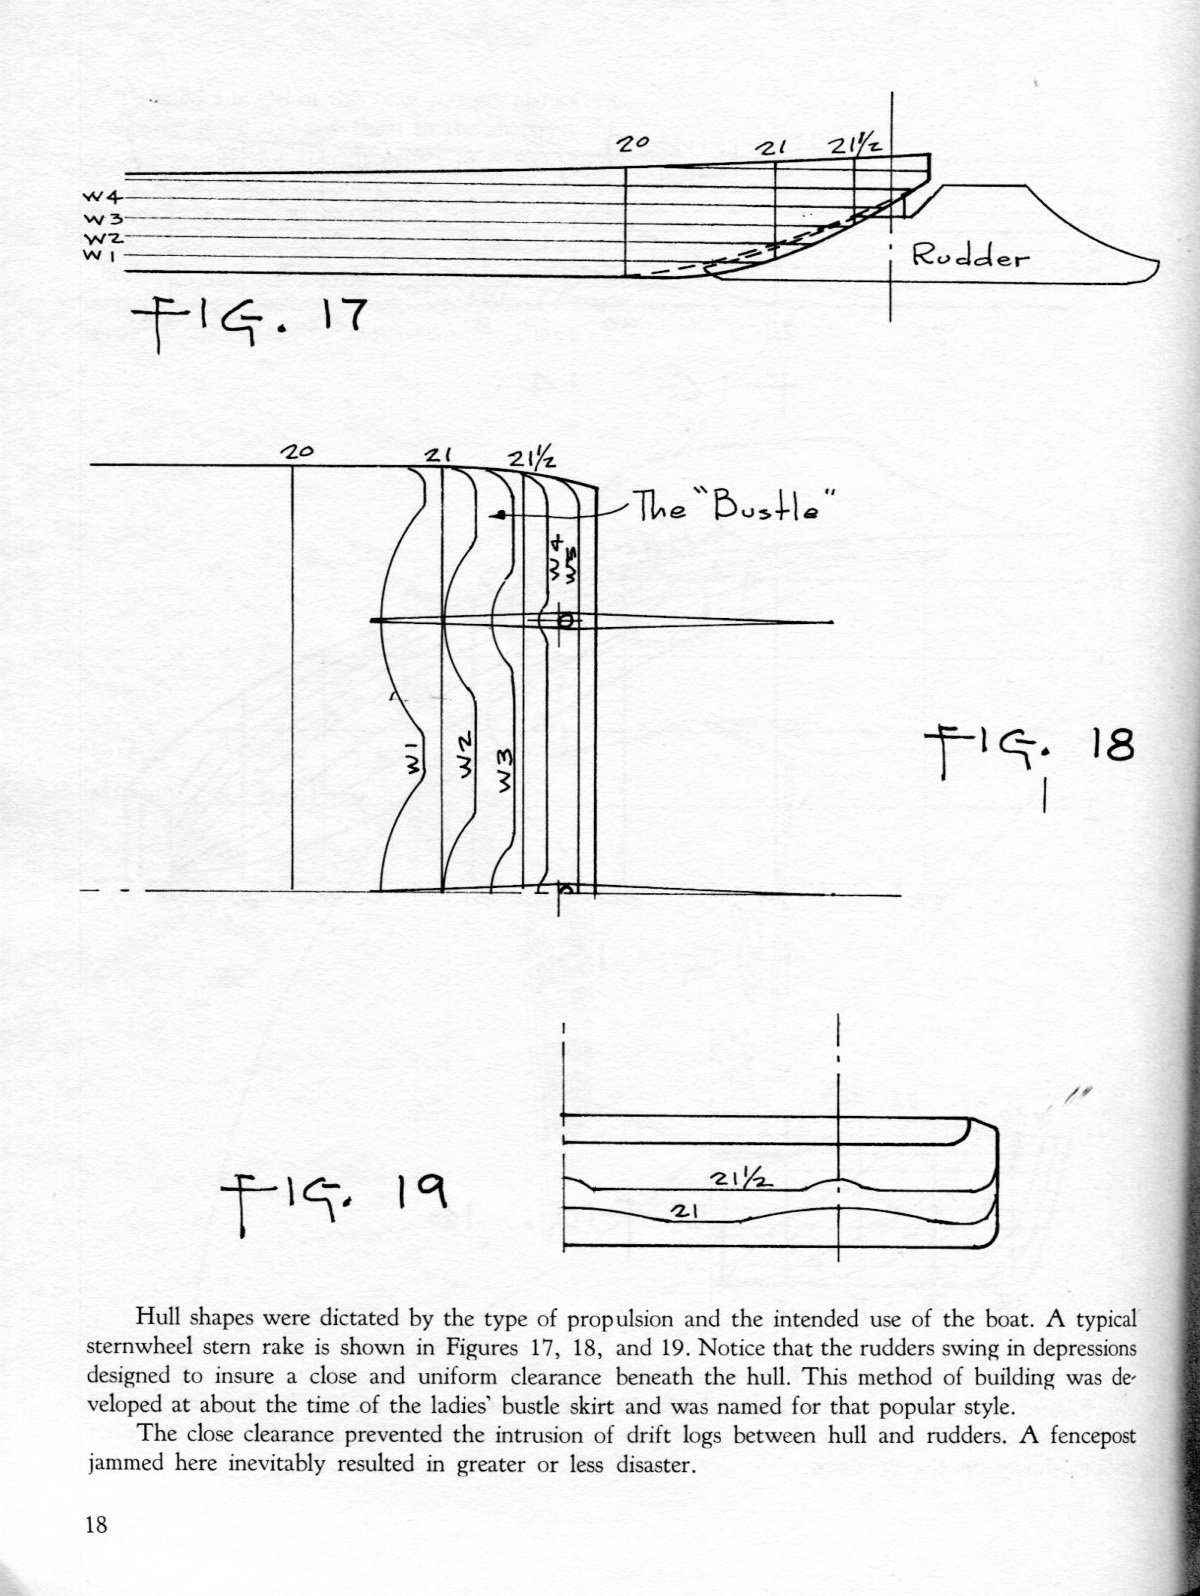
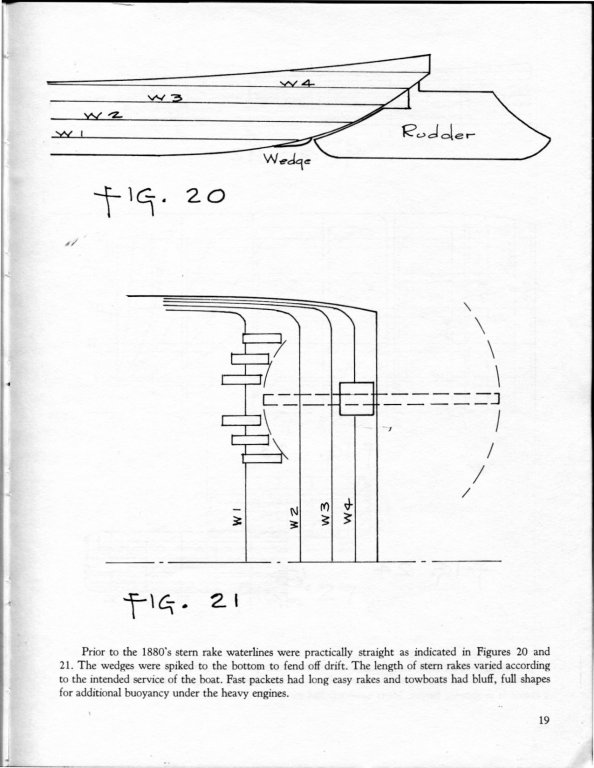
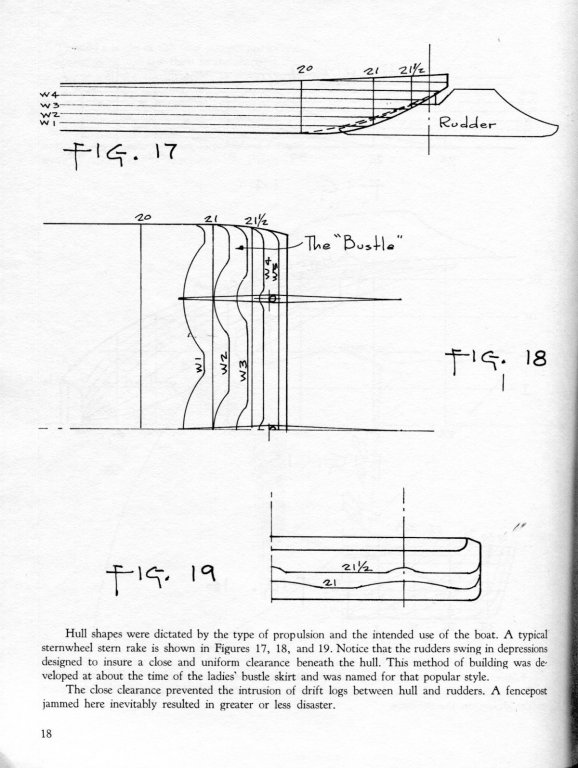
Rudder construction is shown and explained in The Western Rivers Steamboat Cyclopedium by Alan Bates on pages 18 & 19. Note the amount of rudder ahead of the rudder shaft. They fit closely to the hull and in both Fig 17 & 18 there is an attempt to shield/protect the rudders from floating debris. They were tucked up tight to the hull and didn't extend below the bottom of the hull. The rudder as shown in Fig 17 is very close to the Chaperon's rudder configuration. The text on the bottom of page 18 reads "Hull shapes were dictated by the type of propulsion and the intended use of the boat. A typical sternwheel stern rake is shown in Figures 17, 18, and 19. Notice that the rudders swing in depressions designed to insure a close and uniform clearance beneath the hull. This method of building was developed at about the time of the ladies' bustle skirt and was named for that popular style. The close clearance prevented the intrusion of drift logs between hull and rudders. A fencepost jammed here inevitably resulted in greater or less disaster" The rudder configuration in Fig 20 with the Wedges ahead of the rudders to offer some protection was also common. The text at the bottom of page 19 reads "Prior to the 1880's stem rake waterlines were practically straight as indicated in Figures 20 and 21. The wedges were spiked to the bottom to fend off drift. The length of stern rakes varied according to the intended service of the boat. Fast packets had long easy rakes and towboats had bluff, full shapes for additional buoyancy under the heavy engines." I hope this helps a bit. The above is all copyrighted by Bates but I have blanket permission from Alan to use his materials. Kurt .
- 133 replies
-
- 3
-
-
- chaperon
- model shipways
- (and 2 more)
-
Floyd: Gravity feed is great but meant for detail painting. If the size of the tug is larger than your usual paint jobs then check out the Badger 360. It's a double action brush that works as both a gravity feed and as a siphon feed. This is possible due to the front end of the brush being able to rotate 360 degrees. As a gravity feed the paint is put into the color cup with it facing up (duh..) and detail painting can be done w/o having the paint bottle attached to the airbrush. For larger areas or multiple parts where you want more paint the airbrush head is rotated so the color cup points downward and the paint bottle with adapter cap is inserted into the color cup. The 360 is my everyday brush. The 360 is very versatile and serves as two airbrushes in one package. I do use the 350 I mentioned the other day for large areas and have several other brushes for specialized work, but the 360 is what I recommend to those wanting one airbrush that will do detail and general coverage. Kurt https://usaairbrushsupply.com/products/360-1-universal-basic-set

- 133 replies
-
- 4
-
-
- alert class
- tugboat
- (and 1 more)
-
Sounds like a plan. Let us know if you solve the problem. Kurt
- 133 replies
-
- 3
-
-
- alert class
- tugboat
- (and 1 more)
-
Floyd: What pressure do you have from the compressor? If the brush blows air before connecting to the paint jar that tells you the air works - but you must have adequate pressure. 15-20 psi should be adequate. I don't remember what paint you are using. Is it thinned properly? Properly thinned paint with adequate air pressure should mean you get paint onto the model. Let me know what paint you are using and how much you are thinning it and what your air pressure is. It might need checking/repair by Badger - it will cost you shipping charges only unless you did internal damage that would require a new body. But let's try to solve your problem before resorting to going to the shop. Ron is right that you might want to use a different brush for doing the hull and larger surfaces. The link below to the Badger 350 is the best price you will see for this neat little single action brush. It's good enough that I used it for many years as my only brush and still use it today for larger surfaces. It is capable of laying down an award winning paint job. It will work much better for larger surfaces than the 150 which isn't meant for doing a model the size you are doing. https://usaairbrushsupply.com/products/350-1m-single-action-medium-head-airbrush
- 133 replies
-
- 4
-
-
- alert class
- tugboat
- (and 1 more)
-
Smoke damaged ship
kurtvd19 replied to Karen's topic in Painting, finishing and weathering products and techniques
I used Simple Green on a model that I think spent years in the engine room of the full size boat. Nothing was cleaning it and with the permission of the museum I tried the Simple Green. Applied with a swab and then wiped off with another and then rinsed with distilled water and dried. Came out great - and clean - and still looking good almost 20 years later. Kurt- 8 replies
-
- 13
-
-
Hello and welcome to MSW Kurt
-
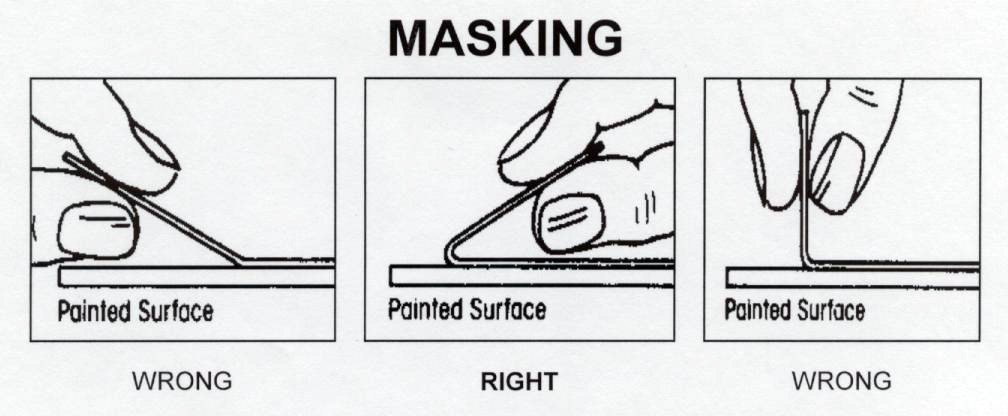
Floyd: Tamiya tape is good. I had been using 3M Fine Line tape - an automotive painting tape that is available at a lot of auto parts stores - as it leaves a very nice line and it doesn't lift underlying paint and it is very similar to the Tamiya stuff. However I recently started using FBS K-UTG Gold Crepe Masking Tape from Coast Airbrush (link below) as it out performs the 3M Fine Line and Tamiya tapes - in my opinion. It's not expensive and it is able to follow a curved line a bit better than the 3M tape. One tip for masking between colors. When masking off to do the next color burnish the tape down for good contact and then lightly spray the edge of the tape on the edge where the next color is to go with the underlying first color. This way, if anything is going to creep under the tape it will be the exact color of the first paint. Let it dry and then paint the second color. remove the tape and you will have a very clean straight edge w/o any creep of the 2nd color over the first. Don't spay against the tape edge either with the first color or the second so paint doesn't build up against the tape's edge. Try to spray at a right angle to the surface of the tape to minimize buildup. And when removing the masking tape pull it back over itself rather than straight up to minimize the risk of lifting the underlying paint - per the sketch. http://www.coastairbrush.com/proddetail.asp?prod=FBS_K-UTG_Gold_Crepe_Masking_Tape
- 133 replies
-
- 10
-
-
- alert class
- tugboat
- (and 1 more)
-
Welcome to Model Ship World Kurt
-
Welcome to MSW
-
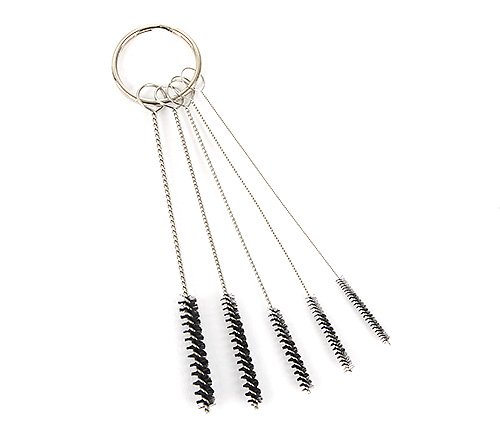
I wasn't aware that they are not metal. There are several sources of wire airbrush cleaning brushes and I assumed they were wire. I just went to the Lee Valley site and saw these after a search for airbrush cleaning brushes. I am familiar with this type of brush and the bristles are safe but I would be very careful that the ends of the twisted wire do not contact the airbrush interior as the ends can scratch the brass. I have some that are similar - longer bristles - and the ends are formed into a rounded end. Actually they are made by twisting from the bristle part of the brush with the wire doubled over and twisting back to the straight -non bristle - part of the brush that slips into a handle that can be used with several sizes of the brushes. Kurt
- 133 replies
-
- 4
-
-
- alert class
- tugboat
- (and 1 more)
-
Floyd: Don't use the wire brushes sold as airbrush cleaning tools. The interior of the brush is very soft brass and can be scratched. This is official Badger opinion, not just my personal opinion. Badger makes a neat little cleaning kit - it does not contain wire brushes. The link to a decent review of the kit is below - I recommend you watch it for tips on cleaning the brush. The kit's got everything you need but you probably already have most of what is provided in the kit. The other link (dons airbrushing tips) is to one about general tips - good site - note he does use a brush but it's a dental brush and the fibers are nylon (or a similar product - not wire). The other link is to the Badger 150 manual - with cleaning instructions specific to the 150. I always follow up a cleaning with lacquer thinner sprayed through the brush. I keep a small jar with an eyedropper to put just a bit of the thinner into the cup - I tend to use gravity feed brushes a lot - but just turn the 150 upside down and drop the thinner into the suction tube. My cleaning procedure between colors - get the excess paint out of the gun - spray into a rag or cleaning jar. Use a doubled over pipe cleaner to clean paint out of the siphon tube. Use a dry section first then a section wet with cleaner. Spray cleaner through the brush till the brush sprays clear. Remove the needle and wipe it clean and reinsert the needle. Clean the tip of the regulator with a swab moistened with cleaner. Spray the next color. At the end of the day do all of the above then disassemble the front end. The regulator's tip needs to be clean both inside and out. Use the tip of a swab or other soft material - not a wire brush. The tip is tiny - don't drop it - make sure it is clean inside and out - again a thin tapered swab or nylon brush - do not force anything as this piece is delicate and if you spread or split the tip's opening it needs to be replaced. The head needs to be clean inside and out - same procedures as for the tip and regulator. Reassemble the regulator, tip and head back onto the airbrush. You might want to use some beeswax on the threads here to avoid air leakage - DO NOT over tighten. If there is air leakage use the beeswax. Reinsert the needle and spray some lacquer thinner through the brush and set aside till the next session. Skip these procedures and you will need to disassemble and do a heavy cleaning. Full disclosure, I work with Badger and they send me around to teach/demonstrate airbrushing. I developed Badger's Marine Pains for them. Kurt https://sites.google.com/site/donsairbrushtips/cleaning http://www.badgerairbrush.com/PDF/150 Badger New.pdf
- 133 replies
-
- 3
-
-
- alert class
- tugboat
- (and 1 more)
-
Welcome to MSW. Great first effort. Therapy with good results. Keep it up. Kurt
-
I know they are but I am not prepared to pay the price. I have found some good turnbuckles for sale that have worked for several builds. Kurt 😀
-
Actually you only need to use right hand threads unless you are pass out magnification for those viewing the model. Tap the body for the screw size - both right hand. Insert the screws and adjust close to the finished size with the top screw a bit longer. Now attach the wire lines and snug them up as best you can before using the turnbuckle adjustment. Now, using the top screw of the turnbuckle tighten the line to its final tightness. After all the wire rigging is secure use locktite to make sure the lines don't loosen up. Now this might not satisfy some but I defy anybody to tell the difference between right and left hand threads once the model is cased. On smaller scales I have made turnbuckles w/o threaded adjustment screws - just eye bolt type ends and soldered the bottom piece and used C/A on the upper after pulling the rigging tight - takes a third hand - that's the extent of Mary's modeling - applying the C/A as needed. Kurt
- 878 replies
-
- 10
-
-
Look at jewelry beading wire. It is available in stranded SS. I rigged a 1/12 scale sloop with 0.014-inch 21 strand wire. It says "knot tying SS" It is nylon coated but it is impossible to tell w/o magnification. And I used crimps for the connections. I found this stuff to be able to be tightened and then crimped but I used working turnbuckles to make final adjustments. Kurt
- 878 replies
-
- 11
-
-
Northwest Short Line Chopper?
kurtvd19 replied to asimon's topic in Modeling tools and Workshop Equipment
I have had one for years and it works fine for basswood and the like. Not so good on boxwood. And the thinner the wood the better so that the cut stays square to the table - when it gets too thick the cut will tend to bend in our out somewhat. But it can chop thin planking woods all day - and maybe somebody else has experience with boxwood and the stuff I was cutting wasn't very thin. I tend to use my Preac saw for the thicket hard woods. Kurt -
Creating Brass Blister Detail
kurtvd19 replied to P_Budzik's topic in Metal Work, Soldering and Metal Fittings
Paul: Thanks for sharing this technique. One of the hardest things I had to learn over the years was how to think of the machining that might be required to make a pert. This video shows that starting with a round piece can produce an elongated shape rather than thinking you need to start with a piece of flat or bar stock. I find your videos very educational and they have helped me a lot. Kurt -
DIGITAL BACK ISSUES AND BOOKS Ships in Scale Magazine back issues are finally available. We have just added the digital archive issues of Seaway’s Ships in Scale Magazine to the NRG Store, on both disc and flash drive. These back issues are named “The Early Years 1983-1999” and “The Middle Years 2000-2009”. These were sold by Seaways as “The First 105 Issues 1983-199” and “The New Millennium Edition 2000-2009” respectively. The digital archives of the years from 2010 to 2018, when the magazine ceased publication, will hopefully be available before the end of the year. We have also added the complete series of digital back issues of Model Ship Builder Magazine on disc or flash drive. Seaways sold these digital back issues as Volume I, Volume II and the combined “The Complete History”. We have decided to offer only “The Complete History” which includes both Vol. I & II. We are now also offering popular practicum reprints by Clayton E. Feldmann, MD. The first, “Building the Continental Navy Brig LEXINGTON – A Practicum” is now available. The classic “Progressive Scratch Building in Ship Modeling” is also available. Both are sold on disc or flash drive We now have all the digital archive back issues of the Nautical Research Journal available at the NRG Store on either CD/DVD and flash drives. Go to the NRG Store https://www.thenrg.org/the-nrg-store.php to order - or use the link on the MSW home page (upper right corner). Remember, full NRG Members get a 20% discount on the price shown. Email the NRG Office at nrghomeoffice@gmail.com with your name and town to get the discount code (you would be surprised how many NRG members share names so we need to be able to tell you apart).
-
- 3
-
-
Best & Strongest wood glues.
kurtvd19 replied to irishrover1970's topic in Modeling tools and Workshop Equipment
Titebond Translucent has essentially the same properties as their Original, II and III glues with shear strength right between the original and II at 3,550 psi - more than adequate for model purposes. The original, II and II strengths are all stronger than the wood once the joint is cured - meaning that the wood should fail before the glue. Of course the tightness of the joint as others have mentioned is very important. But from a strength aspect these is hardly any difference between the glues. I suspect the joint itself was the issue not the glue. Titebond has very extensive use/application and properties descriptions on their website. Kurt -
The Nautical Research Journal / Model Ship World Spring Issue (64.1) is live and digital subscribers can now access the new issue. The print copy will be mailed on or about March 13. New subscriptions/memberships can be added at any time. Sign up for the digital edition - save postage and get your copy before the print copies are even mailed. See a sample digital edition at the NRG web site https://www.thenrg.org/digital-edition.php

-
- 5
-
-
Bruce: Congratulations. Very nicely done. Kurt
-
If you are a NRG member but don't remember your member number email Mary at the office and provide your real name and she will send you your member number. Email her at nrghomeoffice@gmail.com