kurtvd19
-
Posts
3,048 -
Joined
-
Last visited
Content Type
Profiles
Forums
Gallery
Events
Everything posted by kurtvd19
-
Larry: Just don't fall into the "Research Trap" where you never get around to building the model while you search for that last definitive piece of information. At some point you have to say "time to build". Kurt
-
Welcome to MSW Larry. As you already know this place can be a fountain of information - even on riverboats! BTW I found some info on steamboat hull measurements that I will send you later today. Kurt
-
 Come to the Conference in October and he will sell it to you there and autograph it. Kurt
 -
I don't remember exactly but it was a temporary tie up when the photo was taken. I wound up machining 4 for the model from brass. Kurt
-
2018 NRG CONFERENCE - REGISTRATION OPEN
kurtvd19 replied to kurtvd19's topic in NAUTICAL RESEARCH GUILD - News & Information
Peter: It was determined long ago based on the experience with some of our Directors involvement in a big west coast event over several years when they did this and attendance dropped off substantially with people spending a few $$ to view in their home rather than attending. This hurt the attendance enough that the event was losing money. It is very expensive to do a good job of recording live events and they were not able to recoup their recording costs with the sales of the recordings. Probably because those who stayed home intending to buy the recordings never got around to it. With that experience, with the same audience (ship modelers) as we have had over the years it was decided not to do this for the reasons above. However, the board is looking at something like this down the road now with MSW being part of the NRG. The NRG membership pays for what the NRG is able to do and we need to increase the number of NRG members significantly in order to have the capital to do things like this. If 10% of the current MSW members were to join the NRG we would be much better able to do this type of activity. We have some things in the works to make membership more attractive so hopefully the numbers will go up and we can consider your suggestion again in the future. Kurt- 19 replies
-
- 4
-

-
- nrg
- conference
- (and 2 more)
-
2018 NRG CONFERENCE - REGISTRATION OPEN
kurtvd19 replied to kurtvd19's topic in NAUTICAL RESEARCH GUILD - News & Information
Jim: The banquet is the concluding event of the conference on Saturday evening. I will get something added to say that it's on Saturday evening. One of those things that I guess we just assumed everybody knew. Thanks for pointing this out for us so we can correct it. Kurt- 19 replies
-
- 1
-
-
- nrg
- conference
- (and 2 more)
-
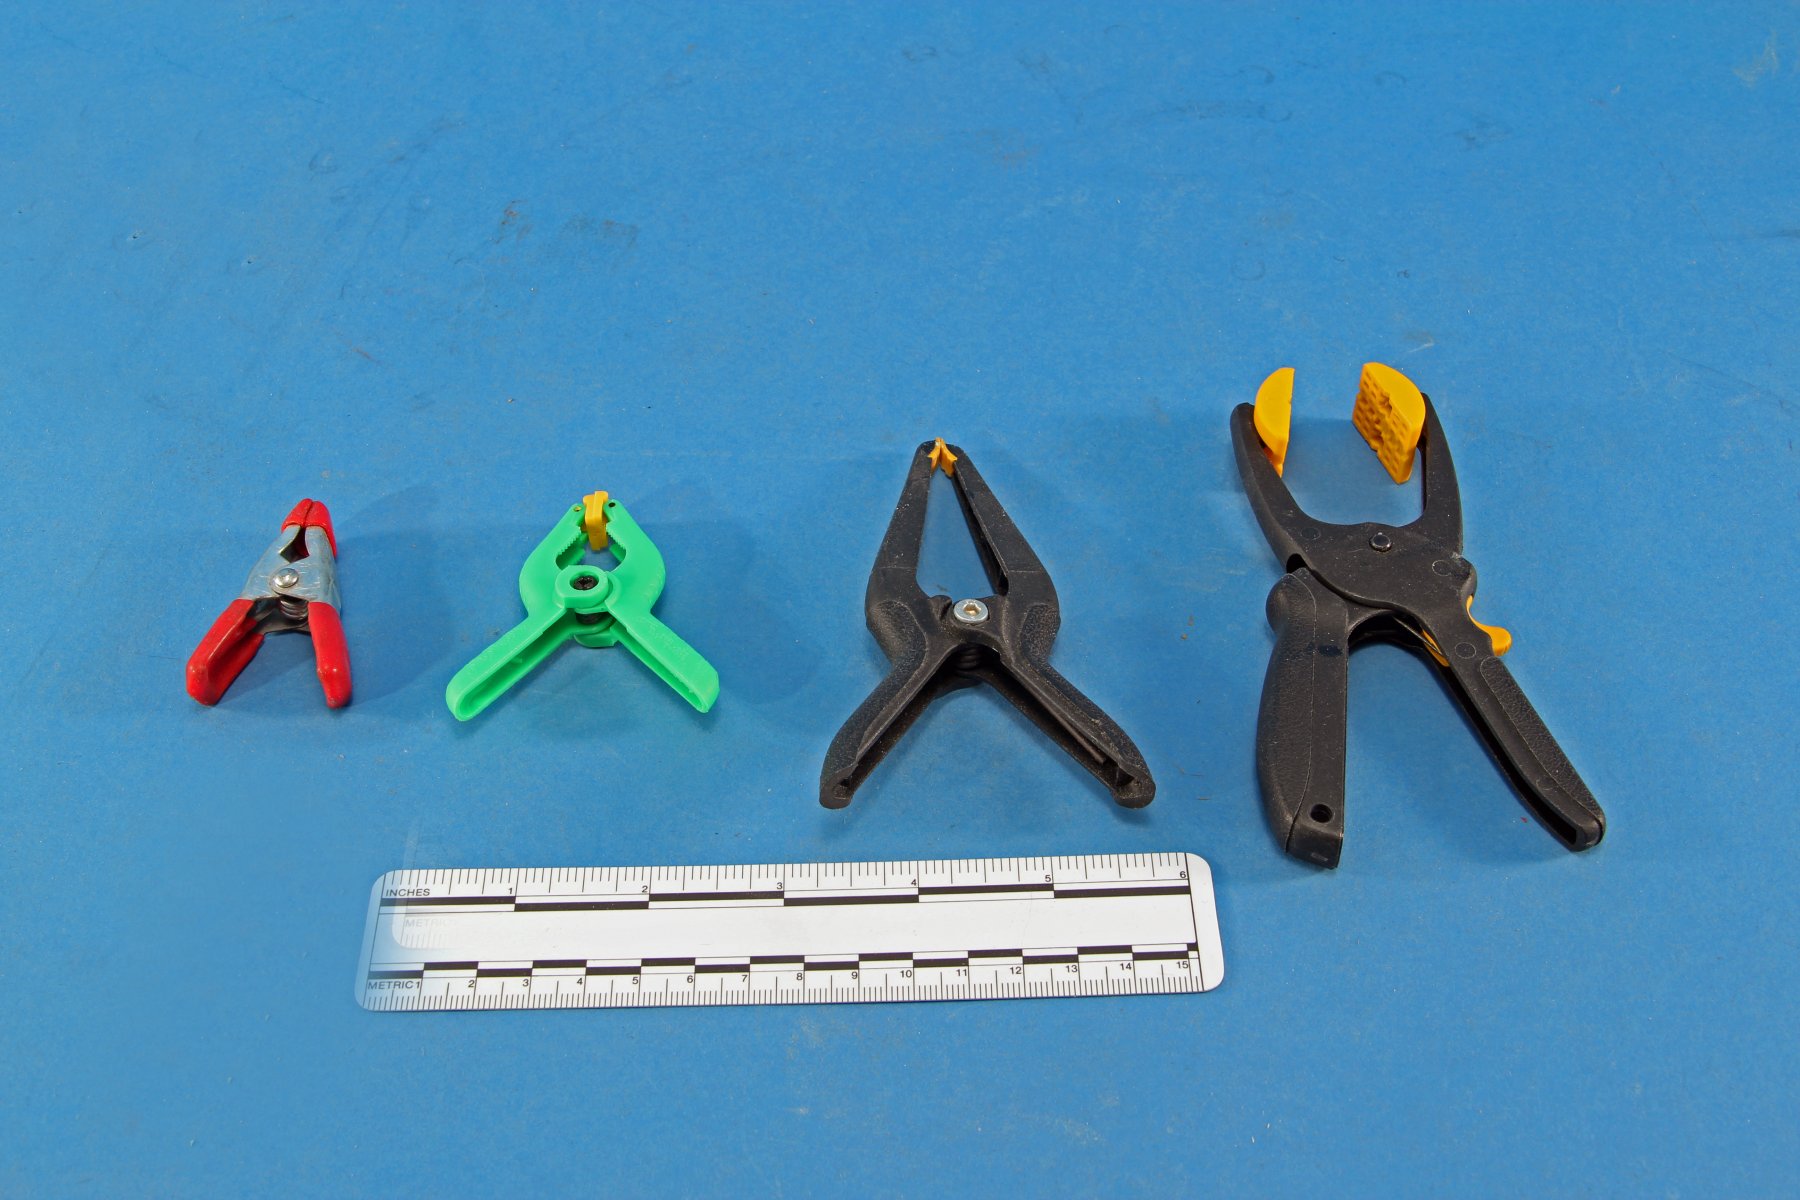
I agree completely - WAY overpriced for everything they sell - nice but unless I hit the lottery big (very hard to do when I don't buy tickets) I will probably never buy one of their tools. Kurt
-
Ron: Look in MicroMark's catalog. Also Harbor Freight, Lowes, Home Depot and Menards carry the clamps. All of the clamps in the photo can be bought at any of these places - not sure if the small metal clamps at the left are available from MicroMark though. Kurt

-
Ken: Dry in Vietnam? Hot and humid - about 115% humidity all over SE Asia and then there is the monsoon season. There were times I'd have killed for a dry breeze. Glad the model is traveling well. Kurt
-
Travel safe Ken. Kurt
-
It sounds like the paint is pretty thick if you can see the primer under the paint and it isn't bleed. The fix is to either remove all the paint and redo it or mask next to the line making the line a bit wider and then don't prime but add a layer of paint out to the tape. Remove the tape and the previous edge should be hidden by the paint. I think removal and starting over might make a better job of it. Also, it sounds like the tape was pretty thick to allow a build up of primer and paint so the edge is able to be seen. Never use hardware store masking tape - it is too sticky and the edges are not straight and smooth and it's real thick. Use a good automotive or hobby masking tape. Tamiya tape is good as is 3M Fine Line tape. I have switched to FBS K-UTG Gold Crepe masking tape from Coast Airbrush (link below). It is a very thin tape that isn't too sticky - sticky tape can lift underlying paints - and conforms well. The thin tape doesn't let paint build up alongside it. https://www.coastairbrush.com/proddetail.asp?prod=FBS_K-UTG_Gold_Crepe_Masking_Tape Hope this helps Kurt
-
Rob: That book by Lankford is good and useful. Also look at Planking the Built-up Ship Model Jim Roberts (MSB113) at Model Expo. Both books are must haves for beginners. I can't recommend Model Expo's paints - very thick and the only paint that I have never been able to use in an airbrush - you can't thin the pigment size down. Contact me at my regular email about paints. Look at the various build logs here on the Bluenose to guide you as you go. Also download the instruction book for it now and look it over. Kurt
-
No you do not - you are asking on behalf of fellow European modelers not MSW. As long as you do not make reference to MSW wanting them to be distributors you don't need permission of any sort. Kurt
- 216 replies
-
- 5
-
-
- masterkorabel
- ships
- (and 3 more)
-
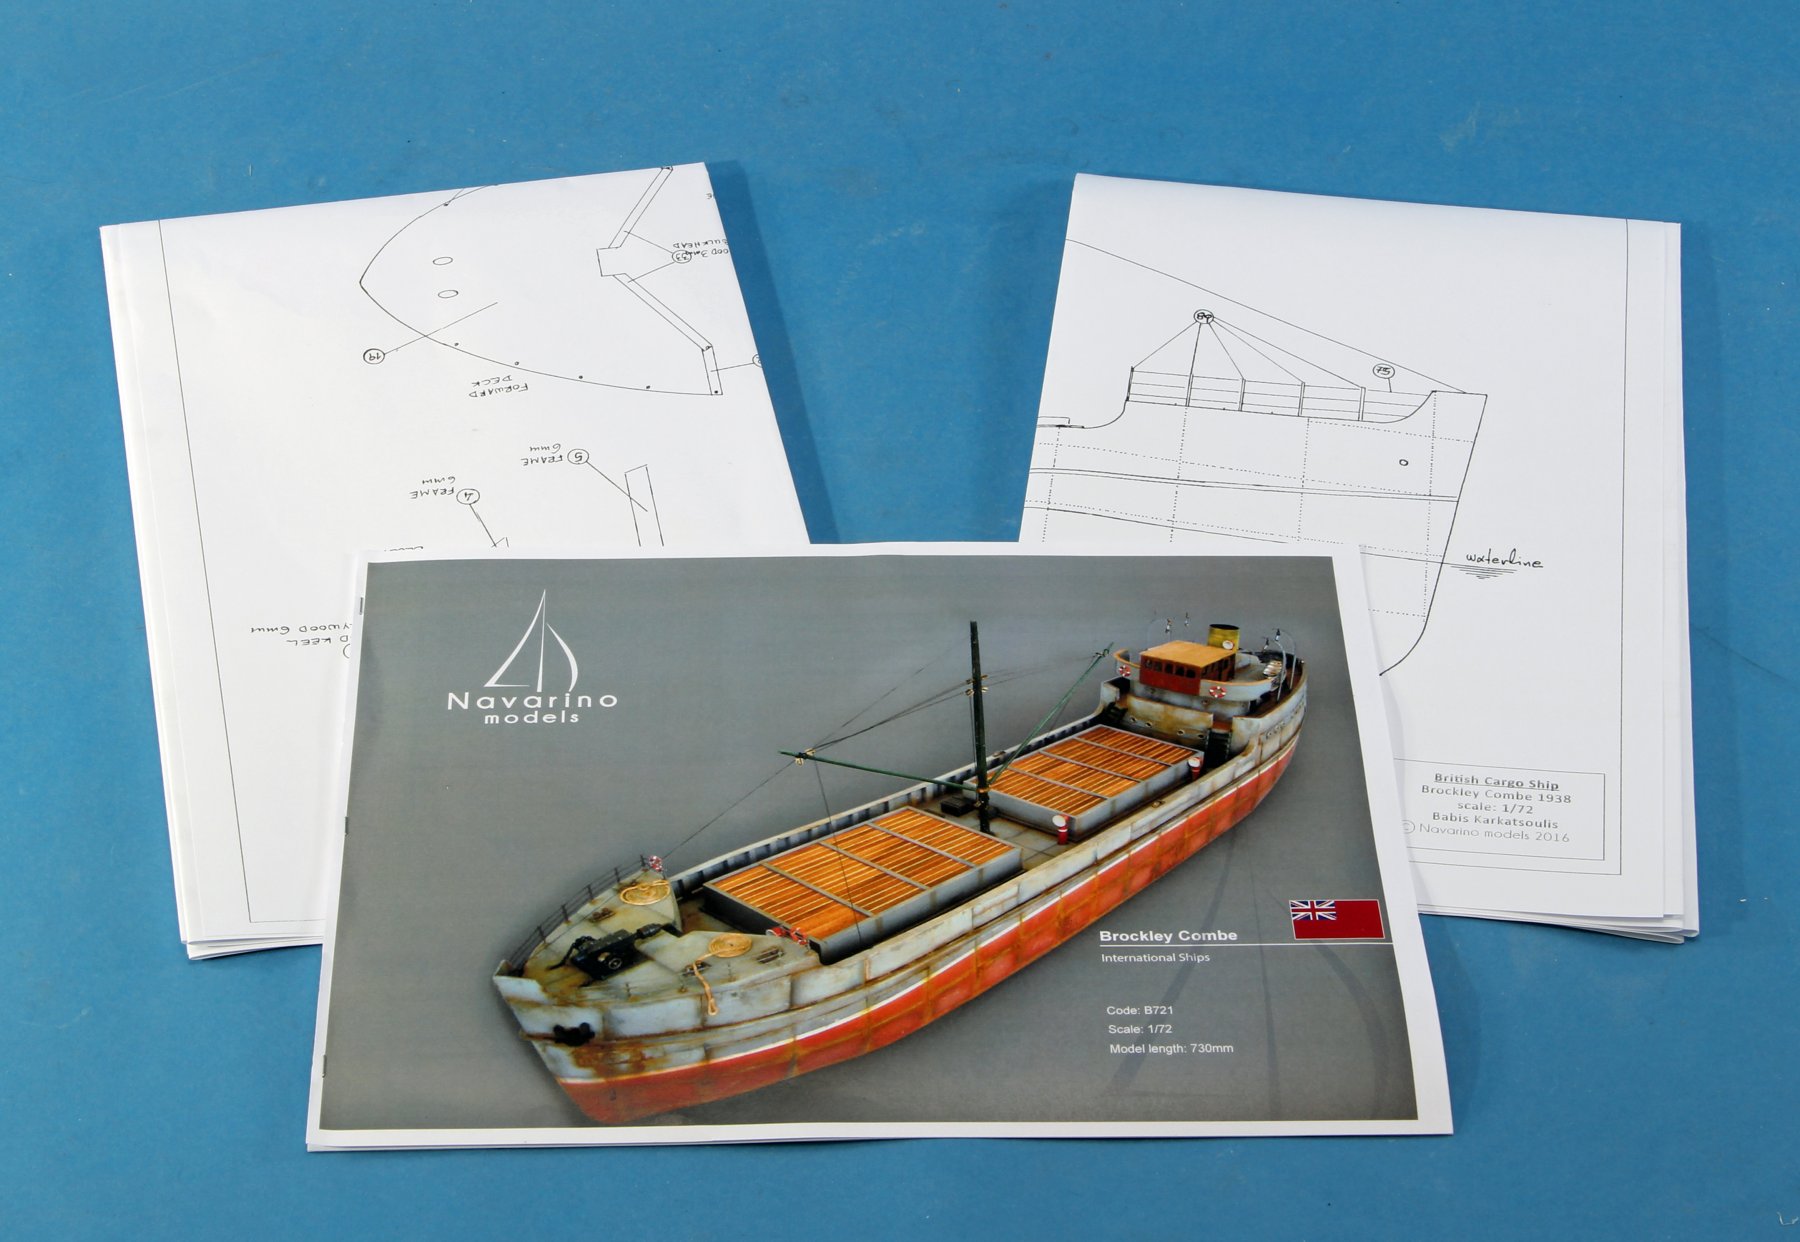
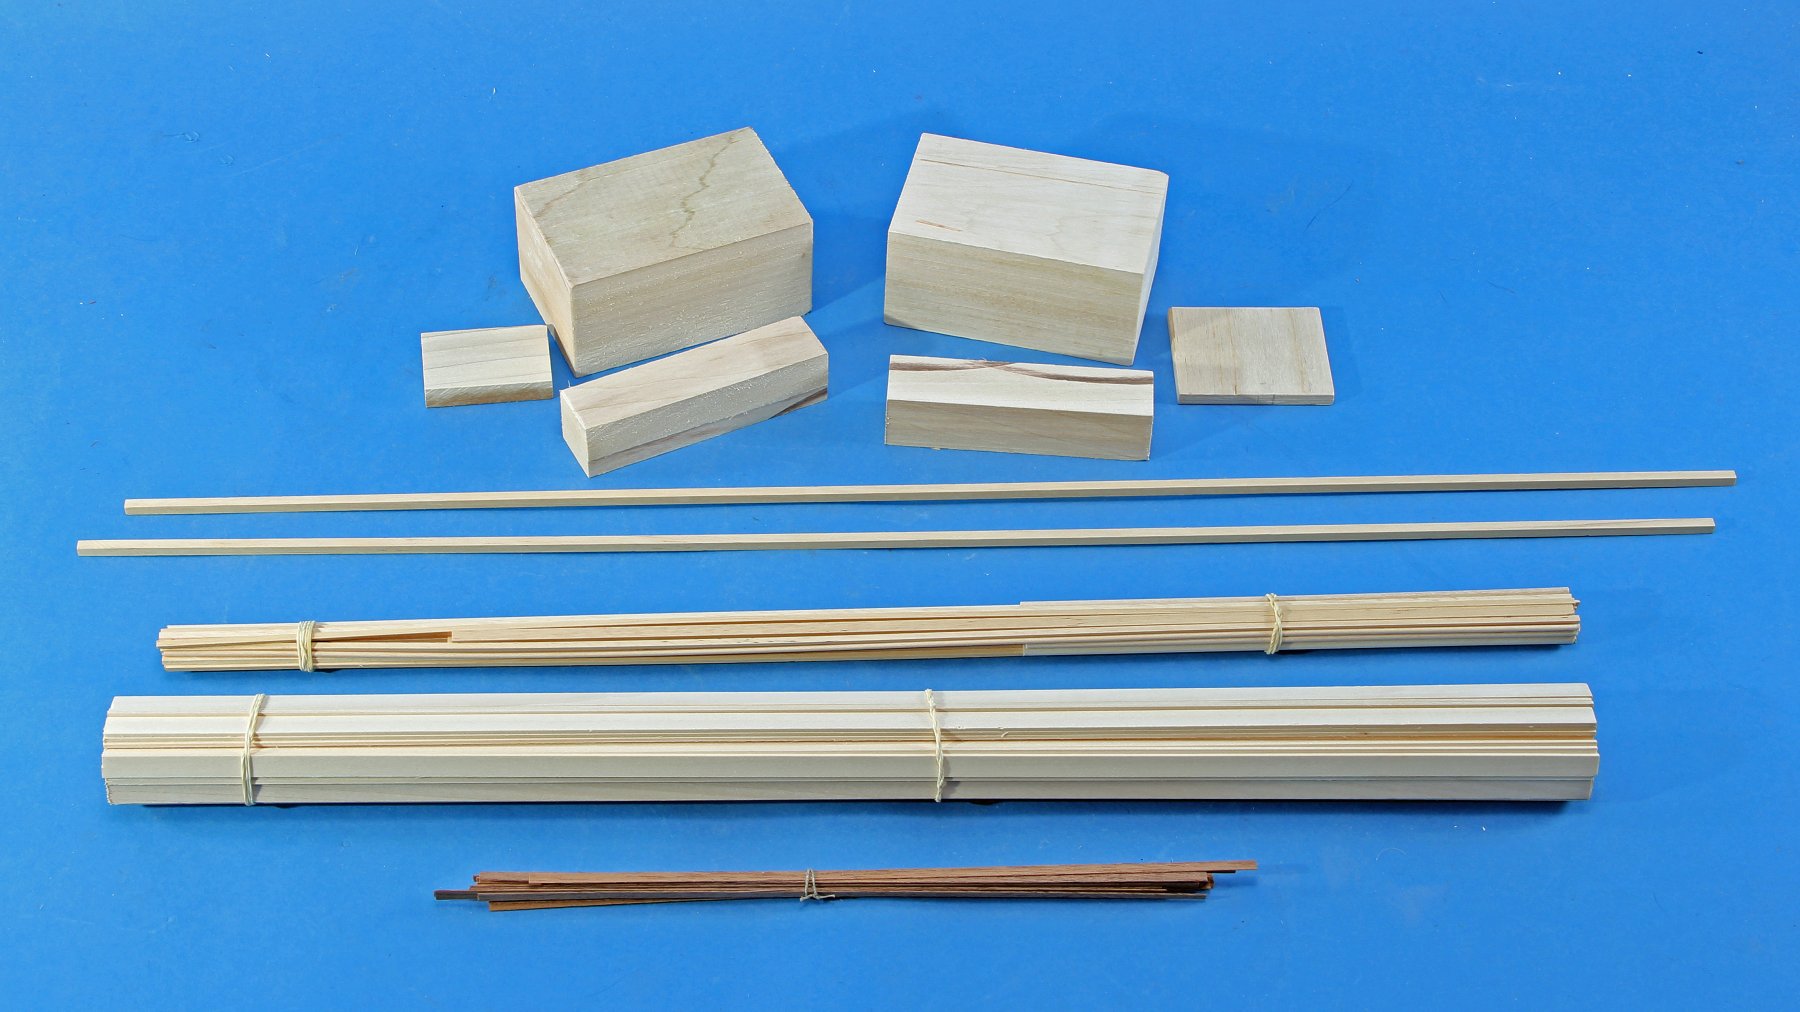
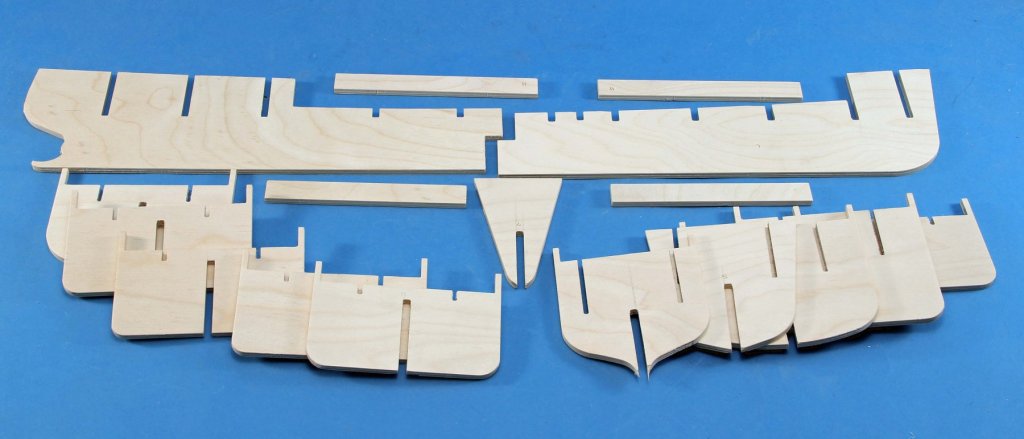
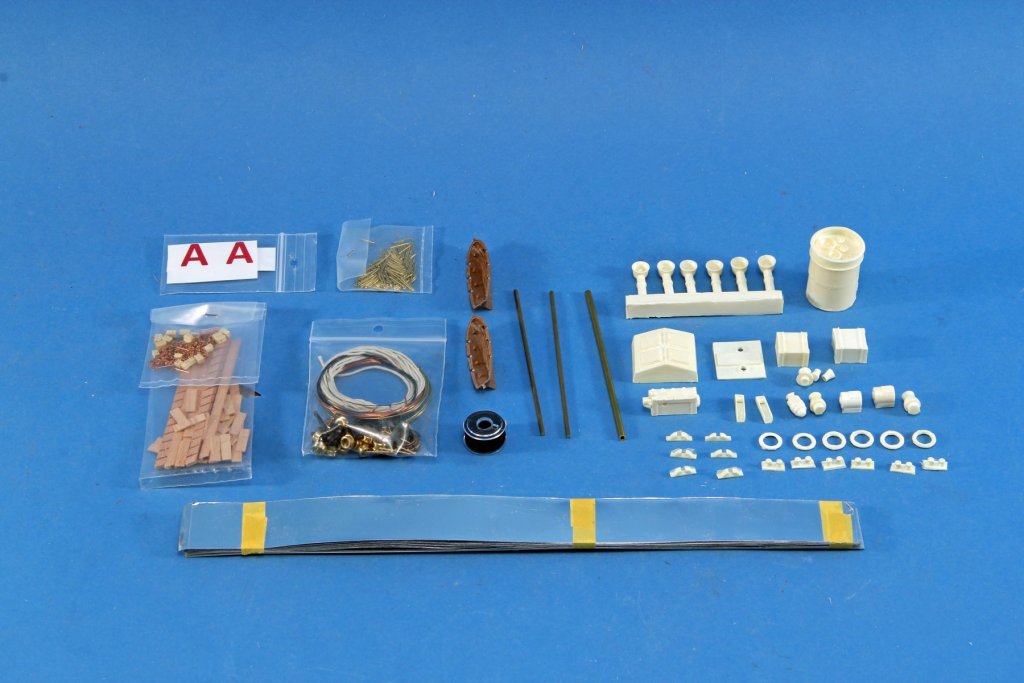
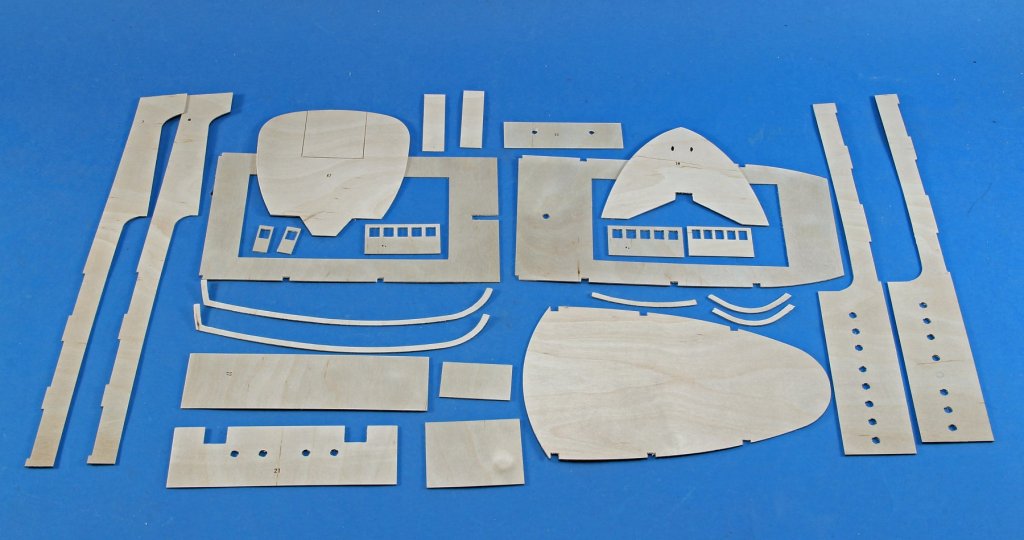
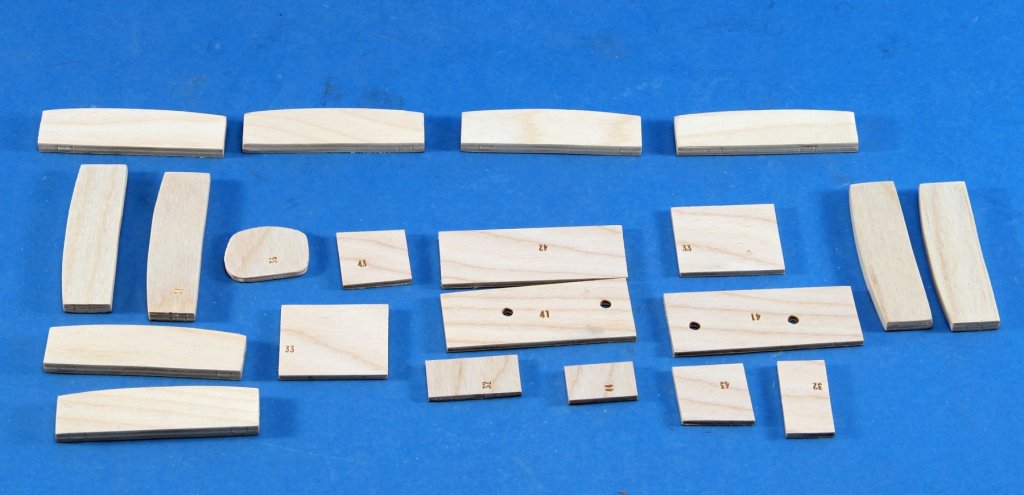
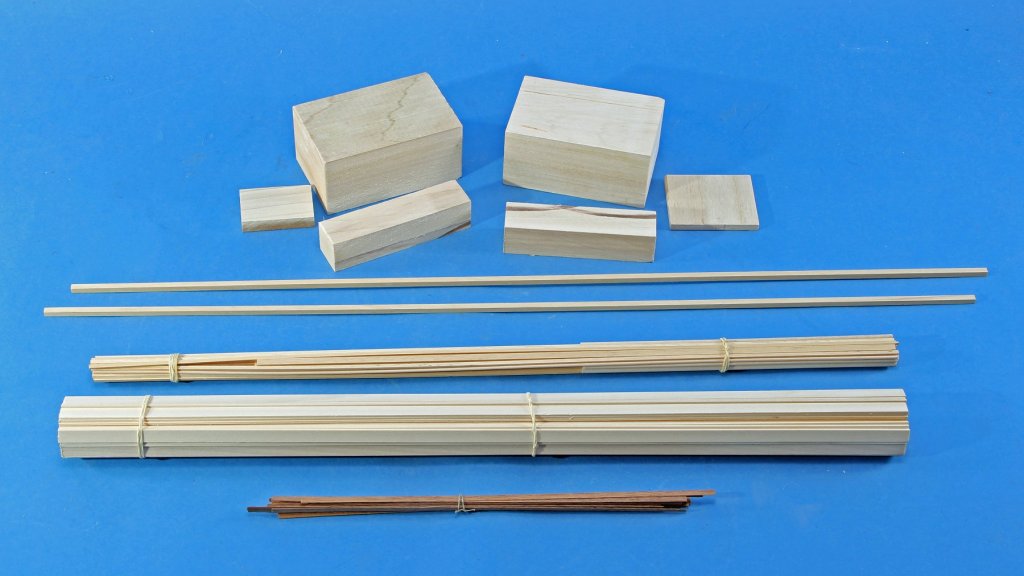
Navarino Models - 1/72 scale - Brockley Combe - 1938 British Cargo Ship The Brockley Combe was a small (171’ x 29’ x 13’) British cargo ship built in 1938 by the shipyard Charles Hill & Sons of Bristol City. It ran aground on May 12, 1953 in the Channel Islands and broke in two, with no loss of life. Charles Hill and Sons was originally Hillhouse and Company, established in 1772 with several name changes until Charles Hill took control in 1845 and named the company Charles Hill and Sons. Charles Hill and Sons went out of business in 1977 with approximately 560 ships built and over 2,000 repaired in their yards over their 205 years. The 1/72 scale model kit by Navarino Models of Athens, Greece builds into a model that is 29” long by 4 7/16” in beam. There are two sheets of full size plans and a six page instruction manual with twenty full color photographs to supplement the instructions. The kit is plank on bulkhead style with a two-part false keel and 11 frames of very good quality five-ply plywood, 0.242” (6mm) thick. The deck, bulwark, roofs and cabin sides are cut from 3/64” (1mm) three-ply plywood. There is also a bag of 21 plywood parts of various thicknesses of three-ply and five-ply. I did not observe a single void between the plies of any of the plywood parts. All of the wood appears to have been CNC routed rather than laser cut as the edges are char free and very smooth. The bulkheads fit to the false keel piece very snugly and being CNC cut there is no angle to the cut like with laser cutting. I dry fit all 11 bulkheads in place without any fit issues. Solid blocks of basswood are supplied for the bow and stern blocks that are carved to the shape of the hull to be planked over. There are also 20 pieces of 0.006” thick aluminum sheet pre-cut into 1” strips for the hull plating. Planking material is 1/16” (1.5mm) x 5/16” (8mm) basswood. The deck planking is 0.021” (0.6mm) x 0.081” (0.2mm) of an unidentified dark wood. Various other sizes of basswood strip are also supplied for the hatch covers. There are a number of very well cast resin parts with very little flash and no pinholes that I noticed. Brass stanchions, brass tube and rod, rigging line, eyebolts, brass wire, anchor chain, cast metal anchors, 3 blade nylon prop and eight each of 3mm and 5mm single and double blocks make up the misc. pieces. There are also British flag and ship’s name decals provided. The instructions are very brief and without the twenty photographs provided would not be adequate for a beginner. Prior plank on bulkhead construction experience will definitely be an advantage. Anybody with just a bit of experience should be able to build this model without a problem. I am looking forward to seeing just how the aluminum hull plating material will conform to the hull. Rivets are absolutely needed at this scale and the instruction photos show a good representation of rivets on the built up model. I plan to use a rivet press by North West Short Line but there are a lot of sources now for rivet heads for those without a rivet press. The photographs and plans show the placement of all of the supplied components of this vintage cargo ship, but supplemental research materials will be needed to make it an accurately detailed model. The supplied kit parts and instructions will provide a nice but not highly detailed model and like all kits can be upgraded with additional details to the builder’s level of detail with some additional research and some scratch building. I think that small cargo ships are underrepresented as a modeling subject and I think this kit is a good representation of a classic design. Review previously published in the Nautical Research Journal Issue 62.4 (Winter 2017)

- 1 reply
-
- 7
-
-
Eric: I agree with Michael on this and it makes a lot more sense that this would have been the way it was done rather than a joint - it would be the strongest way to do it. Kurt
- 599 replies
-
- 3
-
-
- sidewheeler
- arabia
- (and 4 more)
-
Elijah: Next time you come to a meeting bring the compressor and airbrush back so I can trouble shoot the combo. Maybe the brush needs disassembly and a deep cleaning. I will go over it thoroughly and make sure it's working properly before you try to use it again. I won't be able to do the night of the meeting though. Kurt
- 228 replies
-
- 4
-
-
- gunboat
- model shipways
- (and 1 more)
-
Elijah: Looks great. Did you get the airbrush working OK? I'm guessing you did... Kurt
- 228 replies
-
- 4
-
-
- gunboat
- model shipways
- (and 1 more)
-
Requesting feedback for future MSW Group Projects
kurtvd19 replied to Chuck's topic in Group Projects on Model Ship World
Carl: There is a small fishing boat - the NRG's Generic Sharpie that fits the bill for a simple small craft. 200+ page monograph to guide the builder. The author did the monograph for the builder with minimal tools noted. All materials are standard sizes - no need for custom milling. Only one build going right now but you can see the info on either link below - the review of the initial announcement. Kurt -
2018 NRG CONFERENCE - REGISTRATION OPEN
kurtvd19 replied to kurtvd19's topic in NAUTICAL RESEARCH GUILD - News & Information
Yes, the vendor and model room is open to the public.- 19 replies
-
- 1
-
-
- nrg
- conference
- (and 2 more)
-
Requesting feedback for future MSW Group Projects
kurtvd19 replied to Chuck's topic in Group Projects on Model Ship World
I found the source for the plans - right in my office in fact. The plans used for the model were the same plans used for the museum boat at the Camp River duBois at Hartford, IL. There was an article in the March 1993 issue of the Nautical Research Journal - Keelboat, Pirogue, and Canoe: Vessels Used by the Lewis and Clark Corps of Discovery by Richard C. Boss = pages 68-87. Incidentally the article is available at the NRG store as a downloadable pdf for $2.50. The article and plans can certainly be used to develop a set of model building plans. Kurt Link to museum site http://www.campdubois.com/ -
Requesting feedback for future MSW Group Projects
kurtvd19 replied to Chuck's topic in Group Projects on Model Ship World
Eric: Do you know what they did for plans of the replica barge in the museum in IL where the expedition spent the winter? I saw the barge before it and the museum were complete and it was very interesting. A guy did a scratch model of this barge and took a gold medal last year at Manitowoc with it. I will contact him about what he used for plans. Kurt -
Requesting feedback for future MSW Group Projects
kurtvd19 replied to Chuck's topic in Group Projects on Model Ship World
I might mention that the Generic Sharpie has plans and a 200+ page instruction manual (a free download). There is currently one build log. Kurt -
Toni: I heat my Sparex in a small crock pot that I got from the thrift store. You do not want to boil Sparex and the crock pot doen's get that hot. If you want to try the heated Sparex I have an extra crock pot you can pick up next time you are here. It does work better when it's heated. Kurt
-
Here is the corrected part of page 6 - cropped from the full sheet - with the notches added to the starboard side of the forward frame. This addendum will be included with all plan sets currently on hand. When new sets are printed it will not be required. Kurt GALLEY - PAGE 6 - Corrected Frame 6.pdf
- 504 replies
-
- 3
-
-
- washington
- galley
- (and 1 more)