kurtvd19
-
Posts
3,048 -
Joined
-
Last visited
Content Type
Profiles
Forums
Gallery
Events
Everything posted by kurtvd19
-
 Every boat I have been on (fresh water guy - they are all boats) the compensator balls were red and green. On one tug they were labeled with white paint, the appropriate Port or Starboard. I think it was a joke that remained for years. I built a model of that tug for the owner and was very tempted to label the balls on the model's binnacle like the prototype's. Kurt
 -
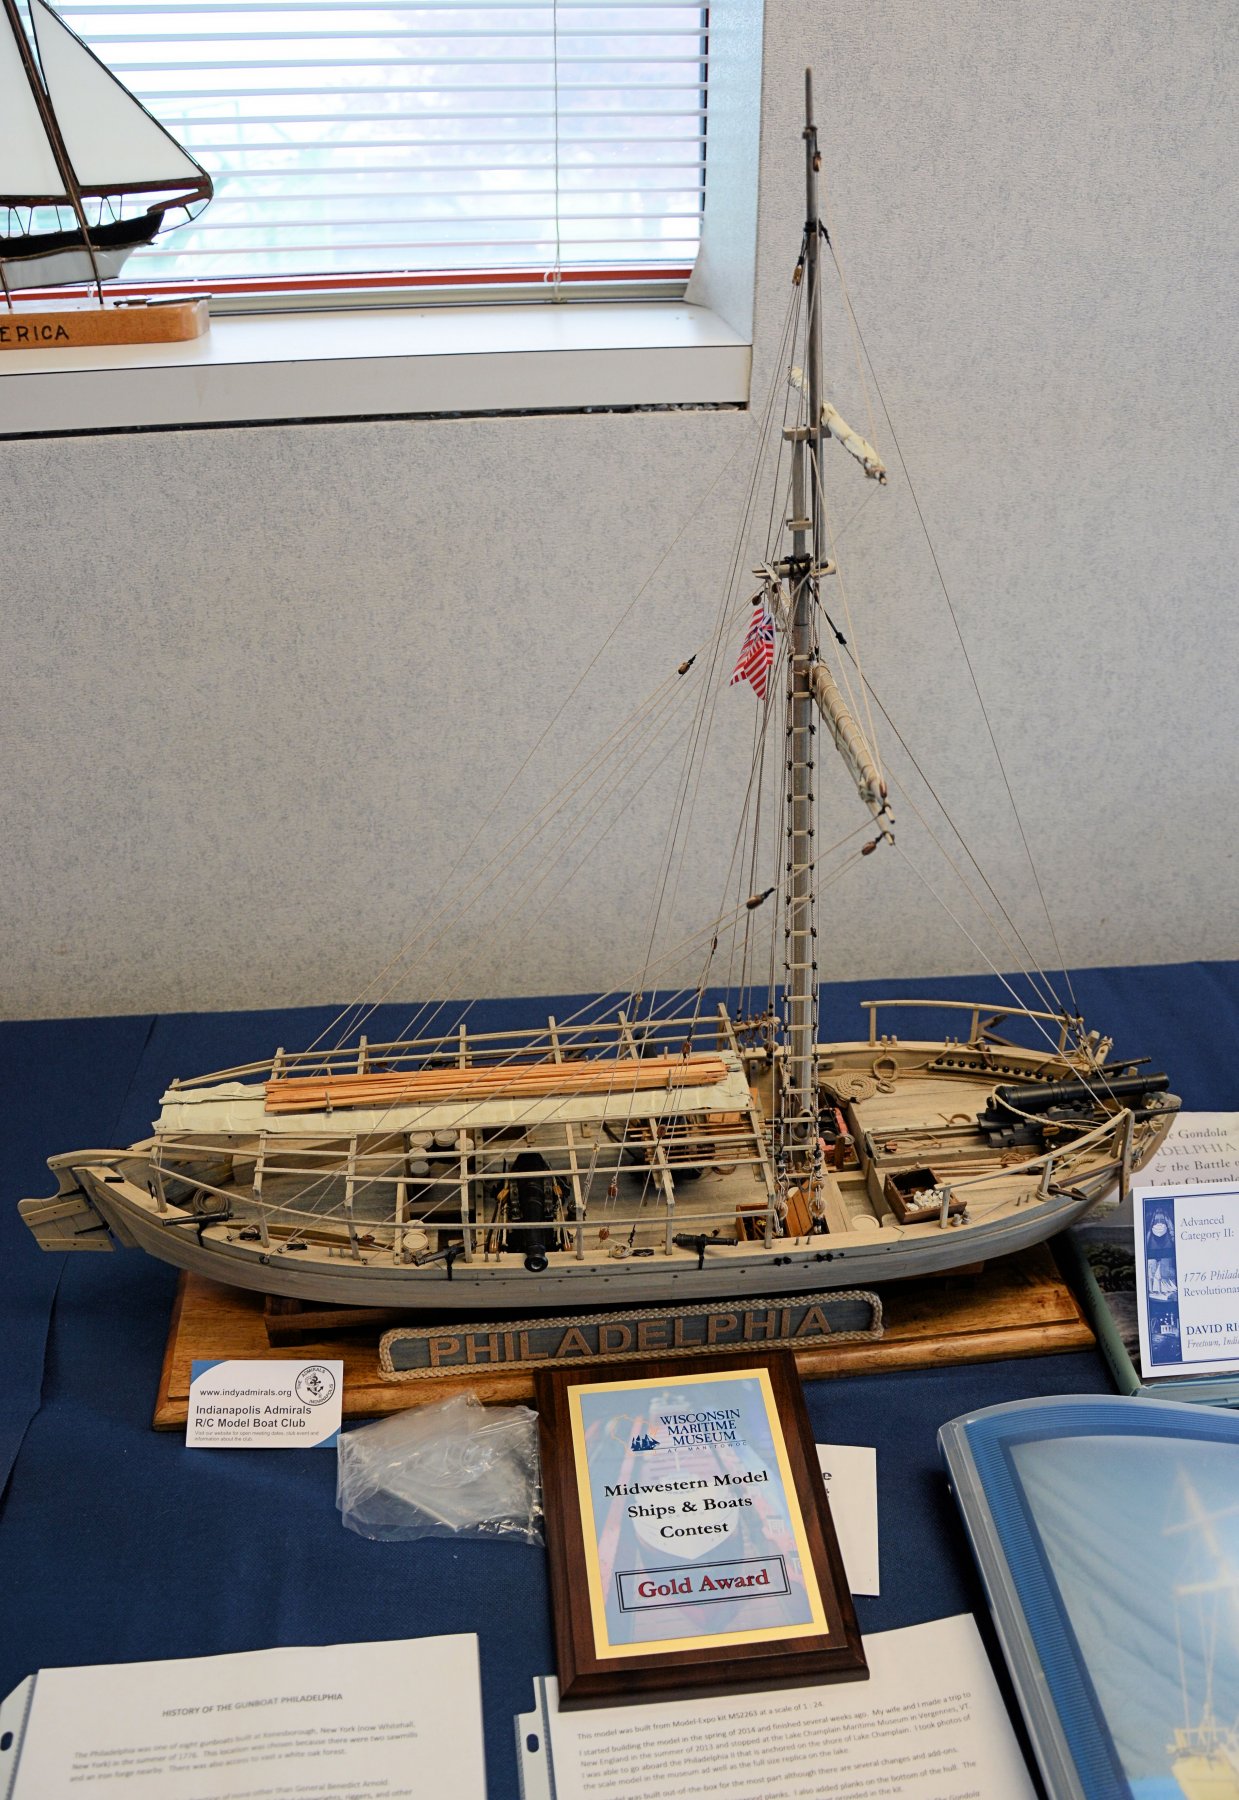
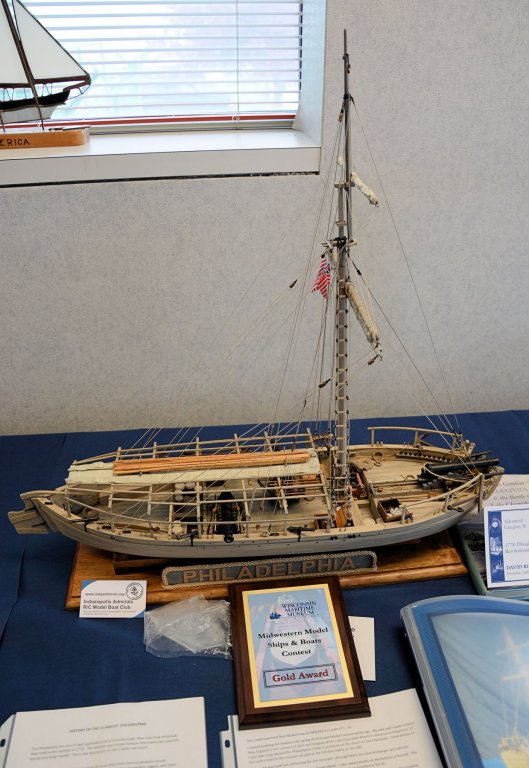
Bruce: Here are two photos of the model by Sam Parent of MN from the 2015 contest at the WI Maritime Museum. This model won best of show in addition to a gold medal and best novice model. It was Sam's first ship model. There are a lot of great details added to Sam's model. He made the bricks for the stove of the same material I used in the magazine series but used the basswood laser cut form that the wood "bricks"were cut out of - filled with the clay, baked and pushed out of the form. A lot easier than the method I used and much more uniform. Glad the articles are helping. Kurt
- 67 replies
-
- 2
-

-
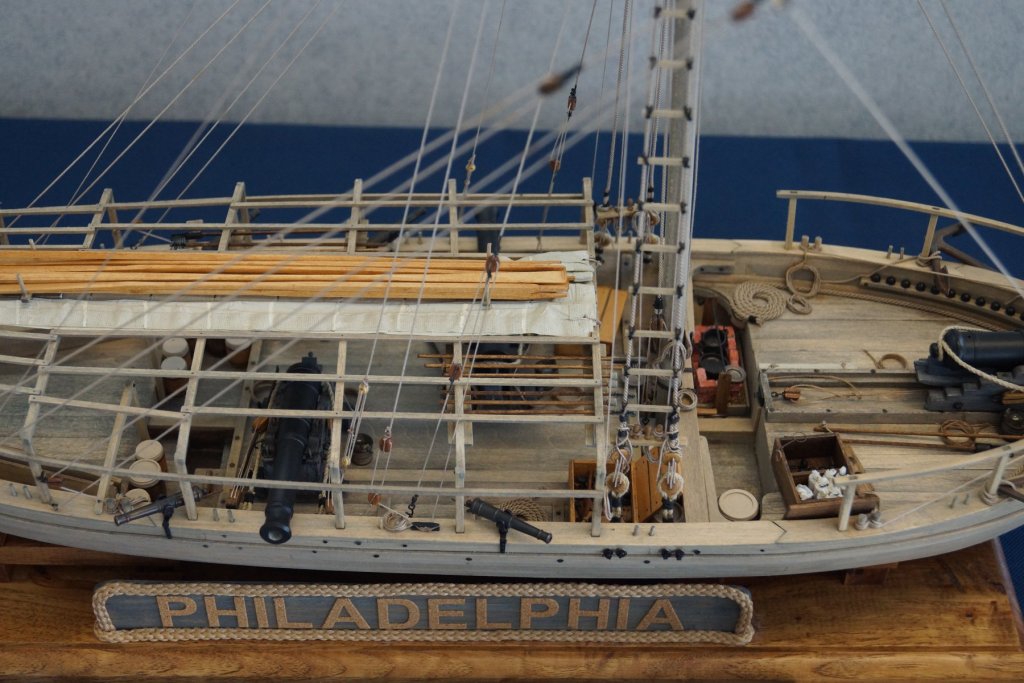
- philadelphia
- model shipways
- (and 1 more)
-
What brand of #11 blades do you use
kurtvd19 replied to bigcreekdad's topic in Modeling tools and Workshop Equipment
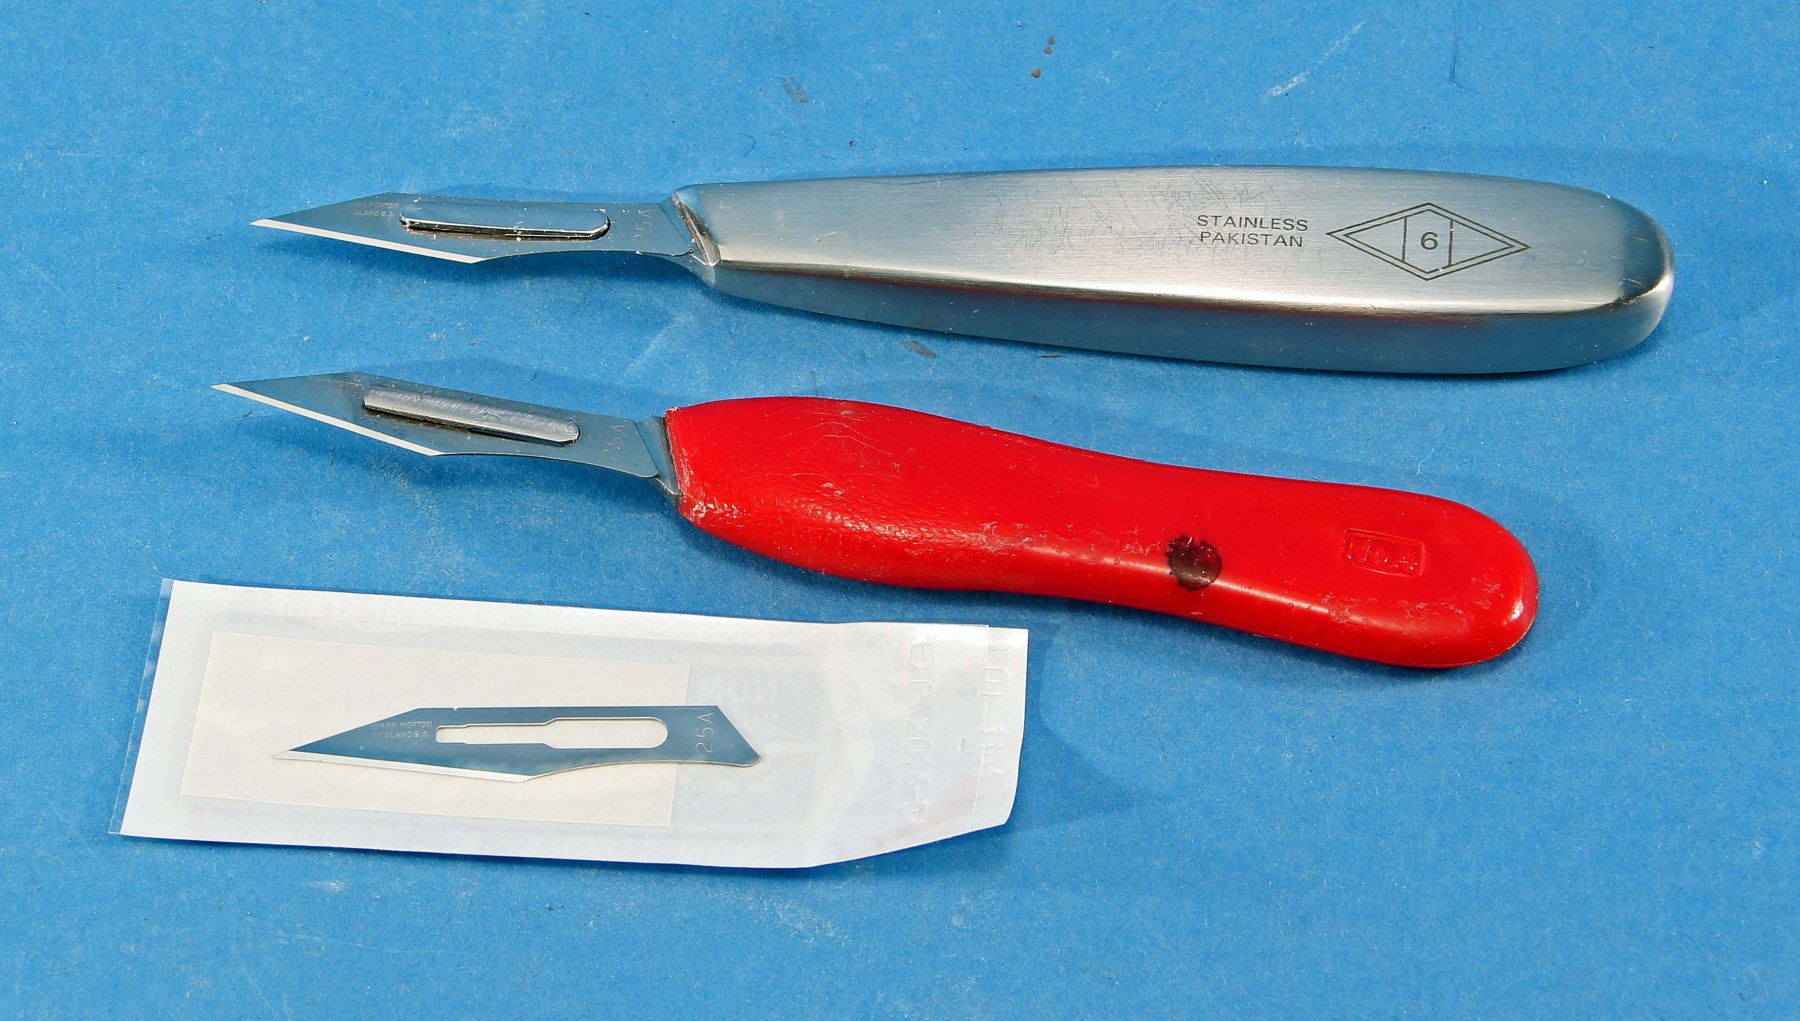
Anybody contemplating using scalpel blades should consider getting a beefier handle than the stamped metal handles sold for surgery as there is little force used in surgical procedures whereas we tend to exert a bit more force and using the surgical handles gets old real quick. Borrowed one of those from my wife quickly gave it back and bought the ones shown below. I use the metal one for fine work and the red one for less critical stuff. When the metal handle needs a new blade the blade in the red handle is thrown away and it gets the used blade from the metal handle. The swapped blade is still plenty sharp. Stropping is routine for blades in my shop. I still have a bunch of Xacto blades/handles but use the scalpel blades most. Each of the handles below cost less than $7.00 each with the red plastic one costing more than the metal one! Both were obtained from ebay (with free shipping - the only way I buy on ebay). Kurt
-
Welcome to MSW Kurt
-
What brand of #11 blades do you use
kurtvd19 replied to bigcreekdad's topic in Modeling tools and Workshop Equipment
I use Swann-Morton #25a blades. They are a lot cheaper if you get the non-sterilized blades. Have found them on both Amazon and ebay You might want to get a plastic handle like this (just an example) https://www.amazon.com/OdontoMed2011®-SCALPEL-PLASTIC-VETERINARY-INSTRUMENTS/dp/B01EC46Q52/ref=sr_1_9?ie=UTF8&qid=1511647956&sr=8-9&keywords=scalpel+handle+4 Kurt -
What brand of #11 blades do you use
kurtvd19 replied to bigcreekdad's topic in Modeling tools and Workshop Equipment
Surgical blades are the way to go. Xacto or Excel both will loosen if you apply pressure that loosens the tightening nut. The surgical blades lock in place and prevent this. Kurt -
Ship-it: Go to the last post on the last page of the link Chris provided about the banned kits issue - to see if your kit mfg. is listed. You can skip all of the prior posts - as the last post is the final word on the issue. Kurt
-
The stack should not face into the wind - otherwise the stack doesn't work and it gets real smokey below decks real quick besides playing havoc with the stove fire. Kurt
- 31 replies
-
- 4
-
-
- ventilator
- flue
- (and 4 more)
-
Thanks for the reminder Eric. Just posted it there. Thanks, Kurt
- 599 replies
-
- 2
-
-
- sidewheeler
- arabia
- (and 4 more)
-
Steamboats and other rivercraft - general discussion
kurtvd19 replied to Cathead's topic in Nautical/Naval History
I just got a new listing of towboat and riverboat plans available from John Fryant of Paddlewheels & Props. He now has the Alan Bates plans available - I was worried that these plans were lost to us when Alan died. I thought I would share them with the other riverboat fans. Kurt PADDLE WHEEL - PROPS - FRYANTS- PRICE LIST 11-17.pdf- 281 replies
-
- 4
-
-
- Steamboats
- riverboats
- (and 3 more)
-
Eric: I just got a new listing of towboat and riverboat plans available from John Fryant of Paddlewheels & Props. He now has the Alan Bates plans available - I was worried that these plans were lost to us when Alan died. I thought I would share them with you and the other riverboat fans following your build log. Kurt PADDLE WHEEL - PROPS - FRYANTS- PRICE LIST 11-17.pdf
- 599 replies
-
- 5
-
-
- sidewheeler
- arabia
- (and 4 more)
-
I would go with a flat barn red or oxide red - same color just different names depending on your source. Any shade of the oxide red would be good. Applied over a white primer it will be lighter and over a black primer it would be darker. No primer - neutral. Absolutely no gloss paint. Kurt
-
I agree 100% with Eric. Cost and availability and also the red didn't show dirt and crud as much as white. Kurt
-
Elijah: Either C/A or epoxy will do the job. Just make sure it's a tight fit - no gaps if you use C/A. The epoxy will fill a small a gap. Then paint. Kurt
- 228 replies
-
- 4
-
-
- gunboat
- model shipways
- (and 1 more)
-
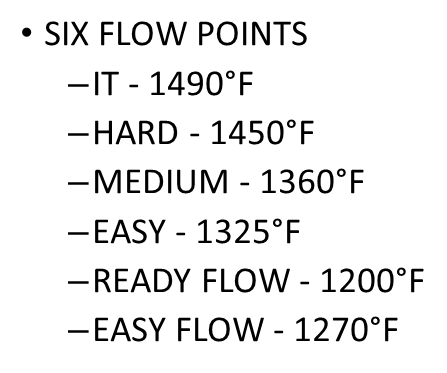
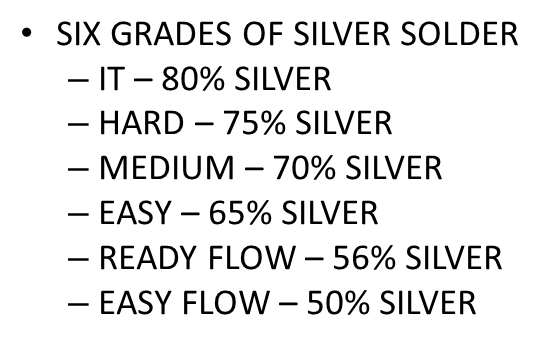
Part of the definition of Silver Soldering is that the solder melts at a temp greater than 780 deg F or 420 deg C. The product you show lists a melting point of 430 deg F so it's not a true silver solder. But read on - it's probably more than adequate. I have a product similar to what you show - Silver Solder Paste with Flux from Pro-Craft and it is available in "Easy" with a melting point of 1240 deg F, also as "Medium" with a melting point of 1275 deg F and "Hard" with a melting point of 1365 deg F. I have used this quite a bit and it's fairly easy to use. Stay-brite also has a melting point of 430 deg F and I have found it completely adequate - see the discussion at The info below is info taken directly from my Silver Soldering Power Point that has been presented at 2 NRG Conferences. The IT would probably never find a use in modeling unless one is doing an operating boiler. The easy flow is used mostly by jewelers for repair work as it's use will not undo previous work. I have been told that easy flow can be used on photo etch but I myself would use stay-brite for photo etch.
-
Brazing vs soft soldering
kurtvd19 replied to dvm27's topic in Metal Work, Soldering and Metal Fittings
I have found that in almost all cases in static modeling silver soldering is not needed. I have found that stay-brite silver solder (J. W. Harris Co #11000) is completely adequate for static modeling purposes. It's listed as silver solder on the container but when it is opened and the instructions are unfolded it is called stay-brite silver bearing solder. It melts and flows at 430 degrees F and has a tensile strength of 10,600 psi. I defy anybody to put enough tension on a rigging line to exceed that rating. The percentage of Silver it contains is shown as 3-6 percent and Tin at 94-97 percent. It is lead and cadmium free I can't imagine any need for more strength in a static model. I do true silver soldering on radio controlled boat rudders and control arms. But the stay-brite has been perfectly adequate for all the hand rails and other metal parts on even 1/12 scale r/c boats. Stay-brite mimics true silver solder in the way if flows into joints. It can be blackened using the same stuff used to blacken the joined parts. It's also great for resistance soldering. I found out with a lot of use that the liquid flux that comes with it works fine but I have switched to Nokorode soldering paste (flux) by M. W. Dunton Co. due to my being able to put the paste flux exactly where i want it unlike the liquid flux. I also prefer it due to less oxidation and base metal distortion than with true silver soldering. Kurt -
Mark: What's being described are chemicals being added to wood and a reaction starts - and then doesn't stop unless something is done to stop it. Neutralizing as you mentioned stops it. I would be very careful about doing anything that isn't able to be neutralized. Not hard to dobefore it is installed but difficult after. Kurt
-
I will bet that the crummy job in MN was a lot better than any of the ones I saw in the Philippines. Kurt
-
Ken: Yeah, they use a lot of them for that in the Philippines. Stacked about 5 high with rickety ladders to each level. Nothing goes to waste there. Kurt
-
Ken: In case you want to do a model for the son-in-law of a smaller "container ship" here's a prototype photo. Kurt

-
Eric: Think about carving a block for each side of the stempost with the shape you described and plank over it it like any other sharp bow. Kurt
- 599 replies
-
- 3
-
-
- sidewheeler
- arabia
- (and 4 more)
-
Eric; I just reread your question and my reply and photo didn't address the actual question as the Chaperon's bow is not what you described. Sorry. Kurt
- 599 replies
-
- 3
-
-
- sidewheeler
- arabia
- (and 4 more)
-
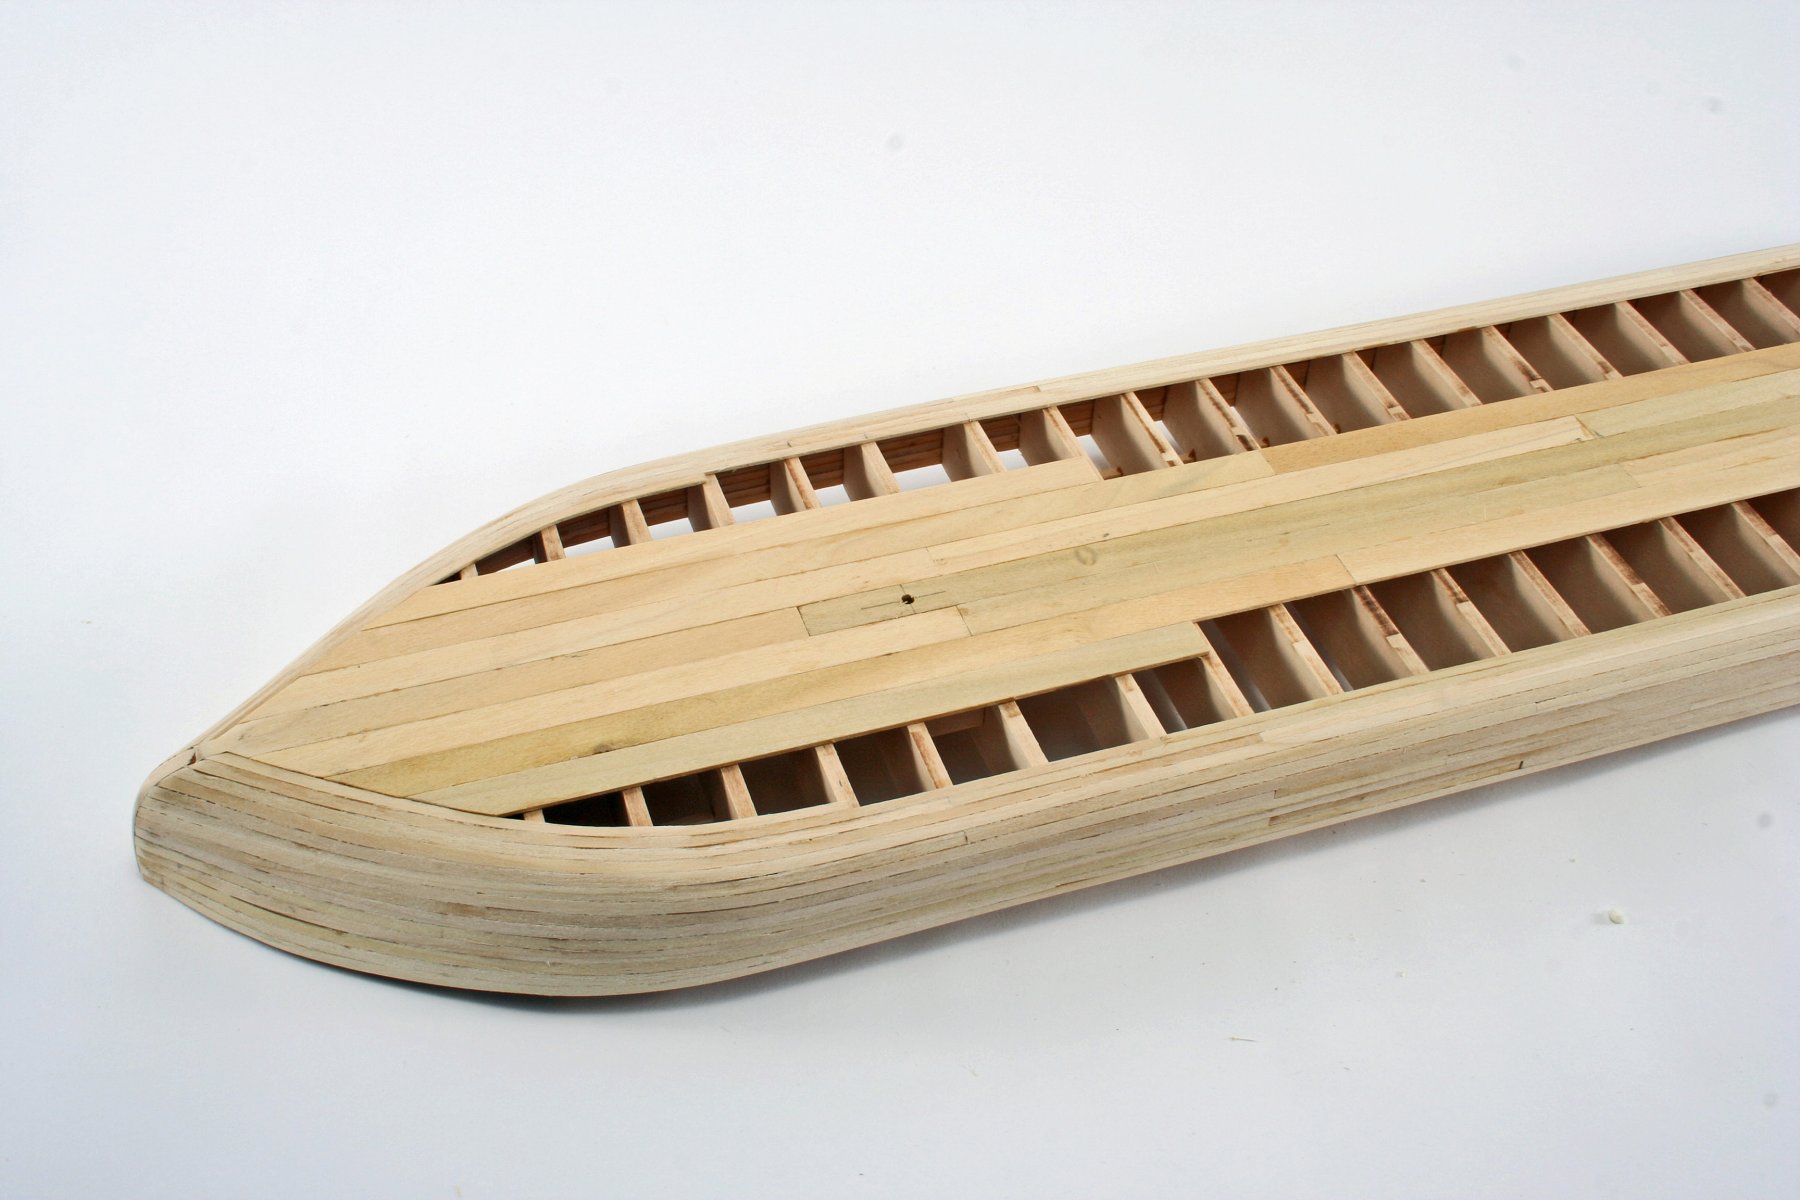
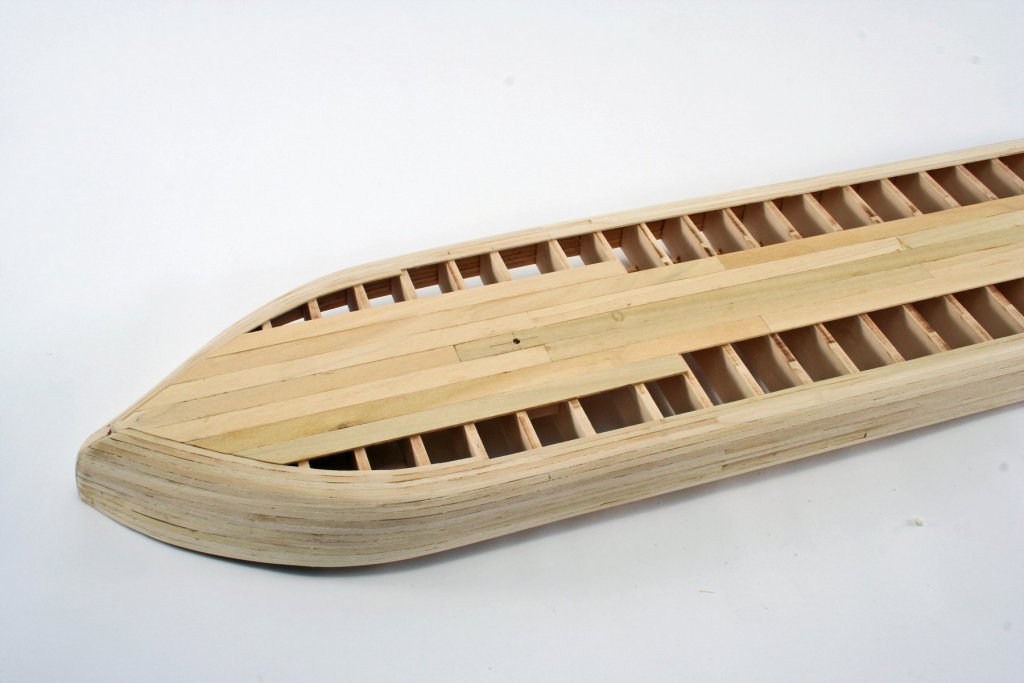
Eric: The attached photo of the Chaperon hull shows how the round turn of the bilge was planked. Narrower boards make it easy to plank this area. Does this help any? Kurt
- 599 replies
-
- 3
-
-
- sidewheeler
- arabia
- (and 4 more)
-
The collar was absolutely a rain shield due to the clearance needed between the stack and combustible construction. Kurt
-
Eric: Check the Murphy Library at the Univ. of Wisconsin at LaCrosse. Ralph DuPae collected photos for years and they are all in this library. Ralph helped me a lot with photos I needed for research. I didn't have to use the library because Ralph and I sat side by side as he searched for the photos I needed before all the photos ended up at the U. The digital collection is quite extensive. Only 2 photos of the Arabia though and they are of equipment. Kurt https://uwdc.library.wisc.edu/collections/LaCrosseSteamboat/
- 599 replies
-
- 5
-
-
- sidewheeler
- arabia
- (and 4 more)