
HOLIDAY DONATION DRIVE - SUPPORT MSW - DO YOUR PART TO KEEP THIS GREAT FORUM GOING! (Only 20 donations so far - C'mon guys!)
×

Landlocked123
-
Posts
449 -
Joined
-
Last visited
Content Type
Profiles
Forums
Gallery
Events
Everything posted by Landlocked123
-
 Hi Ed, Is there any chance you can post some pictures? Thanks, John Ps does Steve have a website? J.
 -
Steve, Below is a link to a free animated knot site. It has videos of any knot you've ever heard of and ten times more of ones you've never heard of. I find it indispensable for rigging. For example it shows a number of ways to tie a constrictor knot which in many applications is superior to a clove hitch while looking virtually the same. Best, John http://www.animatedknots.com/index.php?LogoImage=LogoGrog.png&Website=www.animatedknots.com
- 1,051 replies
-
- 5
-

-
- cheerful
- Syren Ship Model Company
- (and 1 more)
-
JD, I've used Flexament extensively, but it tends to sit on the surface of the threads and obscure the threads themselves. It's fine to create a head of the fly, but I would prefer to see the seizings. So Unithread with either 50/50 white glue and water or CA would be my first choice. Best, John
-
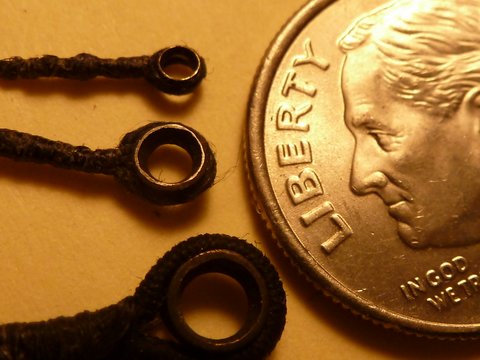
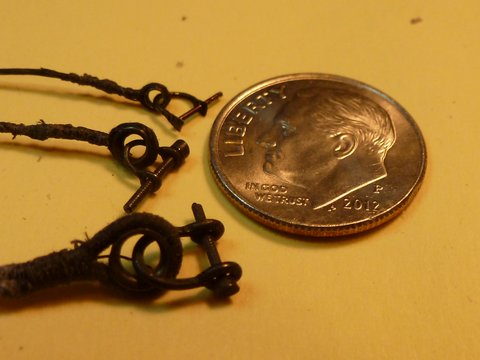
Hi Guys, Well I finally got my act together and made some thimbles using Chuck's techniques shown on the the Cheerful build log. Like so many other things in this avocation, it is both easier and harder than it seems. Once I got the "touch" and made the appropriate sized blunt points to turn the collar it was easy to knock out bunches of them. The smallest thimble is made from Albion 1.5 mm thin walled brass tube. Chuck made the point that this stuff is very soft and easy to cut (there's a link to a video on the Cheerful log). This actually gave me more trouble than any other aspect of making these. I knew I was working with metal and it took a long time before I found out just how much of a soft touch it took. I was using so much pressure that not only did I cut the tube, but I scored the brass rod I had inserted into the tube. With the K&S I had on hand, I didn't have much luck rolling against the exacto blade, so I used a jeweler's saw to cut the blanks. I made two blunt points of different sizes to roll the collars out of some steel common nails. I cut off the heads, chucked them into my drill press, used a file to create a rounded cone, and polished with some sand paper. A few light taps on the mandrel and done. Best, John Ps. This was my first shot at seizing the eyes and I used some some of #8 synthetic fly tying thread. Neither CA or diluted PVA would stick to it and the clove hitches I used wouldn't hold. Next time around I used some #8 Unithread.....much better. J.
-
Miniature Hand Tools
Landlocked123 replied to Julie Mo's topic in Modeling tools and Workshop Equipment
Me??????? I just use a VERY delicate touch with my chain saw -
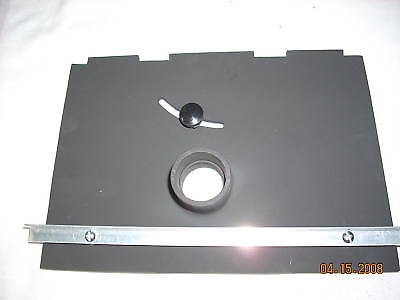
Hi All, Yesterday I made a MAJOR improvement to my Dremel 580. I installed the dust cover and vacuum port which includes a "lock-down" for the rear of the motor assembly (see pic.) below. It made a huge difference in the performance of the saw. After install, as a test, I was able to rip a 3/32nd" board out of a 3/4"x24"x4" piece of walnut and it measured out +/- 0.005". I started out slightly thicker and after a pass or two on my Byrnes thickness planer it was perfect. I'm pretty confident that I can get down 1/32" with a little practice. It's not a Byrnes Saw, but with Bill Wilson's add-ons, I'm all in at less than $150. When I do finally step-up to a Byrnes Saw, I will keep the Dremel for no other reason that one can adjust the angle of the blade. Best, John http://www.ebay.com/itm/DREMEL-580-TABLE-SAW-BACK-DUST-PLATE-W-BLADE-LOCK-/262810838186?hash=item3d30bf24aa:m:m18DMfN-8PCCfRd1-lx4vNg
-
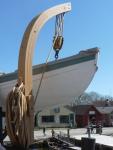
E.J. How's is it planking with such large spaces between the frames? Based on the miter box in the forground it looks like they are at least three - four inches apart. Thanks. Best, John
-
Hi Keith, Sorry about the airbrush. Here's site from a guy named Don Wheeler who has reviewed virtually every air brush out there. https://sites.google.com/site/donsairbrushtips/home I've read a lot of his reviews and he seems pretty impartial. Someone on MSW pointed out the site awhile back. Kurt Van Dahm from NRG & MSW is a real expert. I attended his roundtable on airbrushing at the Mystic NRG Conference in 2015. If you reach out to him, I'm certain he would be of help. Best, John
-
Hi Keith, She's really looking beautiful. How did you end up finishing the mahogany. In an earlier post, it looked like you had used some type of varnish or shellac, but in the last few pictures you achieved a really nice, rich, deep, mat finish. Thanks. Best, John
-
HI Chuck, Following the Cheerful has been great! I want to thank you personally for everything I've learned here (btw, I'll post some pic.s of my my thimbles in a couple of days). The big question is are we now ready to see your 32 Gun Frigate Winchelsea (however you pronounce it)? I know I'm not alone in wanting to follow the build. It's definitely on my "bucket list" and I can't wait to see it move to completion. Best wishes for a very happy New Year, John
- 1,051 replies
-
- 9
-
-
- cheerful
- Syren Ship Model Company
- (and 1 more)
-
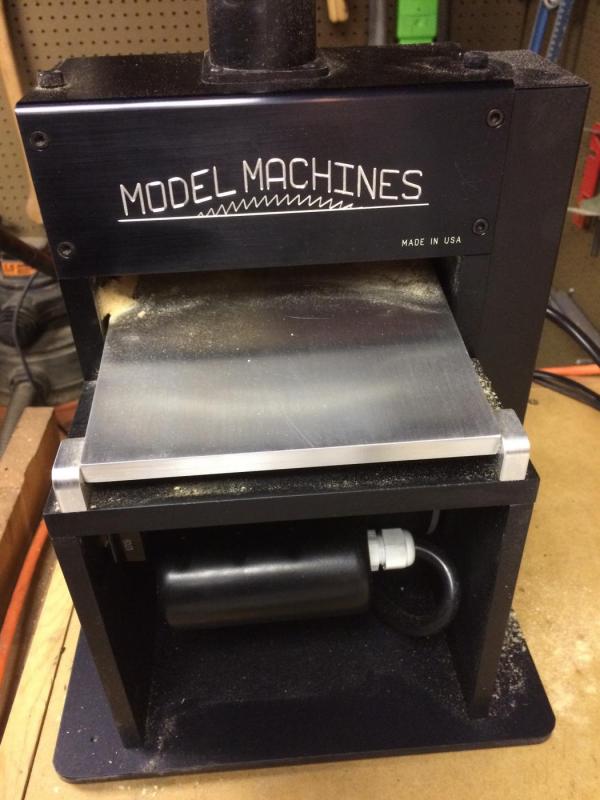
Hi Guys, I must have been pretty good last year because Santa also bought me a Byrnes Thickness Sander! I finally got the chance to play with it yesterday and I found that the dust port does not fit to my Black & Decker Shop Vac. My question is whether or not I can use "off the shelf" PVC fittings to make an adapter or do I need to scratch build something? I know you guys have the answer . Best, John
-
When to varnish
Landlocked123 replied to medic's topic in Painting, finishing and weathering products and techniques
HI Guys, I guess the same would be true for a painted deck, like on a schooner? Well, I've already painted the the deck and I'm ready to attach the deck furniture. Should I therefore use epoxy? All suggestions are welcome. Happy New Year, John -
Hi Remco, I hope all is well and that you had a great Christmas and New Years! I spent the day reading slowly through this entire build. As many have pointed out over the course of build there really are not appropriate superlatives to describe the quality of your work! This is truly a masterwork and I want to thank you for everything I've learned from it. But now, like the abrupt end of a great novel, I'm dying to know what comes next. If it's not inappropriate of me, may I ask where things stand now? You have my best wishes for a fabulous New Year. Best, John
- 1,215 replies
-
- 6
-
-
- sloop
- kingfisher
- (and 1 more)
-
Hi Charlie, I'm not sure, but I think Sal used 1/4" copper tape which is 6+ mm wide. Of course using this set up you can make them any length. Go to the Model Expo site and look at Chuck's instructions for the Syren. I believe that is what Sal did with the addition of the exacto blade. J.
-
Hi Charlie, The best coppering job I've ever seen was on Sal D's Syren which won 1st Place in last year's Northeast Joint Model Clubs show in New London, CT. He details how he did it on his build log on MSW (starting with post #126). I've attached the link below, I pretty sure Sal won't mind. Best, John http://modelshipworld.com/index.php/topic/8410-us-brig-syren-by-sald-%E2%80%93-finished-316-scale/page-7
-
Ken, I've just read through your Niagara build which is also excellent. Why don't you chemically blacken brass. In my opinion, you get much more detail come through. Though you couldn't do the cool trick with glue bolt heads. Have you ever tried to replicate the bolt heads with solder, which could be blackened? Thanks. Best, John
-
Ken, I've been lurking through your build and it is wonderful. Especially the fabulous metal work. I enjoy working with brass as well and I've learned a number of good techniques through your work. I saw in one of the recent posts that you are coming out with a second edition of your book. Do you have an idea of when it will become available for sale? Thanks. Best, John
-
Byrnes Drawplate
Landlocked123 replied to Landlocked123's topic in Modeling tools and Workshop Equipment
Thanks Guys. Can one draw other woods than bamboo? Best, John -
Hi All, Santa was good enough to bring me a Byrnes Drawplate . I've never used a Drawplate before and would appreciate any tips and pointers. Thanks. Best, John
-
Hi Mark, CONGRATULATIONS on reaching a great milestone! It's much easier now to see what a beautiful model she'll be. I hope you and your family have the Merriest possible Christmas. My hope is that you and your family have the best of everything in the New Year (especially sharks with laser beams . Best, John
-
Hi Ed, I wish you and your family a VERY, VERY, MERRY CHRISTMAS
- 3,618 replies
-
- 8
-
-
- young america
- clipper
- (and 1 more)
-
Miniature Hand Tools
Landlocked123 replied to Julie Mo's topic in Modeling tools and Workshop Equipment
Very nice Roger. Thanks! Best, John -
Meet Your NRG Directors and Officers
Landlocked123 replied to tlevine's topic in NAUTICAL RESEARCH GUILD - News & Information
Thanks Guys (& Dr.s) Best, John -
Miniature Hand Tools
Landlocked123 replied to Julie Mo's topic in Modeling tools and Workshop Equipment
How about some pictures of the models Roger? Best. J.

