


Roger Pellett
-
Posts
4,519 -
Joined
-
Last visited
Content Type
Profiles
Forums
Gallery
Events
Posts posted by Roger Pellett
-
-
If you plan to paint the cap rail, cutting it from a sheet of thin craft plywood might make things easier. Craft plywood in metric thicknesses that closely approximate 1/64”, 1/32”, 1/16” and 1/8” is usually available from craft stores such as Michaels. You might also find at hardware and home improvement stores. If you intend to build more ship models it’s handy stuff to have on hand.
if you feel that you don’t have the skill to saw this to shape, cut it out oversized and sand to its final shape.
Roger
- thibaultron, mtaylor and allanyed
-
 2
2
-
 1
1
-
Ships with Frames joggled to fit in and out plating were not unheard of. I believe that they were mostly seen on smaller vessels, particularly those where weight was a concern. I doubt if Titanic was weight sensitive. Passengers are actually a light cargo. Capacity to haul these is limited by internal volume. The same is true for the freight that she carried. A prestige vessel would command high freight rates, not applicable to heavy bulk cargos.
I do not know how the backing strips were fitted during construction.
Roger
- Force9, Canute and Hubac's Historian
-
3
-
There were several systems used to plate iron and steel ships before electric arc welding largely eliminated riveting during WW II. The most common was the “in and out” system, not clinker. For riveting to work, the hull plates had to be solidly backed up. For longitudinal seams plates could be fayed against their neighbor but the overlapping geometry of transverse seams required a baking strip between the plate and frame. Without this, the rivets would not draw up tight. Clinker planking required tapered backing strips, difficult to shape and expensive. The in and out system allowed the use of cheaper non-tapered backing strips. The picture below, taken from a 1916 shipbuilding text shows the different plating systems.
Roger

-
It’s been a long time since my last progress report, but life has kept me away from the workshop. We spent the month of March in Florida, with a scheduled return on April 1. This is “high season” and accommodations are always full. We were scheduled to return home on April 1. That morning we got an email from Delta airlines saying “Your flight is cancelled due to Minneapolis weather and we are unable to book you on a future flight.” At least they didn’t tell us to have a nice day. As remaining in Florida indefinitely was not an option, we decided to drive the rental car home. We did break the road trip at the halfway point to visit our son in Evansville, Indiana. We finally arrived home on April, 12.
Once back we caught up with household paperwork and then began a round of Dr Appointments. My wife has an iron constituton, but my internist found a problem that I had overlooked while in Florida. This involved appointments with local specialists and ultimately a trip to the, Mayo Clinic that will happen in the near future. This all sounds more serious than it actually is. Although we receive excellent medical care in Duluth, Mayo has more specialized equipment and procures.
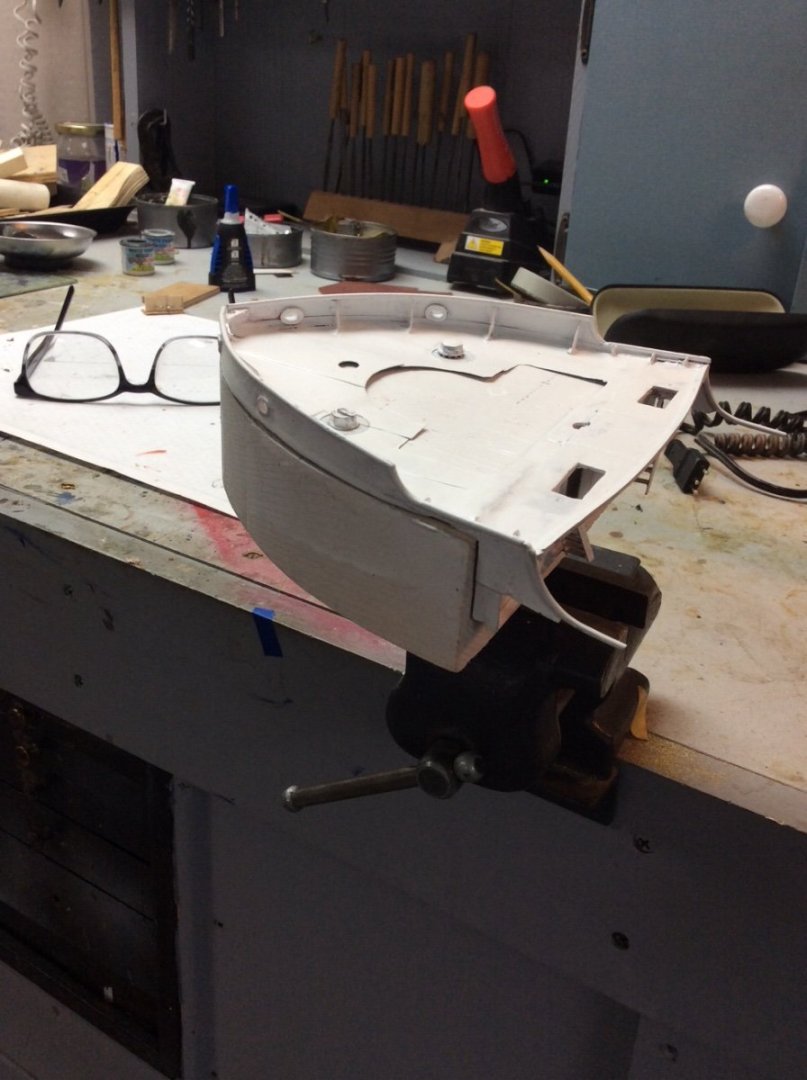
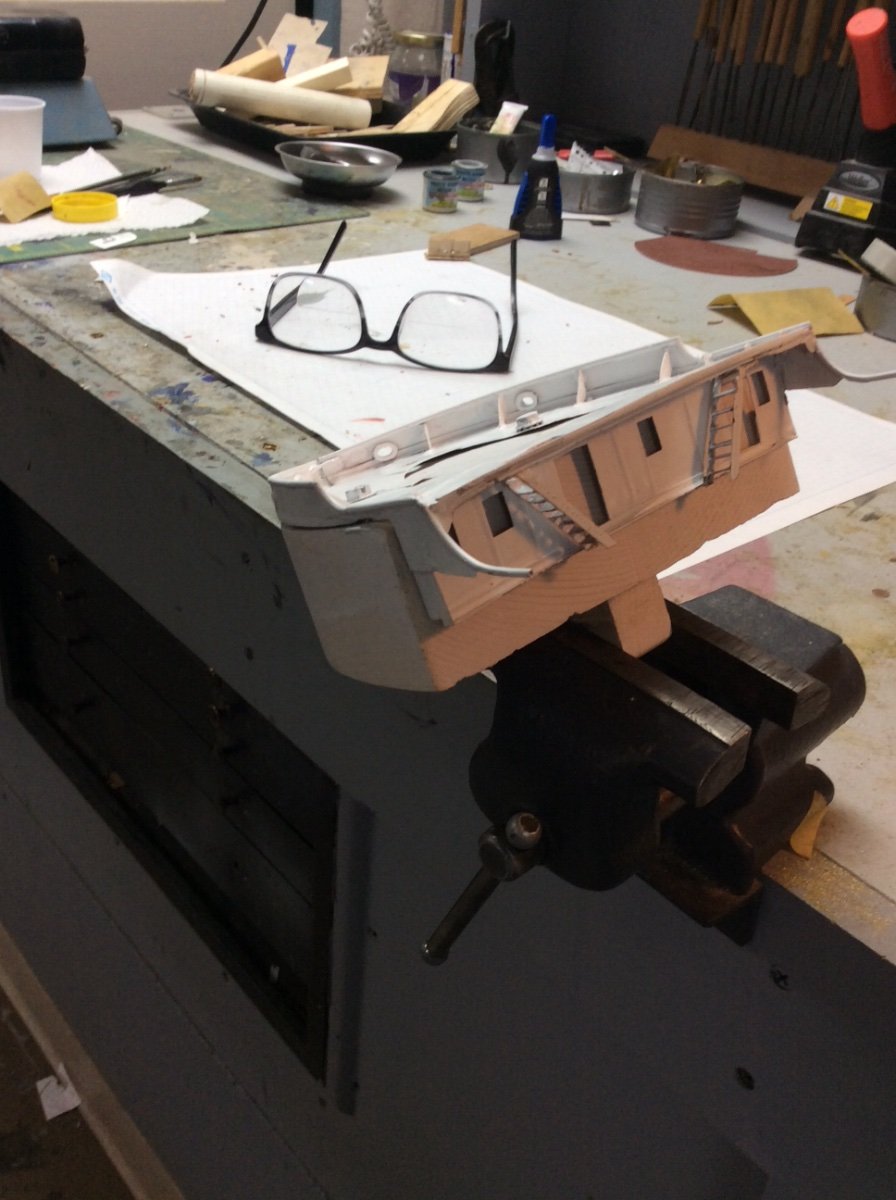
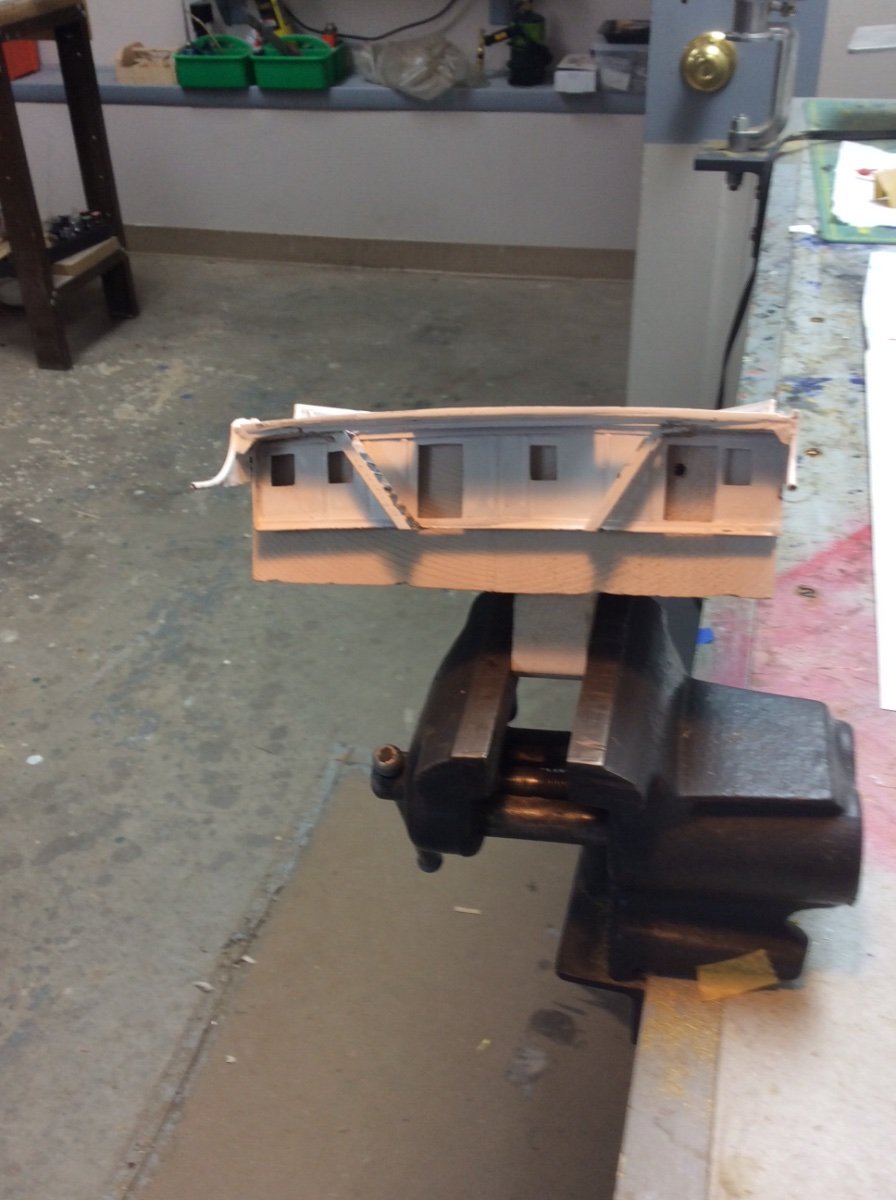
Meanwhile, I was able to finish the forecastle subassembly. The thin brass sheet is easily damaged so much “body work” is required. This involves filling noticeable dents with Bondo, removing blobs of solder, spraying a coat of primer, and then repeating the process. I have Proxxon pencil sander and pencil engraver. These are great tools for getting into tight places. I have long since used all the pads that came with the sander, new ones are easily cut from adhesive backed sanding discs.
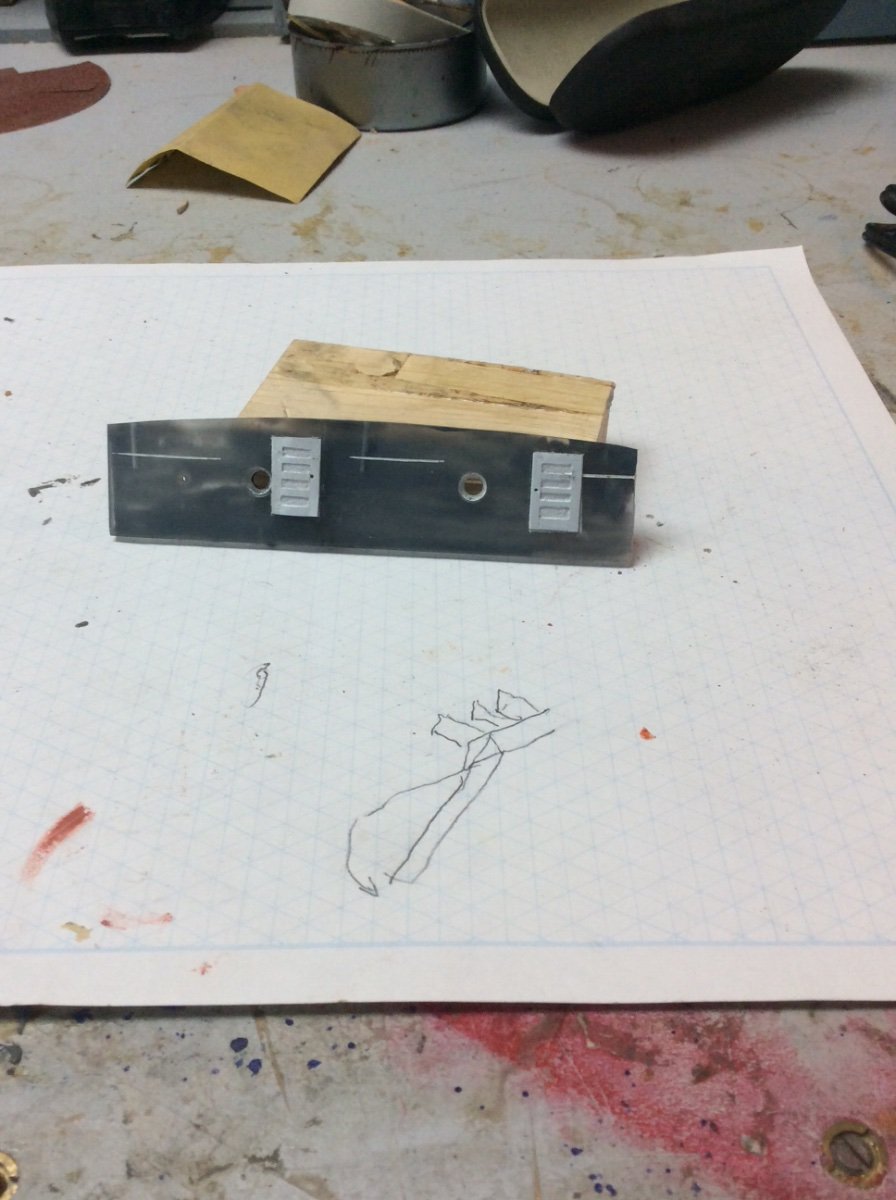
Photos below. The first photo is plexiglass that will fit behind the subassembly to provide window glass and doors. Much of the primer will be sanded off then the subassembly is fitted to the hull. The assembly is fitted to a block of wood to temporarily protect it.
Roger


- shipmodel, Valeriy V, Mirabell61 and 15 others
-
18
-
-
If you plan to use pressure sensitive adhesive copper foil tape I really think that you’re doing things the hard way to achieve questionable results:
Longevity- All pressure sensitive adhesives are suspect
Scale- See Johnnie’s Post above
Nails- At model making scales, best left off
Weathering- difficult to achieve scale effect
I would use acid free paper stiffened with shellac. Cut it into plates and glue down with PVA glue. You can then paint with airbrush to achieve wanted effect.
I agree with Bob that copper foil in model kits is just a marketing gimmick.
Roger
-
Not a metallurgist but an experienced industrial metal fabricator.
The mechanism is oxidation caused by exposure to oxygen ions (air, water, etc). Corrosion resistant materials “work” by forming an oxide film bonded to the substrate that isolates it from the corrosive source.
Metal fabricators take advantage of this property to finish surfaces. For example, specifications for stainless steel nuclear service piping often require that the pipe be “pickled and passivated.” This is a two step operation. The pipe is first cleaned in tank of hydrofluoric acid. This is followed by passivation in Nitric acid. The dull grey color of stainless steel is this corrosion film. Unfortunately, when this film is damaged accelerated corrosion exists between the protected and unprotected surfaces.
I am less familiar with copper and brass alloys but suspect that they form similar protective corrosion films.
Roger
-
What was the name of your book?
My book produced my 15 minutes of fame. It was a finalist for a 2018 Minnesota Book Award and Honorable Mention, Northeast Minnesota Book Award. Both involved attending an awards event. At one an invited guest told me not to invite him for any future books! I enjoyed seeing my book at the Mystic Seaport Bookstore and like you in the collection of many libraries. In your case, being a Naval Institute author is a big deal. Having this on your resume is the sort of thing that might interest them or Seawatch to contract you to write volume 2 of Sloops of War.
These books are entirely different from the mass market volumes found everywhere. Print runs are small, in some cases, 500 or so books. My contract provides a 25% royalty but when discounts to sellers and institutions are taken into account the return is minimal. My publisher is an academic press. Commercial publishers may offer better terms.
Roger
-
I second Bob’s recommendation. The books are well worth the price and contain the collective knowledge of NRG members in the years before MSW. The original volume I was bound like a paperback book and after a while the pages fall out. More recently the Guild republished Volume I using the spiral bound system. If you buy the book on eBay make sure that it’s the spiral bound version. Volume II was originally published using the spiral wound system.
Roger
-
As a author who has actually published a book on a particular ship type (the Great Lakes Whaleback Ship) it is a massive effort.
Doing the Research is the fun part, and since I enjoy writing and telling a story it was fun too.
From then on, things get more difficult. First of all, my text had to be, word processed into an integrated whole. The text needs to be footnoted, keeping in mind that one error invalidates all succeeding footnotes. To do this accurately you need to have a system from the beginning to organize all reference material for future easy reference.
You also need written permission to use drawings, photos, etc. and any extensive quotes. This is a big job and no place for latrine lawyers. Even though drawings and photos may be old enough to claim public domain this does not permit their custodians from claiming copyright and to charge for their use. Once you have permission, all graphic material must be attributed.
After this all has been done, it’s time to approach publishers. Publishers will usually require a draft the book, a discussion of its significance and an economic justification to publish. For books of this type, pre-publication advances are a figment of one’s imagination.
The publisher will usually hire and pay for a cover designer, an editor, and will assume responsibility for formatting the book. I was responsible for paying for someone to index the book. So far, she was paid more than the royalties that I received.
Roger
-
Thanks Bob,
I have a piece of genuine mahogany in my shop ready to be made into a ship model case. It’s nice stuff.
When I was in engineering school the model shop that produced models for the towing tank (now called the hydrodynamics lab) used beautiful clear pine, also called pattern makers pine. These were all what we called “Solid hull” models although they were built up from laminated lifts with the center sections cut out. These models were quite large. Our senior design project was design of a tanker with a hinge in the center of the hull to reduce bending stresses. To test this we built an 8’ long model that could be tested with and without the hinge to determine the difference in resistance. I am surprised that the Navy specs don’t allow this type of pine.
Roger
-
-
-
-
Since you don’t plan to rig the model IMHO an ensign would be out of place. There are, however, examples of unrigged models decked out with flags flown to celebrate the vessel’s launch. There was a fascinating article in the Nautical Research Journal several years ago about the detective work required to sort out the launch flags for a model in the Naval Academy’s collection.
Roger
-
Haven’t been there for a number of years but this is a GREAT museum, on the scale of Mystic.
When we visited, my wife, who is not necessarily a marine museum enthusiast was fascinated by a display about songs of African American workers in seafood processing plants and another about Chesapeake Bay resorts. Like Mystic they feature a working shipyard.
Roger
- mtaylor, thibaultron and Ryland Craze
-
3
-
PEric,
You will get an accurate hull from a POB kit provided the manufacturer provides enough bulkheads to force the planking to assume the required shape.
I assume that museum’s policies of limiting acquisition of models to solid wood hulls is because they are unsure of the longevity of the planking. This may change if POB models prove to be durable.
Roger
- mtaylor, Ryland Craze and Canute
-
3
-
I wonder if this model was once displayed in a bar or another location where there was heavy tobacco smoke. I agree with your restoration philosophy. Too much improvement will just destroy the original builder’s work. I would clean the hull and repair any damaged paint. Matching colors should be interesting. The Cuttyhunk Hard Twisted linen line is good stuff. I have a couple of spools bought from Model Shipways back in the ‘70’s. You can sometimes find it on EBay.
Roger
- mtaylor and Keith Black
-
2
-
I am surprised at the lack of market for Age of Sail books. A completely unscientific poll of model ship projects on MSW would lead one to believe that that’s exactly where the market is.
In my case, I felt that the really interesting parts of this excellent book were the chapters dealing with the early development of these vessels. There are other sources that deal with these ships in the later part of the Eighteenth Century.
Roger
-
Some idle speculation regarding Bob’s question.
The old standbys; AJ Fisher, Model Shipways, etc. offered solid hull kits of subjects based on solid research, particularly the availability of accurate hull lines. With solid hulls a skilled craftsman was not constrained by the way planks wanted to bend around widely spaced bulkheads. This allowed accurate reproduction of subtle hull shapes. These kits could and did produce beautiful models of mostly American subjects.
In the 1970’s we were invaded by a host of awful POB model kits usually of European manufacture. This is not just my opinion. The then Editor of the Nautical Research Journal published a lengthy article titled Piracy on the High C’s decrying the poor quality of these imported kits. These kits were supported by a first class marketing program. The subjects, often fictitious, were more exciting than the staid offerings offered by the old American Companies as they often offered “hook” to a recognized Nautical event. Why are there so many Titanic kits and so few if any SS United States kits? The kits also made the nonsensical claim that constructing a POB hull was just like building the real thing. These kits have improved over the years and several new companies now offer POB kits that build into beautiful, accurate models expanding the appeal of the hobby. Unfortunately several of the old companies did not improve their offerings and have lost market appeal.
A notable exception would appear to be Bluejacket. They offer POB kits, the POF kits that Bob mentioned, and Solid Hull kits. Their new USS Olympia kit is Solid hull and they presently have a Solid hull Coast Guard vessel under development.
And last, a recent photo of an AJ Fisher kit completed over 80 years by my father. A solid hill kit; 1:96 scale.
-
The last dry transfer letters that I bought were made by Woodland Scenics and probably bought on Amazon. The Model RR suppliers might be the last holdout for this technology.
Roger
- mtaylor and thibaultron
-
2
-
-
According to Wikipedia, the best information that I can find at the moment, Enterprise was equipped with one hanger level cross deck catapult (removed later) and two hydraulic flight deck catapults. If this is correct, the two flight deck catapults would be visible on the model.
Roger
-
Rotary tools: I do not use rotary tools for wooden construction for two reasons.
First, a mishandled rotary tool can do an enormous amount of damage in an instant, particularly with the soft woods supplied with kits. Instead I use needle files and very small rifflers whenever possible.
Second, hobby grade rotary tools are high speed low torque machines. They run at MUCH higher speeds than tools designed for drilling. The centrifugal force created can instantly fling a small wire size drill away from the hole that you are trying to drill. The archimedes type drill recommended by Wefalck is a better choice. If you must use a powered drilling tool, buy one especially designed for this purpose.
These recommendations from MSW members, including me, are all influenced by personal work habits sometimes developed over decades. As such they reflect individual strengths, limitations, and interests. They may not reflect the, way that you want or are able to work. Rather than spending a lot more money on tools, I suggest that you get busy building your model and buy additional tools as needed.
Roger


Peerless 1893 by Cathead - 1:87 - sternwheel Missouri River steamboat
in - Build logs for subjects built 1851 - 1900
Posted
Having lived in an Ohio River town for nearly 20 years, I was impressed with the “can do” attitude of the people who lived there. I would assume that this would be typical of people living along the banks of the great Western Rivers and away from major population centers. I have a book in my library describing the machinery, where known, used to propel Confederate Ironclad Gunboats. In almost every case this machinery was adapted from other uses; steamboats, of course but also sawmills and other industrial applications. Hull shapes were simple enough to eliminate the need for elaborate drawings and lofting.
Roger