Chuck
-
Posts
9,726 -
Joined
-
Last visited
Content Type
Profiles
Forums
Gallery
Events
Everything posted by Chuck
-
 That is really wonderful work Ryland. Very precise
 -
The lady Nelson kit is very poorly designed. The bulkheads are so far apart that it will be impossible to properly spile using the tape method. Unless of course you fill the gaps between the bulkheads with filler blocks and fair them to shape first. For such a small model there should have been no reason at all why they couldnt place more bulkheads on that model. You couldnt even use a compass. So you dont get discouraged and give up on trying the proper method for planking....... You could just plank the first layer any way you can hoping it will turn out smooth and not faceted.....but my recommendation is to fill up those gaps between bulkheads even if you just use some soft balsawood. Then fair the hull smooth so you have a solid foundation to line off your hull and spile. If you look at even how the dreaded gunport template sits against the frames as designed...you are starting the process with a bad foundation to build upon. I wouldnt even try it.
-
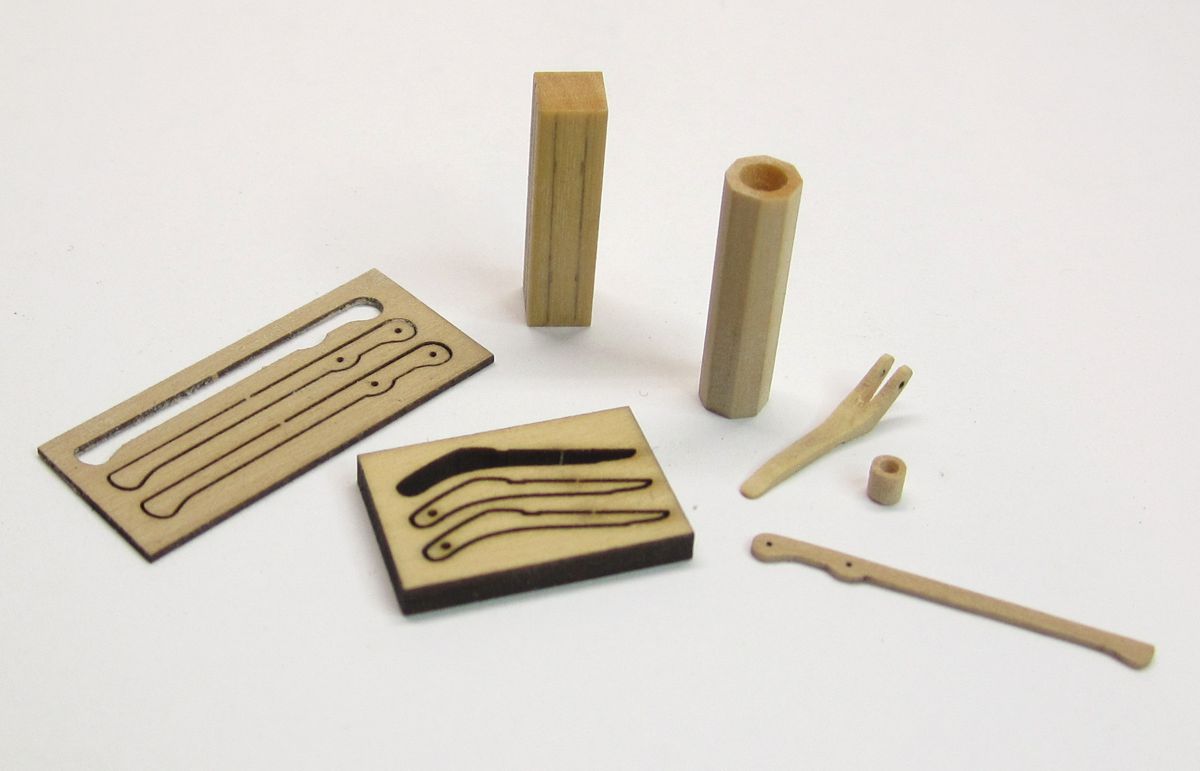
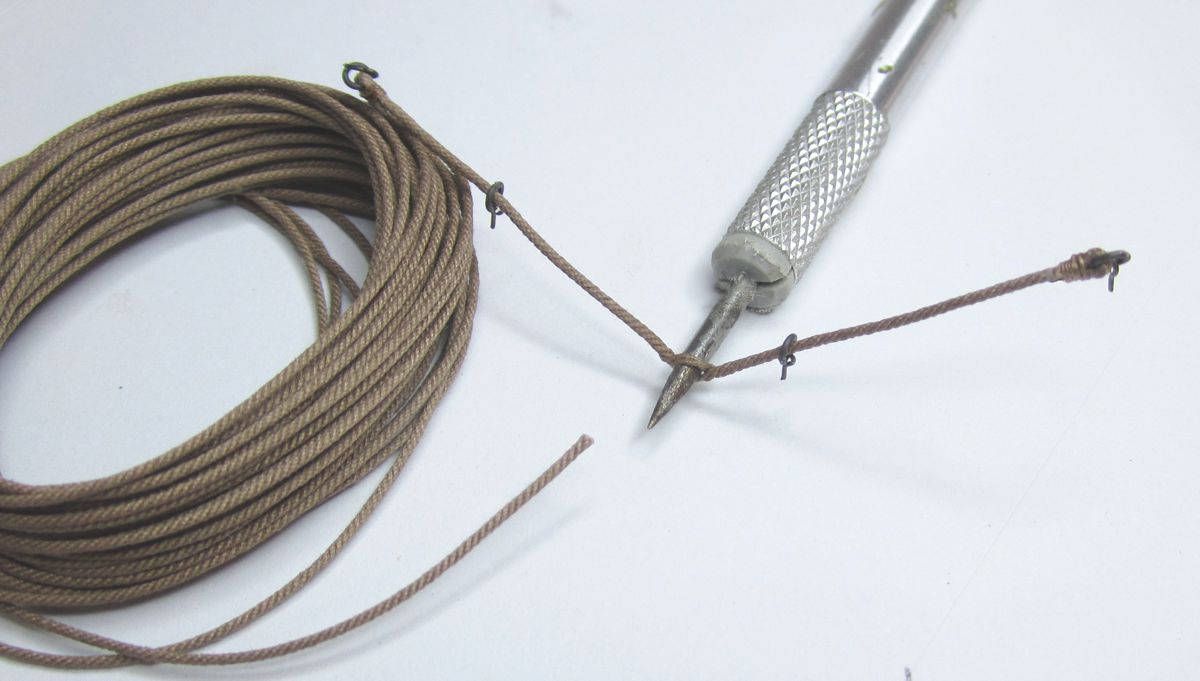
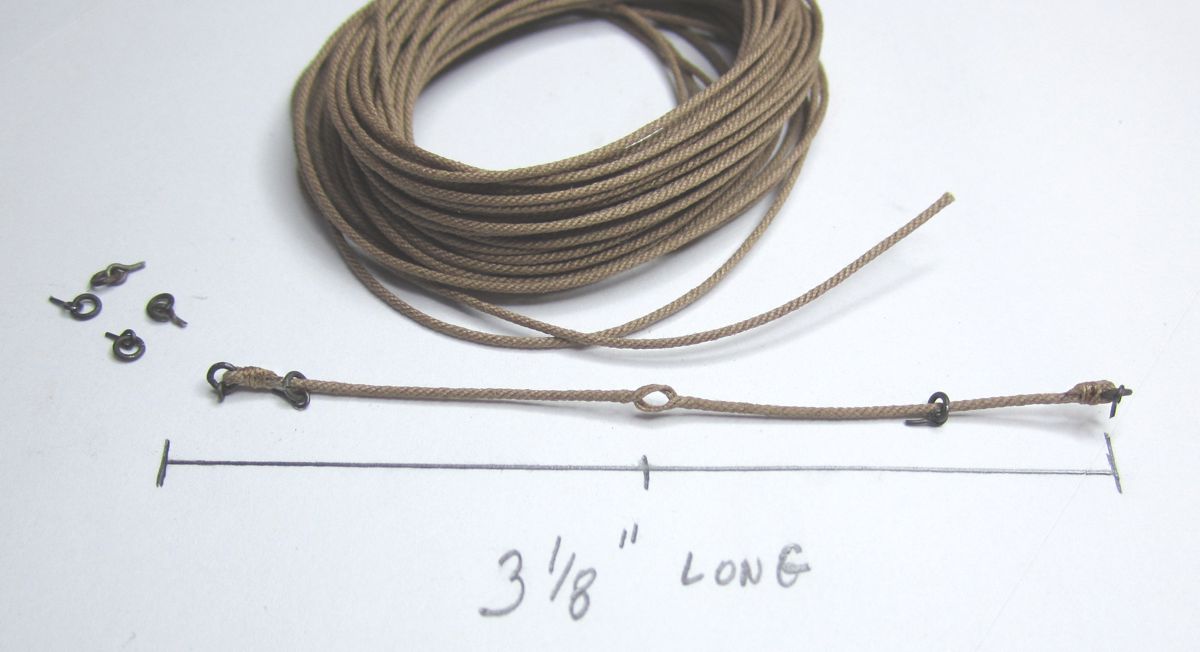
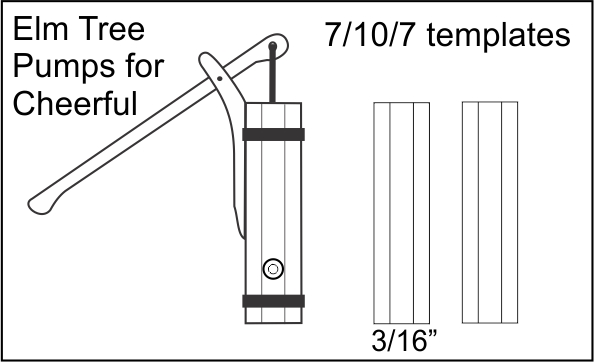
Thank You very much. The pumps have been completed. You can see that I decided to paint them red. Most people leave them natural but I figured I would go all in with the painted look. The same is true for the pump handles and bracket. These were made of either wood or metal. Because most folks leave these natural I figured I would paint them black and make them look like metal. This is how they were treated on the contemporary model of Surly. All of the pieces were painted before assembly. Then I used some heavy paper to make the reinforcing band. Those who have these plans will also notice that I have only used one band. Yet on the plans there are two. I have once again seen so many variations of elm tree pumps I figured I would show it both ways. Those building Cheerful can decide which they prefer. 1. transfer the 7/10/7 template lines to each side of the 3/16" square pump tube. Carefully file the tube to an Octagon using the lines as a guide. Drill and bore out the top of the tube to a depth of about 3/8". Carefully use a bit that will leave the pump tube walls not too heavy. 2. File and shape the bracket for the handle. The part that sits against the pump tube is tapered thinner so it fits on one facet of the octagon. Use a slotting needle file 1/32" thin or less to file the slot in the top to a forked shape. This will accept the handle. 3. Place a 1/16" x 1/16" strip in a dremel to round it off. Using an emery board this takes only a minute. This will become your pump spout. Drill a hole into the end before parting off a 5/64" long spout. Glue it to the pump tube. All pieces can be painted first. 4. Using some card stock strips wrap it around the tube as shown on the plan to simulate the metal reinforcement band. One ore two is fine. The top band should be carefully placed so the notch in the bracket accepts it at the the right height on the tube. So measure its location from the plan. 5. Glue the bracket into position. 6. Insert a length of 24 gauge black wire into the hole on the end of the handle. Like an eyebolt. Insert the end of this long wire into a pre-drilled hole in the bore of the pump tube. Adjust the length of the wire until the other pivot-hole in the handle site in the bracket nicely. The handle should be in the downward position to be correct. 7. Finally insert a small length of 28 gauge black wire into the bracket hole and through the handle to lock it in position. Snip it off on both sides so it stand proud of the bracket's surface just a little bit. Now its time to start on the winch!!!


- 1,051 replies
-
- 43
-

-
- cheerful
- Syren Ship Model Company
- (and 1 more)
-
Thank you very much!!! I have started on the pumps today. Basically I started with a 3/16" square and used the 7/10/7 ratio to convert it to an octagon. You can see how I carefully marked the blank and then filed the piece to shape. The end was drilled out afterwards. I also laser cut the handle from 1/64" thick boxwood. The handle bracket was made from 3/32" thick stock. The bracket was tapered where it attaches to the pump tube. Then it was notched out with a fine file to make it look like a fork. The handle will fit into this. But first I must paint the pieces and then assemble them. Maybe tomorrow. Chuck

- 1,051 replies
-
- 25
-
-
- cheerful
- Syren Ship Model Company
- (and 1 more)
-
Thanks Greg The lathe is still packed up in a box. Whenever I think I need it, I am too lazy to set it up and read the instructions. Its faster and easier for me to just use the needle file and emery board. One of these days I will get around to unboxing that thing to try it out.
- 1,051 replies
-
- 6
-
-
- cheerful
- Syren Ship Model Company
- (and 1 more)
-
Time machine... Thanks for the kind words guys
- 1,051 replies
-
- 8
-
-
- cheerful
- Syren Ship Model Company
- (and 1 more)
-
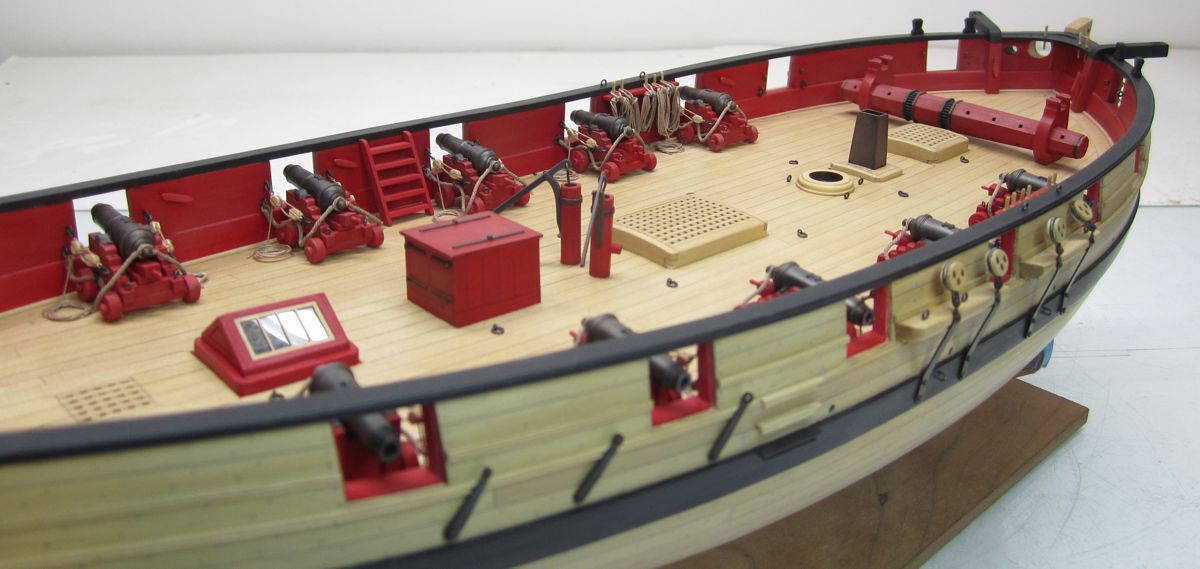
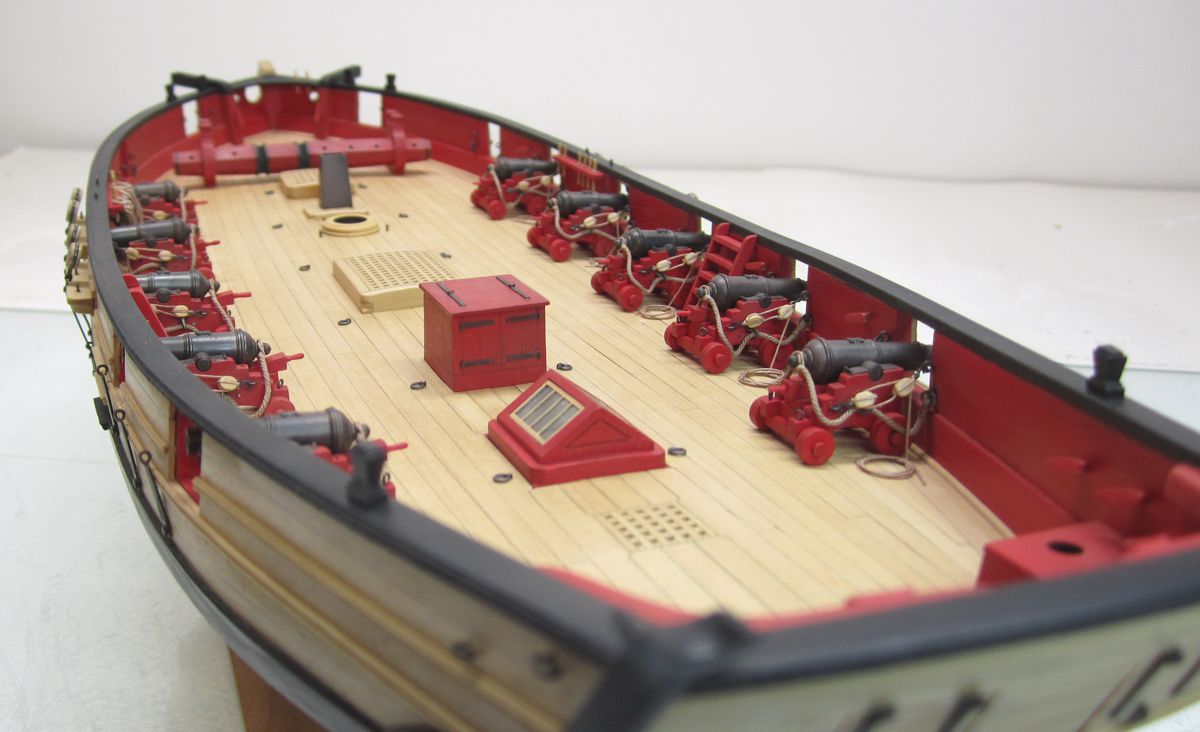
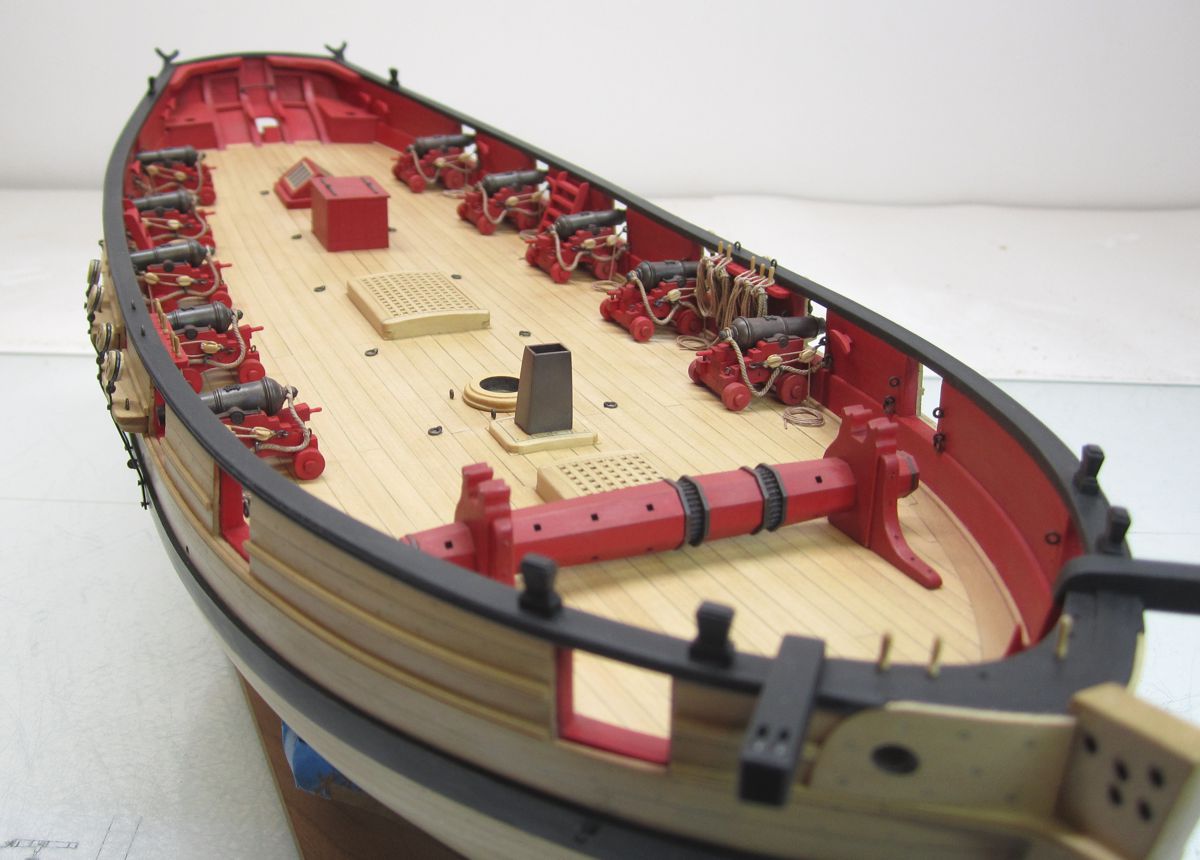
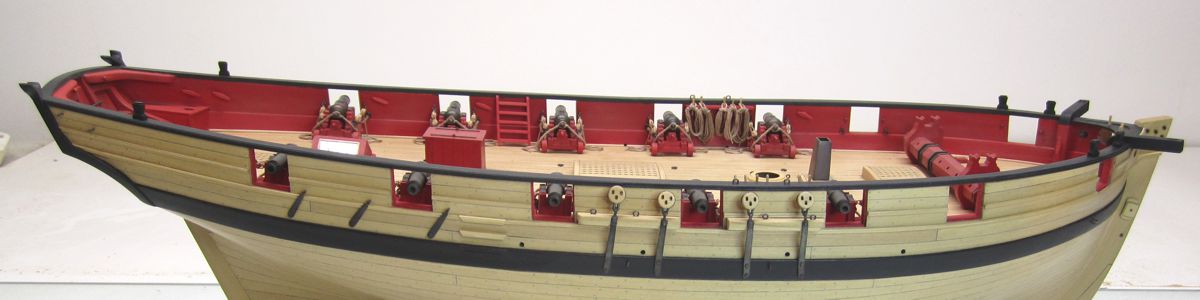
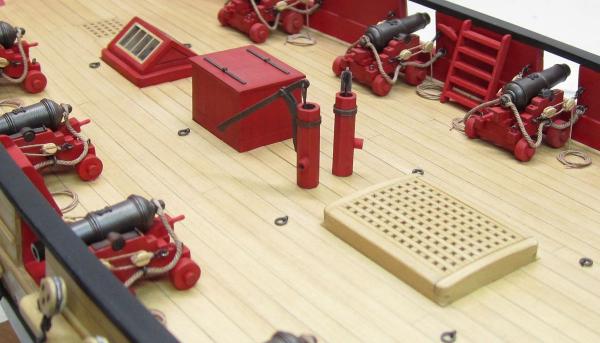
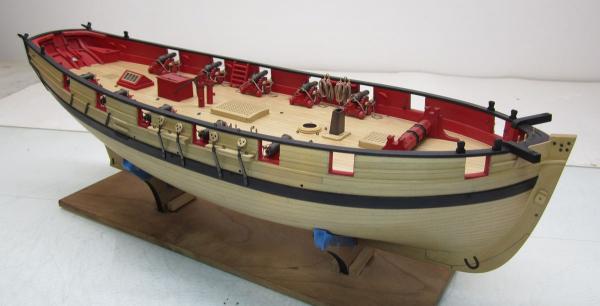
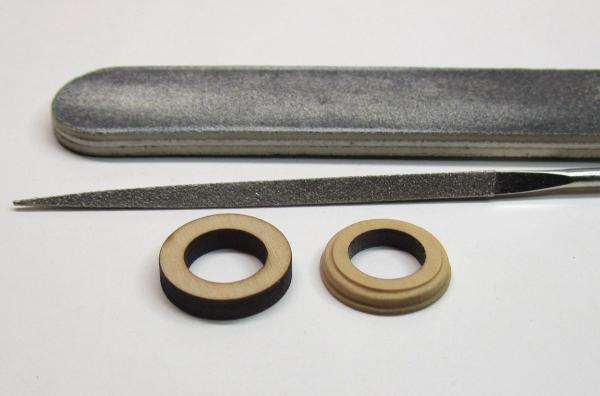
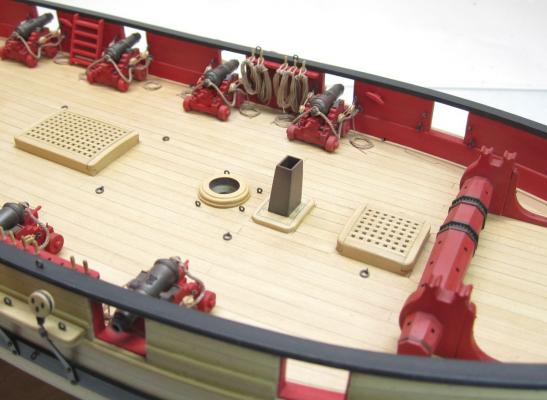
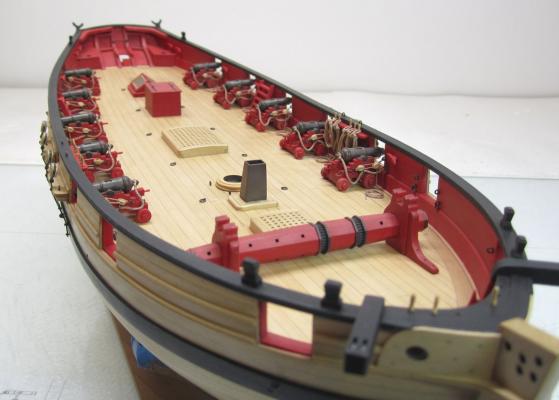
Just a small update even though I have been working on her steady. The guns on the starboard side are completed. The deck rings for the inhaul tackles were added as well. Then I made the galley stack. This was pretty straight forward.....four thin pieces glued together. Measurements were taken from the plans. When it was all glued up I sanded the four sides even more to thin it down a great deal. The thickness of the walls were needed to look like metal so the thinner the better. It was painted black and then treated so the finish looked like the cannon. Hopefully it looks different than the wood parts painted black. Finally I made the mast coat. It is a bit of self indulgence. I realize it wouldnt look like this in actuality but many times they are shaped like this on contemporary models. I prefer it over seeing those pie-shaped wedges. I think that looks very clunky. You can see in the photo how it looked before and after. It started out as a plain washer of boxwood. The I shaped it by hand with the two files and emery board. Next up is the pumps and winch....


- 1,051 replies
-
- 30
-
-
- cheerful
- Syren Ship Model Company
- (and 1 more)
-
That is really looking good. Glad to see you back at the bench. See you in a few weeks!!!!
-
Yes indeed. Those batten strips need to be a "press-fit" into the grating. Not too loose and not too tight. In order to get it just right because the tolerences are so tight. Just run the battens through some sand paper. Just once or twice and try it again. You will know when its right. It will fit really nice. Dont ever force it because of impatience. AND this is what holds the grates together although I would still apply a wash of diluted yellow glue. these parts are made just a hair larger or within a close tolerance to what is needed. It would have been far worse to make them even a hair smaller than needed and loose. Even though this would make assembly easier, it would not achieve the same result. Pulling the battens through some fine sandpaper is a piece of cake. The results are well worth the effort. This would also be true if you were making them from scratch. Chuck
-
I find it easier to construct the gratings first...then build the coamings around them. This way you get a nice tight fit with them. No open holes along the sides and certainly no spaces. If you are also creating the grating with a camber as it should have, then when you build the coaming around it, you will have an easier time matching it. If after you are done the completed hatch is slightly larger or smaller than your plans it wont be noticeable yet you will have a really tight and beautifully made hatch.
- 843 replies
-
- 3
-
-
- niagara
- model shipways
- (and 2 more)
-
That willmake an excellent workshop. You are doing some great work on Cheerful. I am sure you will be up and running very soon.
- 310 replies
-
- 4
-
-
- cheerful
- Syren Ship Model Company
- (and 1 more)
-
Yes indeed......
-
Well done and its great to see you working on her again Russ.
-
Basically to harden the rope.... Before you remove the rope from both sides of the rope walk, After cutting one side only, you stretch the rope. Dont tug it back and forth. Just give it a gradual gentle pull until it stretches no further. Then hold it there for a few minutes or clamp it there. Do this while you still have control of the rope. If you just cut it free willy-nilly from both ends, and you havent achieved balance from the opposing tensions it will unravel and snake up and get tangled. I am sure this is familiar to many. So this is the opportunity to control the rope as it is still attached to one side of the rope walk. Gradually let it unwind until it no longer untwists. This is the point where you have achieved balance in the opposing tensions. It should hang very nicely. The opposing tension is what keeps the rope together....twisting all three strands in one direction individually firstvand then twisting all of those strands together in the opposite direction. Its hard to achieve perfect balance. But if you can keep the rope in control after cutting one side free as you let it naturally untwist into balance......you are ready to harden the rope. Hope that makes sense. I harden the rope by gently stretching and holding it there. When you eventually cut the rope completely free....no twisting and unraveling or snaking together in a tangled mess. If after you do this, you examine your rope and it is laid up to loosely...it just means you havent put enough initial twists in the individual strands. You didnt build up enough energy and tension so it keeps from unwinding to a loose lay. So the next rope you make should have more tension built up initially in the individual strands . Its trial and error until you discover the proper recipe. But once you do...you can make perfect rope every time..... and very consistently. Again..this is very hard t do on one of those self-contained automated planetary machines. Finding that balance in tension and hardening is tougher.
-
Rope Making Basics
Chuck replied to mikiek's topic in Rope Making/Ropewalks's Discussions about Rope Making
That would actually be a great idea.......use the thicker stuff first. That is how I taught my son to make rope. He kept breaking the smaller lines until he got used to it. Actually I was thinking of making a video...just have to convince my kids to shoot the video. Ultimately I would like to offer my new rope walk to the masses some day....but there is a learning curve and you must get the feel for it. The "feel" has a lot to do with it. Something I think only a video could most easily convey. I cant even get them to take out the garbage so its just one of those things on the "to-do List". Chuck -
Rope Making Basics
Chuck replied to mikiek's topic in Rope Making/Ropewalks's Discussions about Rope Making
Thats the issue...I usually just tie it to the three/four hooks of my rope walk and spin it in the opposite direction. It unlays and then after that it lays up in the other direction. Just like that I now have left handed thread to make my right handed rope. All in one step. As it unlays initially.... the rope walk end is actually walked back...or the gap between the two actually gets wider. Before closing up again as it begins to twist in the other direction and tighten. I dont do it ahead of time as you mentioned. But I suppose you would have to in order to wound it up on those spools for the machine. The mono thread comes in limited colors....I really dont use it for my rope. I just know its out there. DMC is the ultimate best stuff readily available for rope making. The only draw back is that it has to be dyed. I used it initially before deciding that I didnt have the time to dye all of the rope I sold. It is all right handed. If I wasnt selling 1000's of feet of rope each month I would still be using it. It great stuff and I never minded dyeing it for just my own use. Rit dye is what I used. It comes in many colors...great stuff. Both lefty and righty ropes. -
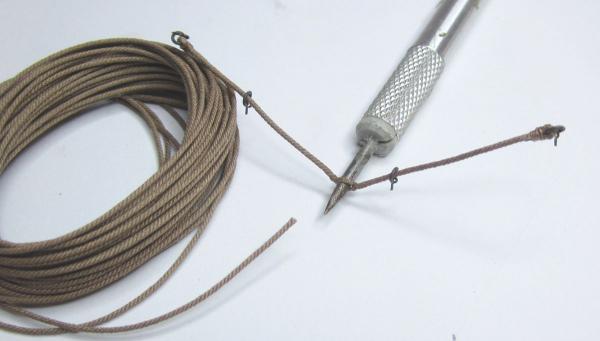
Ken Your rope looks great. Well done. Although folks search and search for the best material.....you nailed it. DMC Corrodent is the best stuff available retail fore rope making. I would still be using it if I didnt want to spend the time dyeing the rope afterwards. There is just too much rope to be made on my end for that. So I get mine custom dyed. Aunt Lydia's is really lumpy/fuzzy and so is Lizbeths. The later is not even a consistent size. I would stay away from those unless you need to avoid dying as well. The wax wont keep the fuzz down for ever. The 10 sizes available by DMC make it easy to make any rope size you want. No fuzzies and no lumps. Its really smooth stuff. Just one tip however. Most folks never twist the rope enough initially when doing the individual strands. The hand crank makes that work hard. I would suggest doubling the initial twists on your rope and this will create a tighter lay of rope. It just looks better. I have removed the cranks and use a hand drill on my rope walk as was mentioned. Since getting the laser cutter I no longer use the Expo rope walk. Last three months or so. Its just too cheaply made. I made my own from solid cherry with larger gears. The rope lays up nicer that way. Much Tighter and I now also have four strand capability. I start with the ends 28 feet apart. Then as the initial twisting occurs the rope walk is literally walked down the table as the thread tightens. For my larger sizes I can walk it as far as 7 feet for the initial twists. Then the three...or in my case sometimes four strands are twisted together on the other end. With my new rope walk I have created a newer rope-recipe for making rope so it lays up even tighter. DONT FORGET TO HARDEN the rope after you make it. Thats the most important part. See how tightly this rope is laid up......more initial twists are needed to achieve this affect. Since making my own rope walk I have been making it with an even tighter lay to it. This is a photo of my breech ropes with my newer .035 rope. Its four stranded as opposed to three. It allows for a neat little splice simulation on the cannon breech as just wrapping around the button looks so out of scale and clunky. This is a photo of how I quickly and not being an engineer changed the expo rope walk when I used it. I used this up until three months ago to make all of my rope. It works fine. The principle of rope making is still the same. I am no rocket scientist for sure.... but it beats cranking by hand. As mentioned I can lay up a 20-25 foot length of rope in 5-8 minutes.
-
Rope Making Basics
Chuck replied to mikiek's topic in Rope Making/Ropewalks's Discussions about Rope Making
Try searching for Cottolin thread or Cotolin. Venne Cottolin is a very good brand but limited by its retail sizes. Just like Coats/DMC many of the sizes are only available commercially though...that means you have to order a minimum of $300 per order and $4000 per year as a Manufacturer or Industrial Distributor. They wont sell to hobbyist. It really sucks. They wont even talk to you unless you commit t ordering the minimums. I have to buy it whether I need it or not to make the minimums each year. Colors are custom Dyed Or you could go with White or Natural unbleached. Its 60% cotton and 40% linen thread and can often be sourced left or right hand. Not sure about the smaller sizes though. You can even search for mono filament thread. Its what I use although all of my small thread is left handed when I get it. I also get two larger sizes in Right handed. Its custom made in Ireland. Not available retail. The issue with the custom stuff is you have to buy a ton of it each time. But I have seen it both ways I think online from specialty weavers and some small places. But only in White or natural unbleached mostly. And almost always in Europe although there is a guy in Canada that offers some. But its a fuzzy mess. If you dont mind going with synthetics...this stuff is really good and available in huge sizes for making larger ropes. http://www.coatsindustrial.com/en/products-applications/industrial-threads/terko-satin But again...only available commercially in the oddball sizes you would want. And the minimum orders are huuuuge!!! That being said.... The issue is primarily with the machine you are using.... Or any self-running machine vs. the old fashion kind. Using a more traditional rope walk that the tension is controlled by you is easier to reverse any right hand thread so it doesnt break. You can get a feel for just how much tension to use while walking the ends of the rope walk as the rope lays up. I have very little breakage on thinner ropes because I have grown accustomed to how much tension and how tightly you can keep the thread while the rope lays up. This is something not easily done with those self-contained machines. One day I challenged myself to try and make a 30 foot length of rope laid up using YLI 100/2 ply cotton lace makers thread. This is incredibly thin stuff. I just wanted to see what size rope would result...I doubt stuff that small would stay in tact in those machines. Chuck -
HM Cutter Cheerful 1806 by Erik W - 1:48 scale
Chuck replied to Erik W's topic in - Build logs for subjects built 1801 - 1850
Slow and steady....... Looking Good -
HM Cutter Cheerful 1806 by Erik W - 1:48 scale
Chuck replied to Erik W's topic in - Build logs for subjects built 1801 - 1850
Its your project and you must make it look the way you would prefer it to look. I wouldnt do the chamfer thing on those planks however. That often looks pretty cheesy...especially if its not done to all of the planking. Just remember that the two planks on our model are much wider than the area on the Rogers model (which isnt really the Cheerful). It will in fact be wider than the wales I believe. Except however at the stern and bow where that strip gets narrower. This is taken directly from the original drafts. So that band of Blue would not be consistent and it would appear to be even prominent than the wales. I came very close to painting it the same way. But after using colored paper on my model to do a test I found that I didnt like it much. The odd shape with the width change just made it look like a mistake. But hey that just could have been me.....maybe you would feel differently after seeing it. I would recommend that you do the same to test how you feel about it. Take some photos and do a comparison. As far as sanding a chamfer into the edge of the plank so it would show up...That would be a bad idea. It is not something that was done in reality but it would look very deliberate as if it was. In most cases the blue will not block the fact that there are two planks anyway. That is something that would be very hard to undo after the fact as well. -
HM Cutter Cheerful 1806 by Erik W - 1:48 scale
Chuck replied to Erik W's topic in - Build logs for subjects built 1801 - 1850
That looks very good....yes it looks weird but it will all come together. Very neat planking job. Chuck -
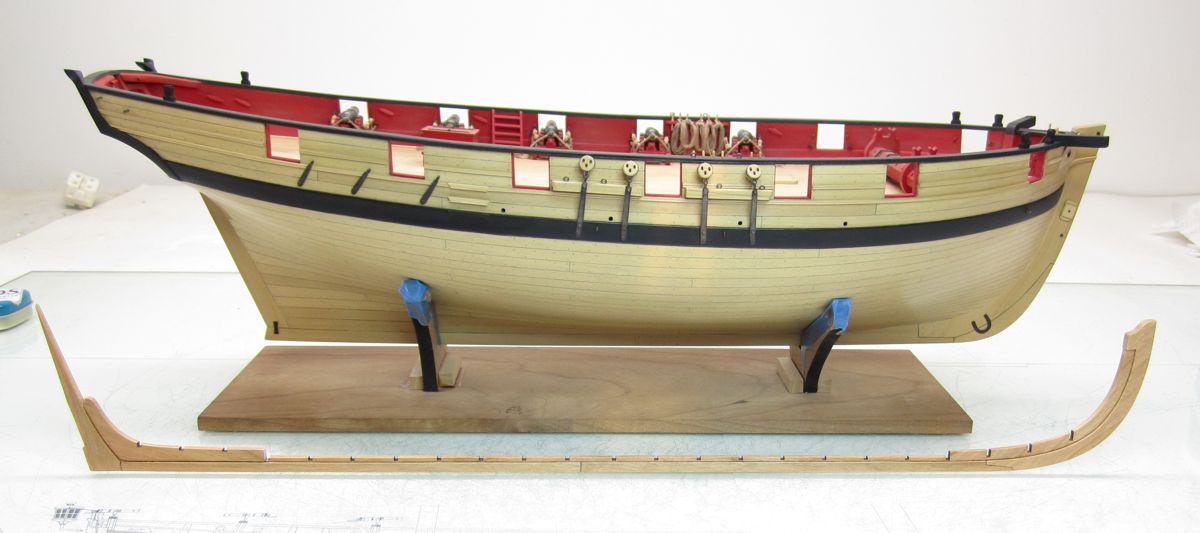
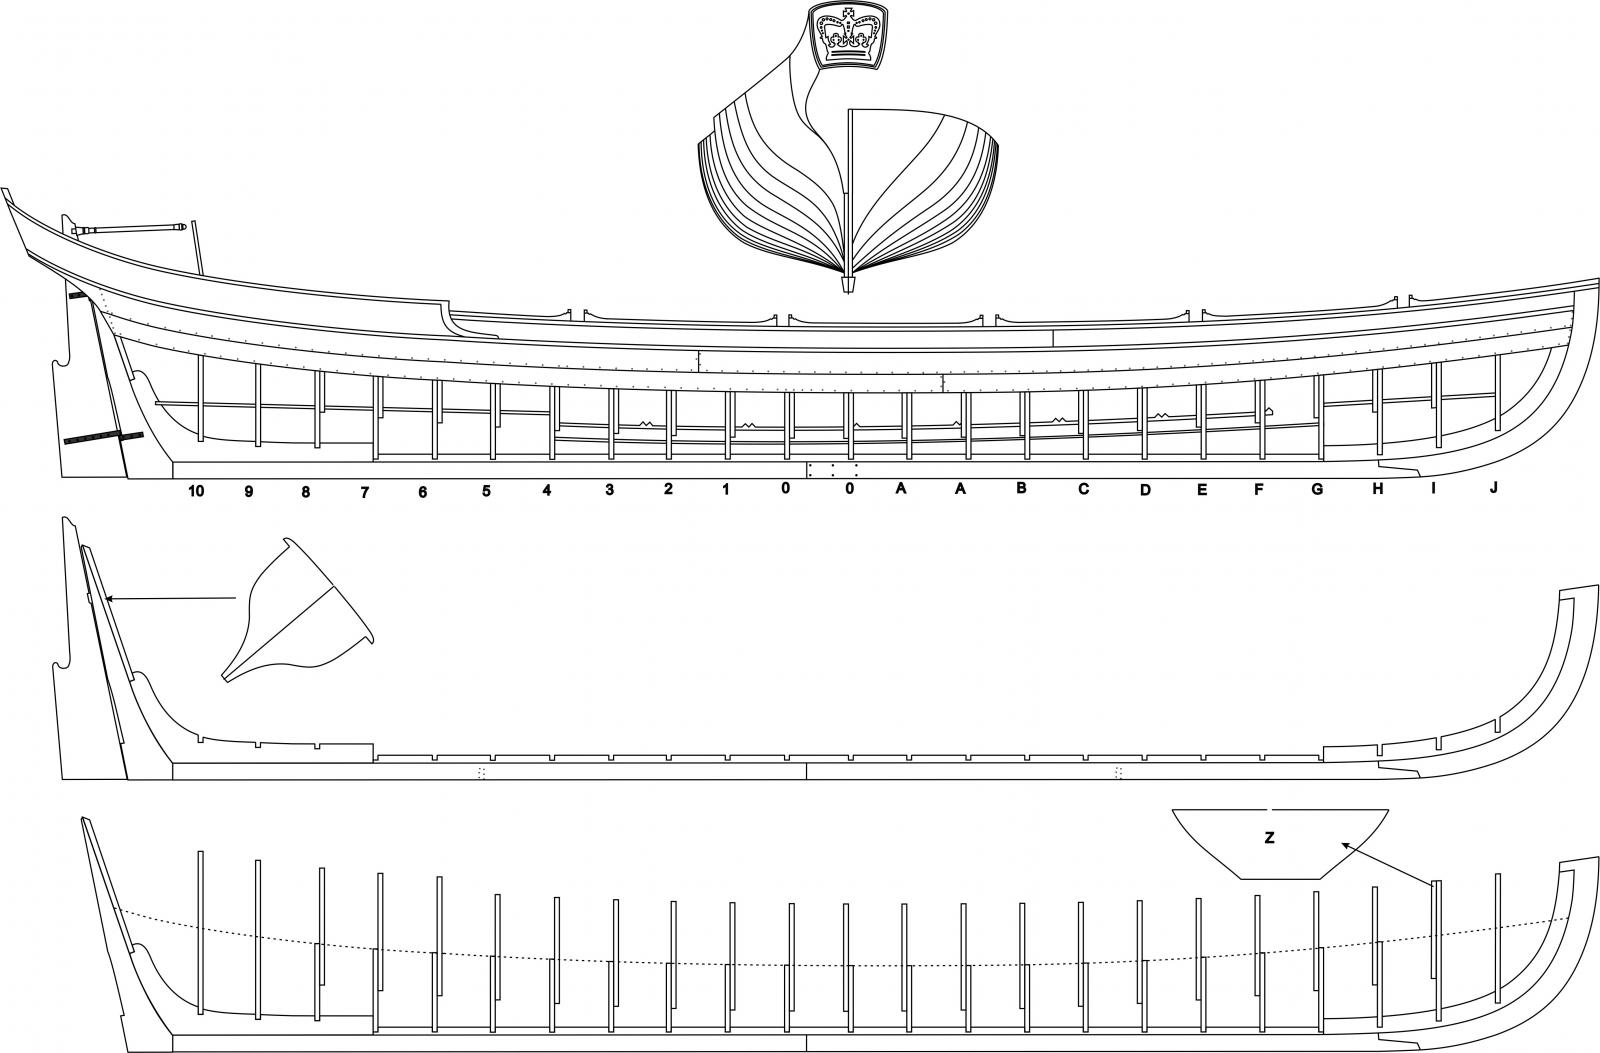
Thank you all very much.....got tired with the repetition of making cannon carriages today....soooo I had prototype keel parts cut out for a while and they were staring at me.....so one project that is slowly getting started is a kit prototype for a Queen Anne style Admirals Barge or Shallop 1700ish. I am testing some wood choices and here is a look at the keel assembly in cherry in comparison to the Cheerful for size...its 1:24 scale. Now back to those carriages...sorry to digress but I had to get that out of my system ....it was bugging the heck out of me just looking at the parts sitting on the table. Chuck

- 1,051 replies
-
- 25
-
-
- cheerful
- Syren Ship Model Company
- (and 1 more)
-
Very nice!!! Isnt the repetition fun??? I am doing teh same thing and it drives me nuts.