HOLIDAY DONATION DRIVE - SUPPORT MSW - DO YOUR PART TO KEEP THIS GREAT FORUM GOING! (Only 13 donations so far - C'mon guys!)
×


michael mott
-
Posts
5,195 -
Joined
-
Last visited
Content Type
Profiles
Forums
Gallery
Events
Everything posted by michael mott
-
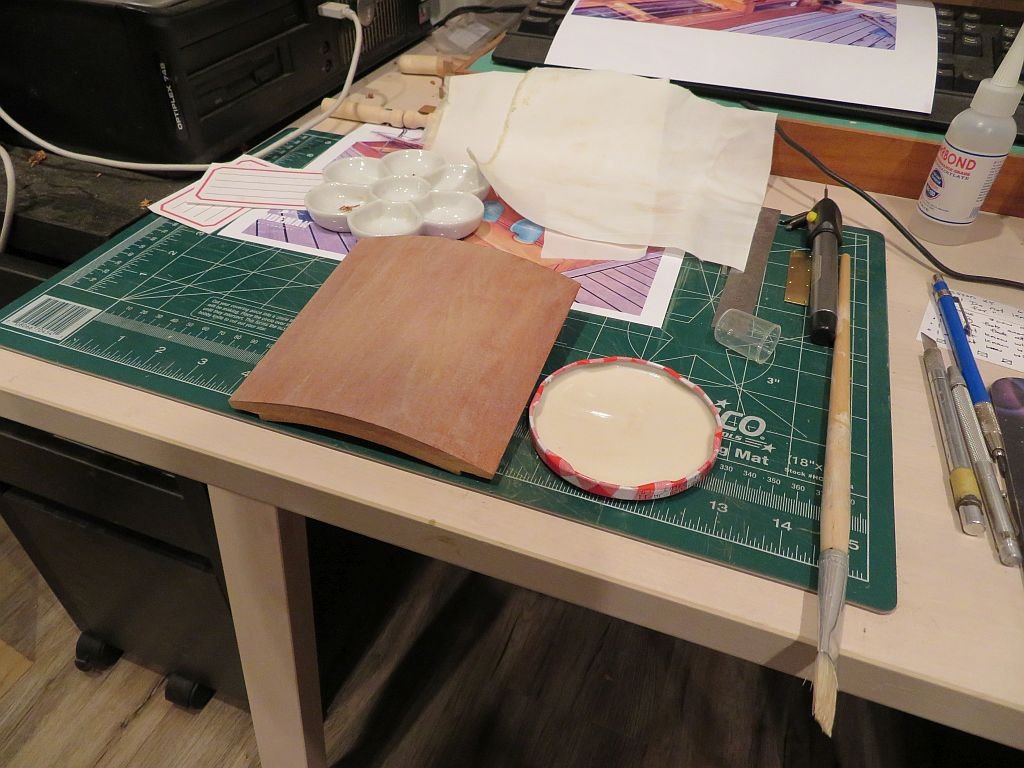
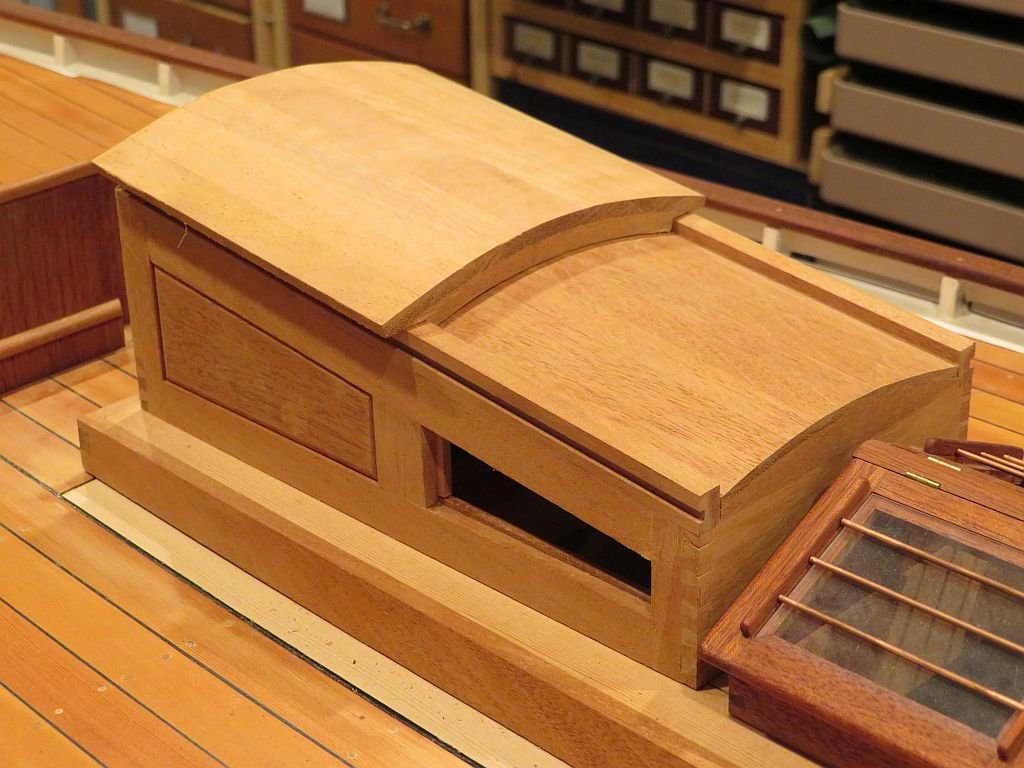
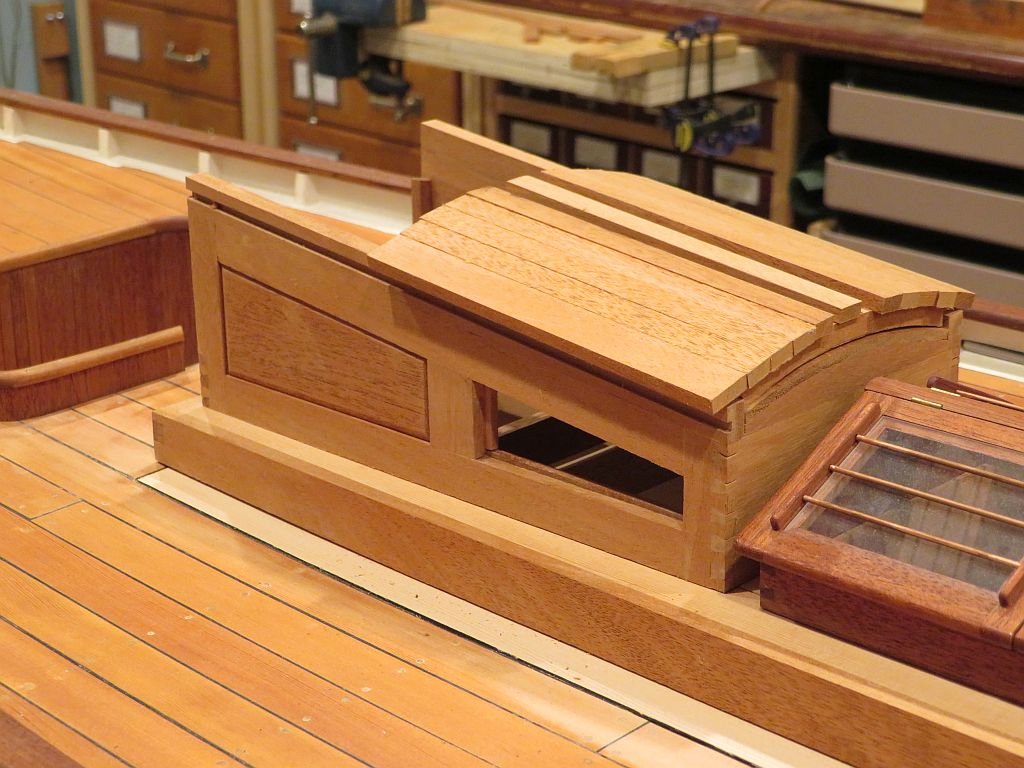
 Mark, Kurt, John, and Grant thanks for the links and kind remarks. Today I put the canvas covering on the hatch, first I coated the mahogany with diluted Tightbond III then laid some cloth a polyester cotton blend. Then coated it again with the dilute glue I used a model airplane heating iron that is used for shrinking fabric on the wings etc. to set the glue. then trimmed the edges and re-glued the edges to seal them. I trimmed the underside flush ready for the capture cleats that will run in the grooves The edges of the canvas will get rounded wooden mahogany capture strips with small brass screw. Michael
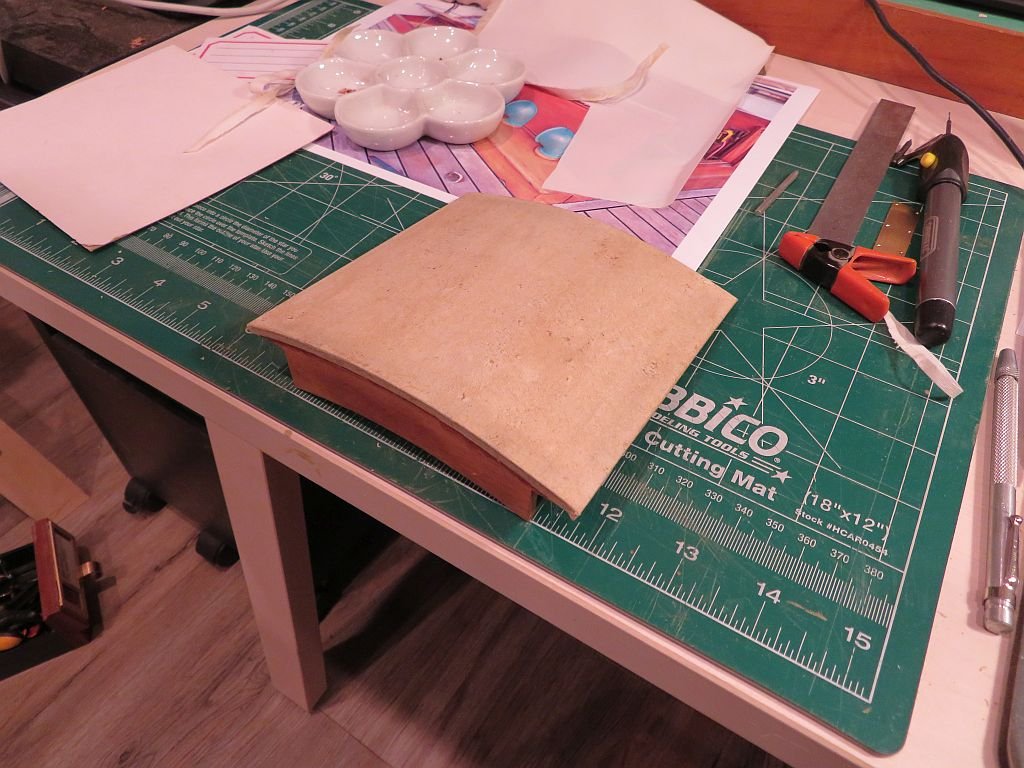
-
Ed I am constantly amazed by the amount of detail that you are incorporating into this model, It is making me want to revisit everything I thought I needed to know about rigging. And how innovative were the sailors of earlier times in making the wind and cloth work for them as efficiently as possible. Michael
- 3,618 replies
-
- 3
-

-
- young america
- clipper
- (and 1 more)
-
Jack , Druxey, thanks for the tip I am not sure why I didn't think of this. I looked on the net and there are quite a large selection of watch and eyeglass screws in sets and kits so perhaps I will try that source. Michael
-
Thanks Druxey I have test set the port side rail and plate. It would be good to find some actual screw this small. Michael
-
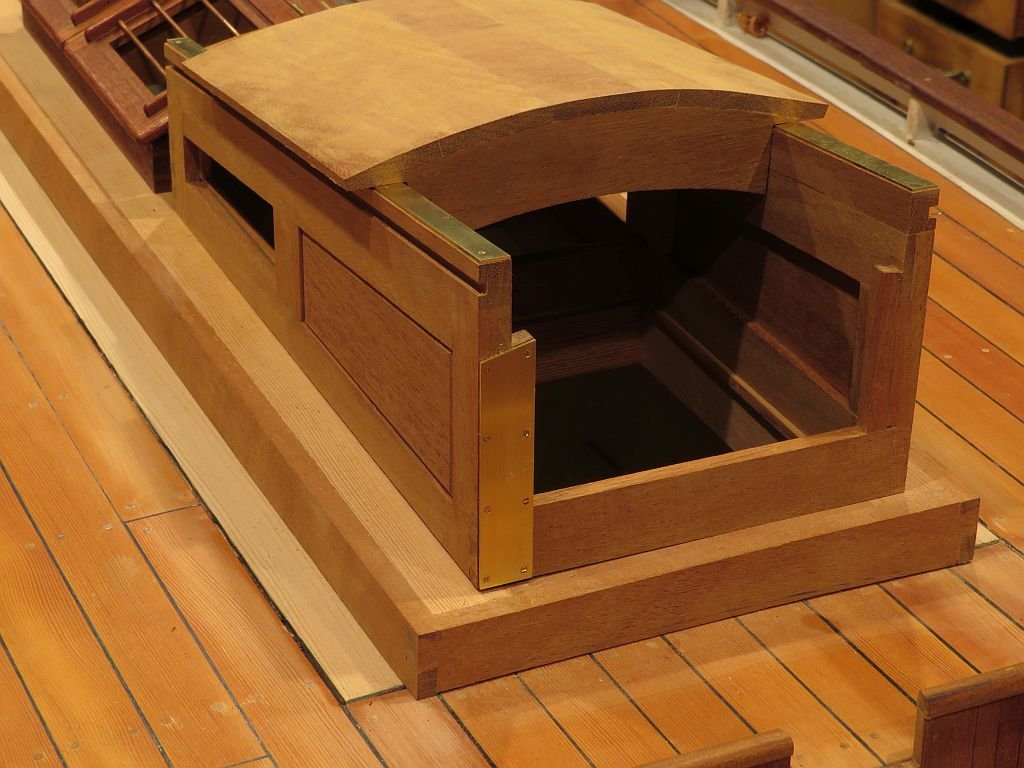
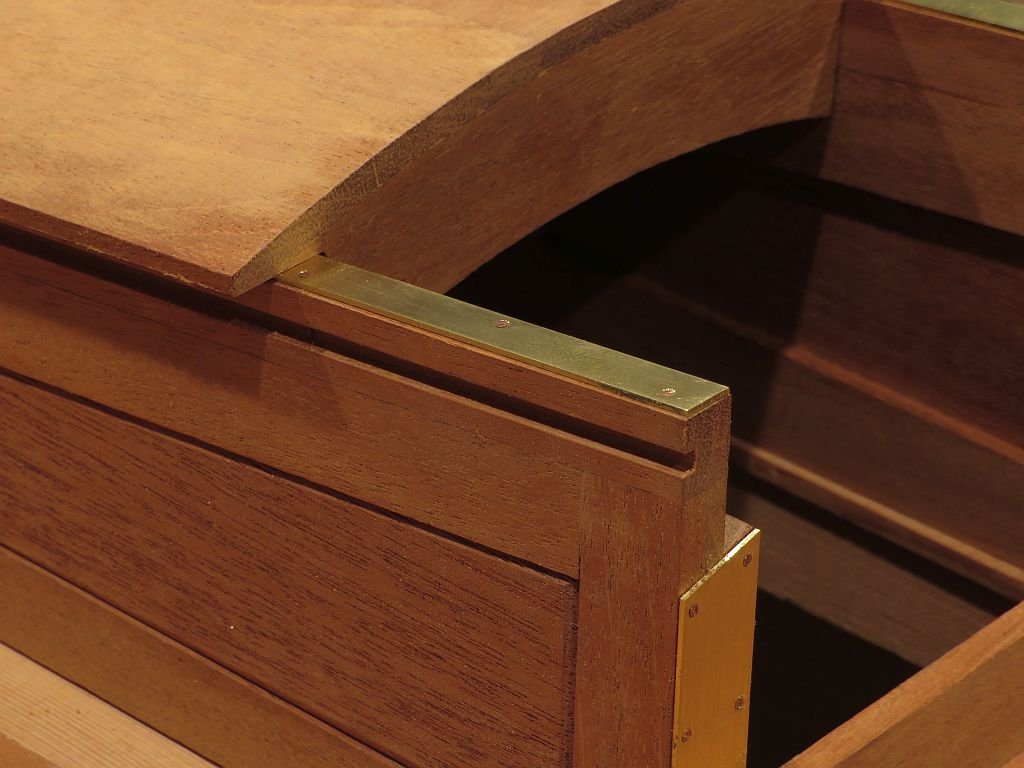
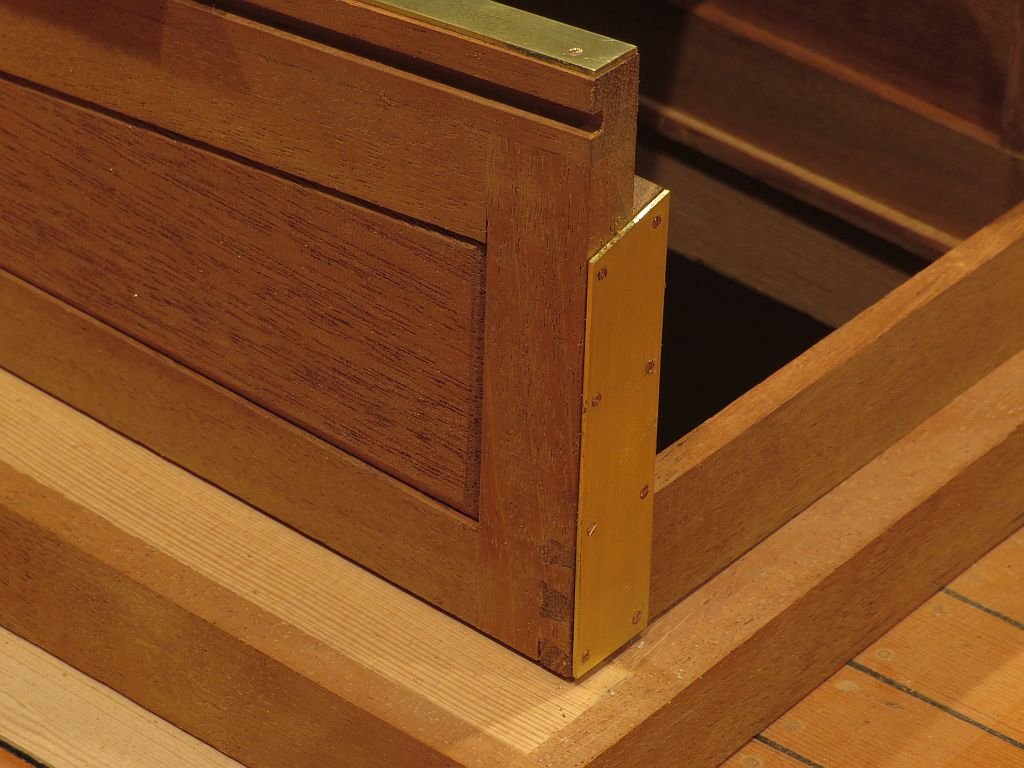
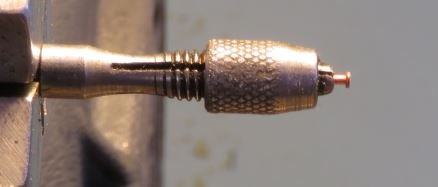
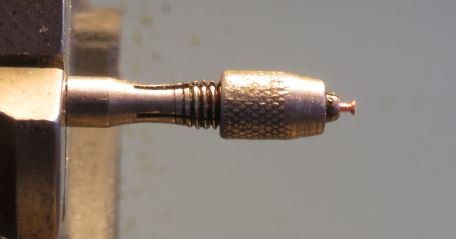
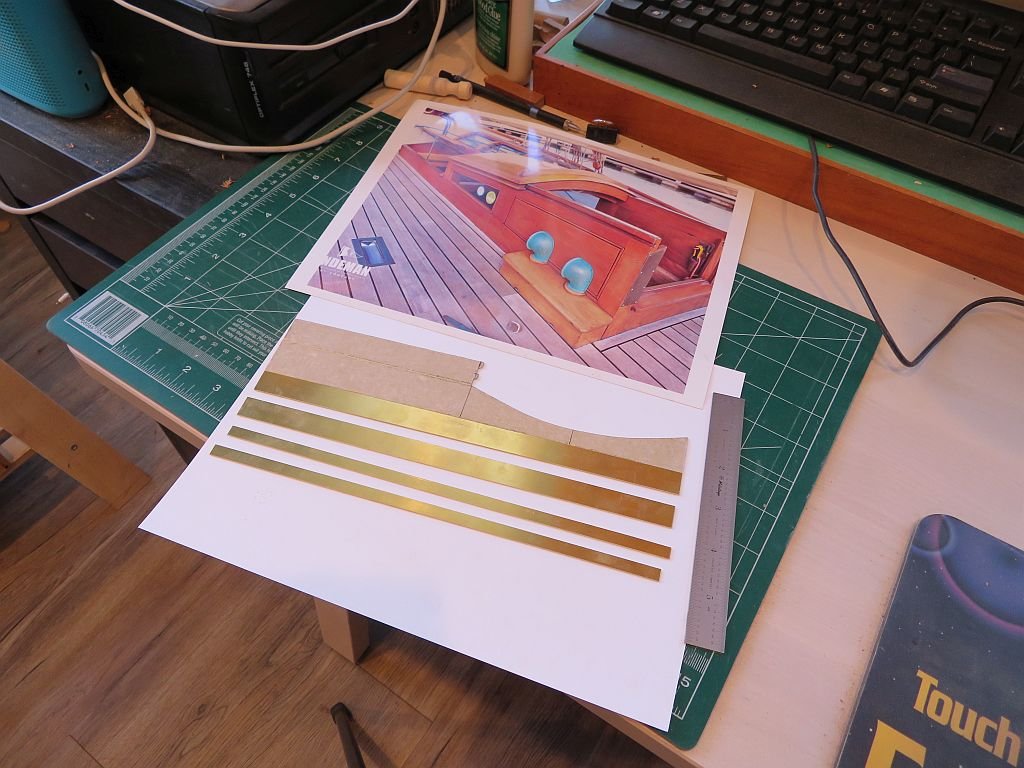
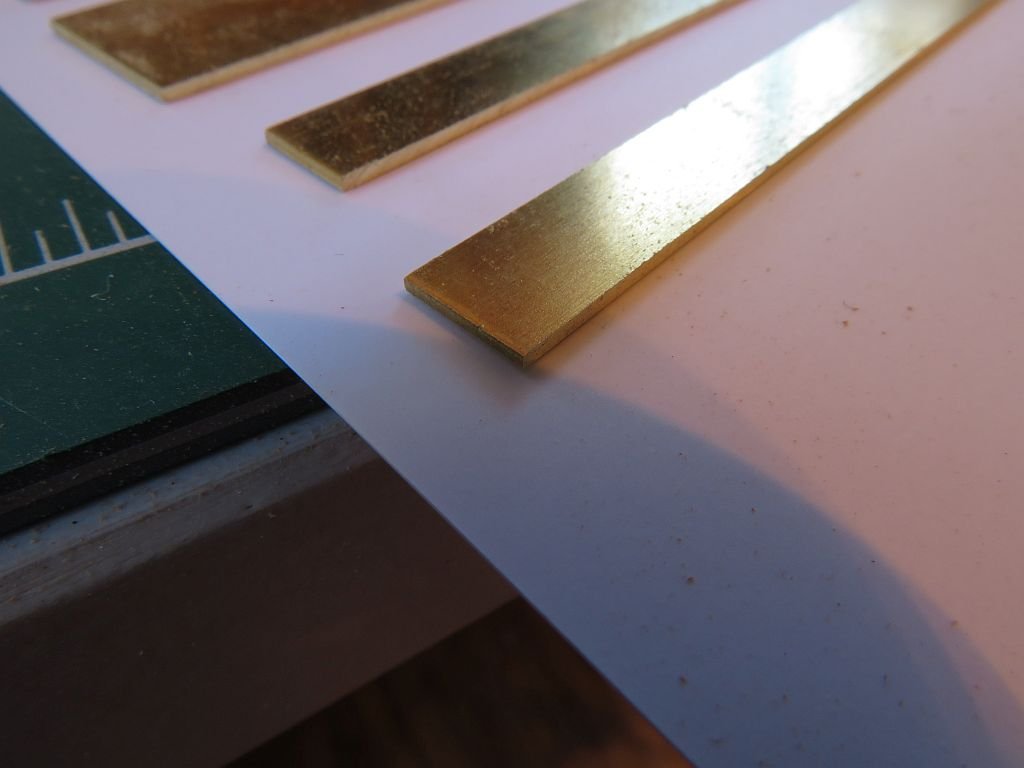
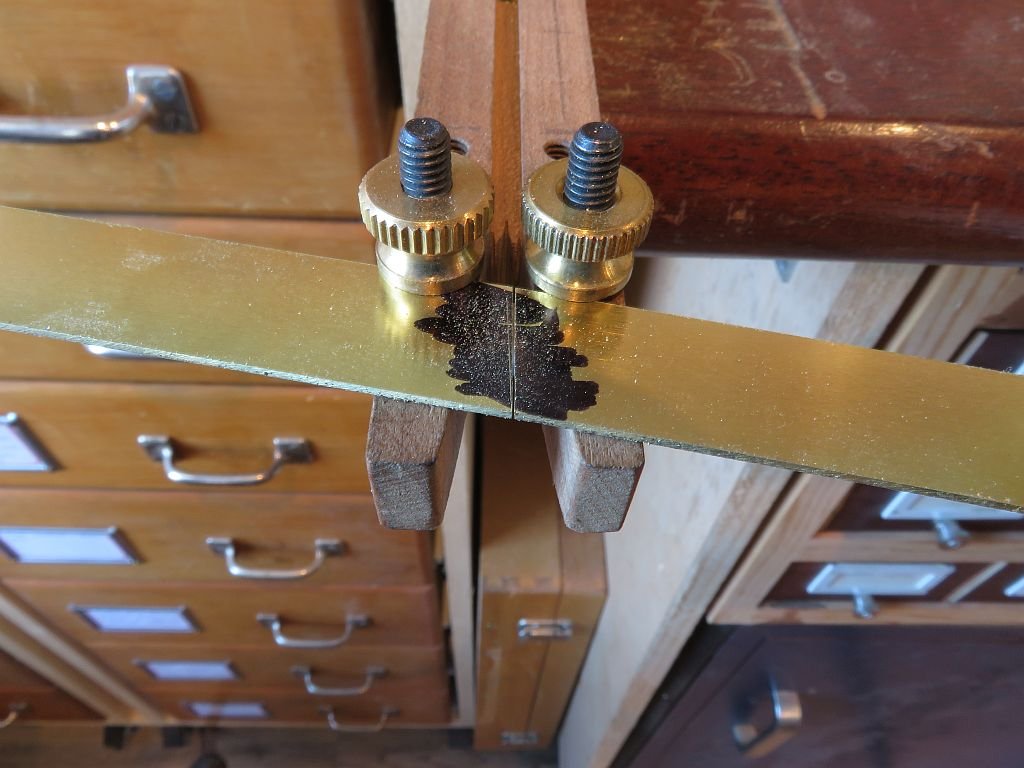
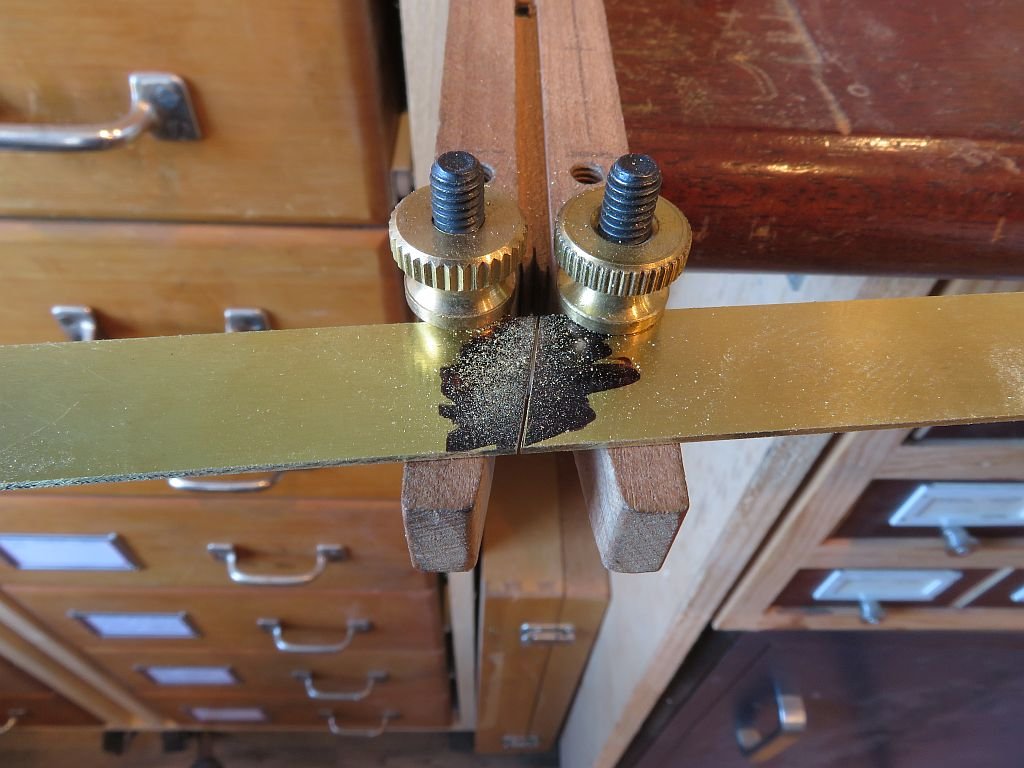
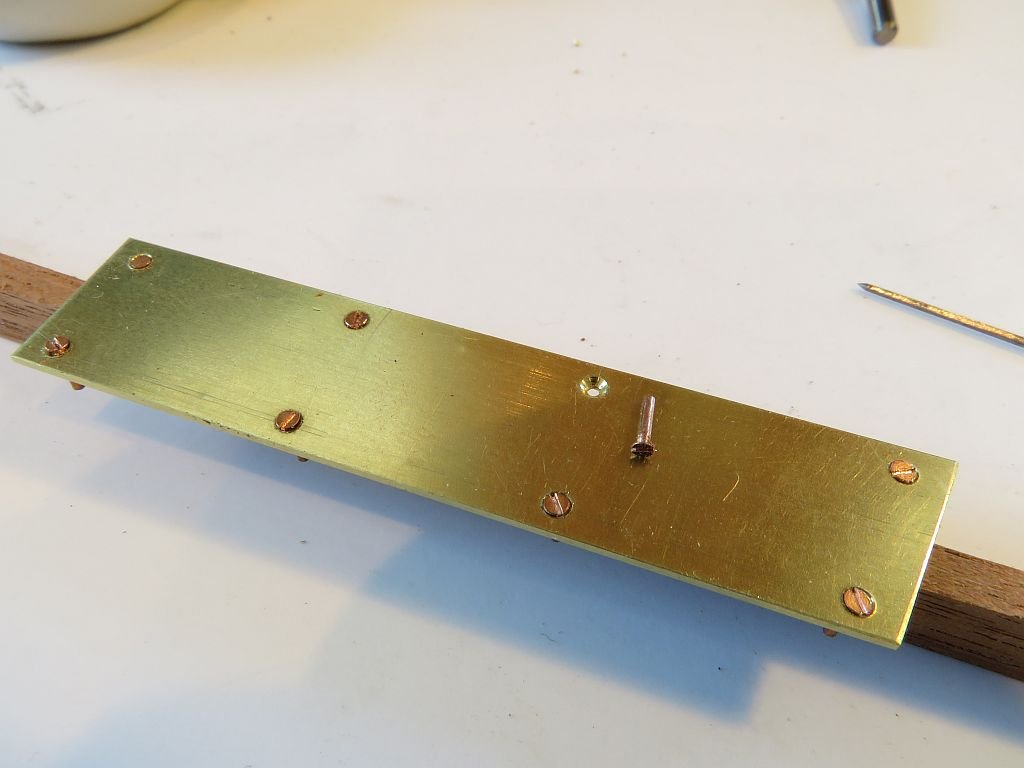
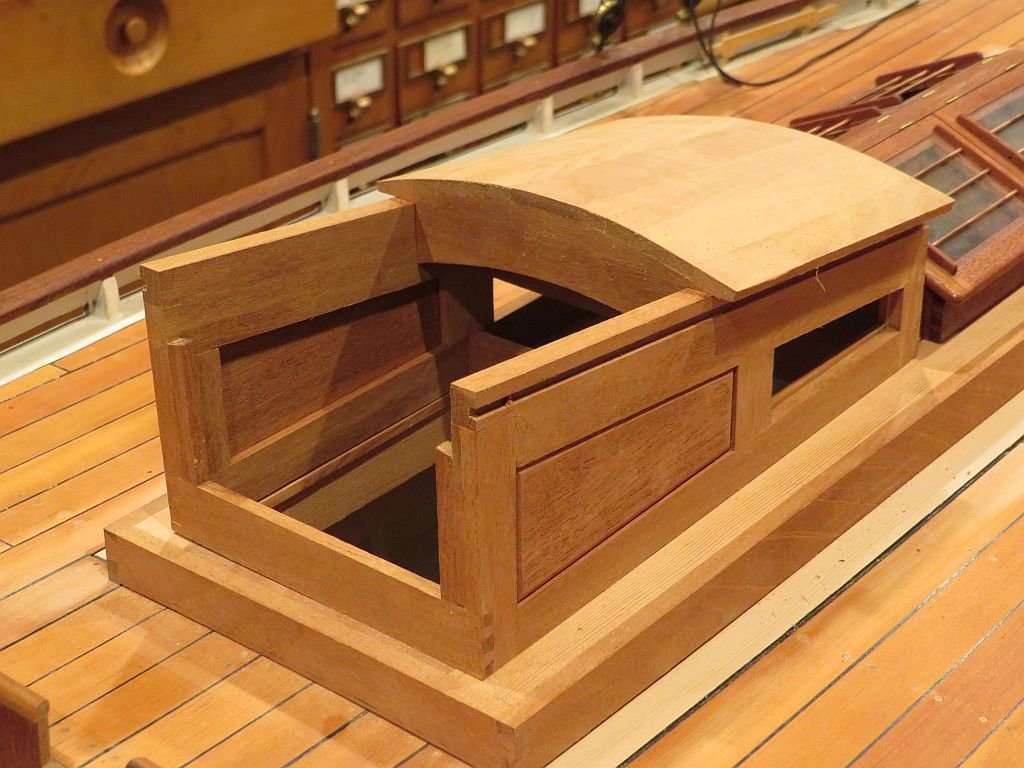
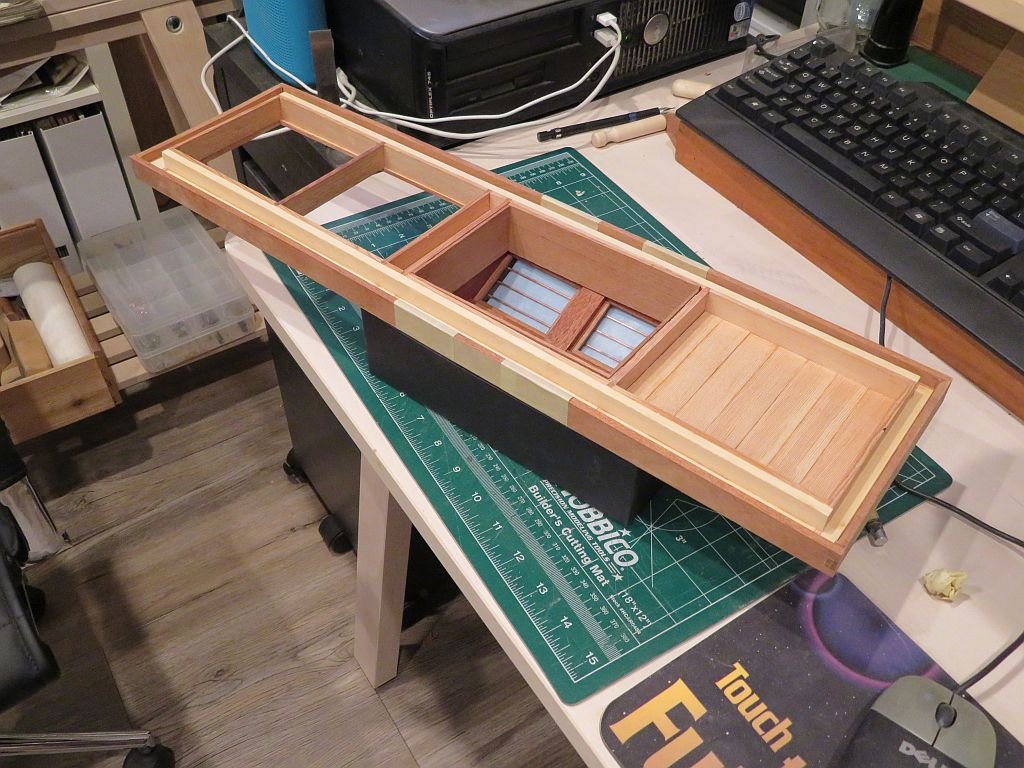
Thanks Ed, and for all those who added likes. Today I started on the brass metalwork for the two plates at the entrance to the companionway and for the top rails. first order of the day was to cut some strips from the .031" sheet stock. I cut 3 pieces 1/4" wide and one 1/2" wide. I used my new 200x 1.2mm slitting saw on the big table saw. I was really pleased with the resulting cuts. and a close up of the edge straight off the saw. after measuring the vertical plates I cut the angles with the jewelers saw. The port side one was a bit sloppy on following the line . The starboard one was a lot better. Next the holes were drilled and countersunk for the fake 3/8" scale wood-screws. The small copper Sig rivets had a head diameter of .055" and shaft of .023" I chucked these in a pin vice in the lathe and filed the pan head to a countersink profile. Tomorrow or later today I will fit them to the companionway. which has been sanded ready for the canvas and the capture runners Michael
-
Byrnes Table Saw Tips (requested)
michael mott replied to Matrim's topic in Modeling tools and Workshop Equipment
Dave I like your solution for multiple cuts, this will work on larger saws as well. One would need to be careful to ensure that the cut pieces can be cleared easily though. Michael -
Congratulations Toni on the completion of your model it really looks superb. Michael
-
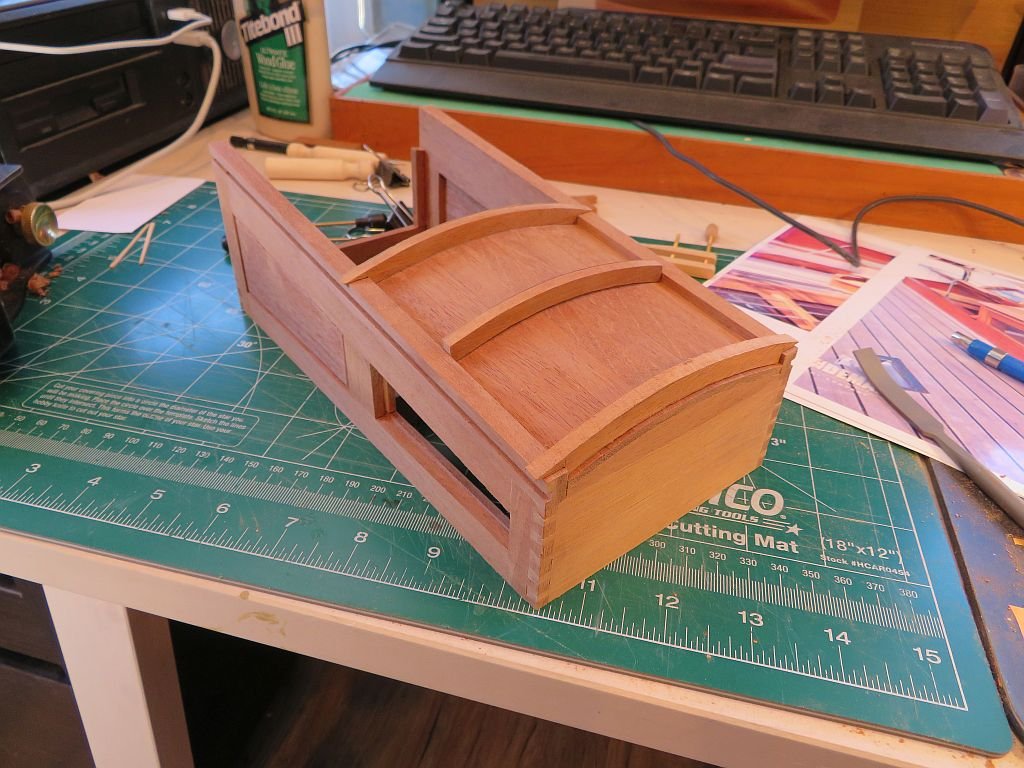
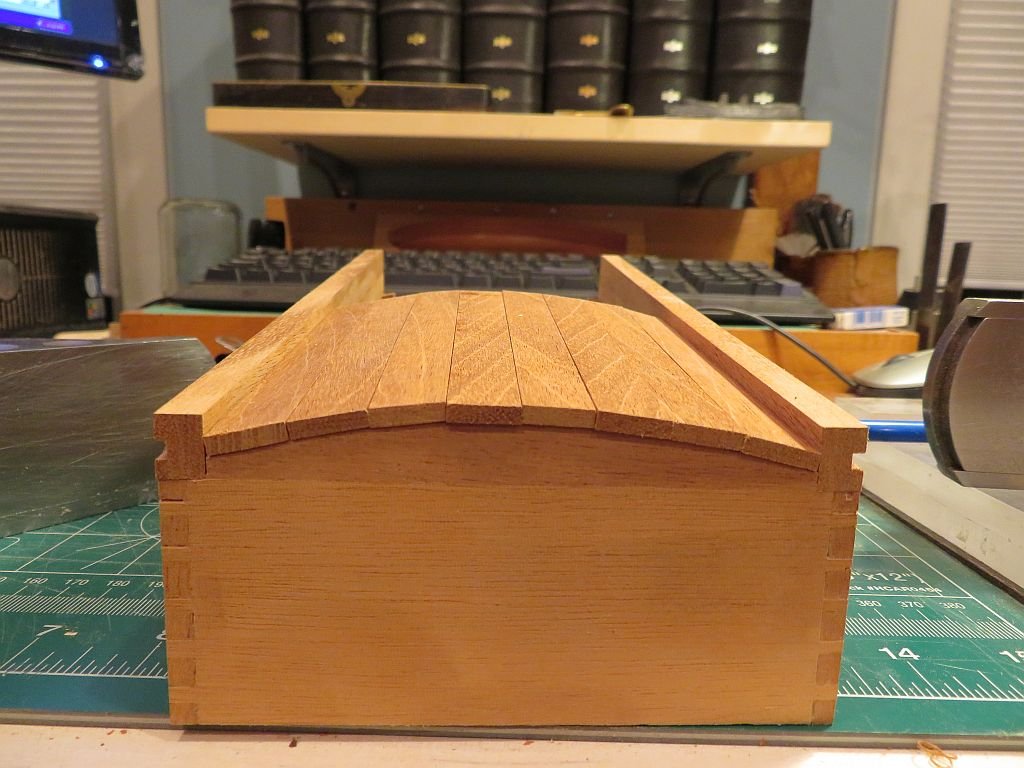
Hi Denis yes the deck will need some finishing later. Today I began fabricating the sliding hatch. The cross members were shaped by clamping them together then gluing the longitudinal planks a couple more to go and then sand to a smooth finish for the canvas top which will get painted white. There will be brass runners along the top of the rails. Michael

-
Lovely clean workmanship Chuck, I am always amazed by how big 1/16 square stock looks in a close up picture. and then see the results of making it cylindrical. Nice metalwork too. michael
- 421 replies
-
- 9
-
-
- medway longboat
- Syren Ship Model Company
- (and 1 more)
-
MONTAÑES by Amalio
michael mott replied to Amalio's topic in - Build logs for subjects built 1751 - 1800
Every time I look at your work I realize that I need to work at getting better in my own work. your example clearly shows what is possible with practice. Michael -
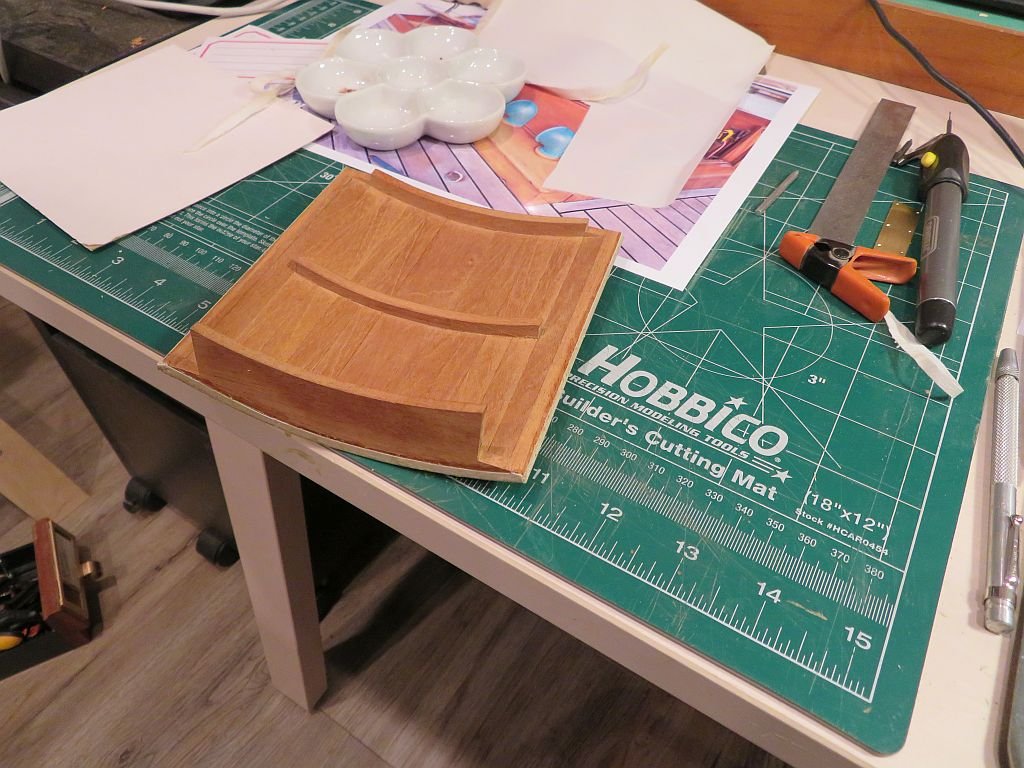
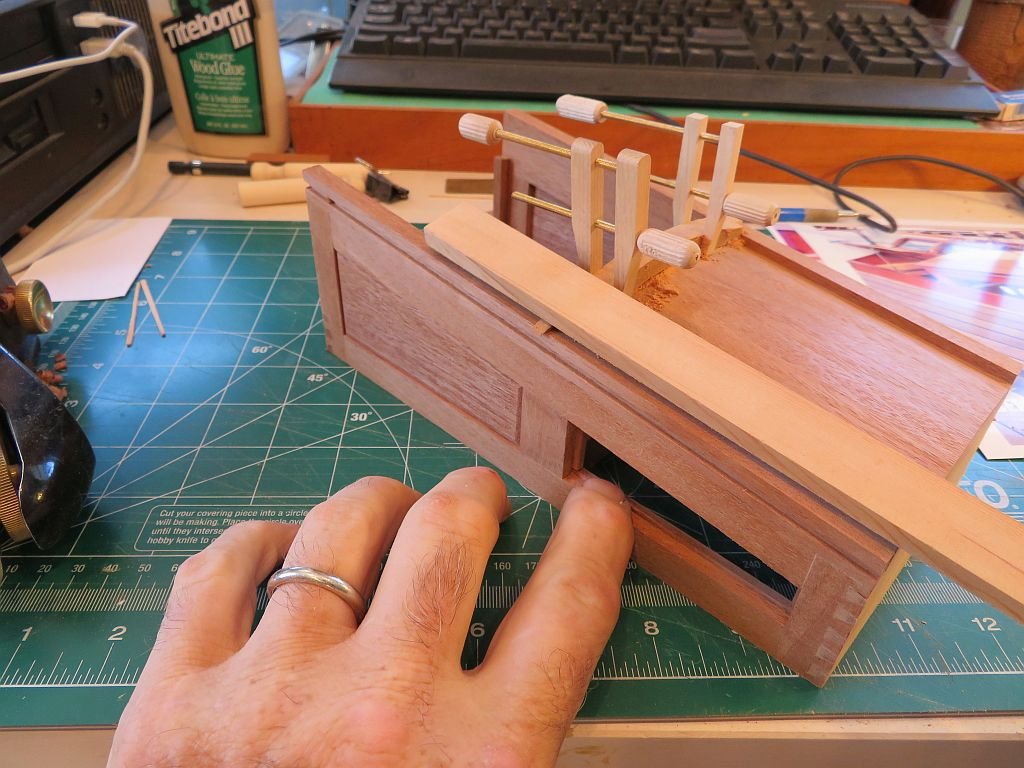
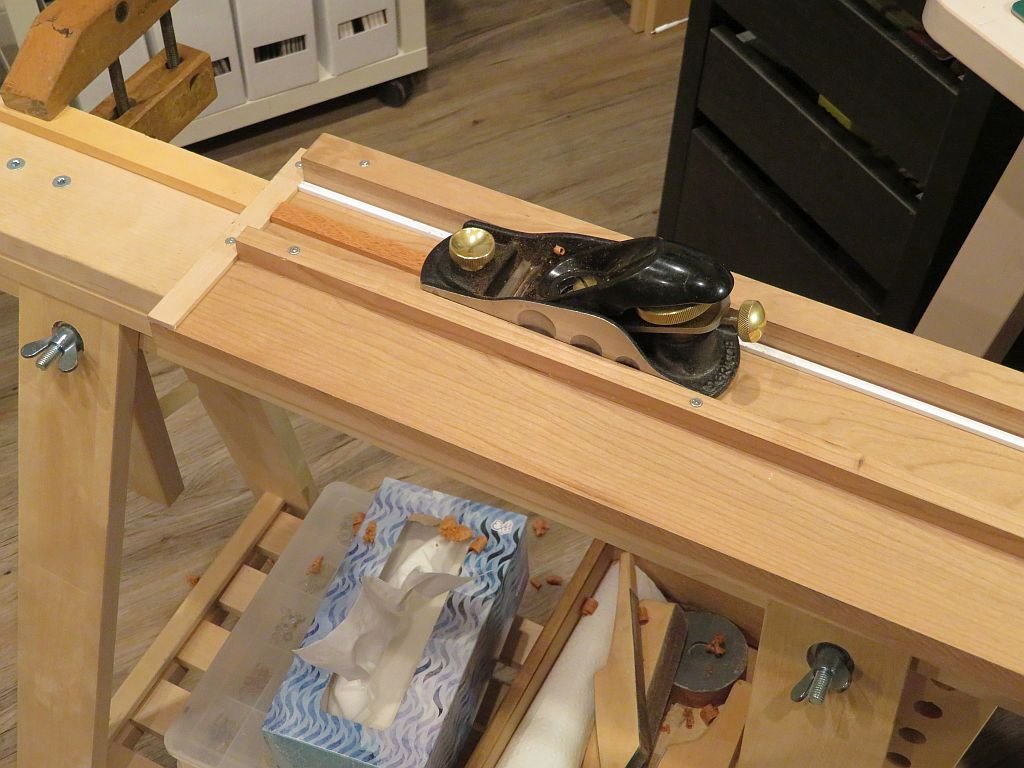
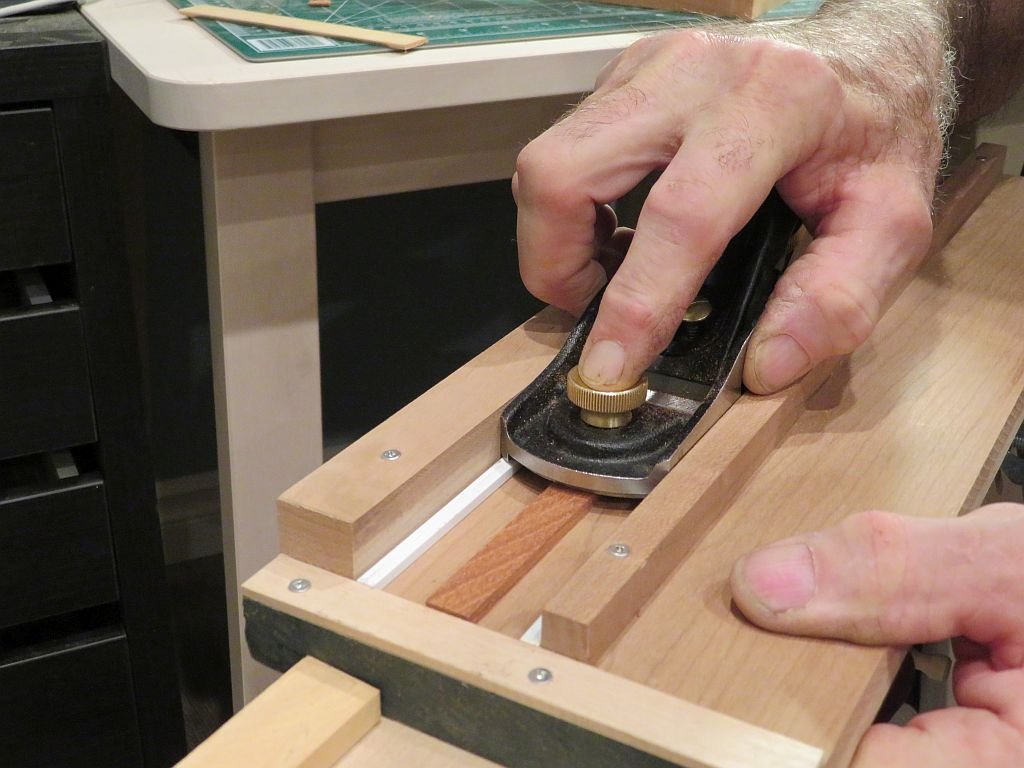
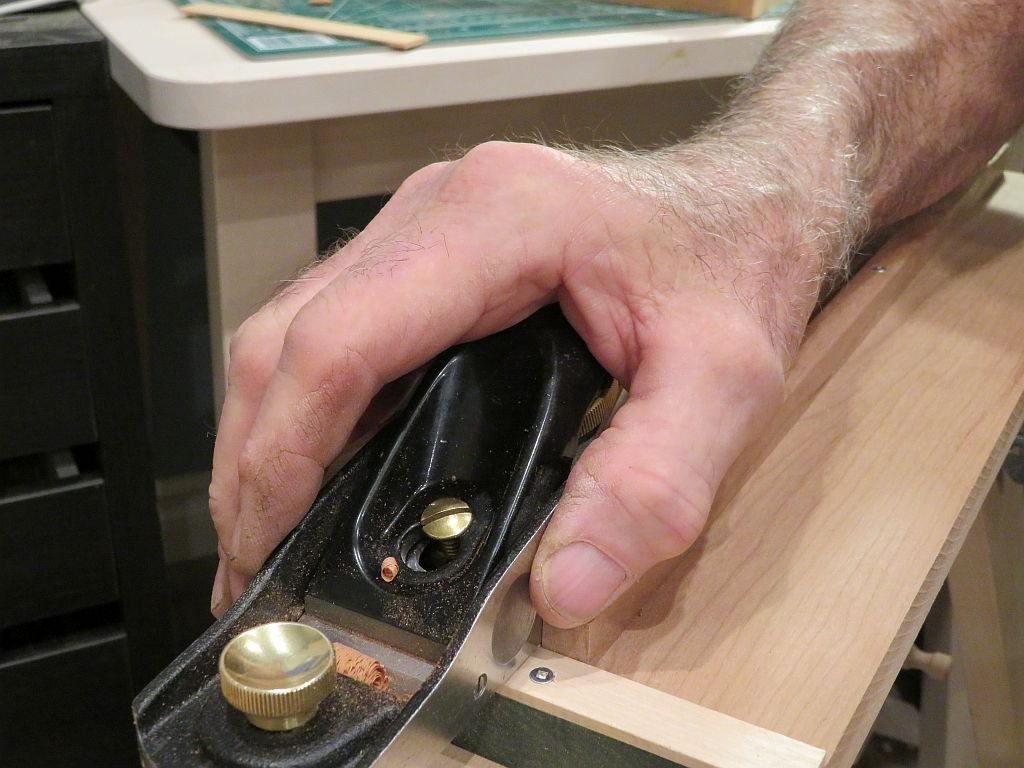
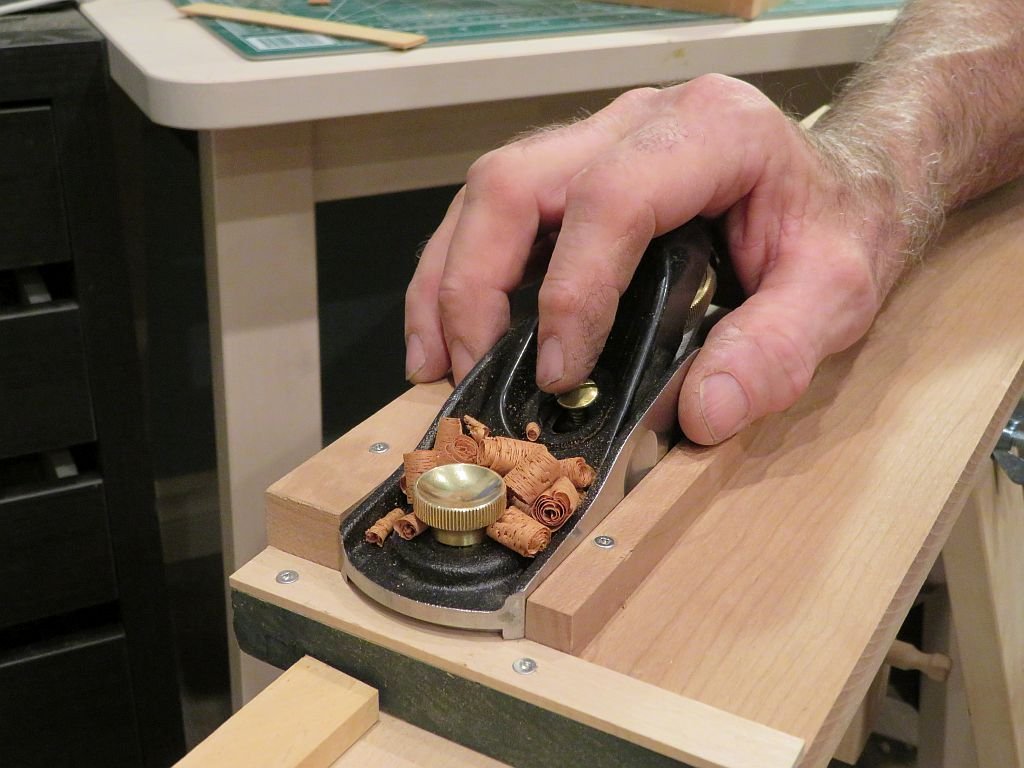
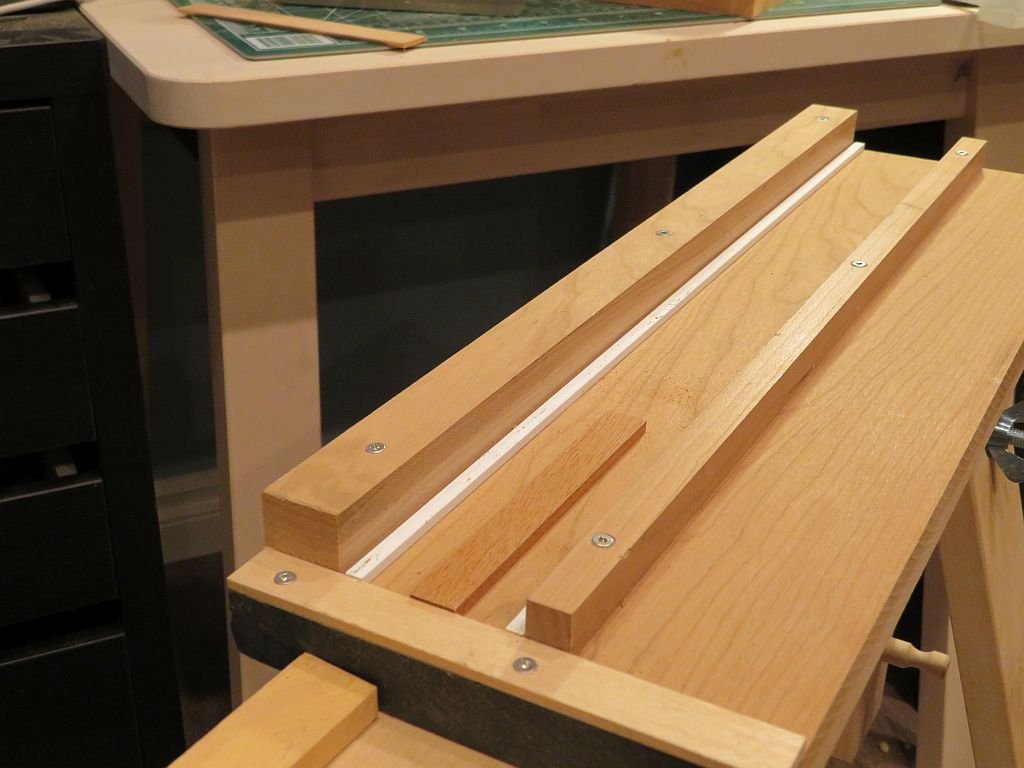
I spent the evening getting the curved top of the fixed portion of the companionway properly fitted. first i used the "thickness planer" a simple way to get the wood down to a consistent thickness. It is made from a slab of cherry with some guide rails to accept the Veritas low angle block plane, with some 1/8th thick strips of evergreen styrene 3/16 x 1/8th this allows the plane to ride along on the side edges without going beyond the depth of the side strips. After a few strokes the strip is down to a consistent thickness in this case .121" just a hair under 1" scale thickness. Next the final adjustment before glue up. I did glue them up but did not take a picture I will clean it up in the morning. Michael
-
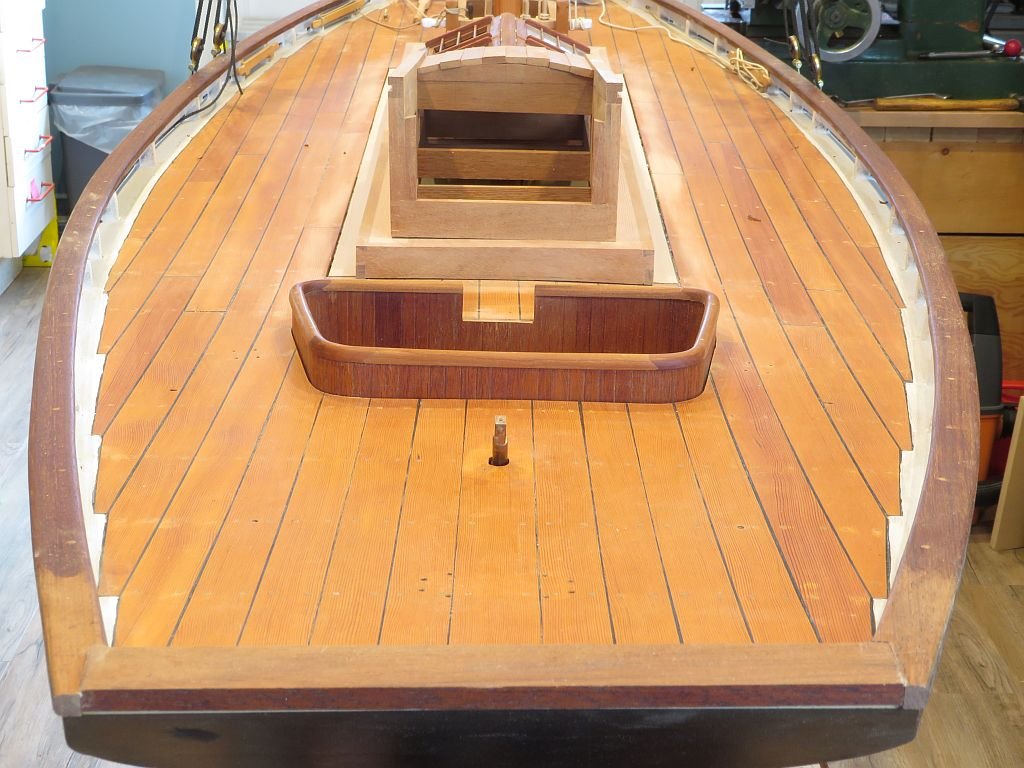
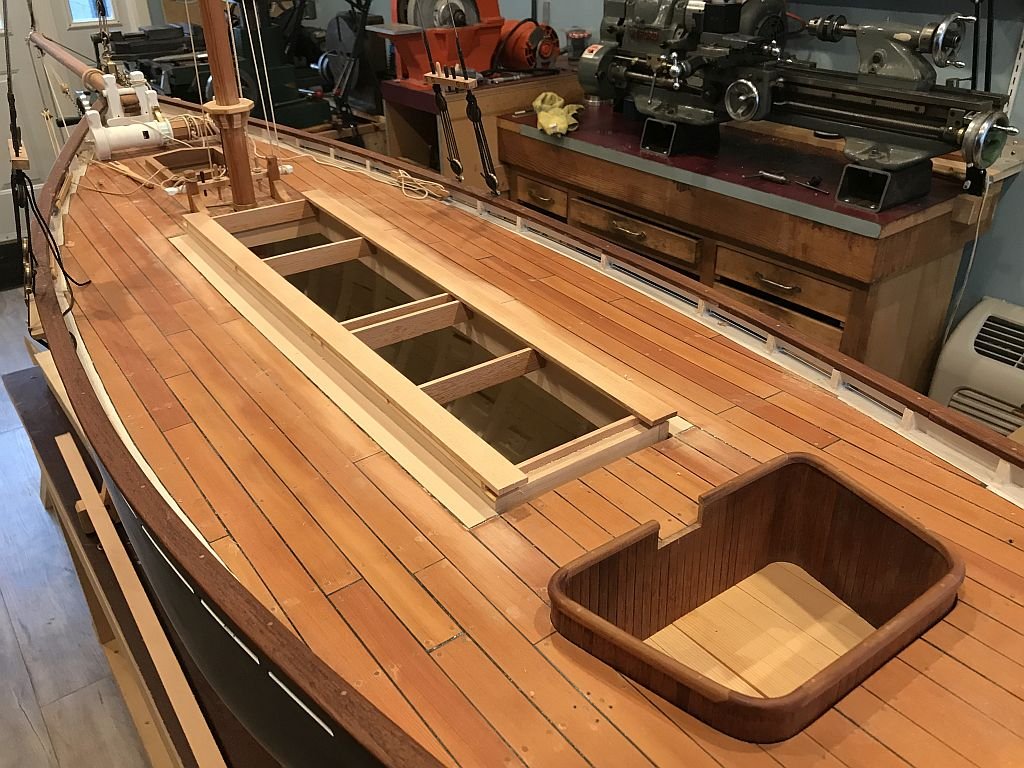
Thank you all again for your encouraging comments. I will be back in the model shop this evening, today I was gutting out the cockpit of maria. Michael
-
15' Dinghy by Bedford - FINISHED - 1:1 scale
michael mott replied to Bedford's topic in Non-ship/categorised builds
This just keep getting better, beautifully executed work. Michael -
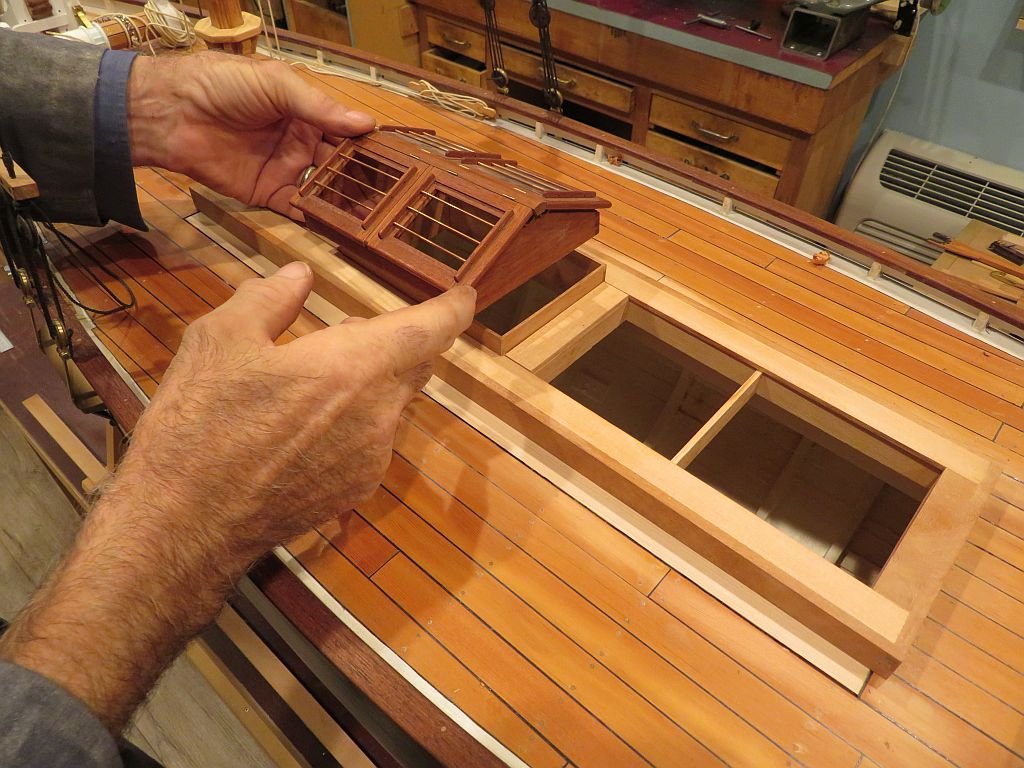
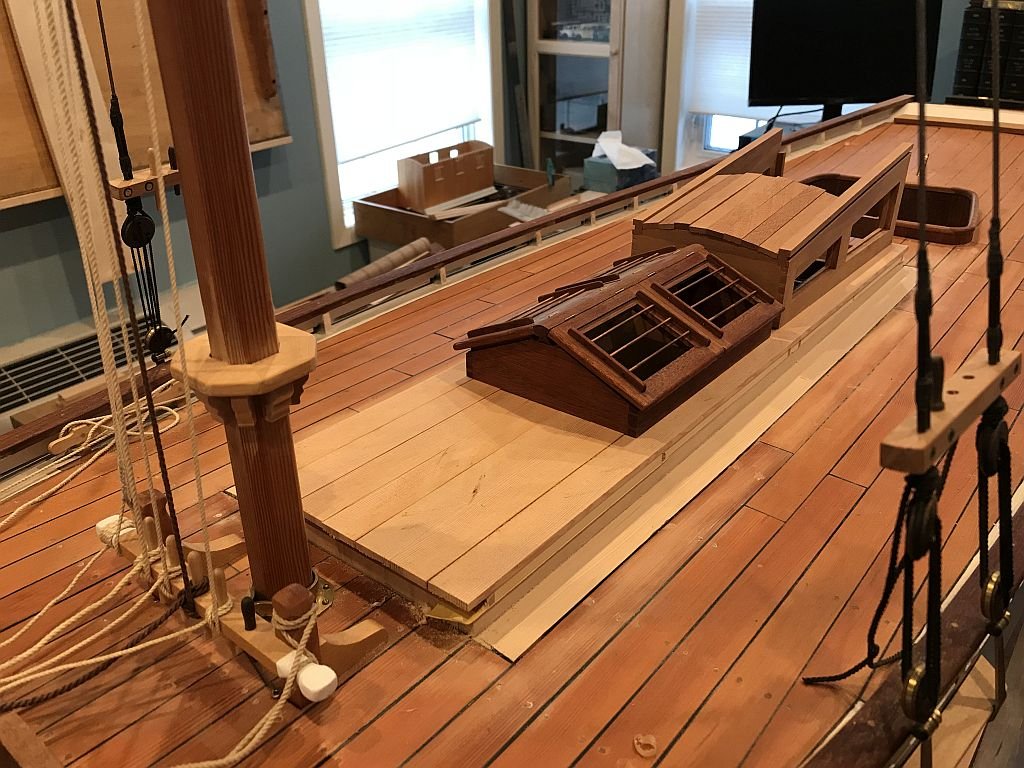
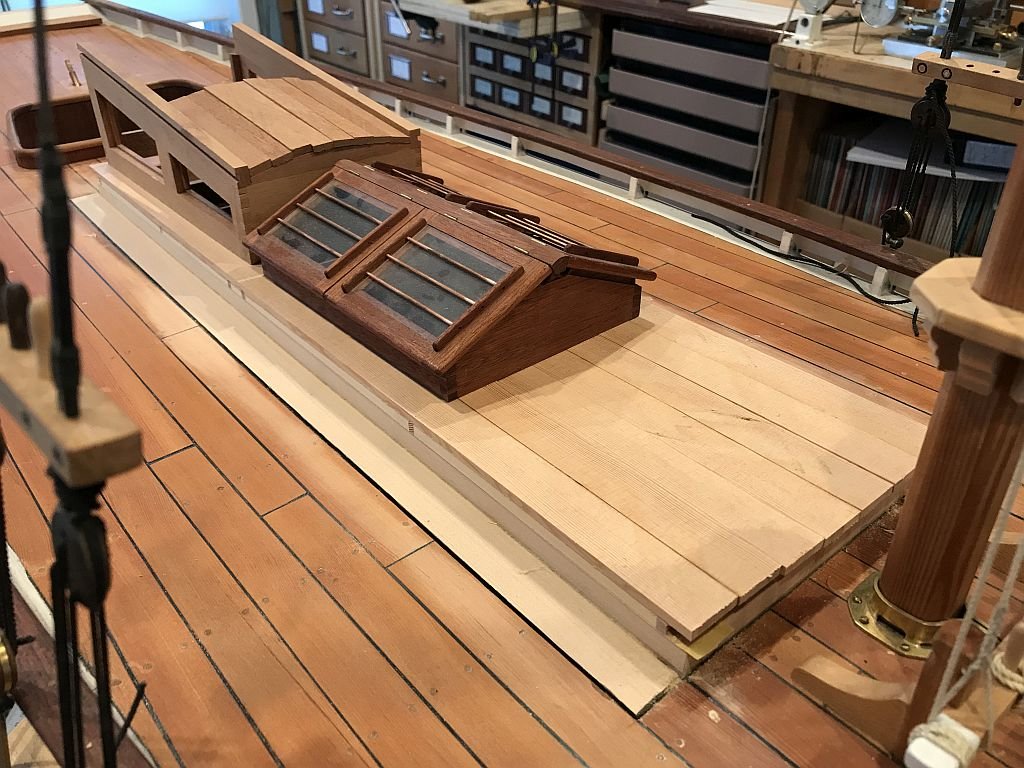
Thanks for all the comments and likes. the skylight inner sleeve was fitted this evening, this was accomplished by first rough fitting then working from the underside with the skylight taped down. The mahogany sheets are 1/2 inch thick and form a nice locator for the skylight. The top edge was softened a little for ease of placing the skylight on and off. Now located in its final position. I need to cut up another CD case to make the glass for the port side lights. Michael
-
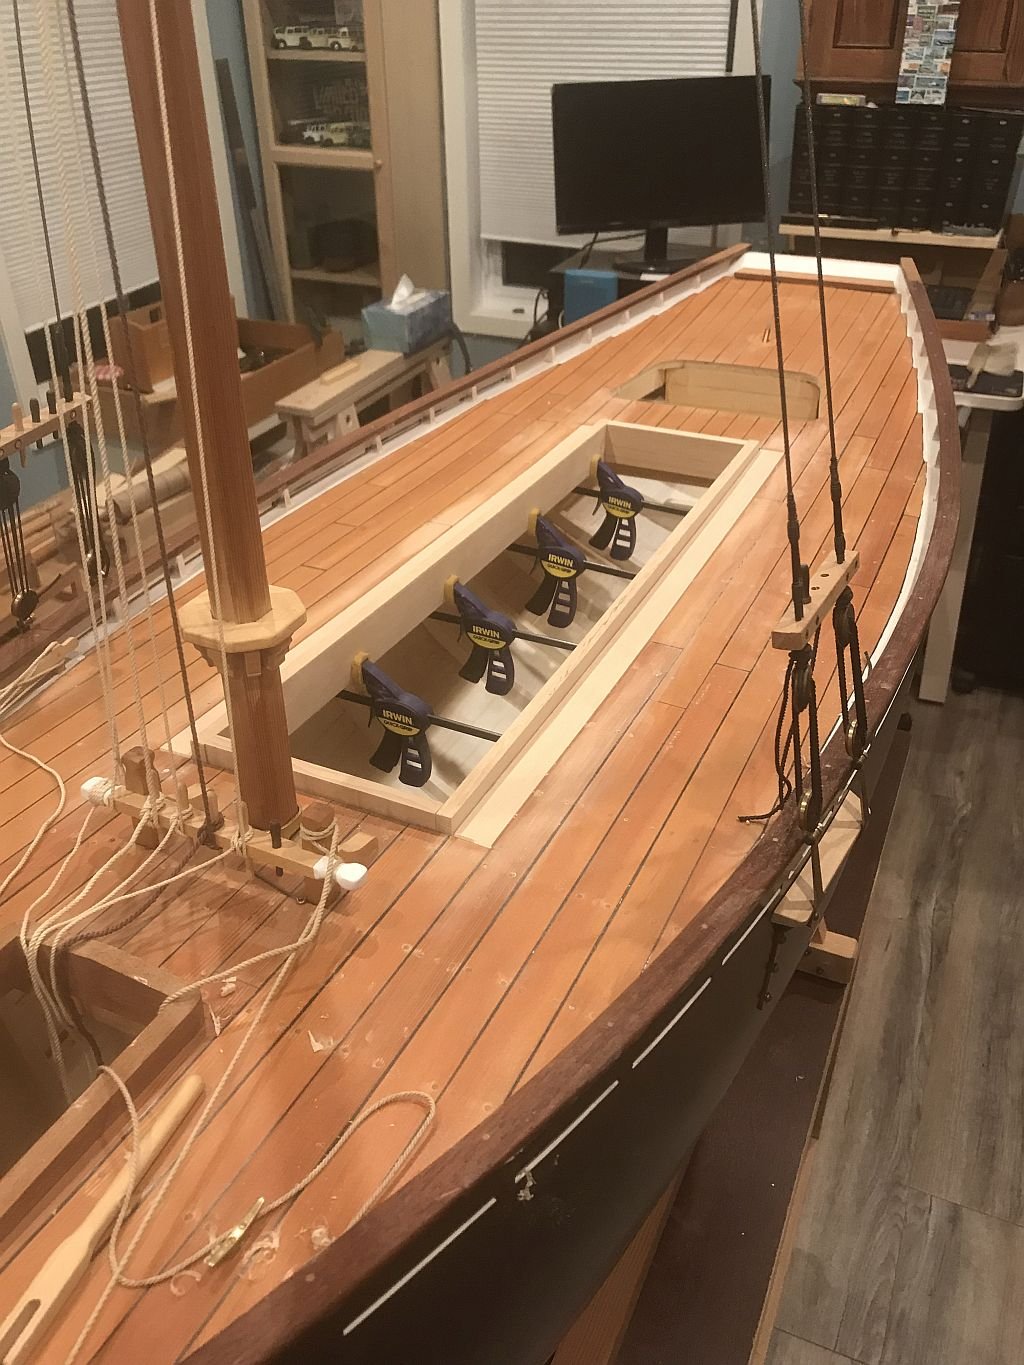
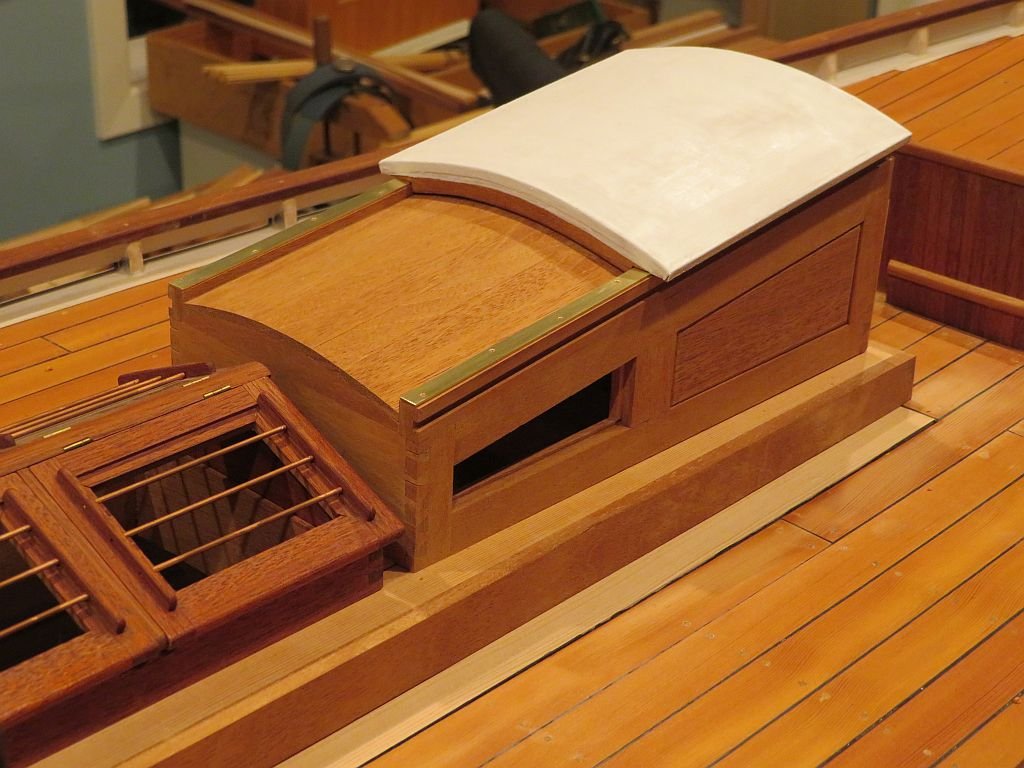
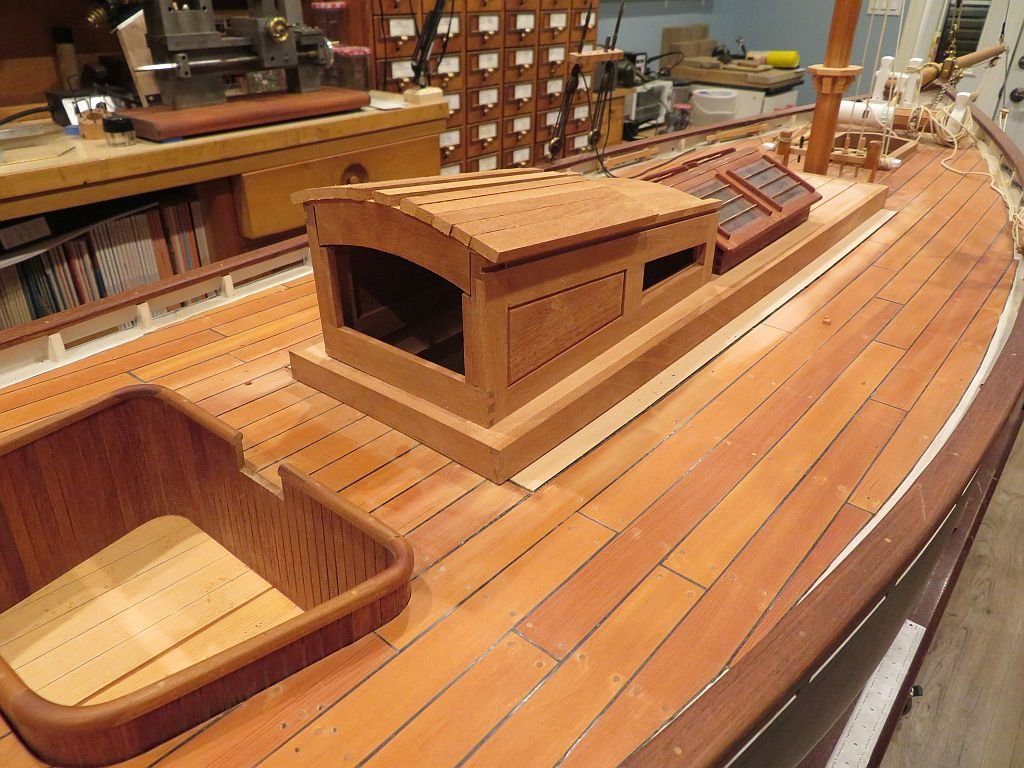
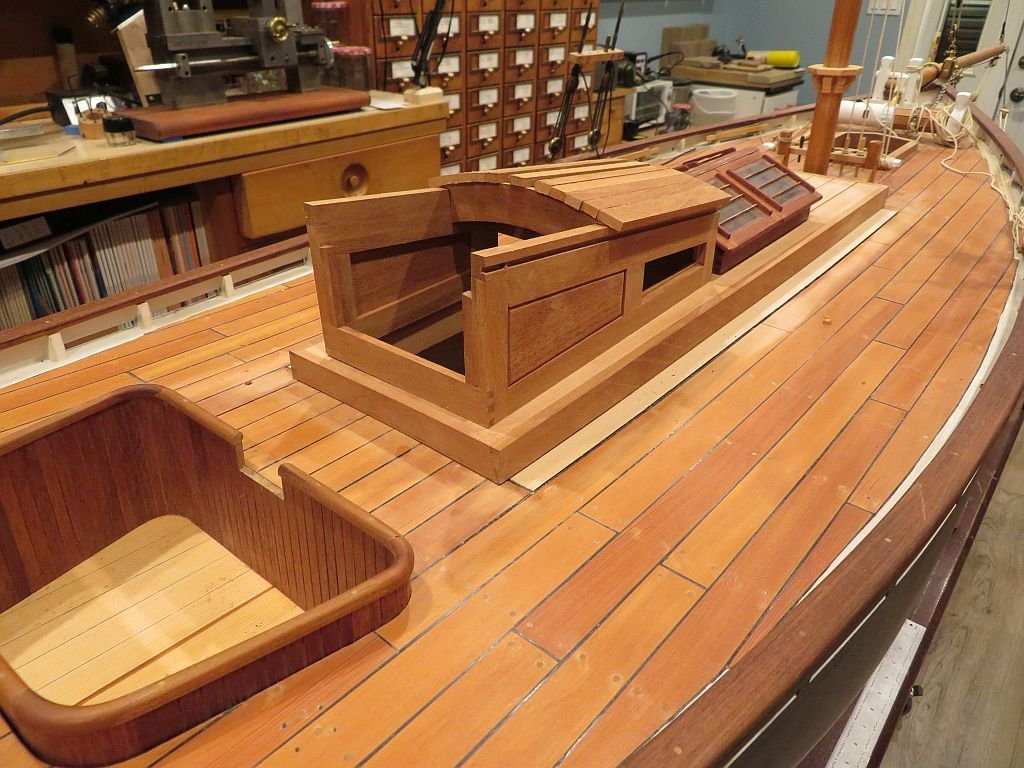
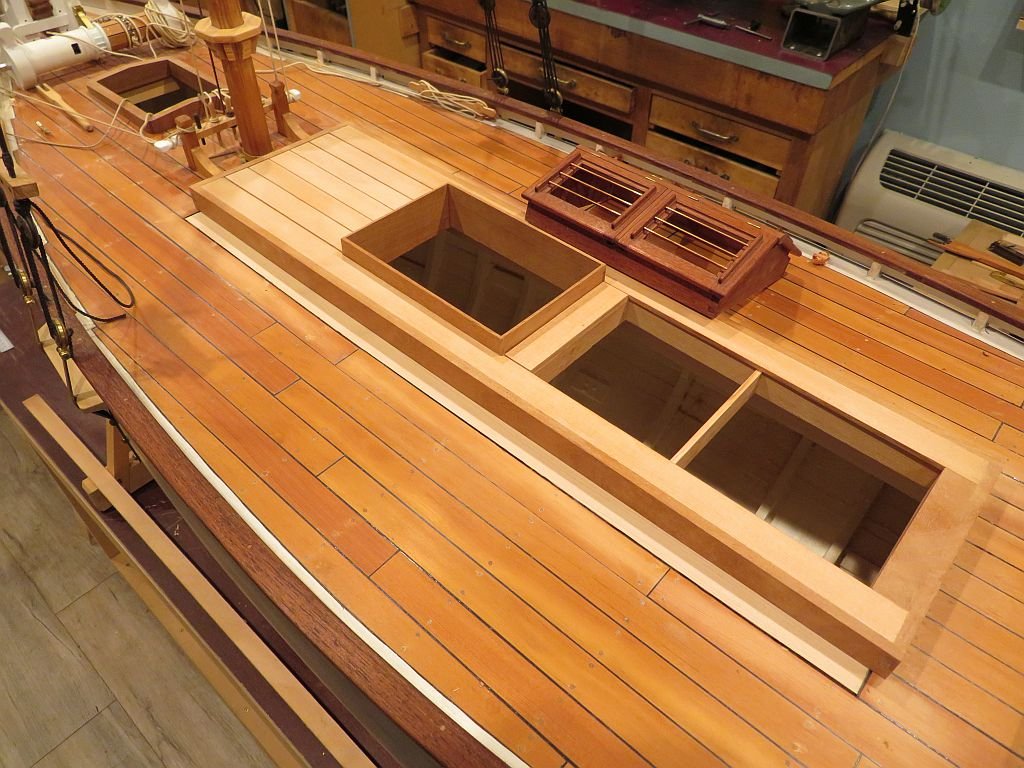
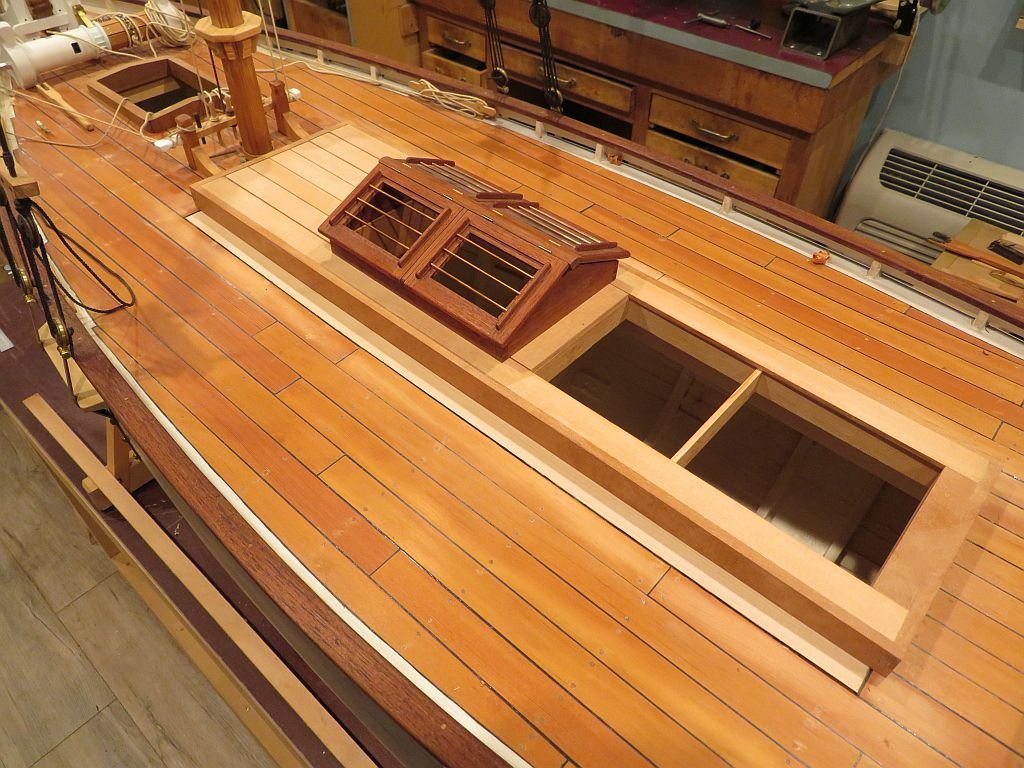
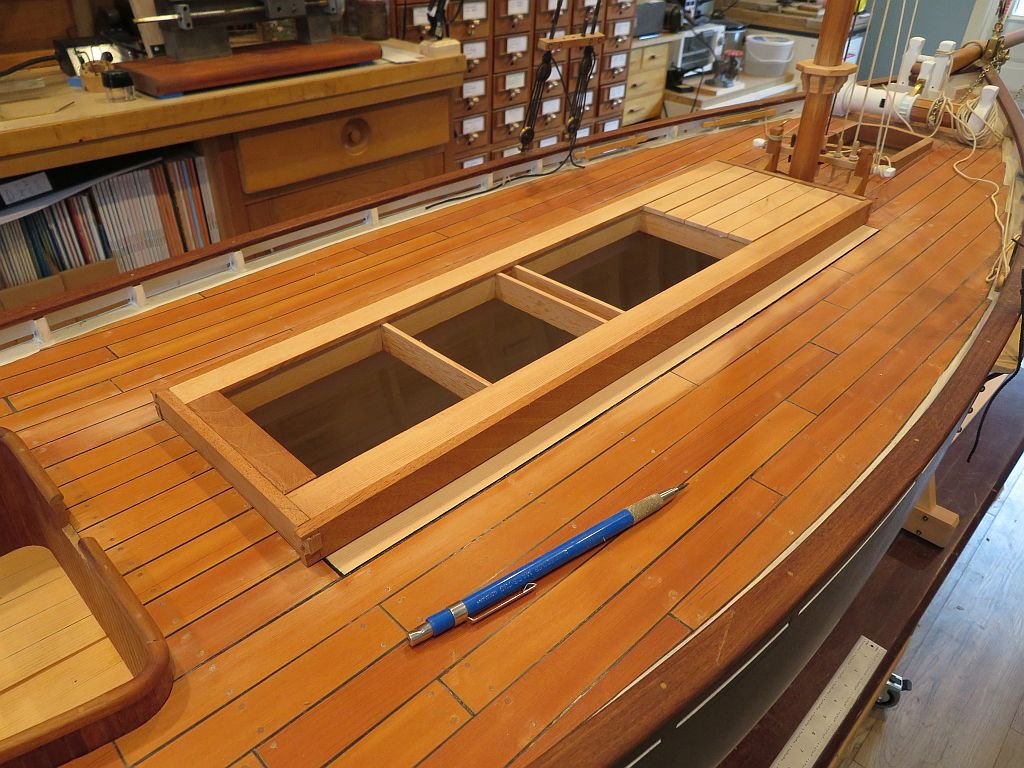
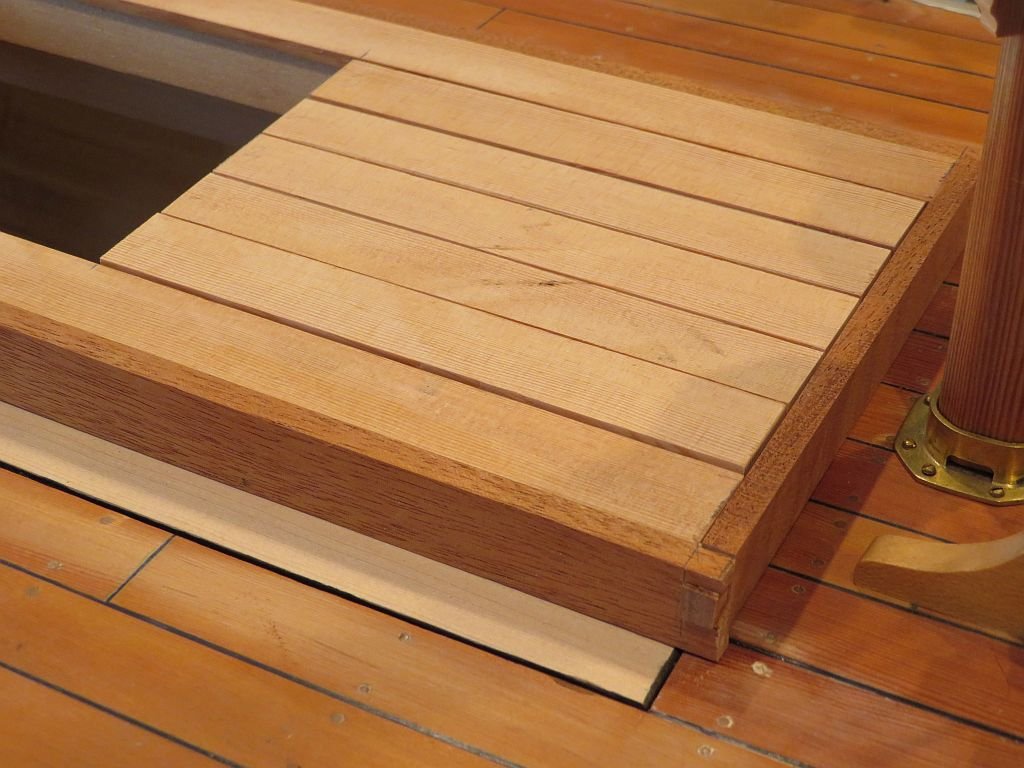
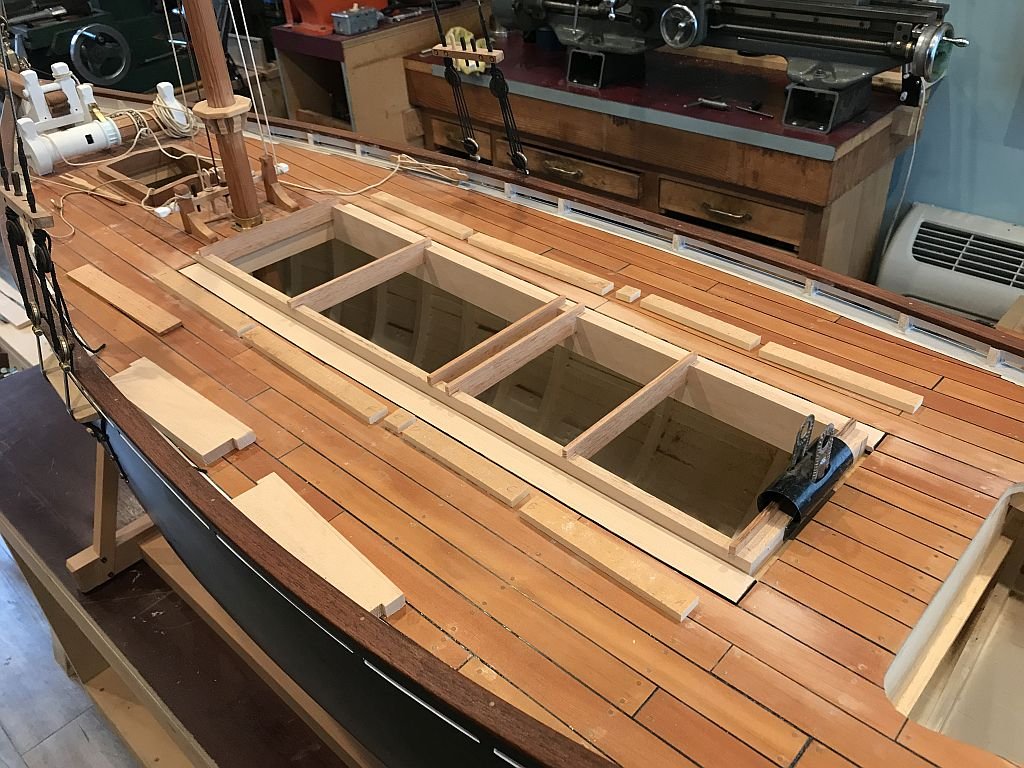
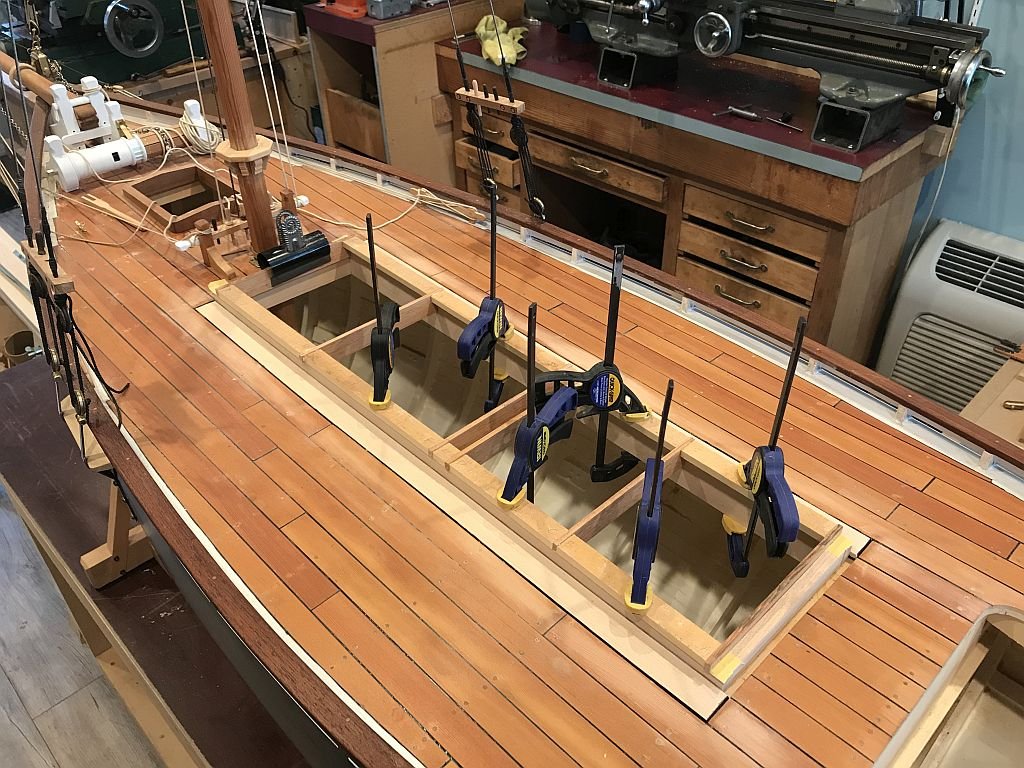
Hello Paul yes I really enjoy working at this scale, that said it becomes more difficult to hide errors. Hi Denis, thanks for looking in. Bedford, Thanks for the kind remark. Hello Ed, thanks I really appreciate your comment, having spent a great deal of time admiring your own metalwork. Thank you to all who have pressed the like button, it lets me know that you are following along. One of the advantages and disadvantages of designing as I go along is that the structure evolves over time. I have been fiddling with the deck structure for the companionway and skylights for what seems like years and not being very happy with one thing or another. this time i feel positive that I'm getting somewhere now. The structure is solid now and can be lifted off easily in order to add the ballast weight for when I do put her in the water to sail. here are a few shots of the progress. The first shot shows the Mahogany drop sides for the "lid" these are glued along the length and dovetailed at the corners. a close up of the corner, I only used one dovetail the height is a scale 6 inches or so and the thickness is a full 2 inches in scale. The stern end all cleaned up. I will be adding a thin foam seal around the bottom where the "lid' meets the deck as an added protection to the interior. It will just look like one of the other sealed black joints. I also finally added the rail across the stern, it still needs a little shaping but at leat it is now glued in place. That's all for now. I have to head out to the lake, being as I am the harbor master of the Edmonton Yacht Club and the docks are coming out tomorrow. September has been a very cool month and we did not get much sailing in during the month. The docks were supposed to come out today but it was 0 degrees, and it is warming up tomorrow to 11, so it will be easier on everyone's hands. there is over 520 feet of floating docks in two lengths that need to be dissembled and stacked on the beach for winter. Also and additional 380 feet of fixed dock. We have a club meal when we are all done. Michael

-
Thanks for the nice comments, they are appreciated. Also for all those who visit and follow along. The rework of the opening for the section that houses the companionway and skylight are now moving forward in earnest, now that I have figured out what I am doing. the strengthening of the structure and cleaning it up was accomplished by adding some fir longitudinal beams, this also added a lip around the opening. Next the cross beams that form part of the removable section were dry fitted with enough clearance so not to bind when lifting them out. thee are clear fir. A full 1 inch by 6inches. After the discussion about yellow cedar I went and found a supplier here in Edmonton who has lots so I picked up a length of nice clear wood 53 x 1 1/2 x 6 and re-sawed it into some various sizes to work with. I made a strip 6mm x 15mm to fill in the spaces between the cross beams and glued them in place after laying a strip of Tamiya yellow masking tape along the edge of the framed opening. Once the cedar and fir were glued up, I glued a piece of clear fir 1x6 along the top side as a strengthening member. Next I did a dry fit of the companionway and the skylight to ensure that the whole assembly will work. The next task will be to take off the removable part and finish the ends and sides to form a clean box like structure that will slow down any errant water that might want to slosh in during the heavy weather sailing. 🌊. Michael

-
Hi Paul I like the way the deck planks look on the cheerful they seem to have the right amount of texture. sometimes it seems that very uniform planks could almost have been scribed on a single sheet of very plain wood. Michael
-
Hello Tomek, welcome and thank you for the details of how you build, the model looks very nice. A lot of fine detail in the small model. Michael
-
Pandora by marsalv - FINISHED - 1:52
michael mott replied to marsalv's topic in - Build logs for subjects built 1751 - 1800
Congratulations Marsalv, a beautiful model and a well deserved medal. Michael -
Dan I am impressed! I don't think I have the patience for doing one of those. It is amazing how much can be done with card. Michael
-
Bob Thank you for your explanation of the AYC it clarified a question that has been on my mind for some time. The model of Skipjack that I am building which was one of the launches built for Andrew Mellon in 1909 was planked in "Yellow Cyprus" now that mystery is solved. I shall have to check for some local AYC suppliers. Michael
-
Toolmaking can be very addictive Mike! be careful or you will find yourself getting sucked right down the rabbit hole. Beautiful clamps by the way. Michael
- 968 replies
-
- 3
-
-
- hahn
- oliver cromwell
- (and 1 more)
-
Hello Mark, The cabin cruiser on the lower level is this one I was warned about not starting another project until I had finished some that are still being worked on. But you know how that works 😀 Michael