


gak1965
-
Posts
603 -
Joined
-
Last visited
Content Type
Profiles
Forums
Gallery
Events
Posts posted by gak1965
-
-
38 minutes ago, rwiederrich said:
George….. I painted the bright copper on my 1/128 scale Great Republic with metallic paint. I then covered that with a sealer dull coat to preserve it. No issues and the most important point is I replicated the muntz metal weathered appearance. The technique requires some faith and nerve. But it’s worth the accuracy. Good luck in what you decide.
Good to know. What paint did you use? And did you use the regular VentureTape or some other brand? I'm already thinking of replacing the 1/4 inch foil in the kit (which implies a plate that is 24 inches tall) with either 3/16 which scales out to 18 inches, or 5/32 foil (15 inches). You can go as low as 1/8 (12 scale inches) but that seems really difficult to work with. My recollection looking at one of your previous builds suggests that 14 inches tall is pretty "standard" for a plate. I also haven't decided exactly what to do about the 'nails'. Walking under the Cutty Sark, the nails did not present as obvious as they tend to in models. I tend to agree with the argument that you previous made that at 1:96 almost any visible nail is way out of scale (although attractive). Even a one inch nailhead (bigger than they actually are, I'm pretty sure) would be about 0.26 mm. I liked your idea for using the screen to create the 'plates' but would need to find something else to replicate it.
Apparently the brass tape doesn't solder as well as the copper, so there wasn't much demand for it in the stained glass world. I was hoping that I might be able to get some old stock from a place here where my younger daughter learned to do SG, but they don't appear to have any. The only place online I can still see a listing for it shows it as out of stock.
Regardless, I need to make up my mind soon. I've almost finished planking the poop, once that is done, it's time to drill and install the vents, put the topgallant rail in place and deal with the coppering/muntz(?)ing.
-
On 7/10/2021 at 3:16 PM, ClipperFan said:
gak1965
I'm friends with Vladimir & just stumbled on your impressive build.
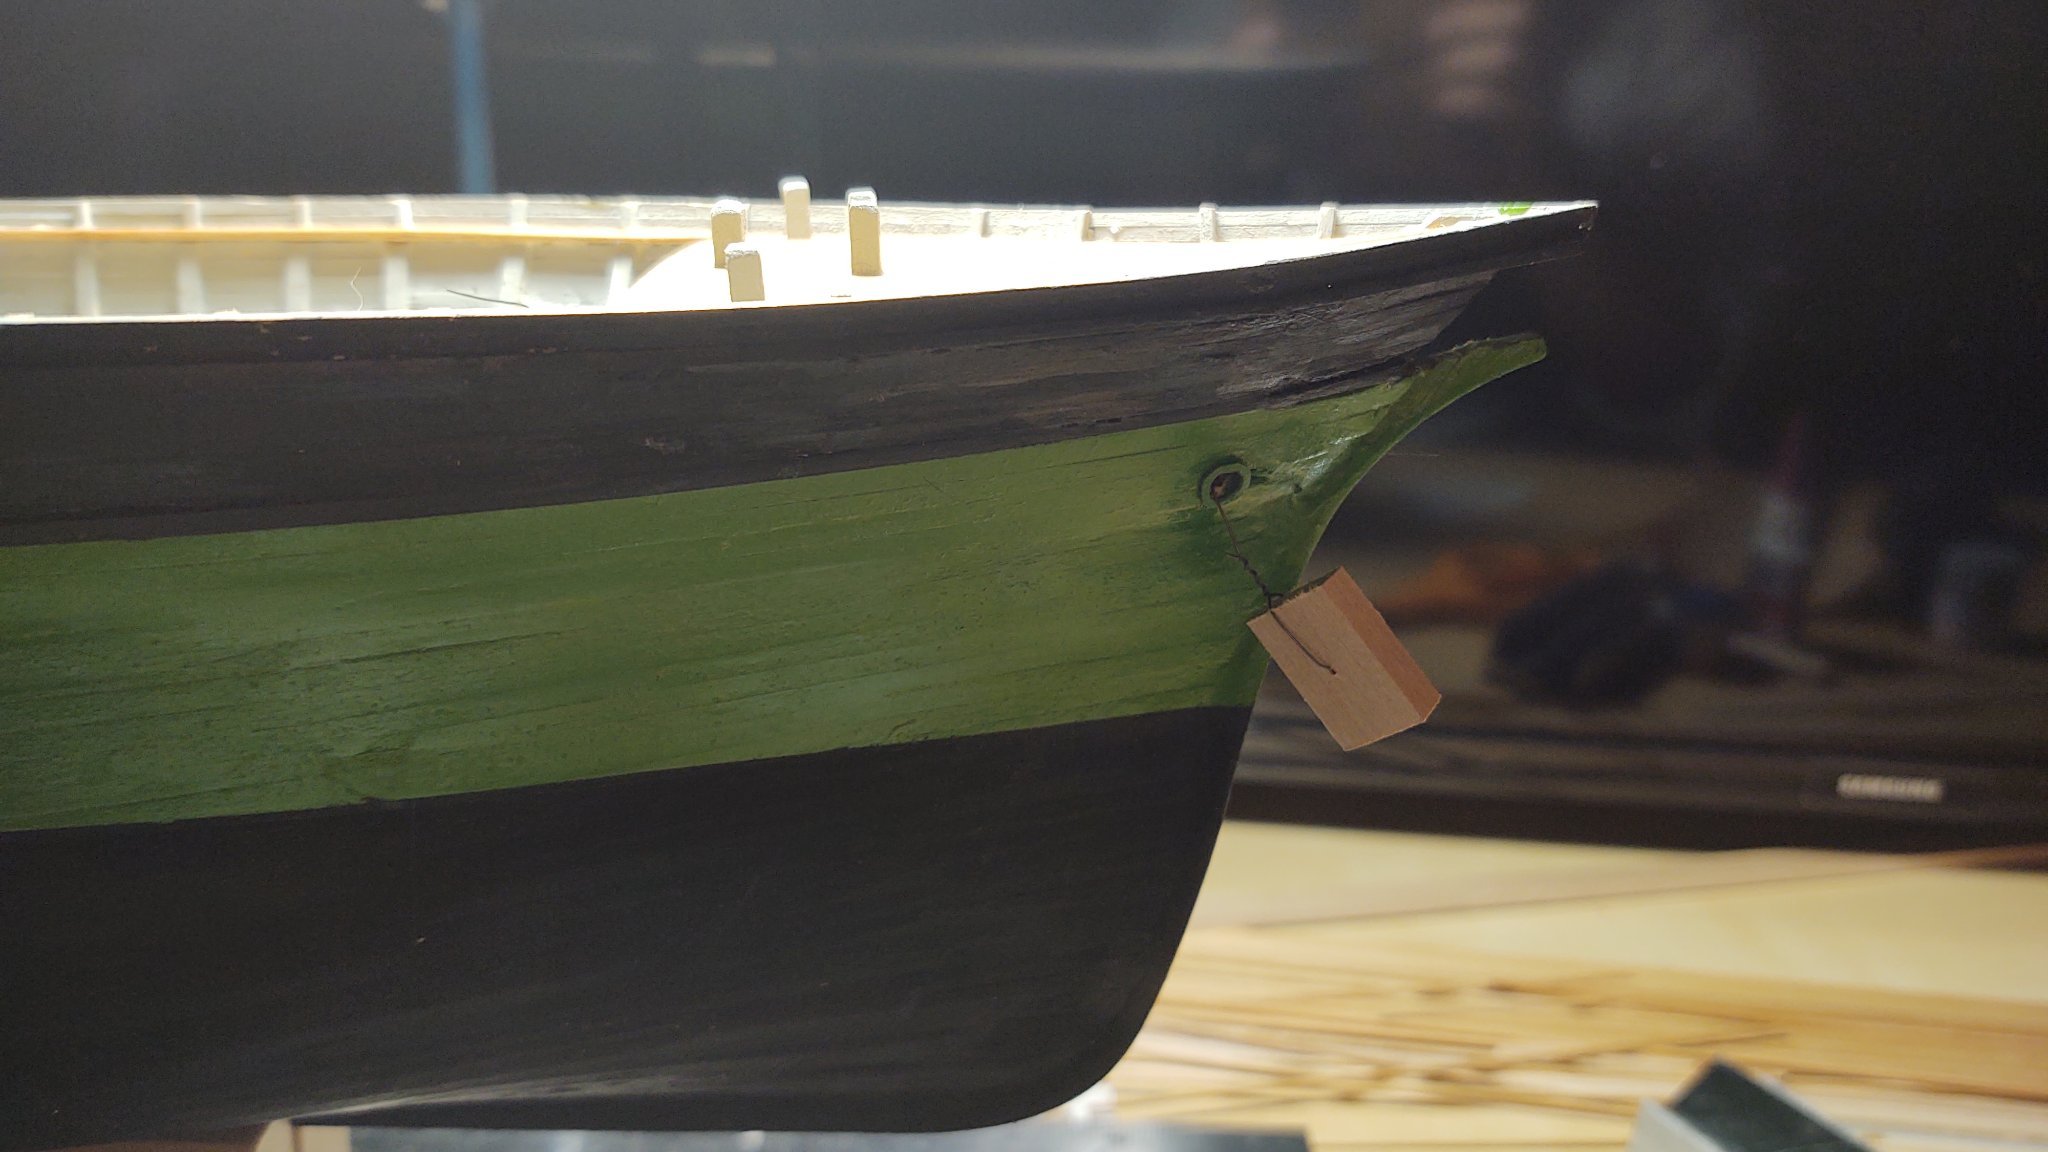
I hope you don't mind my sticking my 2c in but I might have some fascinating historical information to enlighten you about the amazing accomplishment of the Clipper "Flying Fish" you're currently building. Being a Scottish Immigrant from Nova Scotia, Donald McKay was very conservative and remarkably consistent in his paint schemes for his Clipper Ships to the point of being boring. Non other than Duncsn MacLean, the Boston Daily News publicist even made a jocular observation that all of McKay's Clippers, like Clergy came in Black. There are others that were painted quite differently. For instance the fast Clipper "Galatea" which had a distinctive full running thoroughbred painted on her fore topsail, was painted deep Sea Bronze. Of course it's your vessel, you can paint her as you choose but I thought you might appreciate knowing something about the Historic nature of this particular McKay Extreme Clipper. I've attached a gorgeous painting done by the famous contemporary artist James Buttersworth commissioned by the Ship's owners to celebrate this McKay vessel's triumphant win in the "Great Deep Sea Derby".
The painting confirms that, like "GLORY of the SEAS" where we actually have photographic proof, the large rear cabin does indeed overhang about 3' from the rear poop deck. The painting also verifies that the rear of the cabin is flat, not curved. Another fascinating detail is her sea bronze & gold trimmed flying fish figurehead. It is most likely smaller than the kit supplied version. If you observe closely, you can see it is apparently embossed on the vessel's Cutwater which mounts over the stem. The beautiful model kit much like "Flying Cloud" seems to include only the Stem not the Cutwater which mounts over it. Since these Clippers were built to take on the heavy seas of Cape Horn, Donald McKay made the Bow extremely rugged. This arrangement makes for a much more stable and graceful Bow than the rather awkward way the figurehead is sort of tacked on with nothing to support it.
https://www.vallejogallery.com/item_mobile.php?page=item_page&id=487#lg=1&slide=4
ClipperFan,
The included picture (and the others at the link) are a great set of photos related to the Fish. FWIW, the idea to paint the ship green came from Stephen Ujifusa's book Barons of the Sea and their race to build the world's fastest clipper ship. In the book, he relates that McKay had wanted to paint the ship green, obviously this was not translated into life, but I decided to try to build it the way McKay had originally envisioned. The biggest problem now is that it appears VentureTape which is the major supplier of copper and brass foil tape to the stained glass community has stopped making the brass variant. Since the Fish had Muntz metal rather than copper plates, I was hoping to use that. I have heard of people painting the copper with metallic paint to get the Muntz look, but not sure I'm going to bother as I wonder about the longevity of the painted copper.
The Model Shipways plans shows a flat surface on the after end of the stern cabin, with slightly curved port and starboard sides so that would seem to be compatible with your observations. Your observation about the cutwater is interesting. I'll have to see if there are any references that show the cutwater clearly enough to add it to the stem.
Thanks for the insights!
George
-
15 hours ago, rwiederrich said:
Wonderful work. I never built the Fish, but it would appear there is overhang of the poop house
Similar to that of the Glory of the Seas I’m building .
Thanks!
It definitely has the overhang. Do you know why? This seems to be a not uncommon design element and the only explanation I could come up with is that it might provide an entrance that is full height since it would presumably be clear of the beams for the poop deck.
-
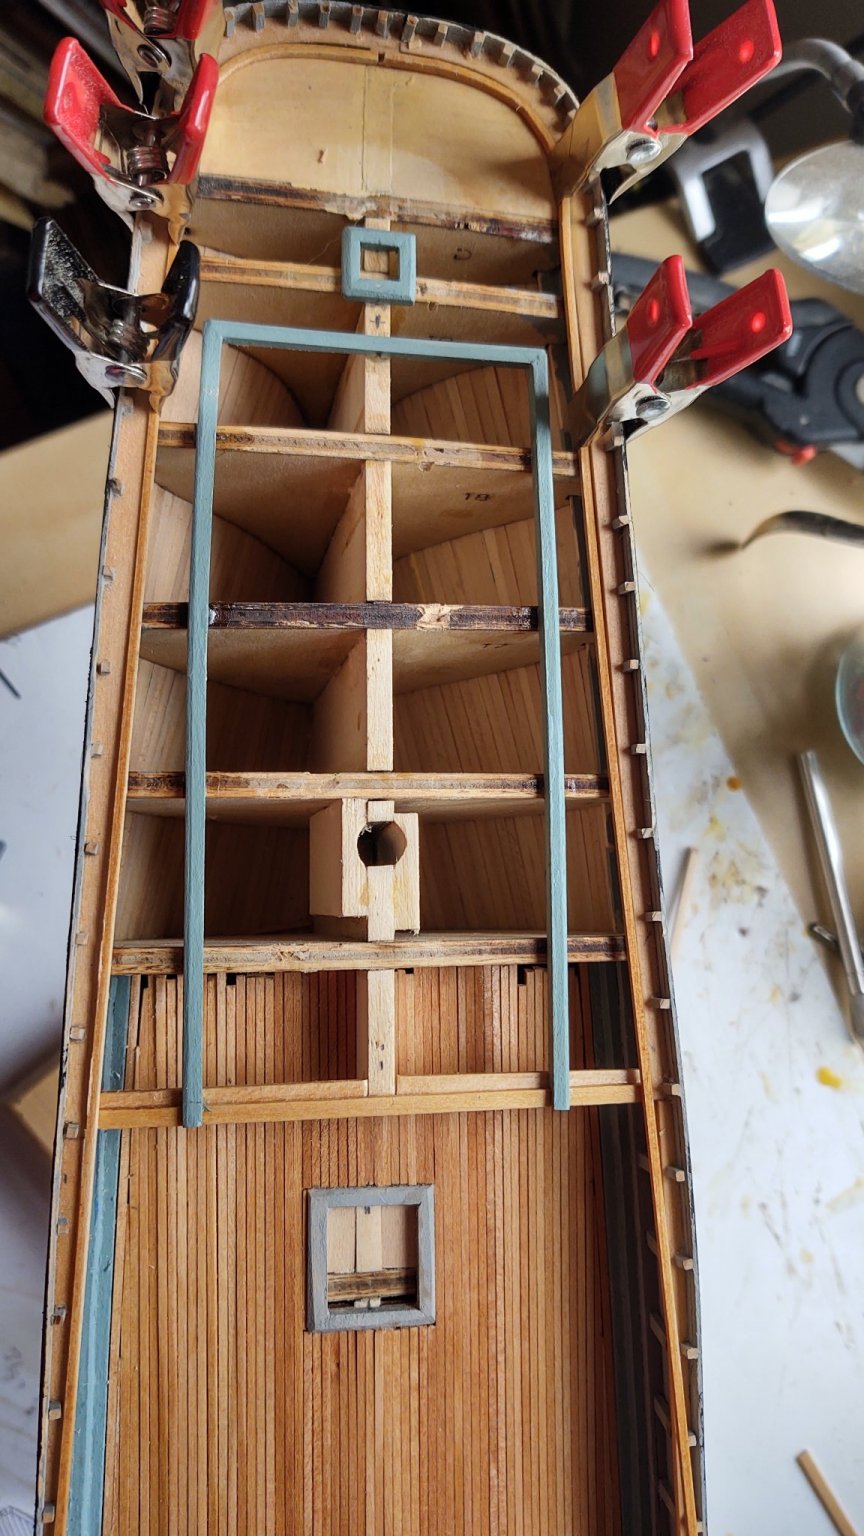
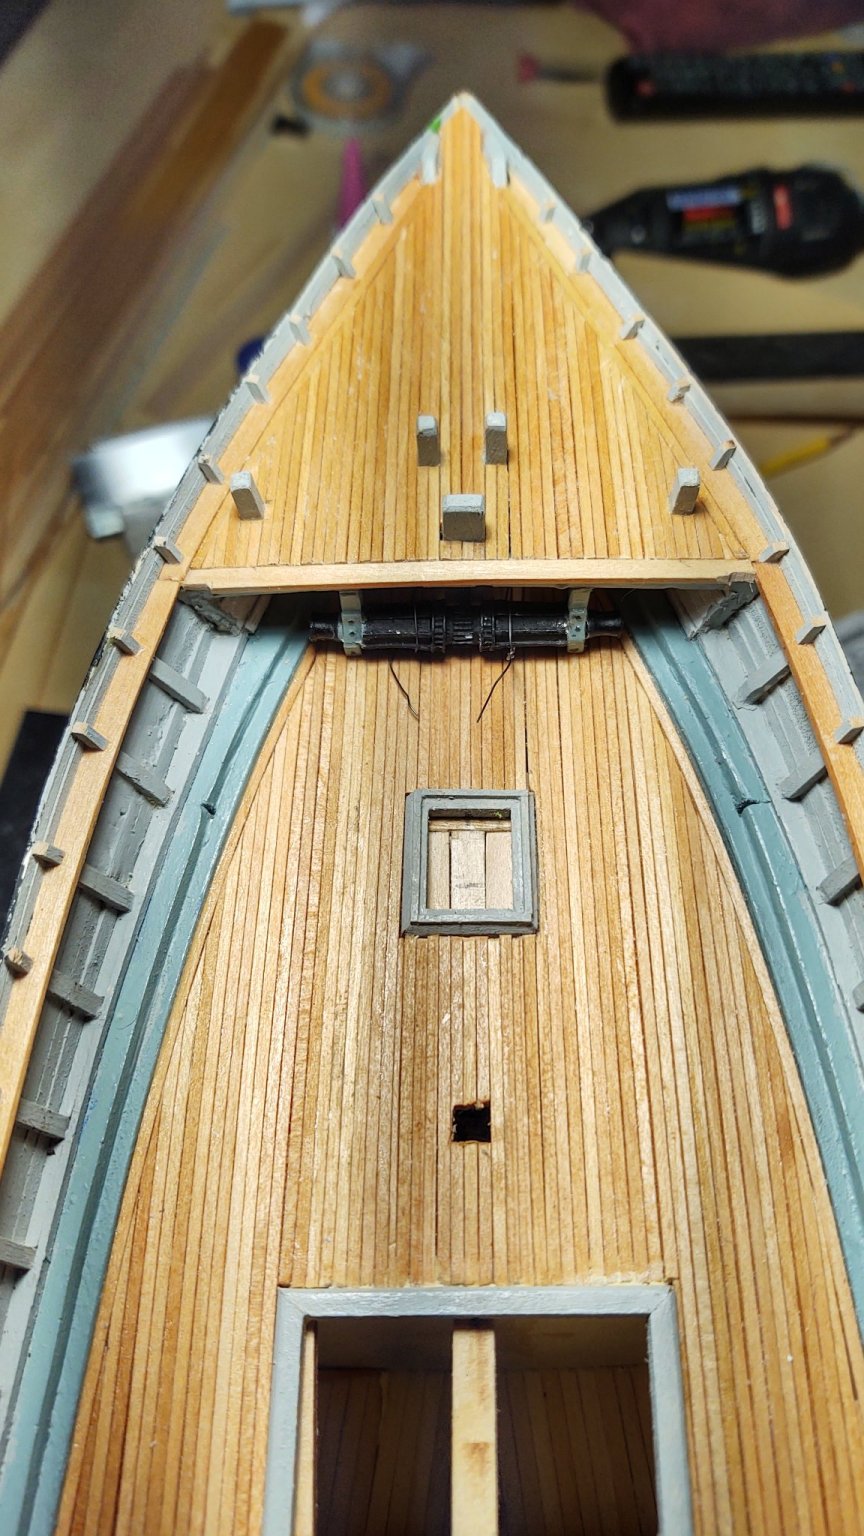
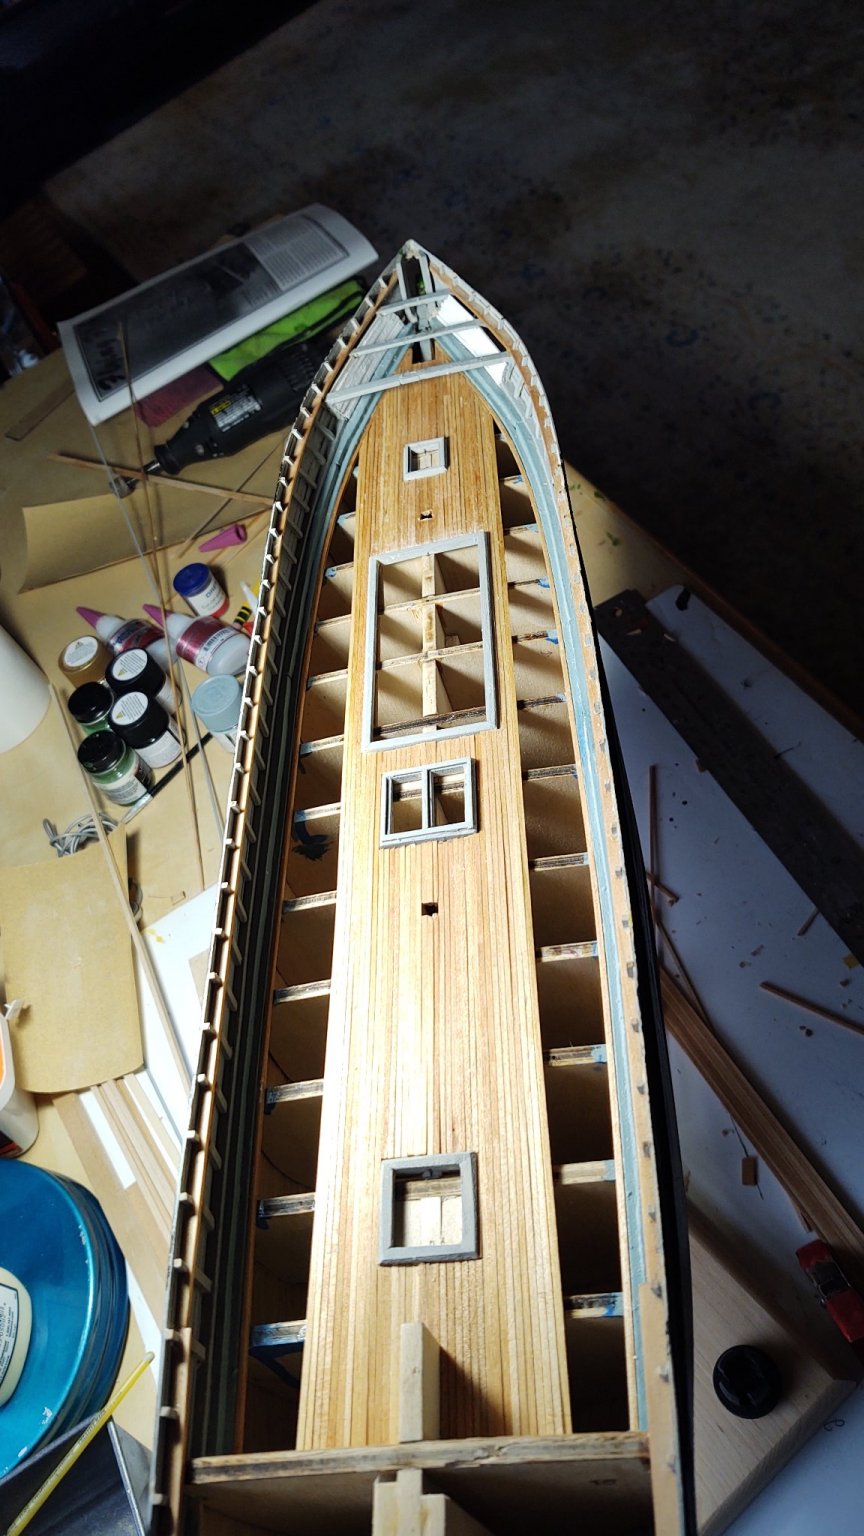
Hey, a quick question to anyone that has done the Fish. I'm working on decking the poop. In the photo below, the coamings for the after deckhouse have been installed, and I'm pre-bending the continuous strake for the deck planking itself. If you look at the plans and the photo below, you will note that the after deckhouse is curved, not straight. The question is whether, in the segment next to the deckhouse the deck planks would have followed the (pretty mild) curvature of the coaming or whether they would have been straight and basically trimmed to match the coaming? Between the deckhouse and the covering board there are a lot of interesting curvature there, just curious as to which would have been done on the real ship so that I can at least try to replicate it on the model.
- Cathead, Tigersteve, Vladimir_Wairoa and 1 other
-
 4
4
-
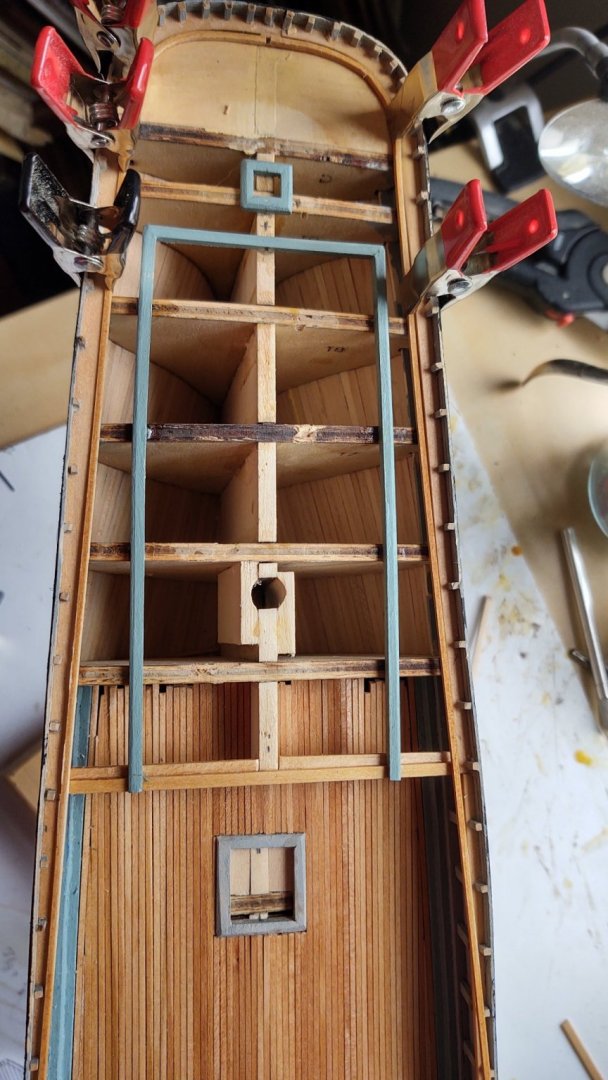
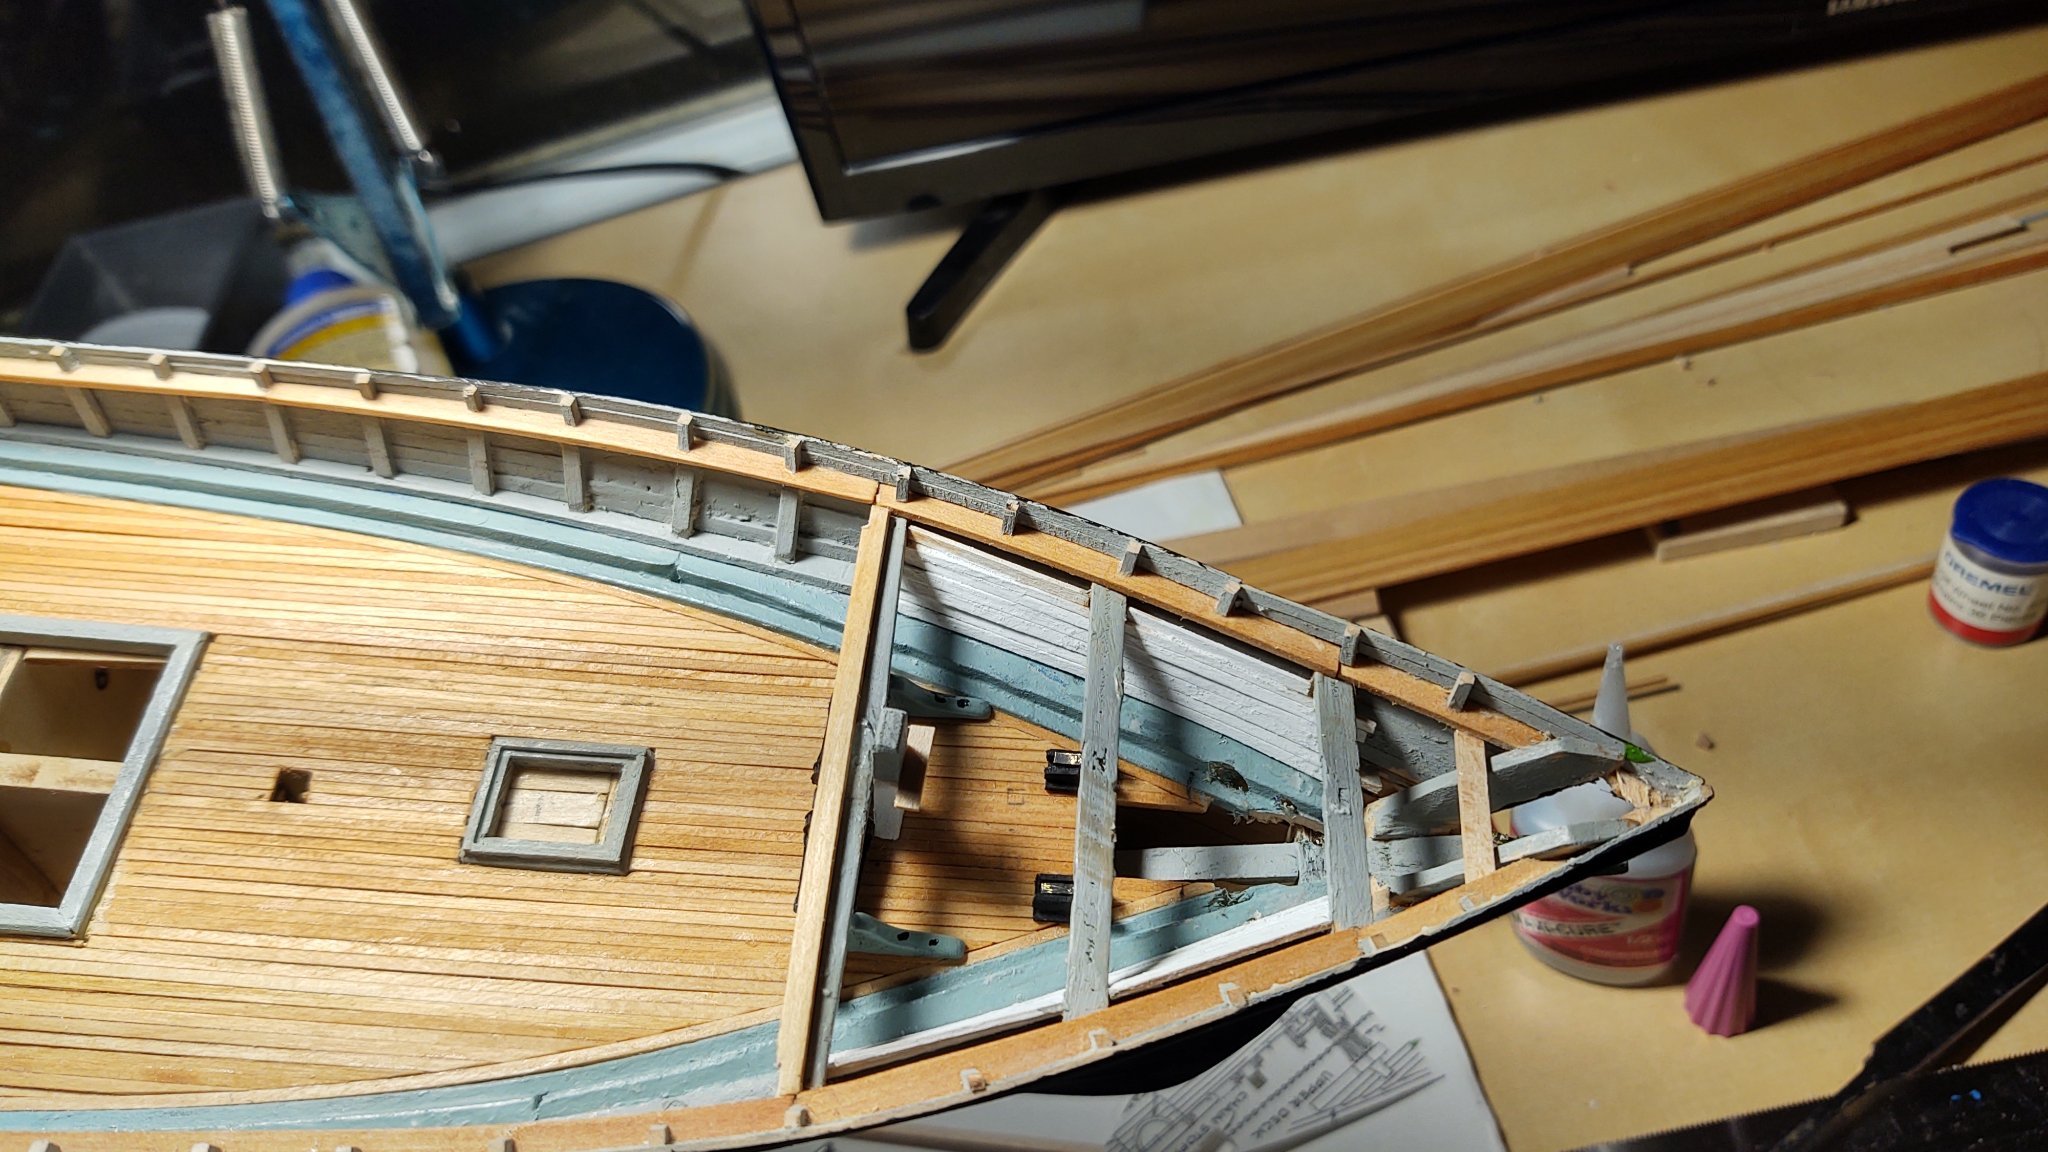
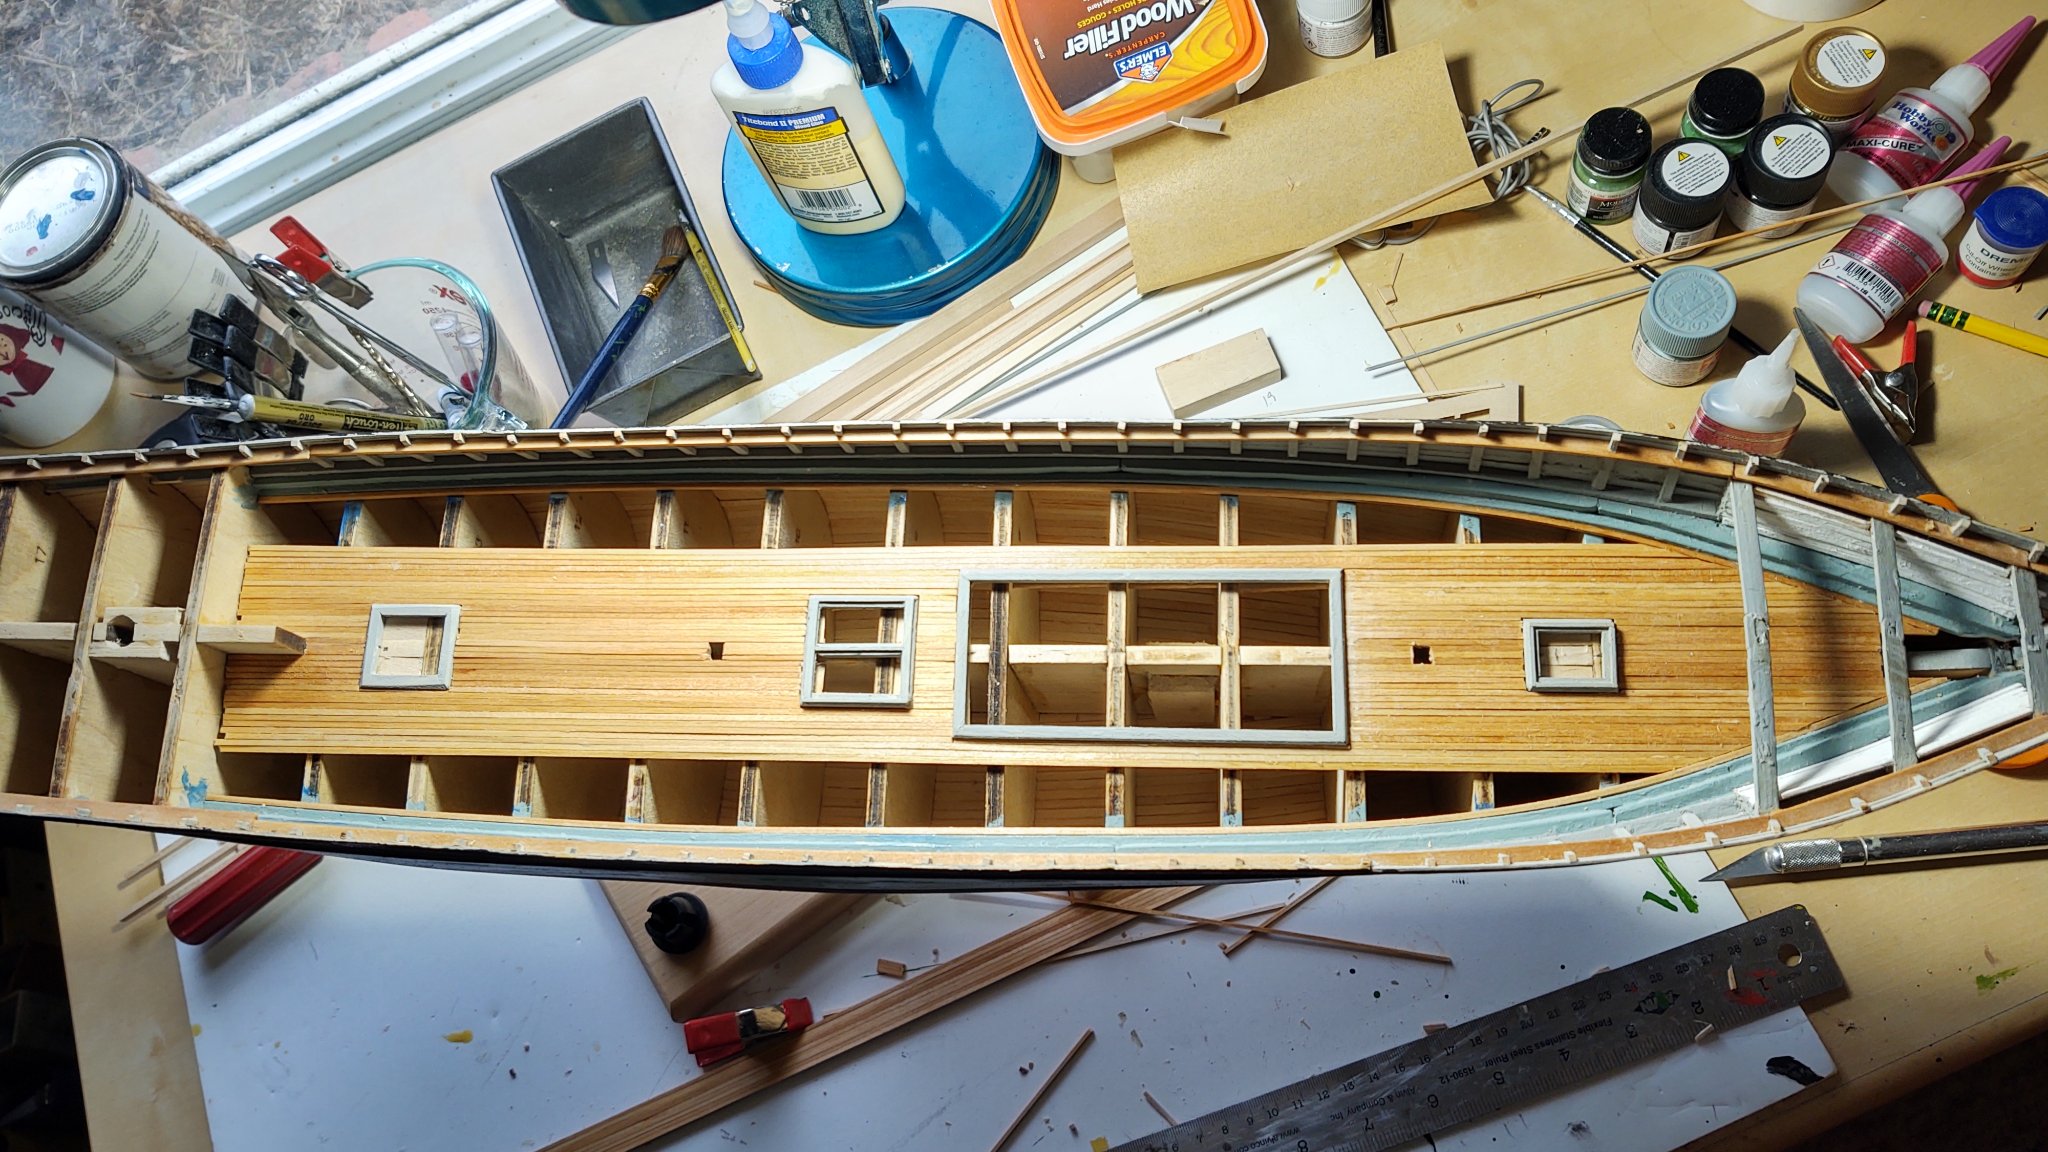
Some progress made in the past week.
While waiting for the chain to arrive from BlueJacket, I started working on the poop, making and painting the coamings for the after deck house and the stores locker.

However, it occurred to me that I had a way of finishing the forecastle without waiting for the chain and without making it impossible to access the chain stoppers and the like. I had a bit of wire that I purchased from BlueJacket that I used on my Niagara - it is nice and flexible and very fine, fine enough to act as the link in a chain. So I fed a stretch of wire through the hawse pipes from the outside, ran it through the chain stopper and then anchored it on the windlass. I connected the outside end to a block of wood to keep it from getting accidentally sucked up the hawse pipe.
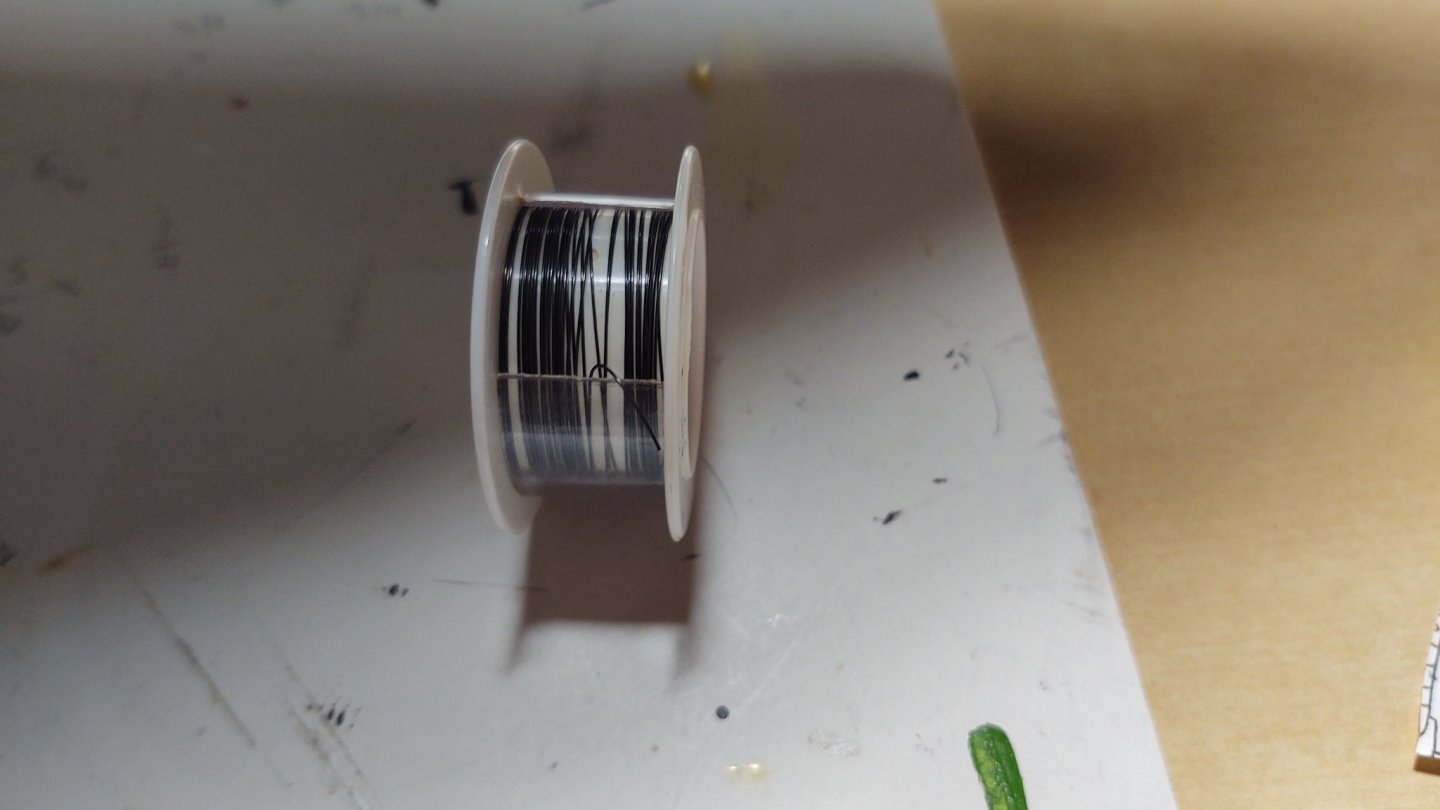

When I'm ready for the chain, I will disconnect the block of wood, run the fine wire into the chain, close the end off with a tiny drop of CA glue and then pull the chain to where I want it.
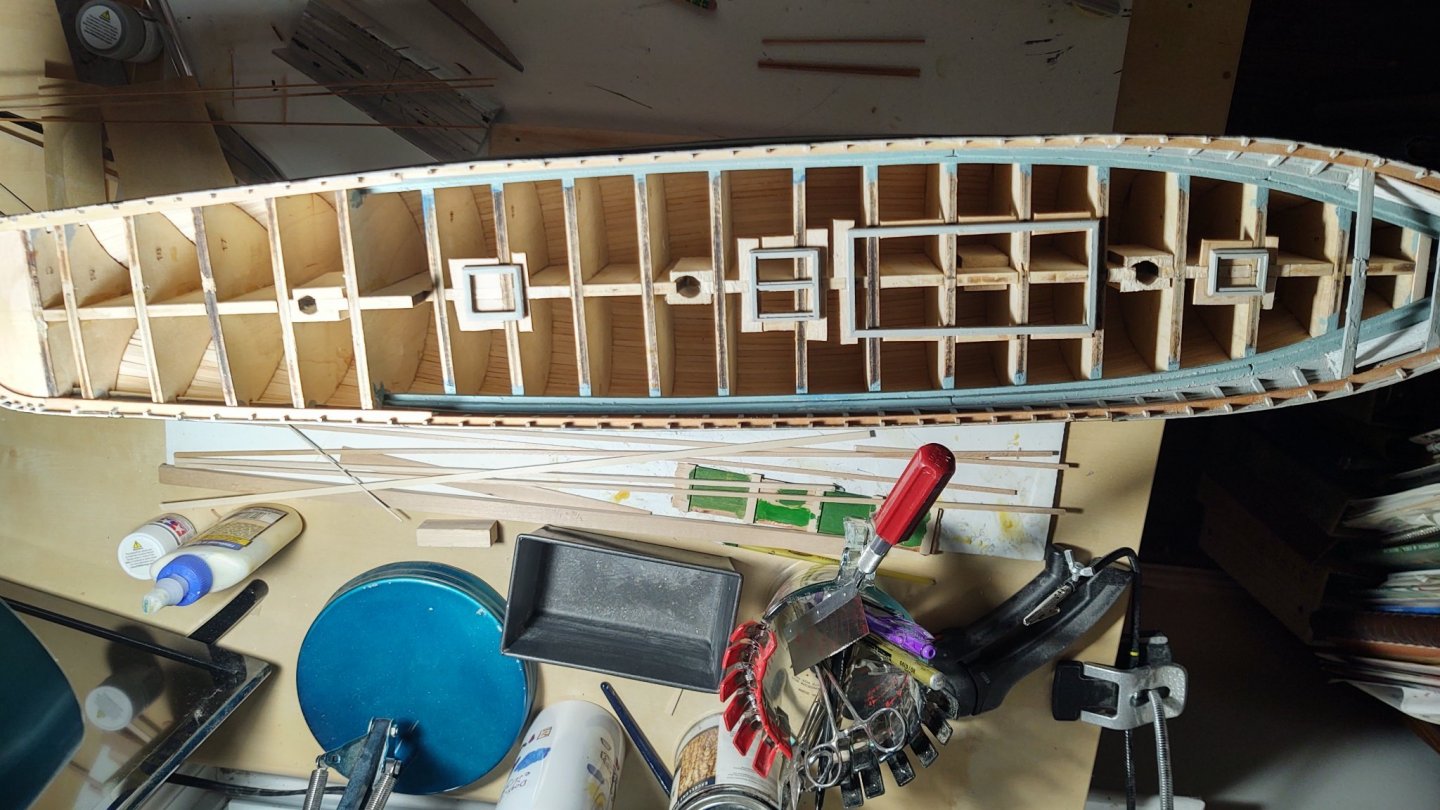
With this out of the way, I decked the forecastle, and installed the remaining 2 bits (which pass through the deck and terminate on the ceiling planks under planking). The last thing to do there before putting the topgallant rail in place is to cut the sections for the catheads.

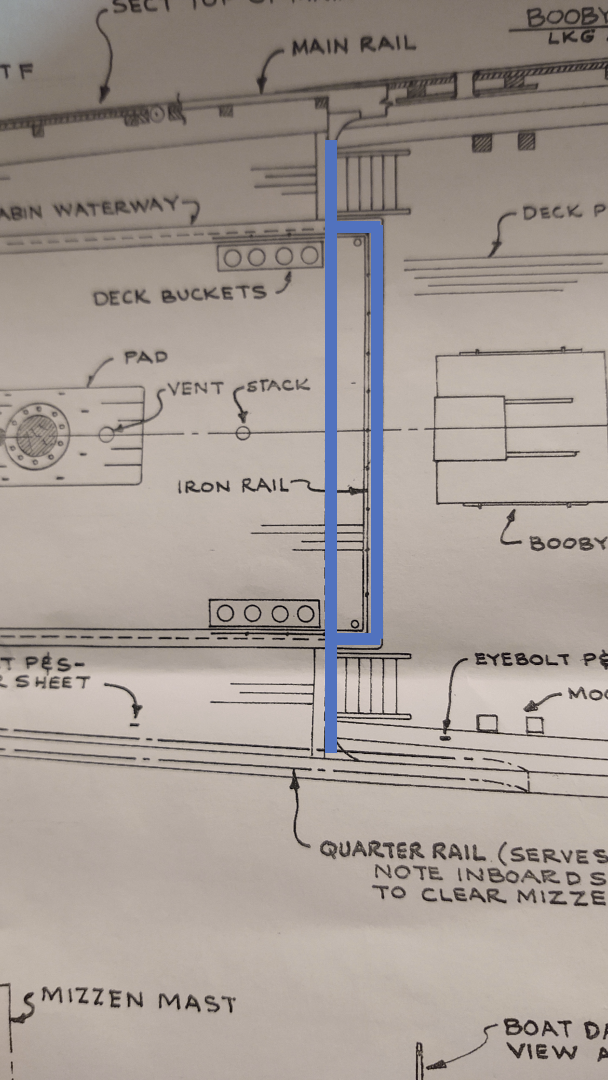
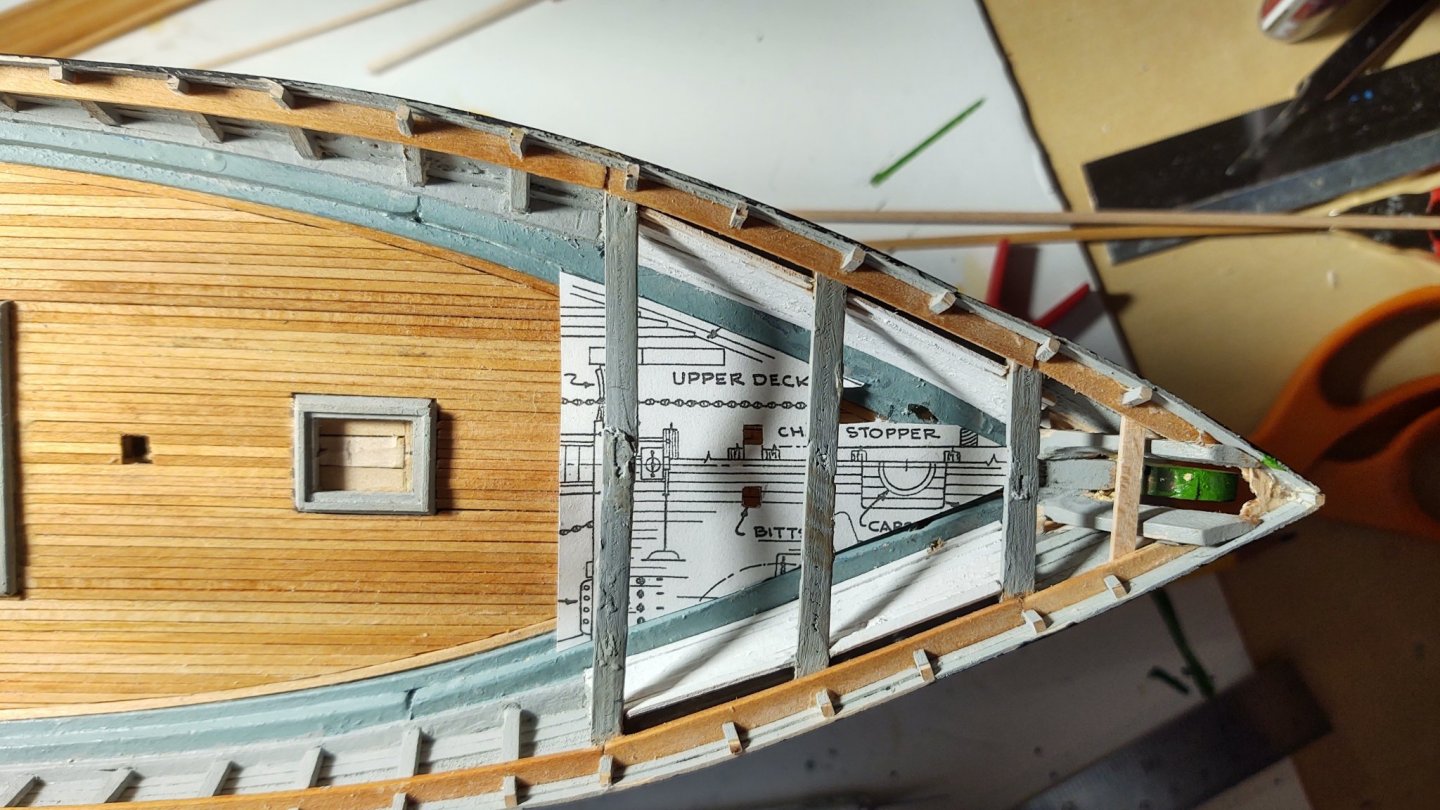
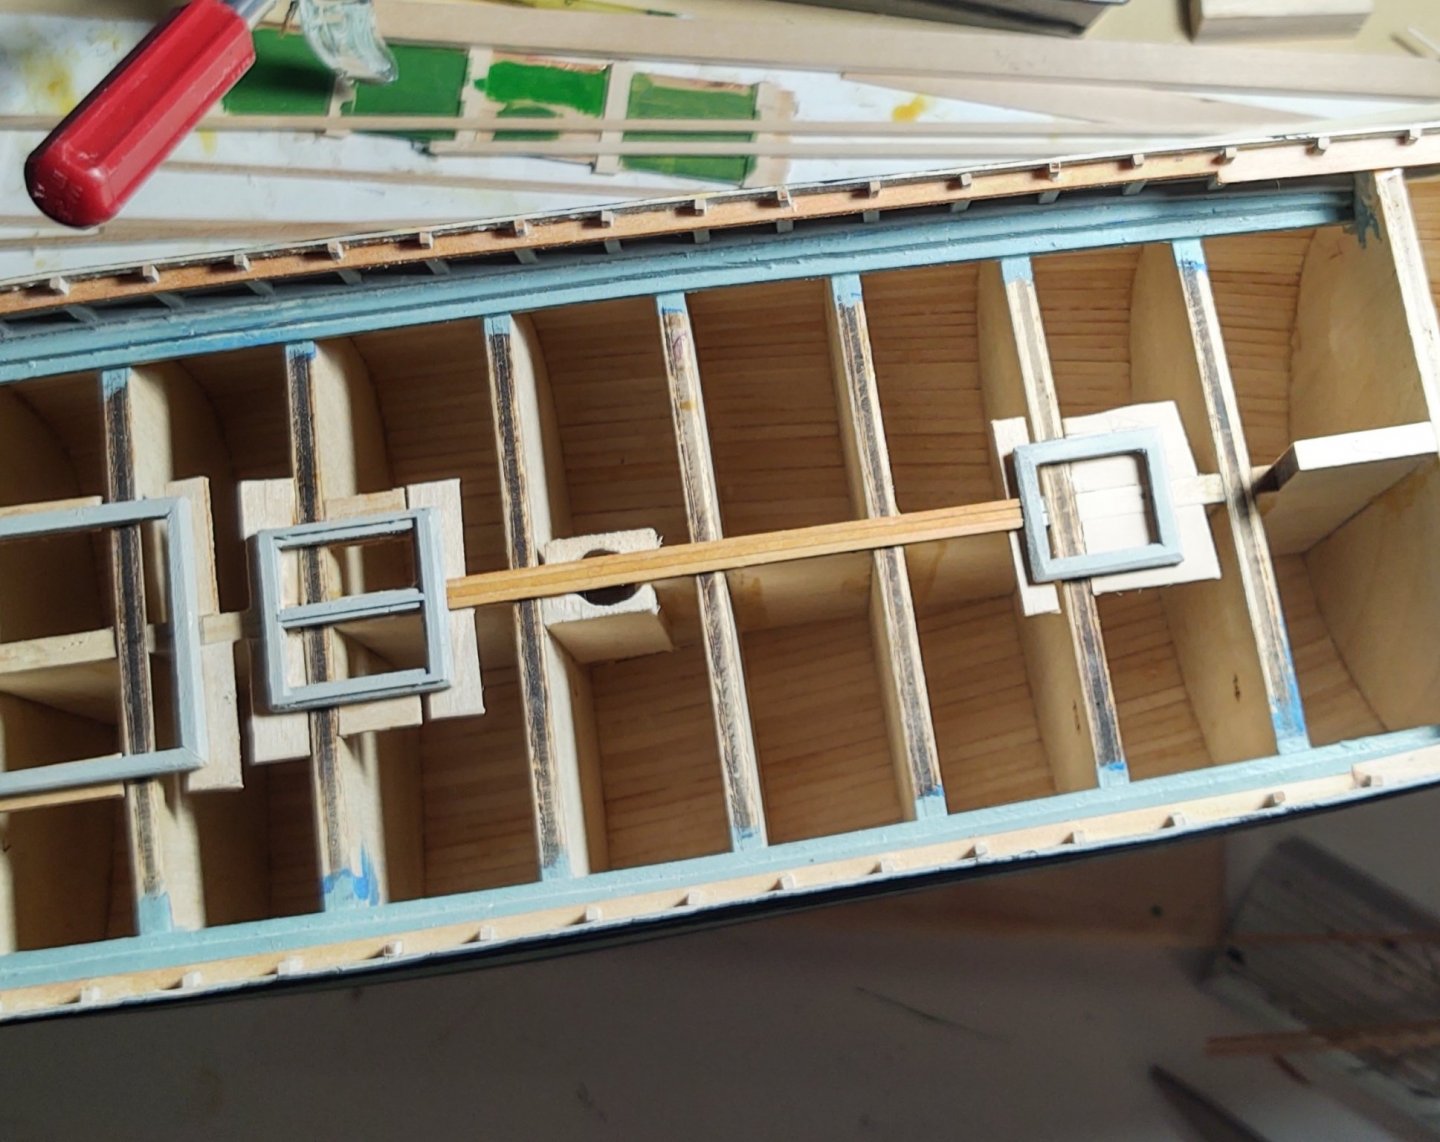
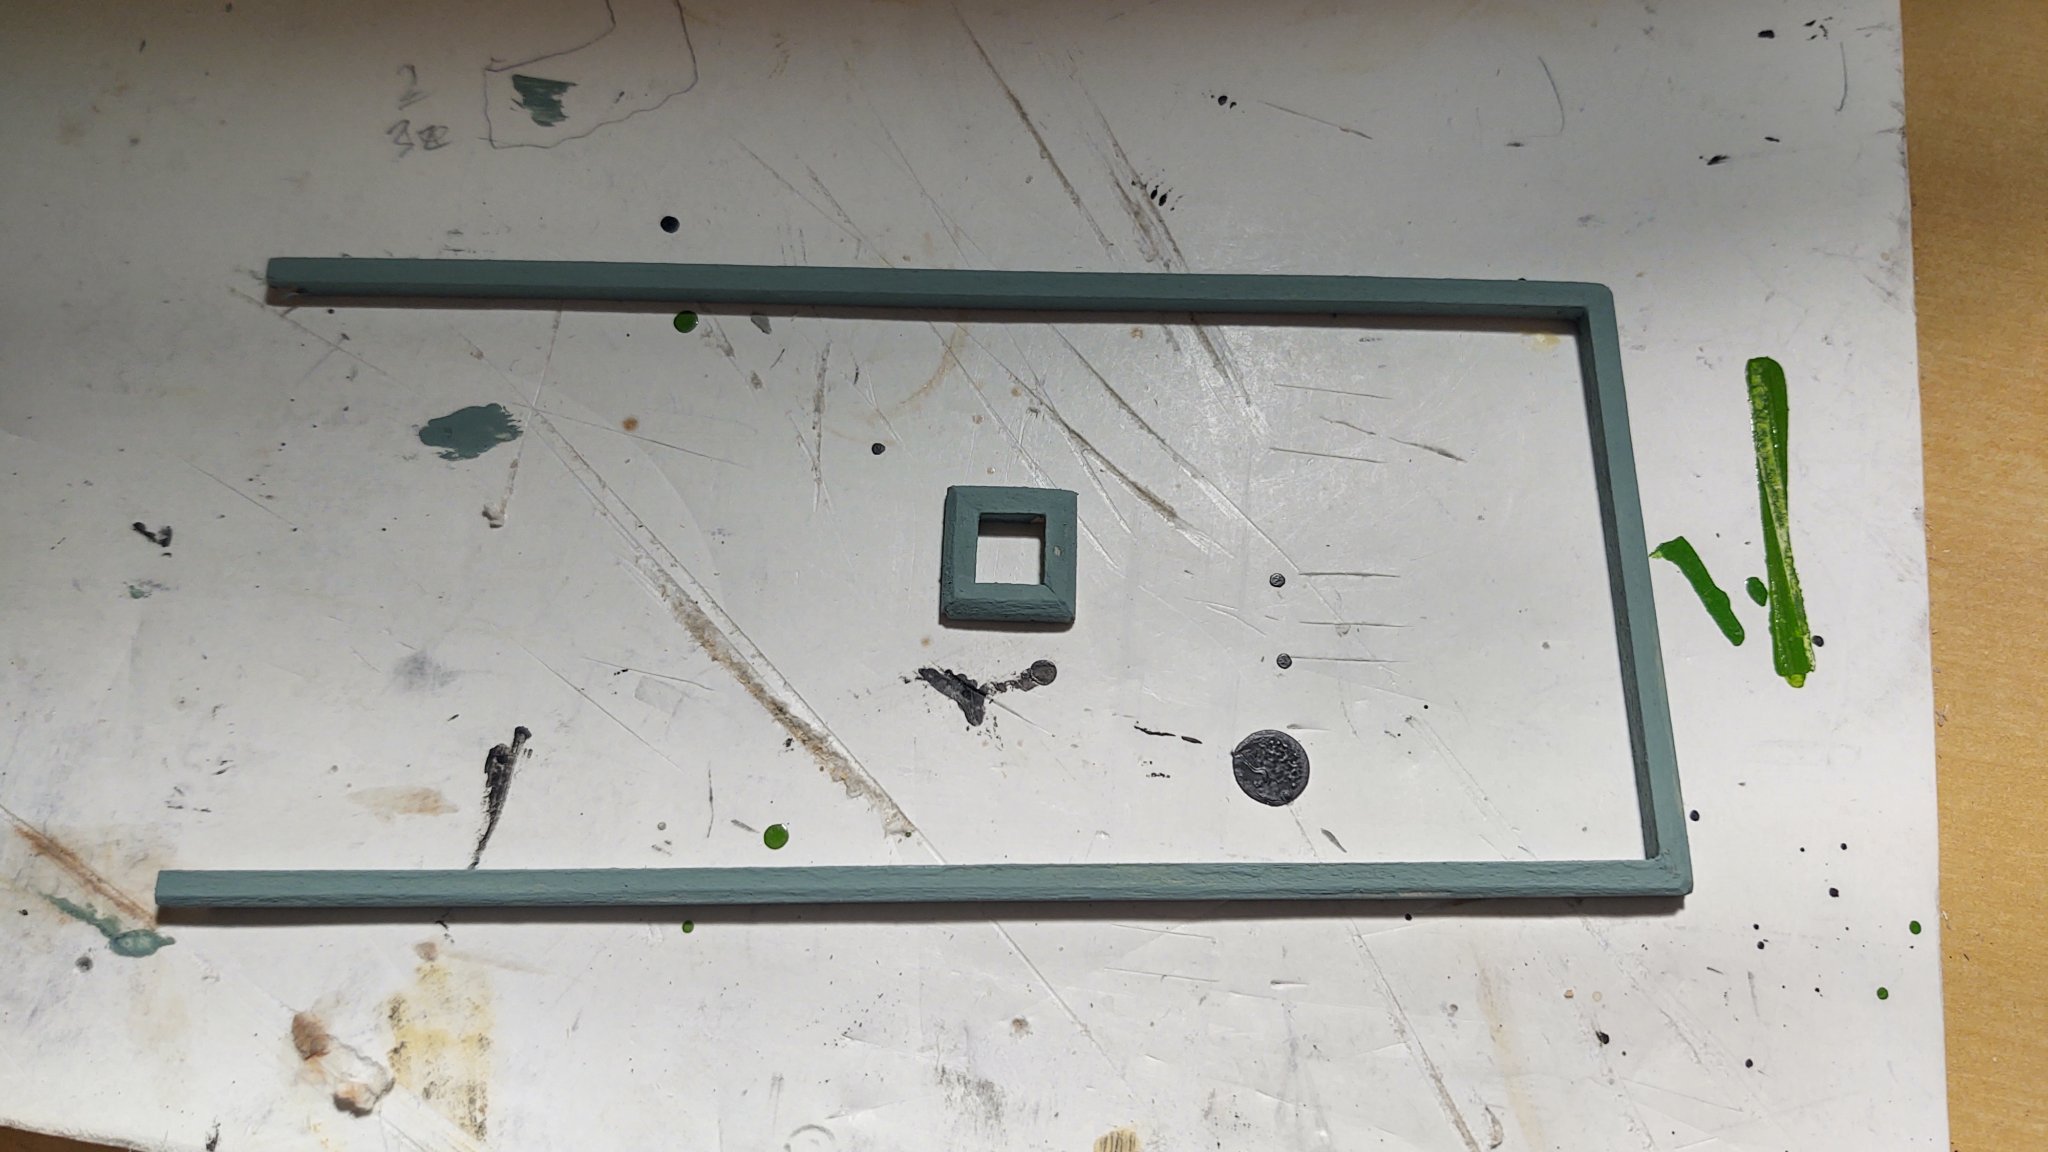
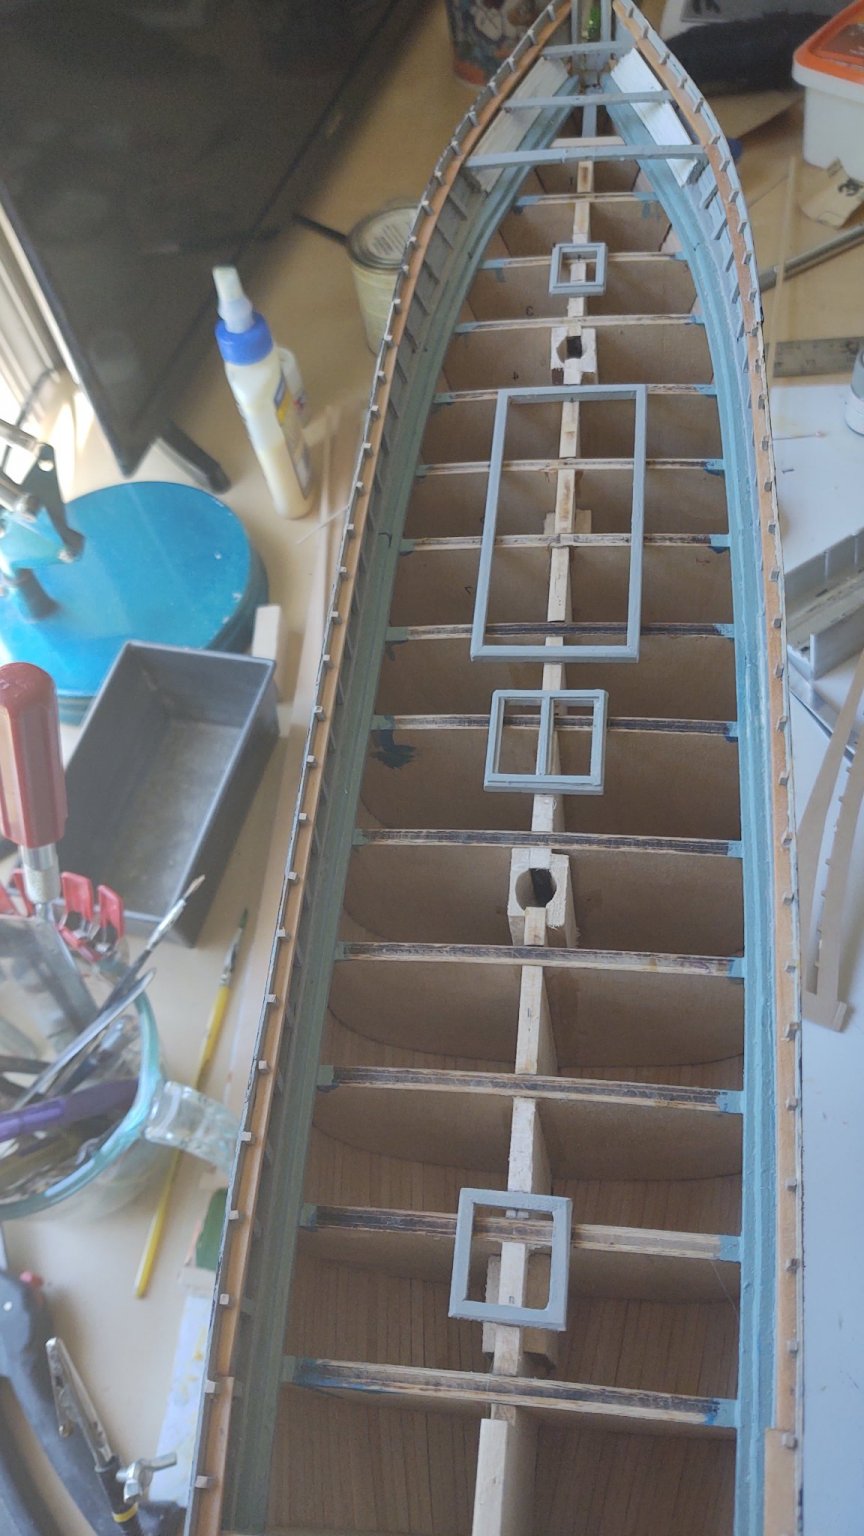
One question to anyone who has completed the Fish. My understanding of the after deck house is that it extends beyond the edge of the poop, but that there are ceiling planks along the edge of poop that closes off the main deck from the beginning of the poop. Which is to say that there needs to be a coaming (or set of coamings) that look like the blue lines in the figure below (or a single coaming that follows the outer edge of the blue below). Is that how you all interpret the plans?
As always, thanks for looking in!
George K
- Cirdan, bhermann, Tigersteve and 1 other
-
4
-
On 7/3/2021 at 10:11 AM, Vladimir_Wairoa said:
Thanks for interesting points Roger, I feel too that painted will hopefully bring her charm she deserves. well im not that good as some lines are atill not perfect looking at photogrphs but we all agree that as much as preparation si tiresome and boring its probably most important thing for planking and planking is important as hell . skpeaking of, this is still my first build of american clipper so it is double exciting for me. Im eyeing build of Other folks here who are cureently building model shipways flying fish, which is very helpful to me as It is even more helpful than looking at plan. I also think that planking will not go to that perfection that i would like to keep it natural wood i assume some filler will be necessary so i firmly decided on painting .
") to some point i think unpainted would also look very blossoming if done extremely right and using fine woods. V.
to some point i think unpainted would also look very blossoming if done extremely right and using fine woods. V.
I think she looks great so far. And I agree with everyone that you do what is going to please you. Yes, we all strive for accuracy, but by definition any model is a simplification and it's also an art form; there is always something of each of us in what we build. I've always painted, perhaps because I started with plastic, but I think it is more likely to be a desire to see something as it is, particularly for ships like this that aren't with us anymore. So, for me, maybe it is a desire to see something from the past - only you know what drives you.
Keep it up. I find it incredibly inspiring (and I'm pretty confident that lots of others do as well). Your work is helping me get the confidence to start my own scratch build plans.
Regards,
George K
-
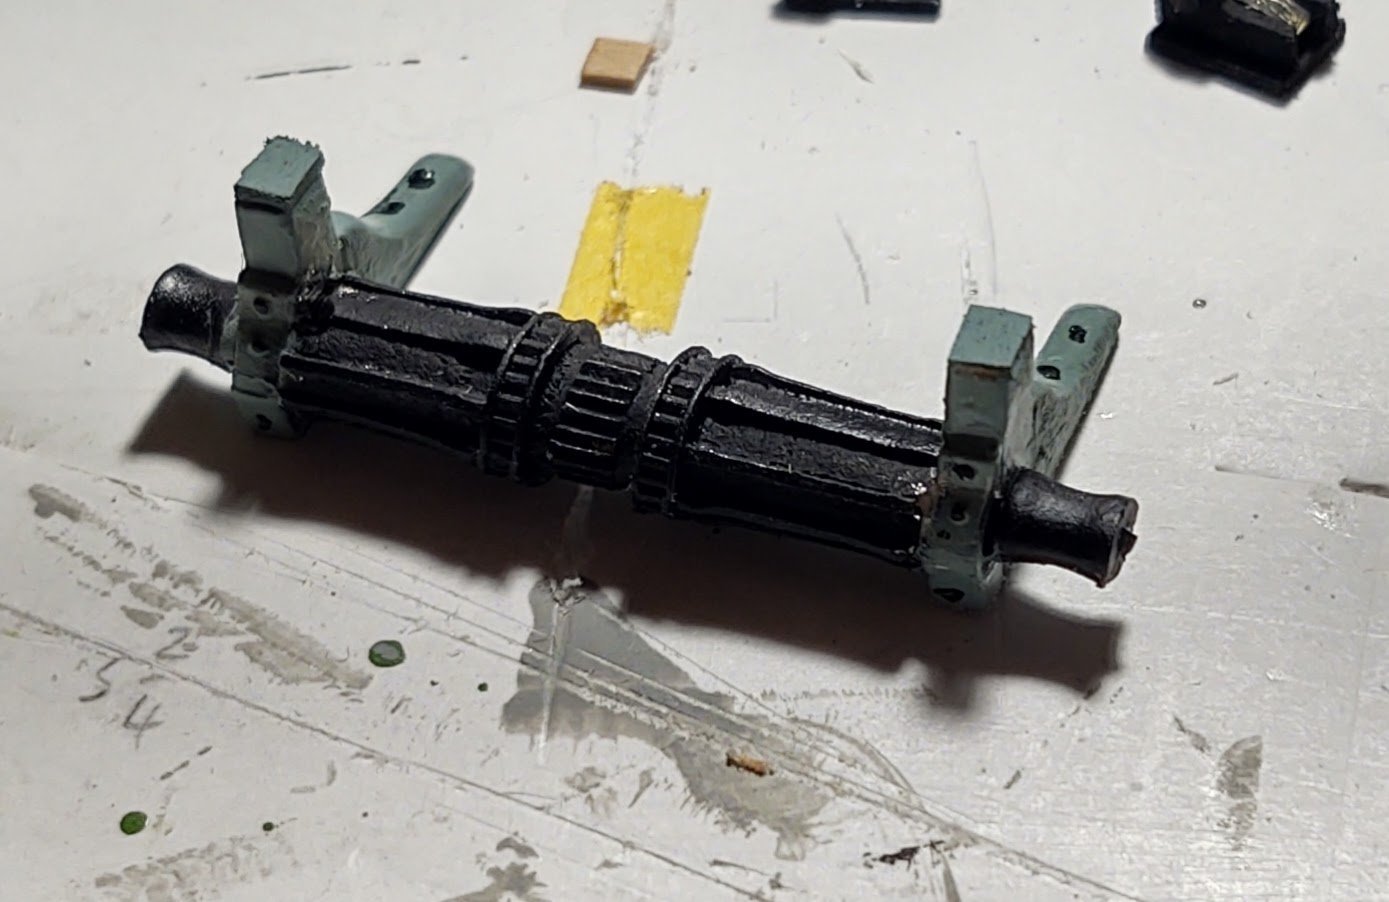
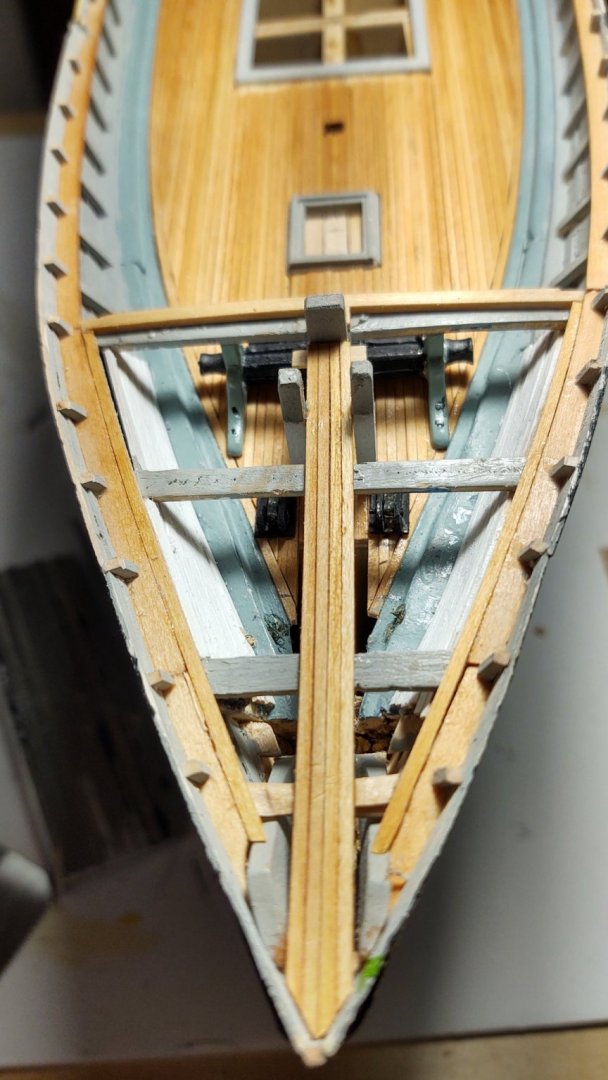
Okay. Initial work on the forecastle. First, the painted cleaned up windlass and the chain stopper (unpainted in the photo)

I copied and cut out a template to locate the furniture
I then mounted a stained end beam (with two small cutouts for where the knees are going to go, mounted the windlass and the chain stoppers. I didn't put in the troughs - it was getting mighty tight in there and they will be practically invisible (true of the chain stoppers pretty much as well, but it was good practice and will help thread the anchor chain cleanly. Next, I mounted the windlass bitt. As you can see in the photo, I mounted a small piece of wood to the forward side to give the deck planks something to mount on.

I then put a continuous strake on both sides of the forecastle deck and then start planking. I did the deck planking slightly differently than the planking on the main deck. The windlass bitt is four planks wide, and so I glued together a section of four planks, which I put trimmed to fit to the bow between the knightheads. Once they were installed I could install the two inboard bitts whose location I had marked earlier. That is the stopping point for the forecastle until the new anchor chain comes in from BlueJacket. Once I have that, I can run the chain through the hawse pipes, chain stoppers and then store the excess under the deck until I'm ready for the anchors. I just don't want to make the interior end of the hawse pipes and the chain stoppers any more inaccessible than they already are until I've run the chain.
So, next steps will be to lay out the coamings on the poop and plank it's deck.
Thanks for looking in!
George K
- Vladimir_Wairoa, Cathead, Cirdan and 1 other
-
4
-
The Flying Fish plans were drawn by Ben Lankford, who also did the Niagara and Pride of Baltimore II. All three sets of plans are magnificent. The Fish plans in particular are less model plans and more like simplified builders plans. They don't show the model bulkheads, but rather the frames, and the detail views show the actual ship timbers, etc.
The MSW kits (which I really like) feel "semi-scratch" to me, having you scratch build a variety of the things that go onto the decks and aloft. Having to fabricate all of those things yourself gives you more feeling of accomplishment, at least in my mind. I agree with you that they feel like they give you the skills needed to build something from scratch. We will see if that is true - I just received plans from the NMM Greenwich for the RRS Discovery, so as I'm building the Fish, I'm going to be turning those into plans for a POB model.
The one area that the MSW kits are deficient (in agreement with @mbp521 , aka Brian) is the Brittania fittings that they supply. The Fish has a lot more of them than either of the other two I've done, and that they are the worst I've seen in an MSW kit. I've replaced the Brittania anchor stocks with wood and brass versions before, so no problem there. The windlass wasn't too bad except for the flash, but the capstans are a mess, the cleats require a lot of cleanup, etc., etc. I thought about scratch building a windlass like @Keithbrad80 but the only model appropriate power tools I have available are a dremel and drill. Nevertheless, it may be possible to build a better capstan (or get the Brittania 1:96 ones from BlueJacket. The Niagara (at 1:64) had a capstan kit, which I may be able to shrink down to 1:96. We'll see.
- bhermann and Vladimir_Wairoa
-
2
-
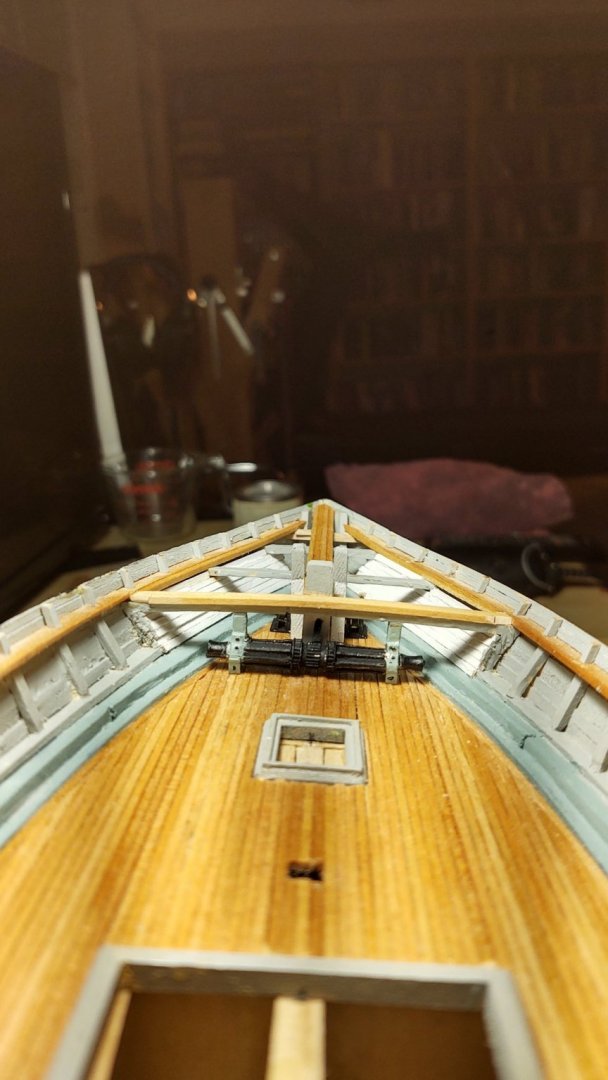
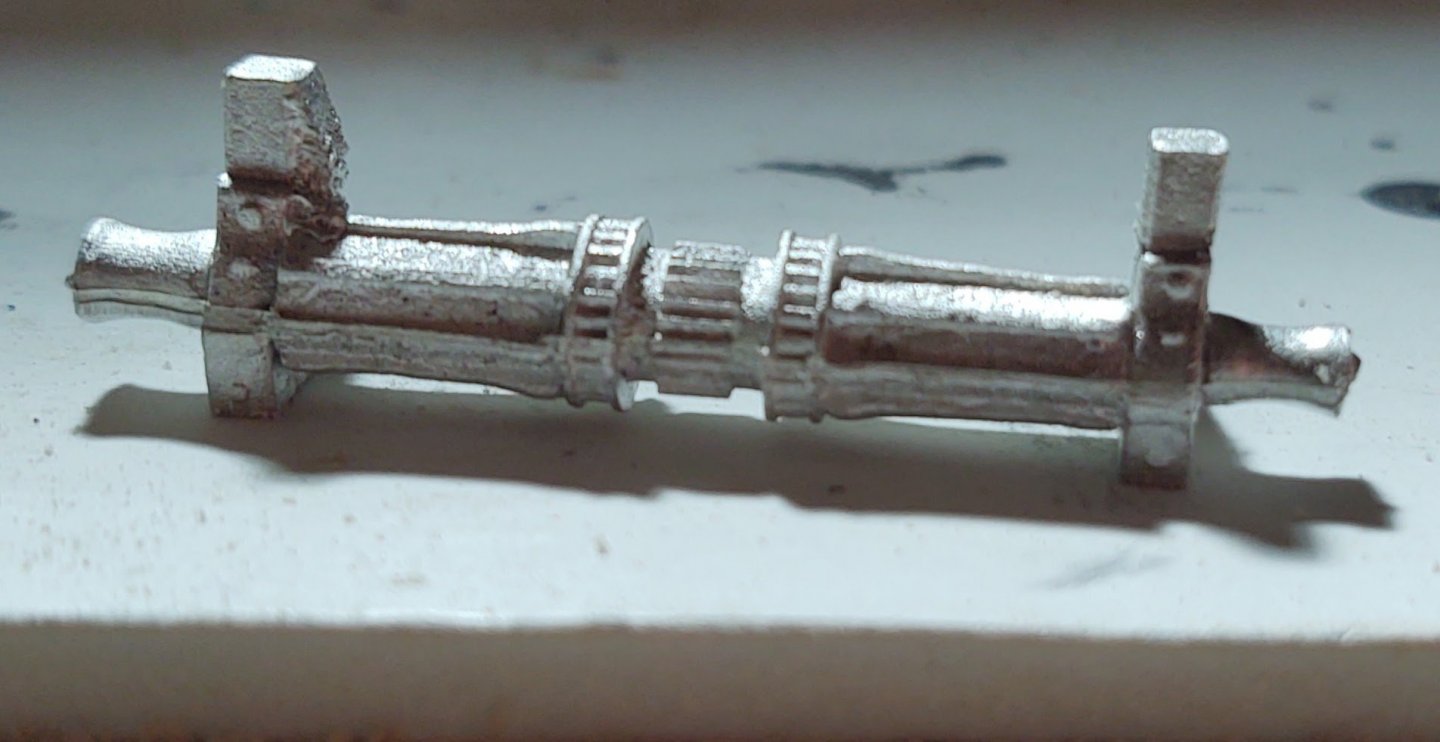
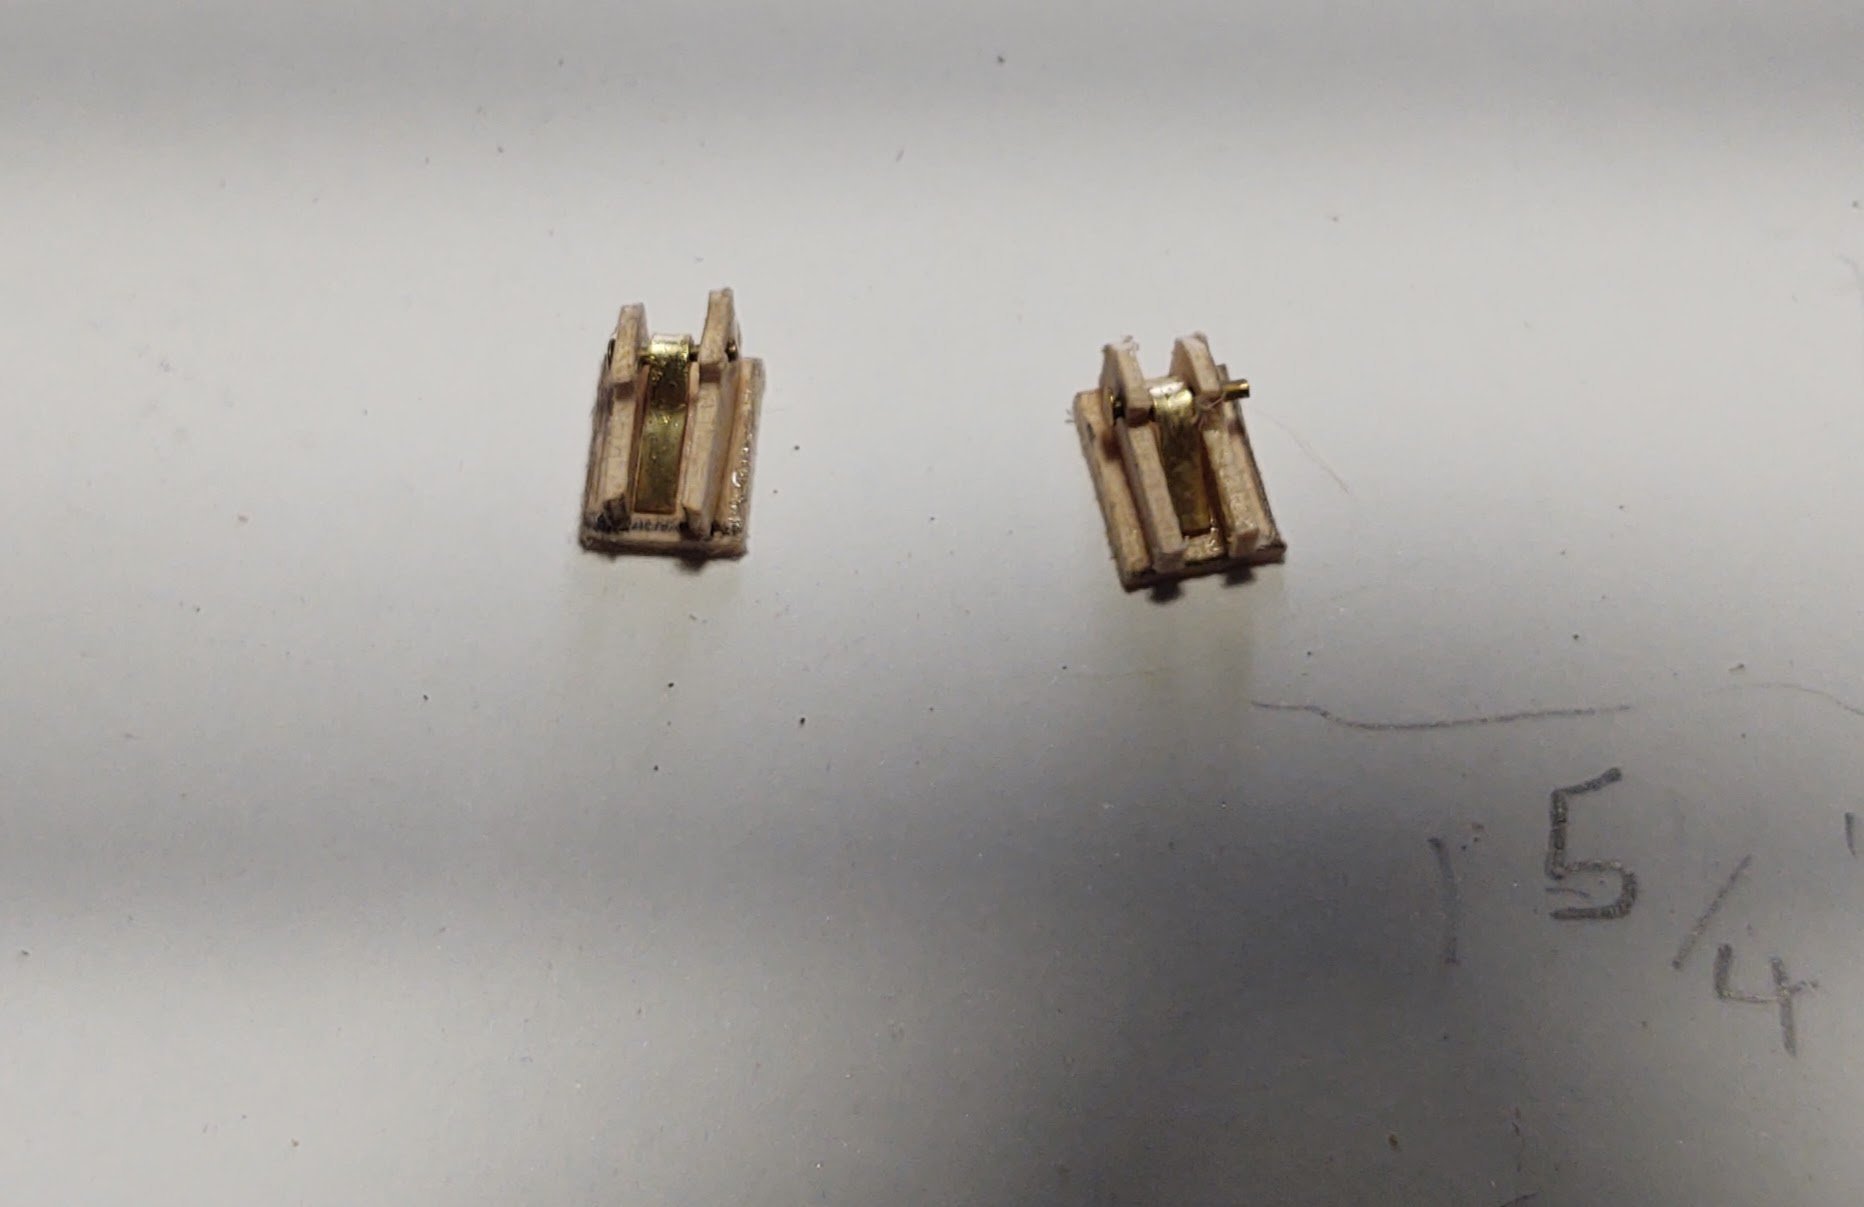
So - making things for the forecastle. I drilled the hawse pipes, made outer rings for the hull where the pipes exit, fabricated the chain stoppers, cleaned up the windlass and painted it, and made the bitts (pictures later). As I install them, I am going to install the anchor chain as well, as I suspect pushing them through the hawse pipes, and the chain stoppers is going to be a real pain once the forecastle is decked over.
Which brings me to a question. the plans show a 5/16 chain link (short axis) at 1/2" = 1 ft. which is a 7.5 inch chain. A 7.5 inch chain at 1:96 would be 0.08 inches, which is, I think 13 links inch given that the supplied chain is round, not oval like real chain. The supplied chain measures about 1/32" and based on the part numbers from model shipways, suggests that it's actually 42 links per inch. This seems wrong to me (and the chain seems awfully wimpy compared to the size of the ship. Am I missing something, or (as I suspect) do I need to order some additional chain? It looks like the BlueJacket chain is orderable in more reasonable lengths. Has anyone used their chain? Do you like it?
George
-
-
2 hours ago, cdrusn89 said:
It could have been worse; if I remember correctly the Niagara kit had four sets of tackle (plus the breeching rope) on each of the 20 guns.
Yep. Niagara has 4 blocks plus the breeching rope. I didn't bother with the hooks - I just lashed the blocks to the relevant eyebolt, reeved the lines into the blocks and then put the eyebolts into pre-drilled holes in the bulwarks and the carronades.
-
2 hours ago, Keithbrad80 said:
Hi George,
excellent work so far! If I remember correctly I drilled the hawse holes parallel to the centerline, it was a pretty tough hole to drill properly but that’s how I read it from the plans. Everything looks great!
Bradley
Thanks Brad! I was worried that I was reading the plans wrong. It will be a nuisance if I have to cut and then replace the joists for the forecastle in order to successfully drill the hawse pipes. We'll see if I can find the the right combination of bits to do so without cutting them out.
-
3 hours ago, bhermann said:
When it comes to staining, I don't know if you are using a pre-stain on the basswood before applying stain. I found it very helpful in reducing blotchiness when staining the birch dowels I used for the Bluenose masts. Maybe it is something that could help you going forward.
Just to show you my lack of knowledge, I've never even heard of pre-stain. Do you have a recommended brand(s)?
Getting the dowels to take stain has always been a problem. If that would help it would be great.
-
Well, the main deck planking is complete. I did not use a nibbing strake - it would have probably looked better, but it is beyond my capability at the moment and [warning, rationalization following] won't make much difference at 1:96 scale. I pre-stained the 1/16 by 1/16 planks, but needed to smooth it out in a couple of places, and so did a bit of restaining in those areas. It didn't seem to have a negative effect. On the whole I'm moderately pleased.

Before moving to the stern, I'm going to build and install everything that belongs under the forecastle, and I'm going to try to place the 5 bitts and then plank around them so that there is some interest in that space. The first step is going to be to clean up the windlass, which as can be seen has a lot of, well, I'll call it 'flash' in homage to the term of art in plastic. It also appears to have a slight casting defect on the windlass bitts that is going to require some filler.
.thumb.jpg.c8f6b0d86d222b7516dc267100c1c318.jpg)
A question to the clipper aficionados out there. Was it standard to paint the bitts some color other than black? My inclination is to paint them the same gray or blue that I've been using on the waterway or the inner bulwarks, or alternatively the white that I used on the ceiling planks, but I just don't know.
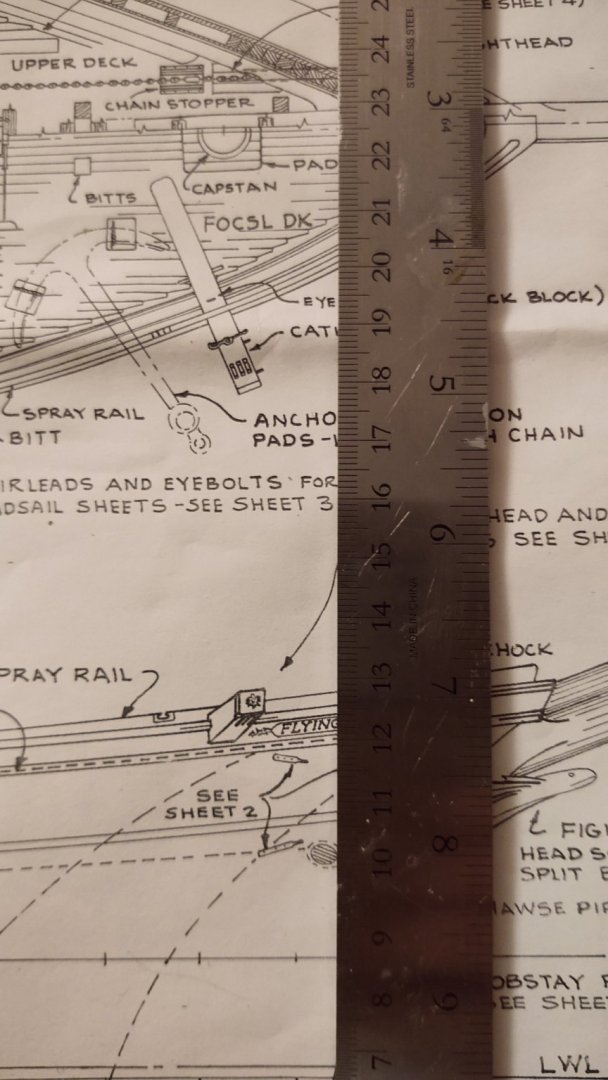
One additional question to anyone who has built the fish (or has knowledge of standard clipper design). If you look at the section of the plans I've snapped below, you will see that the anchor chain goes through the chain stopper (which I will fabricate "approximately" just to help guide the chain itself, through what I tend to think of as a wear pad (although supposedly it also removes gunk) and then out through the hawse pipe. The pipe slopes downward and exits just below the waterway. Both of the previous ships I've built that required drilling them had the pipes aimed 45 to 60 degrees from the orientation of the ship's centerline. But when I run a straight line from the pipe, it looks like it exits the hull pretty much lined up with the location of the hawse (follow the ruler down). So - am I reading this right? Do the hawse pipes more or less run parallel to the centerline?
Thanks for looking in!
George K
- Vladimir_Wairoa, Cathead and Cirdan
-
3
-
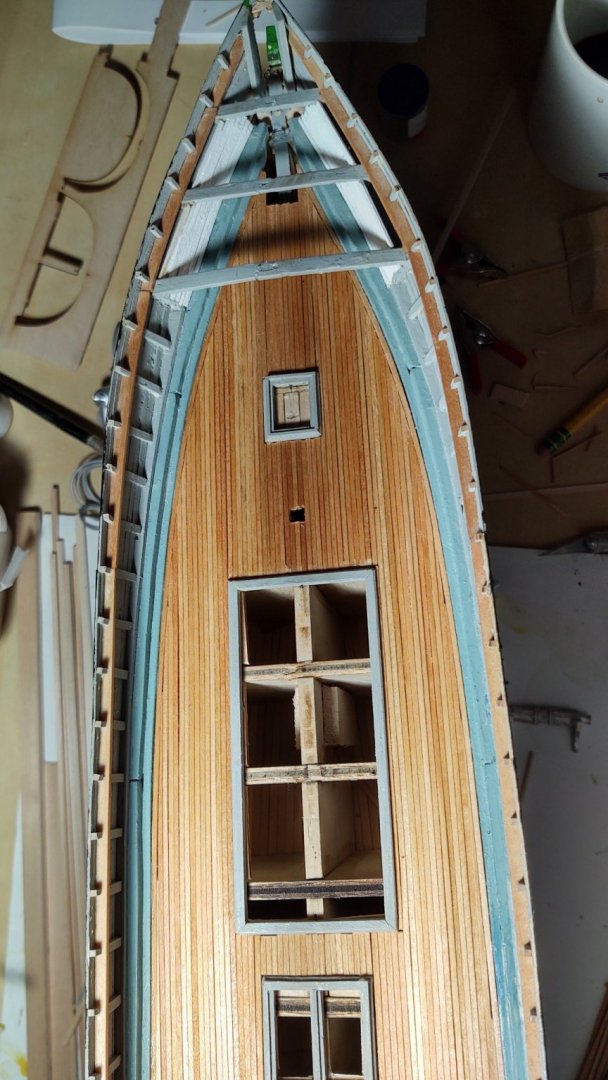
Well, my last post was almost a month ago, during which time I've moved my younger daughter home from college in Boston, and moved the older daughter from her job at a paper in a small town in Nebraska to a new paper in Boise, ID. As a result, I haven't made quite as much progress as one might hope in that time. However, the main deck is starting to come along.


As Brian pointed out, when you work around the various coamings, you are likely to occasionally have an alignment issue. Fortunately, they weren't major problems. Where the coaming edges did not line up exactly with the end of a deck plank, I put the planks in place fore and aft, then put the next plank outboard in place. This typically left a gap on the outboard edge of the coaming itself that I filled in with a sanded down plank. I find this to yield a more even result than trying to cut out segment of a single plank and have it fit both to the previous plank and the coaming edge.
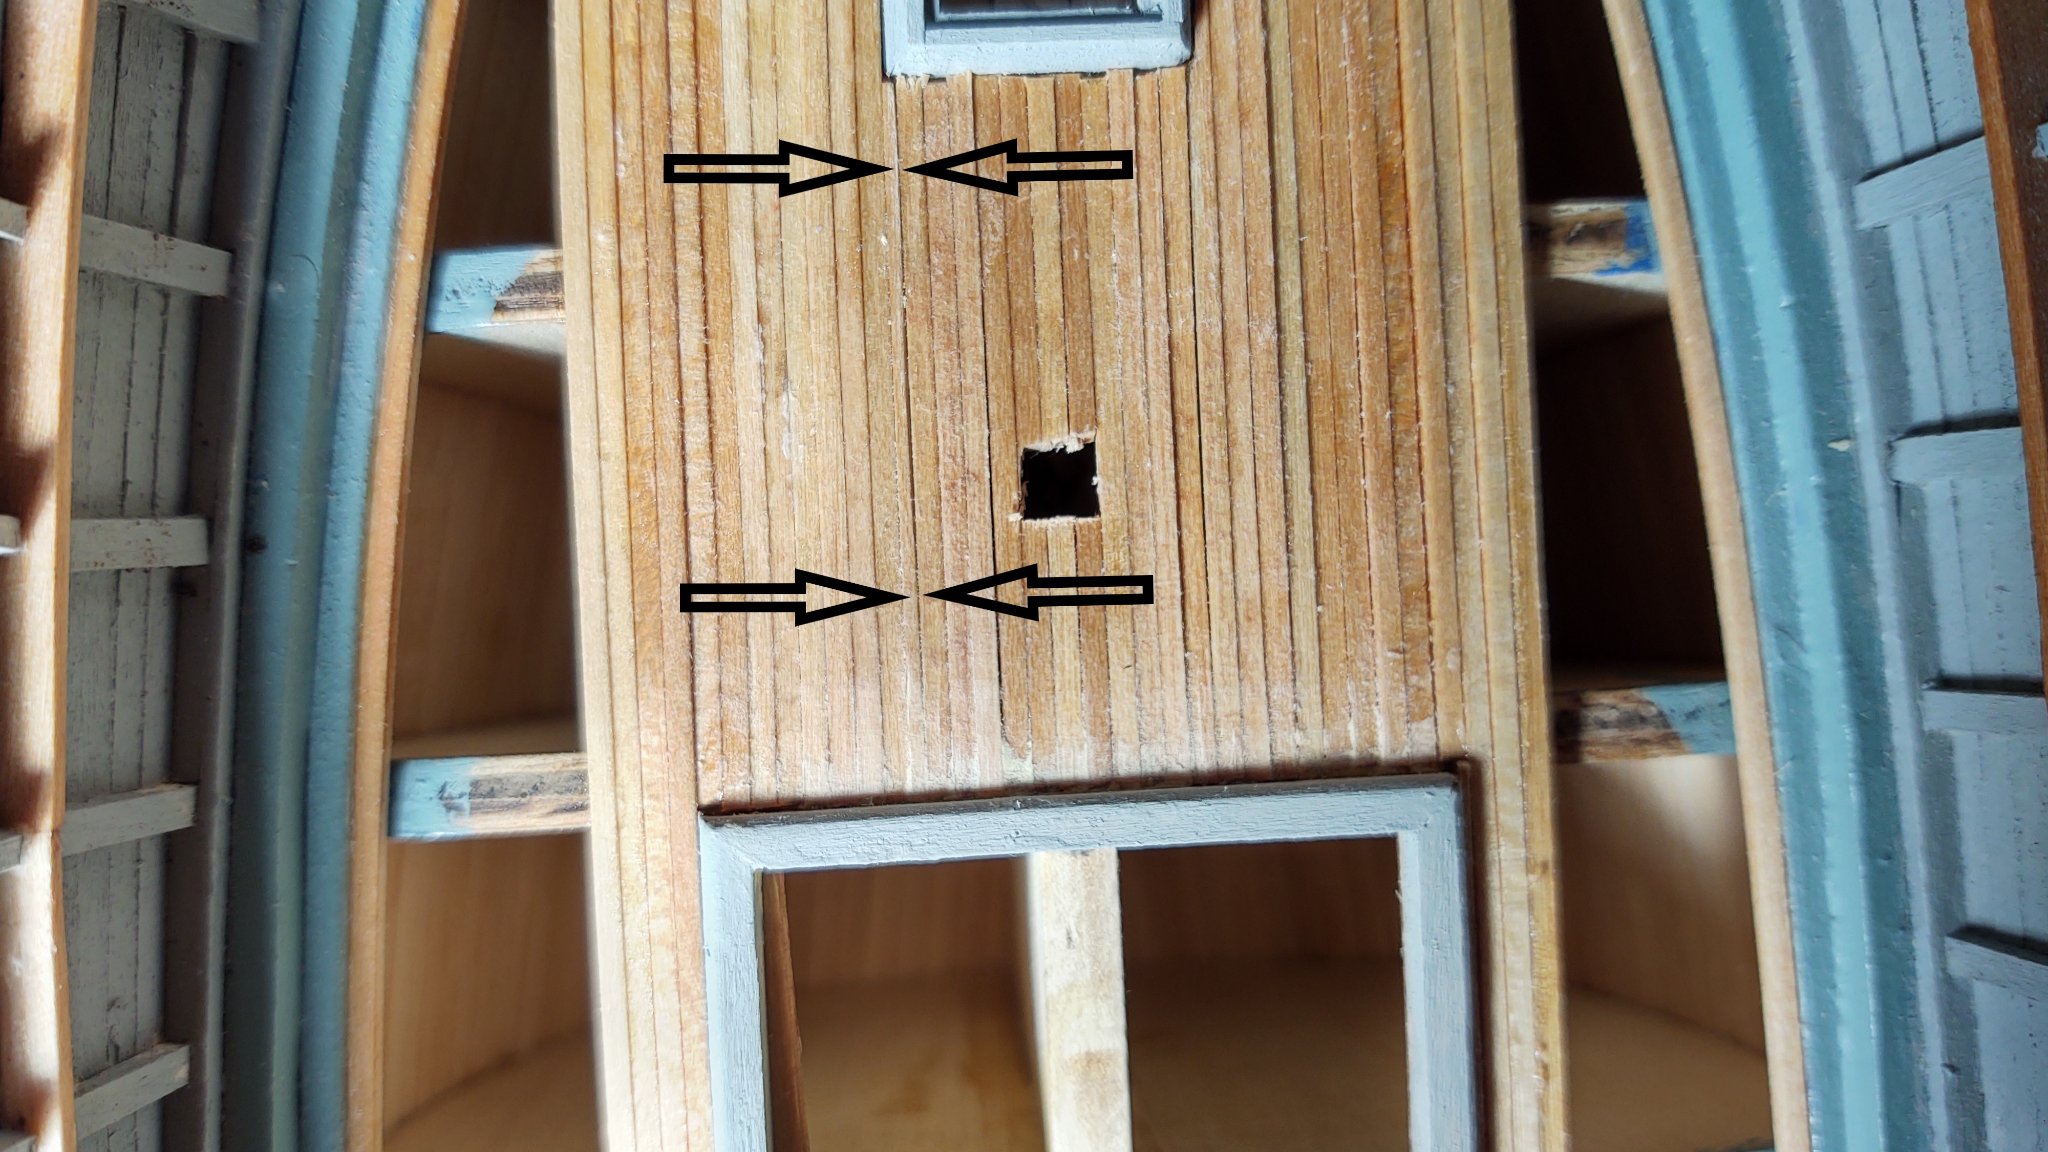
I also had a couple of places where I had to put in the equivalent of a stealer on the deck. In the image below, you can see that in order to have the planks fit properly when they were adjacent to planks started further aft, I needed to fill a small gap. The arrows indicate the about 1/32 inch plank I used to fill the gap. It won't be noticeable once the deck furniture is in place. I don't know if it was an asymmetry in the hull or just the result of variations in the thicknesses of the 1/16 deck planks, but either way it's not a big deal.

Hopefully more in less than a month.
George
- Cathead, BobG and Keithbrad80
-
3
-
-
-
37 minutes ago, mbp521 said:
...and away we go!
Great start. By the way, not sure if you previously mentioned it or not, but what is the color you are using for the coamings and waterways? I like it!
-Brian
The coamings and bulwarks are Tamiya XF-80 "Royal Light Gray", also labelled 'Navy Gray' (https://www.tamiyausa.com/shop/acrylic-paint-flat-mini-10ml/acrylic-mini-xf-80-navy-gray/). One presumes therefore a standard Royal Navy color although you couldn't prove it by me.
The waterway is Tamiya XF-23 "Light blue"
George
-
Thanks for all the encouragement. An update.
I fortunately re-checked the sizes. The largest coaming was too wide, so I adjusted, painted and mounted them in the hull.

Scrap wood was placed around the coamings to give the deck planks something to anchor to:
The deck planking stained with 'maple' stain:
and the first three deck planks installed.
Much more planking to go, but it's a start.
Regards,
GAK
- mbp521, Cirdan, rwiederrich and 2 others
-
5
-
Absolutely amazing job! Calling it the 'Revell Cutty Sark' seems to be a misnomer at this point. As much scratch building as you've done, I'd put it in the scratch section.
I can understand why you wouldn't necessarily want to put the figures in place, 1:96 is a kind of awkward scale for them. At 1:350, no one expects figures to be detailed, they kind of add some surface interest, and I've seen ships (particularly aircraft carriers) where they gave a proper sense of the bustle. That said, I included some of the 1:96 figures on my (out of the box) Revell Constitution. But, they were figures painted by my then 7 and 9 year old daughters and the model was a present for their grandparents. The 'toy look' wasn't as much of an issue.
- FrankWouts, Keith Black, kirill4 and 1 other
-
4
-
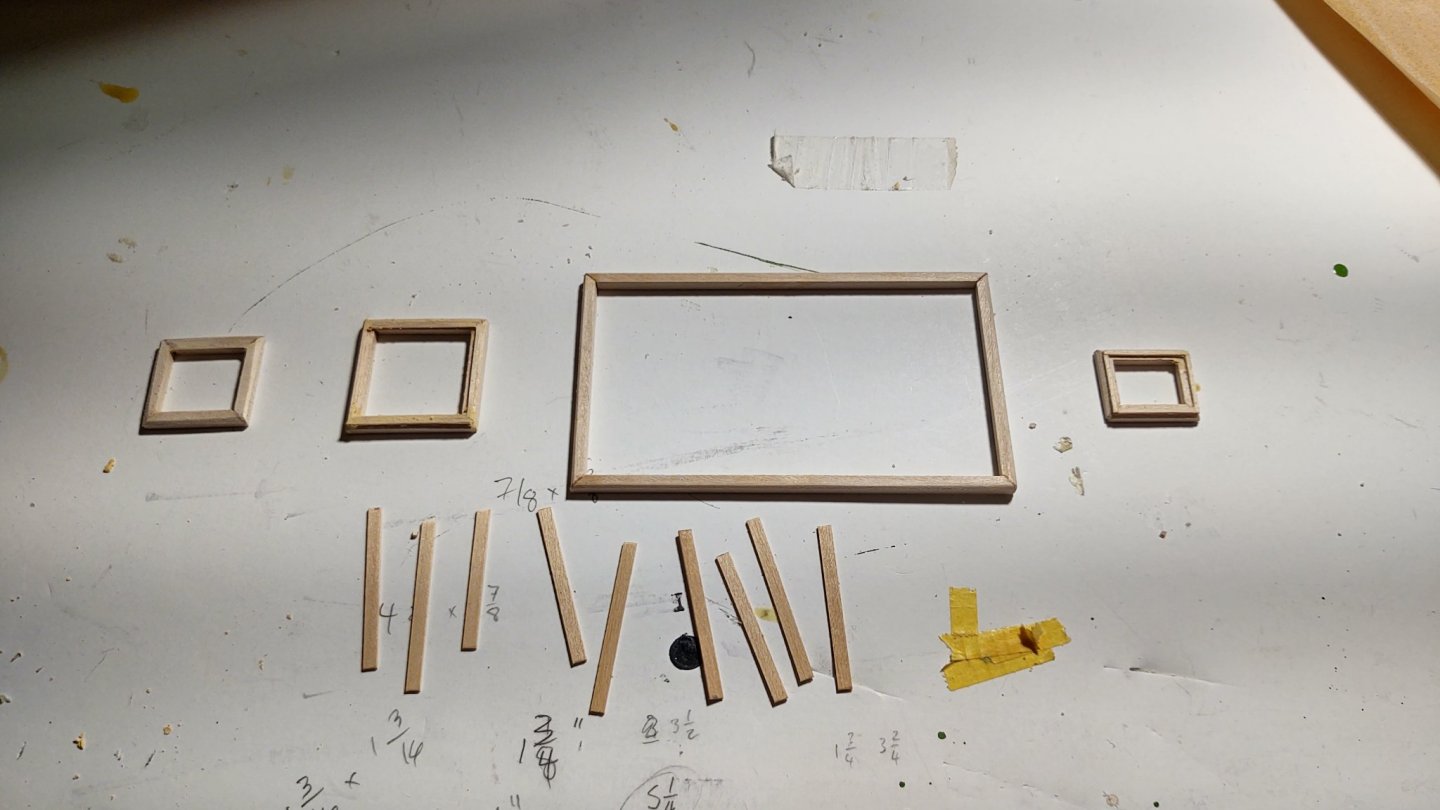
Very, very brief update. I've been busy with work work, home work, and what might be called vaccination logistics and it's kept me away from the building table. As a first step back, I've built the four coamings for the main deck. I like to put them in first and fit the deck planking against them rather than putting the planking down first. It is a bit of a pain, particularly when the coamings and the deck planking don't match exactly (i.e. always), but, it's how I've done all the others and I don't intend to change now.
This took way longer than I originally intended, as the smaller coamings are very fiddly - if they are even vaguely off they look really bad - I wound up making multiple pieces for the small ones until they finally looked right. The 1/8 by 1/32 segments are eventually going to be the hatch covers. I cut them so that I could place the 1/32 by 1/32 segments I used to define the edges of the hatch covers in a way that everything would fit properly. Anyway, they are built, sanded and the bottoms are sanded to match the camber of the hull. They aren't painted because I realized I was out of the particular gray I'm using for the bulwarks and coamings. Once they are painted and installed, time for the main deck.
- Vladimir_Wairoa, mbp521 and Cathead
-
3
-
I will follow with interest.
A quick question. Do you have access to a laser cutter or use a commercial service? If the latter, which one and what did they need to do the cutting?
George K
-
Good luck Brad, I wish you all the best in your new efforts!
-


.jpg.526528e02c331df604e88b5b392259bb.jpg)


Flying Fish by gak1965 - FINISHED - Model Shipways - 1:96
in - Kit build logs for subjects built from 1851 - 1900
Posted
Oh, and a palate cleanser. I was in New York City to race the NYC triathlon over the weekend. Here are two photos of Wavertree that I took while I was there. Built 1885 in Southampton and, according to Wikipedia, one of the last ships built out of wrought iron. Love those clipper bows.
George K