


Bob Fraser
-
Posts
291 -
Joined
-
Last visited
Content Type
Profiles
Forums
Gallery
Events
Posts posted by Bob Fraser
-
-
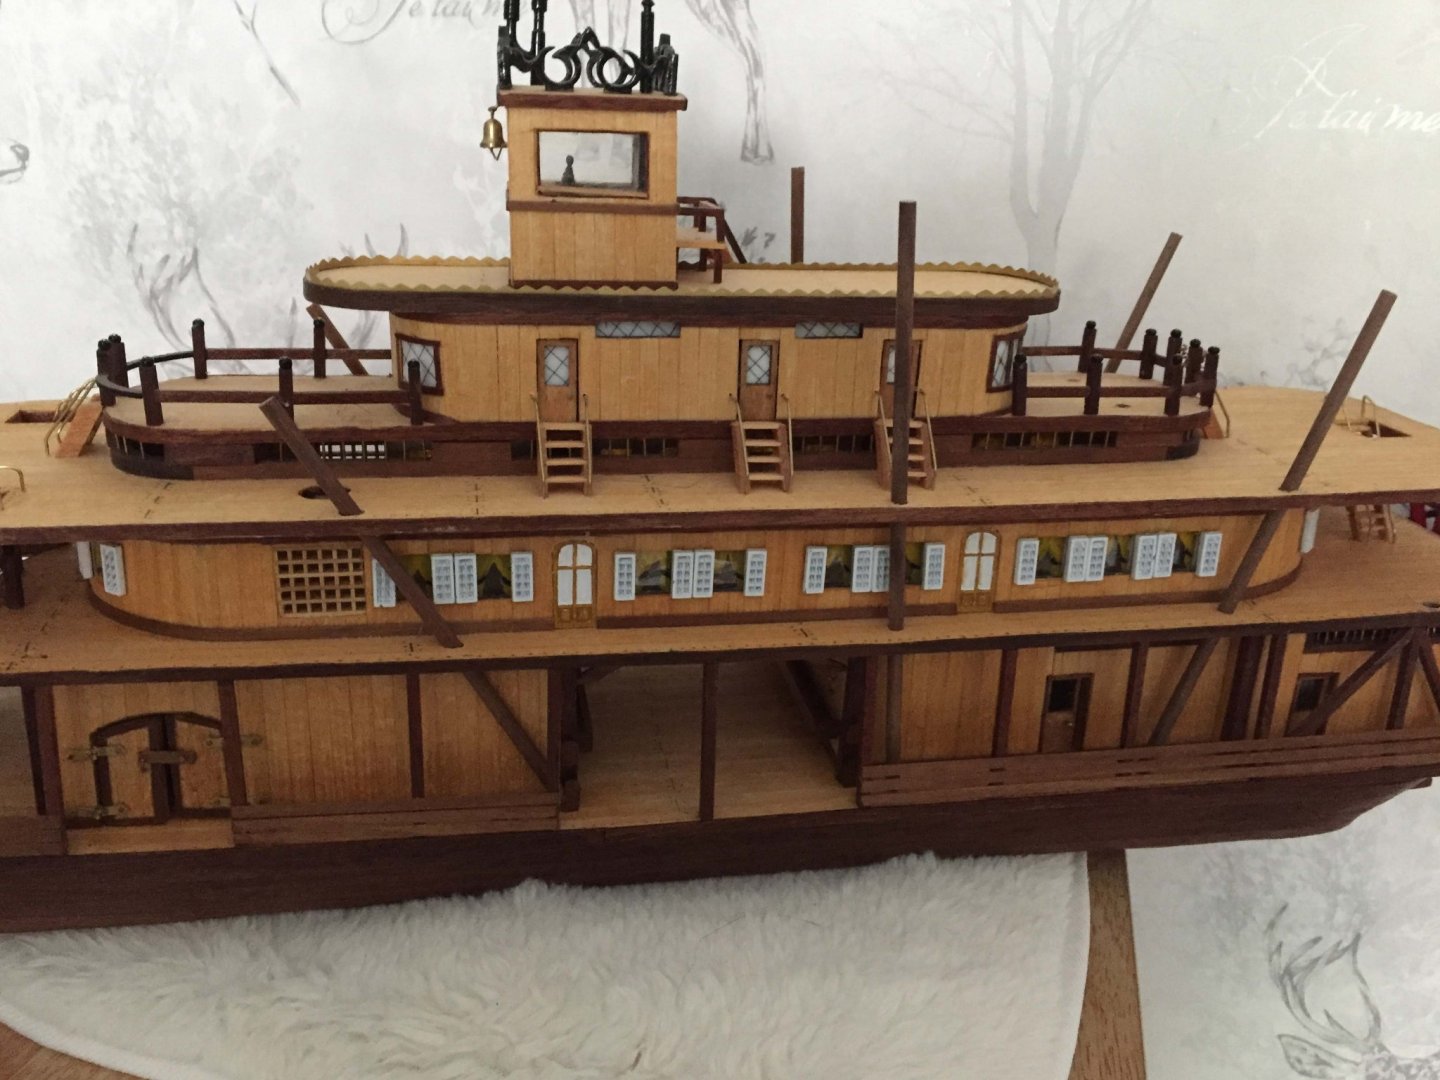
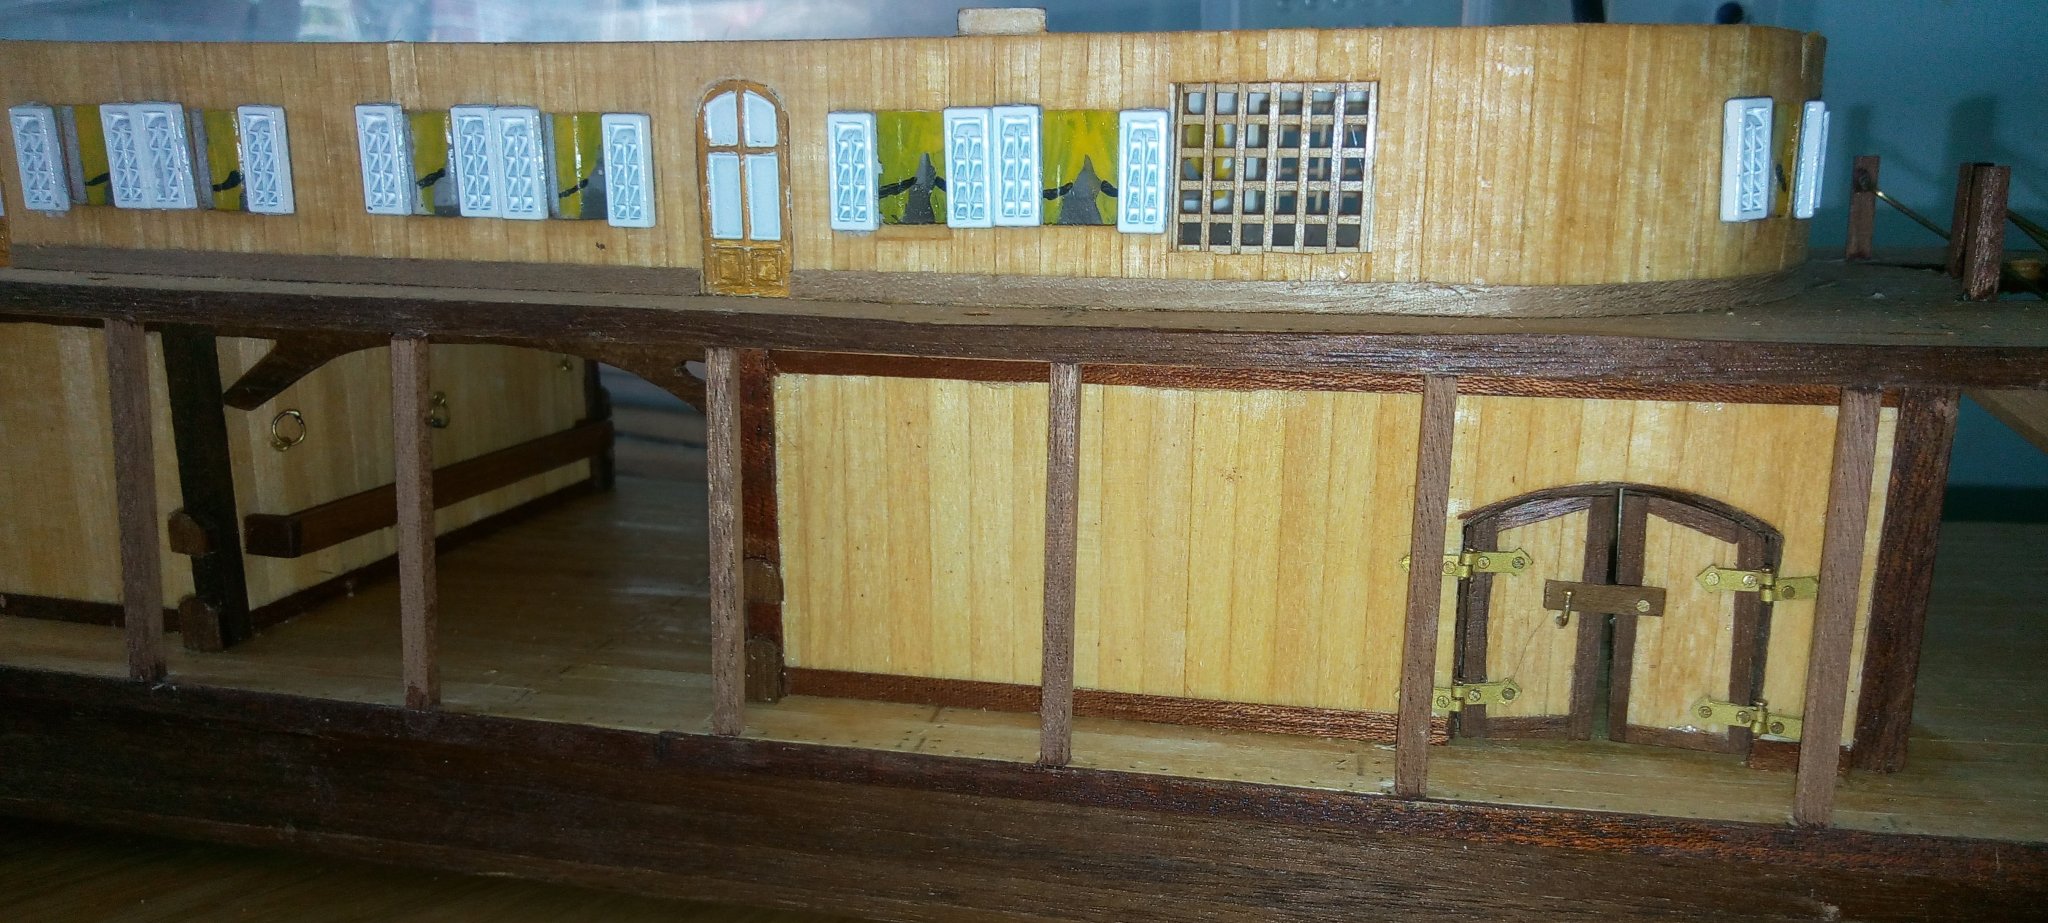
Brushing off done, and new wood oiled.
Having already painted the smoke stacks I decided to sort them out, and the other smaller stacks to make sure the sizes and holes were correct before doing fiddly delicate work that could be broken off. These are just paced at the moment.
Also did the side masts that AL call "turnbuckles" as these run alongside the side railings.
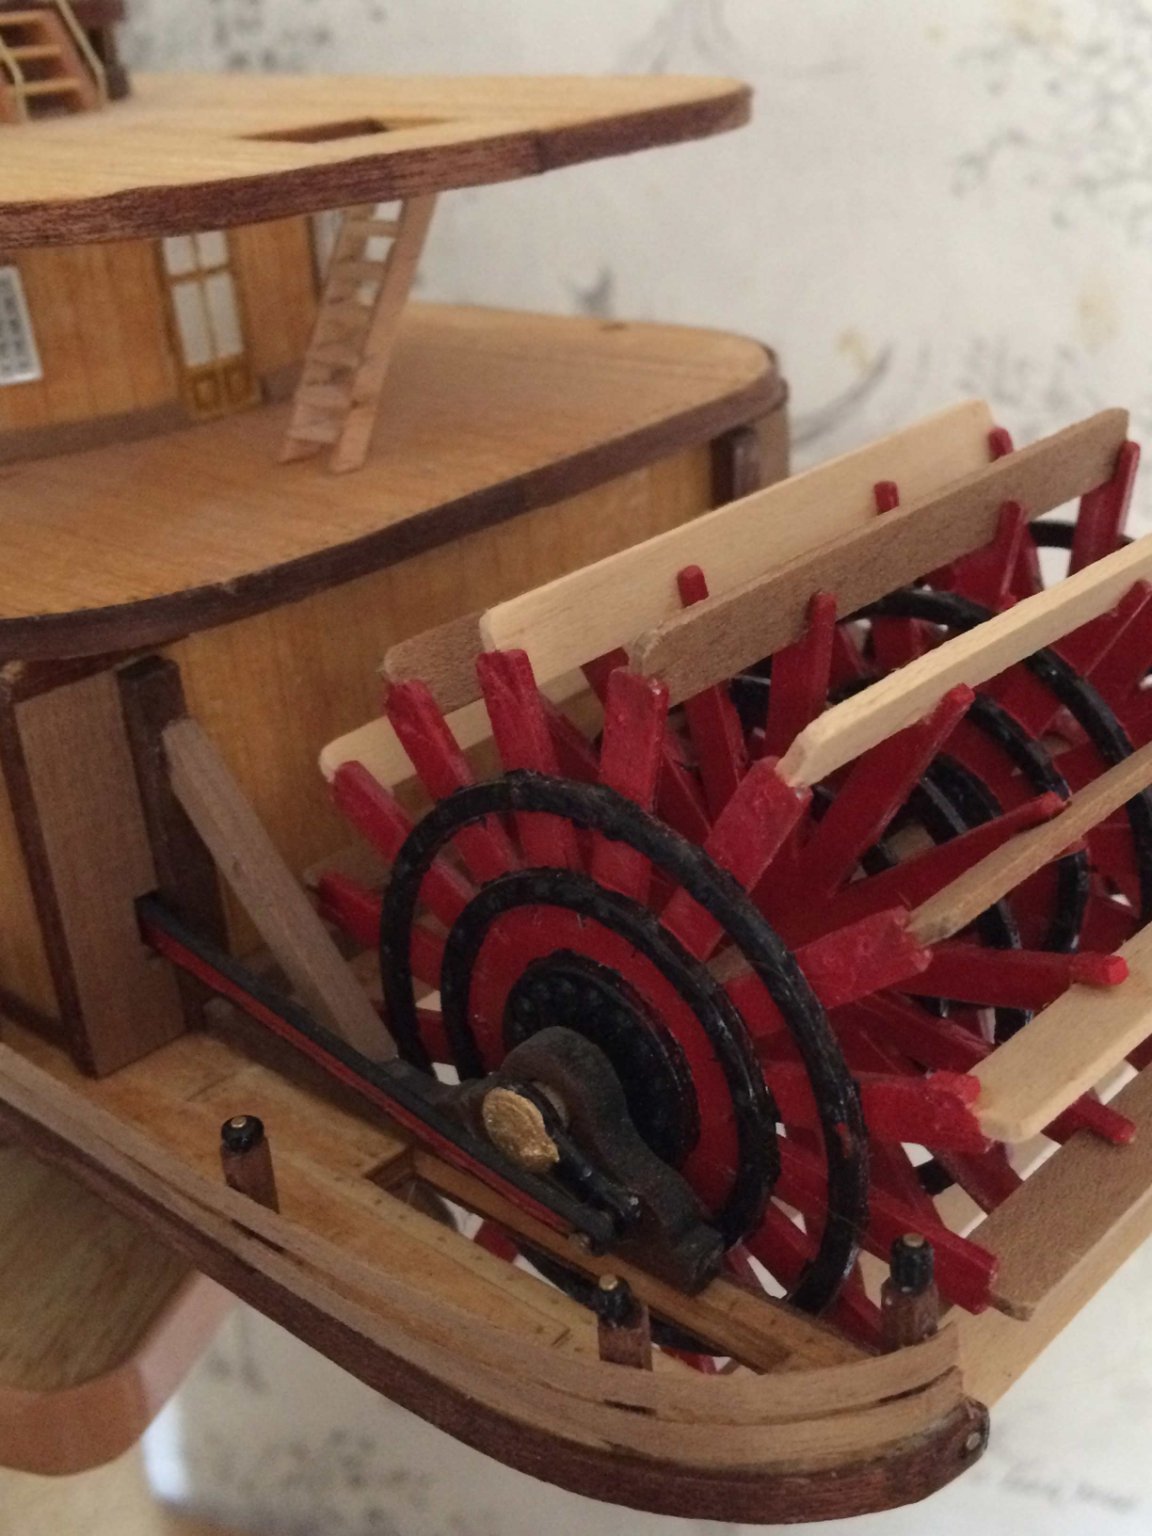
The smokestacks I'd already painted - bad move as it turned out. The brass rings wouldn't fit! So some sanding and fit testing ended up with this -
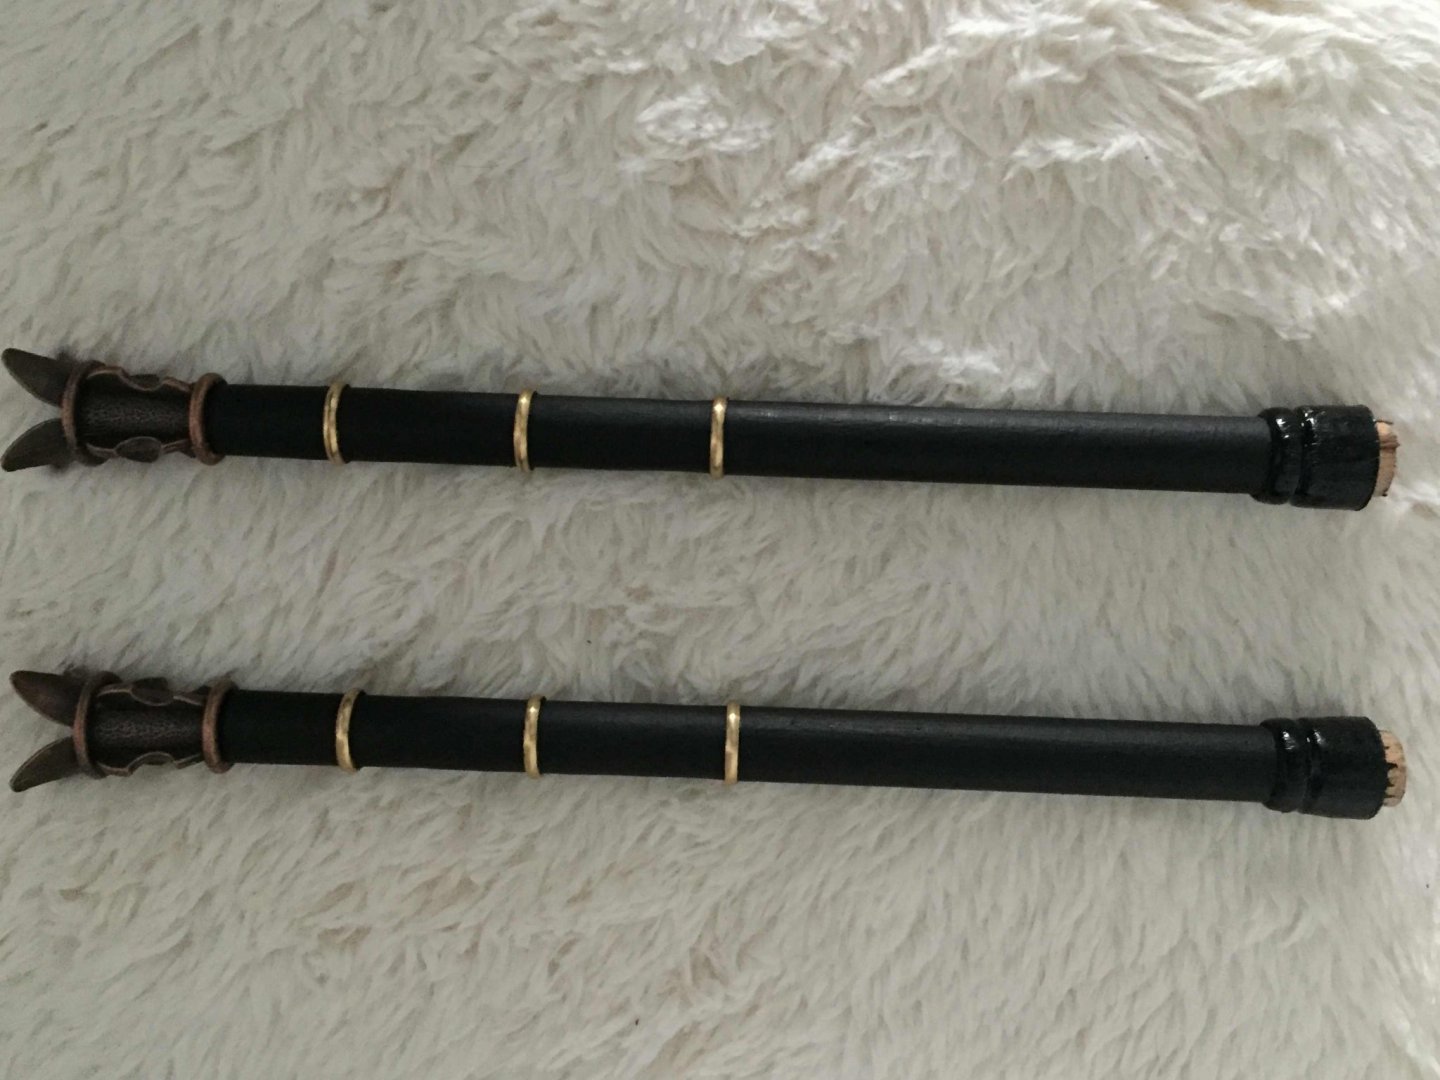
Still to paint the fancy bits, and will put a brass strip around the expanded base inside the indent.
For the turnbuckles - well, the deck holes are cut through vertically and are too small for the width of dowel required, so some shaping and angling of the holes on both decks is required. Again best done before any railings are fitted!
Engine room stacks, again holes too small for the required dowel and didn't quite line up straight - probably my fault when fitting the upper decks.
On the revamped release these at turned in at the bottoms, so holes resized, bottoms shaped to a curve, and shaved to fit.
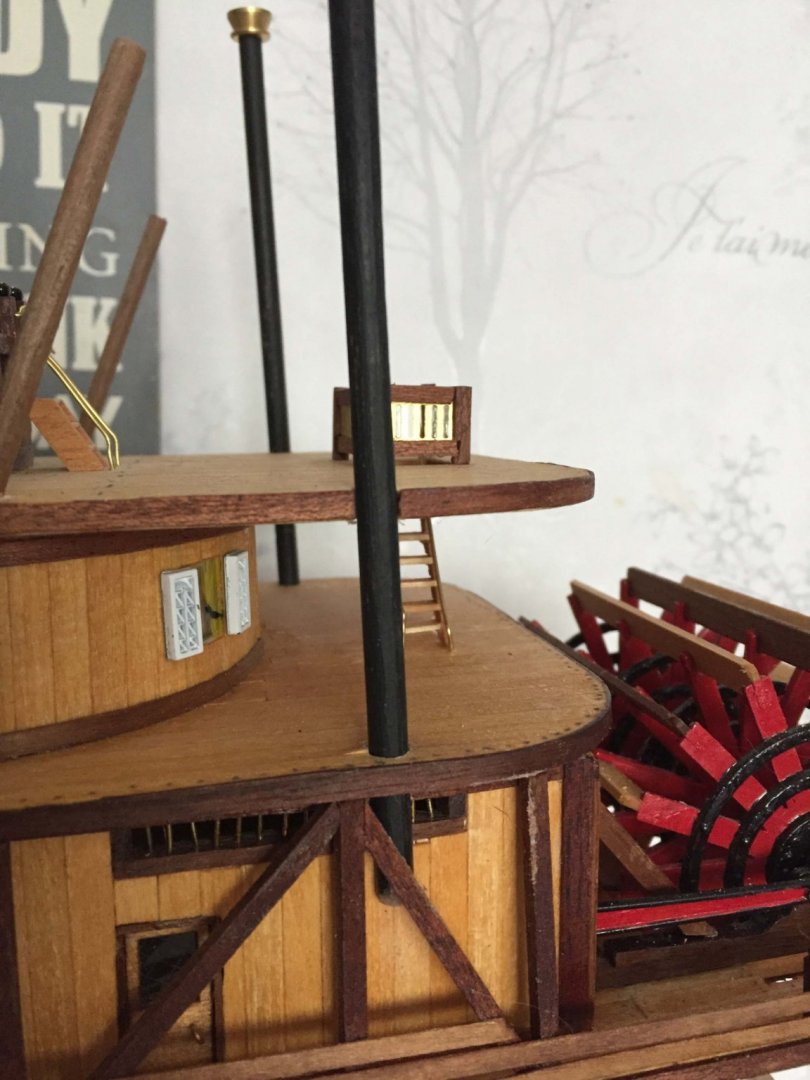
Going to put a brass strip around the outer to hold it against the upper deck.
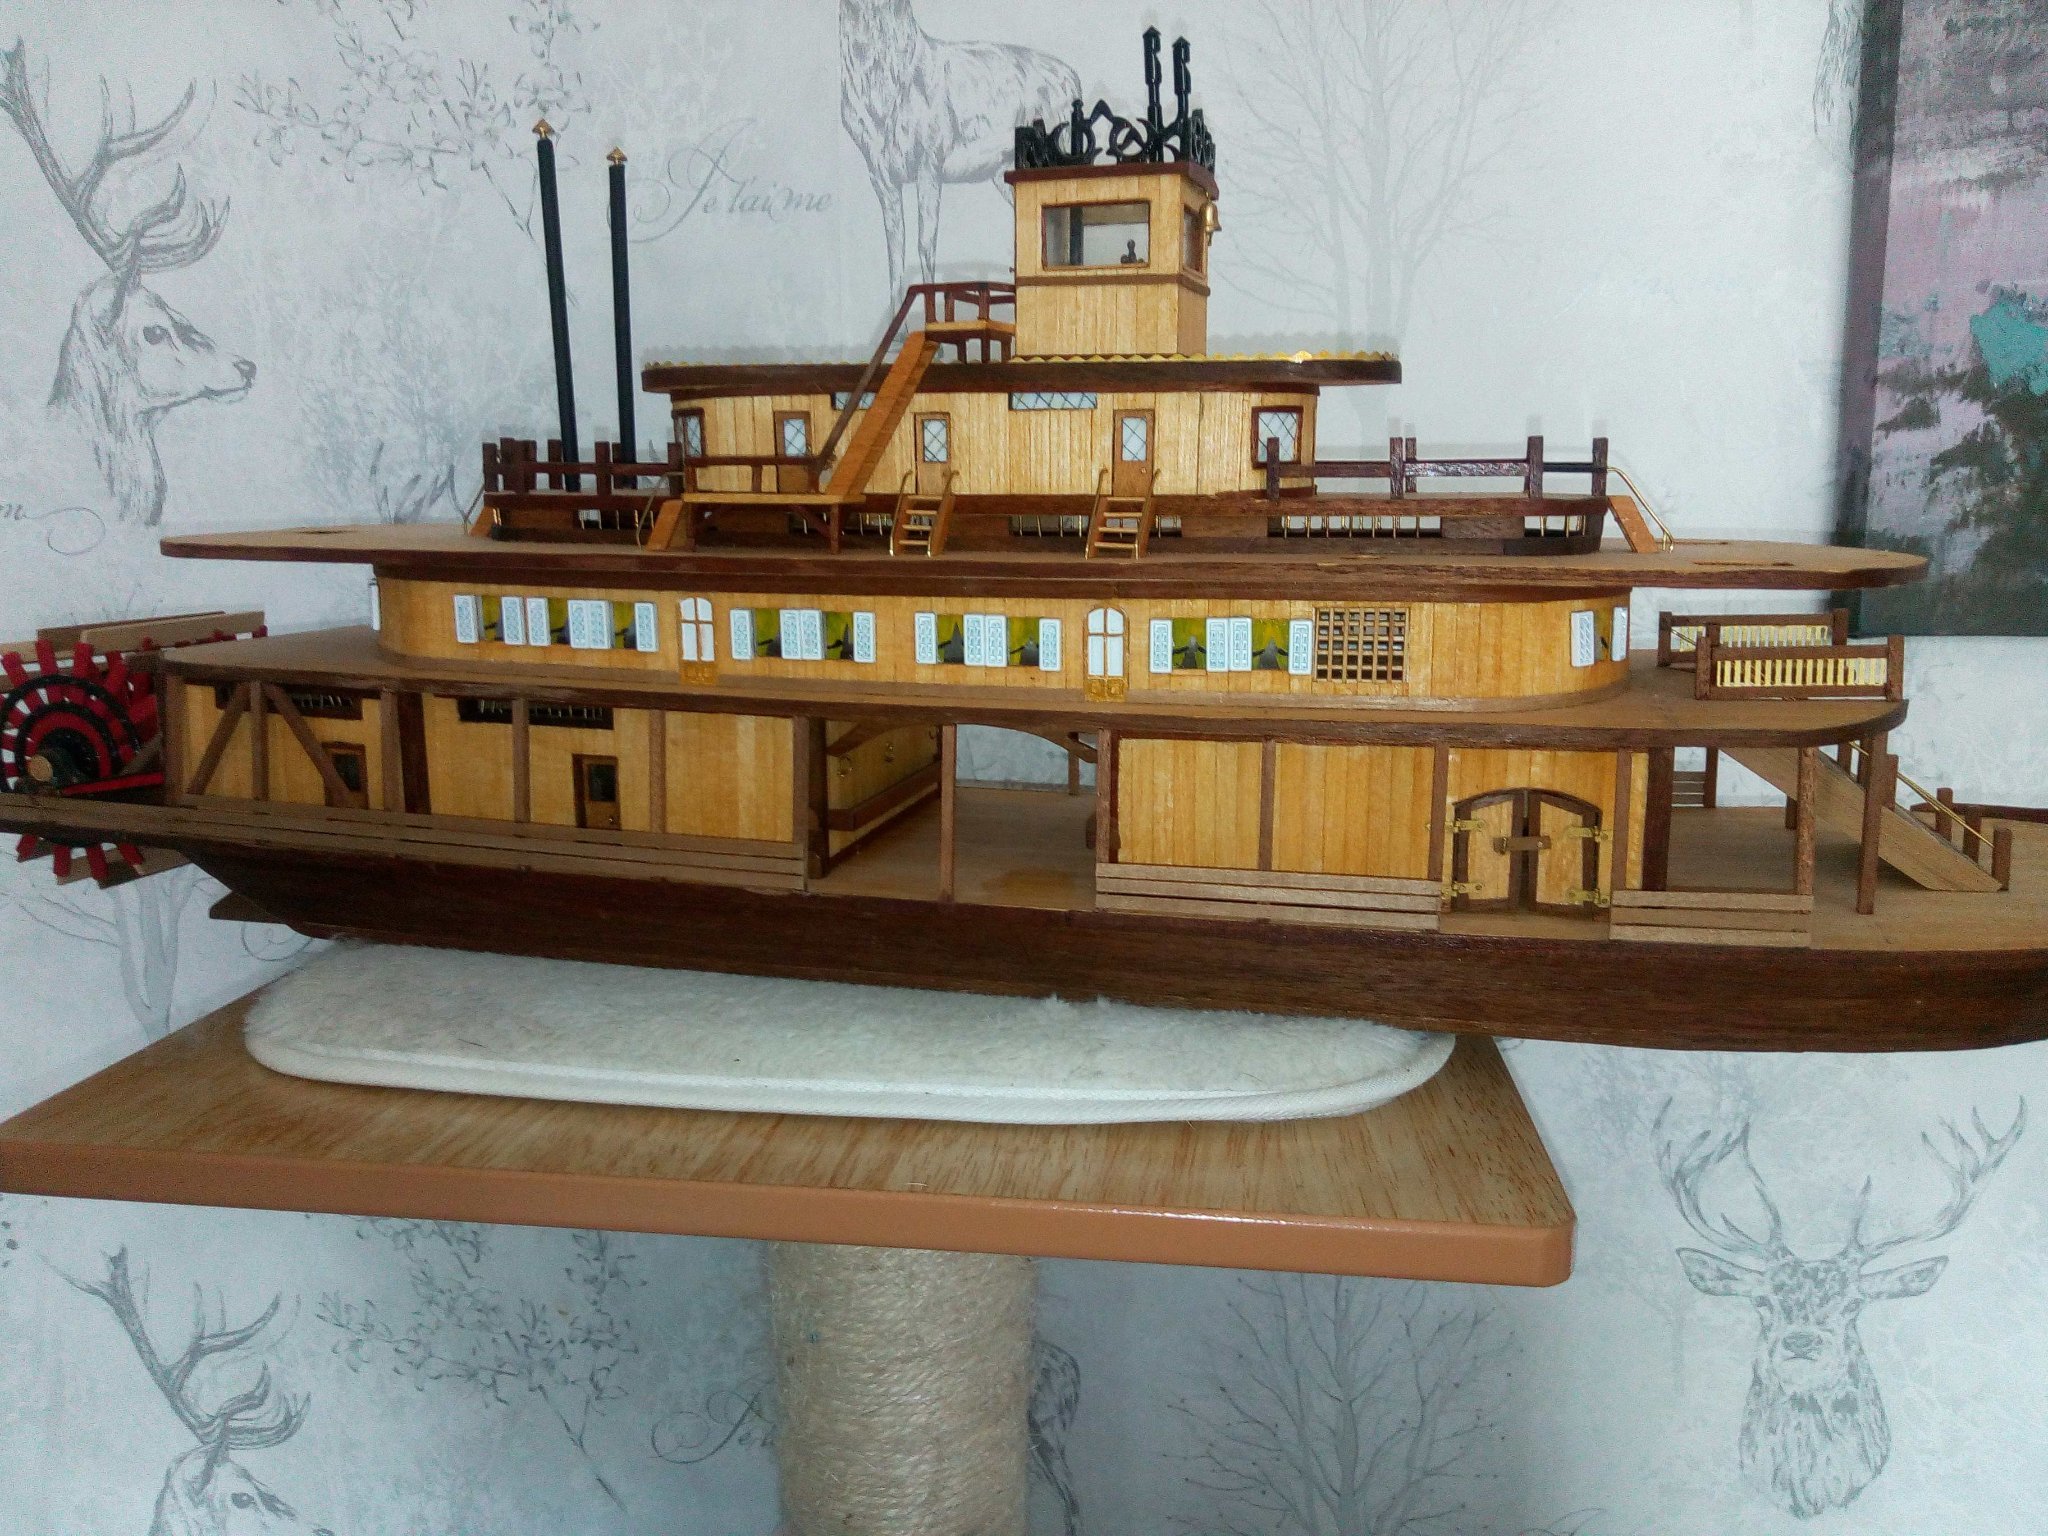
The guard railings around the stern were made and fitted.
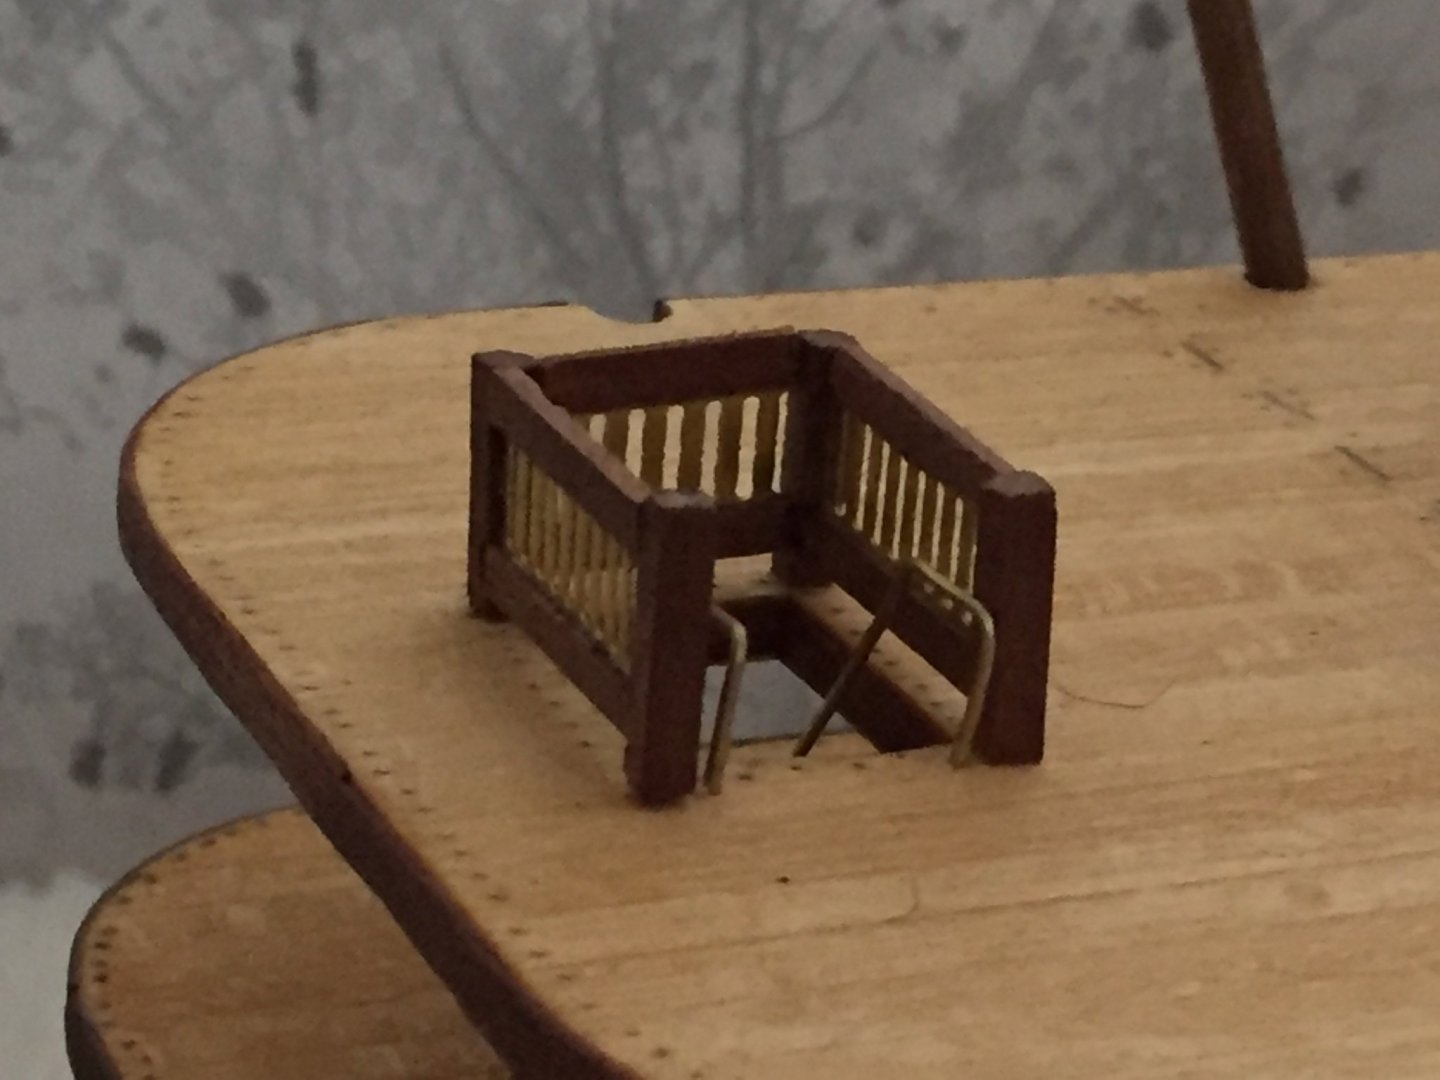
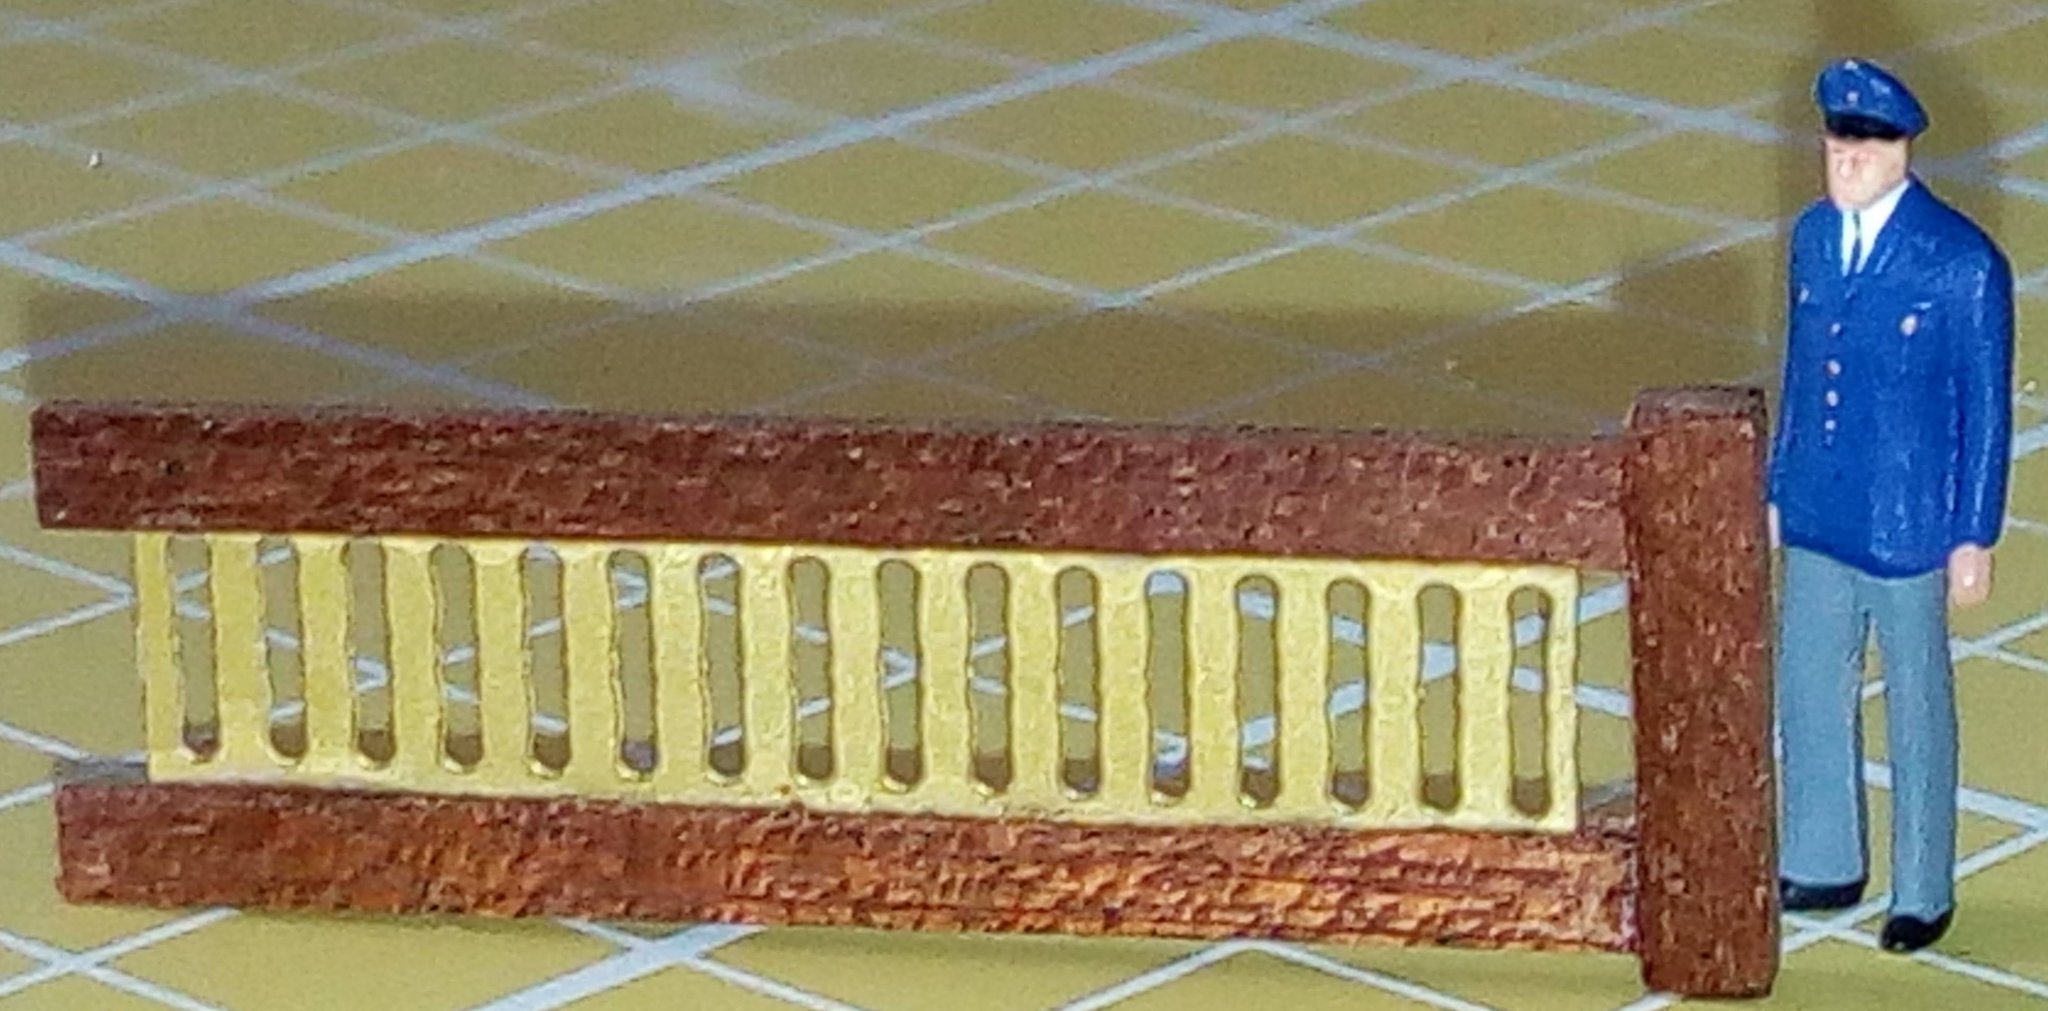
I noticed that the upper two decks upper and lower railings are inset into the newels. This is only visible on a couple of pictures, and not mentioned at all in the instructions. Bad photo, but you can clearly see the mortice cut out on the centre deck, and that the lower rails are inset on both levels.
Going to give it a try!
Got the grandkids today, so all work put safely out of reach!
Cheers for now,
Bob
- Altduck, EricWilliamMarshall, PRS and 1 other
-
 4
4
-
Small update.
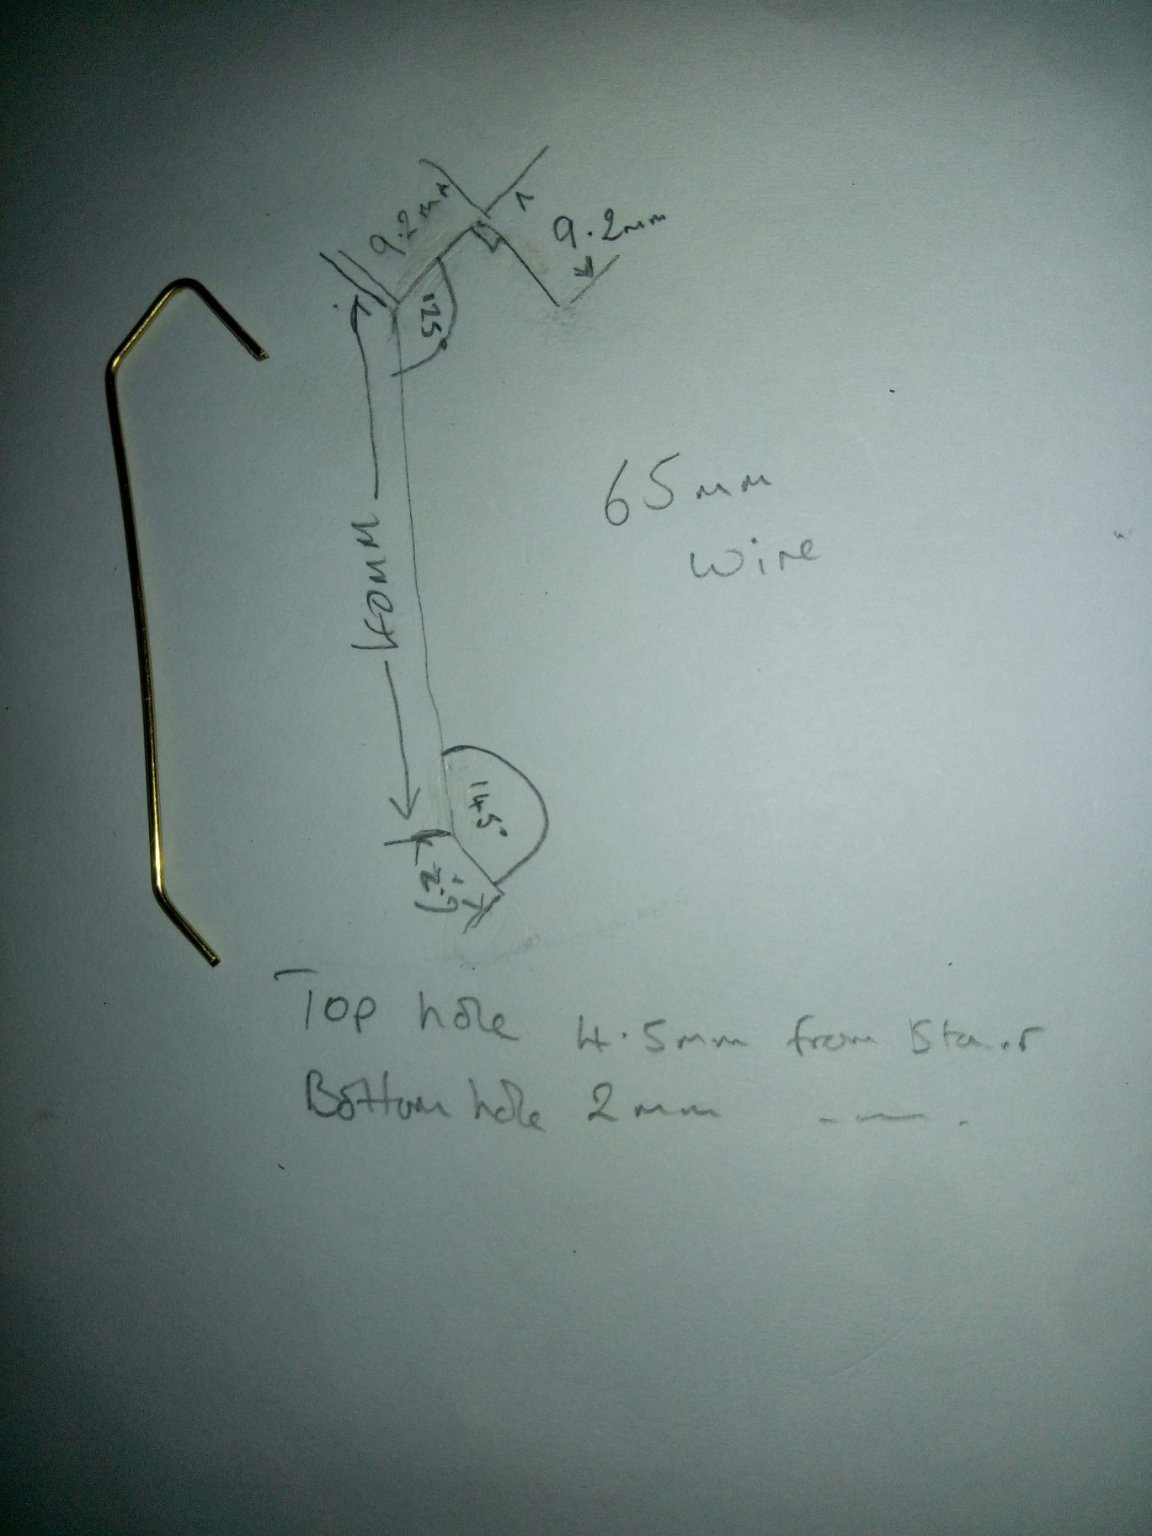
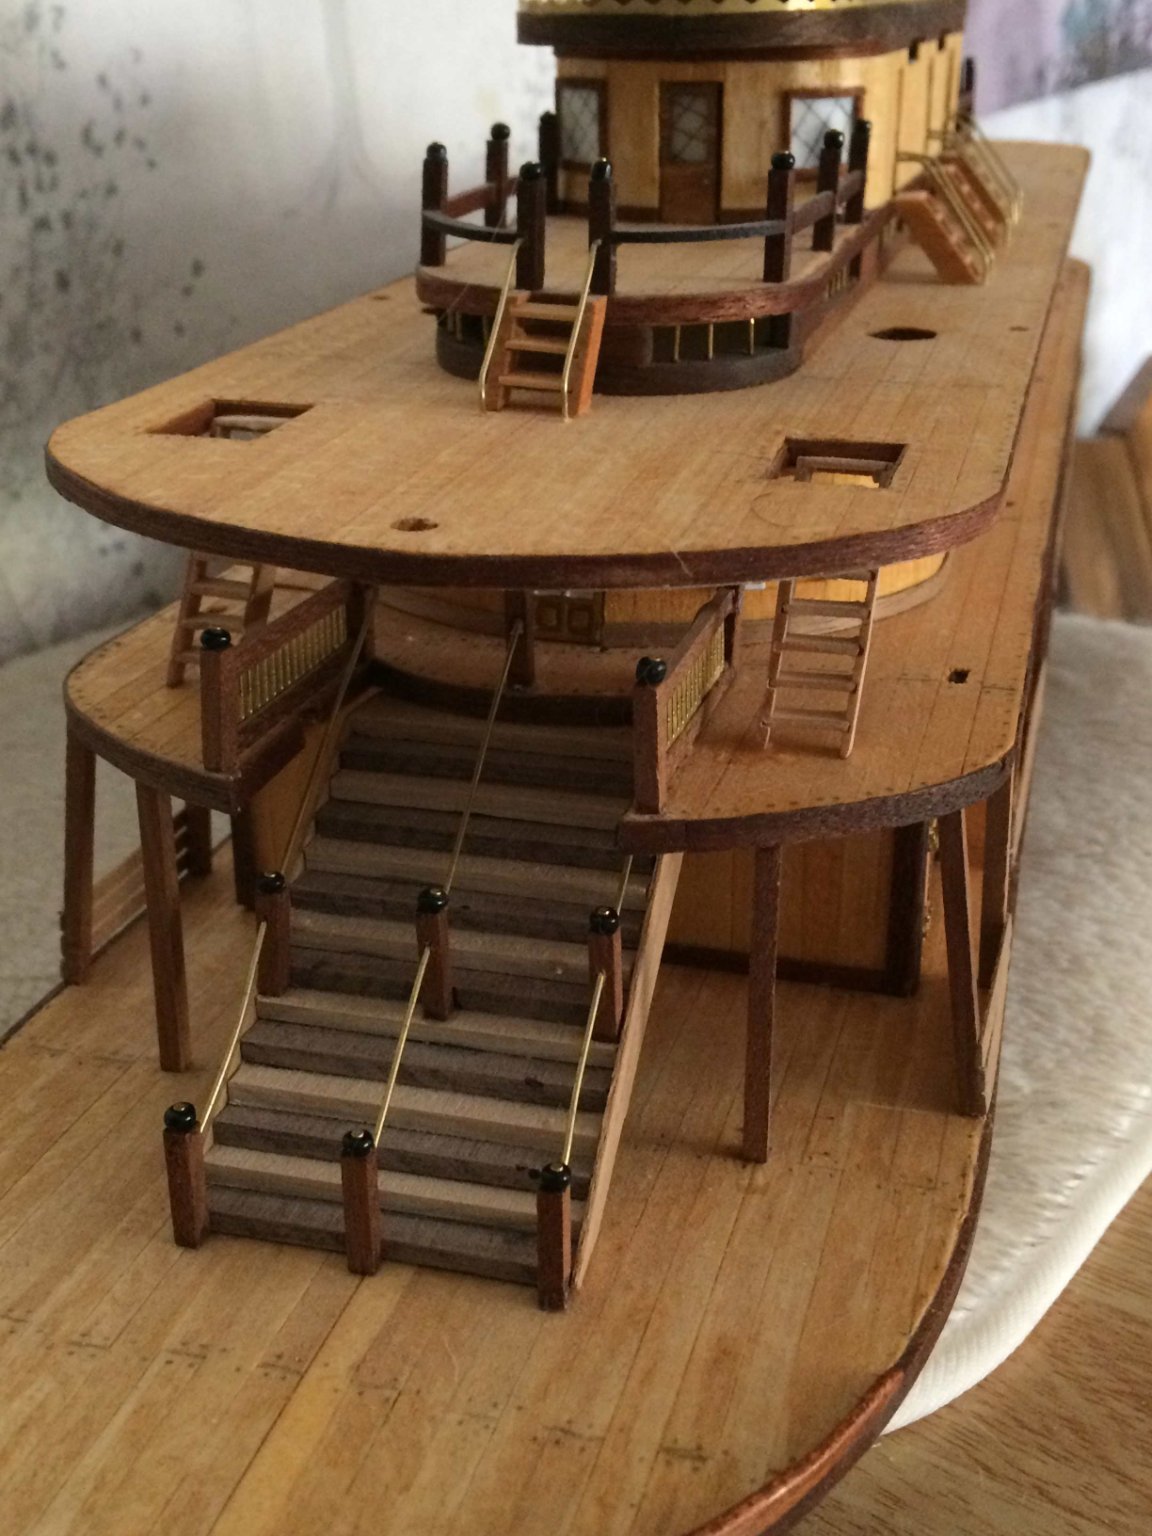
Added the handrails to the upper level stairs.
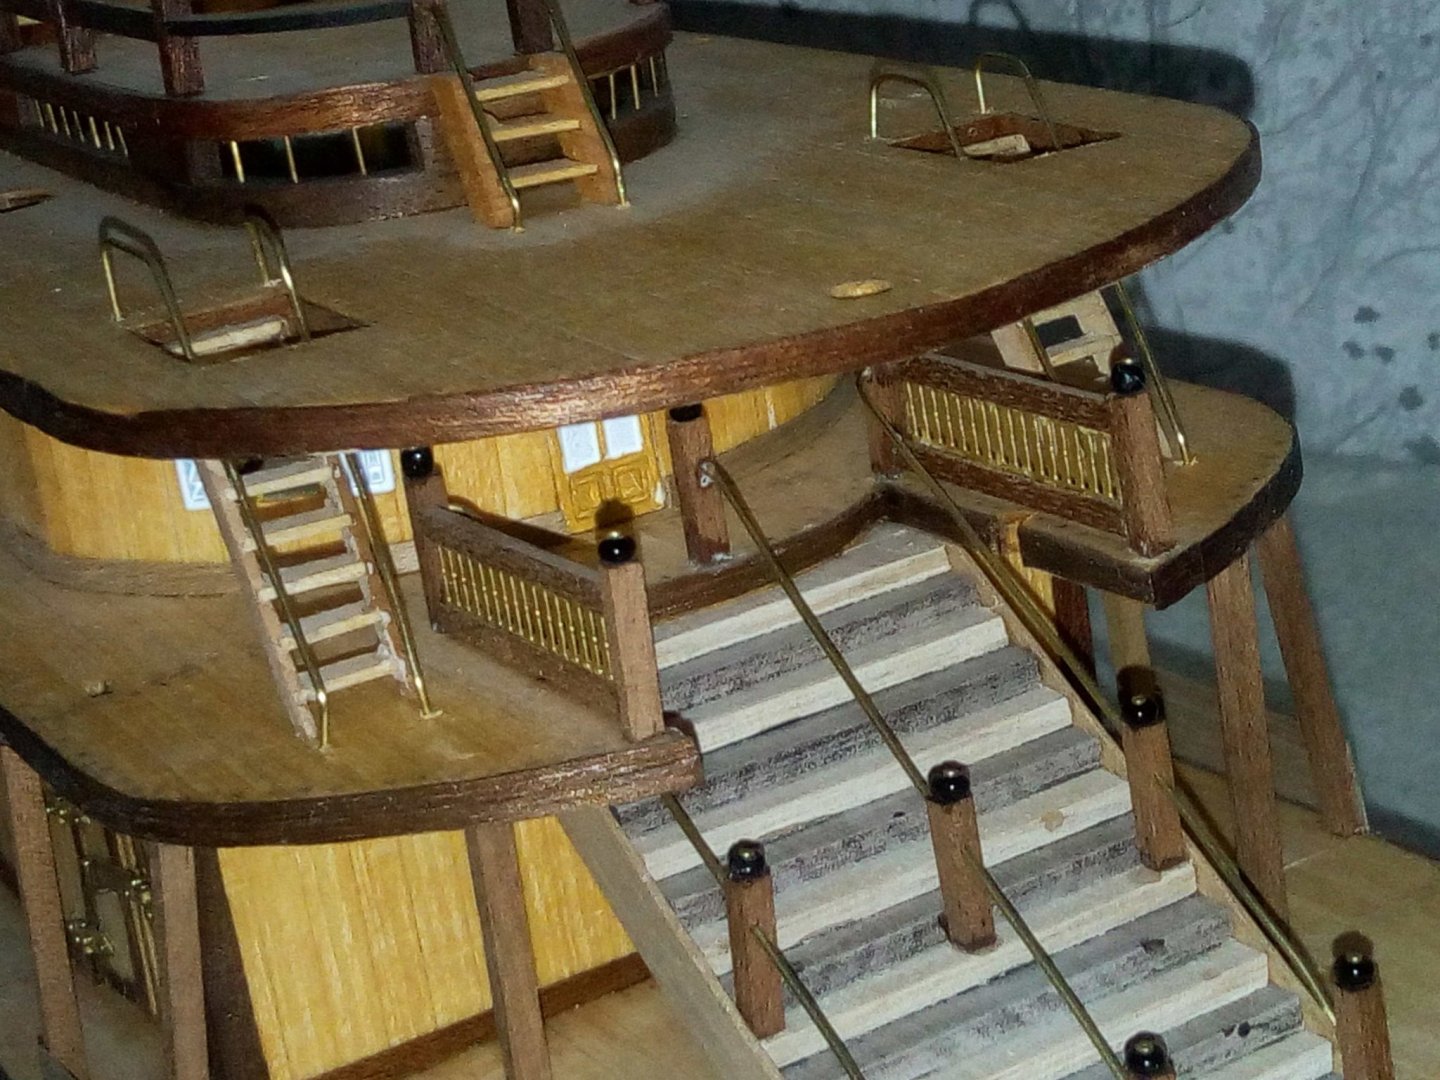
These are the dimension used for my build - probably won't work for anyone elses. Quicker and easier to work out 1 and then copy it.
Used brass beading wire, 0.8mm diameter.

If anyones interested Artesania Latina now have a new website and a New Revamped Kit! The photo etch railings have changed for the better, and it comes with a base and nameplate. You can also buy a not yet available LED lighting kit and motor for the paddle, and a set of figures that are.
Now I need to give it a good brushing off - you can't see the dust under normal lighting!
Cheers,
Bob
-
Looking neat there - you probably could stand on it, but, just in case, think of all the work you've done on the stem!
Bob
-
Thanks all for the encouragement.
Realised I'd forgotten to put the bead cap on the railing newels - Doh!
Checked out the instruction manual and it shows them just glued on. As this is going to be with brass railings, (no paint except where needed are the orders!), I decided to embellish them with a brass top. Holes drilled into the top where reachable, and brass nails cut to size slotted into place and glued.
Also added the three remaining upper staircases, thinning the sides down - something I should have done to the others before installing - as they're quite thick. Hindsight is a wonderful thing, but always too late!
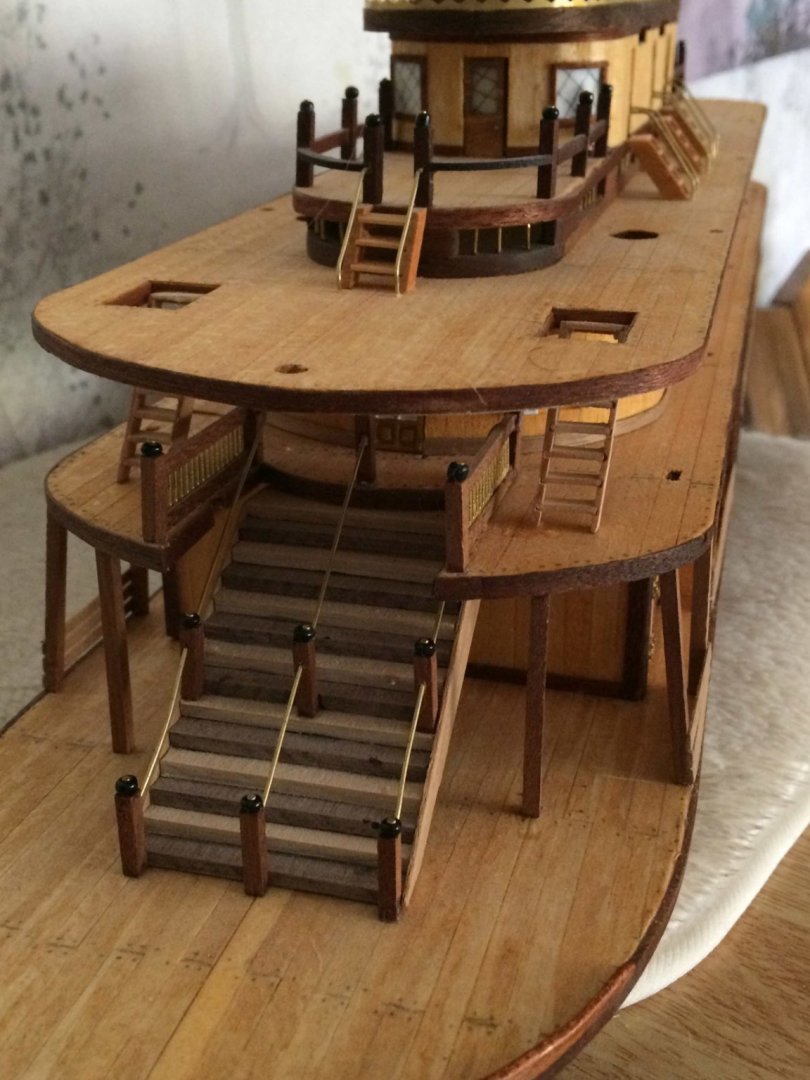
I've also rounded off the edges on the paddles as they just seemed "wrong" with the sharp corners.

Cheers for now.
Bob
- BLACK VIKING, Cathead, VitusBering and 1 other
-
4
-
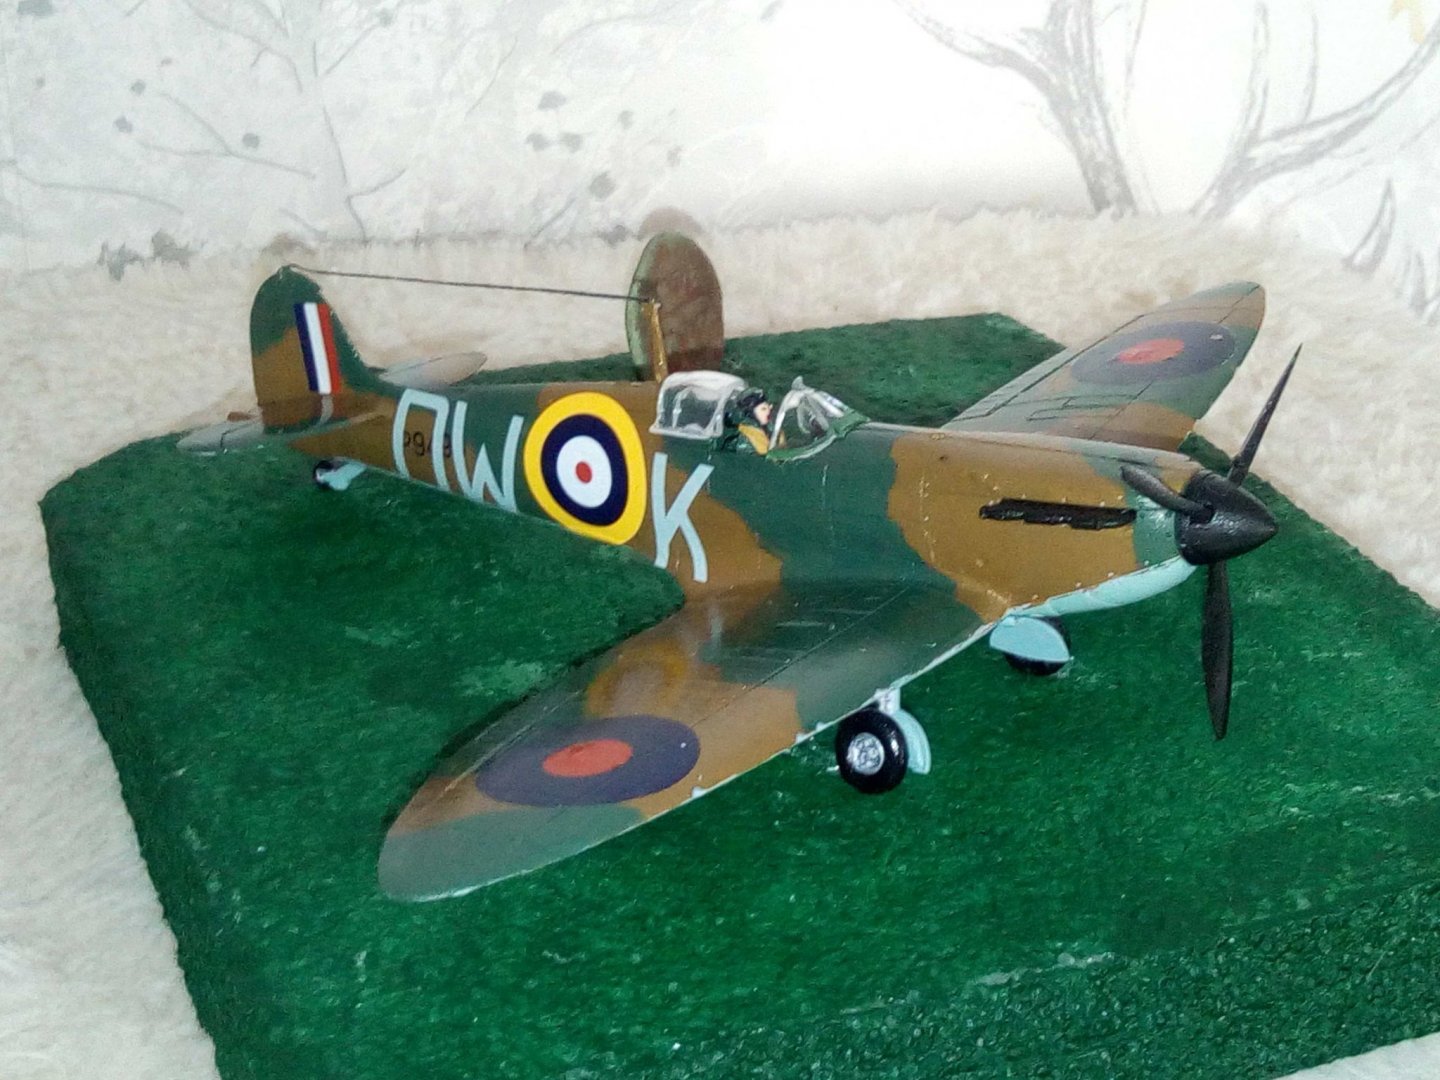
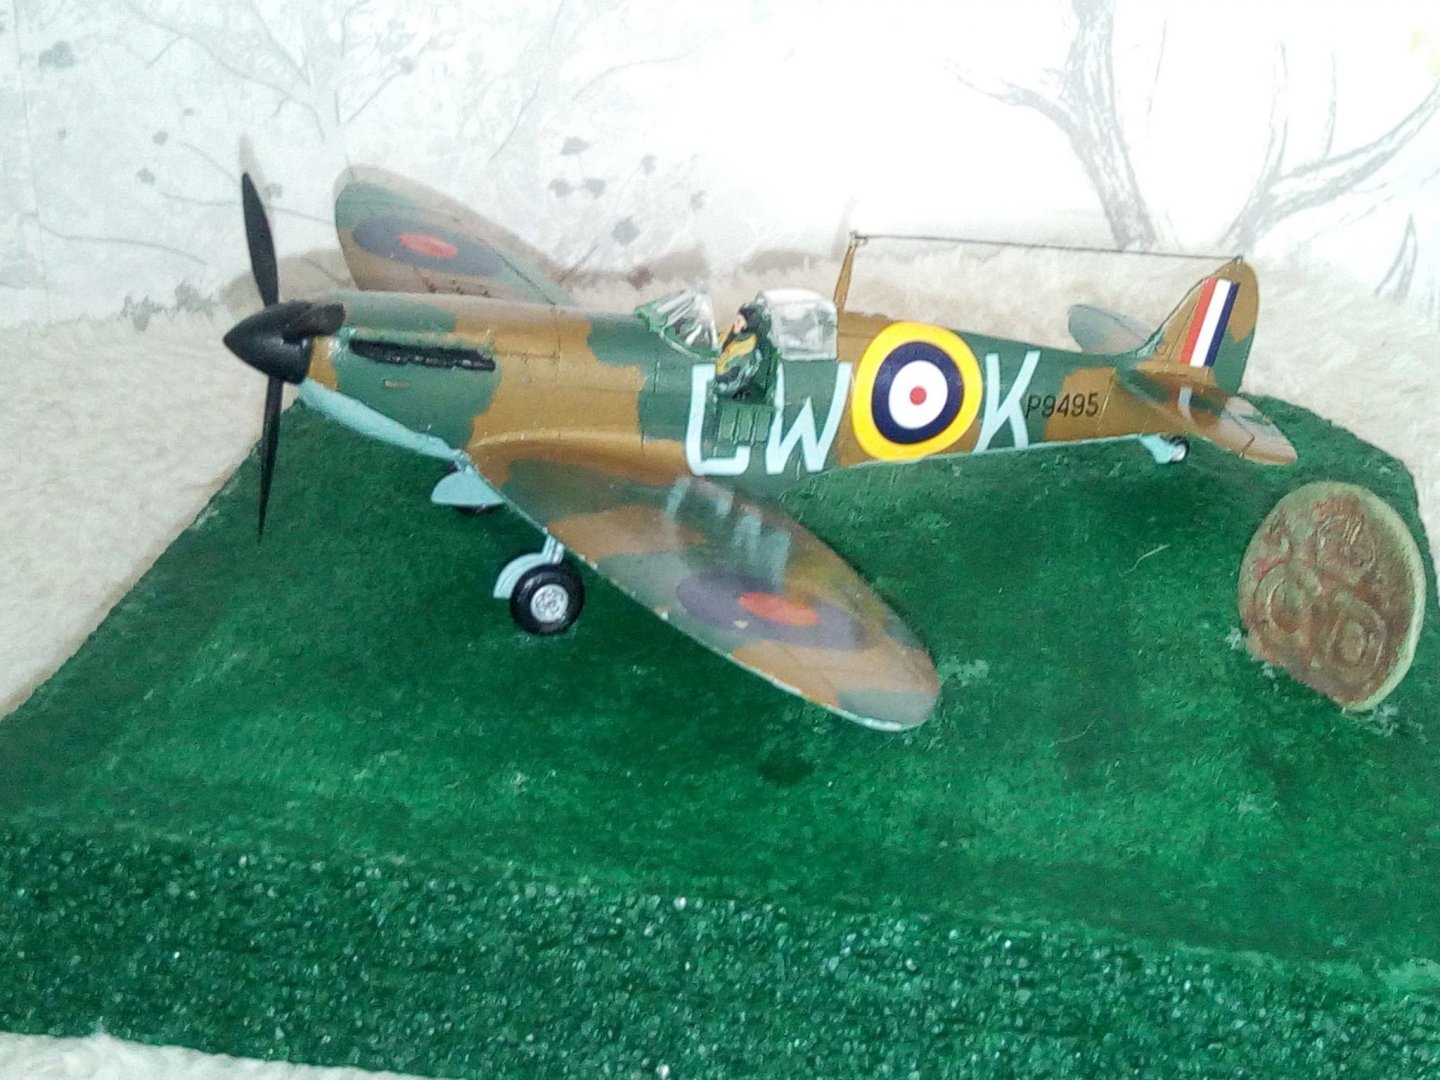
Background -
One day earlier this year I found what I thought was an old penny at the entrance gate to the field where our horses are kept.
When I got it home and cleaned it up it looked like a token with the letters CD with a crown between on it. After some research it turns out it is the cover of a button from the uniform of a Civil Defence Force member.
I asked the farmer if it could have belonged to a member of his family so I could return it, as he regularly uses rubble from a dumping ground to fill in holes in the tracks.
It wasn't, and he explained that he has an area of land that, during 1941 - 43, Bootle council used as a dumping ground for clearances from the bombing, mainly from the May blitz in 1941. Over the years lots of bits and pieces have turned up, including, gruesomely, some body parts. Over the years other local councils have used Crosby beach front to dump their wartime rubble, and to help create a sea defence.After 1943 these buttons became plastic / bakelite, and where it came from definately dates it to the Blitz. The members of the Civil Defence Force were initially Air Raid Wardens, but widend into the CDF and became responsible for many other roles during and after the air raids. Liverpool Civil Defence Force
I've found bottles and cutlery but probably this is the most poignant and personal item I've found, belonging to an unknown person who, for whatever reason was unable to join up, took on this thankless and often dangerous job.
My grandfather was a member of the Home Guard during WW2, and one of his friends drove a fire engine His Story which he told me himself but here is told by one of his daughters. And more Civil Defense Liverpool stories Liverpool CDF Awards 1941
These stories and the brave actions were repeated all over the UK.
So this turned into my own little homage to these brave people.
This is the first time I've touched a plastic model airplane in about 45 years, but the button desreved a display, not just to be put away.

Thanks for reading,
Bob
-
At last - a real update! (Sorry for the delay)
Lower deck uprights added to the remaining side and both sides now have lower deck railings.
Steam stacks made and placed but removable for access to installing railings later on.

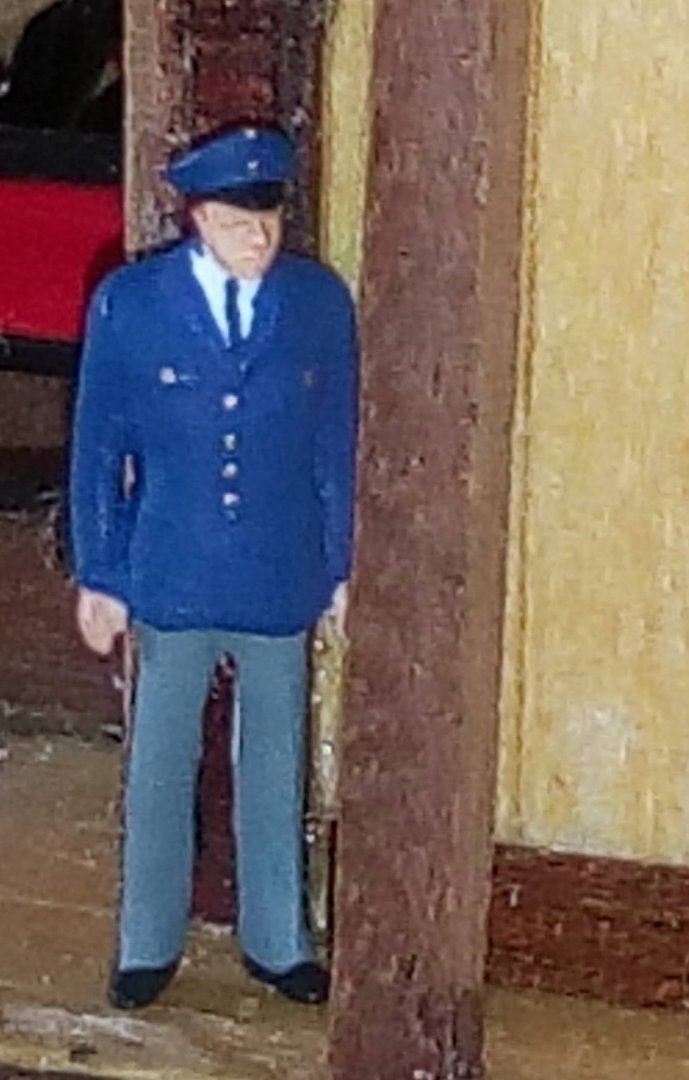
And of course the captain and his mate have to inspect

Cheers,
Bob
-
On 5/19/2021 at 7:03 PM, Vegaskip said:
Mersey Return

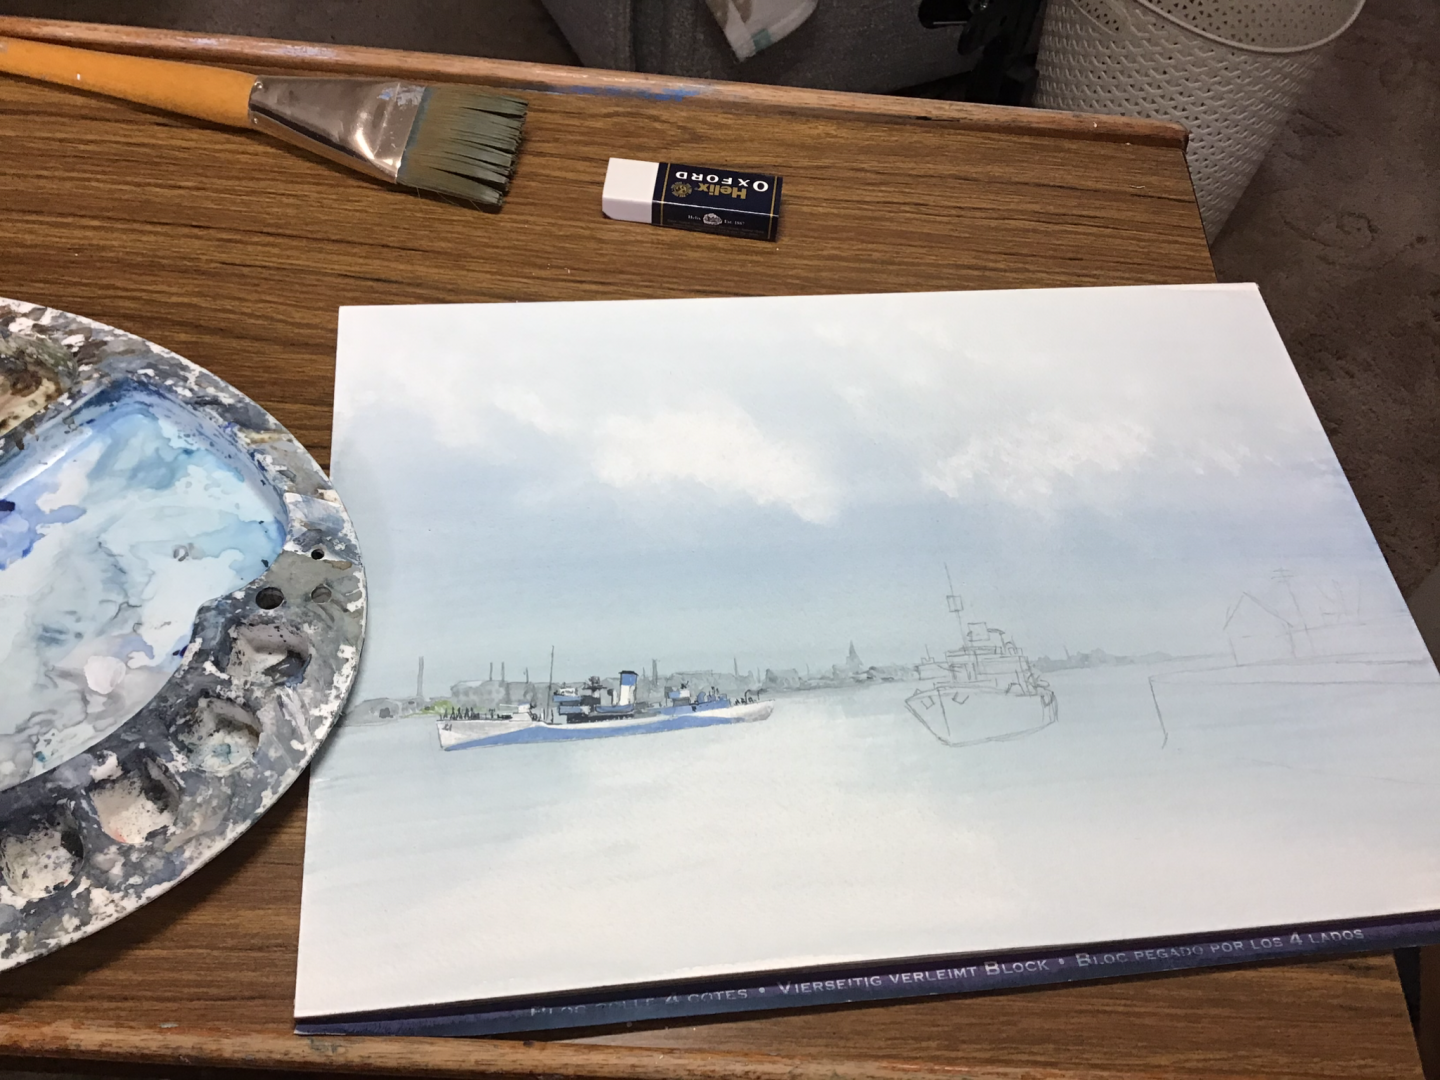
Two Flowers and an HDML
W/C 14" X 10"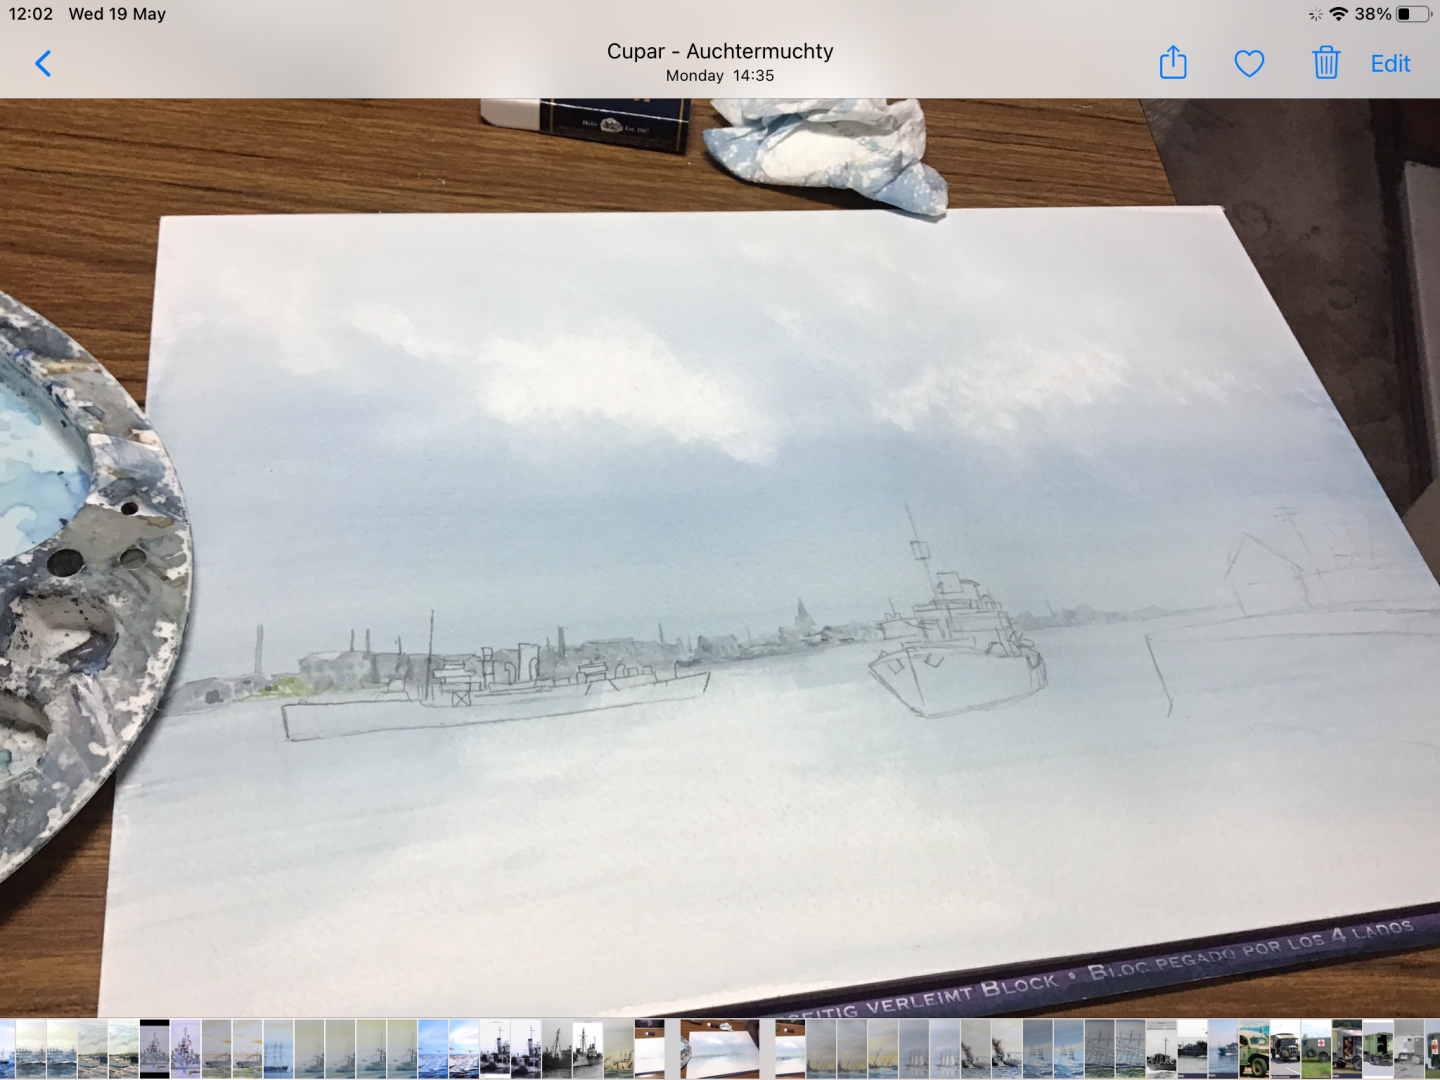

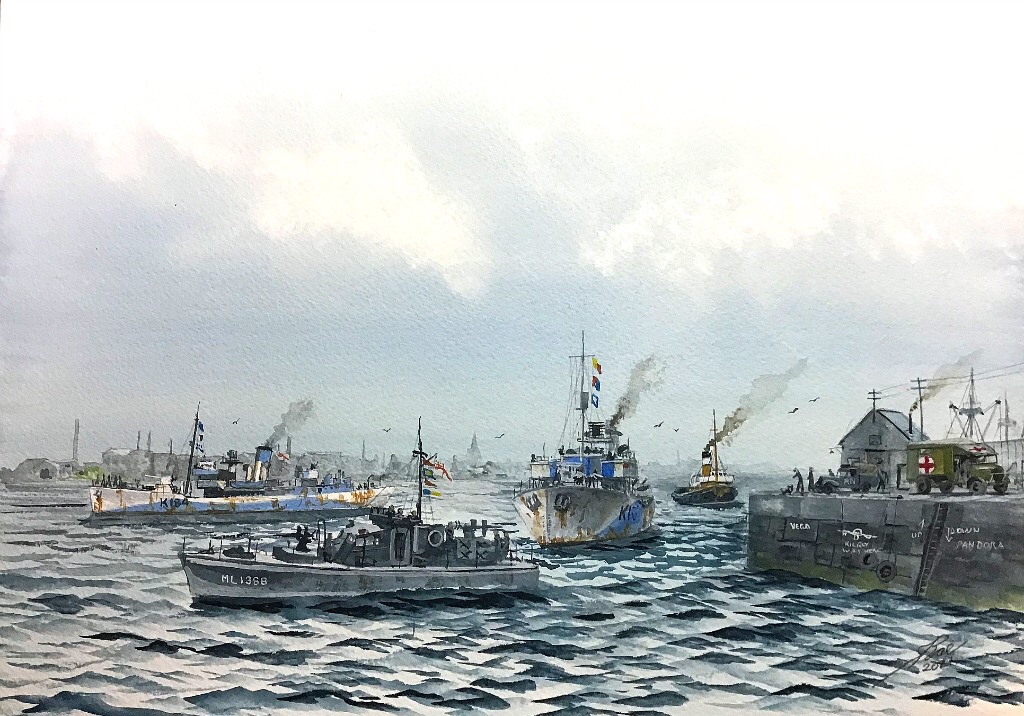
It's as if you were there! This was only half a mile from where I used to live. When the tall ships came to visit this was the entrance they used.
Really enjoy your paintings!
Bob
-
Hi Cathead, and others who are following along.
Sorry for the silence so far, life really does get in the way at times!
Just before things were put away I fitted up a jig onto the mini pillar drill in order to make 0.5mm slots 0.5mm deep into 1.5mm planks to take the PE railings. This was so much faster than hand filing I'd done and I thought "Yes! I can get this done!", and then had to pack it all up.
It did turn out to be a longer job than thought. He wanted a space themed bedroom with models on shelves and walls, but wanted specific ones, and the room fairly specific. He's high end autistic and everything has to be just so. Still got the Saturn V to finish and the Eagle lander to do.
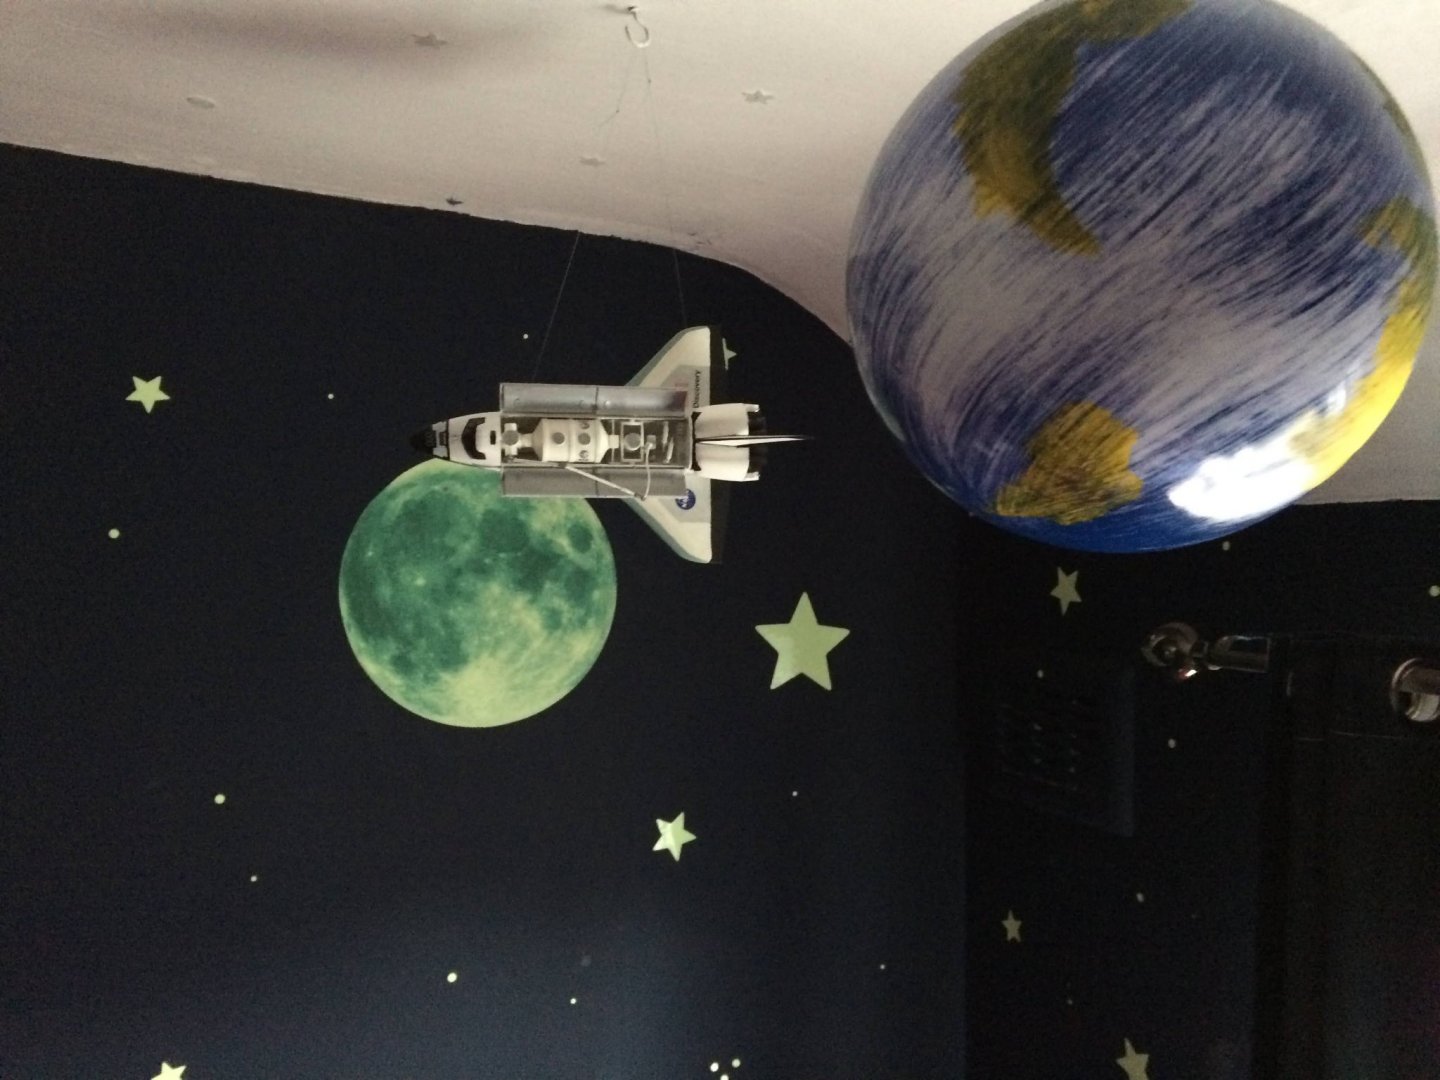
Walls, ceiling, bedding and curtains needed to be glow in the dark, and one wall a giant nebula mural with glowing stars added.
It didn't stop there! The house then had a new damp course in the hall, living room and kitchen, so a full strip down and decorate throughout which include the satirwell and landing, with a new kitchen yet to be installed and then re-decorated.
Meanwhile middle son (23) was staying with us as his "support bubble" for the first UK lockdown taking up the modelling area.
Our two youngest, above son (11) and his sister who is 13, are home schooled so I do a the lesson planning and "one to one teaching", normally I was able to manage to do a little modelling around them, but not this time.
Christmas arrived and went and I'm only now being able to get back to getting a corner to work on and the modelling stuff out.
I did get an early christmas present though, a pillar drill for the shed - ploy by the admiral to get me to make body joints for the posable teddy bears that she makes as presents for family and friends. (also because I nearly took my left thumbnail off at the bed of the cuticle using a hand drill to make them when she ran out of shop-bought ones).
I'm looking at the King as I type, back on a shelf in the living room, the parts box is almost accessible again in the store room so hopefully in a week or so.
Thanks for looking in,
Bob
-
Nice paintwork - wish mine was as good.
I've seen her each time she came into the Mersey. I used to work for British Telecom and the building looked out on the river. The 1st time she came to Liverpool, as she went down river to turn, she rode so high the funnel cut off the microwave phone links across the river, and again when she turned back to come up opposite the Liver building to anchor. Caused quite a stir until it was realised that was what had happened 😃
-
-
I saw a model of this many years ago at a local swimming baths (New Brighton outdoor baths now long gone), but it was in a showcase behind a window.
There was a local group wanting to raise money to salvage her. She was built only a couple of miles from where I lived.
I've also recently found out her Executive Officer was a cousin (distant)!
Great build 🙂
-
The boilers look good. Will you be connecting the wheel arms to them?
Mine are just through the walls.
Bob
-
-
Hi Wayne.
Welcome.
Have a look here, there's a lot of pinned info that will help you. card-and-paper-models
Cheers,
Bob
-
3 hours ago, TreeSqueak said:
..I might get my dremmel out.
Go careful, you can quickly take too much off with it.
Use a piece of string, or a 0.5mm length of stripwood to check for lumps or gaps as you're going.
This is where, many years ago, I trashed a model 🥵 and didn't really touch another until now.
Is this a double planked hull?
- mtaylor and TreeSqueak
-
2
-
2 hours ago, Swoolley2002 said:
Can you please help me understand where the keel is at in the model parts? There is nothing specific that I can find and I don't want to screw this up too badly.
Hi.
Don't know if Anna is able to reply.
Part 26 is a length of walnut, 500mm long and 4mm x 5mm. You have to cut this to length yourself, and shape it to fit as in pic 9 where it meets part 25, and pic 10 where it meets the end of the flat bottom.
Before cutting and fitting ensure part 25 sits flush to the hull, as it hasn't fitted too well on my build.
Your best idea would be to start a build log of your model in the 1850 - 1900 area, (check out how to create a build log name), and use the same tags as this log so that other builders of this model who are currently active can follow along and give you help and advice.
Bob
-
-
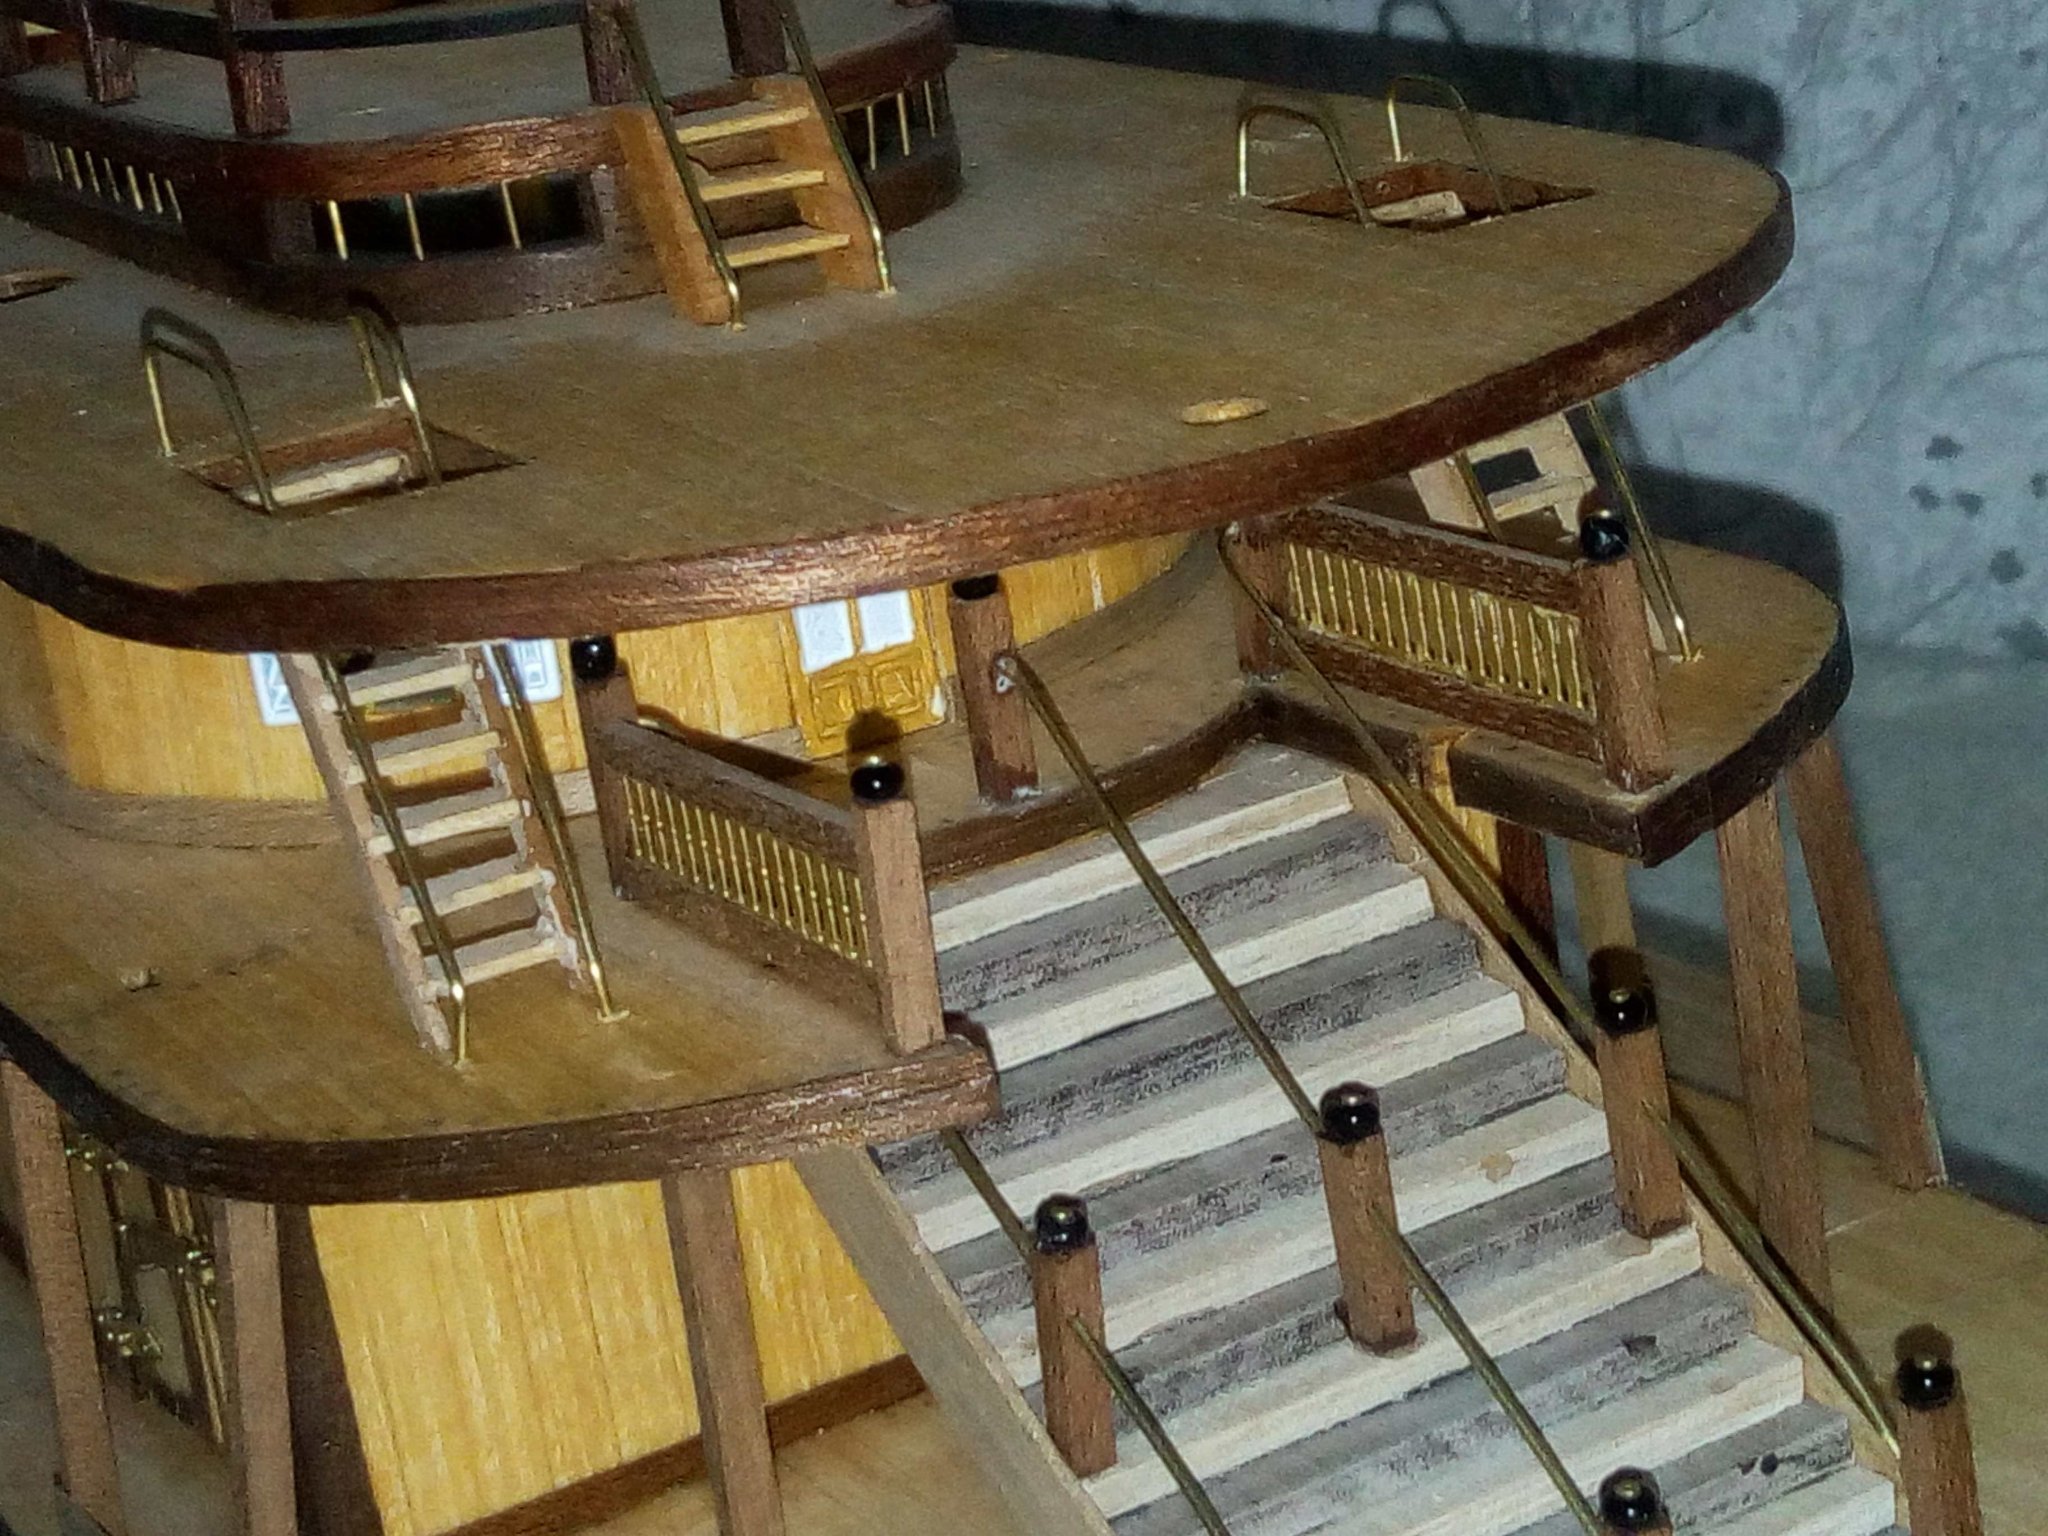
Thanks Halfdan. The Captain has now been joined by a very stern Mate!
Thanks to all for the likes.
I did these, one side only, before the 4 week illness 🤢 break.
Distances between were measured as per the large plan page as advised (thanks @John Gummersall)
Measured the height with a micrometer - great - cut one out to test fit.
Fitted - then realised these are angled 🤬 Each one differnt height.

Then the Mate inspected the sternmost post. His comment was "a bit of a tight squeeze there!"
He also inspected the stairwell fence for height.
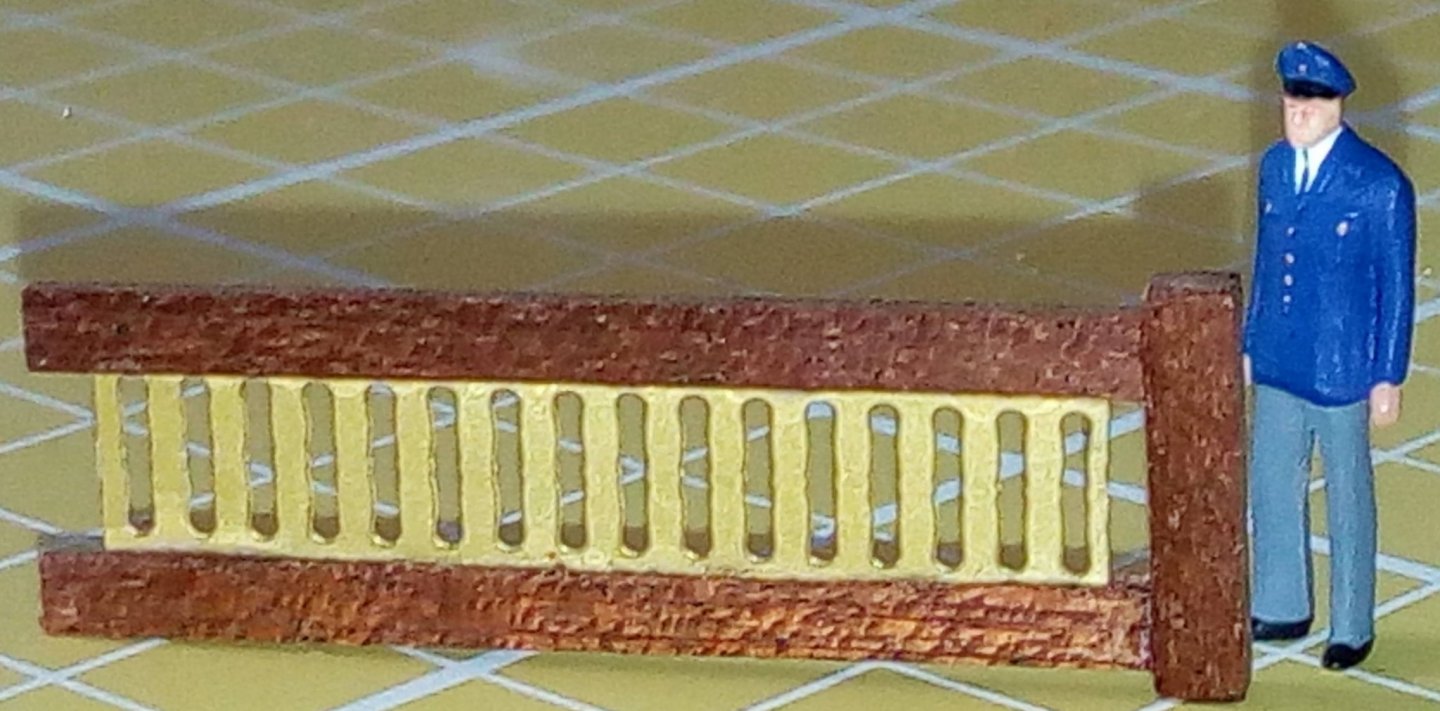
said it was "fair enough"
Looking at sorting an easier way of putting a slit into the beams to sit the brass etch into.
May be a while before another update, decorating the son's bedroom.
Cheers,
Bob
- VitusBering, Cathead, Halfdan and 1 other
-
4
-
It looks like step 15 in the booklet shows the proper placement. Pic from @toms10
These should be shown on the A4 sheets that show all the cutouts from plywood?
Sometimes these parts look like throw aways after a larger piece has been removed, as I've found.
Sorry I can't be of more help on this one 🙁.
Bob
-
Hi Treesqueak
Have a look at Toms10s build. It shows where and what these pieces are for. Maybe ask him about them?
It also looks as if he has an English copy of the instructions too!
-
I see what you mean, you'll need to cut out the window parts and put the plastic ones in their place, keeping the rest of the metal stern. Go careful and slowly!
Like Backer, scored lines and black paint on plastic sheet is how I did the Mississippi windows in simple square windows.
Or you'll need to make the inner window frames and use something like Microscale Micro Krystal Klear (other products available!) to fill in the gaps.
Don't forget you'll need to put a colour wash behind them to show them off. I recall some doing black or dark blue behind the panes.
Enjoy the "freestyling".
Bob
-
On 6/14/2020 at 11:33 PM, thegrindre said:
"HI"
That said, I hope these forums are what they seem to be, very helpful and informative for us greenhorns. I've been lurking here a few days now and like what I've seen so far.
Hi, They really are!
Oh, and welcome from across the Pond
Bob
- mtaylor and thegrindre
-
2
-
-
Hi Teetree.
Simply put - especially for me - The bottoms don't line up because of the way the hull is designed, you'll see this in the pictures. The tops line up decause that's where the deck lies. I completely messed up my first attempt 40 years ago and gave up until recently - no internet for help back then!
Have a read of these tutorials Hull and Planking Lots of info there.
[Also I would suggest starting a build log in the 1751 - 1800 area. Loads of help and advice to be gained by that.
Read this on how to name your log too! Naming your log]
Edit - see you've already done this!
Bob
- TreeSqueak and mtaylor
-
2


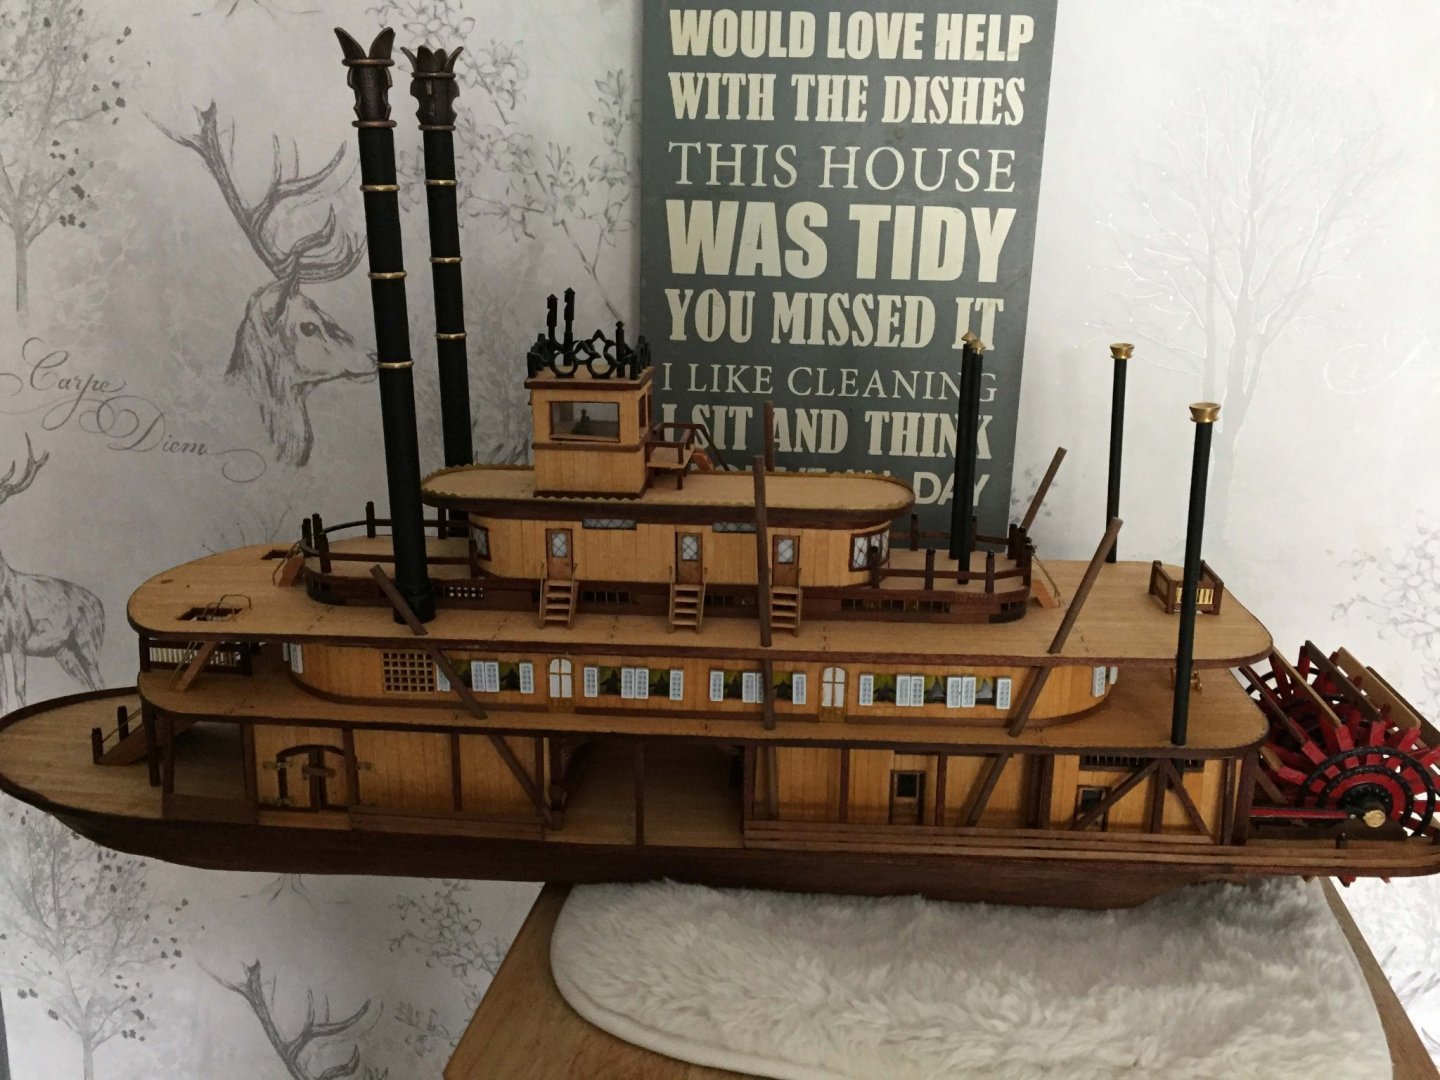
King of the Mississippi by Bob Fraser - FINISHED - Artesania Latina - Scale 1/80 - 1st Build
in - Kit build logs for subjects built from 1851 - 1900
Posted
Thanks for the explaination. Hadn't thought of hogging as to why the fore and aft are braced together, but it's fairly obvious when it's pointed out!
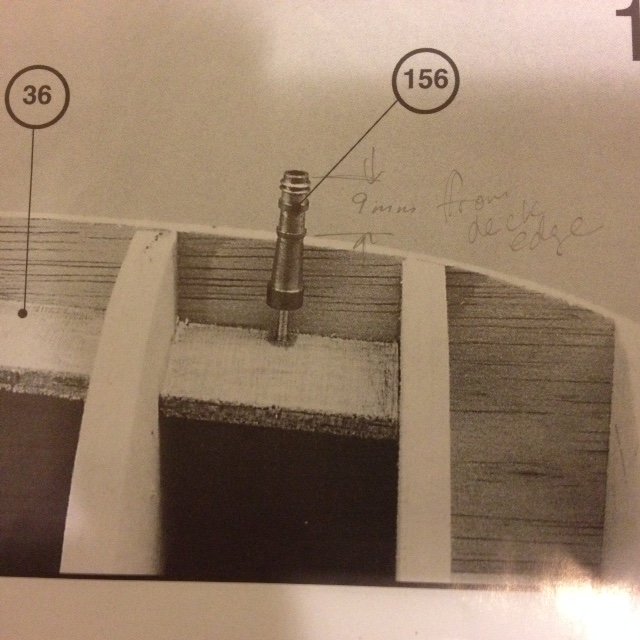
AL also use the same term for the loop of rope formed through the eyes on the brass hoops on the smokestacks that tensions them to the deck.
I take it that proper turnbuckles were attached to the posts and deck to tighten the rope (wire or maybe actual chain?) to its proper tension?
Although on my model the angles at the tops are slightly out so they aren't quite in the straight line that I assume they, and the connecting ropes, should be now that I know what they are for, on the drawings that AL supply there is an inward angle at the stern for the rope that is run continuously from an eye forward on the lower deck threaded through holes in the hog posts.
AL aren't (weren't) known for their accuracy of their models!