EJ_L
-
Posts
2,246 -
Joined
-
Last visited
Content Type
Profiles
Forums
Gallery
Events
Everything posted by EJ_L
-
 I would add a couple lawn chars, beer cooler and fishing gear off the stern...
 -
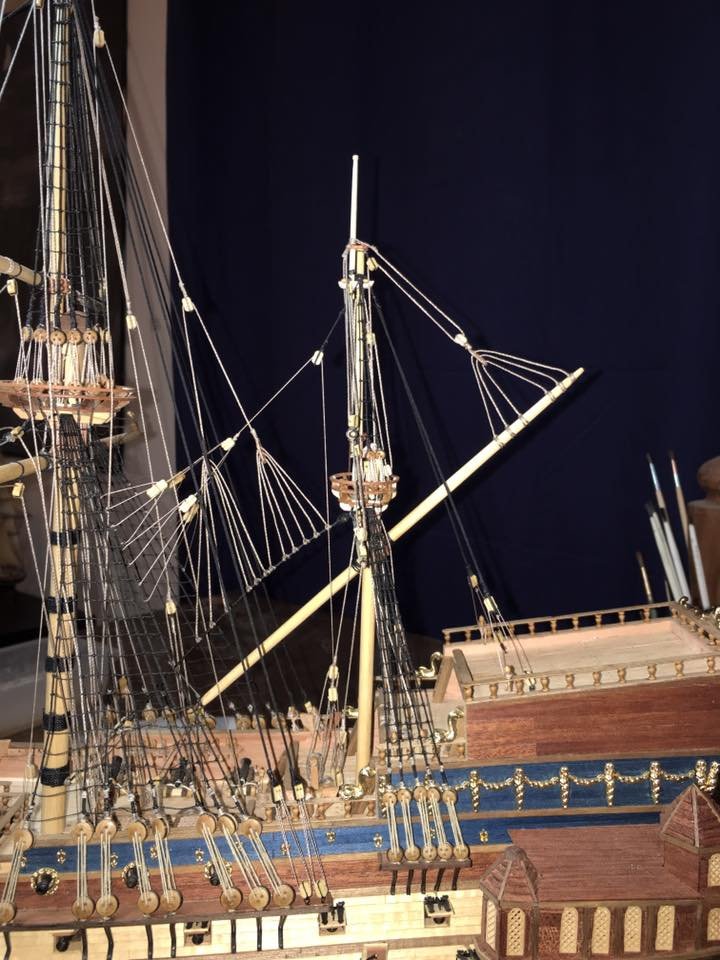
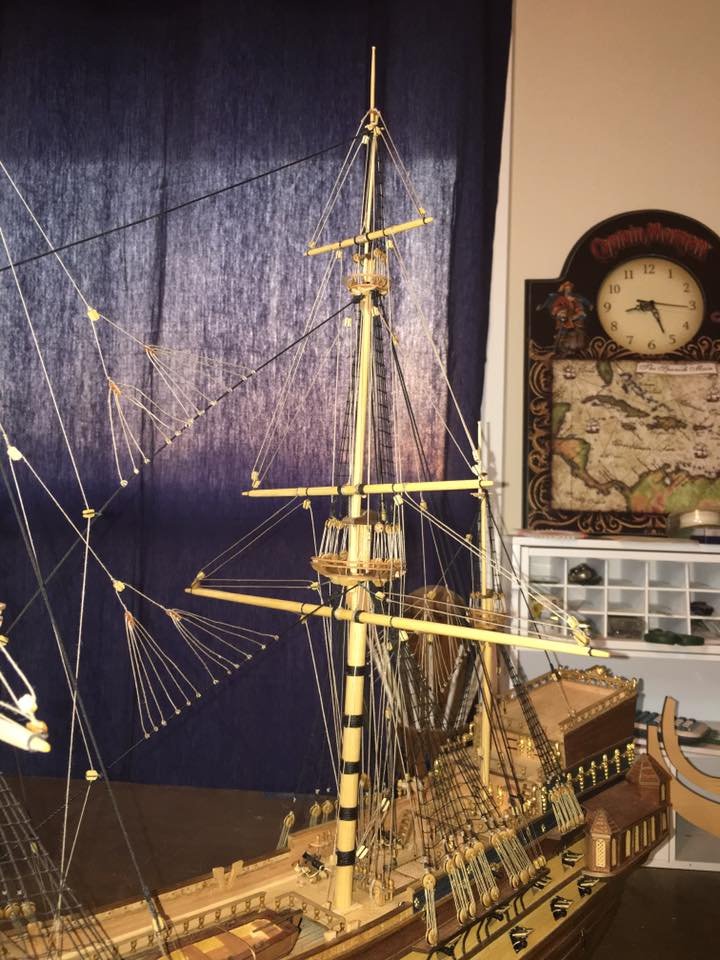
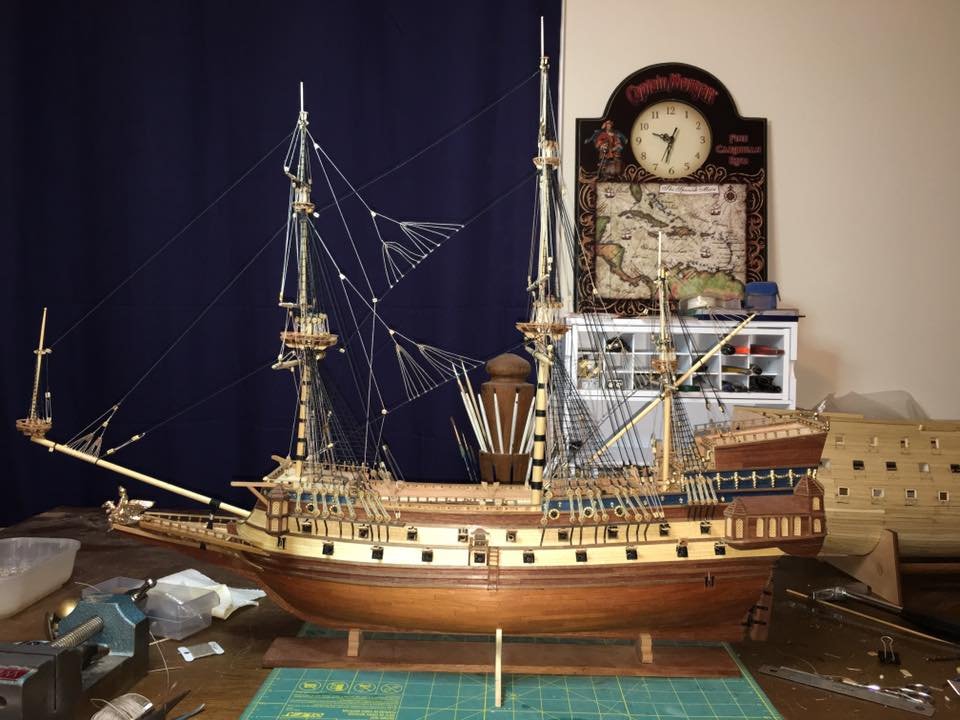
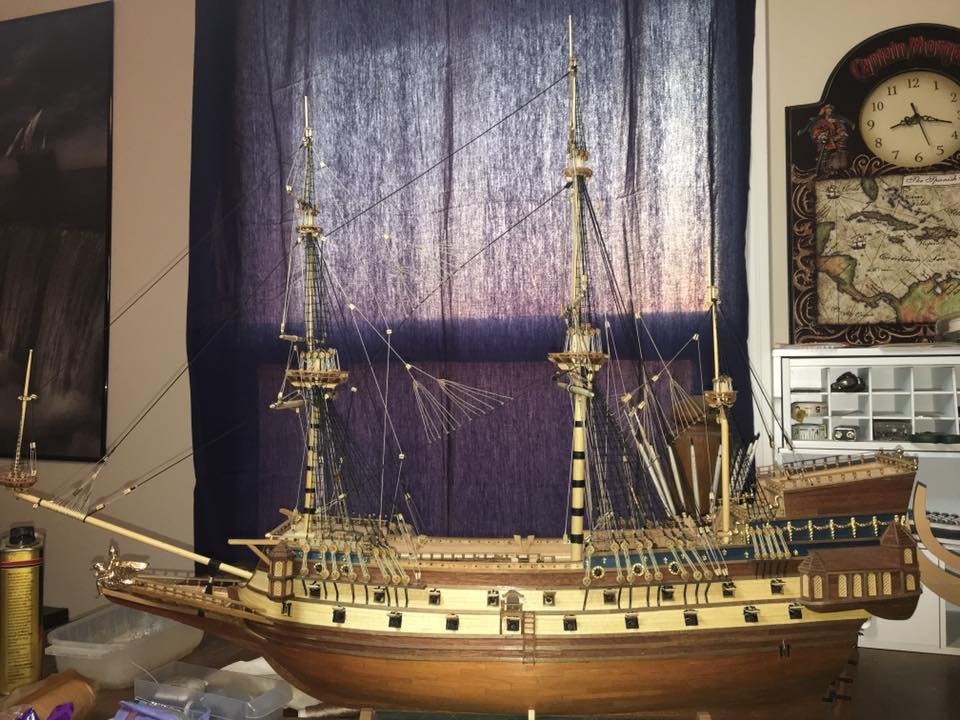
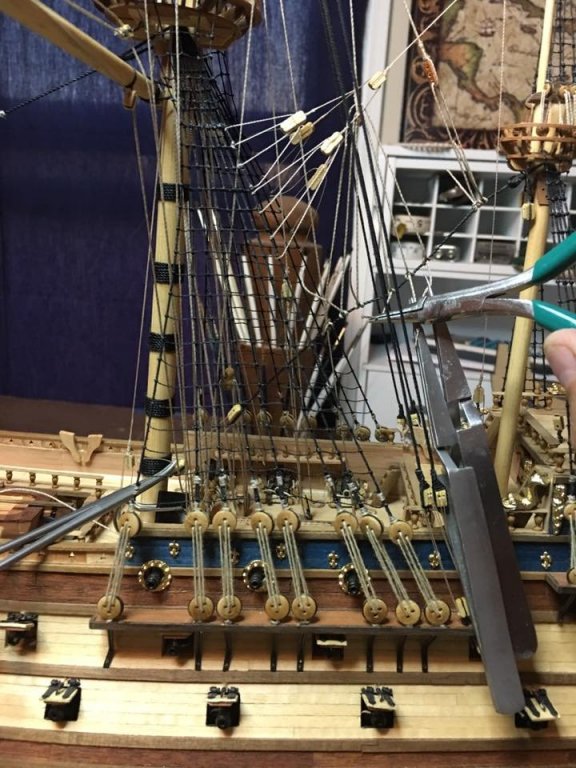
Busy week in the shipyard as all three of the mizzen yards have been rigged! The actual rigging for these yards was simpler than the other masts but threading the ropes through all the lines from the main mast yards and behind the lower main shrouds was a pain. I've also started to add in the rope coils but I still have a lot of those to make for all the rigging ends. Now I just have the two yards on the bowsprit but those will have to wait till after I work on S.R. for a bit. I need a break now from rigging! As always, thanks for stopping in and enjoy!


- 608 replies
-
- 9
-

-
- la couronne
- corel
- (and 1 more)
-
Do you have a known dimension such as a window or door that you could use to find the scale? Example, if you know the height of the actual window should be 2 feet and the model is 1 inch than your scale would be 1:24. There is a handy app for your phone called model scaler that I use for those handy conversions or to find unknown scales.
-
She looks incredible! You have done an excellent job and that large scale just adds an even bigger wow factor!
- 213 replies
-
- 4
-
-
- la couronne
- 74 gun
- (and 2 more)
-
Great find Steve!! That looks like a fun little kit that you could get creative with. I got a seat and am ready to watch the show.
-
Hey Denis, Just stumbled across your log here and my first though was, "I don't remember you finishing your Thermopylae..." then I took a minute to stop looking at the pictures and read and it all made sense. It is kind of fun to take a break from serious builds to do a fun one every now and then. I am betting that while this will be entertaining to watch and though you are keeping it "simple" it will still turn out to be a nice model when all said and done. Think I will hang out and relax and watch your Jolly Roger.
- 140 replies
-
- 4
-
-
- jolly roger
- lindberg
- (and 1 more)
-
Welcome to MSW! There is lots to learn here for any experience level and plenty of people who will happily guide you as you start out. Good luck to you and I look forward to seeing your work!
-
Welcome to MSW, even if it's a few months later. Best wishes to you on your Niagara build!
-
Welcome to MSW Shane! Great to have you with us. I wish you the best of luck on your Bounty build and look forward to seeing your work!
-
Possibly interesting find by an utter newbie
EJ_L replied to Dylanmserra's topic in New member Introductions
Welcome to MSW Dylan! Not for certain but the turrets at the bow and stern bring to mind the La Couronne, French Ship 1637. The Fleur-di-lis also back this up. There are many discrepancies though, including that 1580 year stamped on the sail that could either be wrong or indicating a different ship altogether. I hope you can find out some more information about her! In any case, take a look at my Couronne build, link in my signature. If this is her than it may be of some help and if it's not, well it still might give you an idea of a similar vessel. I wish you the best of luck and I will keep an eye out for your log as seeing these old relics get restored is fun to watch! P.S. I also have that book Frankie mentioned and it is extremely valuable for rigging ships of this period. I recommend buying it! -
Welcome back Thomas! I was not here for the old site so everything about your build will be new to me! Looks like you have yourself a nice place to work and a good start on your ship. Looking forward to seeing her resume progress! Best of luck and happy building!
-
Welcome to MSW Louie! Great to have you with us. I highly recommend if you have not done so yet to start up a build log so we can see your pictures and help you work through the issues. I always say to try not to compare your work always against those that are better. Instead use them for inspiration and guidance but only compare your work against your own work with the goal in mind to make sure each build is a little better than the last. That way you are always improving and before you know it, your work will be up there with those you admire. I wish you the best of luck and look forward to seeing your ships!
-
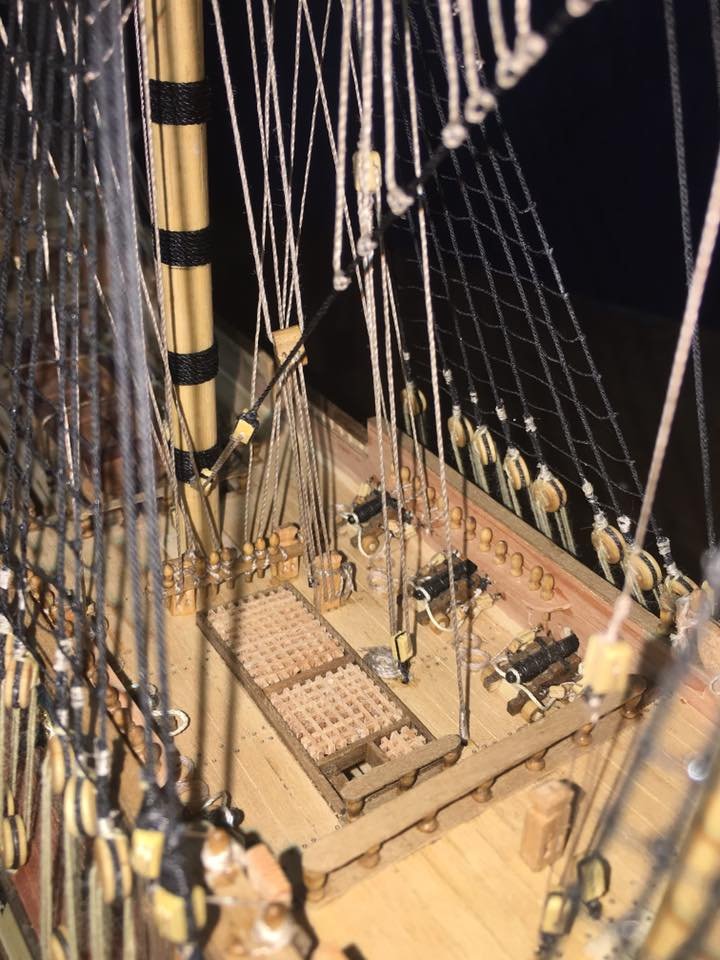
I have heard the same as Richard stated about having to either sit astride the barrel (though that would not be fun when hot!) or having to lean out over the bulwarks to clean and reload. This was obviously very dangerous but they did what they had to back then as it was normal. With that method to reload and not having a large recoil, smaller deck space would be acceptable. In addition to metallurgy still in early development, so too were these large ships. Learning how to build multiple deck ships and what requirements were needed for all the was still in the trial and error stages. Each ship would make an adjustment here and there but there were no set rules of what worked. I'm sure if Vasa had actually seen combat the narrow deck space would have been noted as an issue and possibly changed by narrowing the cargo hatches during a refit.
-
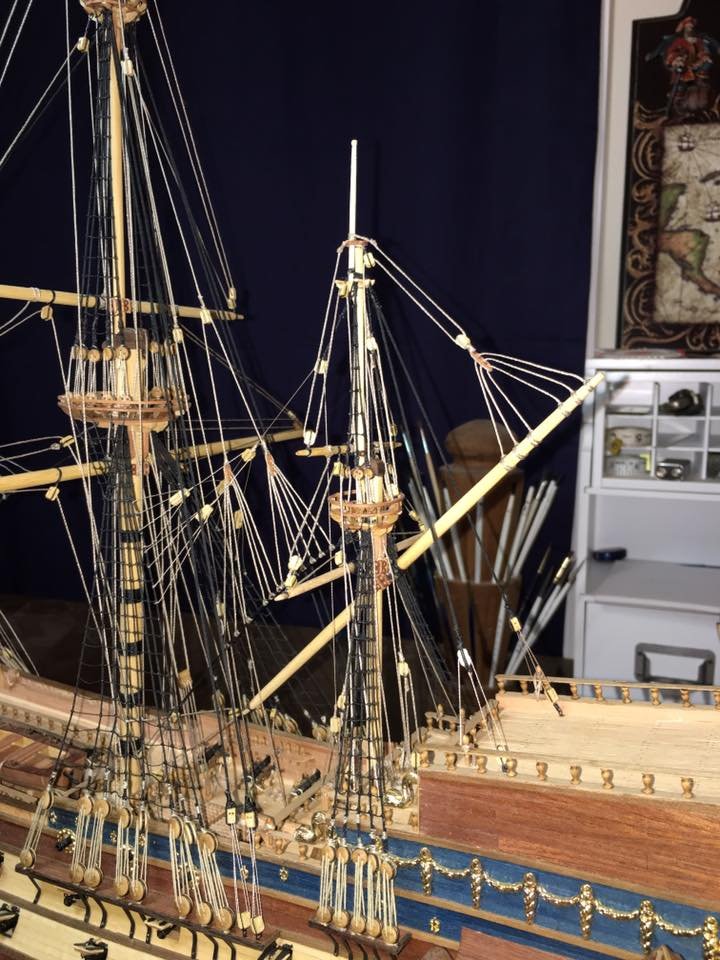
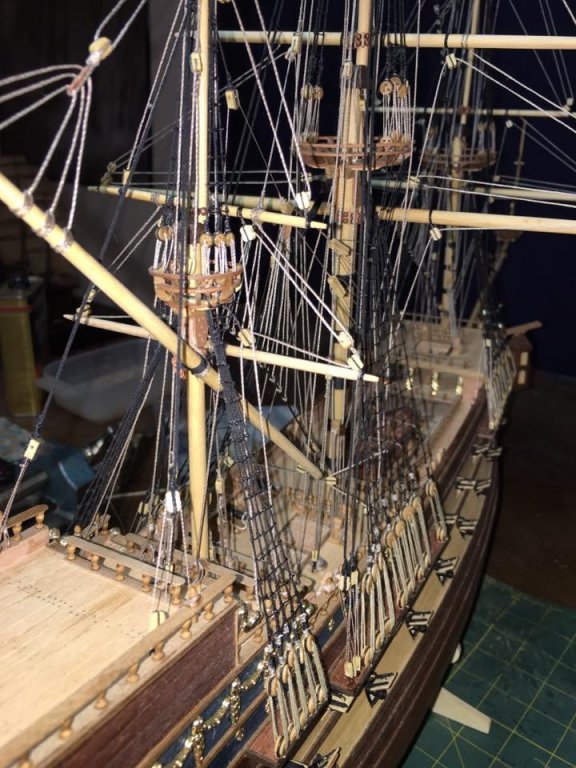
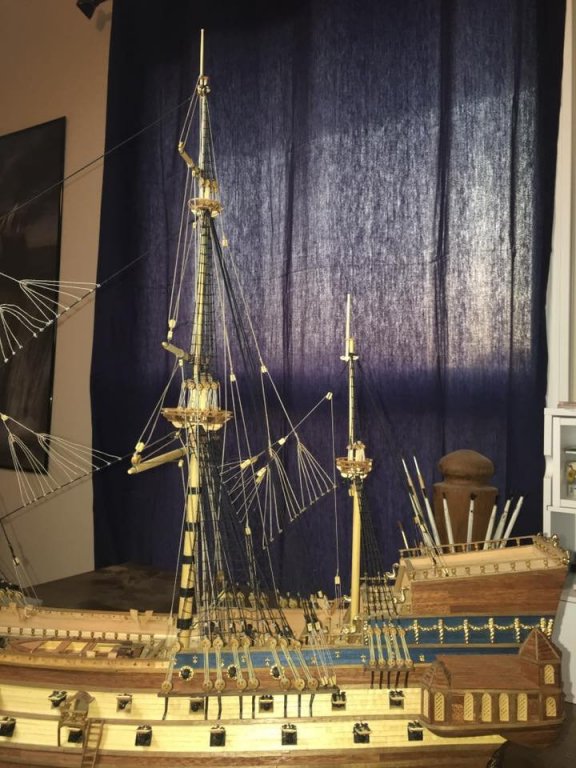
Well, I just surprised myself and finished up my crows foot rigging a day earlier and it even looks good! With that, all the main mast yards are in place and I am ready to move on to the mizzen mast. Partly because I am still in the mood to rig and partly because I am not in the mood to start sanding on S.R., I am going to go ahead and push on with La Couronne. So that means more pictures and entertainment for all of you! For now, here are the current pics. Michael, I did include a close up of the Euphroe blocks. Hopefully that clears that up a little more. I had to use the camera on my phone as both batteries on my good camera are apparently dead... so focusing in on the close ups was difficult but I think you can see enough. I can always upload better if needed once the batteries charge.


- 608 replies
-
- 11
-
-
- la couronne
- corel
- (and 1 more)
-
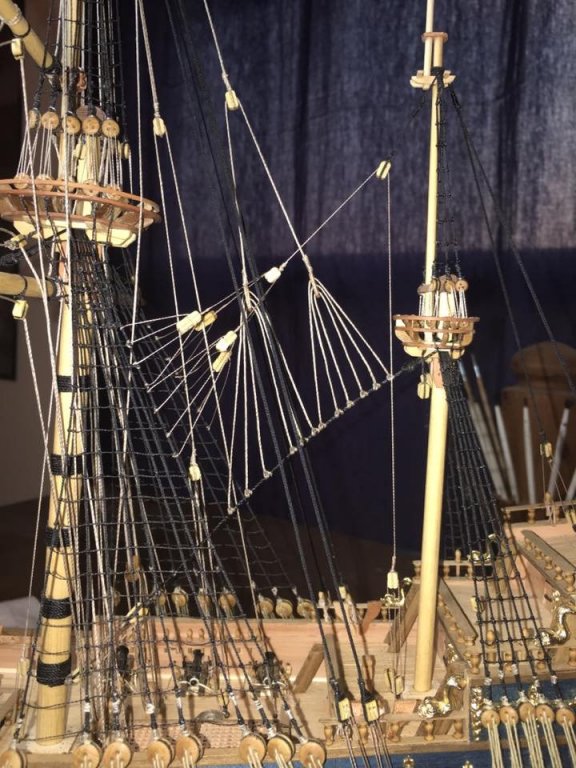
I've always made those particular lashings tarred as I agree with you in the amount of water they would be exposed to on a regular basis would justify them being tarred. In my understanding of rigging, with a few exceptions, unless it is running rigging used to make something move, it would be tarred for protection. As always, great work and nice clean rigging. Those bowsprits with the spritsail masts really make a statement when installed.
-
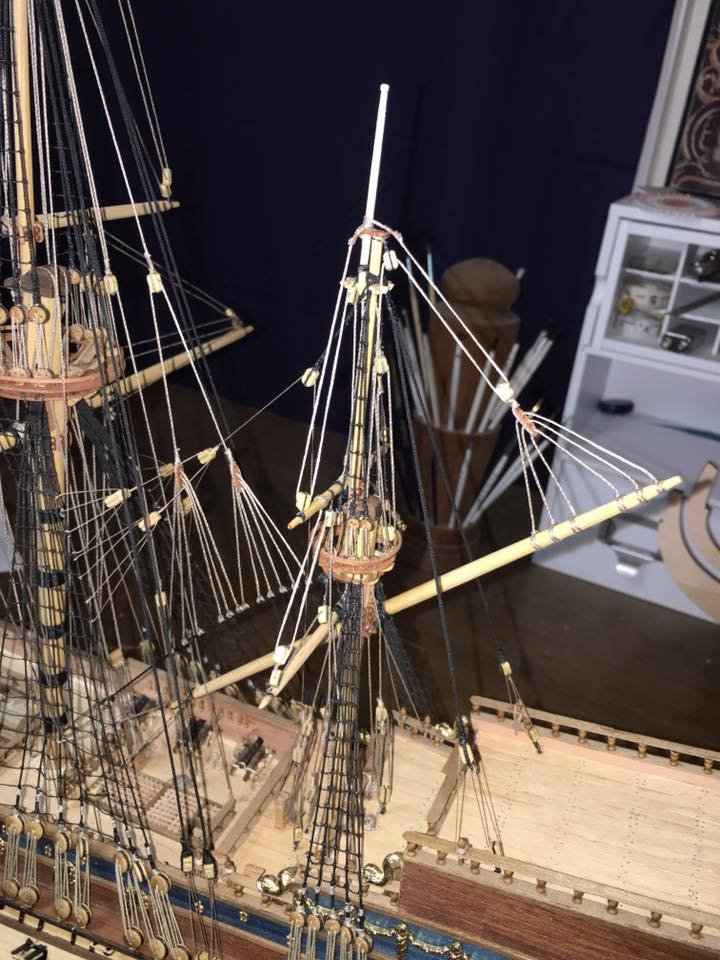
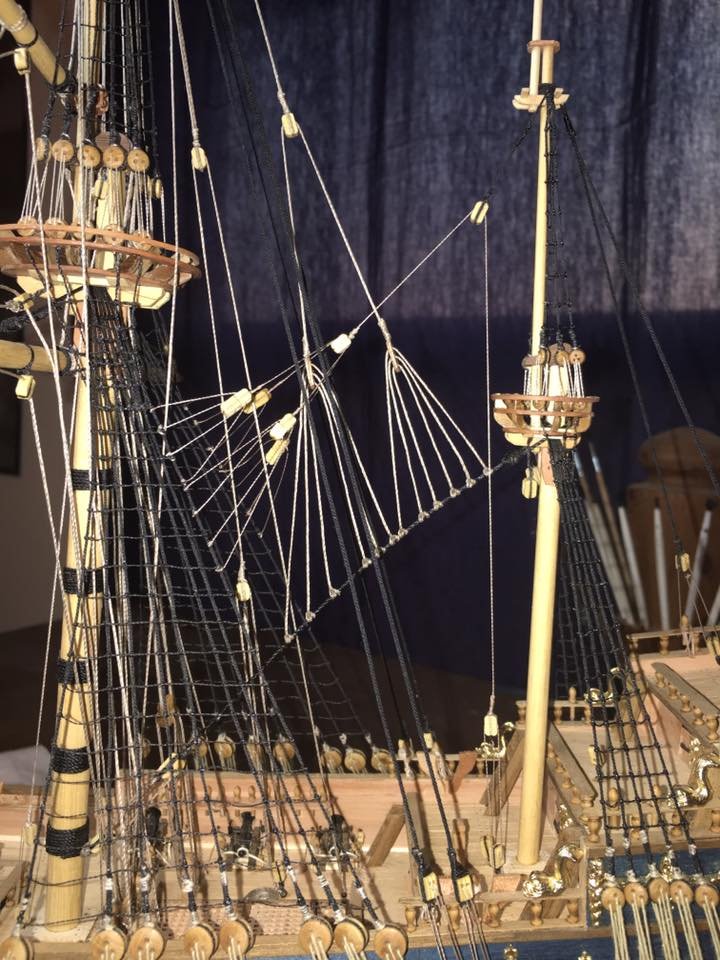
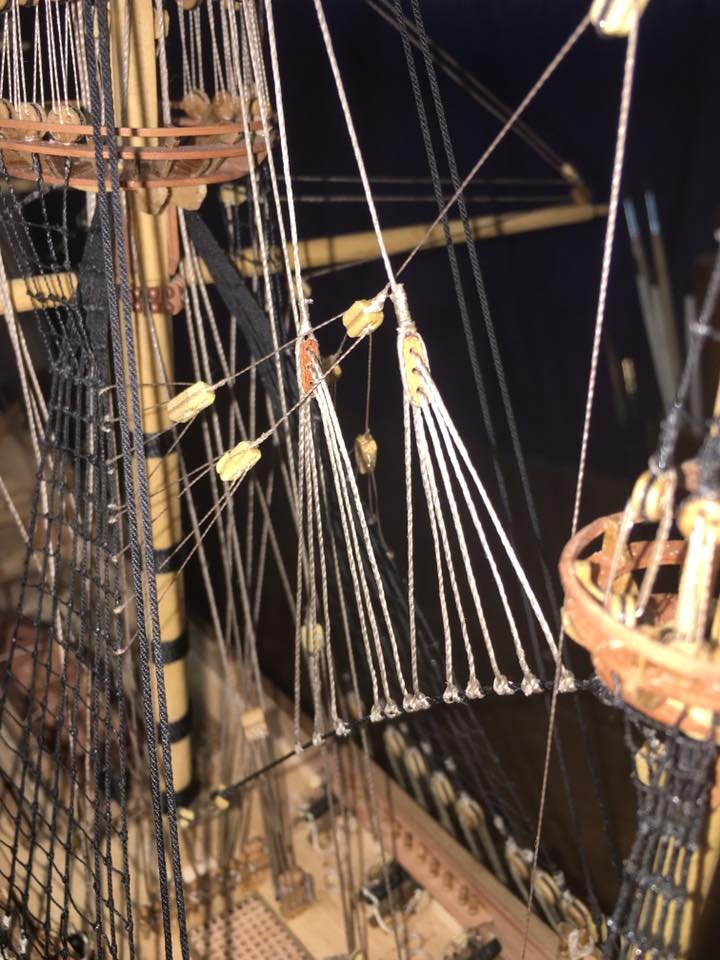
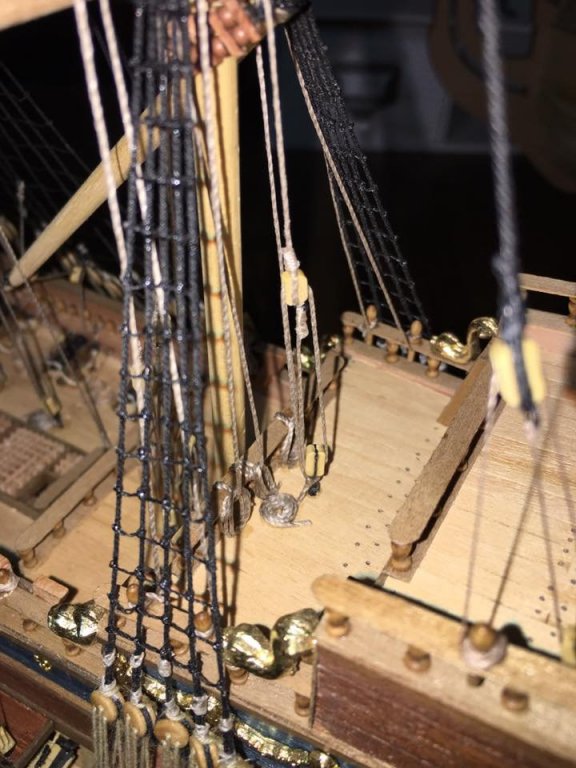
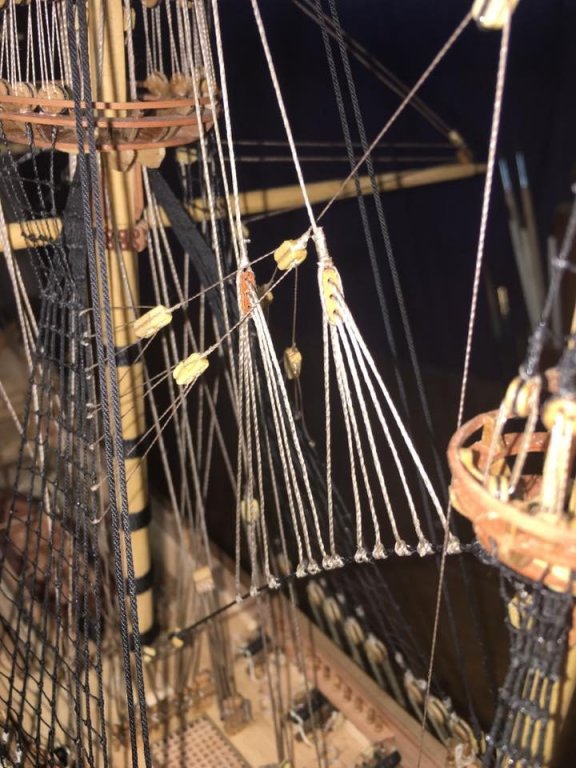
Thank you Michael on the kind words and to the likes as well. The Euphroe blocks that you pointed out are just as you suspect, custom but simply made. Scrap wood, drill the required number of holes stacked on top each other the then I trim and sane the block to size and shape. Basically, it is just an oval with a row of holes. Where is used the fiddle style blocks on the crows feet, I cannot say for certain if this is correct. My drawing was not very clear on this either but as to function, it works fine as it is still one hole on top of another. I first thought of using double and triple blocks as you have said as the way Corel draws their rigging, it looks like all the ropes pass through the same plane as they would in a double or triple block. This is incorrect. The proper rigging uses Euphroe blocks as described above. My recommendation would be to stick with the Euphroes. In fact, my entire forestay rig I fear may be incorrect. Right now I have the stay stropped to a double block and the crows feet splitting there. I am starting to see that this may be wrong and that the stay may have been two separate ropes leading to the crows feet and then to the shrouds. I do not yet know if this is true for La Couronne or not so I do not think I will change that unless I get confirmation. Let me know if you have any more questions. The 17th century rigging is definitely a challenge to interpret what should and should not be there.
- 608 replies
-
- 2
-
-
- la couronne
- corel
- (and 1 more)
-
Cedric, after hearing about what you attempting to do over on Marc's log I had to come here and pull up my seat right away. This should prove to be a very interesting, educational and overall exciting project to watch come together! Good luck and I'm looking forward to sharing this adventure with you.
-
At least around here when you go crazy you have some great company!
- 2,699 replies
-
- 1
-
-
- heller
- soleil royal
- (and 9 more)
-
Marc, You are faced with some tough decisions. With the amount of work you are putting into the design, where do you draw the line at what is acceptable? It would be easy to say do it all if this was a true scratch build where you had free reign to make those adjustments across the whole ship. Working with in the set confines though of a pre-formed hull restricts that ability to a point. Pat that point, you may as well go fully into the full scratch build. After many years of modeling in plastic and building several ships in it, I know the frustrations that it can create. While a lot can be changed you still reach limits on what is feasible to do. Seeing how you adapt to these challenges and work within the limitations set by the mold and your own plans is one of the things, (outside of the ship herself and the excellent research) that is truly fascinating about this build. Watching you work through the complicated decorations and make them work within those limits while staying true to the original ship is a view of model building that is not often seen. When you finally start the build phase, watching her come alive will be a sight to see I'm sure! If you are looking for a tie breaker on to straighten the ports or not to, I am on the side of straighten them. While yes, it is a lot of work, it is relatively easy enough to do and will make the overall appearance better. Also, if what you say is true and you are planning on remaking the port enhancements anyway, this would not be going far out of your way to correct something that may bug you later on. Either way, carry on!
- 2,699 replies
-
- 1
-
-
- heller
- soleil royal
- (and 9 more)
-
Well done indeed! She is looking good and i think it is safe to say that we all owe wood filler a lot with regards to making our builds look good.
- 45 replies
-
- 3
-
-
- model shipways
- willie l bennett
- (and 1 more)
-
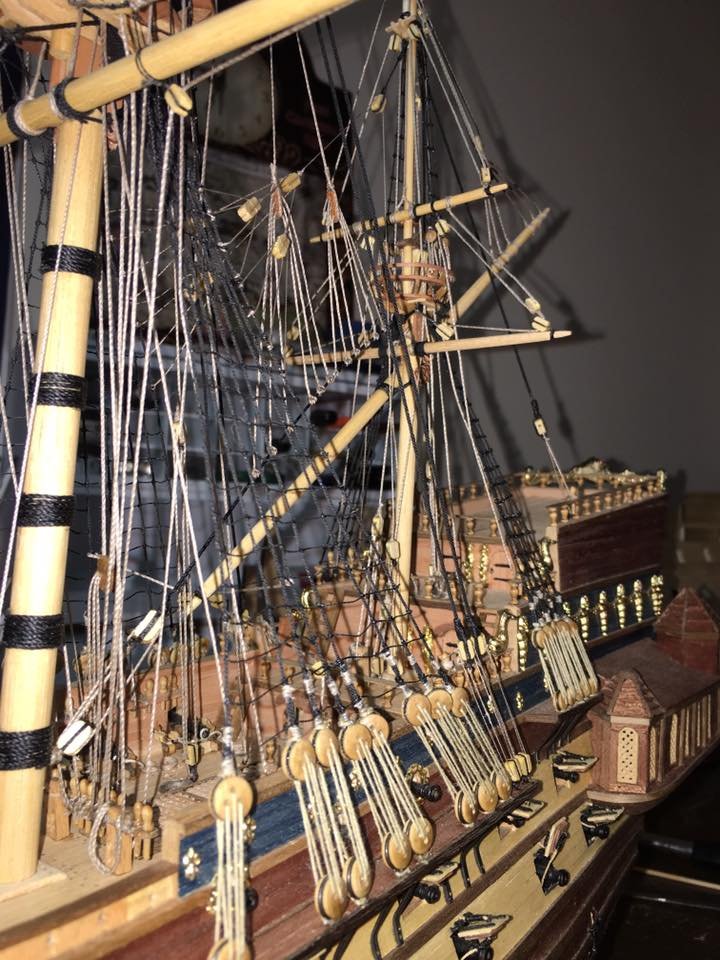
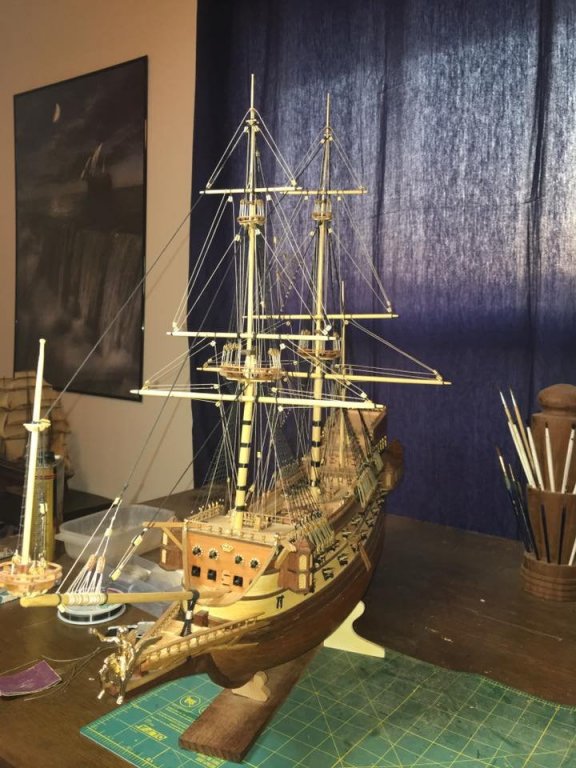
I'm back with a partial update! I have not been idle on the build just slow this past week and weekend. I did get a lot done in that I stained my deck and my dog plus grilled up a lot of food for the admiral and myself, had a few drinks and spent a nice evening on the deck with the admiral and a bottle of wine. Now back to work! So, I have been working on the main top gallant yard crows foot rigging and am no longer clear if I am building a model ship or training to be some type of crazy surgeon but I do know that I need to either grow more hands or buy more clamps! While I do not have pictures of everything yet, I did get all three main yards in place with the course and main top rigged. Top gallant yard is bent to the mast and now it is a matter of getting the crows foot in place. A few more nights of working and I should have it. I will add more pictures then but I figured a small update is better than none. Enjoy!

- 608 replies
-
- 9
-
-
- la couronne
- corel
- (and 1 more)
-
On my La Couronne build by Corel, there was just barely enough room to have the guns completely inboard. I framed my cargo hatches a little smaller to give a tiny bit more room though in reality it would still be extremely tight when the guns were inboard. Michael, your rigging is looking great and I do love that catharpin. Whether it was really there or not is hard to say but it looks like it belongs and adds a cool element of extra detail. I'm also excited to finally see your bowsprit and spritsail topmast installed as that is one of the unique features to the time period that in my opinion, make these ship stand out.
-
Royal Louis by fmartins - multi-media
EJ_L replied to fmartins's topic in - Build logs for subjects built 1751 - 1800
No worries. My wife is finishing her Masters right now and I know how busy she is till the end of July also. We will all be here when you return. Long build times and long breaks in between updates can be quite common in this hobby. I wish you all the best luck in finishing your Doctorate. That truly is a great accomplishment! -
I had not seen those drawings before or if I had, I did not realize they were of the same ship! While the overall shape and size is the same, the decorations, windows, balconies, quarter galleys, gun ports and more have so many variances between renderings that with out having the drawings labeled, verifying that they are of the same ship would be nearly impossible. I can now understand where some of the conflicting elements on my plans have come from. For instance the 5 window stern lights looks to be a variation of the 7 window configuration. Same with the confusion on the quarter galleys being open or closed and even how many there were. I can now definitively see arguments for a few ways just depending upon what year the ship is being modeled and which drawing the modeler uses. Why couldn't photography have been invented a few hundred years earlier....
- 2,699 replies
-
- 2
-
-
- heller
- soleil royal
- (and 9 more)
-
Welcome to MSW André! Great to have you with us. It sounds like you have a full ship yard of projects ready to go so I wish you happy building and look forward to seeing your work!