
DONATION DRIVE - SUPPORT MSW - DO YOUR PART TO KEEP THIS GREAT FORUM GOING!
×

bruce d
-
Posts
3,044 -
Joined
-
Last visited
Content Type
Profiles
Forums
Gallery
Events
Everything posted by bruce d
-
 Haven't visited them in a while but these people are long-time specialists (and five minutes away from Cuty Sark!): About Us (navalandmaritimebooks.com) HTH. Bruce
 -
Hello Bruce, and a warm welcome to MSW from the UK.
-
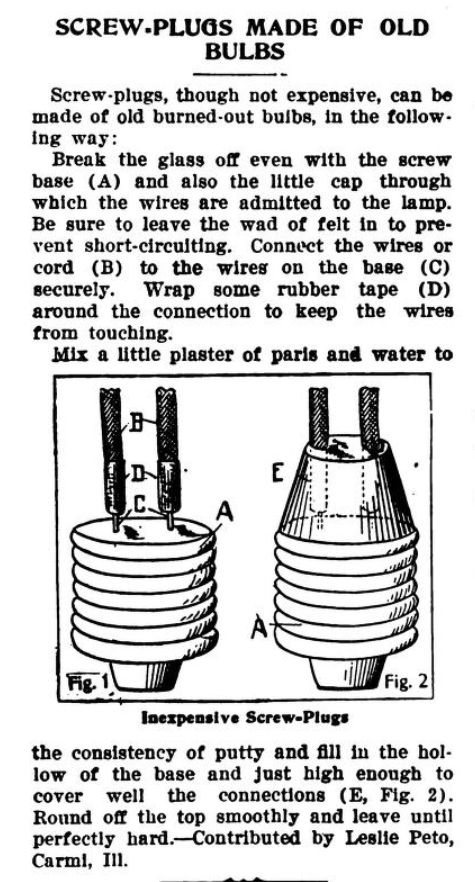
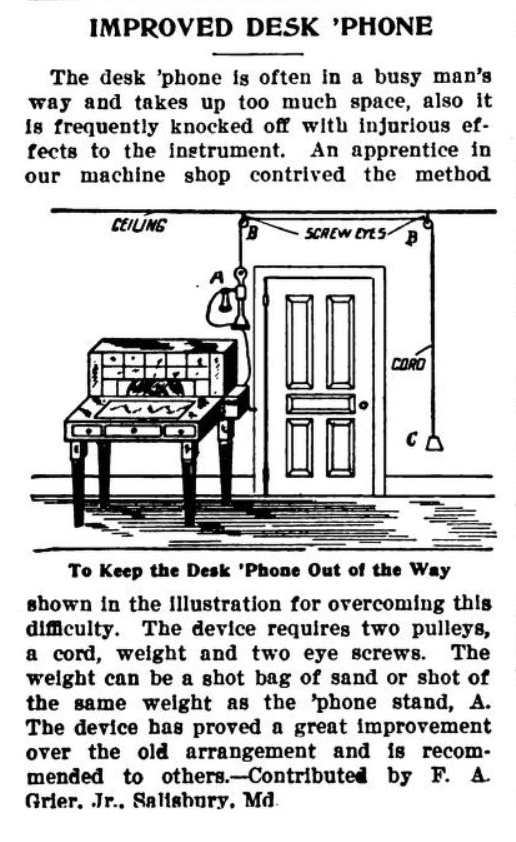
How they used to make power extension leads: what could go wrong? (Same edition of Popular Mechanics Shop Notes)
-
Popular Mechanics Shop Notes Special, 1918:
-
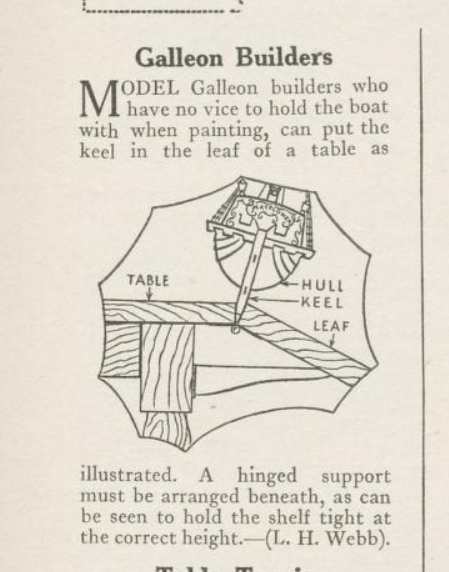
Perplexed by which keel clamp to buy? Problem solved! 4 From HOBBIES WEEKLY magazine, May 29, 1937
- 227 replies
-
- 12
-

-

-
You will do just fine. That is the type of problem solving that keeps the model-making fires burning.
-
Another two cents worth: You can make a collar and/or a saddle out of wood that fits the drill body and has a flat bottom surface. Once satisfied, epoxy them to the drill body and now think of this whole assembly as your headstock. This should be easy to fettle into alignment. I suggest hardwood for these pieces. The lathe I described in my earlier post was made this way. The old geezer who made it was full of tricks. To achieve alignment, he made the collar and saddle deliberately loose fitting and secured them to the base plate. He then mixed a wad of Milliput (a two part modelling putty) and packed it into the area where the drill would be clamped by the collar and sat on the saddle. Then he carried out his alignment procedure and left it to finish curing. Afterwards he added some bracing to keep the now perfectly aligned headstock stable. This is one solution. Lots of drill-lathes are out there that don't have Milliput in their components so obviously it a wide open subject. Permatex or Evo-Stick Hard Metal Epoxy would probably be a better 21st century alternative but I have not used them with wood. Keep us posted please, it's a good project. Bruce
-
Fitting of combined lift and sheet blocks to the yard.
bruce d replied to DaveBaxt's topic in Masting, rigging and sails
... and for a moment I thought I had dozed off again! -
Fitting of combined lift and sheet blocks to the yard.
bruce d replied to DaveBaxt's topic in Masting, rigging and sails
Wise words! -
Capella, I agree with the comments of wefalk above. It will be up to you, of course, but the question of what exactly you need from the tool is important. Having said that, I can also say that I have seen a couple of quite successful drill-powered lathes over the years. My two cents worth: if you go for a drill-powered machine, there will be a trial and error process and then it will work. I make this rosey-tinted prediction because it is clear that you have a good idea of what you want to achieve and are willing to solve problems. So, with apologies if you already are addressing this, the one thing I will steer you toward in your deliberations is this: if the lathe does not run true, ie concentrically, it will be very difficult to get any good results. The key to this is ensure the headstock (your drill) is aligned perfectly with the tailstock and stays that way. Since you are using wood as a building material it will be very easy to be caught out on this point. Wood reacts to changing environment. Just a few thou mis-alignment may give you a headache when making the small stuff we need for our scale models. The good news is that the solution (imho) lies in the design and choice of materials. So, my suggestion, which is based one particular successful homemade lathe I saw a long time ago: Use a stable board with a smooth laminated face as the base-plate/bed. Make your tailstock with parallel sides and a smooth bottom that will slide easily along this bed. Make a ‘trough’ for the tailstock to travel back-and-forth in. This can be simply two battens, preferably smooth laminated stuff again, fixed to the bed and perfectly parallel. They should maintain the tailstock alignment for the whole length of travel. Feel free to take a long time ensuring the parallelism of these two battens. A means of locking the tailstock in place without twisting is important. After the trough is in place, chuck a long dowel or bar in the chuck of your drill and use whatever tricks you know to line it up parallel to the bed and battens. Then lock the drill in place. Now you can centre the tailstock. The battens forming the trough can be used for mounting a tool rest, positioning a tool holder, mounting a steady or a duplicator. The lathe design in the video posted by David is a good guide and the flexibility of some of his features is a good idea. Having an off-set facility in the tailstock without disturbing the basic alignment is a good thing especially if you plan on doing spars and masts. This should be straight-forward by dropping a custom made off-centre steady into the ‘trough’ (there has to be a better word 🤐). I hope this is useful and doesn’t seem as if I am saying there is only one right way to do the job. The lathe I described above was made by an engineer and was used for making both drumsticks and chess pieces. He also made a duplicator and a dividing attachment which worked perfectly on even the smallest of work-pieces. One last point. I am sure you will make sure your chuck is ok before investing a lot of time 😁. Best of luck, I am sure a few people here will be interested to see how this progresses.
-
Well done Eberhard! Here is some more information on the records in their archives. As you can see, there are other drawings of the same subject, including the ship's boat. One of the drawings listed is ...
-
Hello Strelok, I am enjoying your log and admire your approach to the task of scratch-building from Admiralty draughts. Perhaps there is something in this other thread ... ... that will help with details of the masting/rigging. Starting at post #75 and for a few posts afterward I have posted some of the comments from Chapelle that expand on his research into Mediator and how he compares her to other vessels. He also explains what part of his sail plan was speculation. This may be of use as you look backwards across two and a half centuries to make your own sail plan . HTH Bruce
-
Welcome to MSW from the UK.
-
Turn a scalpel blade into a saw
bruce d replied to bruce d's topic in Modeling tools and Workshop Equipment
I don't know the advantage gained by using beeswax instead of water or oil but it seems to have been the standard way for jewelers to anneal gravers 'back in the day'. Possibly a metallurgist among us can shed some light? Having now watched a couple of his other videos I can see Paul Hamler, the guy behind it all, is quite a character. He has made a gazillion different things and can make you laugh. -
Congratulations on a beautiful model and a memorable build log.
- 857 replies
-
- 5
-

-
-
- Sphinx
- Vanguard Models
- (and 1 more)
-
Turn a scalpel blade into a saw
bruce d replied to bruce d's topic in Modeling tools and Workshop Equipment
Mark, I'm interested to know what others find when they try this trick. I have already found how the blades perform differently with different woods. -
Turn a scalpel blade into a saw
bruce d replied to bruce d's topic in Modeling tools and Workshop Equipment
From 20:45. I did a few experiments and found that I preferred the results obtained by using firm hand pressure (he uses a small hammer) and not going over the same spot twice. I am certain everyone will find their own style. Also, a straight blade converted to a saw will act completely differently from a curved one, at least in my hands. -
Hello Joe, Just FYI: it works fine for me. I am using Edge, if that matters. Good luck! Bruce
-
I found this trick buried in a YouTube video. After trying it out, I was pleasantly gobsmacked to find just how well it worked. Clamp a curved scalpel/craft blade in a vice, curved edge uppermost and exposed. Rock a file, not too worn, along the whole length of the exposed edge while pressing firmly but not too hard. Place the blade flat against a sharpening stone and make a single swipe on each side. You now have a saw. When pulling the saw across a test piece of wood it was surprising how much 'drag' I could feel as it cut compared to the same blade and same piece of wood before the saw-teeth were installed. It doesn't seem to matter if the blade is worn or new, so I know what I will do with tired blades in the future. It works best on curved blades used with a rocking motion but will also work with straight blade used for shorter strokes. The kerf is quite narrow and a saw made this way seems especially well suited for scoring straight lines in wood since the toothed edge resists following the grain. Maybe others already know this trick but hopefully someone will find this useful. Bruce
-
October 14, 1942. The German hilfskreuzer (auxiliary cruiser, disguised armed raider) Komet was sunk off Cap de la Hague in the early hours. Komet was attempting to break out into the Atlantic and was ambushed by British, Polish and Norwegian Hunt class destroyers and British and Dutch MTBs. The wreck was found in 2006.
-
Hello and welcome to MSW. I hope to you start a build log for your Bluenose.
-
Welcome to MSW from damp East Sussex. Look forward to seeing some of your subjects, liners are always cool. Bruce
-
My local Aldi has a small bench grinder with flexible shaft accessory for £29.99 which looks very useful. I almost talked myself into getting one despite having three flexi-shaft tools and two bench grinders already. If you know their habits, it will be 'first come, first served, sorry -don't-know-if-there-will-be-more-coming' so if it is of interest, get down there. This video from a couple of years ago looks like the same one I saw, not sure if the accessories are the same:
-
- 1
-
-
It will be well worth the wait, I'm sure. Think of all those lovely things you've done on the model and only we got to appreciate!