

bruce d
-
Posts
3,014 -
Joined
-
Last visited
Content Type
Profiles
Forums
Gallery
Events
Posts posted by bruce d
-
-
Chris,
I can’t offer a definitive answer to what orders were given, and when, but there are a few anecdotes in the ADM (Admiralty) records in The National Archives UK to keep the subject lively:
7 February, 1772 - Commissioner Frederick Rogers, Plymouth advises their Lordships at the Admiralty that they should ‘… inform what price is allowed the contractor for painting the names and ornamenting the compartments in ships' sterns.’ ADM 106/1216/96
-
11 February, 1772 – The Plymouth Officers advise their Lords at the Admiralty that ‘the contractor for painter's work here has not been paid for painting the ships names and compartments in their sterns and opine he deserves 6s. (6 shillings) for each ship’ ADM 106/1215/31
-
26 October, 1772 - The Plymouth Officers ordered Thomas Winsloe of Tiverton to write the names of several ships on the stern. They requested from the Admiralty for him to be paid at the rate of 6 shillings for each ship, the price they thought it is worth. ADM 106/1217/208
-
21 July 1773 - Portsmouth Officers report that they have asked ‘… Phillip Avery, the Painter ... the reason the name of the Albion was not written on her stern, when she was last painted at Spithead. They inform us that on their application to the Captain (rear-admiral Hon. Samuel Barrington) for doing it, he told them it was unnecessary as the name was carved and supported by the claws of the Lyon in her Head.’ ADM 106/1220/266
-
And then 18 April 1778, Commissioner Proby of Chatham acknowledges ‘Receipt of warrants to rub the names out of the sterns of the Victory and Formidable, …’
ADM 106/1244/116So here we have at least one captain saying ‘No, not on my ship’.
HTH,
Bruce
- AJohnson, thibaultron, Dave_E and 4 others
-
 7
7
-
And a warm welcome to MSW from the UK.
👍
- Edwardkenway, Keith Black and mtaylor
-
3
-
Looking good, Joe.
BTW, ignore my advice in the other thread about Cornwall Model Boats, I see you have already found them. 👍
- JDillon and Edwardkenway
-
2
-
Joe, I hear you. The good news is that it is unlikely you will be the first to encounter an issue with a particular material or kit so ... ask and find out how someone here has already found an answer. Besides our MSW sponsors there are other places that support the UK model-habit such as Cornwall Model Boats ( Cornwall Model Boats - Static display and radio control model boat kits including period wooden model ships.Model Ship fittings, Caldercraft Boats )
to name but one. They stock Occre kits.
HTH
Bruce
- mtaylor, Keith Black and JDillon
-
3
-
5 hours ago, druxey said:
Mounting the brass on a sacrificial wood backing will also ease the job
Double sided tape works well for this. If you are using a slitting saw blade it's probably best to raise it higher than normal practice and use a slow feed rate.
To release the brass from the sacrificial wood without distortion can be a problem, I soaked the whole assembly for a day or so in white spirits to loosen the bond. Plywood may fall apart after this which is the best result.
-
Looking good, Kevin.
BTW, I watched your video on clamps earlier and learned a couple of things. Thanks!
- Kevin Kenny and mtaylor
-
2
-
Nice work, Bitao, and thanks for showing the secret tool that makes the magic.
- Tony Hunt, mtaylor, Keith Black and 1 other
-
4
-
-
Hello John,
First, well done for doing a 'dress rehearsal' of a vital process.
Just a point concerning the images: it appears the grain in all three pieces is going in the same direction. When you do it for real, I believe the centre piece should have the grain running cross-ways. The direction of grain will was a primary factor in construction for the original shipwrights and will apply in many components in a serious model.
The fit looks good, will watch for next steps. 👍
-
6 minutes ago, My Fathers Son said:
this will keep me busy for a while.
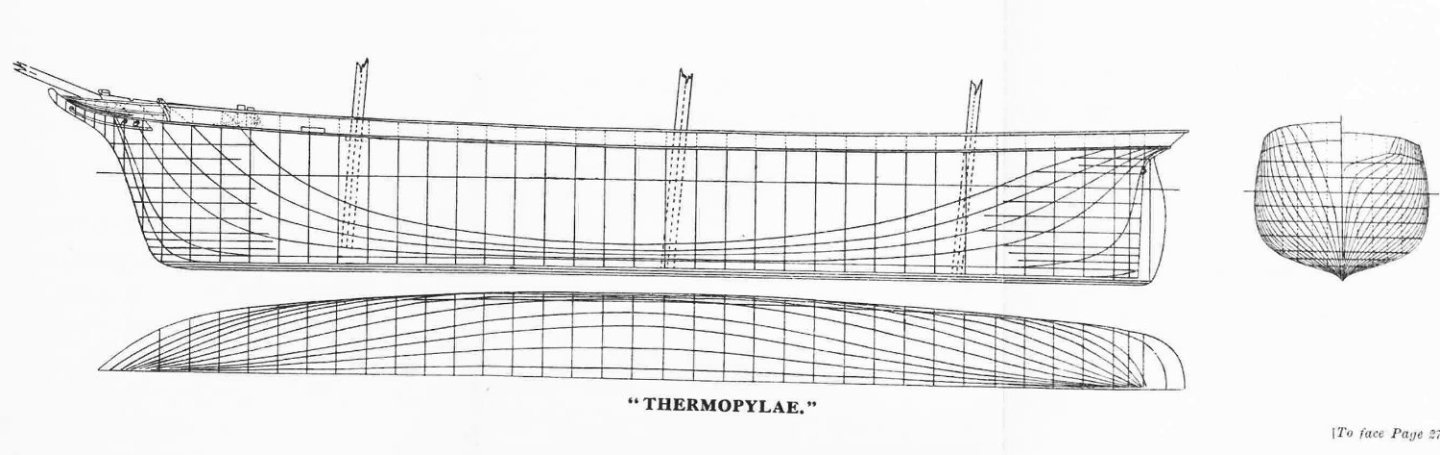
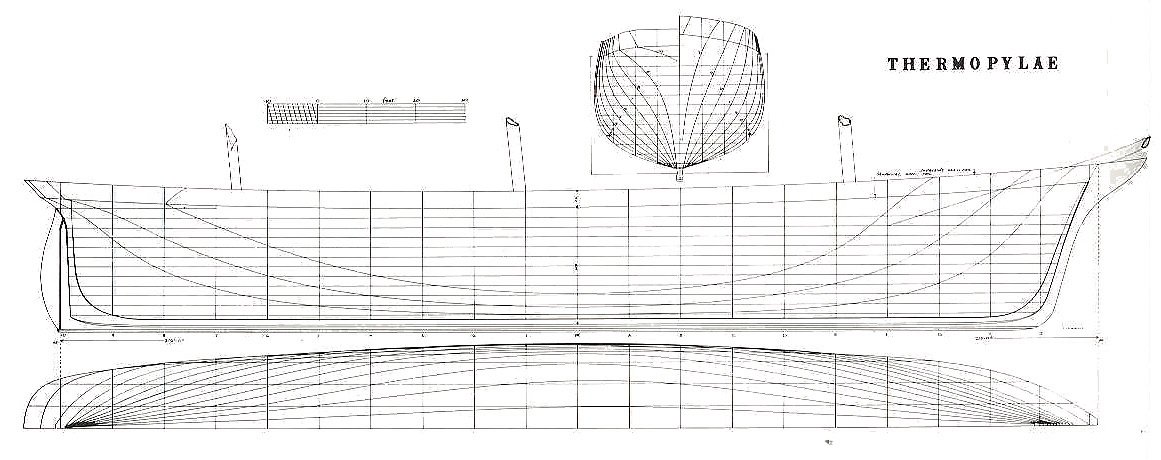
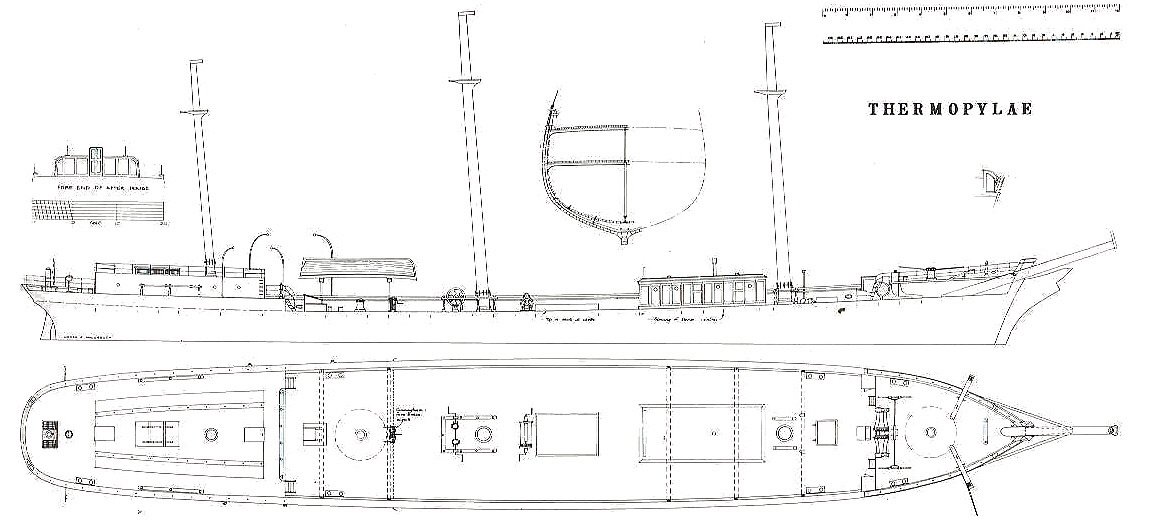
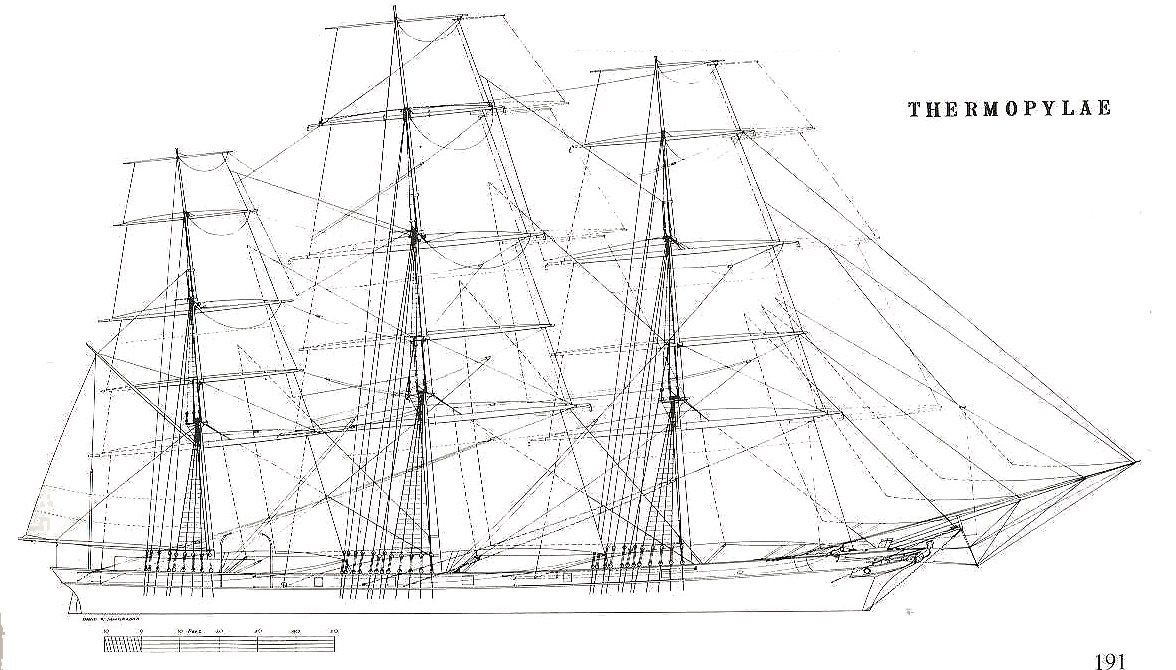
I'll bet! Glad to help, looking forward to seeing your Thermopylae.
- Scottish Guy, Keith Black and mtaylor
-
3
-
Thesis Submitted by Jose Daniel Quijano for Master of Arts in Maritime Archaeology Degree, 2013
- Seahawk1313, thibaultron, Martes and 2 others
-
4
-
 1
1
-
Hope this helps.
After opening the link choose 'RELATED DOCUMENTS'
Thermopylae | Ships | Archive & Library | Heritage & Education Centre (lrfoundation.org.uk)
Also these:
-
4 minutes ago, allanyed said:
There appear to be rows of cannon ball racks, but I cannot find any contemporary information that would confirm this. Have you found any details about these?
Nothing to confirm or deny, but they are there.
I have high hopes for having more information soon(ish) but whether or not it will change any existing ideas about her appearance or fittings remains to be seen.
Now I'm curious. Why the interest in cannon ball racks?
-
9 minutes ago, My Fathers Son said:
I haven't started cutting anything out yet, I am practicingmy hull construction and planking before attempting the real thing.
I'll see what I can do.
👍
- Keith Black and Scottish Guy
-
2
-
Simon, just catching up. Am I reading this right, you are still looking for a workable set of plans for Thermopylae? I may be able to help.
- Keith Black, mtaylor and Scottish Guy
-
3
-
Toni,
Haven't found a rule to quote but these images below from NMM are pretty consistent. The swivels are above the rail but not so high that the crew would be impeded in reloading. As I understand it, and as is illustrated in these contemporary models and plans, the swivels most deadly use was in firing down into an attacker and the quick working of the guns depended on the crew being able to get on with it without acrobatics. Since they are so often found mounted outboard of or directly above the rail, they really couldn't be any higher.
So (at least the way I am going to mount mine after asking myself the same question) - the swivel guns will be at approximately shoulder height relative to the deck.
Atalanta (1775); Warship; Sixth rate; sloop; 16 guns | Royal Museums Greenwich (rmg.co.uk)
Warship (1740); Sixth rate; Sloop; Brigantine; 12 guns | Royal Museums Greenwich (rmg.co.uk)
Fighting vessel; Bomb vessel | Royal Museums Greenwich (rmg.co.uk)
Warship; Sixth rate; 24 guns | Royal Museums Greenwich (rmg.co.uk)
Warship; Frigate; Amazon class; Fifth rate; 32 guns | Royal Museums Greenwich (rmg.co.uk)
Escorte (captured 1757) | Royal Museums Greenwich (rmg.co.uk)
Senegal (1760) | Royal Museums Greenwich (rmg.co.uk)
As a by-the-by, I believe there were also occasions when a swivel gun was jury-rigged to fire from a mast-head. I am so glad I didn't live in the 18th century.
-
Steve, welcome to MSW from southern England. That is a very nice model, looking forward to seeing more.
Regards,
Bruce
- mtaylor, Edwardkenway, Keith Black and 1 other
-
4
-
-
11 minutes ago, allanyed said:
I took a look at the plans as I have an interest in this vessel as well. I realize the lines drawings by Jeff Staudt are copied directly from ZAZ6368 from RMG and very accurate. I did notice that there is no windlass or other device forward as found on every other vessel of her type and size (or even smaller than Mediator) that I could find on the RMG Collections site. Does anyone know if this vessel had no windlass or is this an omission on the drawings for some reason? Would the crew actually have to manhandle the anchors via the cathead without mechanical help? I find it hard to believe there was no windlass or a small capstan, but surprises are not new in this hobby of ours. TIA
Allan
Well spotted Allan. Digging in records shows that she was fitted with a capstan while in Portsmouth dockyard between May and June 1745. It was at this time the lines were taken off and despite seeing pumps and stoves we do not see a windlass.
Mediator had been roughed up when captured by a French privateer off the Needles and then suffered further bruises when re-taken by the RN the following day. She was needed back in convoy service urgently and repairs were quickly authorized plus instructions given to record her lines.
Despite the artist meticulously recording other details (such as the miss-matched stern windows which reconcile with hasty repairs) I saw no hint of a previous windlass in the correspondence or the plans. If it hadn't been for the capture by the privateer and re-capture the following day there would be no drawings.
NMM describes her as 'purchased' but this is not entirely accurate. She was owned by a RN officer who bought her in the West Indies and contracted her to the RN for the supply crisis. She foundered and was lost at Ostend in a storm just a few weeks after release to duty from Portsmouth dockyard.
I will eventually write the tale and post it.
-
6 minutes ago, wefalck said:
you might want to define the rabbet line better. It looks, as if you won't have much space for the planking above the bulkheads in the midship section. But then I don't know, how you will construct the keel.
Eberhard,
The keel is a little wider than the plywood former so will become a useful part of the puzzle. I am planning on tacking a dummy in place for the planking to be replaced later. Also, I am counting on being able to finish the rabbet with the dummy in place.
Very sensible comments on the hardness of the fillers, thanks.
-
I am doing my first ever fairing of a POB model (scratch built Mediator from Jeff Straub plans). My gut feeling is that I should have fillers between some of the bulkheads where the gap is greatest and/or the lines change. The bow fillers are necessary but my lack of experience leaves me seeking advice about the rest of the hull and stern.
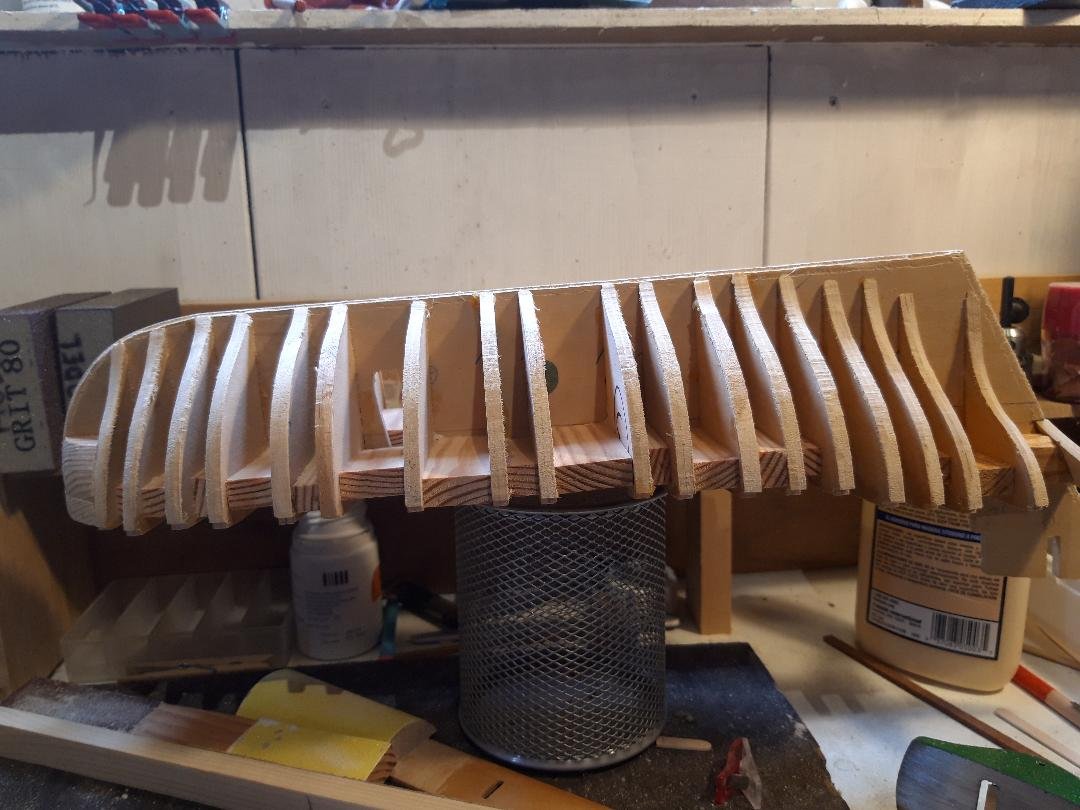
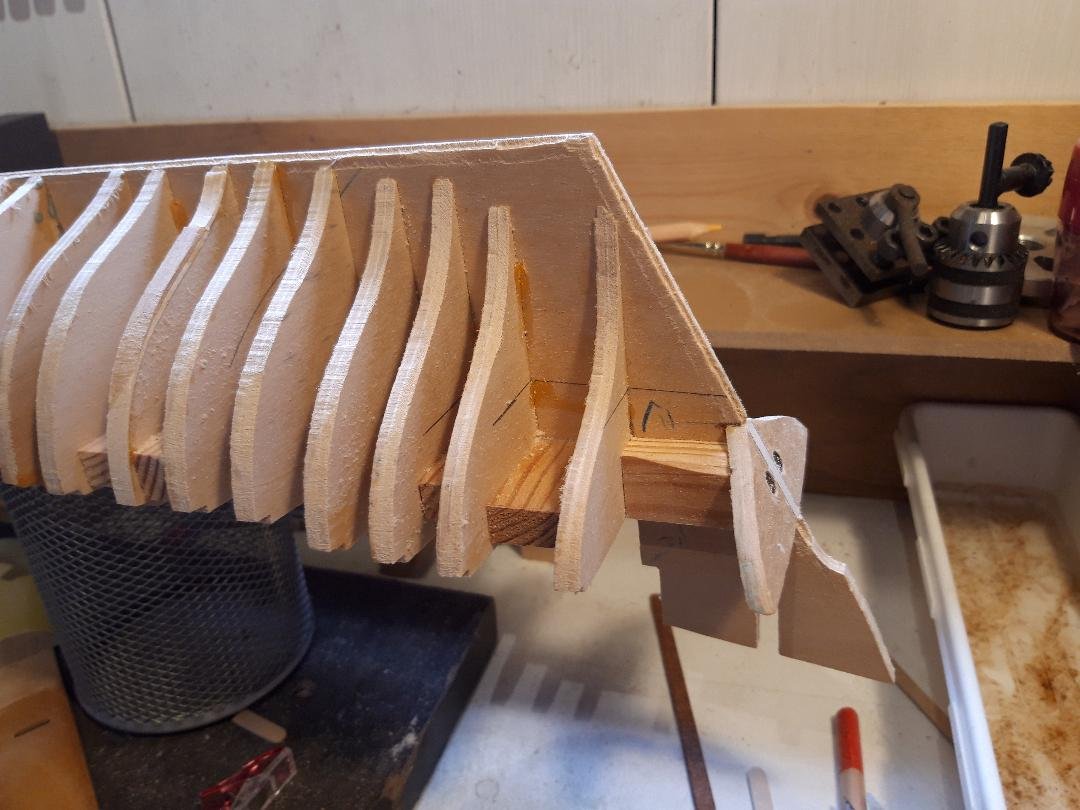
As the shape emerges from my sanding efforts it seems now is the time if it is going to happen. Common sense says to use wood softer than the bulkheads.
Are there any negatives or cautionary tales about bulkhead-fillers?
Thanks in advance,
Bruce
-
I agree it would be nice on one level but as Steven says it would be complicated.
I believe it is a good idea for everyone to put their location, at least their country, in the spot below their avatar. This helps.
What are you looking for?
- Keith Black, allanyed, Ryland Craze and 3 others
-
6
-
Michele, welcome to MSW. Those models are magnificent and I hope you will share a build log with us.
I am with everything of course but especially your carving. May I ask what is your method?
Bruce
- Ryland Craze, mtaylor, Keith Black and 1 other
-
4
-
Thanks Guy, cautionary tales are always welcome in this thread but I have already been ambushed by printer-woes, see post#2, and it is possible they have surfaced again (but I am getting a bit ahead of myself).
Fairing is moving ahead and has required a bit of fettling: there are a few low spots and I have been adding material.
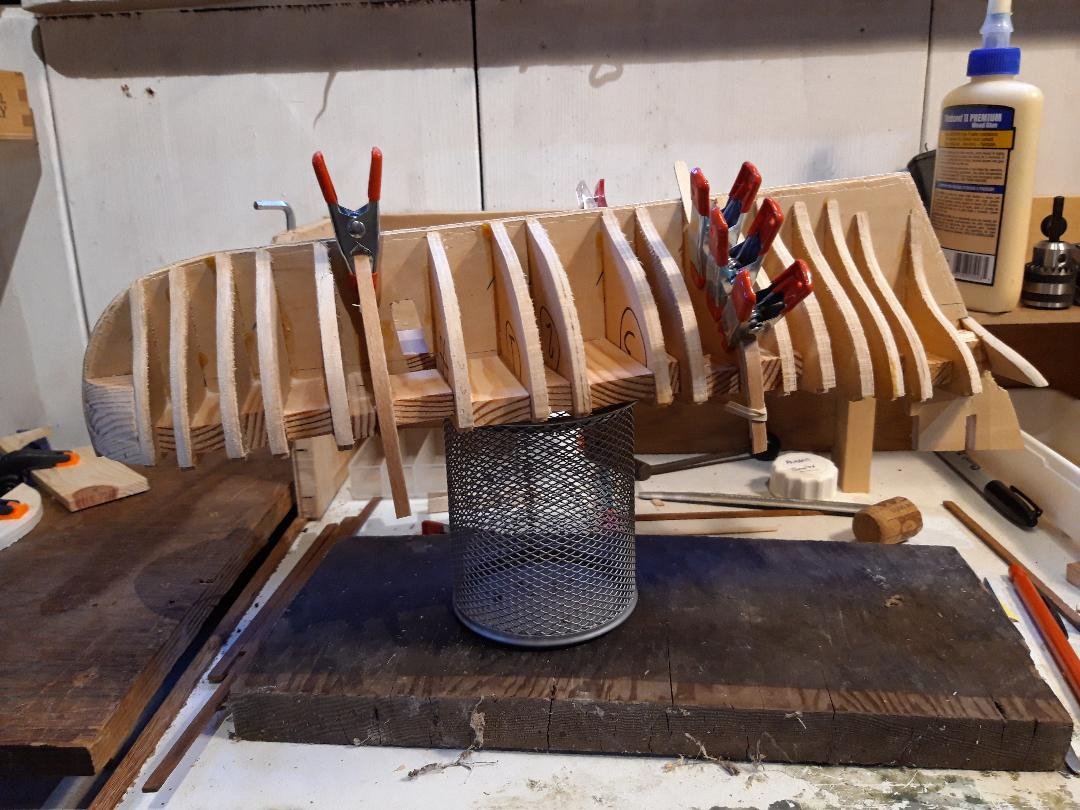
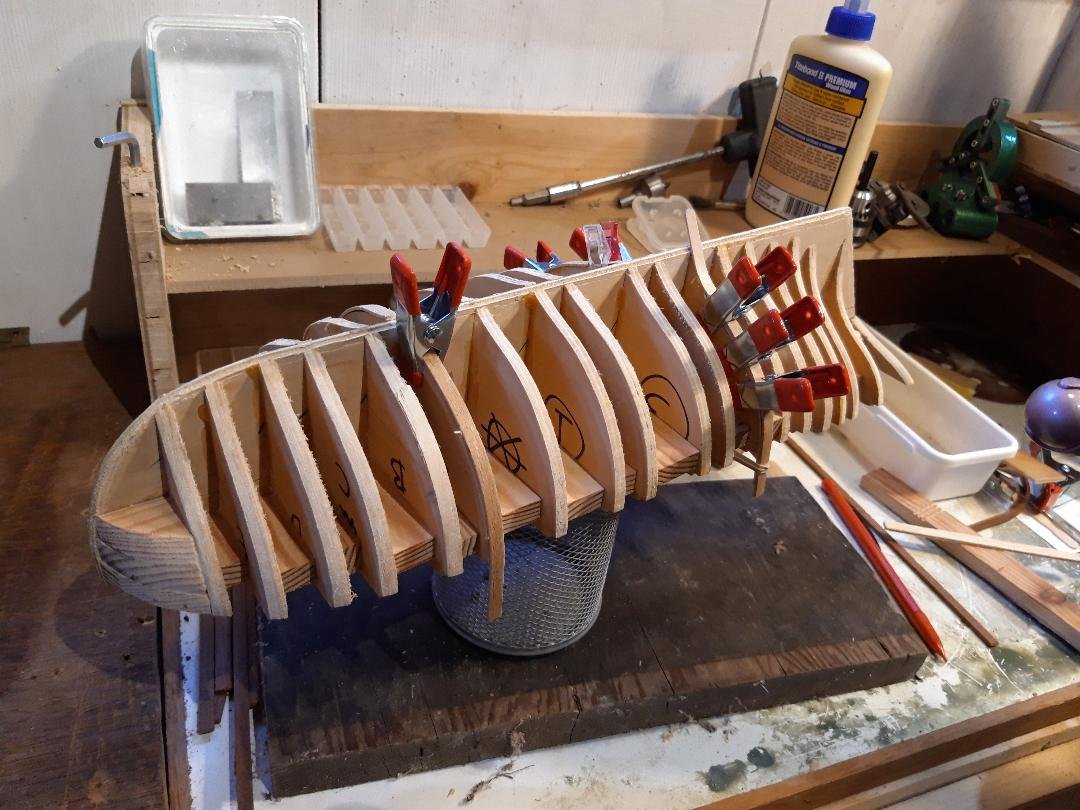
There is something about bulkhead number 5 that is odd. On both the Mark 1 Mediator, the one that I started and then stopped, and now on this second attempt, bulkhead #5 is low. I don't see how it is a printer issue as the piece is the correct height. Bulkhead #A is also affected, again on both Mk 1 and Mk 11, but far less noticeably. I was careful when cutting out the bulkheads for Mk 11 and am satisfied that the piece matched the drawing before I started assembly. Yet, here we are again. At an appropriate moment I will check the master drawings and the scans I made but ... I suggest anyone considering building Mediator leaves a bit of extra material around these two bulkheads. There is nothing obviously wrong with the shape, just that when the formers and bulkheads are assembled #5 is low by about 2mm, #A about 1mm in a short section. No biggie, just something that is avoidable.
After trying a couple of different woods and bending methods I settled on using coffee stir-sticks and hair tongs. The results were perfect from my point of view because the wood, which may be birch, is of a similar hardness to the ply used for the bulkheads. This is a useful feature when sanding.
I wet the stir-stick for a minute or so and then roll it around the heated tong free-hand. It is quick and effective. Clamps and rubber bands do the holding.
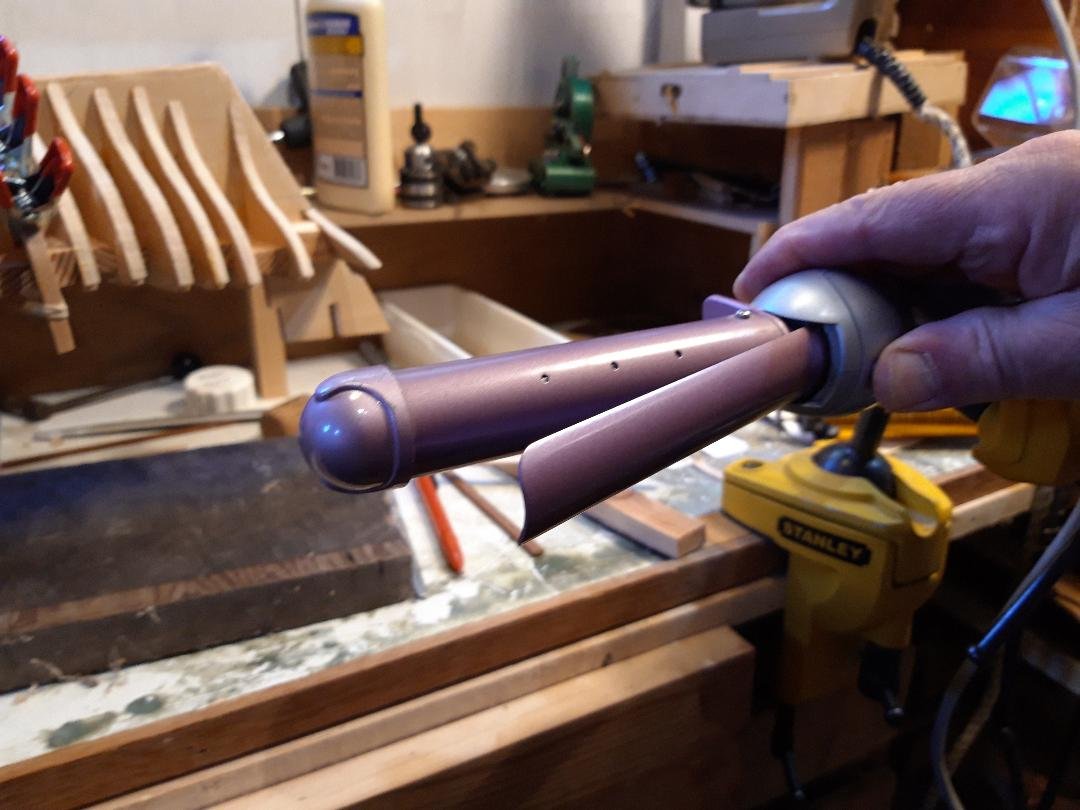
One 'top tip' for anyone wanting to do it this way: have a look at the way the tongs were intended to be used. The tubular body of the tong heats up and the moving part that pinches the hair is spring loaded to hold the hair while drying/curling. This moving 'finger' gets heated by being in close contact with the hot tube. Put the wood to be bent between the two hot pieces, making sure the wood stays in close contact with the 'finger', and it heats the wood from both sides making a neater and more predictable result.
Now if only I had some hair to try out my new skills ...


Chris Watton and Vanguard Models news and updates
in Traders, Dealers, Buying or Selling anything? - Discuss New Products and Ship Model Goodies here as well!!
Posted
Caution! Thread drift strikes again!
George, you have rattled my cage. Ouch.
I have a piece of old Bermudian cedar which is not pink at all: now I wonder if it really is 'old Bermudian Cedar'. Can you just confirm that you are saying the deck of the model in your picture is old Bermudian Cedar, i.e. pre-1950 cutting, not a more recent harvest?
BTW, that model looks nice.