Keith Black
-
Posts
6,718 -
Joined
-
Last visited
Content Type
Profiles
Forums
Gallery
Events
Everything posted by Keith Black
-
 Sorry Mike, I forgot that this is a friends model and not yours. And now I remember past conversations.
 -
I don't understand why red was used on the bulkheads, I know it was but white makes more sense (IMHO) with it's ability to reflect light. Great progress Tom.
- 346 replies
-
- 1
-

-
- Sophie
- Vanguard Models
- (and 1 more)
-
Dave, see the below, page 26 post #768. MSW's search engine is invaluable.
-
Mark, absolutely beautiful work. Great visual treat. 👌
-
Mike, welcome back. In my humble opinion you need to strip it all the way back to the bare hull and proceed with the restoration from the ground up. All three mast need to be removed and rebuilt. Taking down the mast means removing the shrouds and ratlines. It's that old saw, if it's worth doing it's worth doing it right.
-
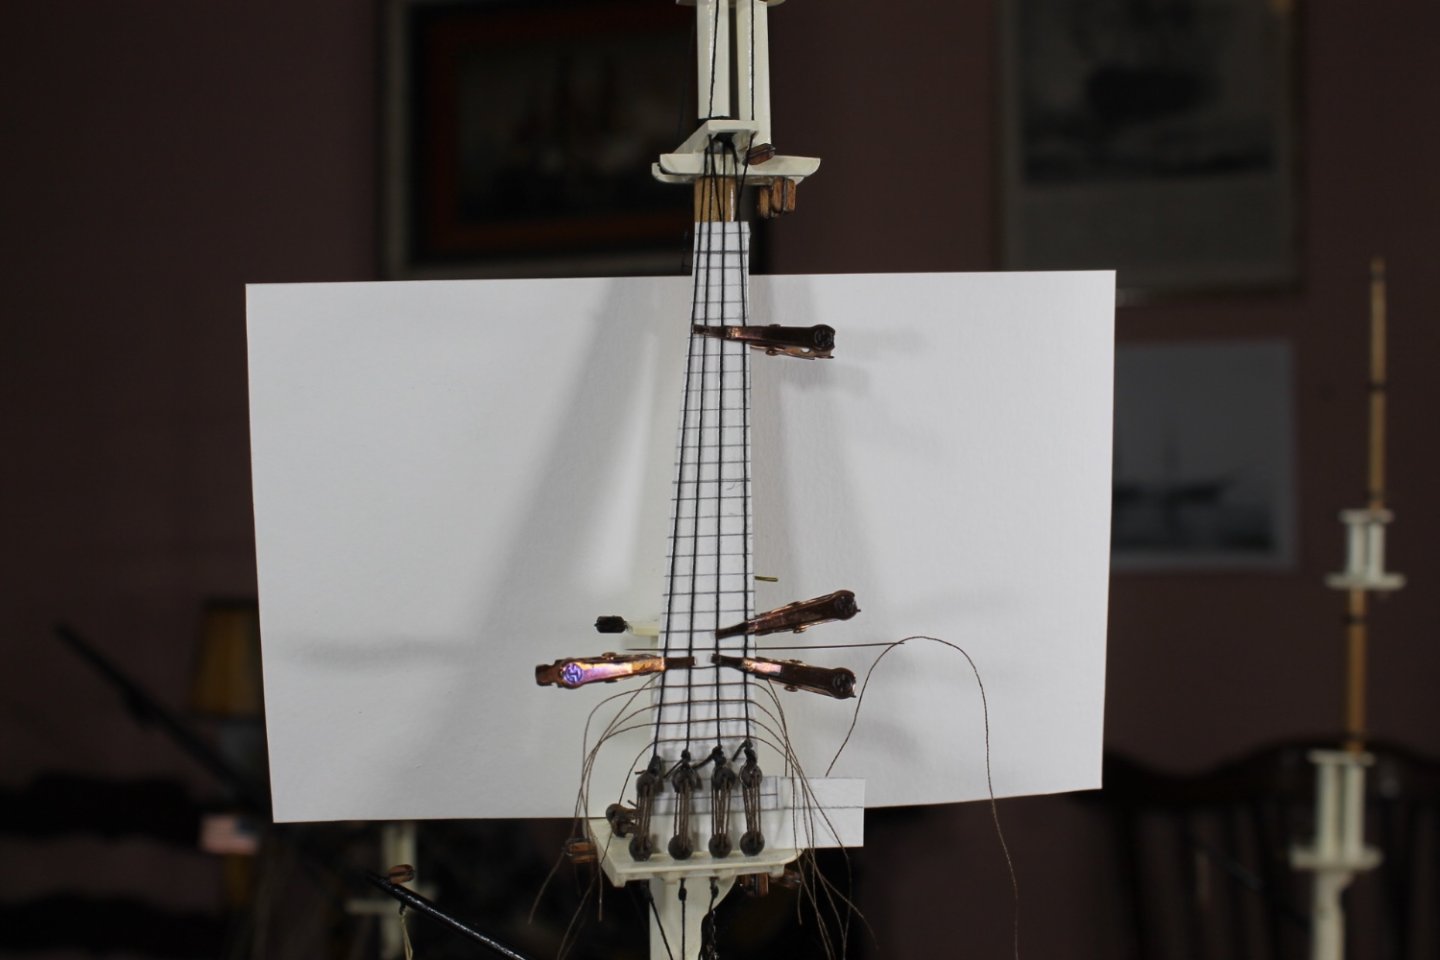
Thank you Eberhard for responding and thank you for great tip. Thank you Glen. Once you start using flush cutters you'll wonder how you ever got along without them. Johnny, thank you. At smaller scales ratline knots seem to be too large IMHO and detract from otherwise beautiful rigging. My dear wife was once a beader but had to gave it up due to her aging eyesight. Needless to say I liberated all of her tools. Yes Tom, each shroud line is pierced. Tom, I hold onto the left side clip to provide resistance to the needle as it pierces the shrouds so my fingers are never in danger of being stuck unless I do something stupid like trying to pull the ratline thread through by holding onto the needle with bare fingers instead of using my needle nose pliers. I'm working at 1:120, Johnny mentioned that this method would work at 1:96 scale and smaller. I also keep my elbows firmly rested firmly on my worktable. You're more than welcome Andy. I'm more than happy to pass on what was shared with me here on MSW. Thank you Keith. We can get caught up in the moment and do some goofy stuff, can't we. Please don't try this method without first practicing on a test piece. You may find it too fiddly or it may not work for you for whatever reason. Thank you to all for your comments, likes, and for following along.
-
Mic, welcome to MSW. Glad to have you aboard.
-
DJ, this is grand news and I applaud your decision. I hope any mental anguish is minimal, concentrate on the good times no matter how few. We're here to help you and provide any assistance and advise that we can. Keith
-
Glen, you could also chuck a nail into your drill before painting and score the shank next to the head and then paint. Separation of the head from the shank once painted would be much easier and less violent.
-
Gary, thank you. I used fingernail clippers in the beginning but gave up on using them as the curved cutting surface makes it too easy to accidentally nick or cut the shroud. Using the flush cutter I can get up against the shroud without fear of cutting it. I failed to mention that when applying the CA I use a needle dipped in CA. I put a small amount of CA in a plastic container lid, dip and apply a tiny amount to the ratline and shroud joint. I then brush CA along the excess thread tail about a tenth of an inch with the needle. Once dry the excess thread tail is hard and it makes trimming with the flush cutter much easier than cutting just soft thread. This is a clever method but it's not mine. At sometime in the past I read about this method here on MSW and tailored it to my particular need. What a wonderful resource MSW is!
-
Gawd she's a precious little soul, what a beauty. i think she's model ready right now!
-
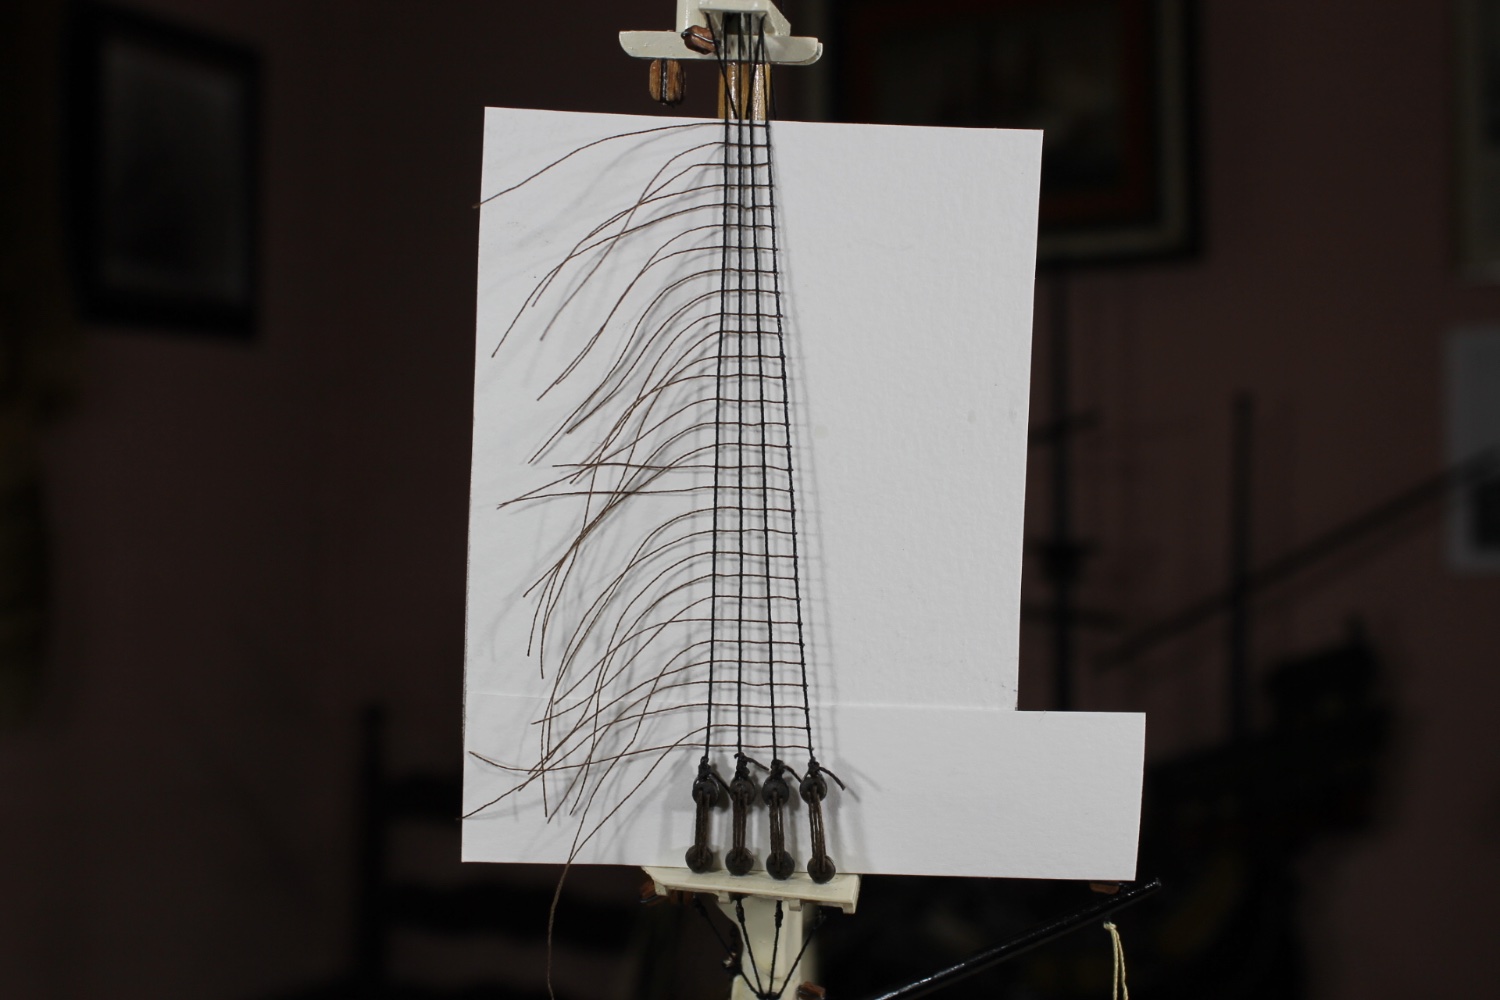
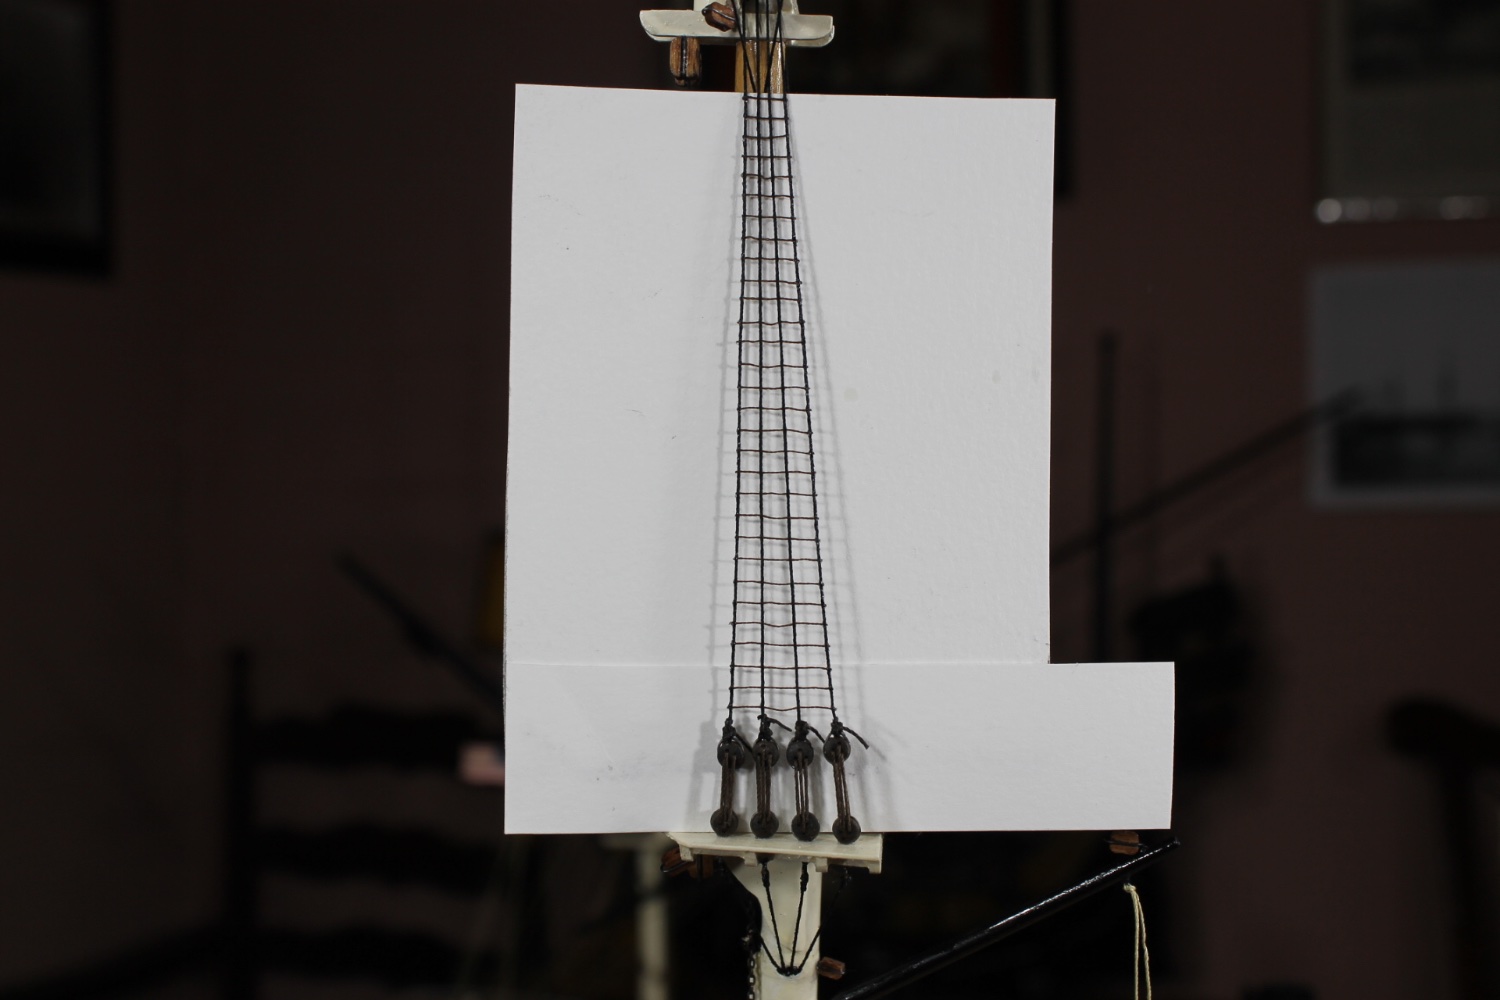
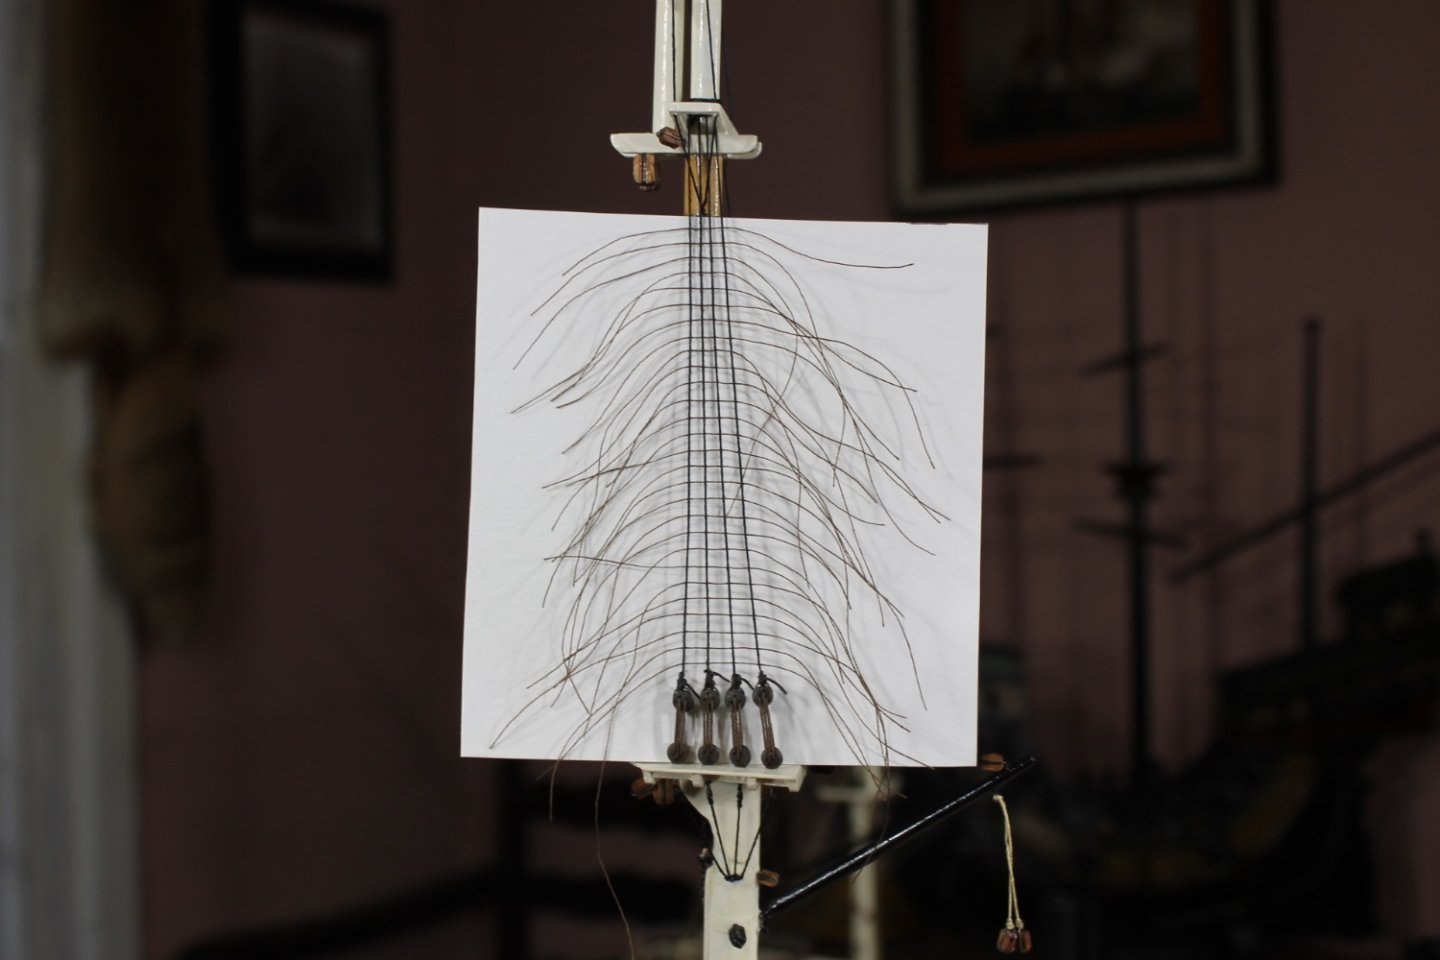
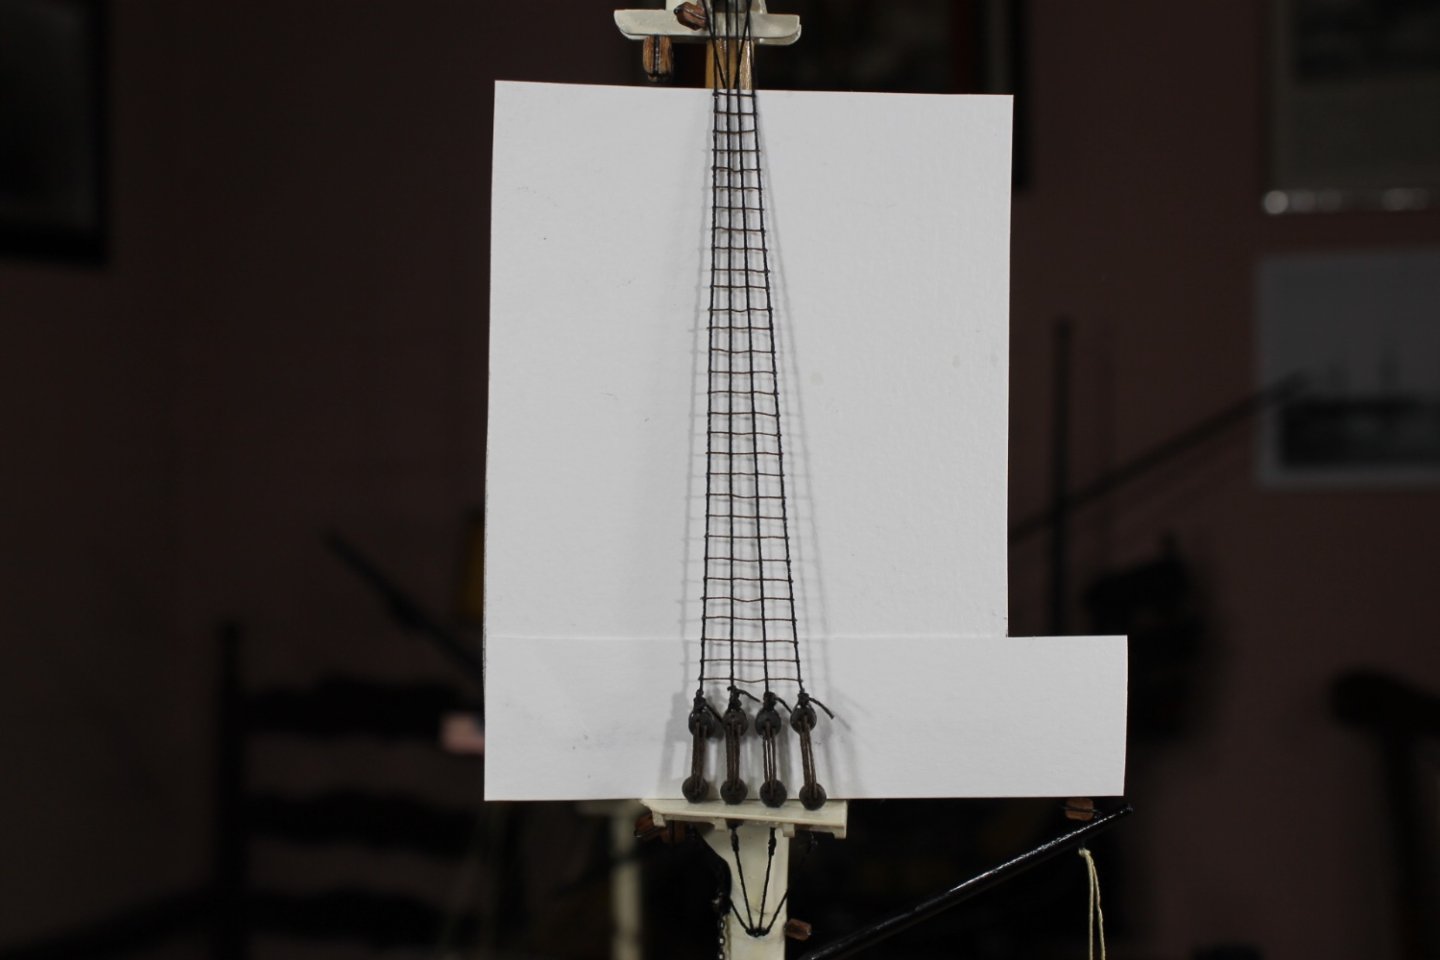
Thank you Mark. Only 57 days till Spring! Keith, twice? And did you scold yourself?! Rob, sorry it's taken me so long to reply, here is my "weave" method...... I work from right to left, if someone wanting to use this method is left handed, I would think working from left to right would be easier. I use flat clips to hold the spacing guide to the shroud lines. I work from the bottom up pinching the should lines as close to the spacing guide as possible. Holding the needle flat against the guide makes penetration of the shroud lines much easier. I raise and adjust the clips as I work my way up. The long piece of card is for photographic purposes only. Only when ALL of the ratlines have been woven through the shroud lines does any gluing take place. At this point it sorta looks like a House Centipede. Because the ratline threads tug their way through the shroud lines, the shroud lines lose their correct angle from the deadeyes to where they attach to the mast. At this point each individual ratline needs to be pulled taunt, shroud line angles corrected, and spacing between shroud lines adjusted. At this point if you have any doubt that a ratline has not pierced the two outside shrouds, pull that ratline and reweave it. Do not proceed thinking it'll be okay because it won't be. This is fiddly but the the whole process is fiddly but it's the most positive method of attaching ratlines to shroud lines in lieu of knots that I've found working at this scale. Again, I work from right to left. I use CA to attach the right side shroud line to each ratline working from the bottom up. Once all the ratlines are glued to the shroud and have had a bit of time to dry, only then do I trim off the excess thread. I use a jewelers flush cutter for trimming and that flush cutter is only used for trimming thread, it has no other purpose in life. I can not stress how extremely critical it is to keep yourself concentrating on what you're doing. If I were to accidentally cut a shroud I don't know how I'd recover. It's a nightmare situation, that's why I do this in daylight hours and make sure my head is totally in the game. After all the ratlines are trimmed make sure they are taunt and once again correct shroud line angles and spacing. After gluing the left side working from bottom up, trim off the excess, make final angle and spacing adjustments. I do not glue the ratlines to the inside shrouds, I only glue the ratlines to the two outside shroud lines. And then it's time to take a much needed break. Thank you to all for your comments, likes, and for following along.

-
Eric, I agree with Brian. Were I you, I'd have long ago made this model of the Cairo as "Being raised from the Yazoo River" after soaking it in a bucket of muddy water and repeated bashing with a two pound ball peen hammer. You definitely have more patience with this piece of bull pucky than I would ever have had.
- 113 replies
-
- 4
-
-
- Cairo
- BlueJacket Shipcrafters
- (and 1 more)
-
Ahh Tom, you'll be able to fill that and it won't even be noticeable. Press on Captain Black, you're doing a marvelous job.
- 346 replies
-
- 2
-

-
-
- Sophie
- Vanguard Models
- (and 1 more)
-
Glen, could you pin the aft edge of the sternpost where it would act like a hinge and could then fold backward and down into the ship? If you could do that you might gain enough clearance where you could go ahead and attach the figurehead before insertion. Once in the bottle it could be raised just like you normally do with the mast.
-
A very convincing backdrop for the main story. 👌
-
Paul, welcome to MSW. You'll fit right in. Glad to have you aboard.
-
Tom, see the below.
-
A #12 needle is a tiny little bugger, it's very thin. When pulling the needle through the shroud lines, the eye of the needle and the ratline thread doubled must pass through the shroud lines. It's a bit of a tug and most of the time I use a pair of jewelry needle nose pliers to pull the needle through. I work from right to left and I was pulling through the far left line and got lazy. Using my left hand I had my index finger on the backside closer to the tip and the needle squeezed between my thumb and middle finger nearer the eye. A little tug, a little pressure, and snap! A small needle snapping in half while being held between your fingers is a bit disquieting. All sorts of imagined ill pass through your mind so I withdrew for the evening. And yes, I gave myself a good scolding.