Keith Black
-
Posts
6,675 -
Joined
-
Last visited
Content Type
Profiles
Forums
Gallery
Events
Everything posted by Keith Black
-
 The early transition period is my fav period even though fraught with build issues due to lack of information. Any of the wood hull screw frigates from all navies is my cuppa.
 -
Mashuno, welcome to MSW. Glad to have you aboard.
-
Thank you, Eric. There are so many questions about parts of this push boat that are hidden or the view obstructed. I think what I need to do is build the hull, replicate the engine room, and pilothouse as faithfully as possible and then start adding those obscured items including, the boiler, wheel's steam cylinders, mud drum, beam engine for boiler feed, hand pump, and coal bin.
- 457 replies
-
- 7
-

-
- sternwheeler
- Hard Coal Navy
- (and 1 more)
-
I've got this sternwheeler virus bad. Now there's a working boat that you need to build, Keith. That's a fine example of one. Thank you, Eric. Yes, please because I'm having a devil of a time seeing it but as I said, I'd dearly love for you to convince me it's a dinghy because it makes life much easier. Glen, I very much wanna believe but I don't see a dinghy, then I don't know what I'm seeing. As far a being a dinghy cover, I'm not sure a dinghy cover was a priority item aboard this vessel. One of the many things we've yet to discuss is crew. Only two crew members are pictured and I don't see hide nor hair of a third which would have been the engineer. Could they have gotten away with just a two man crew? That seems a bit sketchy.
- 457 replies
-
- 6
-
-
- sternwheeler
- Hard Coal Navy
- (and 1 more)
-
Eric, thank you but for whatever reason I'm having a hard time seeing that as the bow of a dinghy. I wish it was a aha moment because there should be a dinghy somewhere aboard and it removes one of the many question marks. If you and Eberhard see a dinghy then dinghy it is and I'll build accordingly. Thank you again! Thank you, Eberhard.
- 457 replies
-
- 2
-
-
- sternwheeler
- Hard Coal Navy
- (and 1 more)
-
I bet that took some time thinking out the process of putting that little jewel together, Eberhard. Nicely done.
-
Roel, thank you for the input and following along. You are absolutely correct, the pipe next to the steam whistle is the waste steam exhaust pipe. I had come to that conclusion earlier in the week but hadn't yet posted a corrected observation, thank you for doing so. Also regarding high pressure water pumps. I plan on building a twin beam engine for the boiler feed and for water used on deck for wash down, etc. I'm having trouble figuring out what I'm looking at in the below image. There is a thing on the port side engine deck, directly aft of the port side light board. In an unknown white triangle I see what I think is tube entering the top of a pipe (It could also be an electrical wire entering the top of a pipe) in the center of what looks like a VW tire rim layer flat. I have no earthly idea what this thing is???? Suggestions would be greatly appreciated. There's a three foot wide wall locker on the engine shed port side wall directly beneath the unknown object, possible connection unknown. There may have been a corresponding one on the starboard side but if so, it's been ripped away. If you look closely at the starboard side engine room deck edge you can see the deck edge is jagged fore of the starboard side light board and missing about 10 inches in and 36 inches aft of the light board. The light board could possibly have been replaced. Damage looks like the area was hit with a dredge bucket. l
- 457 replies
-
- 3
-
-
- sternwheeler
- Hard Coal Navy
- (and 1 more)
-
3D Naval Guns 1850s ~ 1870s
Keith Black replied to JerryTodd's topic in CAD and 3D Modelling/Drafting Plans with Software
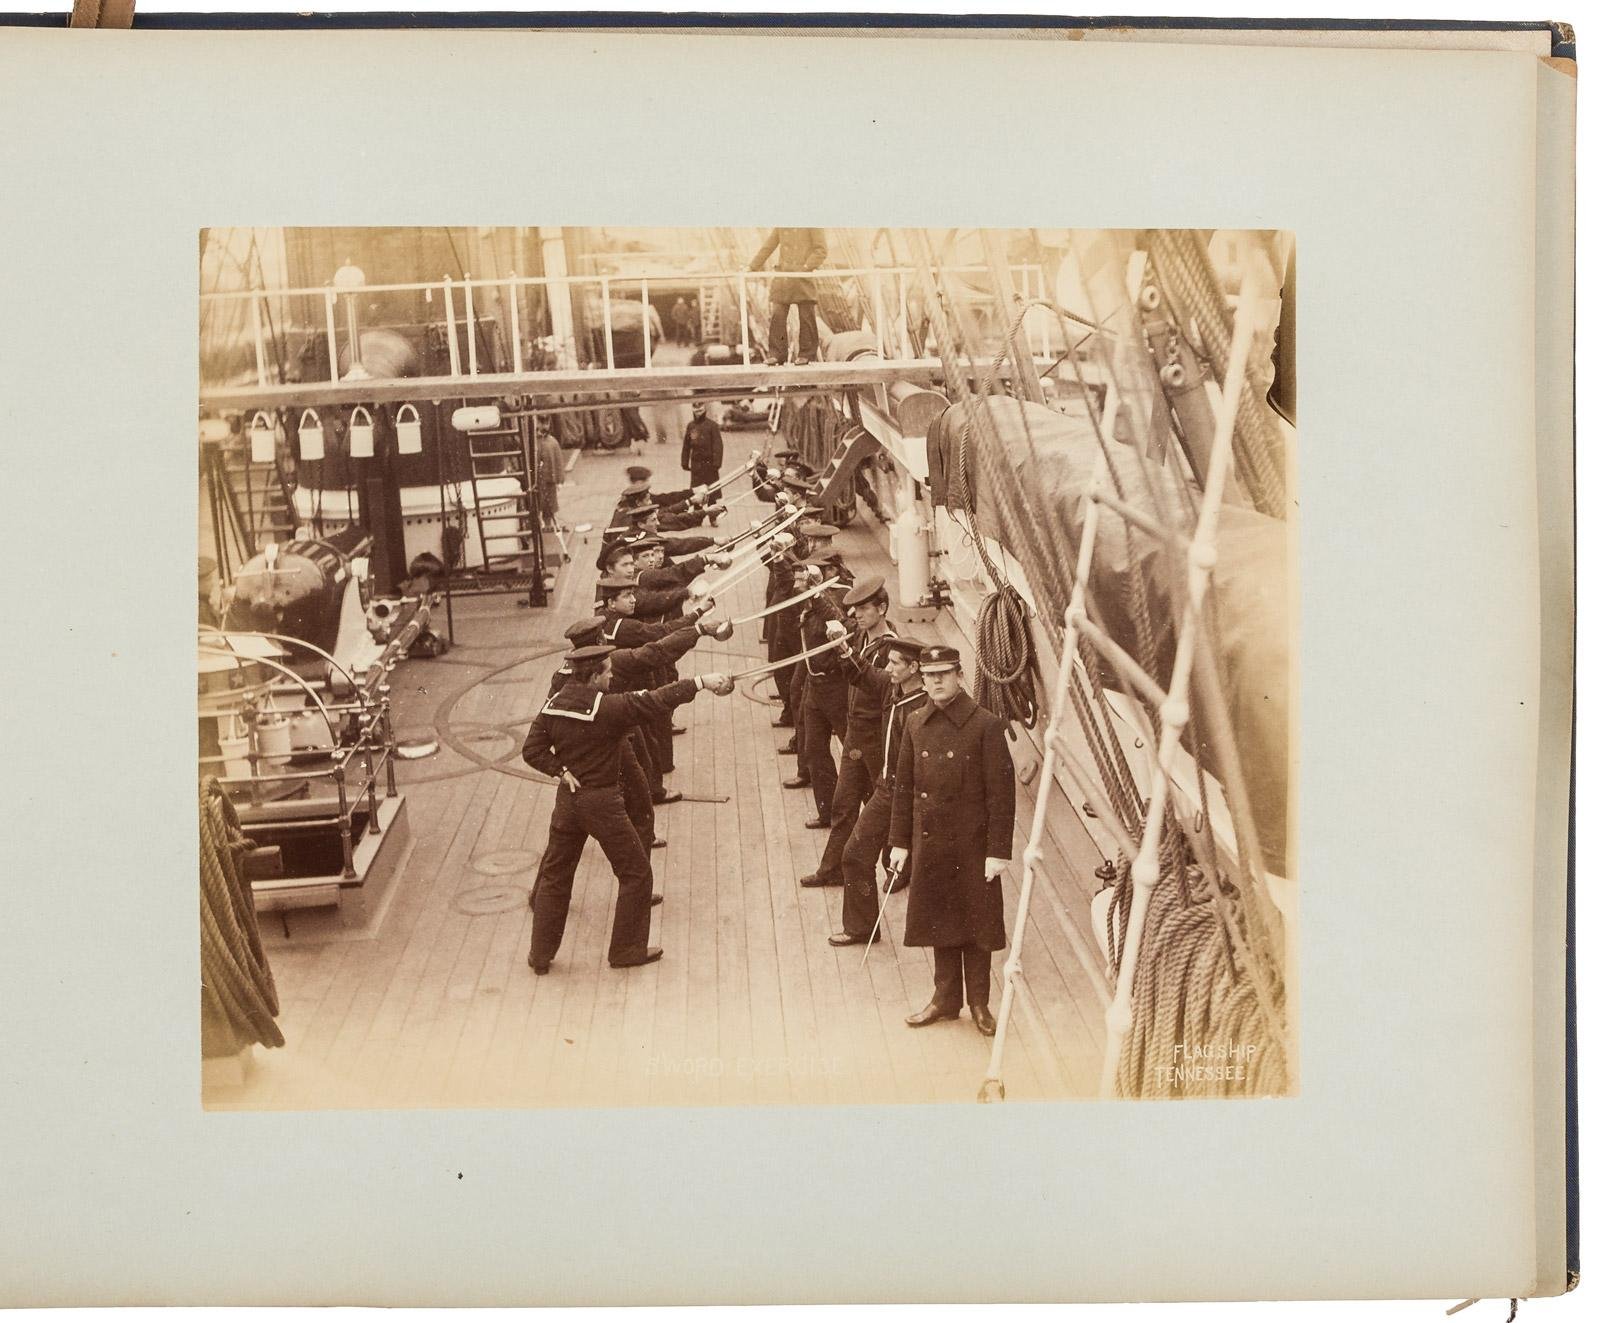
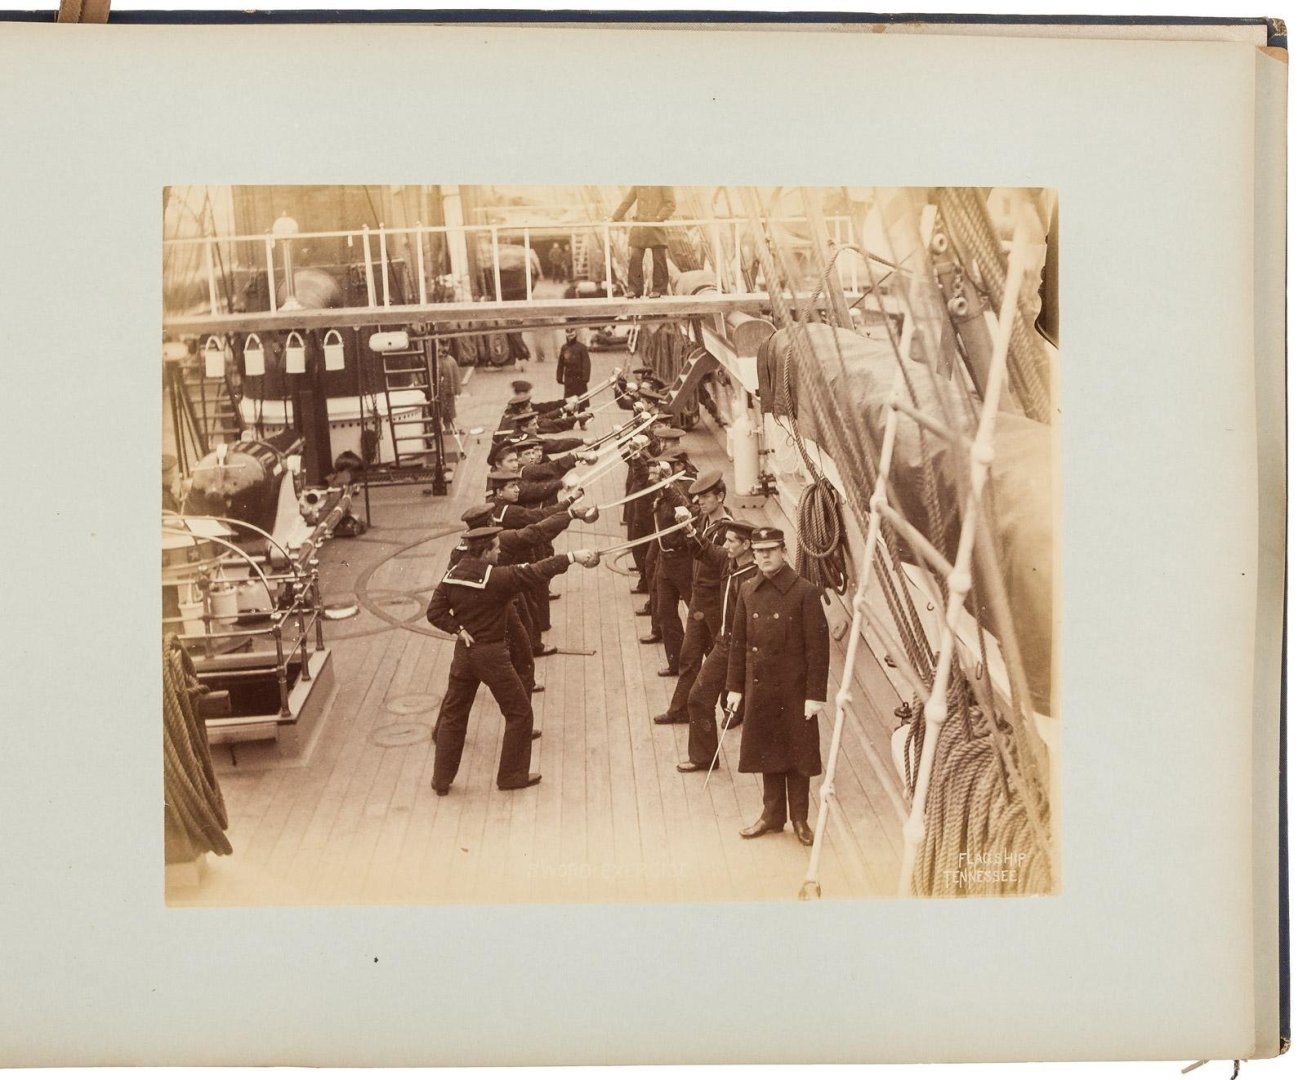
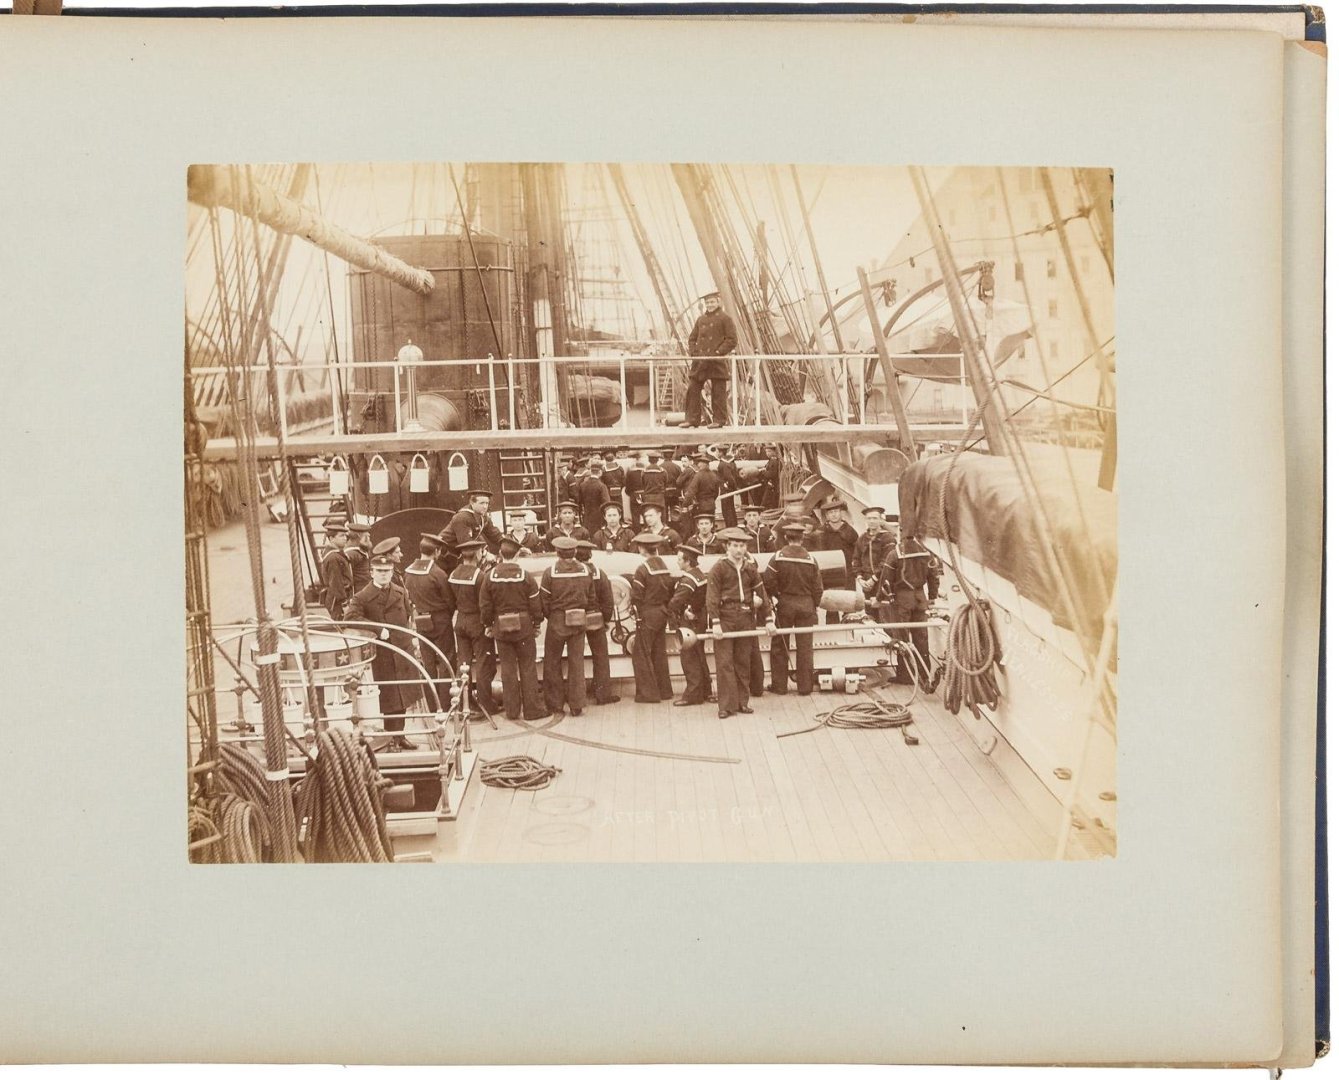
Below images are of the USS Tennessee ca 1865 thru 1880. The first image was taken ca 1865 when still the USS Madawaska before refit and name change to USS Tennessee in 1869. Gun work starts on page 4.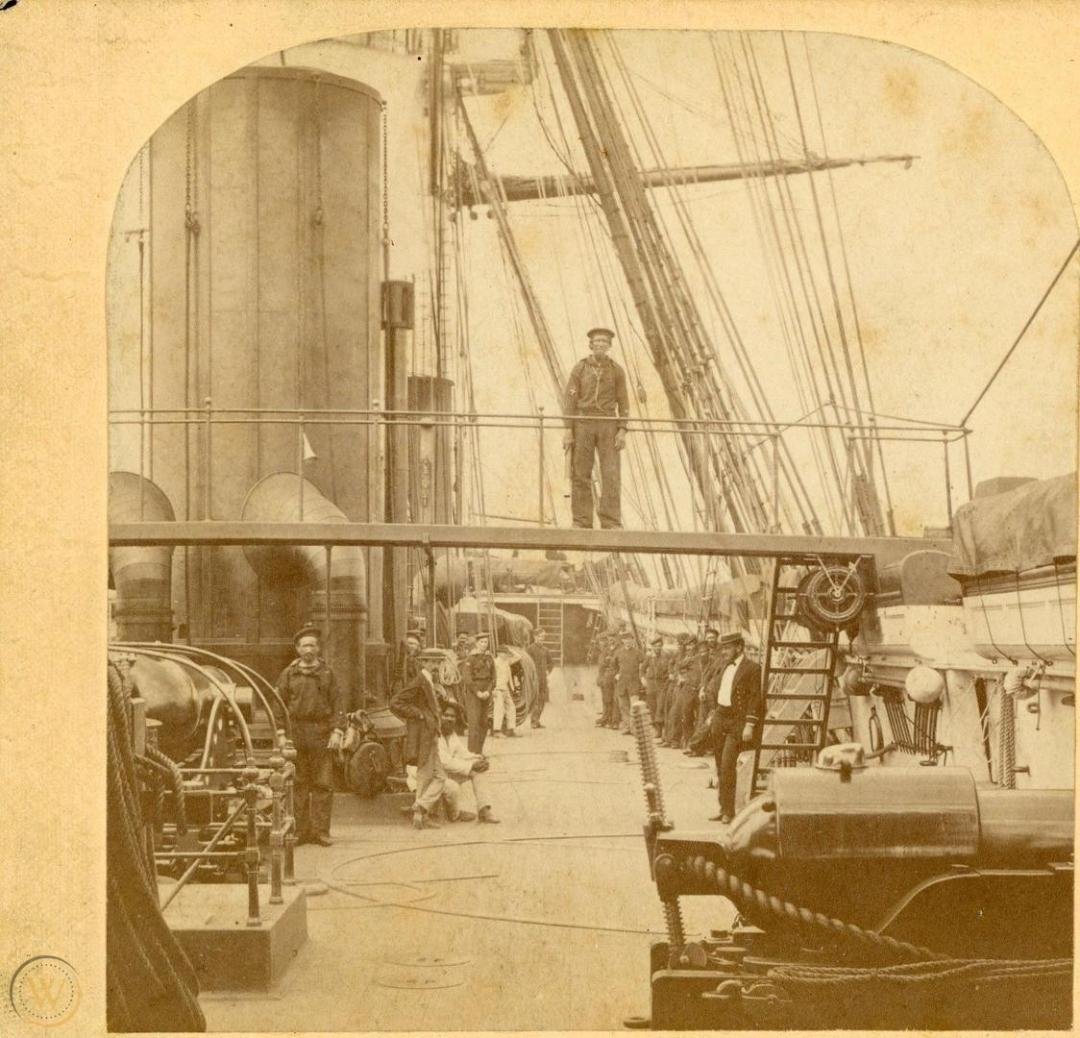

-
Siggi, you're going to cover all that beautiful work with decking?
-
Thank you, mcb. I'm happiest when modeling, I need a project that calls to me throughout the day and these quirky rigs are fascinating and tickle my imagination. The one in post #29 is a horizontal boiler, the one I'm trying to model I believe to be a vertical boiler and is a smaller boat.
- 457 replies
-
- 3
-
-
- sternwheeler
- Hard Coal Navy
- (and 1 more)
-
And you can screw on a nut before cutting the rod allowing the nut to chase the threads once the cut is made.
- 139 replies
-
- 4
-
-
- ancre
- Bateau de Lanveoc
- (and 2 more)
-
That's the God's honest truth. You're making wonderful progress, John.
-
This is a very cool vid of starting up a 1928 steam tug, well worth the watch. New information regarding the Hard Coal Navy and push boats from the 1920's to 1930's is getting harder to find. I was hoping to come across more nuggets of information because the area between the engine room stern wall and the wheel halves is a mystery. I may have to resort to filling that void by guessing the how of things in that area but I don't like doing that. I've started cutting out mockup pieces of card for laying out (I have to come up with a name) the ugly sternwheeler configuration. So many questions, so few answerers.
- 457 replies
-
- 6
-
-
- sternwheeler
- Hard Coal Navy
- (and 1 more)
-
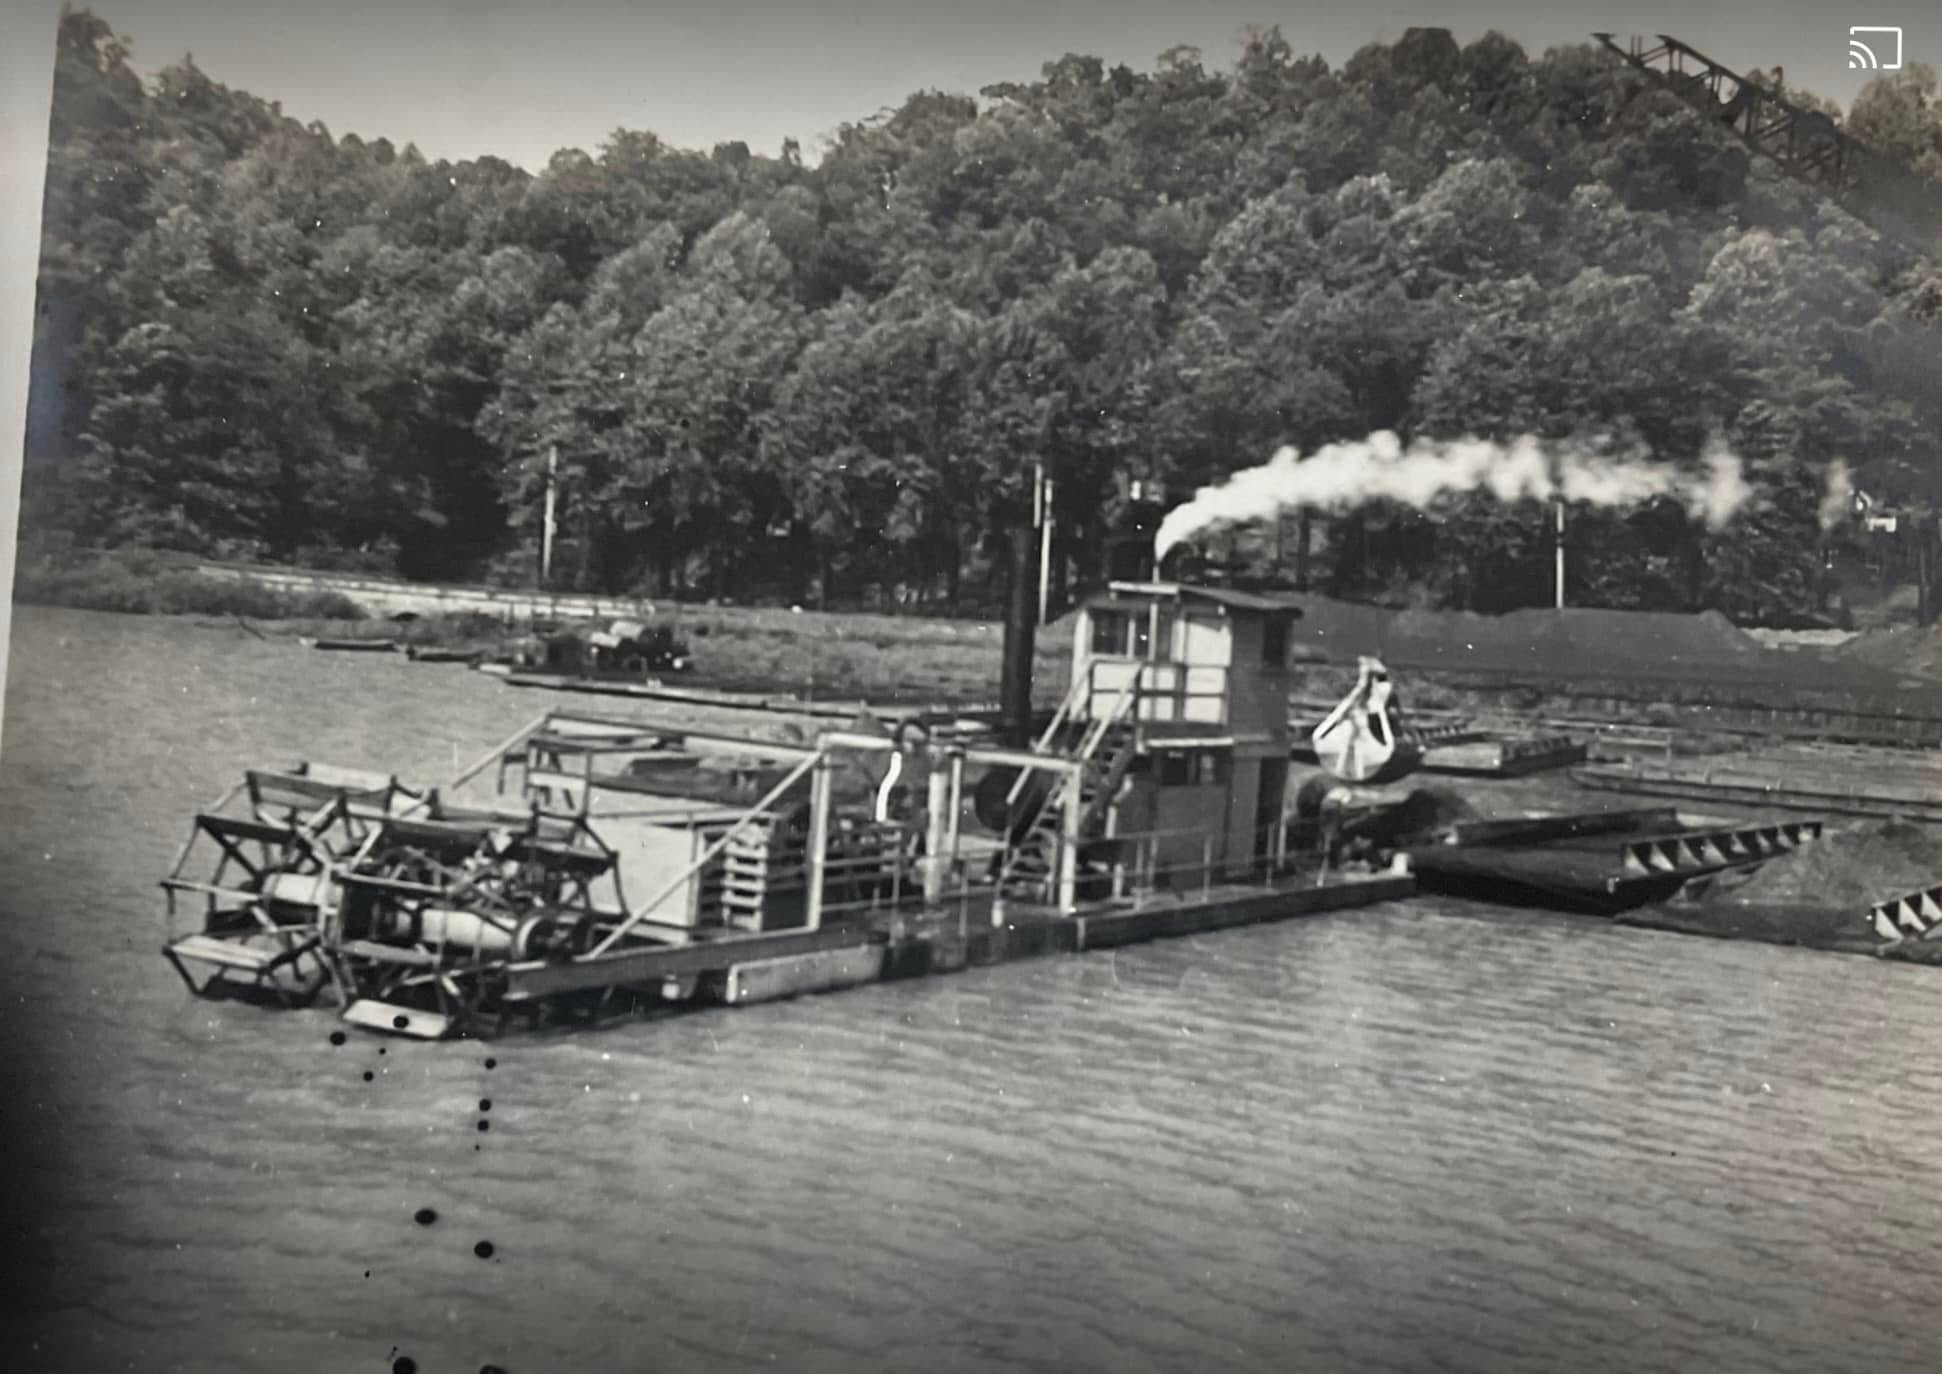
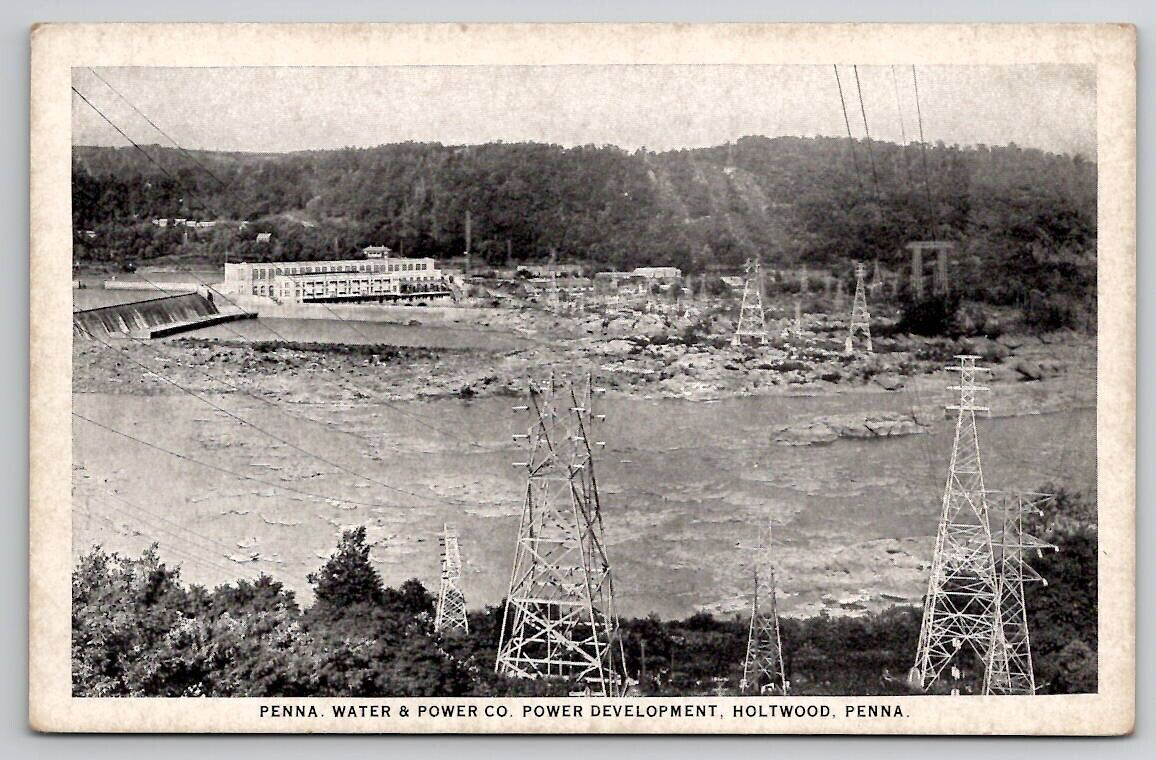
Found this image on FaceBook. Caption reads " This is a tugboat also, this is one of the ones that works the water in Lake Aldred, above Holtwood, a little bit older then No. 7, this photo was taken in 1945"

- 457 replies
-
- 10
-
-
- sternwheeler
- Hard Coal Navy
- (and 1 more)
-
Wes, welcome to MSW. There are several Swift build logs that you can view for helpful ideas. Glad to have you aboard. https://modelshipworld.com/search/?q=Swift&quick=1
-
Congratulations, Glen. The bell and frame are incredibly well done as is the whole model. I applaud your selflessness efforts and thank you for making me proud to be a fellow MSW/NRG member.
- 301 replies
-
- 5
-
-

-
- Constitution
- Bluejacket Shipcrafters
- (and 1 more)
-
Grant, thank you for being willing to follow along.
- 457 replies
-
- 1
-
-
- sternwheeler
- Hard Coal Navy
- (and 1 more)
-
Andreas, welcome to MSW. Glad to have you aboard.
-
Beautiful planking, Vaddoc.
-
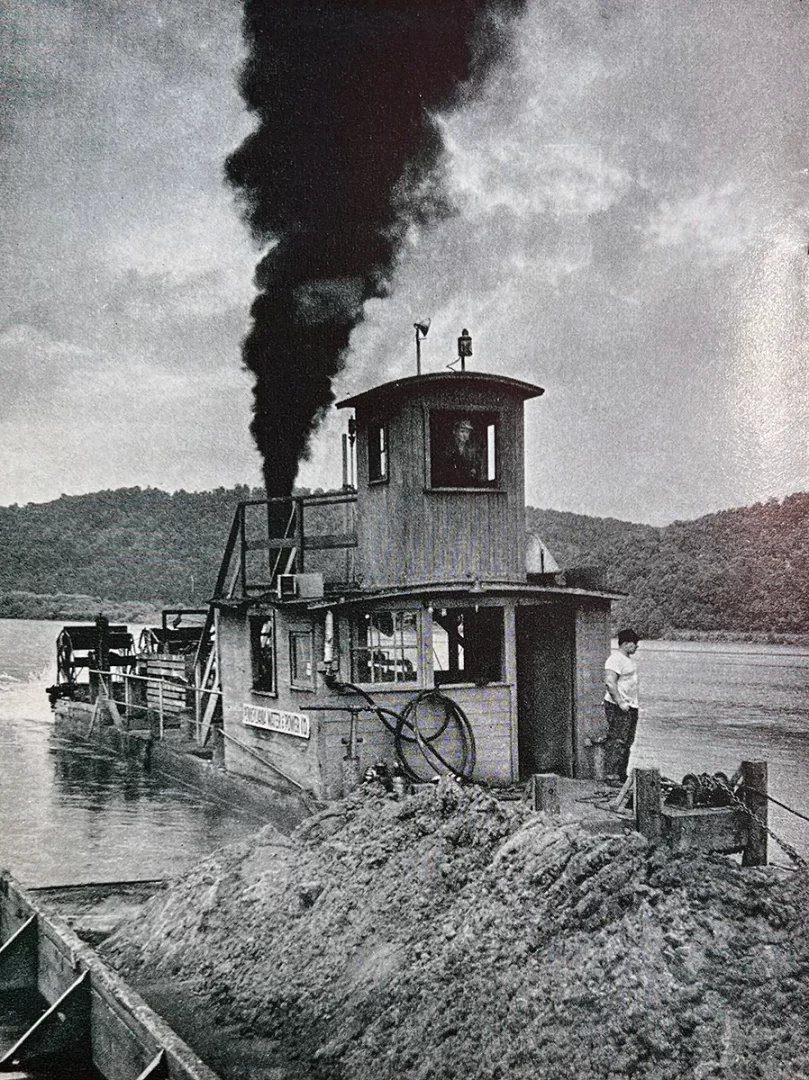
Senior moment. I read the Safe Harbor history to mean Pennsylvania Water & Power CO changed it's name to Safe Harbor Water Power Corp. Duh. No doubt the sternwheeler in question is operating on Lake Aldred. And I dare say there was one and ONLY one push boat that looked like the Lake Aldred vessel. As I said, senior moment. Back to the sign and first word, sounds like? If you can get Pennsylvania squoze in there I'm all over it. Interesting but Penna doesn't seem to work either.
- 457 replies
-
- 3
-
-
- sternwheeler
- Hard Coal Navy
- (and 1 more)