Osmosis
-
Posts
626 -
Joined
-
Last visited
Content Type
Profiles
Forums
Gallery
Events
Everything posted by Osmosis
-
 Welcome aboard Adam, You've got an excellent start there. Very neat and tidy work so far. Now that the holidays are over and I finally have my work room back perhaps I can get back to it. Best regards
- 139 replies
-
- 1
-

-
- san francisco
- artesania latina
- (and 1 more)
-
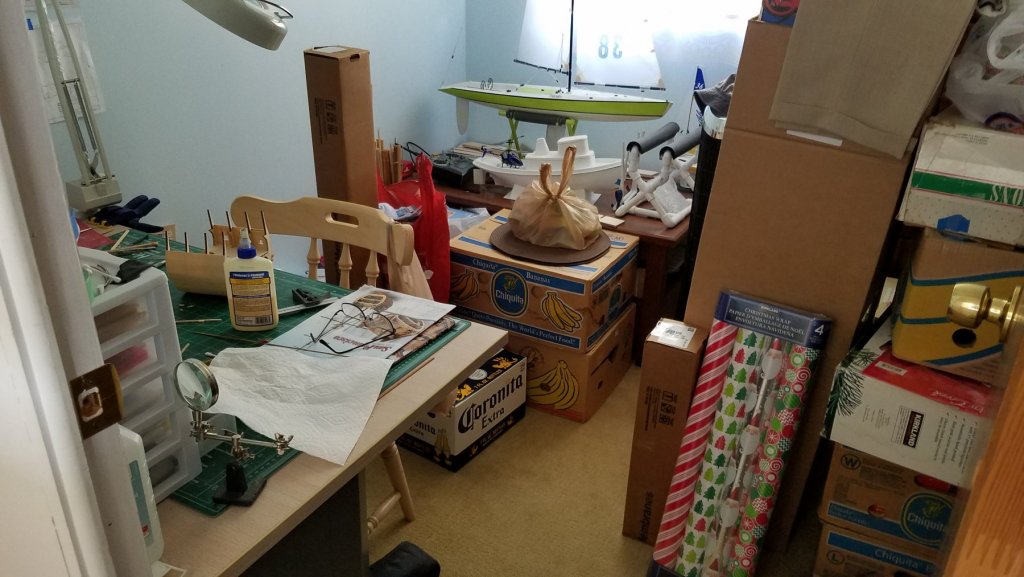
My work room is small enough normally but around Christmas it gets turned into a store room for all of the decoration boxes and also for hiding all of our grand daughters gifts. Here it is before the gifts were even in there. So during the time of year I have the most time off I get to spend almost no time hobbying. The Corona is for my Son in law not my Grand Daughter.
-
I would still send them the above pic just out of curiosity. It looks like Thunder was right and the laser is programmed not to run off past the margins of the layout but to cut parallel to them until it intersects the next curve. That would be my guess.
-
Can someone explain why the two anchors on the port side? I spent 12 years in the modern navy and never ran across this configuration that I can remember. Of course being pretty old now and pretty drunk then probably doesn't help much either. Thanks
-
E-mail John at Model Expo that picture and he will have another one out to you ASAP. At least that has been my experience in dealing with them.
-
Truly masterful Bob. Do you ever sleep? If you do I am sure you dream about this stuff. Take some time off and enjoy the Holidays. Best Regards
- 359 replies
-
- 3
-
-
- prince de neufchatel
- model shipways
- (and 1 more)
-
With all of the Christmas rush I have not had even one minute to work on this project. But......... after a month of absolutely no replies, out of the blue today I got an e-mail from AL stating that my replacement carriages have been sent. Even though I told them that I ruined one of the supplied ones and wanted to buy a replacement they sent them free of charge. Somewhat slow but good customer service I would say. Best Regards and Happy Holidays
- 139 replies
-
- 1
-
-
- san francisco
- artesania latina
- (and 1 more)
-
And here it is installed with 2 coats of poly. I have decided to go with 6 cannon instead of 8. There are a couple of reasons for this. 1. I never liked the spacing of the center 2 guns. 2. I assembled one of the carriages with the kit supplied barrel and trucks and it would almost impossible undo that. 3. I have e-mailed AL about buying a replacement sheet of carriages a couple of times and have received no response and I really want to get past this stage of the build. So there will be just 1 cannon in the geometric center on the main deck and 2 equally spaced on the gun deck. At least that is my plan for today. Best Regards
- 139 replies
-
- 5
-
-
- san francisco
- artesania latina
- (and 1 more)
-
Thanks but I prefer cleaning up saw dust over plastic curly wurlies. But I am still amazed to see the level of detail in these builds. And as for being a "target" when I said "warm" welcome I meant warm it was about 80 degrees in Florida today I wonder what the temp was in Gelderland.
-
Welcome aboard Sir.
-
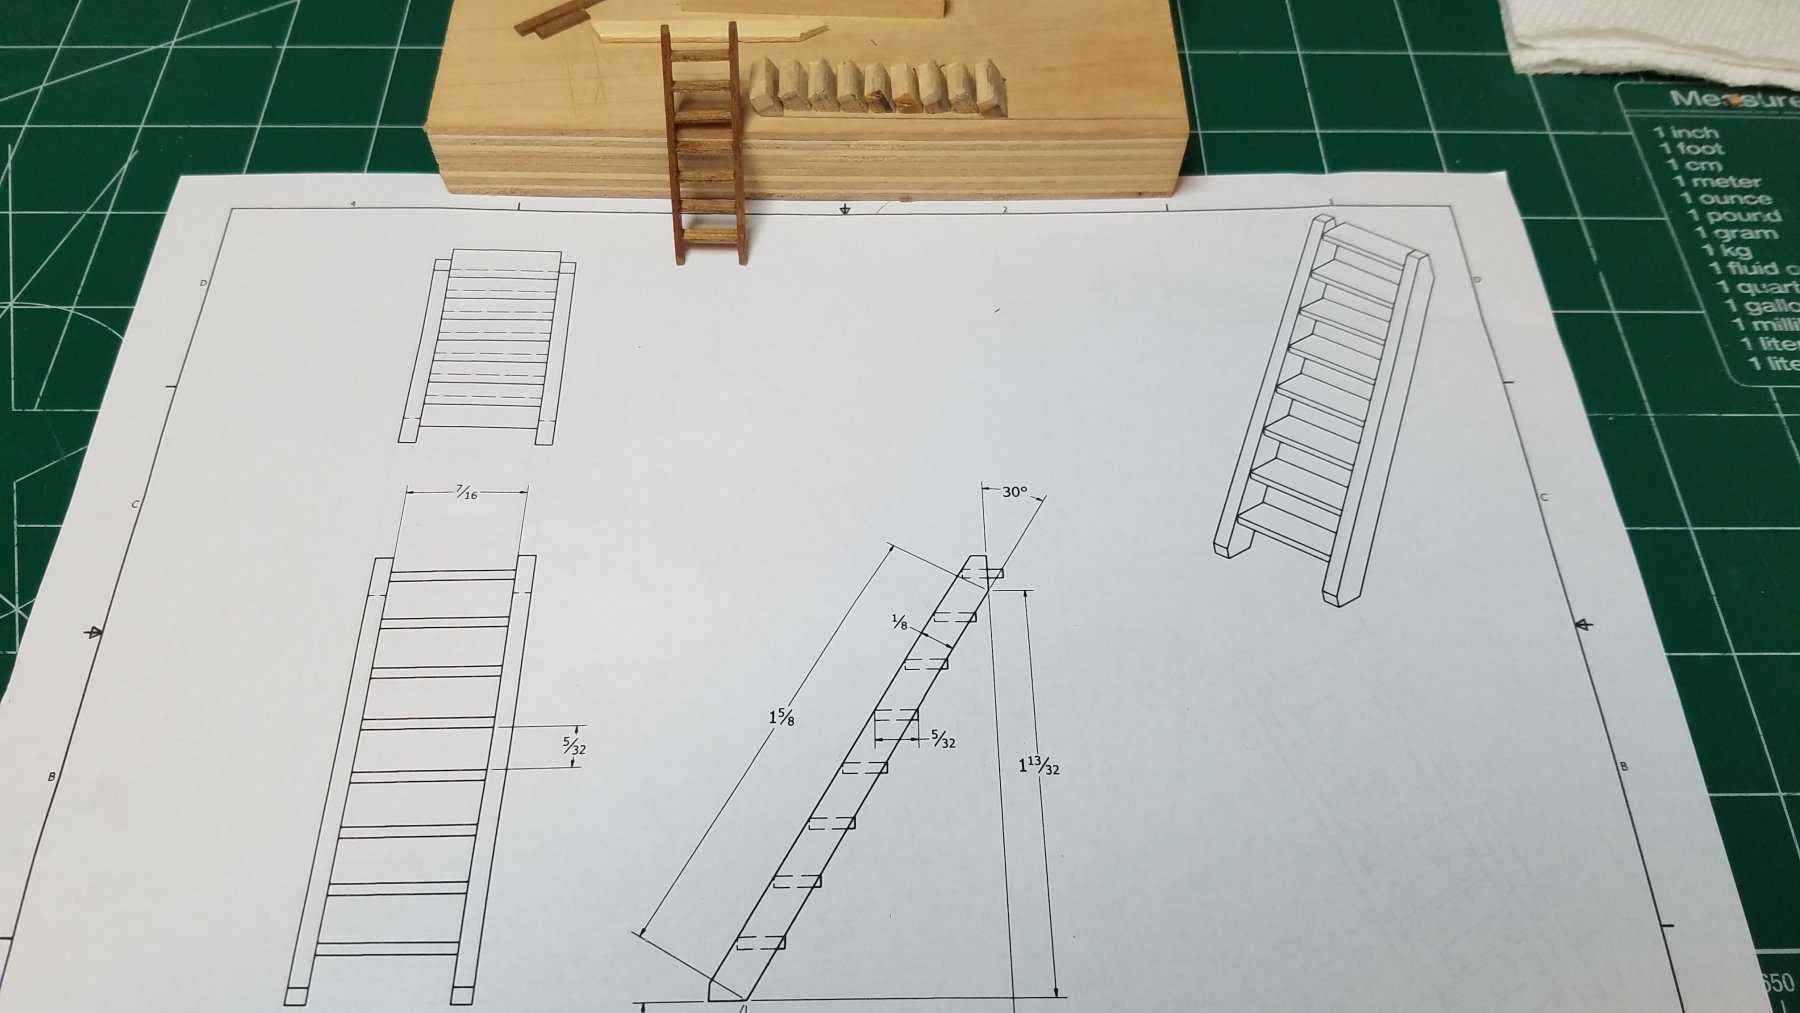
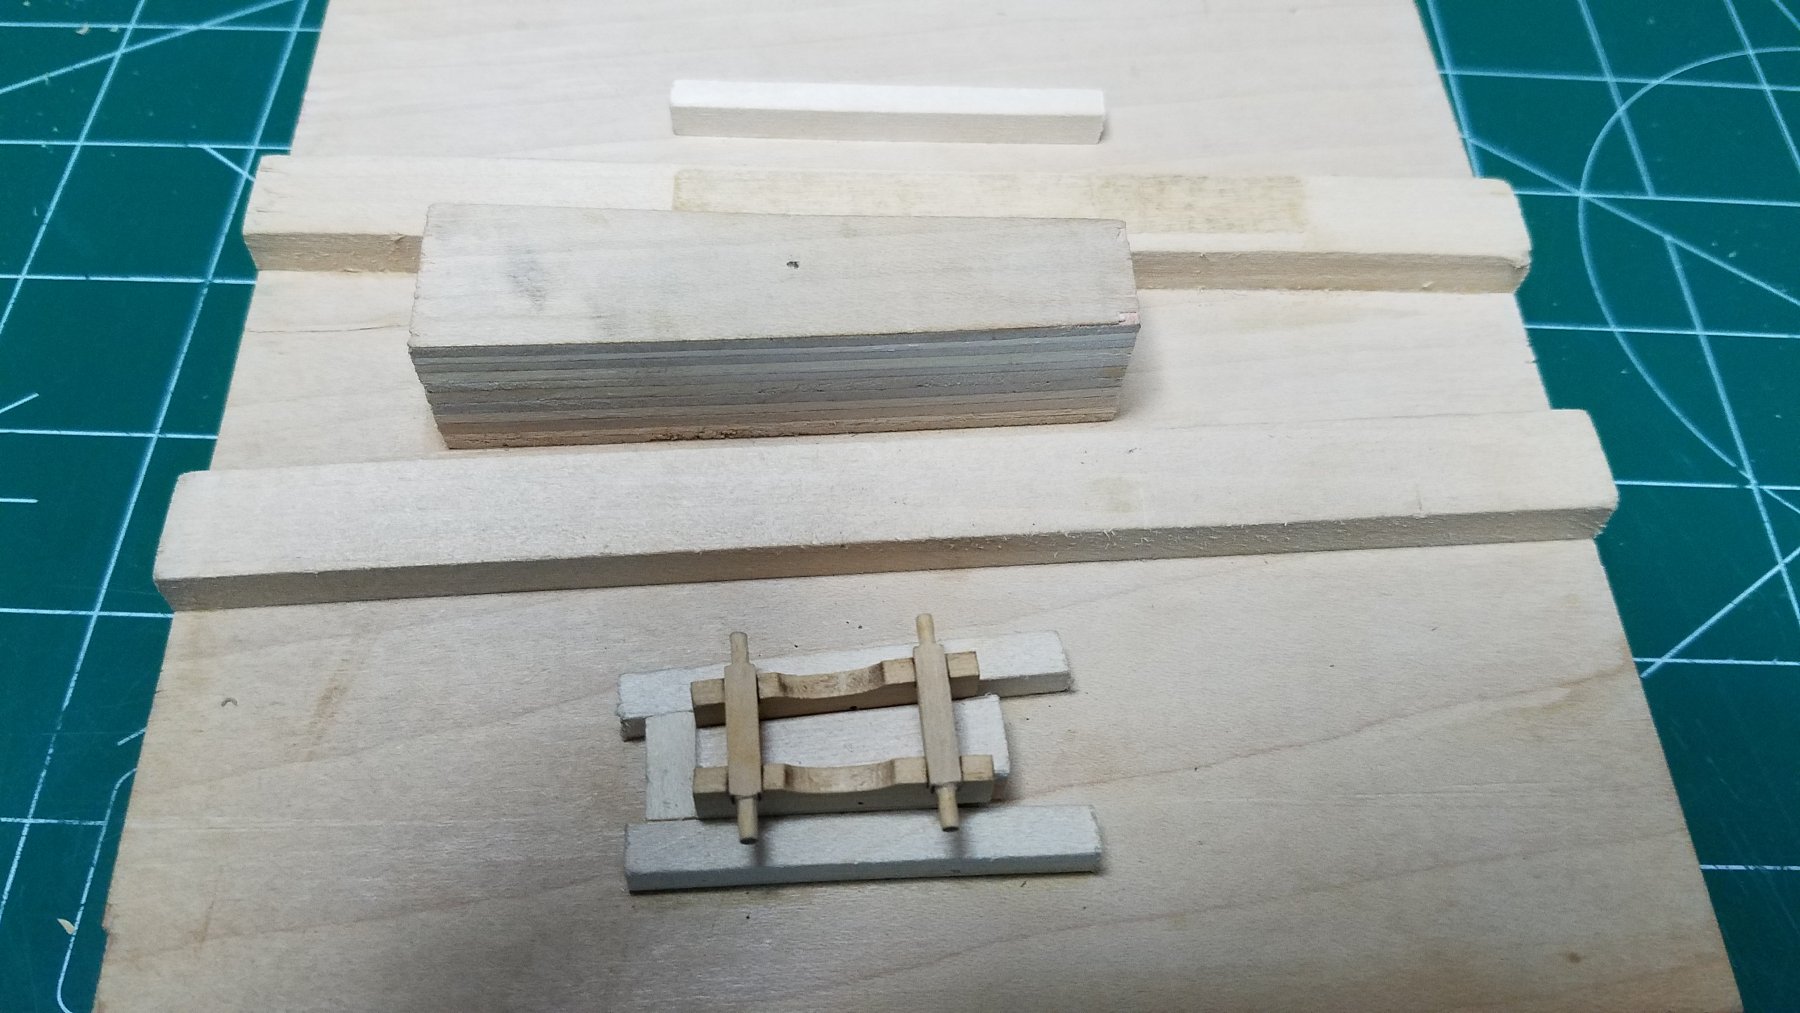
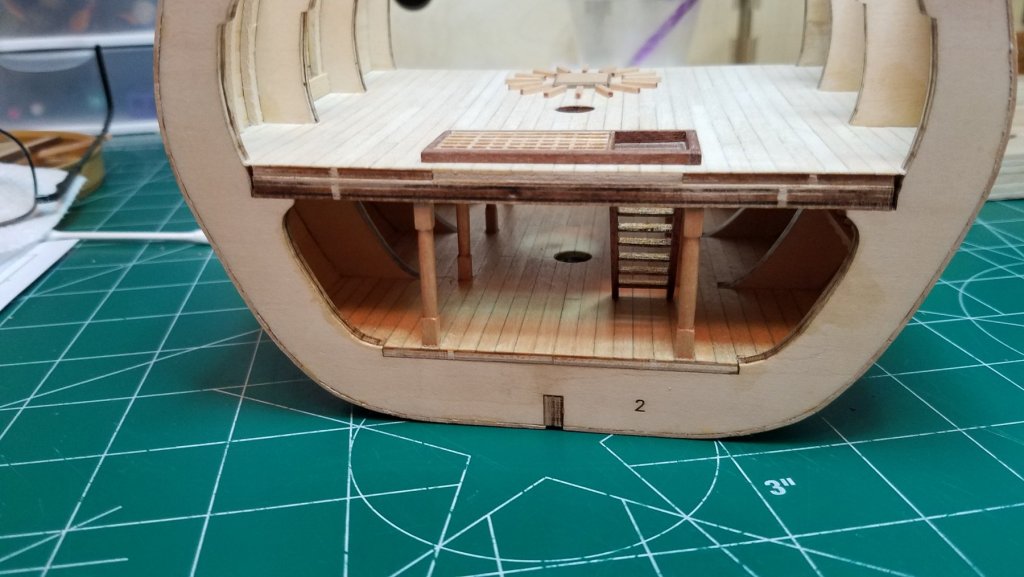
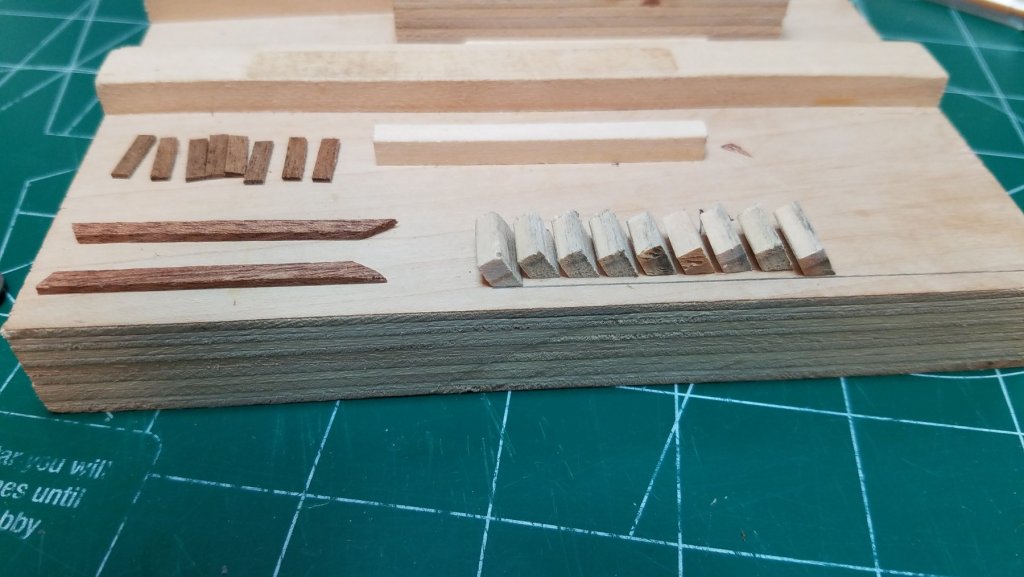
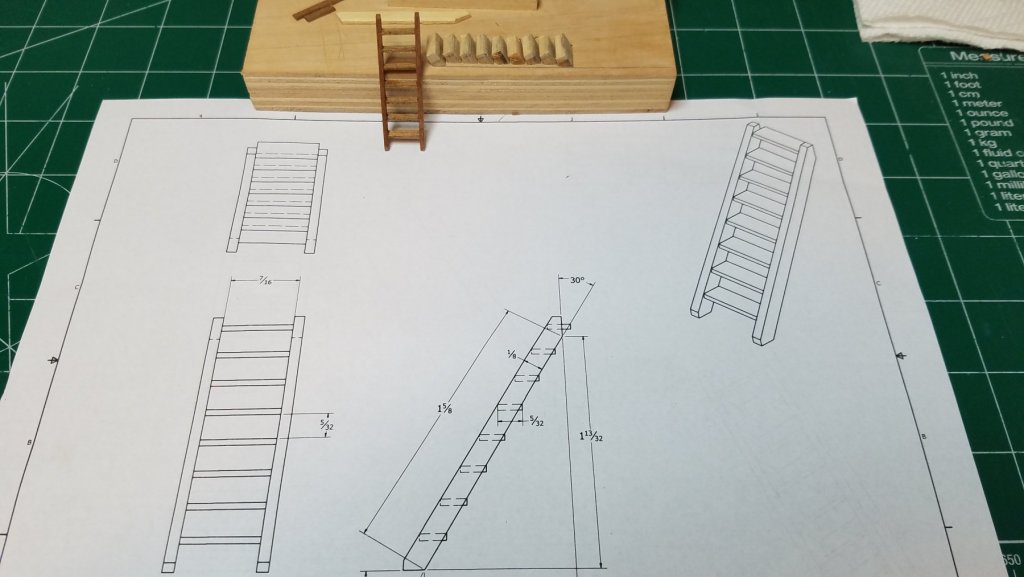
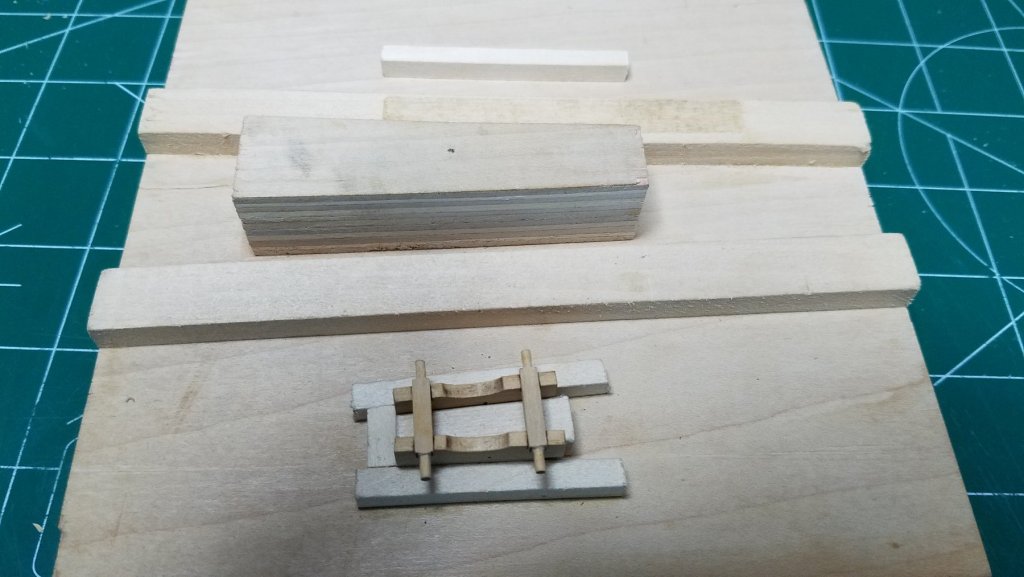
Thanks Warnerade for the kind comments. Like I said before I really don't think this kit has any basis in reality. As I have been going along I have been trying to research Spanish Galleon construction methods and drawings. I have not had much luck yet. I will keep trying as I have an idea for my first scratch build that I would like to try. From what little I have found it seems that this kit took some liberties with the layout of the deck equipment. I got started today with the lower ladder. I know I seem to be jumping all over the place but that is the way my mind works and this kind of build allows for that to a degree. I guess that is why I like them. As you can see from the pics below after getting the measurements I needed I spent my lunch hour on Friday modeling the ladders in Autodesk Inventor. Once I established the pitch angle I cut the parts for the jig. And glued them to what has become my jig platform. I then cut out the parts for the lower ladder. I did not document the actual assembly process as I was kind of involved in getting it right since this is my first one. It was pretty straight forward though put the rungs in the slots and glue on the rails. I did have a few minor hiccups but nothing worth noting here. The top rung you see in the drawing should have been deleted and is not on the final product All in all it went pretty smooth and did not turn out too bad. I did a dry fit and it looks pretty good. A couple coats of poly and then glue it in. Best regards

- 139 replies
-
- 3
-
-
- san francisco
- artesania latina
- (and 1 more)
-
OK, now turn off the cell phone and go diving already.
-
Nice! Mind my asking where that would be?
-
Kingfisher by amateur - FINISHED - 1:1 - CARD
Osmosis replied to amateur's topic in Non-ship/categorised builds
I was wondering what happened to this little guy. Very nice! Glad to see that he is still around. -
Thanks Jim, I think so too. Now that the matter of the cannon is settled I can get back to work on the hull. Best Regards
-
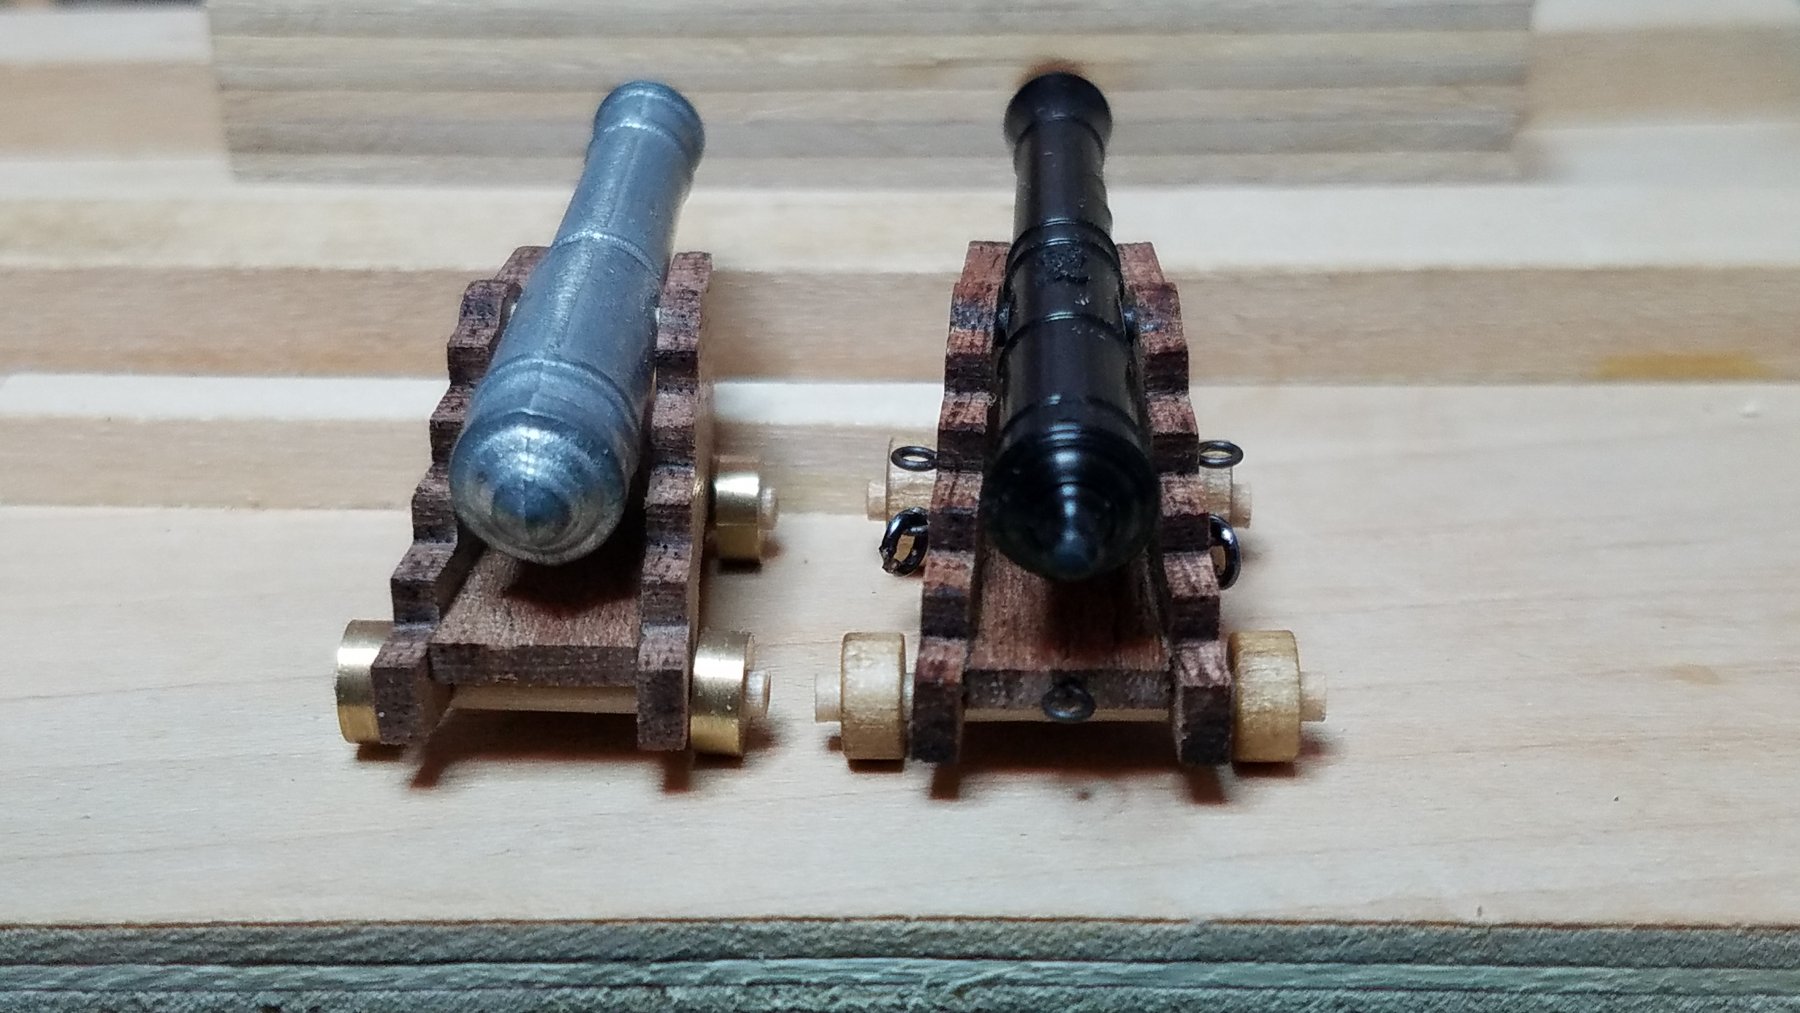
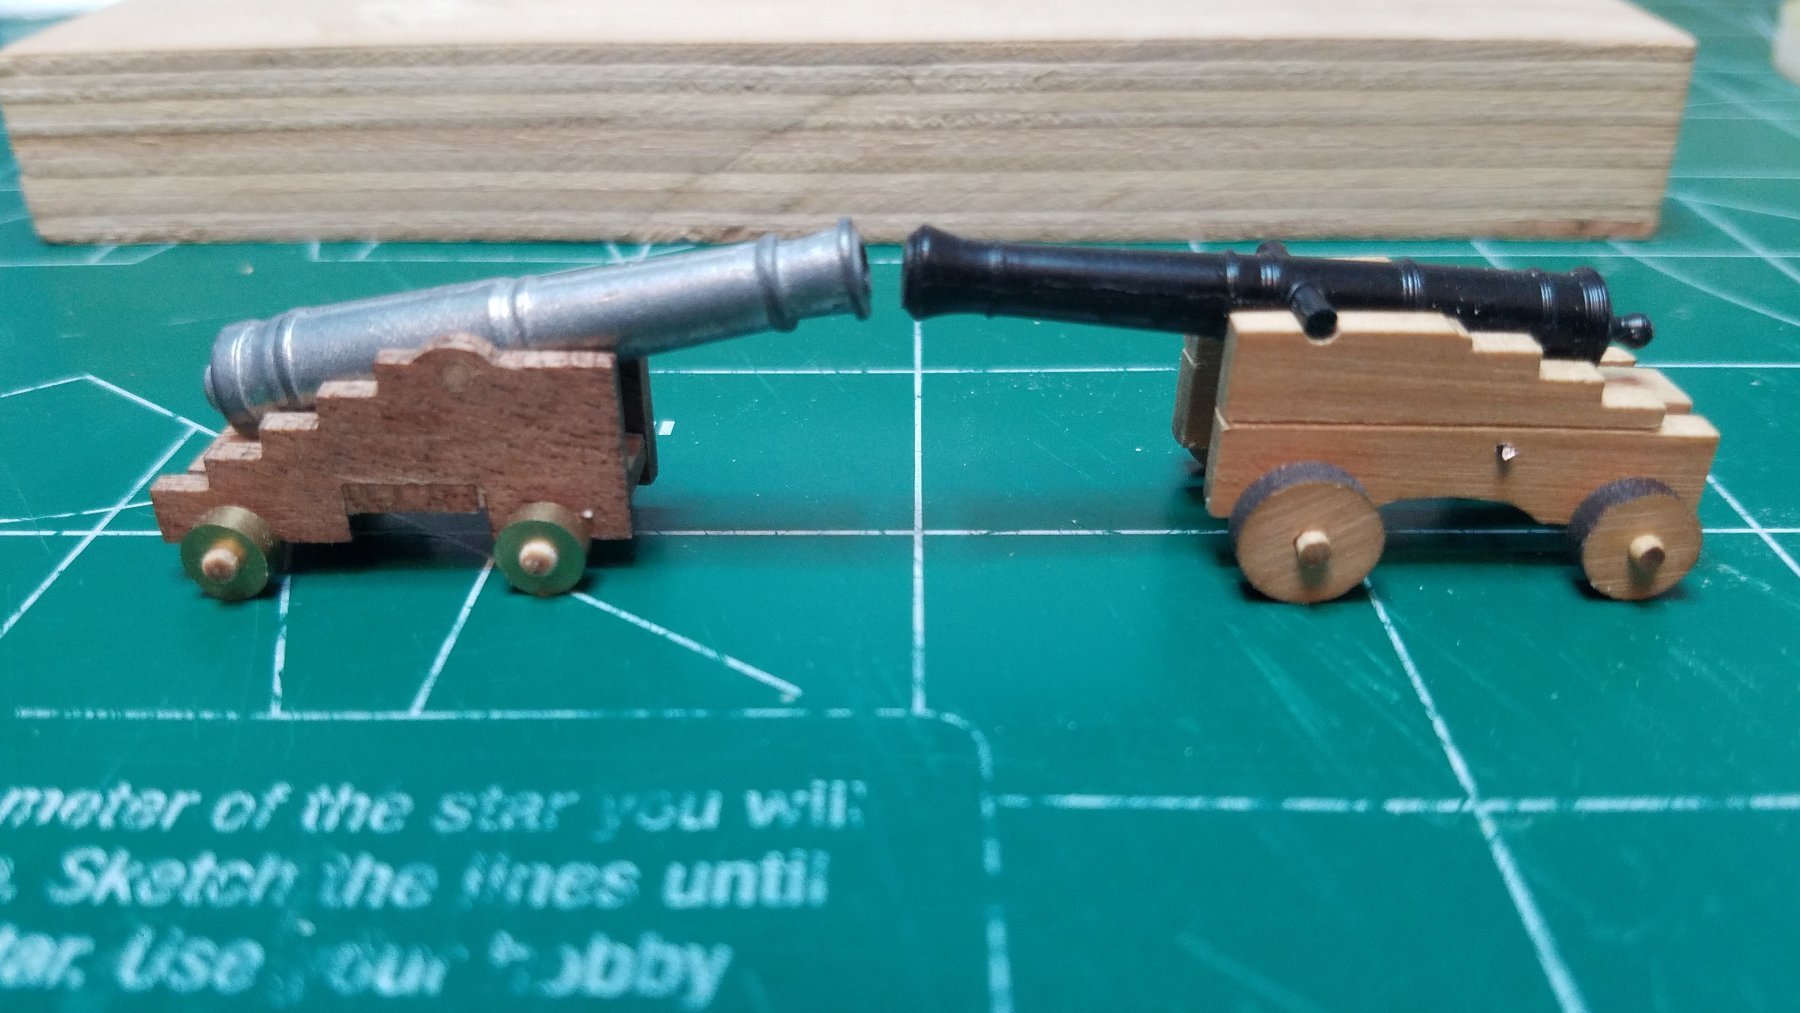
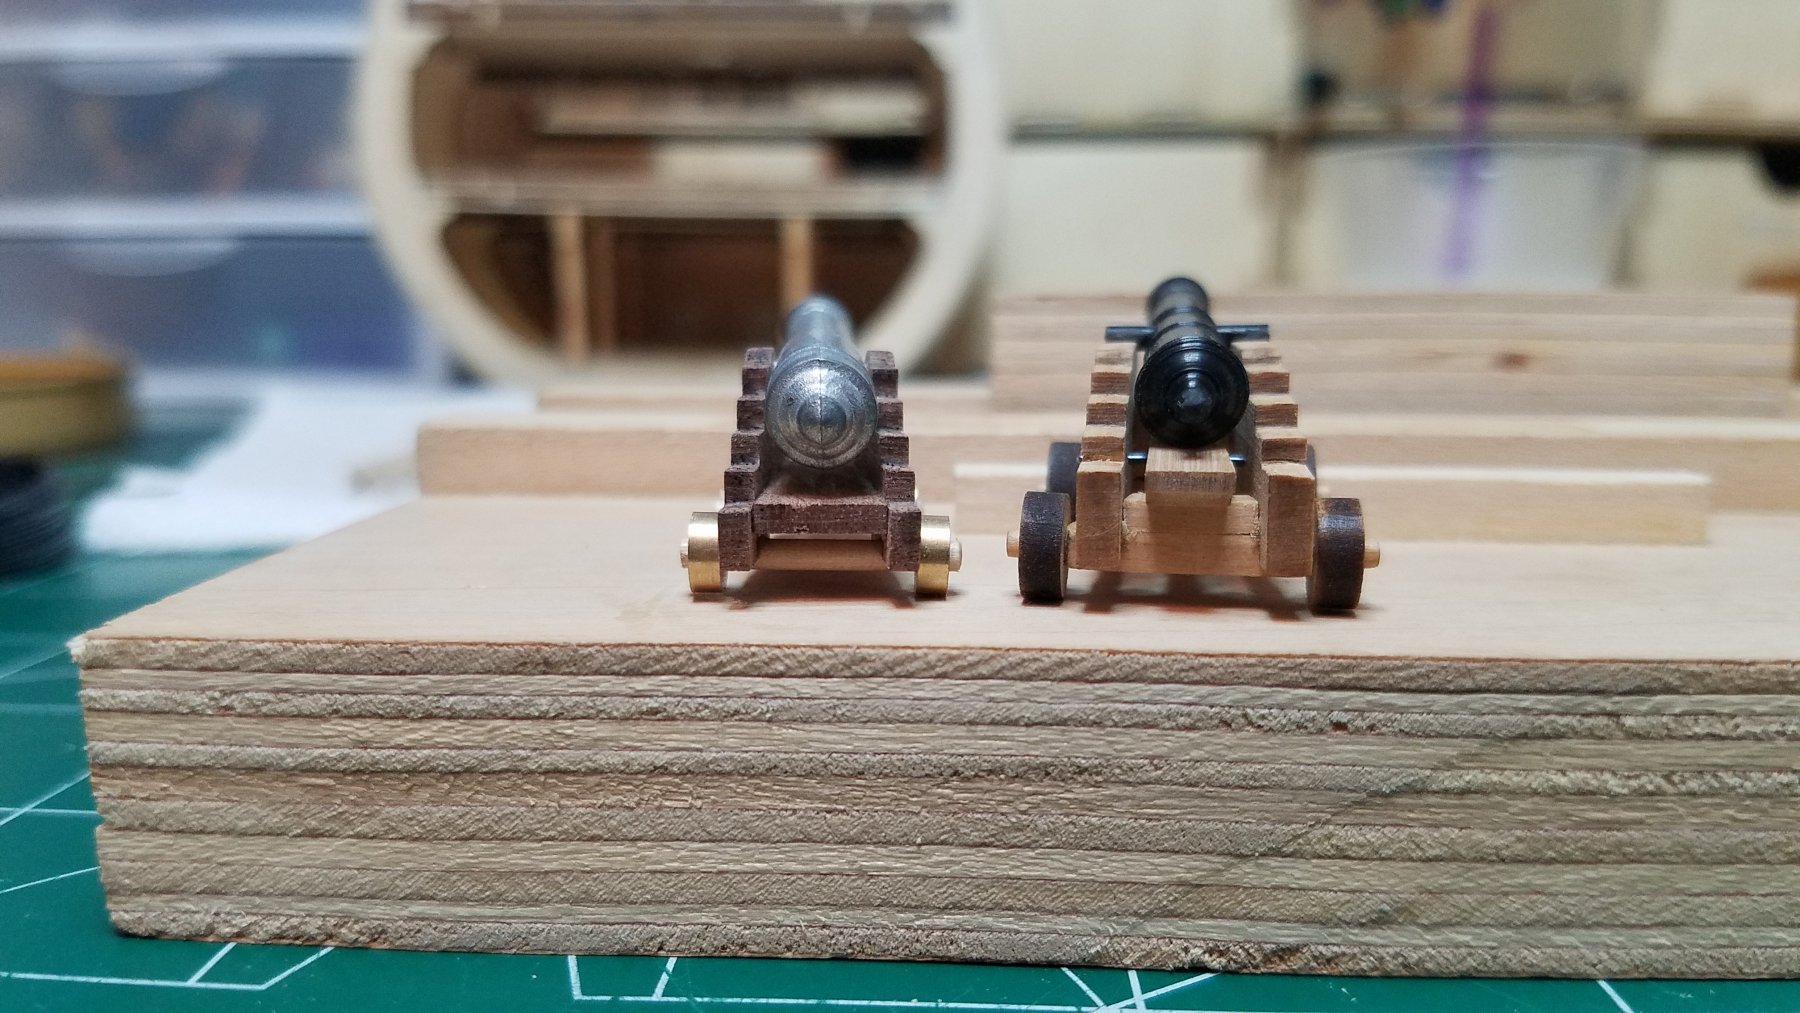
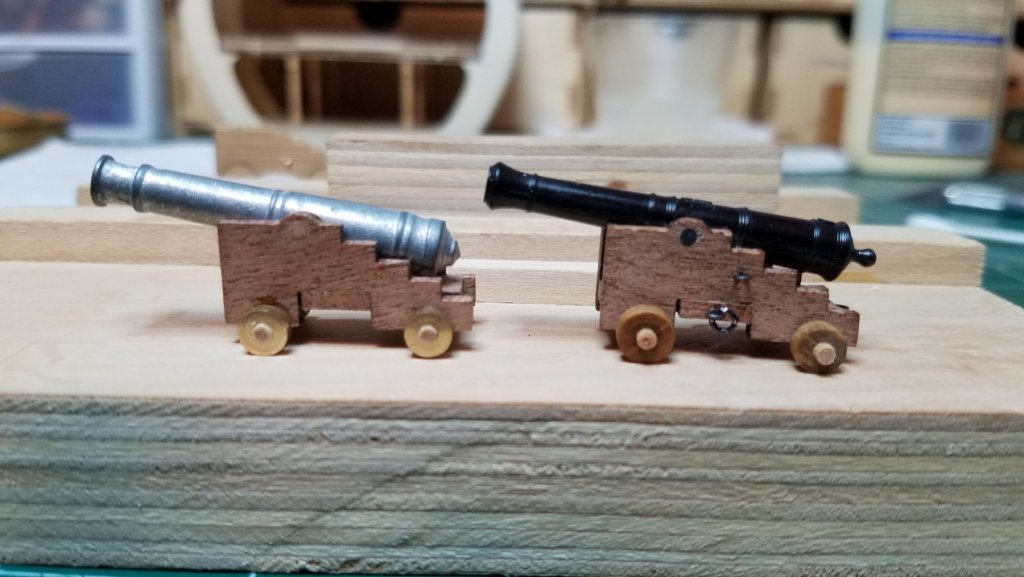
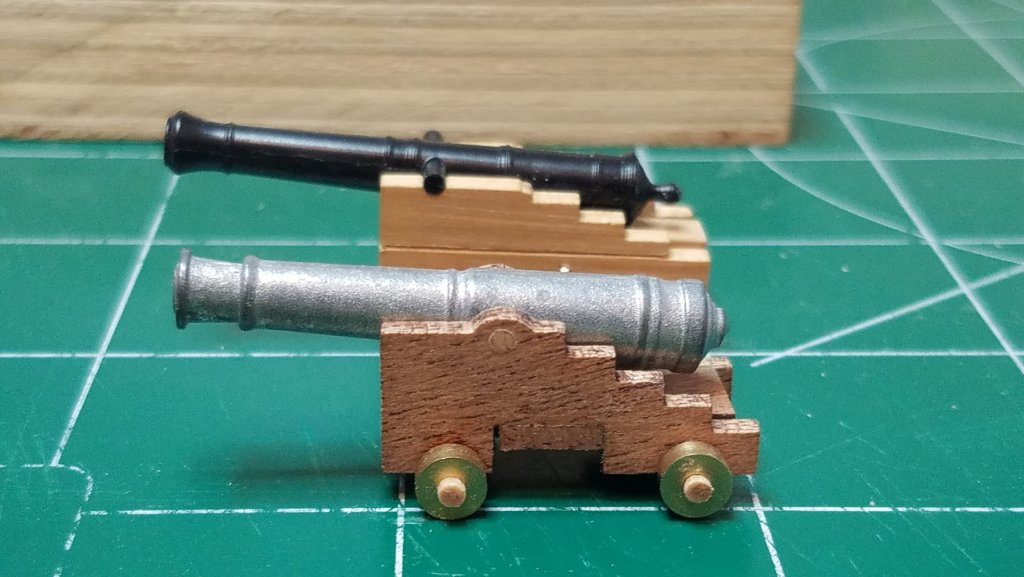
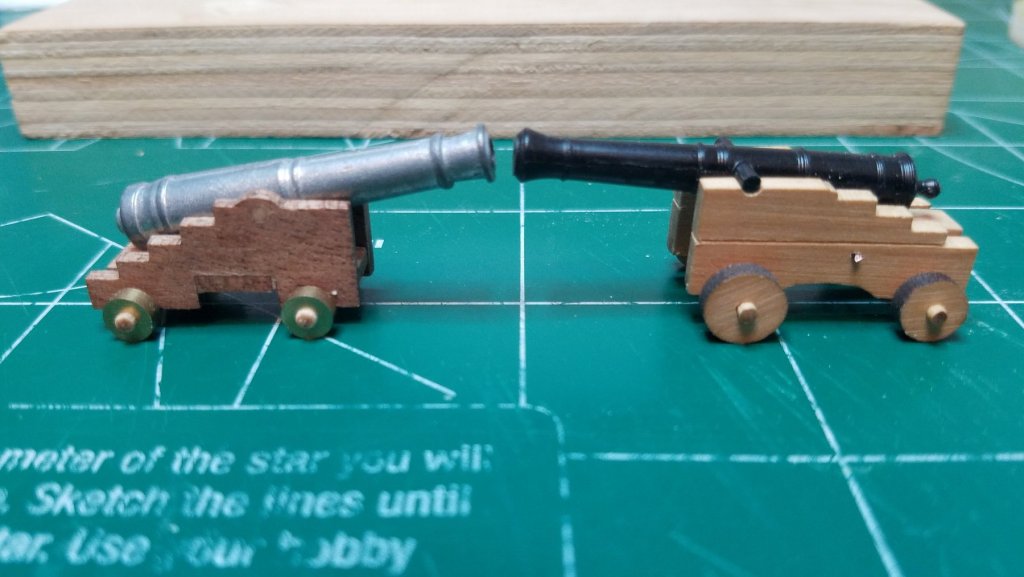
Well by mixing Chuck's Barrels with Model Expo's Trucks and Artisania Latinas Kit Carriages I think I finally have come up with a passable cannon. Add a little hardware and we are good to go. I just got home from work and threw this one together. I will most likely add some more details in the finished product. Definitely a quoin and pins for the axtrees. I also drilled out the bore on the barrel, being cast it was just a dimple on the muzzle. I ran a 1.5mm bit about 1cm deep using a pin vise.

- 139 replies
-
- 1
-
-
- san francisco
- artesania latina
- (and 1 more)
-
Thanks for the reply Jim. I am more worried about the mass of the assembly itself I am afraid it is just slightly to big. Unfortunately the tiny brass trucks on the kit supplied cannon are probably the thing I dislike the most about it. I have ordered some smaller wooden trucks from Model Expo and will most likely run down there today and pick them up. I was thinking of trying the new trucks and one of Chucks barrels on one of the kit carriages to see how that looks. Best Regards
-
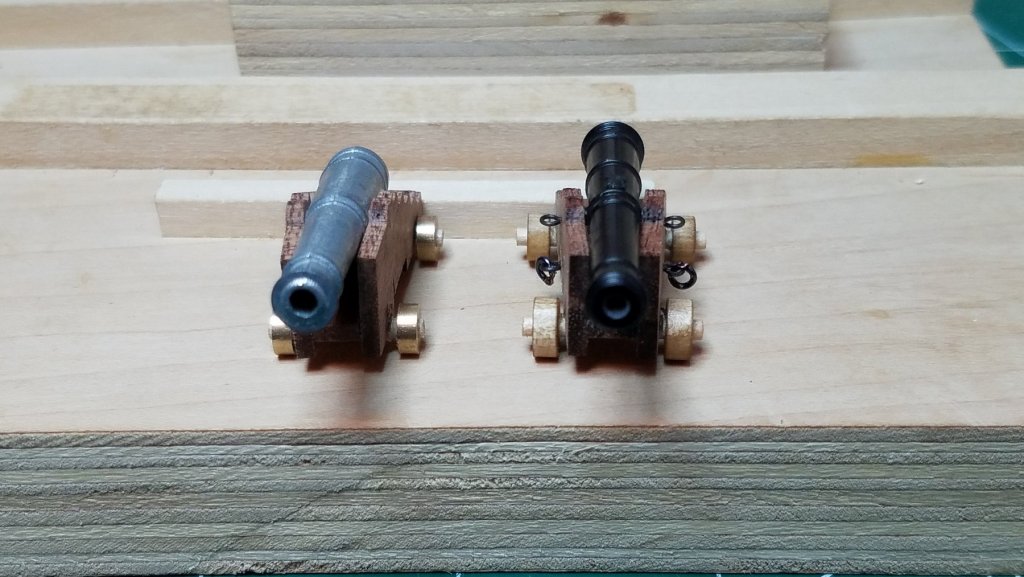
Some minor progress and a new quandary. First a question. How do you remove ALL of the char from such small parts? I know it is only 8 cannon but I need a way to hold these small pieces. I still have the fixture I made for scratch building the 1/24 scale gun carriage used in my battle station build. I just made a smaller version and put it on the same platform. It is great for holding the small parts for the initial alignment and glue up. Now the problem. While no comparison for quality and realism the new cannon are a bit bigger than the kit supplied ones. The trunnion on the Syren barrels is off center so I was able to lower the barrel slightly by turning it over although this hides the emblem and touch hole details. I will have to think on this for a while. I knew they would be larger but I was not expecting it to be that noticeable. Rest Regards,

- 139 replies
-
- 1
-
-
- san francisco
- artesania latina
- (and 1 more)
-
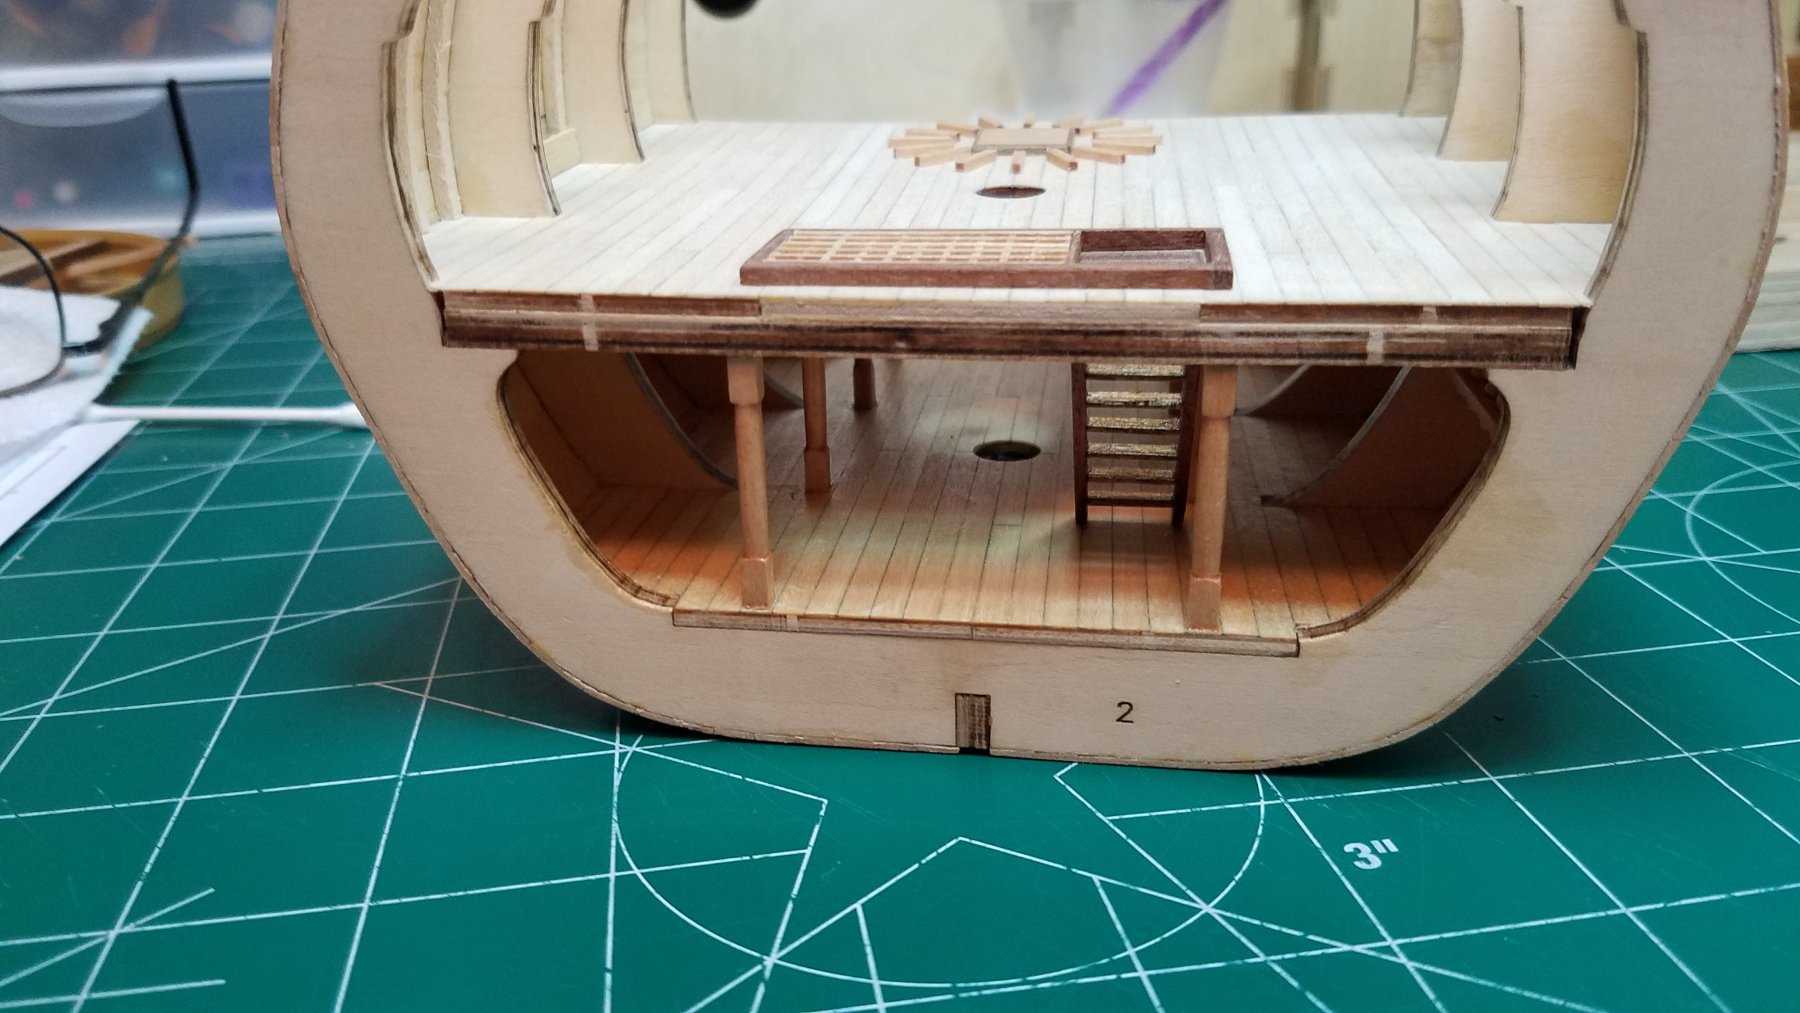
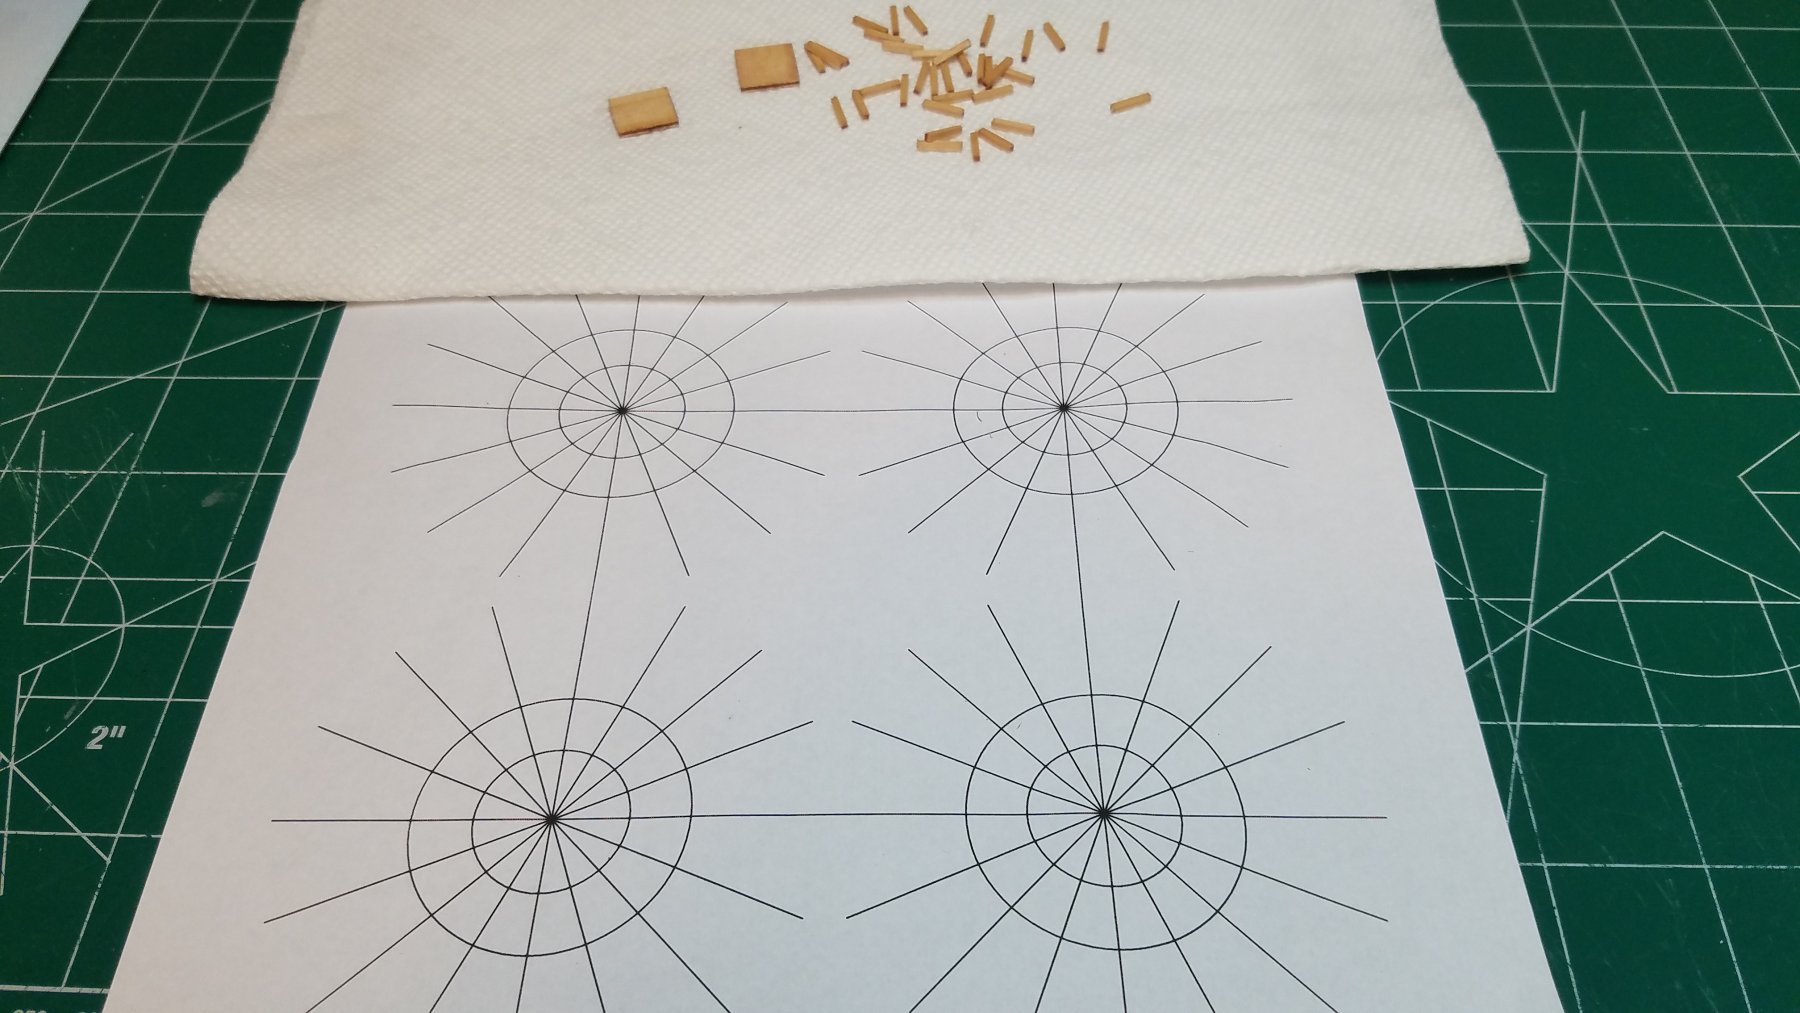
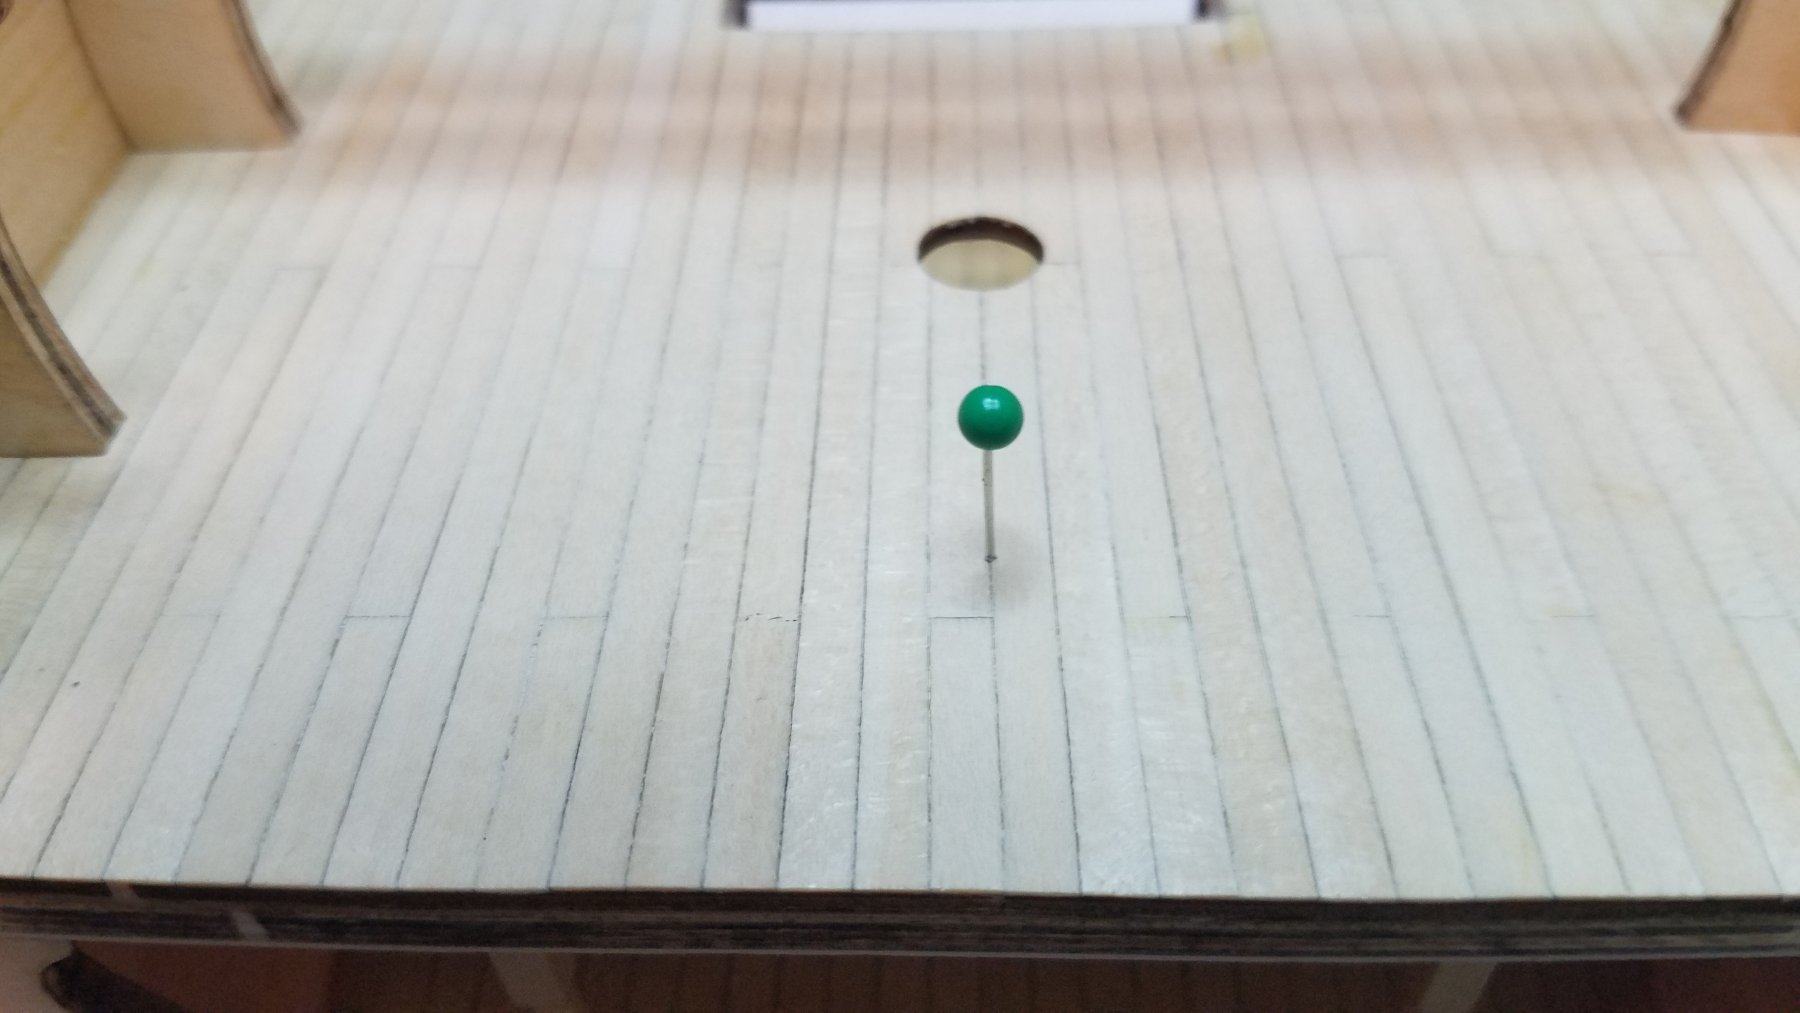
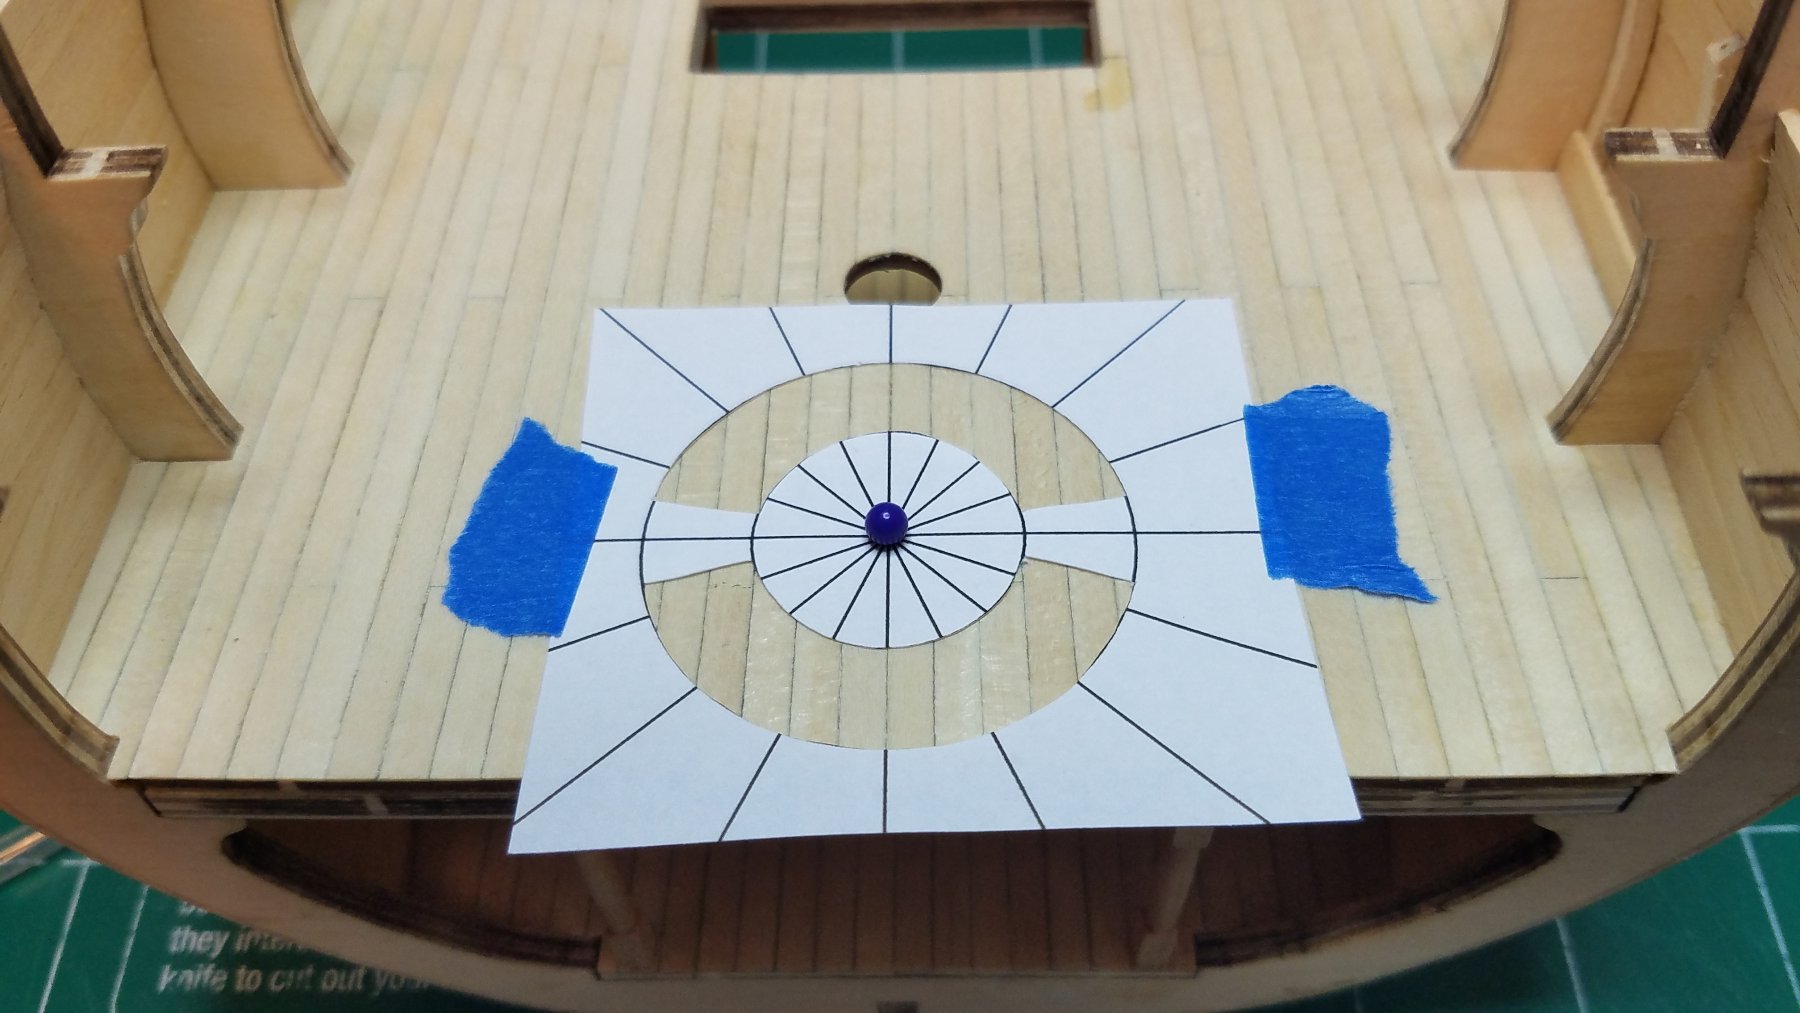
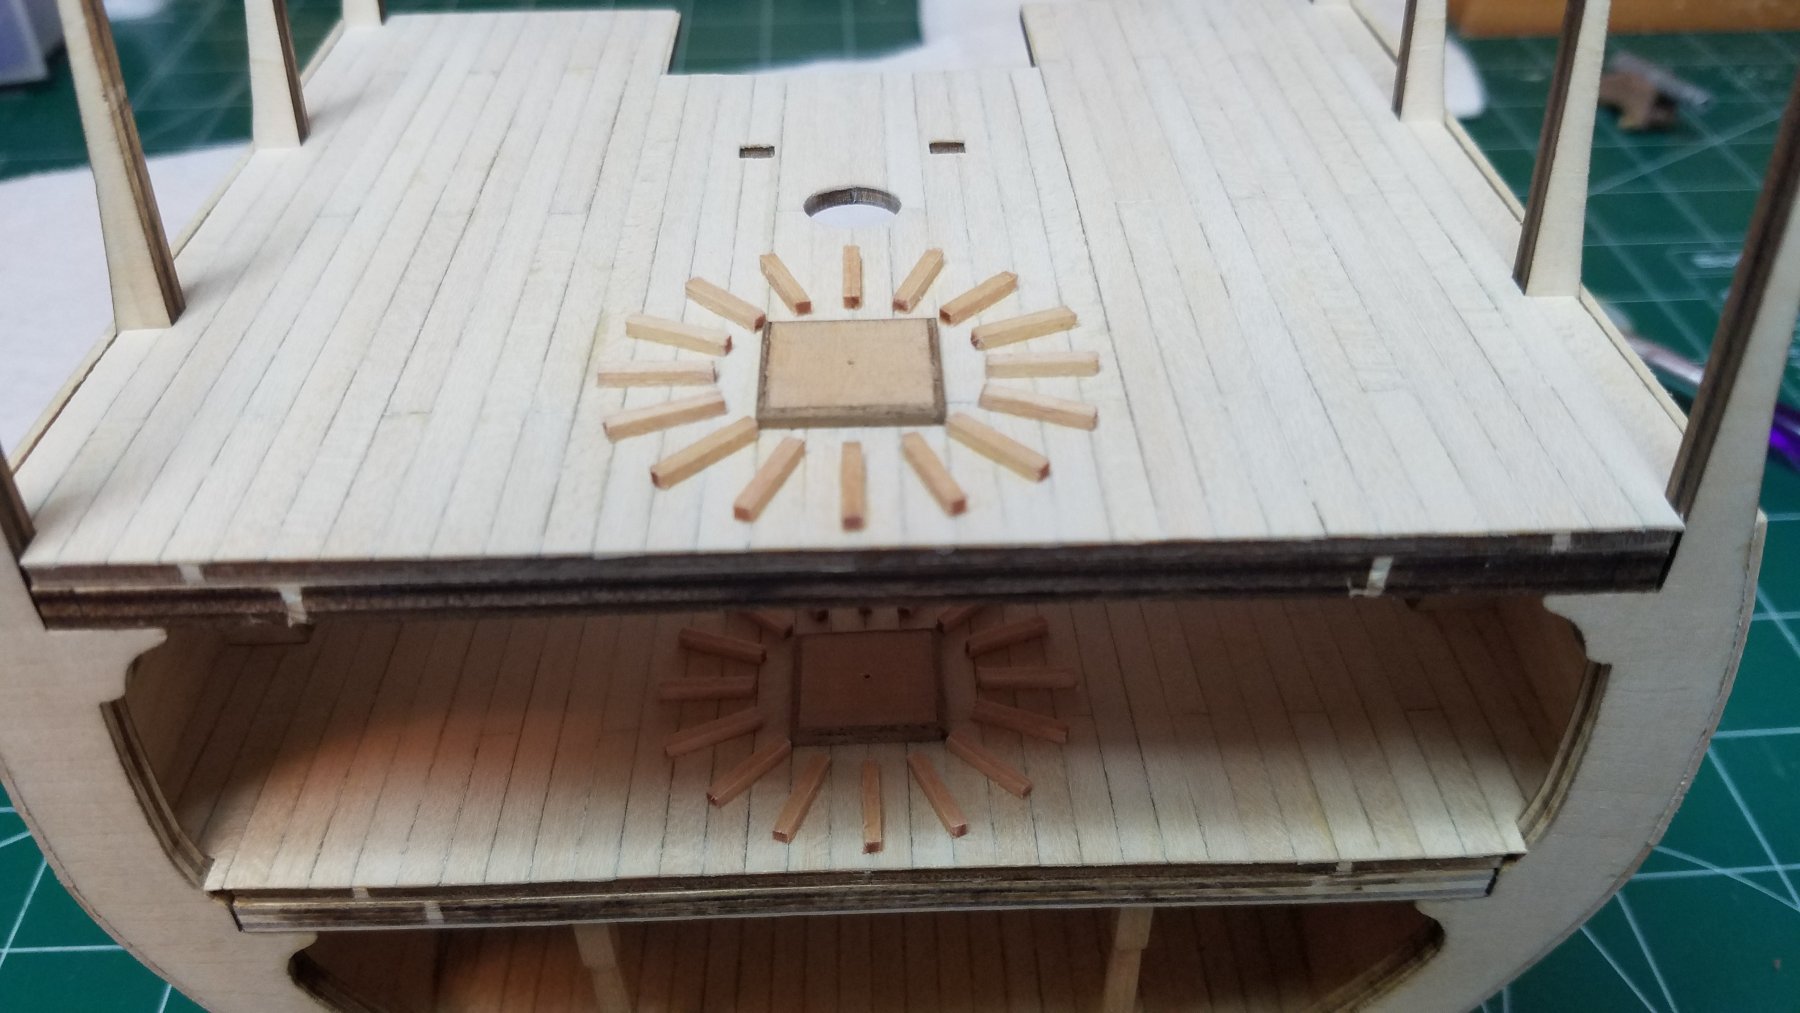
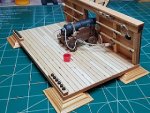
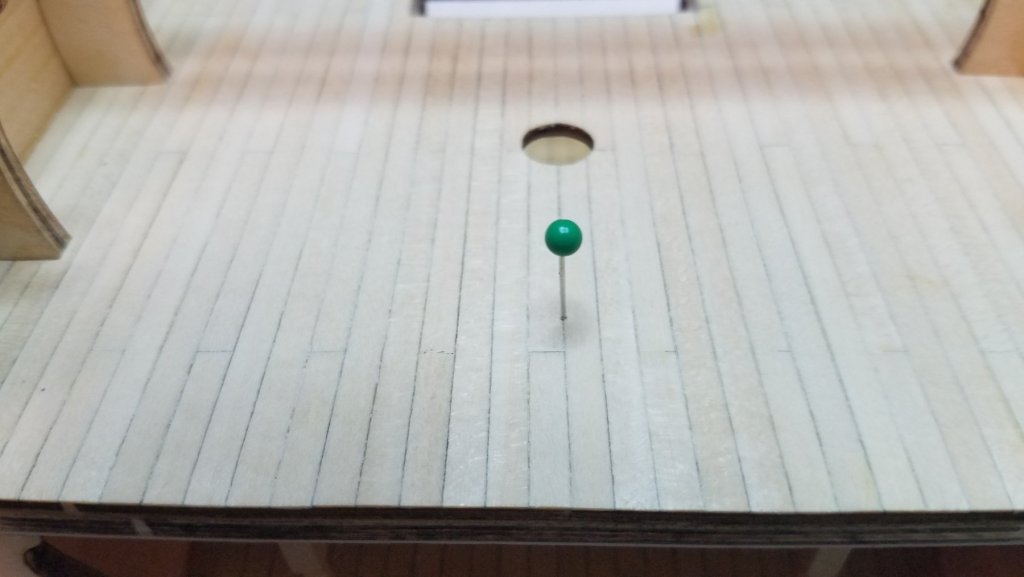
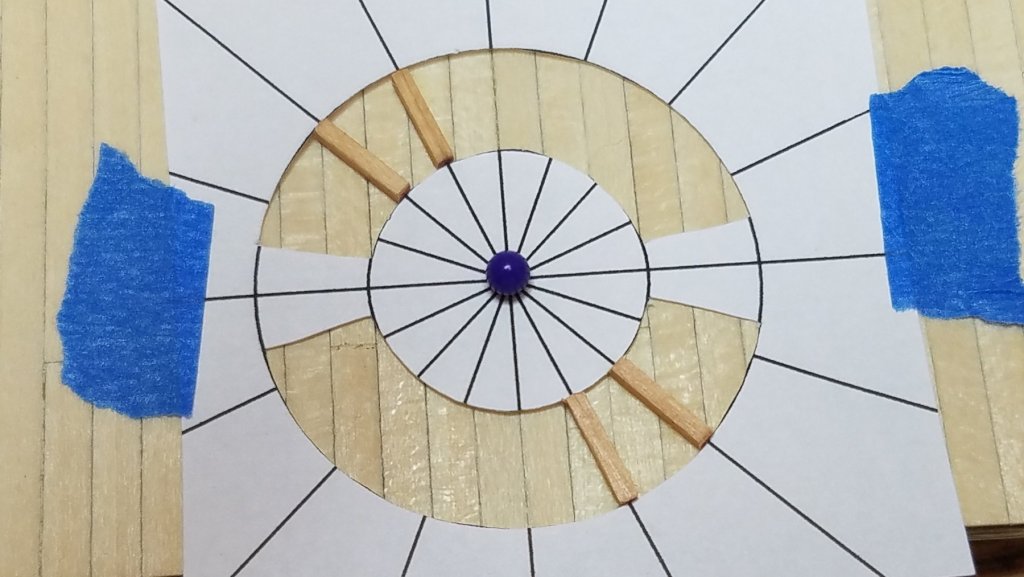
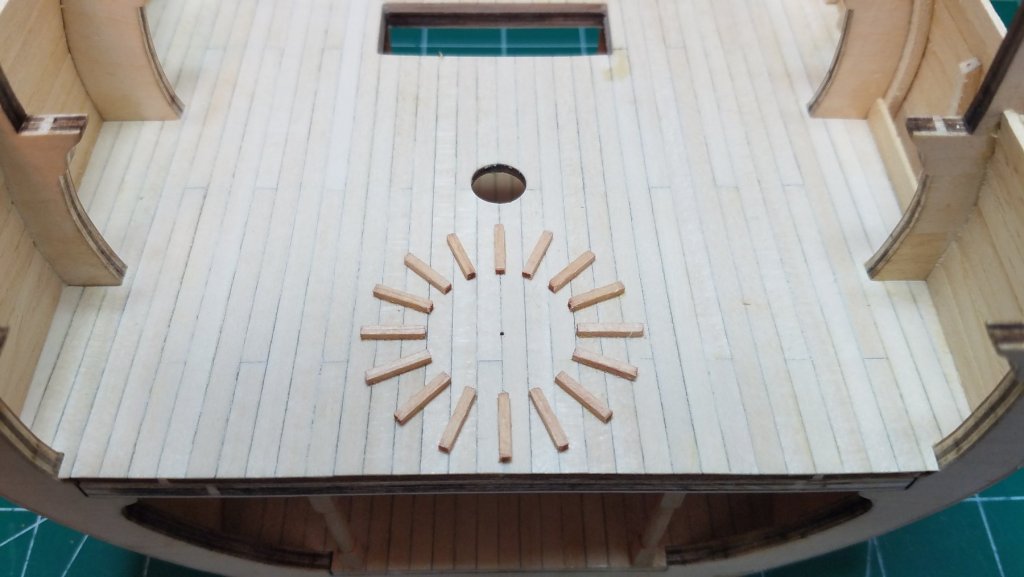
After a great Thanksgiving with my family I am finally back to work. One of the things that bothered me on some of the pictures and even in the instructions was that the alignment of the foot treads seemed haphazard at best and in the case of the instruction photos down right sloppy. I thought there must be a way to do it better so here is what I came up with. First I cut and stained all the pieces. Then I made some templates in autocad and printed them full scale. The circles being the O.D. and I.D. of the tread layout and and 16 rays to indicate the alignment of the treads. I then drilled a .025" hole in the deck at the center point and a corresponding one in the capstan base. Using an xacto knife I cut out the template. I aligned it using the center hole and the center seam in the deck planking. It was then just a matter of laying in the treads in line with the rays on the template. Once I had 14 of them in place I rotated the template 90 degrees and glued in the last two. In between gluing foot treads I wrapped the capstan base in mahogany to cover the exposed plywood edge even though the instructions do not call for it. I had seen some pictures of real installations where this was done and liked it. I did both decks the same way. The top deck is not glued in yet. I will put some small pins in the holes to help align the upper and lower capstans when it comes time to install them. Now it is back to guns and gun ports. I received these from Syren the other day. I will build one of them up to determine the height of the gun ports. I think these are just a smidgen taller than the kit supplied cannon. That's it for now. Thanks again for all the like and comments.


- 139 replies
-
- 4
-
-
- san francisco
- artesania latina
- (and 1 more)