Osmosis
-
Posts
626 -
Joined
-
Last visited
Content Type
Profiles
Forums
Gallery
Events
Everything posted by Osmosis
-
 Thanks Jim, HOF and Dan for the comments and all the likes. Dan, I found myself in the same boat (intentional pun there). I have started a couple of complete ship models over the years and have come to realize that I do not have the attention span for it. I think these type models suit me much better and since most are not meant to be historically precise they allow some freedom to add small touches of detail that one might not add otherwise. Also you can move from one task to another very quickly so I don't have time to get bored with any one phase of the project. Eventually If my skills improve enough I might try scratch building a battle station or fully framed cut away of some fictitious ship. Best regards
 -
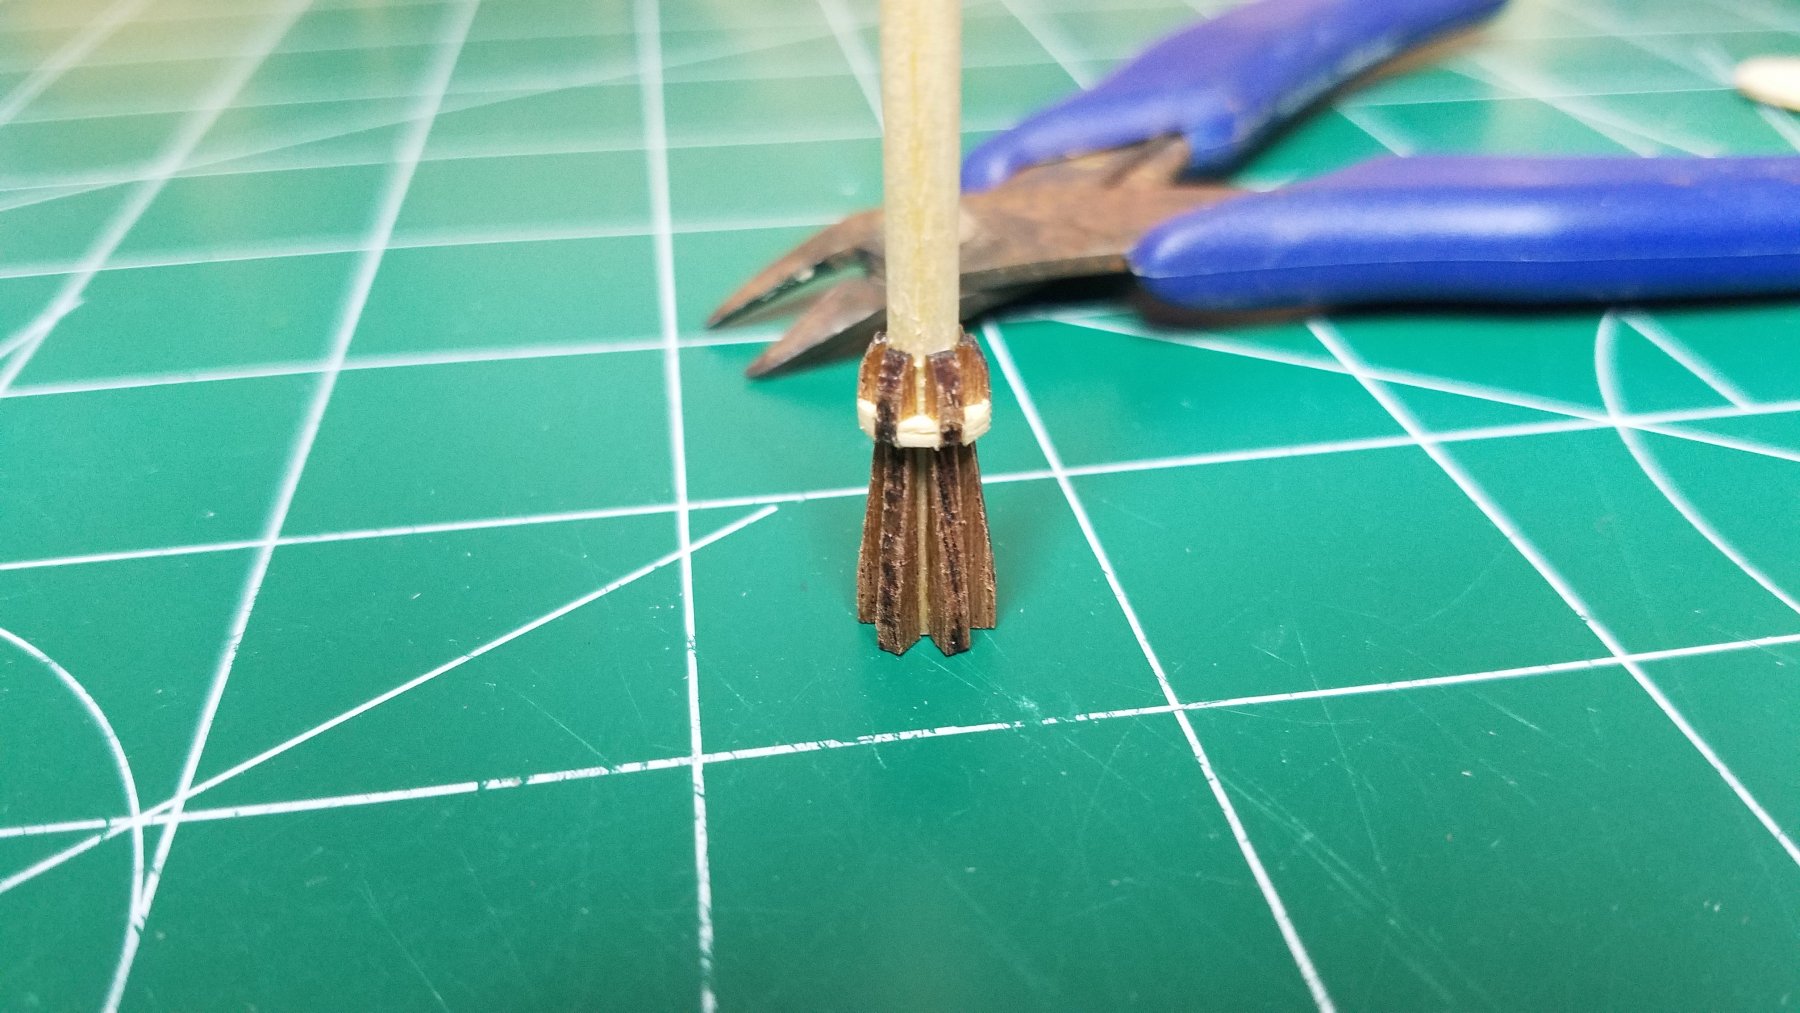
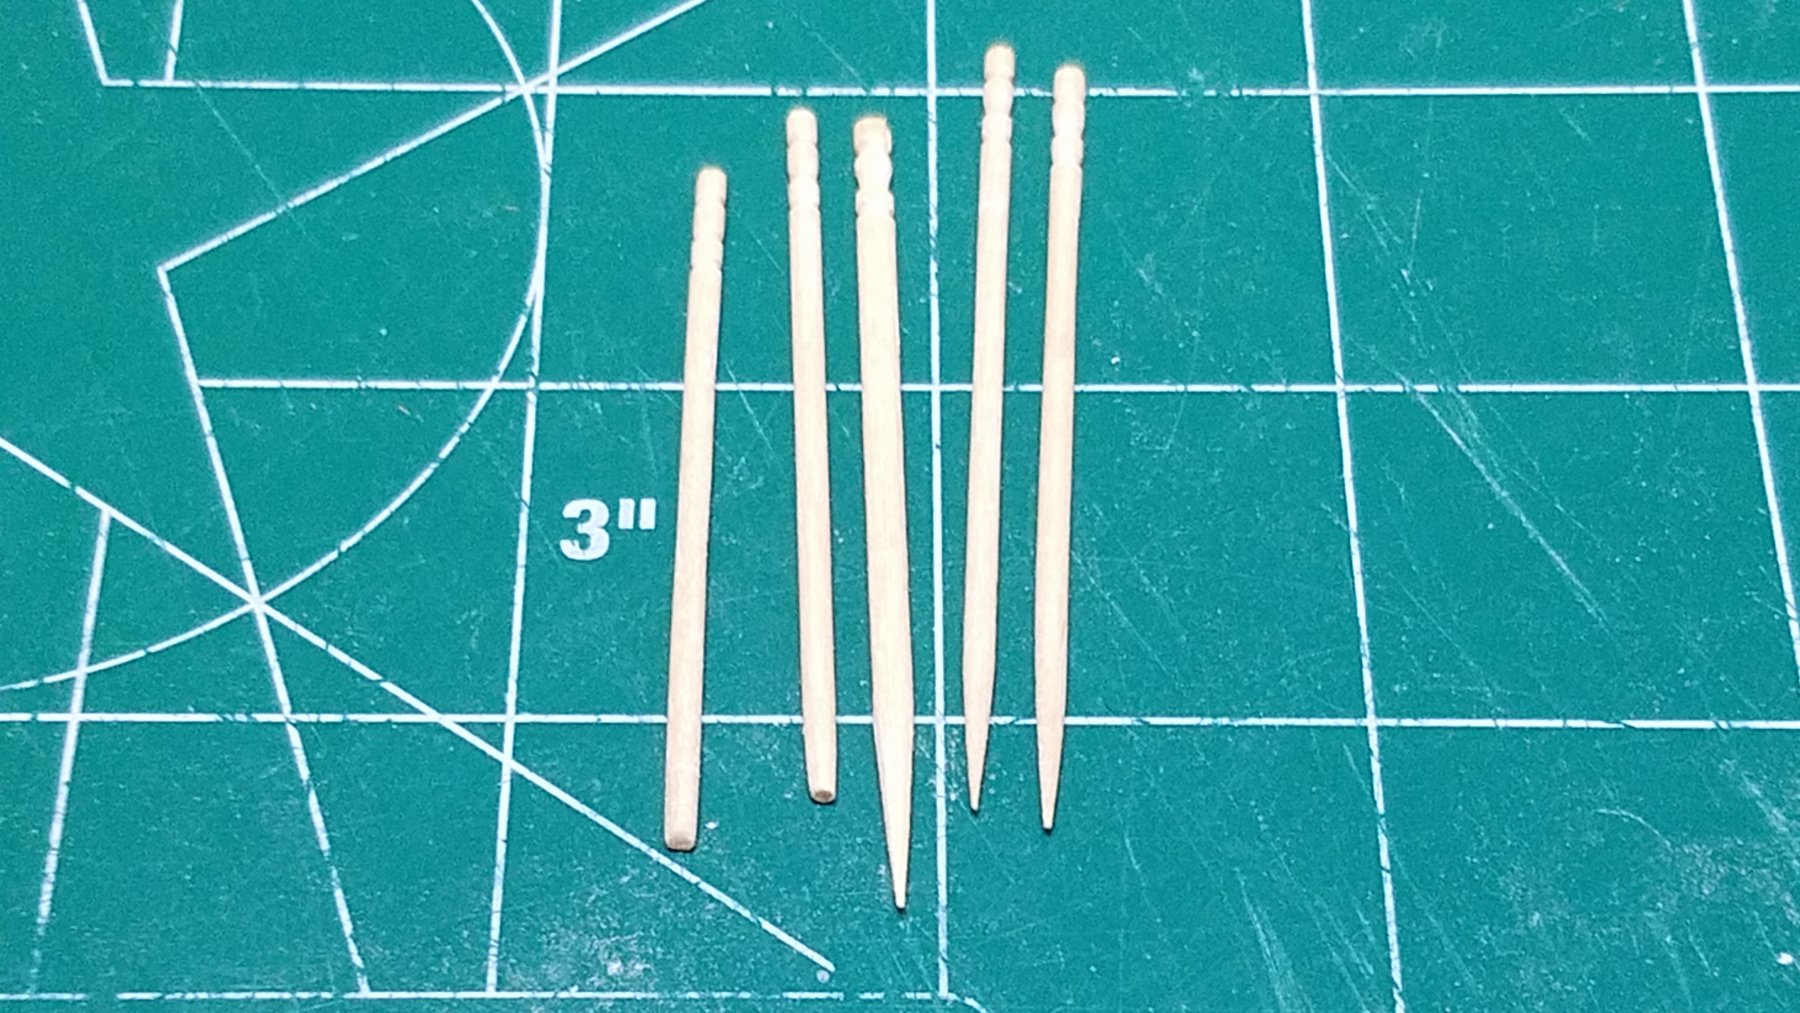
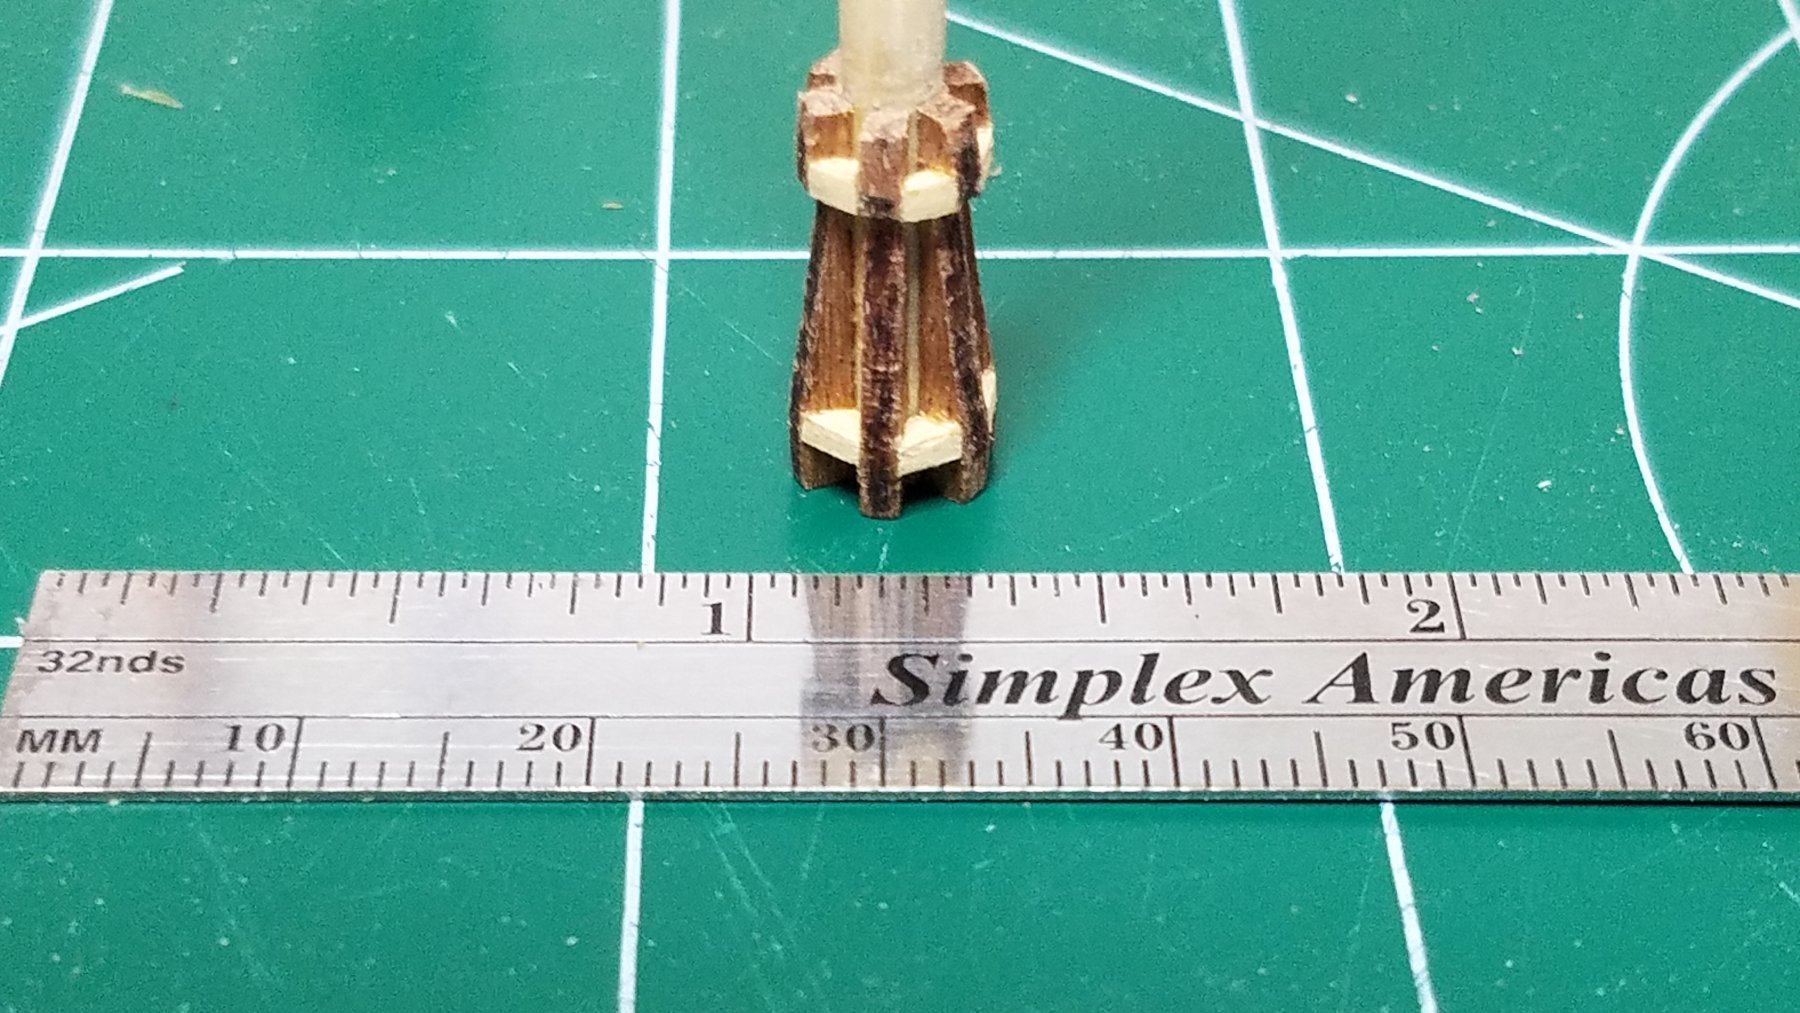
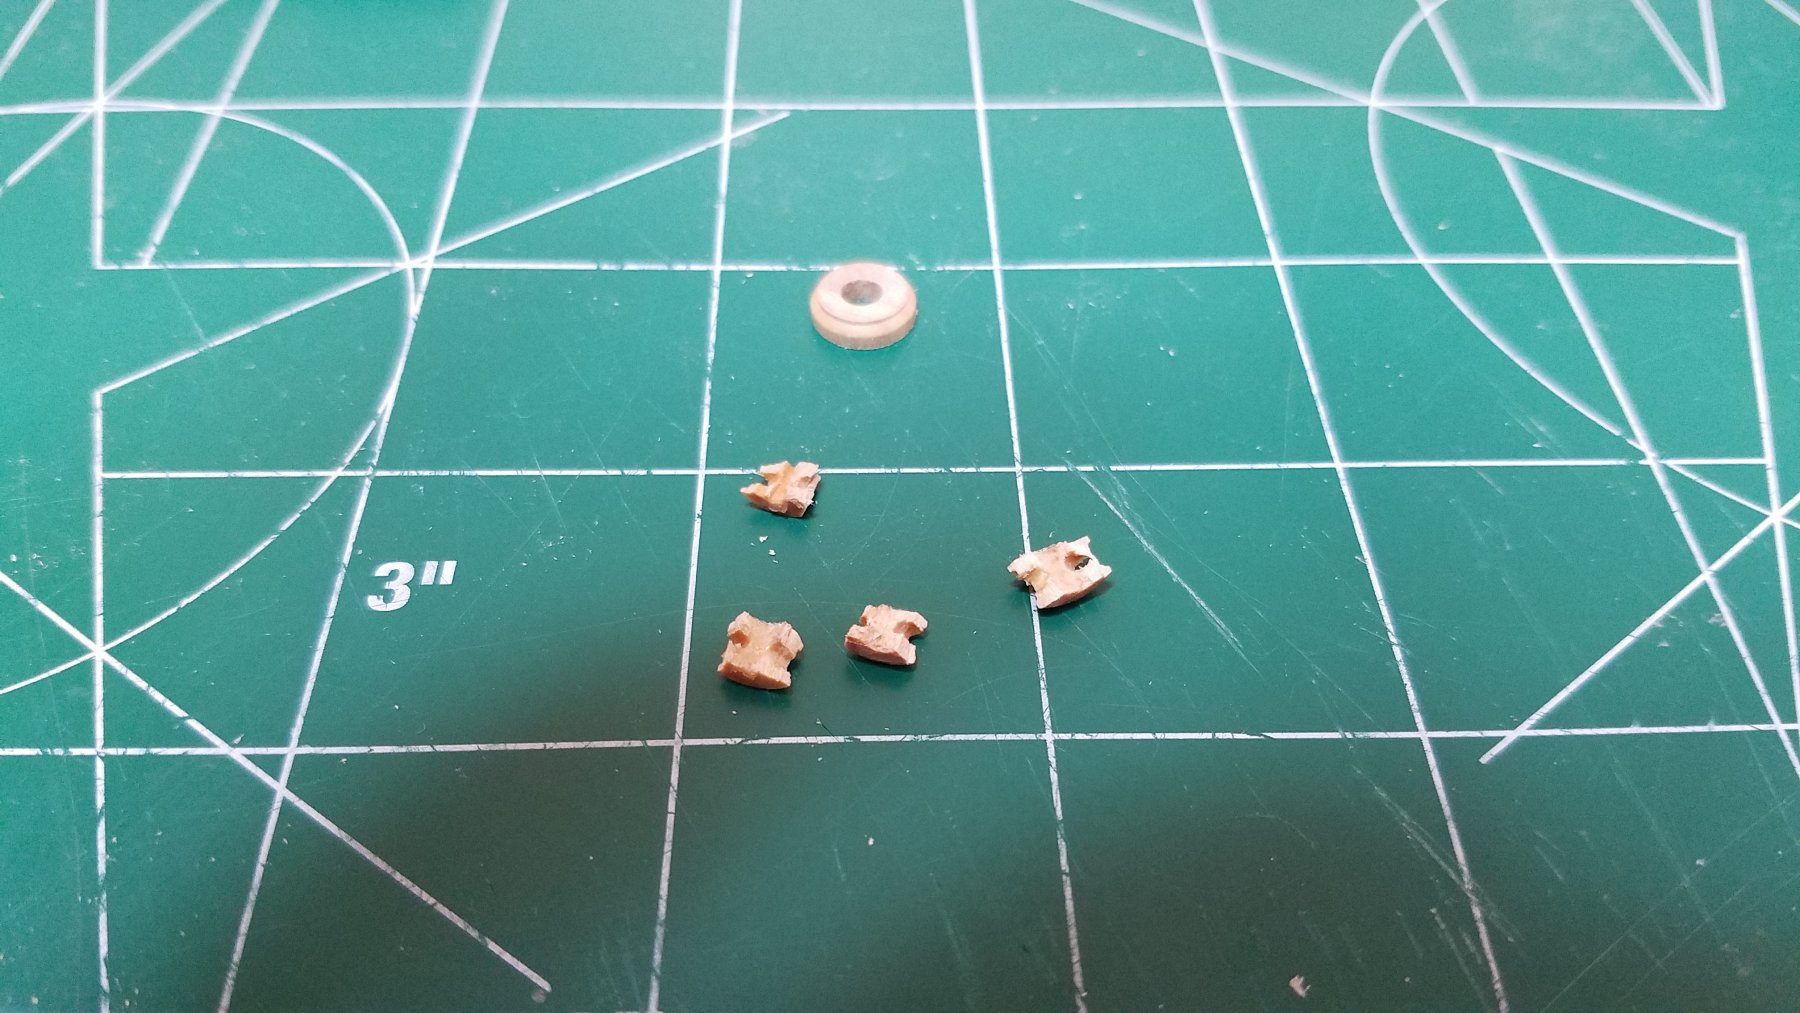
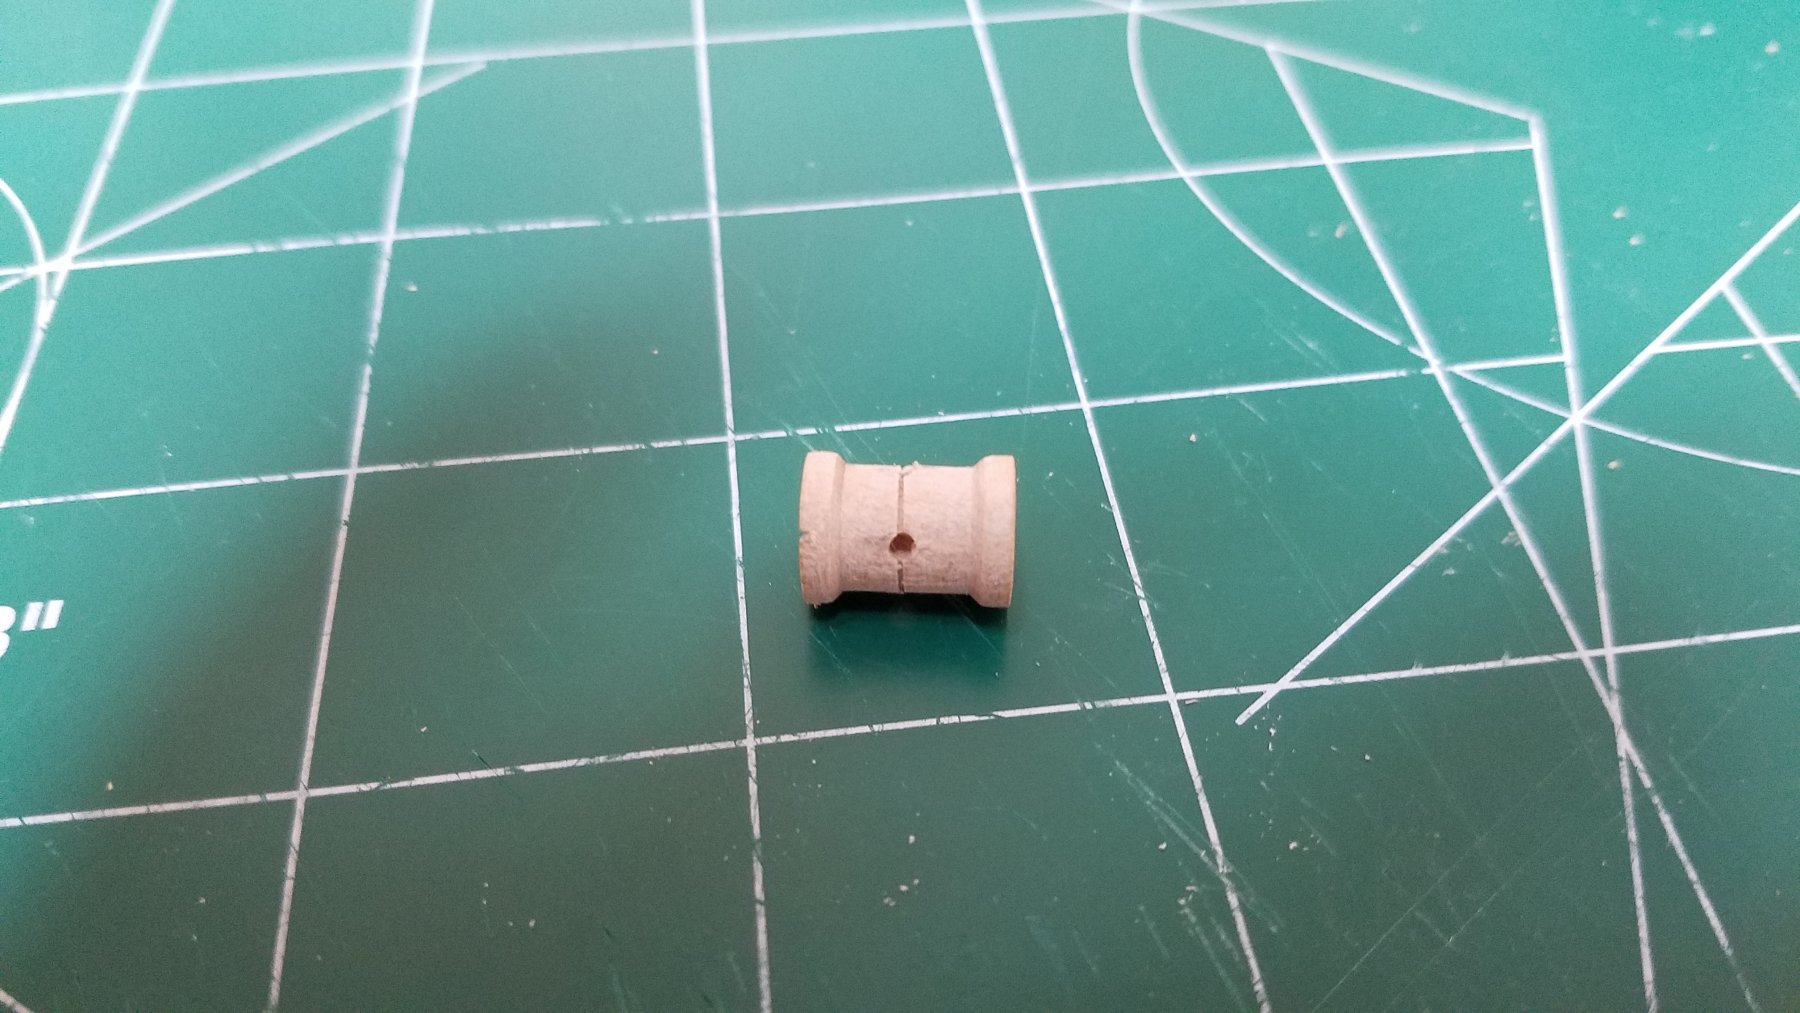
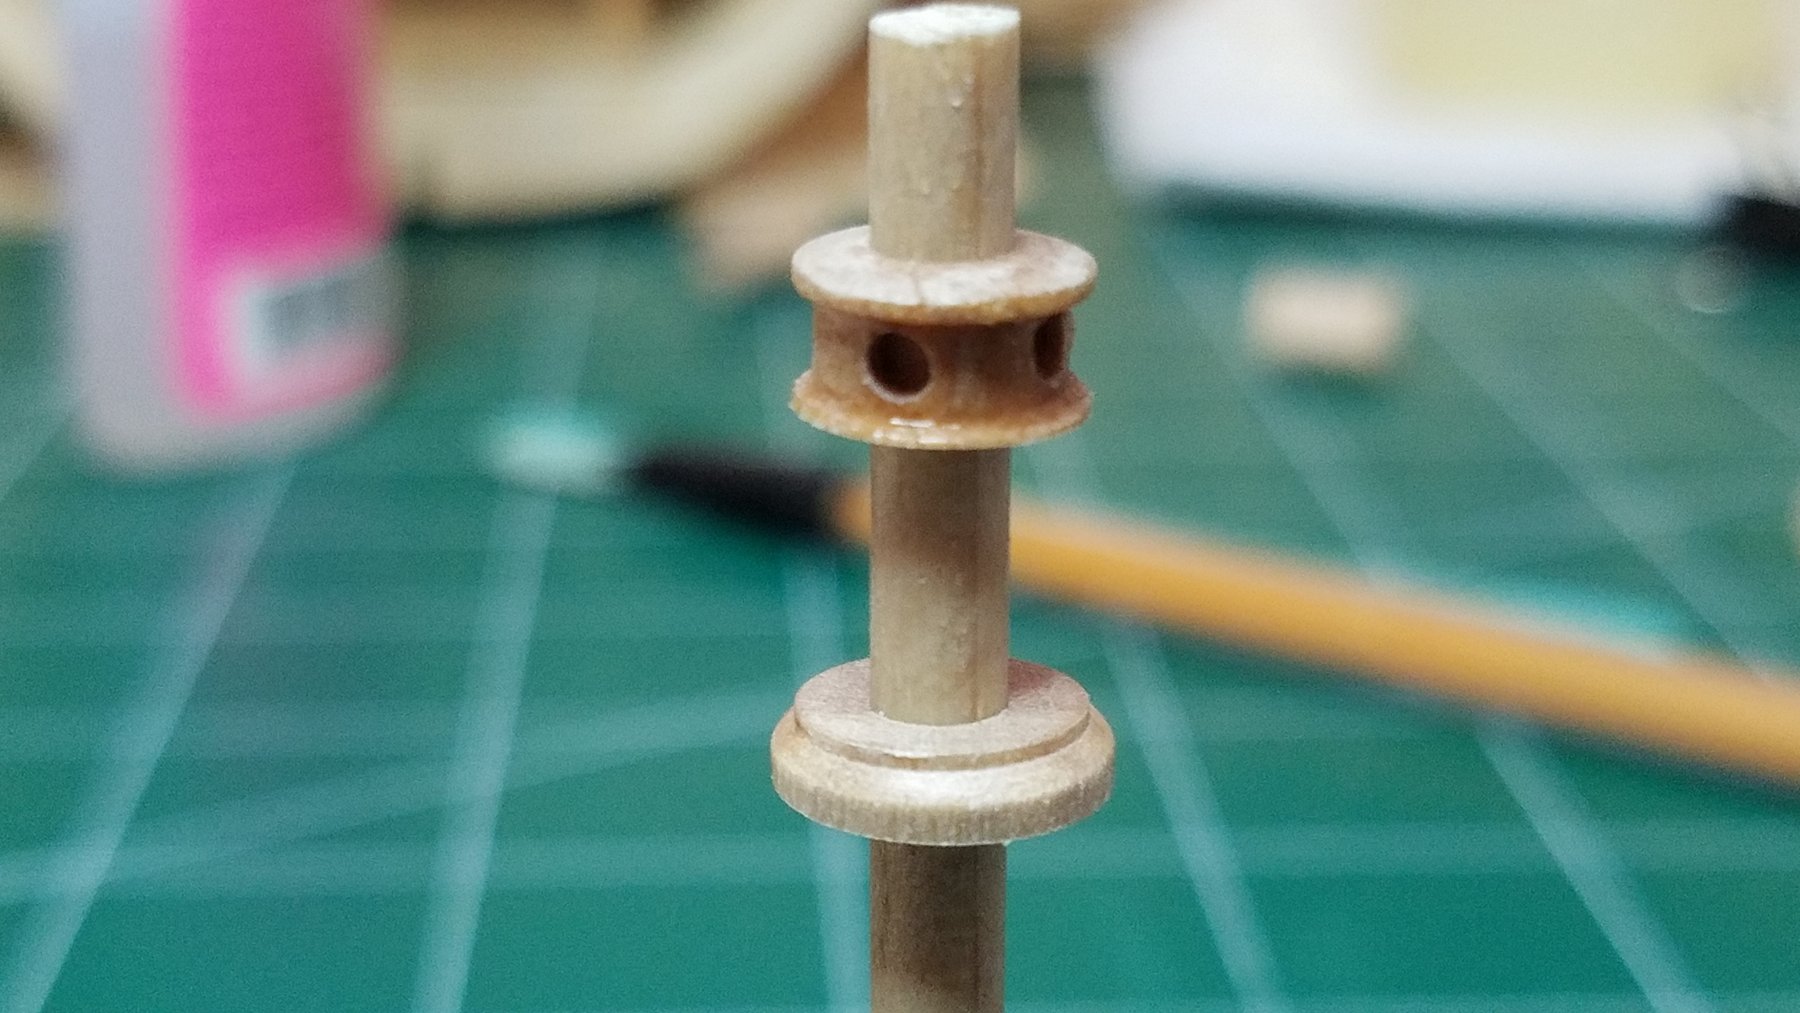
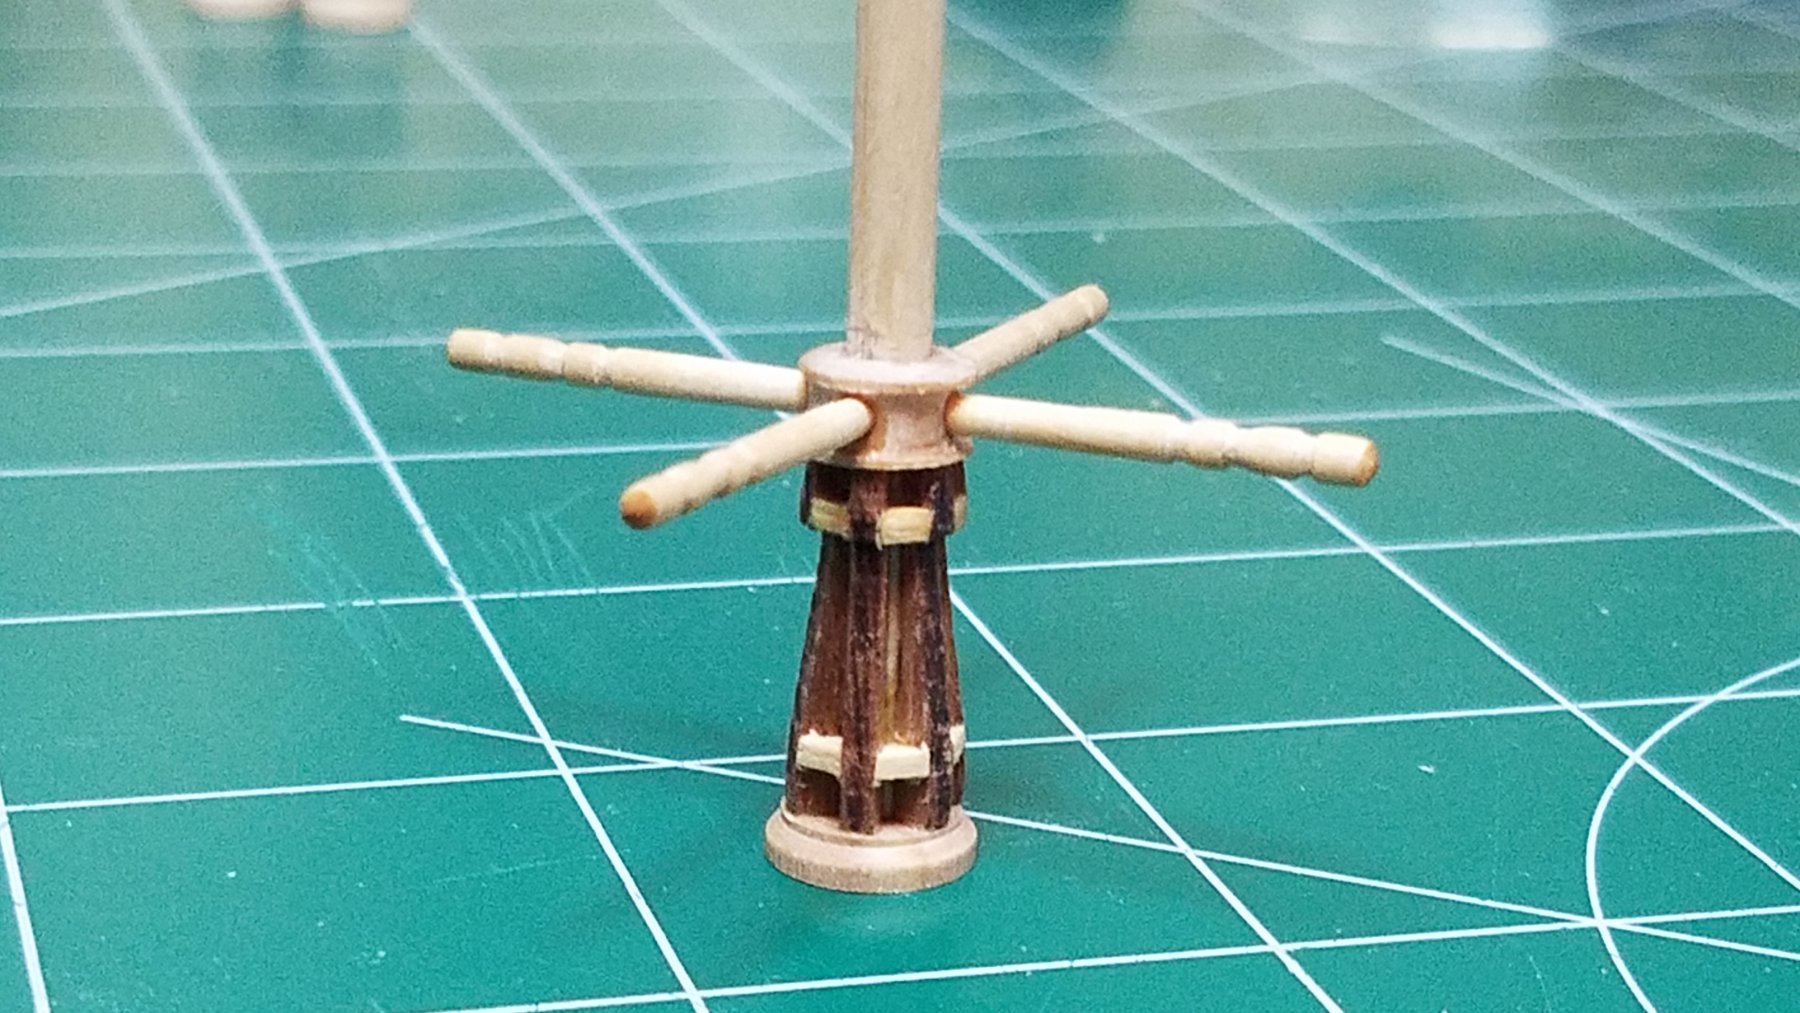
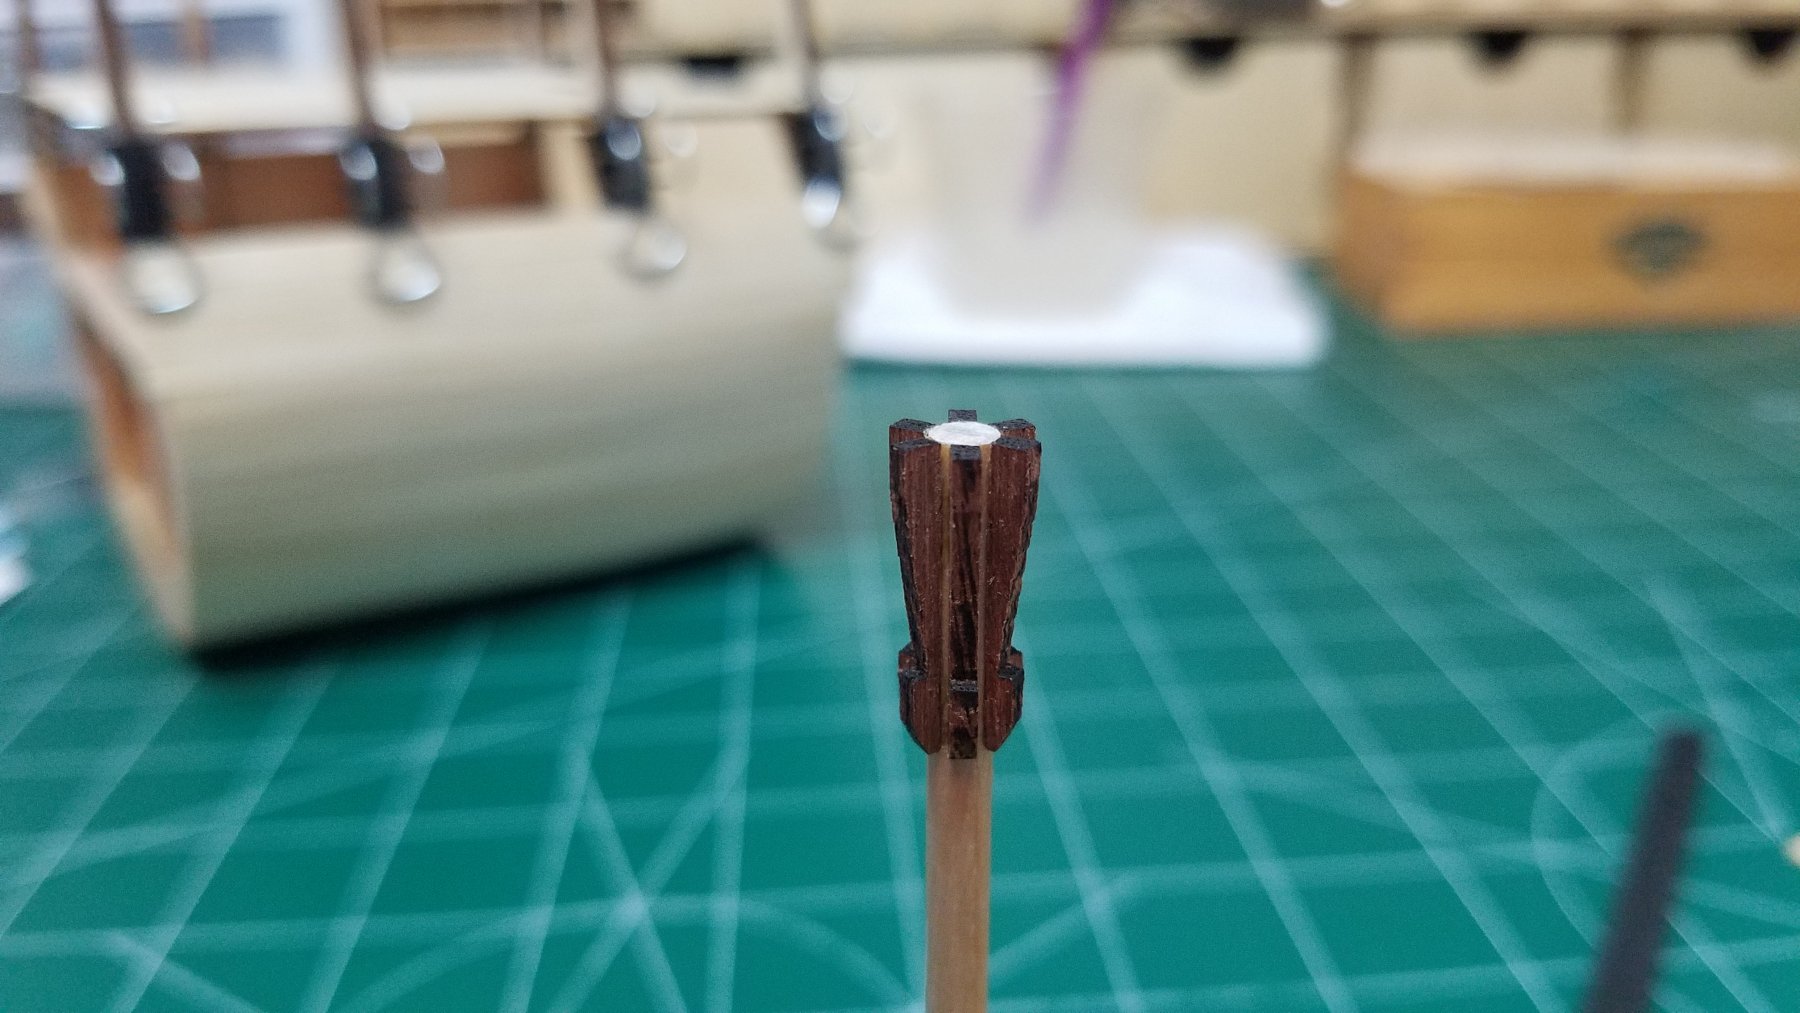
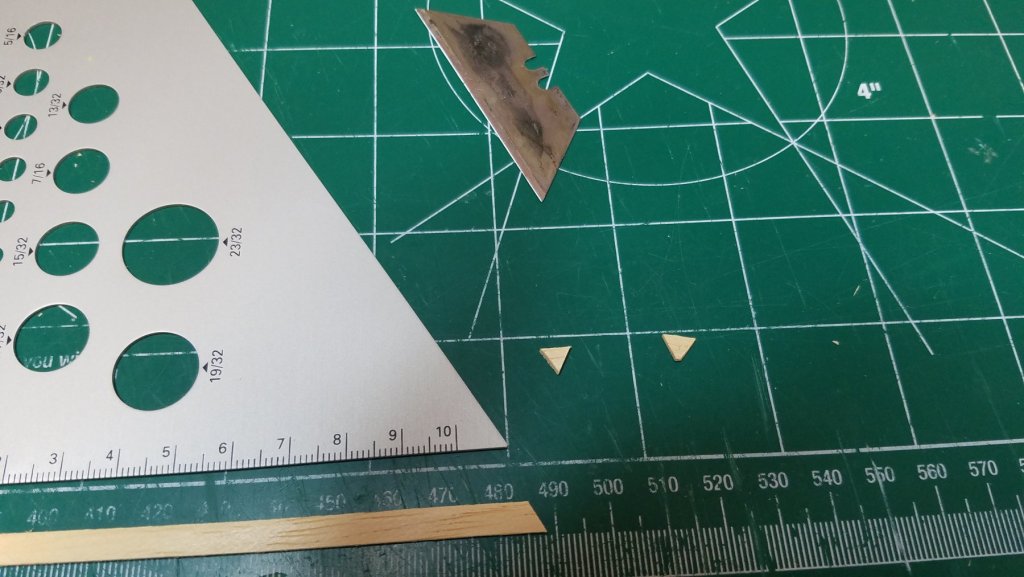
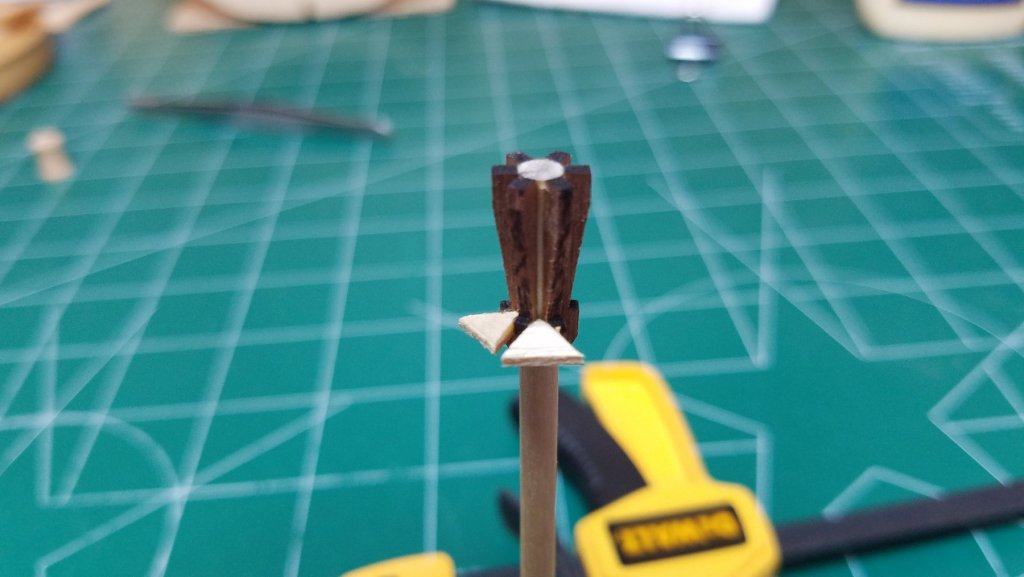
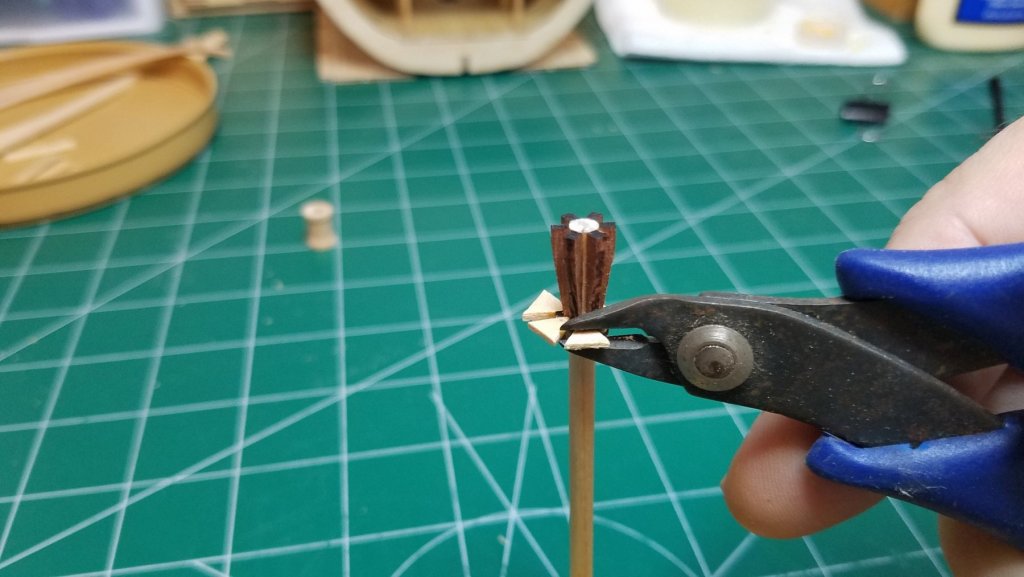
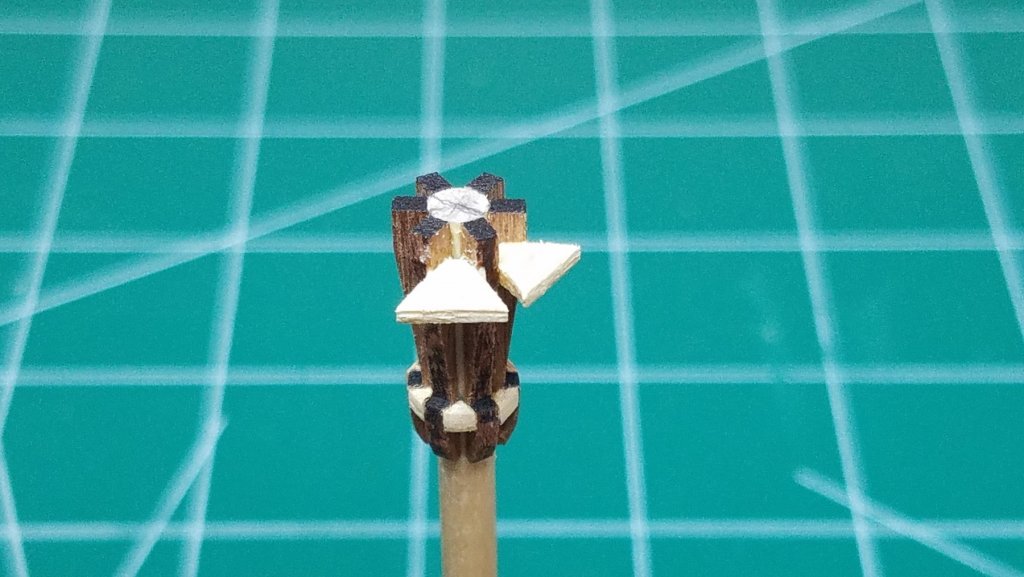
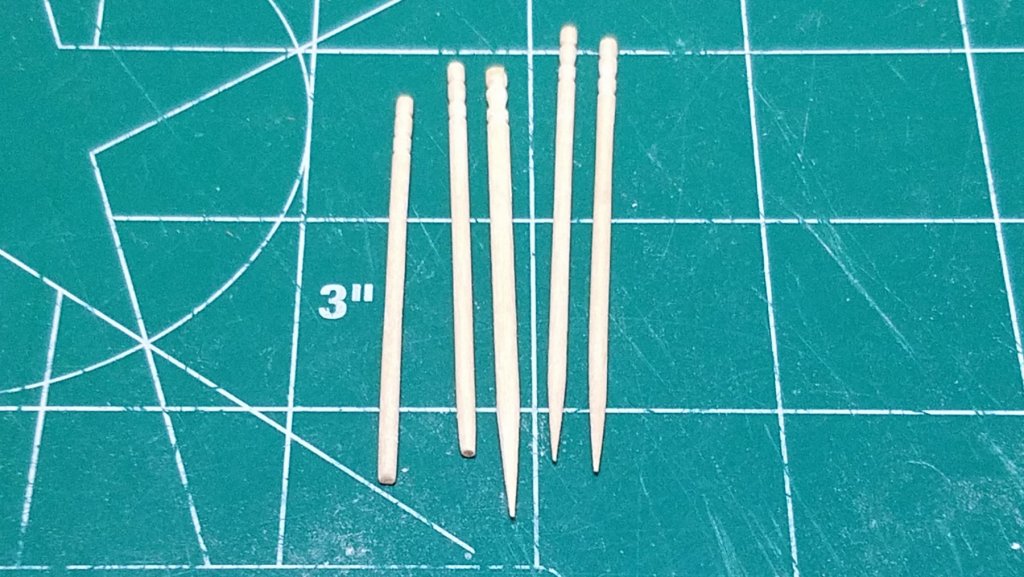
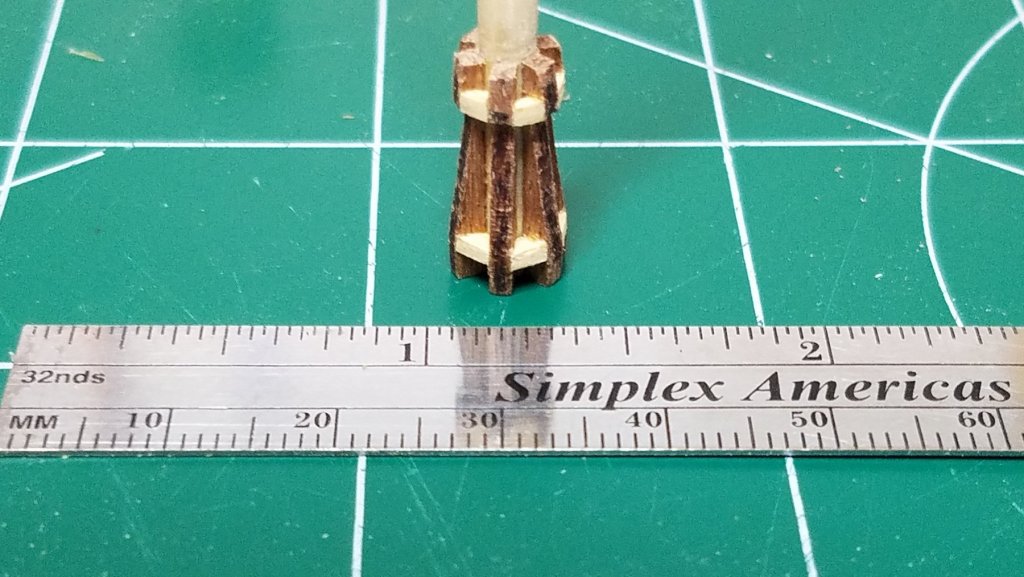
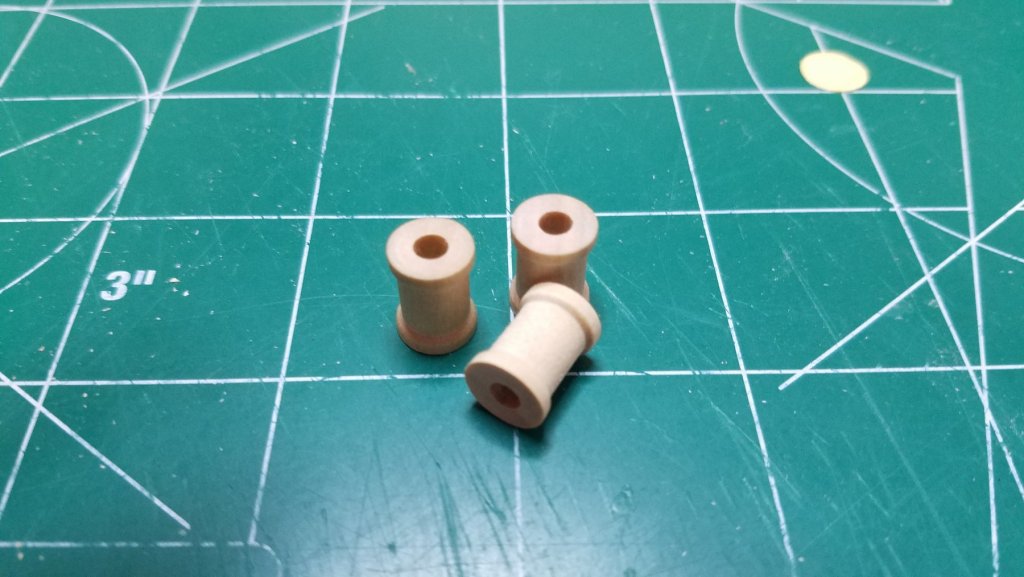
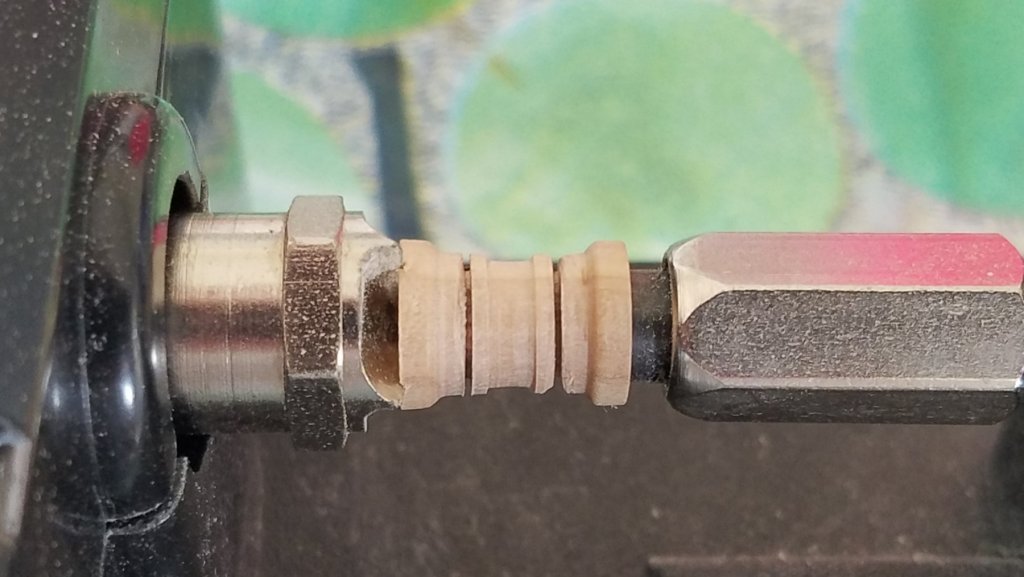
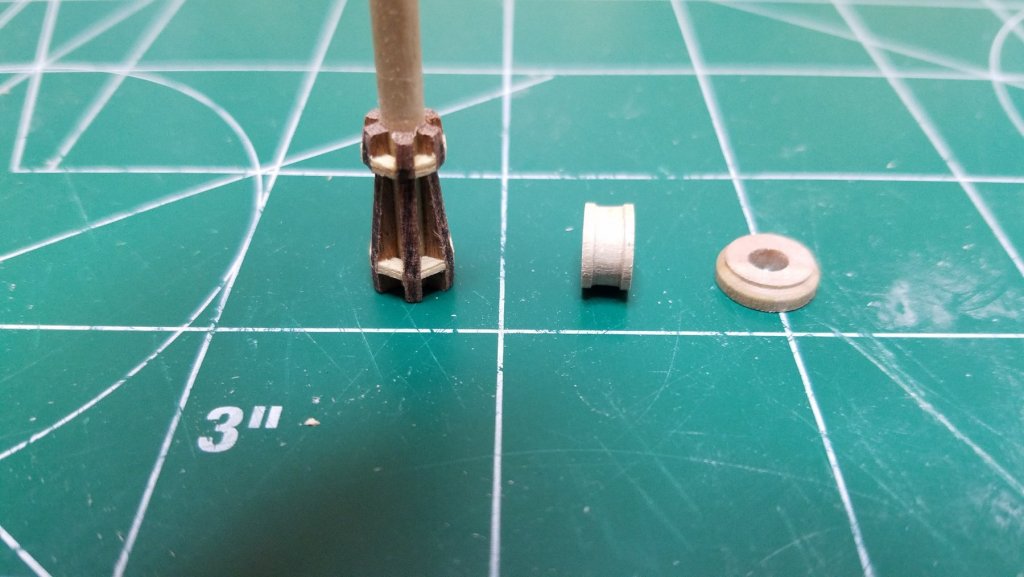
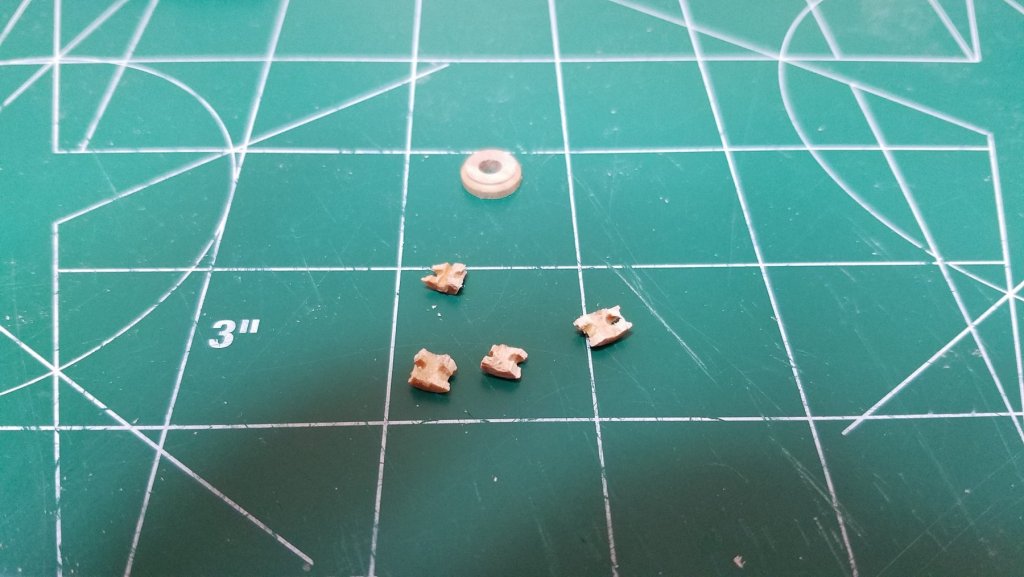
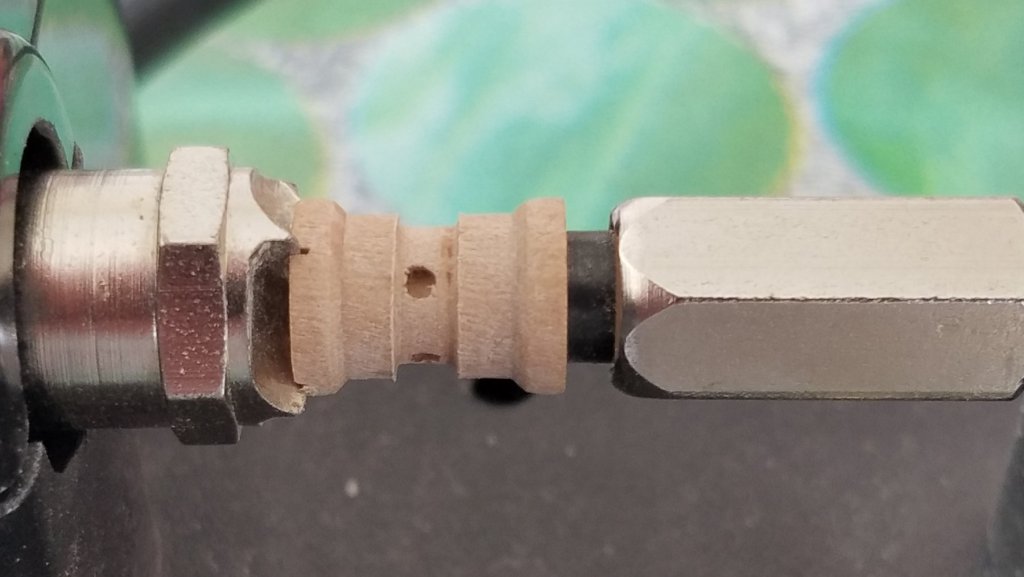
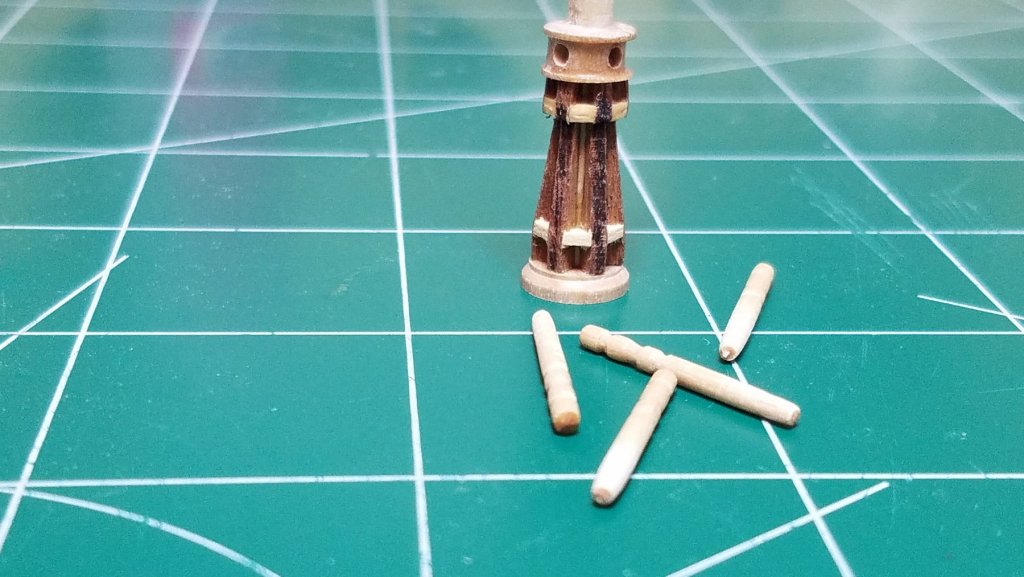
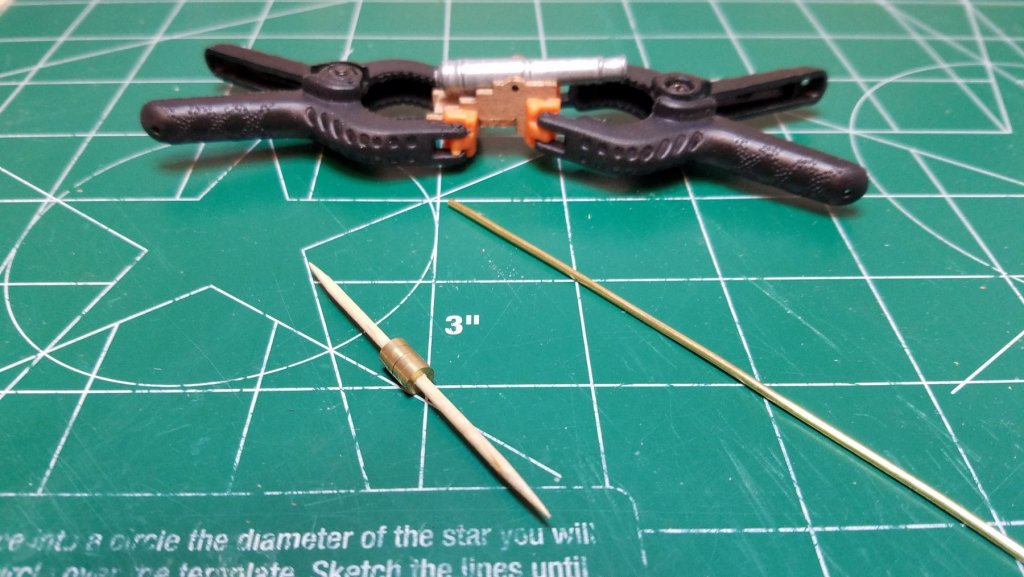
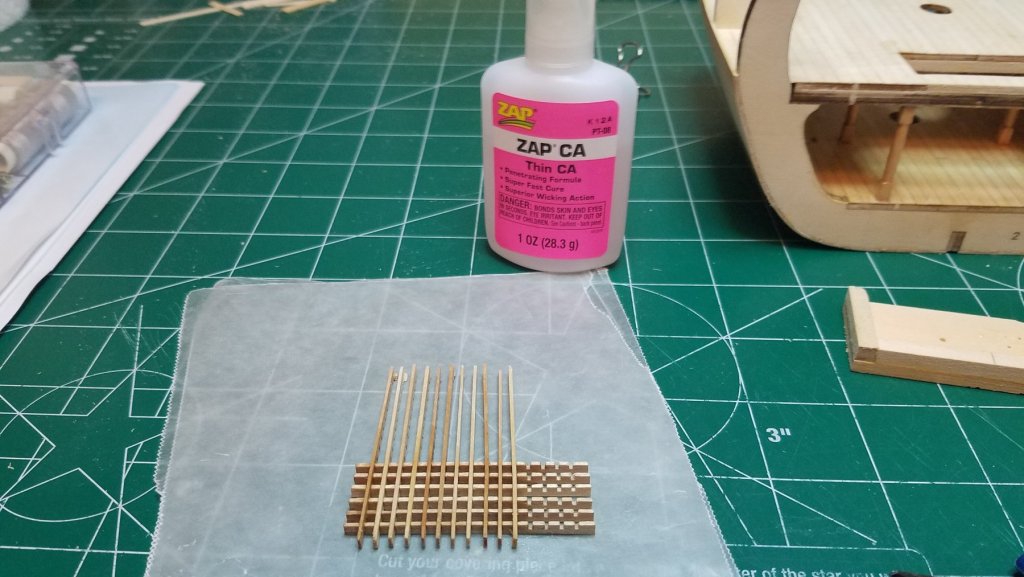
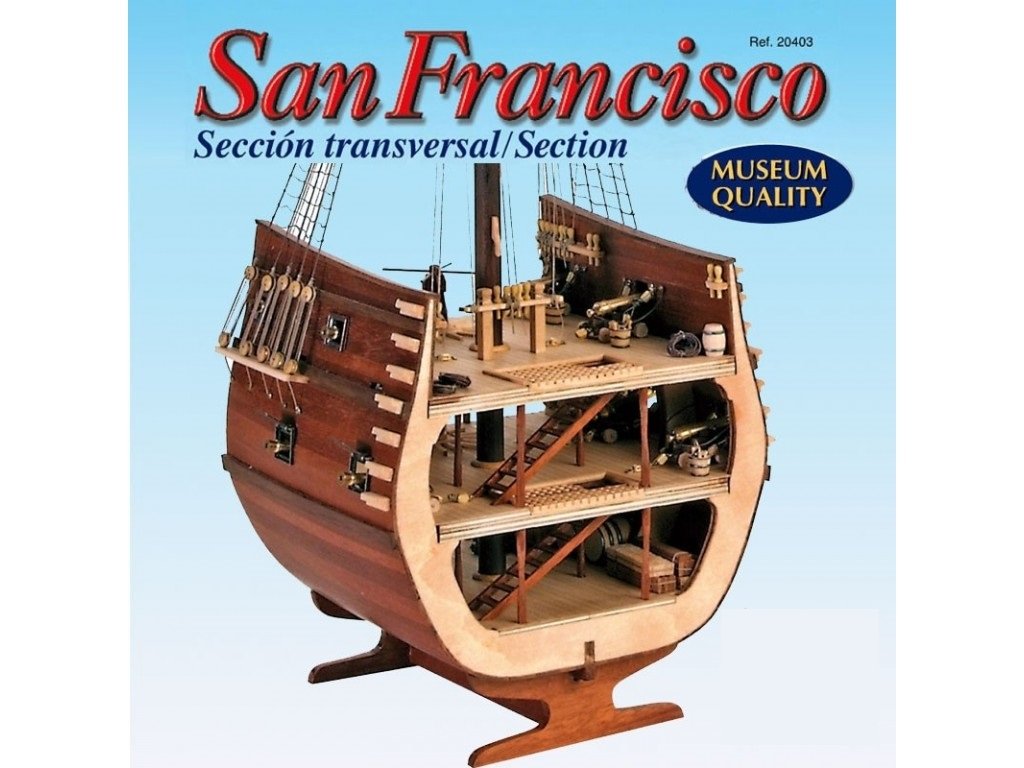
I decided to upgrade the capstans for my build of the AL San Francisco Cross Section (there is a link to my build log in my signature line if you would like to pop in). The capstans if built as per the instructions would be a severe disappointment in my opinion. I get it that to add this much detail would drive the cost up and this is one of the things that each modeler can decide to do or not do to make a model unique or add a little pop. This is the instructions for the capstan which would basically leave it looking like this. I only used 6 whelps instead of the kit supplied 8 in order to give me more room to add the details. Taking some inspiration from Wolfram zu Mondfeld's "Historic Ship Models" and the NRG Database articles on capstans I think we can do better. I started by cutting some left over planking into little wedges. Using my triangle as a guide. Then glued them in place between the upper part of the whelps. Once they were dry I used my nippers to cut off the excess. And sanded them smooth. After sanding the upper chocks smooth, lather rinse repeat for the lower chocks. After sanding the lower chocks I had to trim the very top portion of the whelps down to allow me to seat the head properly. Speaking of the head that is next. I found these little spools at hobby lobby they are just the right size. I have a mini lathe but it does not have a clamp type chuck so I do not have any way to drill a hole in the center of a work piece with any kind of accuracy so these are essentially dowels with pre-drilled holes. The holes were so close to what I needed I only had to ream them out by hand. Attempt # 1 After getting one of the spools chucked up in my dremel lathe. I used a square needle file to cut a groove in the center of the spool. Then I used my razor saw to cut the parts. I wound up with the two parts I needed and it did not take as long as I though it would either. Now to drill the bar holes. Just as the drill broke through the last hole it literally crumbled in my hand. RATS! Attempt # 2.............. The same as attempt # 1. Yes it even ended virtually the same way. DOUBLE RATS!! Then the light bulb went on. Attempt #3............... I chucked the spool up and using my razor saw scored a slight kerf cut in the center of the spool. Then removed it from the lathe and drilled the holes while it was still its original thickness. Duh! Then put it back in the lathe and filed the recess. After separating the head from the spool I gave it a squirt of thin CA to harden it up a bit. Because I still had to concave the bottom to get it to seat on top of the whelps. The finished head and base plate. you can just see that I gave the top of the head a domed shape using a sanding stick and 400 grit sand paper. Now on to the bars. The kit supplies brass wire but that will not do at all. I have had a couple hundred of these tooth picks laying around for ever. I knew they would come in handy eventually. Using a draw plate and a little sanding I got them to a usable diameter. Then cut to length. I would say that the capstan is looking more like a light house at this point. The Bars are installed a little final sanding and some clean up and we can install this one. Not to shabby for my first attempt. A definite improvement and at 7/8" it is just under 4' at full scale. This really was a challenge for my fat stiff fingers. I will need to wait a couple days before I make the upper one.


- 1 reply
-
- 6
-

-
Well it took a while and I wanted to make sure it turned out ok before I started posting. The lower capstan is done. This is the instructions for the capstan which would basically leave it looking like this. Taking some inspiration from Wolfram zu Mondfeld's "Historic Ship Models" and the NRG Database articles on capstans I think we can do better. I started by cutting some left over planking into little wedges. Then glued them in place between the upper part of the whelps. Once they were dry I used my nippers to cut off the excess. And sanded them smooth. After sanding the upper chocks smooth, lather rinse repeat for the lower chocks. After sanding the lower chocks I had to trim the very top portion of the whelps down to allow me to seat the head properly. Speaking of the head that is next. I found these little spools at hobby lobby they are just the right size. I have a mini lathe but it does not have a clamp type chuck so I do not have any way to drill a hole in the center of a work piece with any kind of accuracy so these are essentially dowels with pre-drilled holes. The holes were so close to what I needed I only had to ream them out by hand. Attempt # 1 After getting one of the spools chucked up in my dremel lathe. I used a square needle file to cut a groove in the center of the spool. Then I used my razor saw to cut the parts. I wound up with the two parts I needed and it did not take as long as I though it would either. Now to drill the bar holes. Just as the drill broke through the last hole it literally crumbled in my hand. RATS! Attempt # 2.............. The same as attempt # 1. Yes it even ended virtually the same way. DOUBLE RATS!! Then the light bulb went on. Attempt #3............... I chucked the spool up and using my razor saw scored a slight kerf cut in the center of the spool. Then removed it from the lathe and drilled the holes while it was still its original thickness. Duh! Then put it back in the lathe and filed the recess. After separating the head from the spool I gave it a squirt of thin CA to harden it up a bit. Because I still had to concave the bottom to get it to seat on top of the whelps. The finished head and base plate. you can just see that I gave the top of the head a domed shape using a sanding stick and 400 grit sand paper. Now on to the bars. The kit supplies brass wire but that will not do at all. I have had a couple hundred of these tooth picks laying around for ever. I knew they would come in handy eventually. Again using one of the cannon wheels as a draw plate and a little sanding I got them to a usable diameter. Then cut to length. I would say that the capstan is looking more like a light house at this point. The Bars are installed a little final sanding and some clean up and we can install this one. Not to shabby for my first attempt. A definite improvement and at 7/8" it is just under 4' at full scale. This really was a challenge for my fat stiff fingers. I will need to wait a couple days before I make the upper one.
- 139 replies
-
- 5
-
-
- san francisco
- artesania latina
- (and 1 more)
-
Welcome Aboard, From one older beginner to another. Best Regards
-
Welcome aboard Bill. Best Regards
-
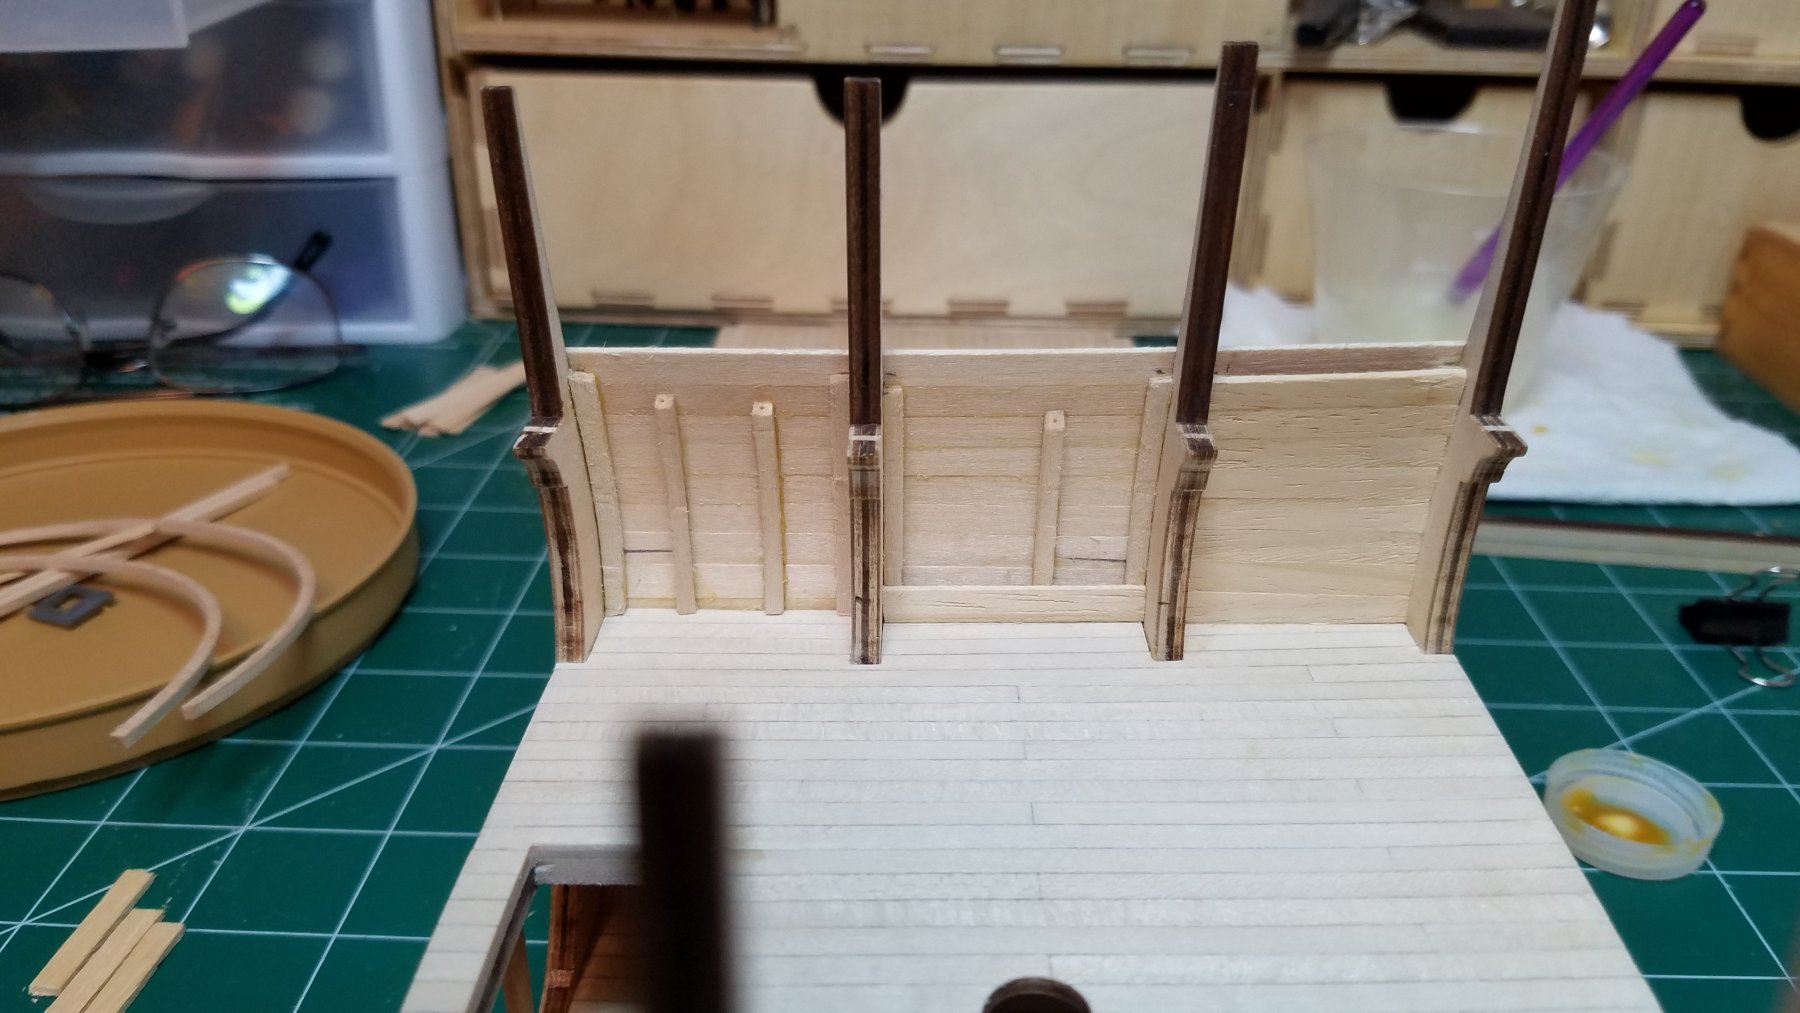
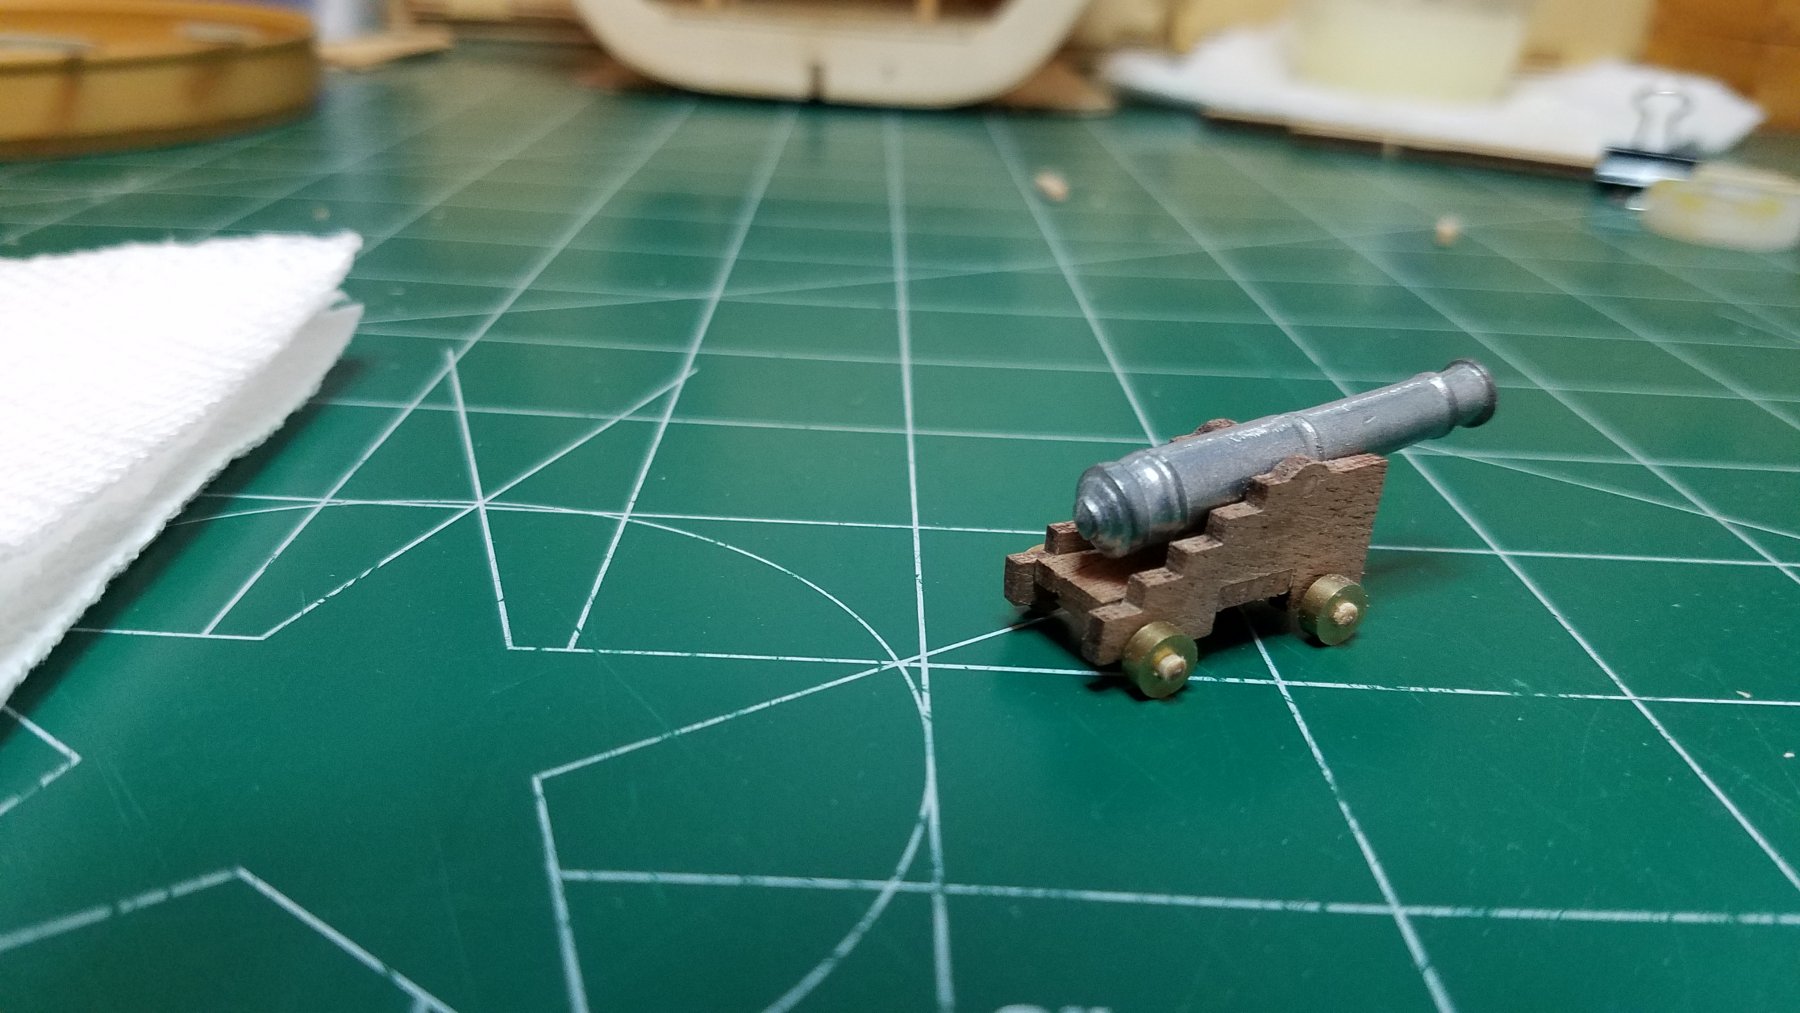
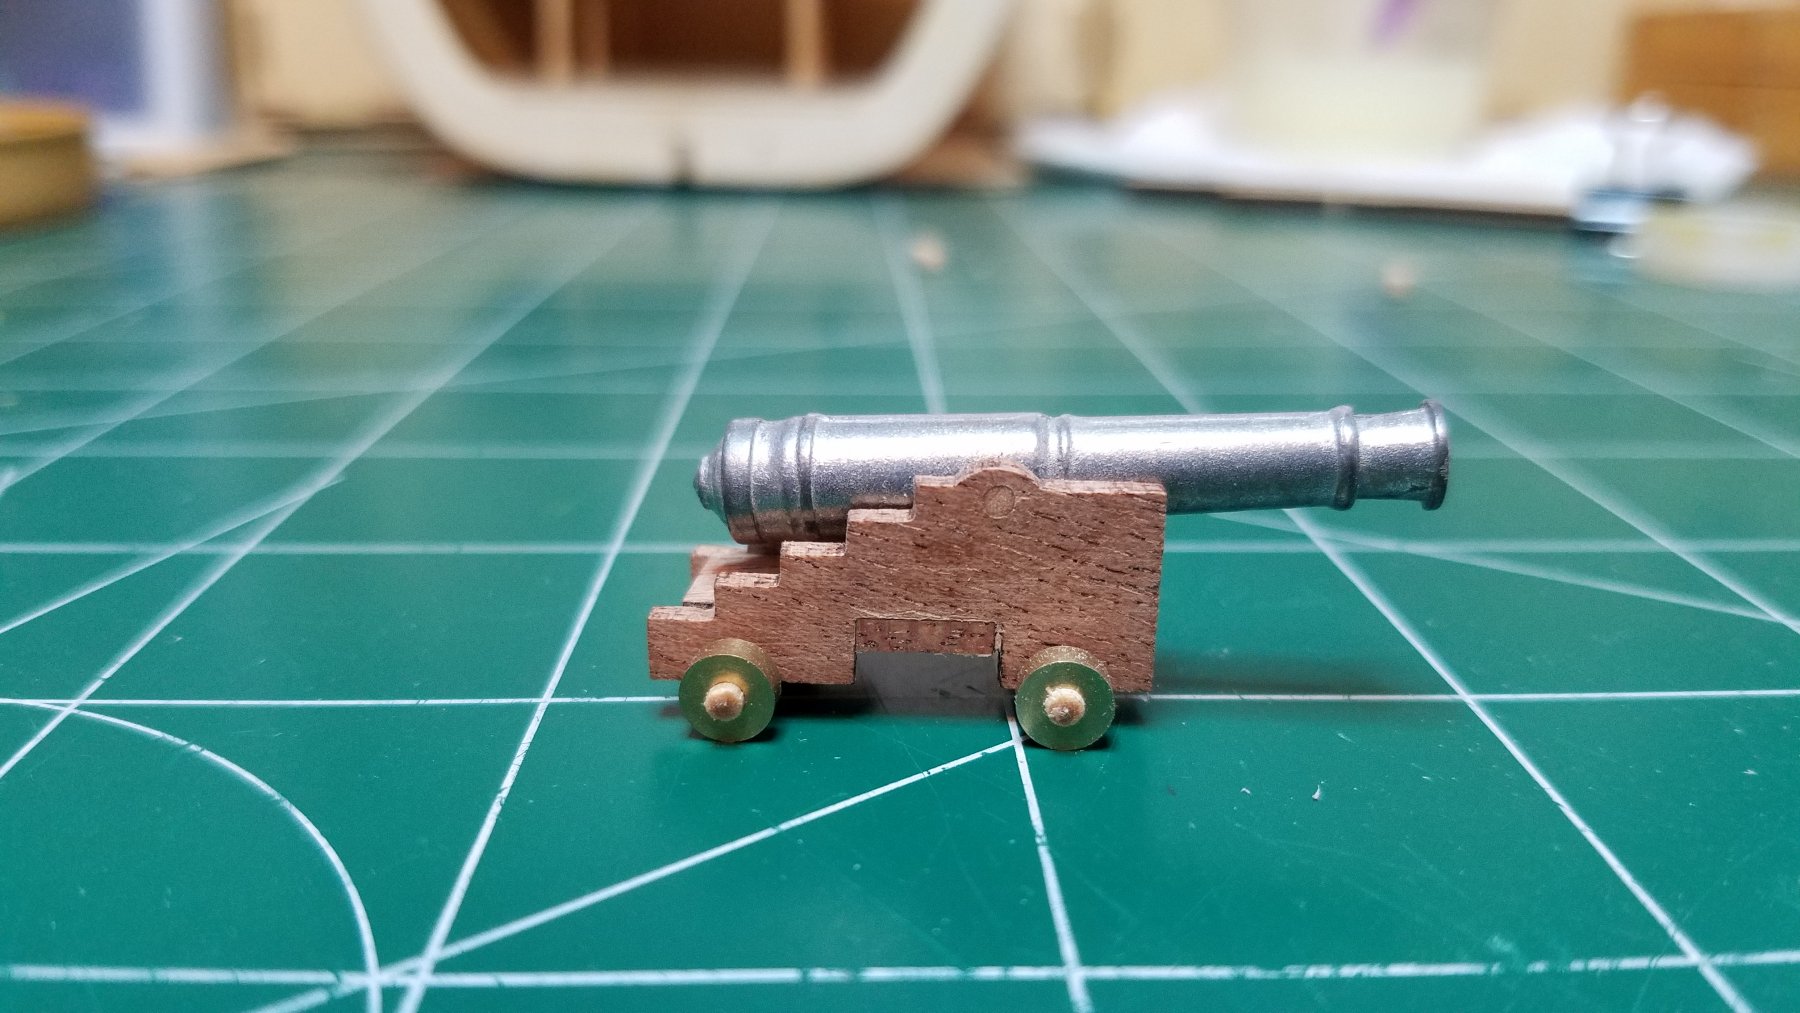
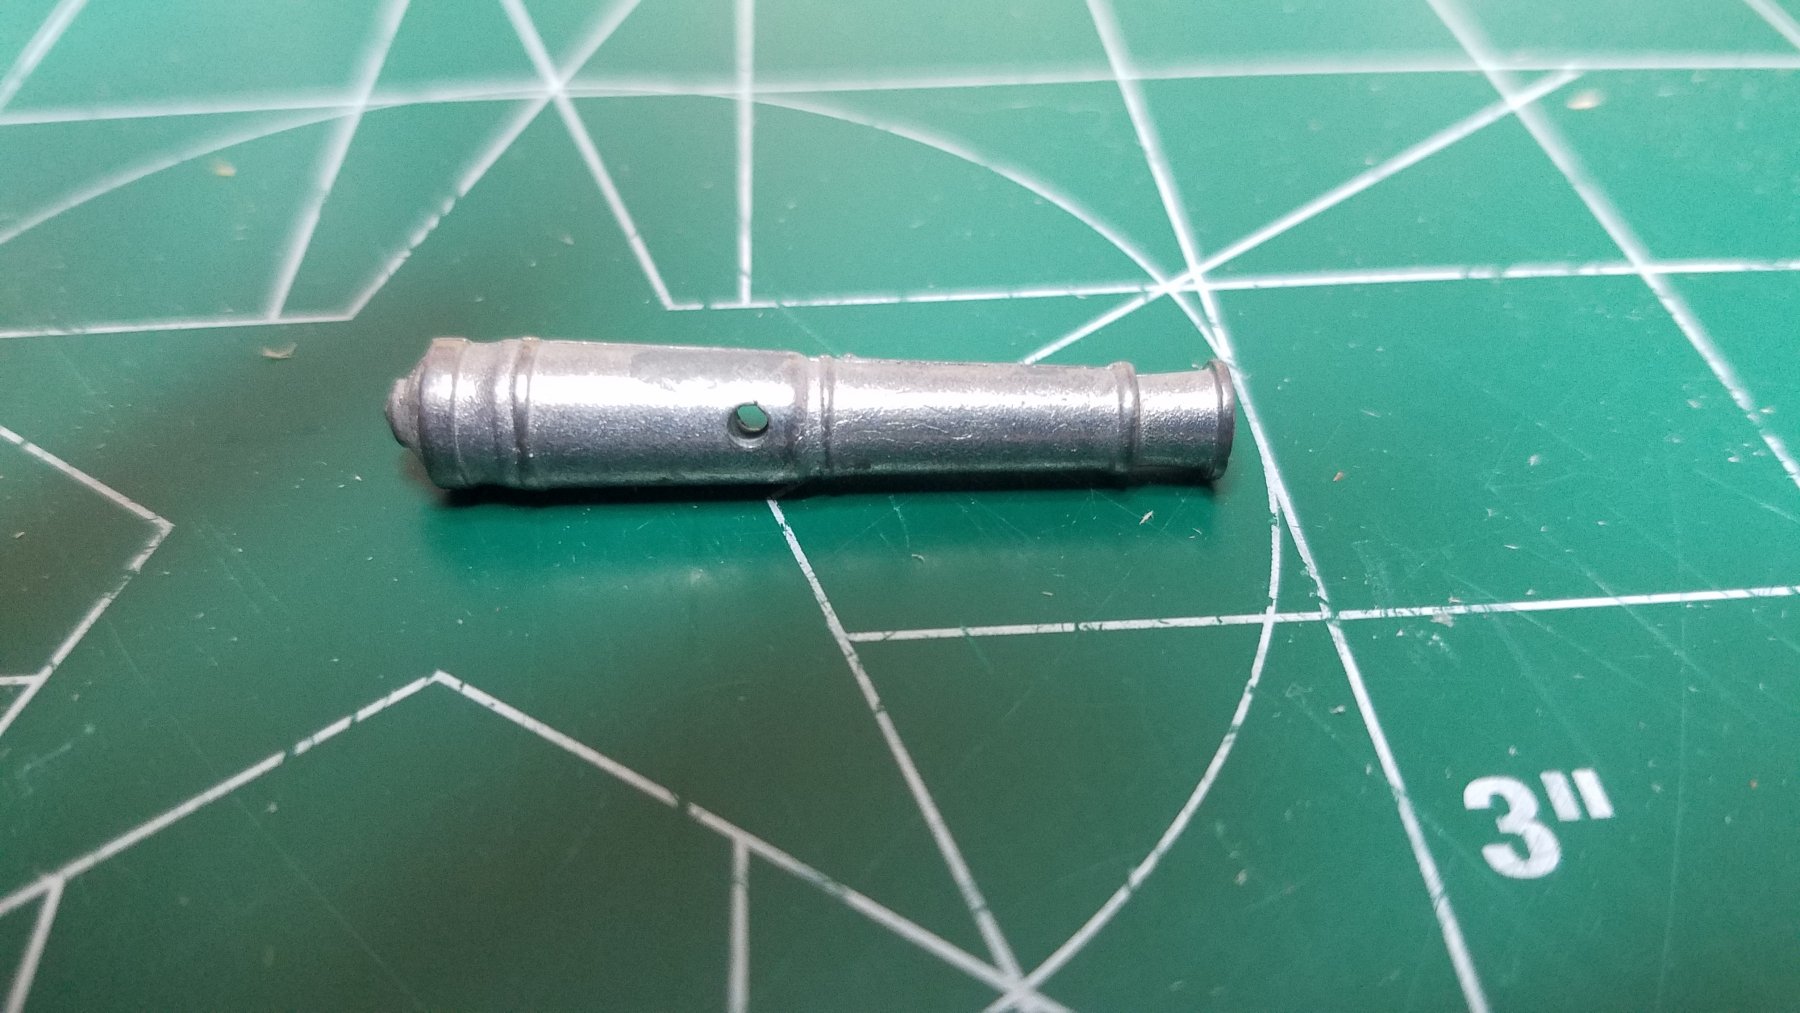
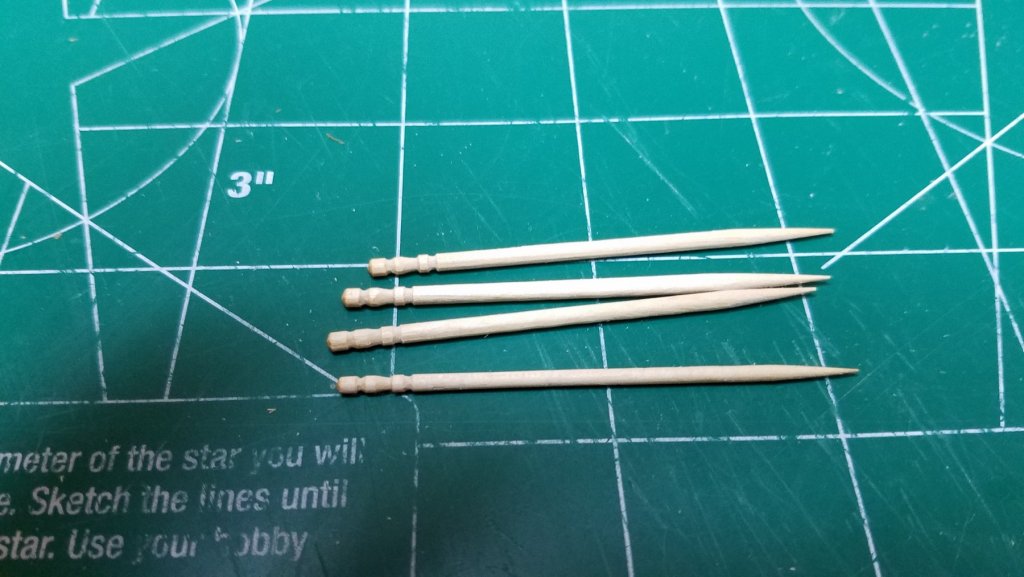
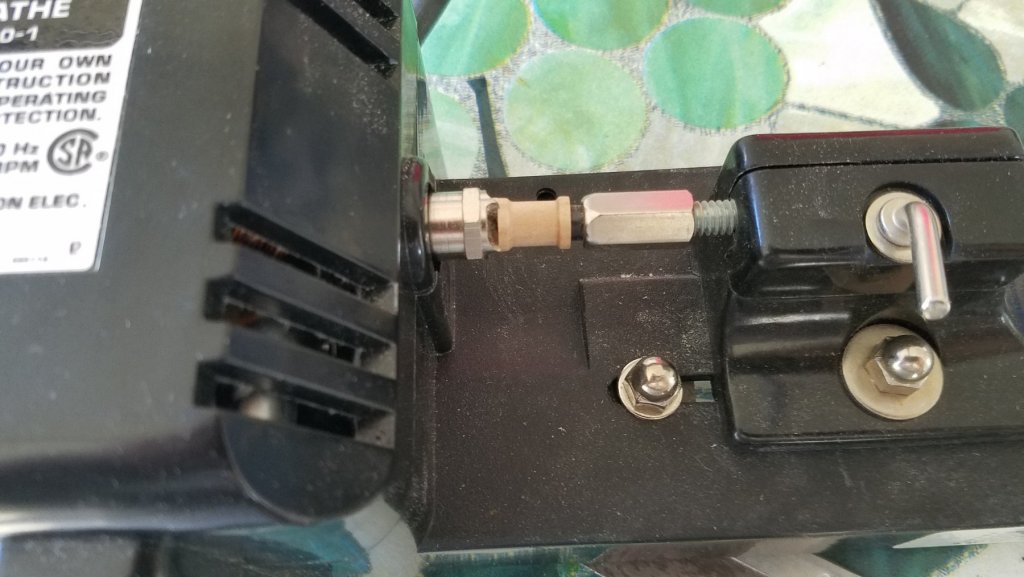
Well I had an epiphany at work today. I Ordered the cannon barrels from Syen but I had no idea if they would fit in or work with the kit supplied carriages. So I ordered the carriages from Chuck and now am at kind of a standstill as far as cutting out the gun ports goes until they arrive. I am not sure what the height of the barrel will be so I may need to adjust the ports up or down accordingly. So I installed the vertical frames for the remaining gun port. Then decided I would build one of the kit supplied guns just as a comparison. The wood is very nice and the cuts are clean. These are the only wood parts for the carriage. I spent quite a bit of time removing the char. Waiting for glue to dry. you can see the brass rod on the right is intended to be used for the axles and trunnion it is way under sized and a very sloppy fit. I would not even consider using it. Using the brass wheels as a draw plate I was able to draw a toothpick down to the correct size. Now all I need to do is wait for the mailman. In the mean time I have to finish my capstan. I will get back on that tomorrow.


- 139 replies
-
- 3
-
-
- san francisco
- artesania latina
- (and 1 more)
-
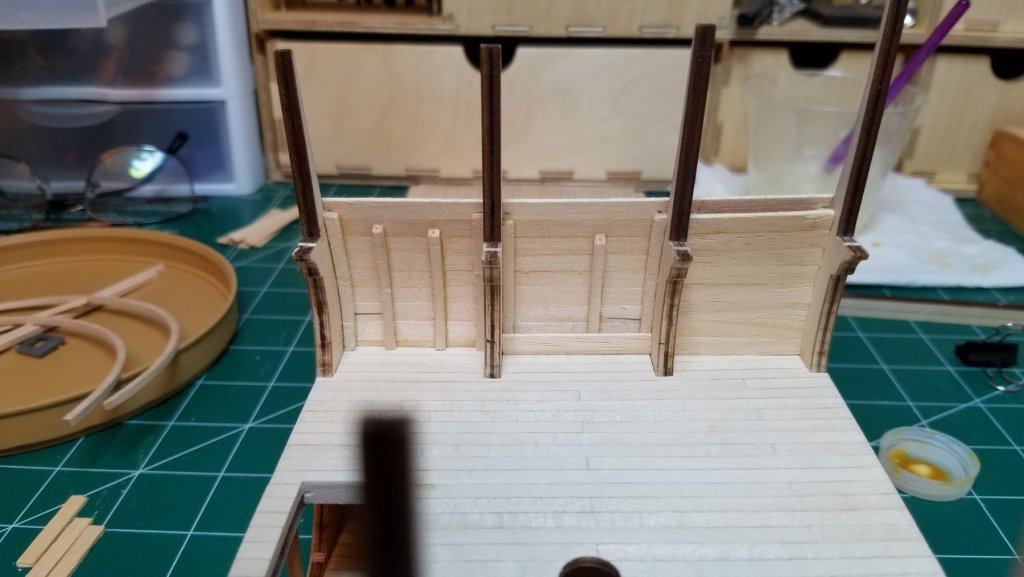
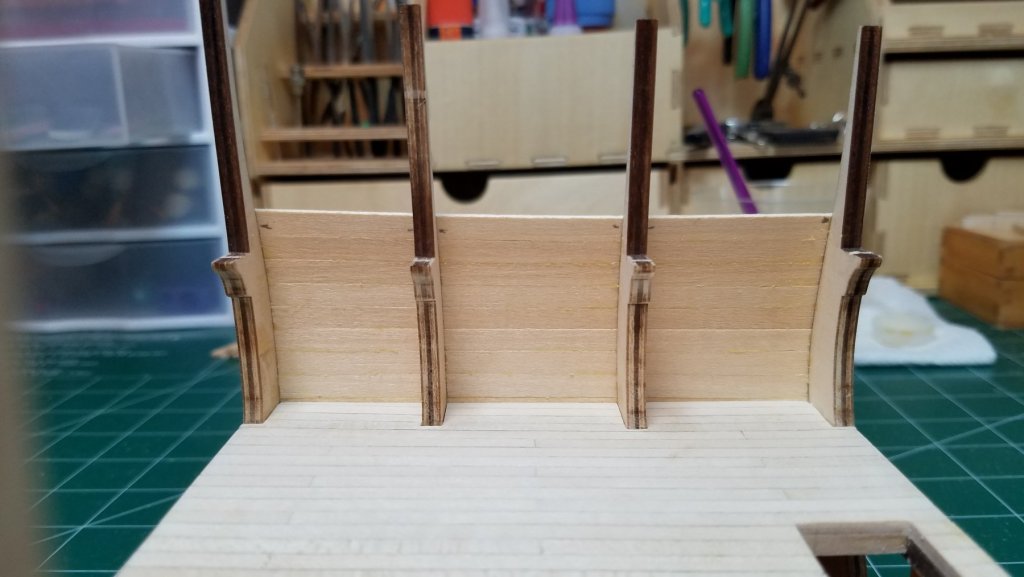
Thanks once again for all the likes. I have spent this evening very carefully laying out the location of the gun ports on the starboard side middle deck. Inside and outside. This step has me very nervous so I am taking great care to get them right. I have one framed in, the head and sill are just set in place to get the spacing right. Hopefully I will get the second one done tonight. In any case as I said cutting a hole in my planking has me a little nervous so no rushing here. If it has to wait until tomorrow so be it. I will get these two done completely before starting on the port side. That's it for tonight Best Regards
- 139 replies
-
- 1
-
-
- san francisco
- artesania latina
- (and 1 more)
-
Thanks Jim I am not really sure yet as I said in the beginning there is so much exposed plywood in this project that I will take them one at a time. I am afraid that trying to cover it all would be a real mess. As for the ends of the decks there is still quite a bit of sanding to do there so I will wait and see. Regards
-
Welcome aboard. And by the way if you made it here I think the fact that you are an addict is taken for granted.
-
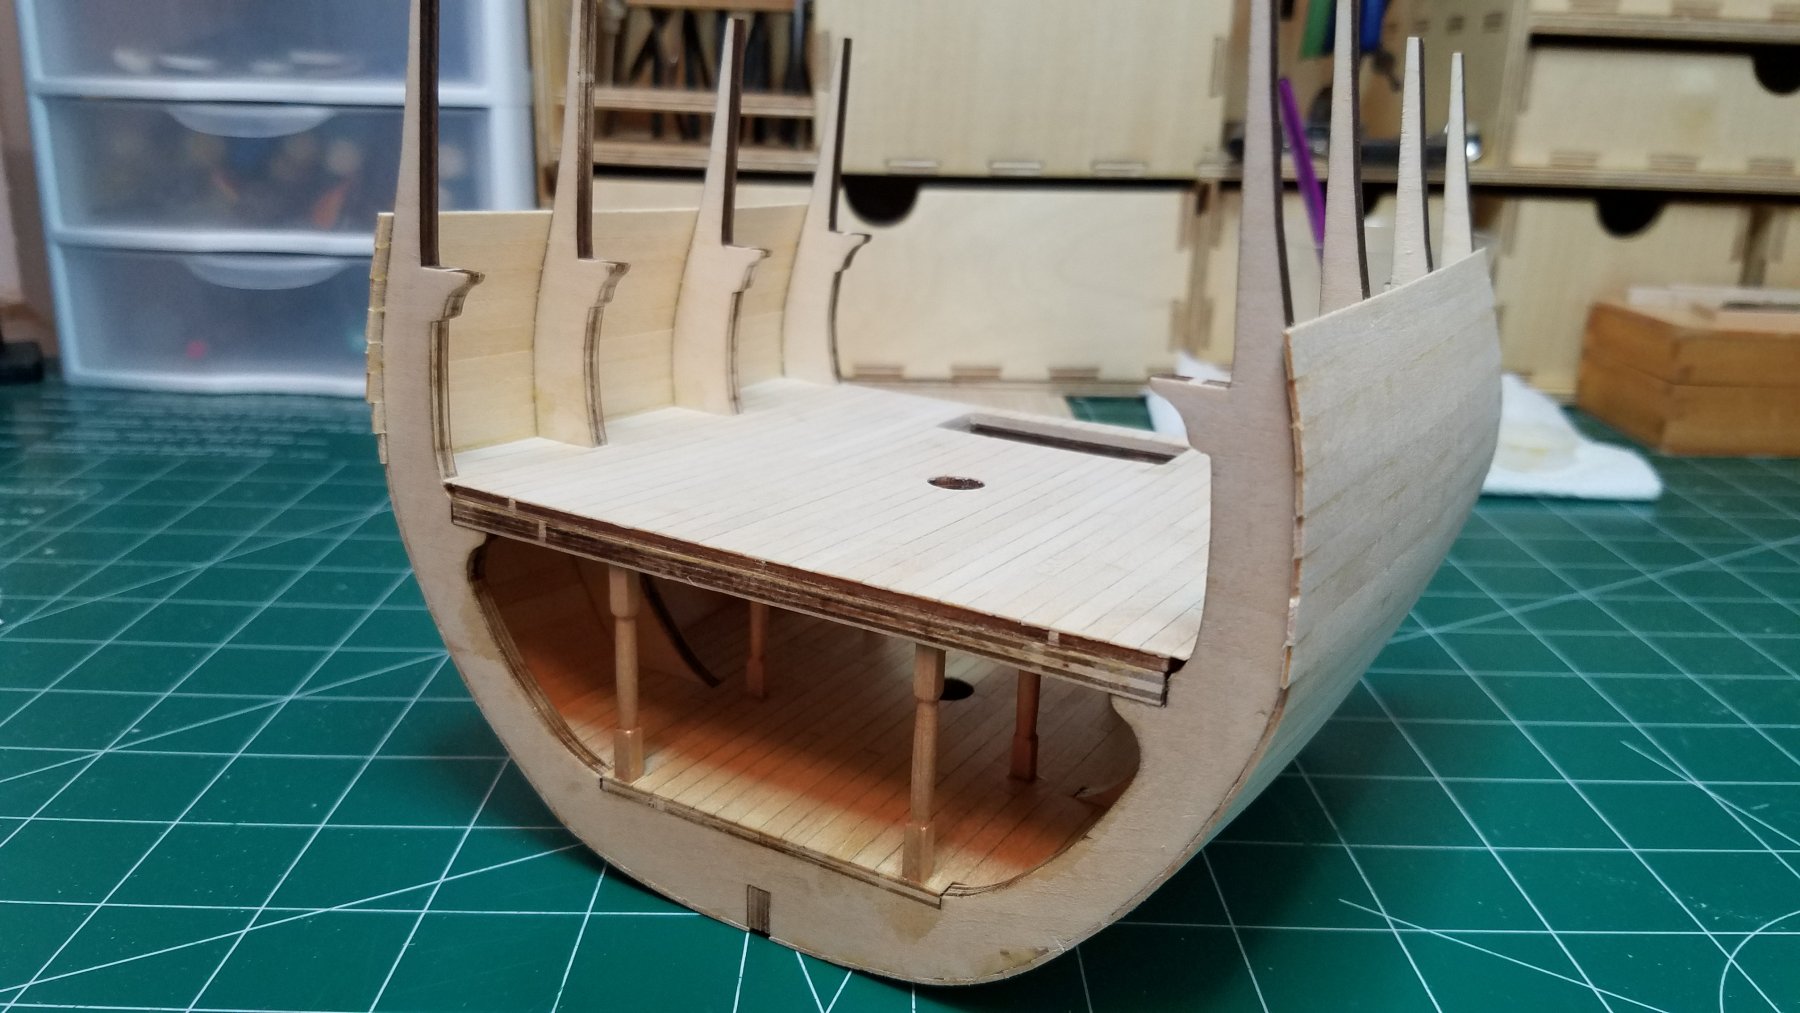
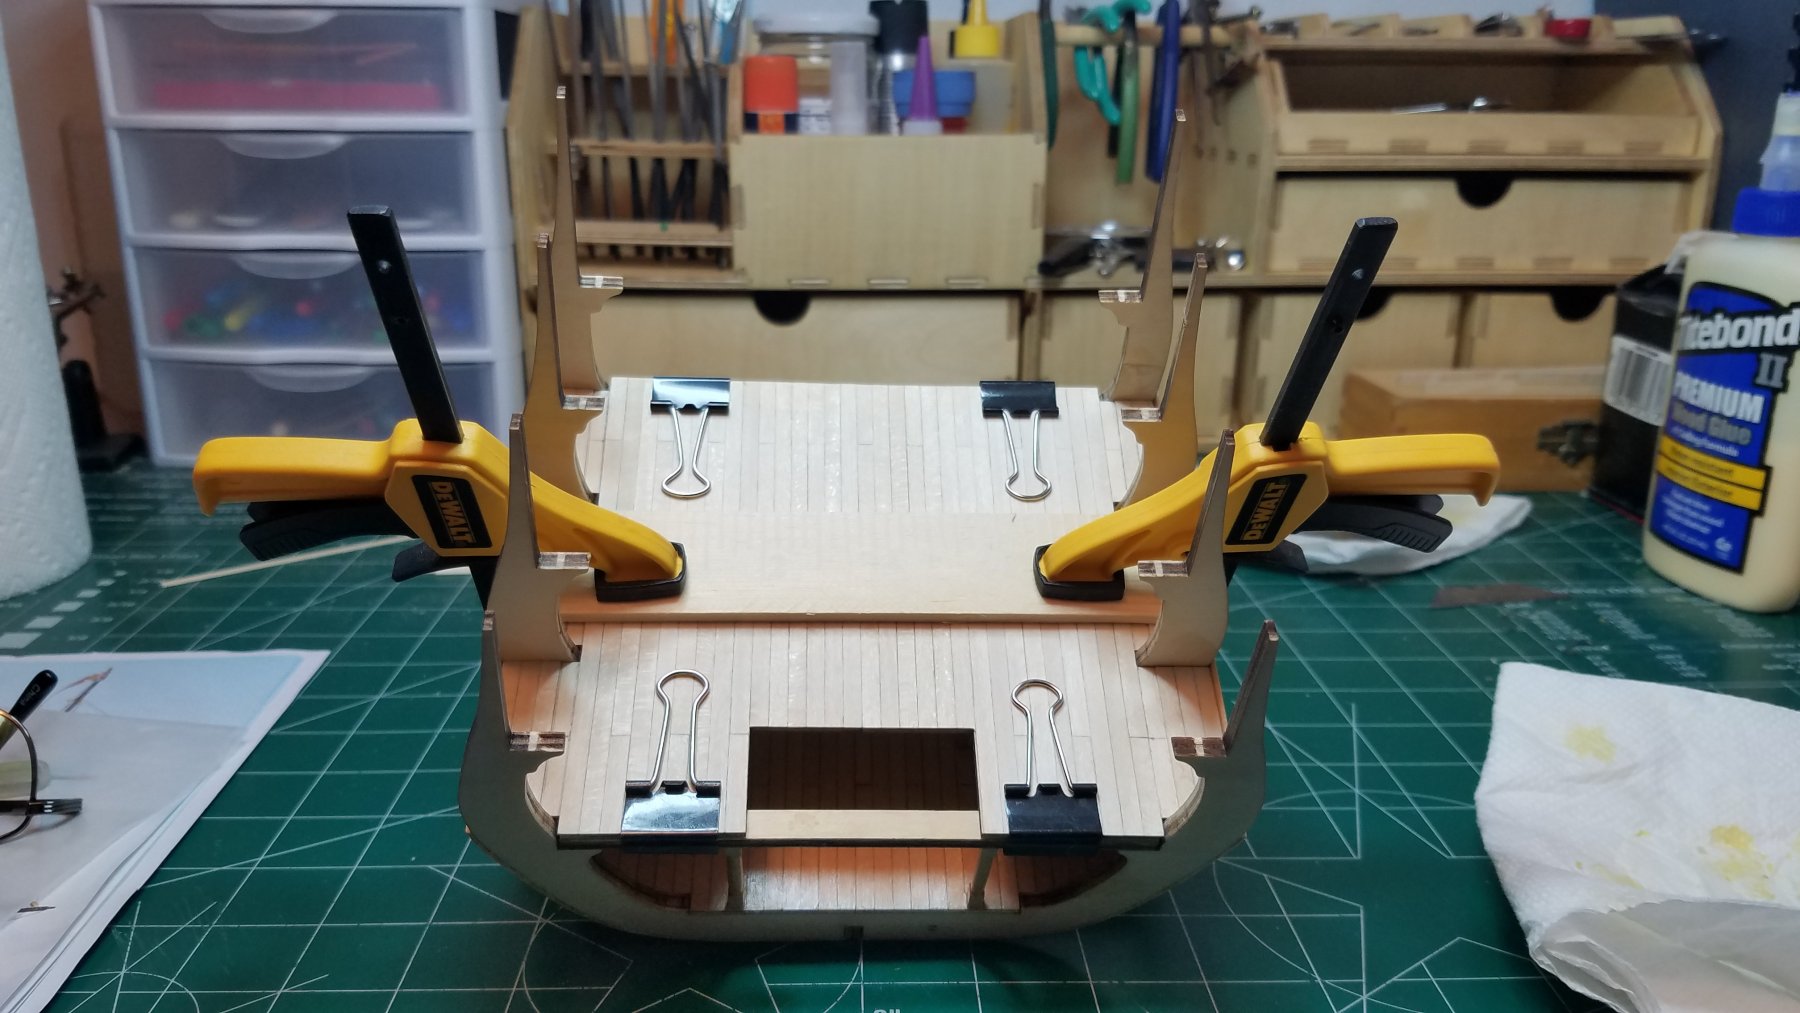
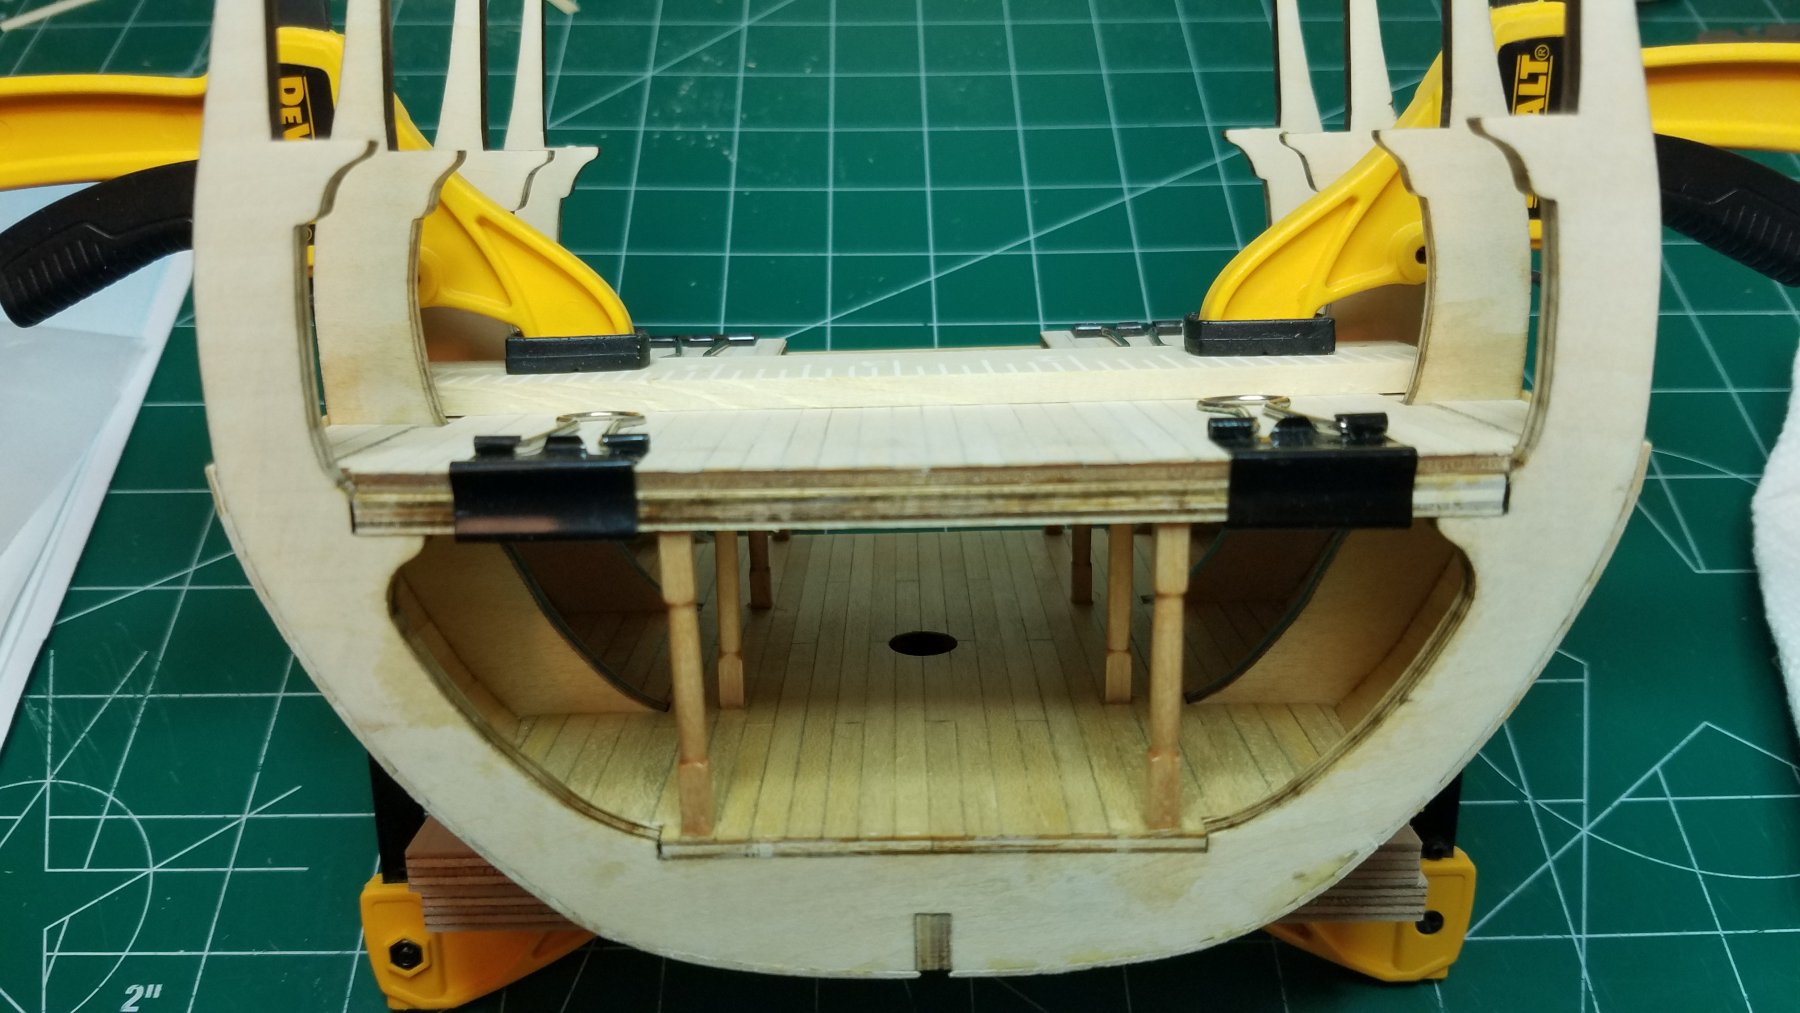
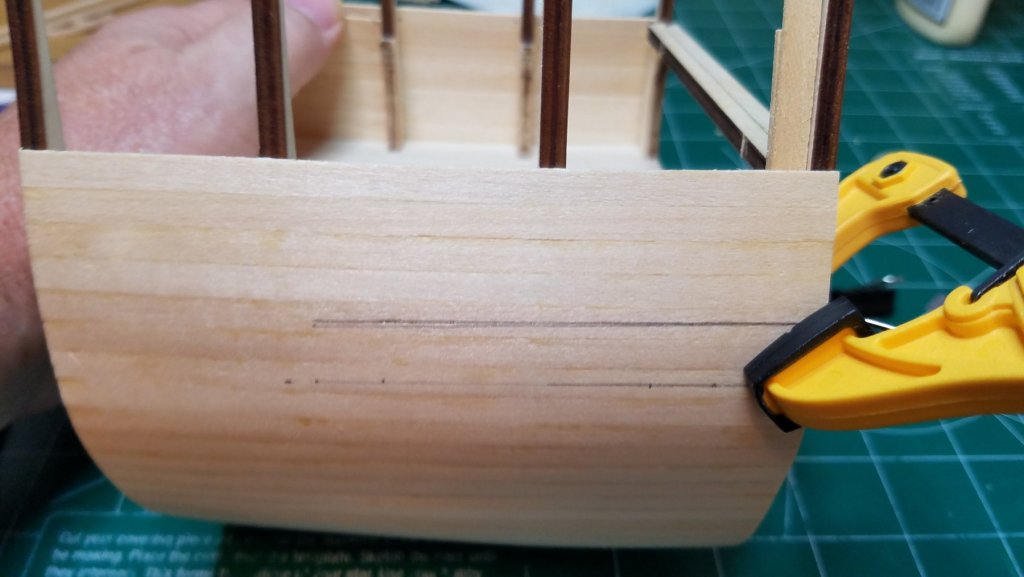
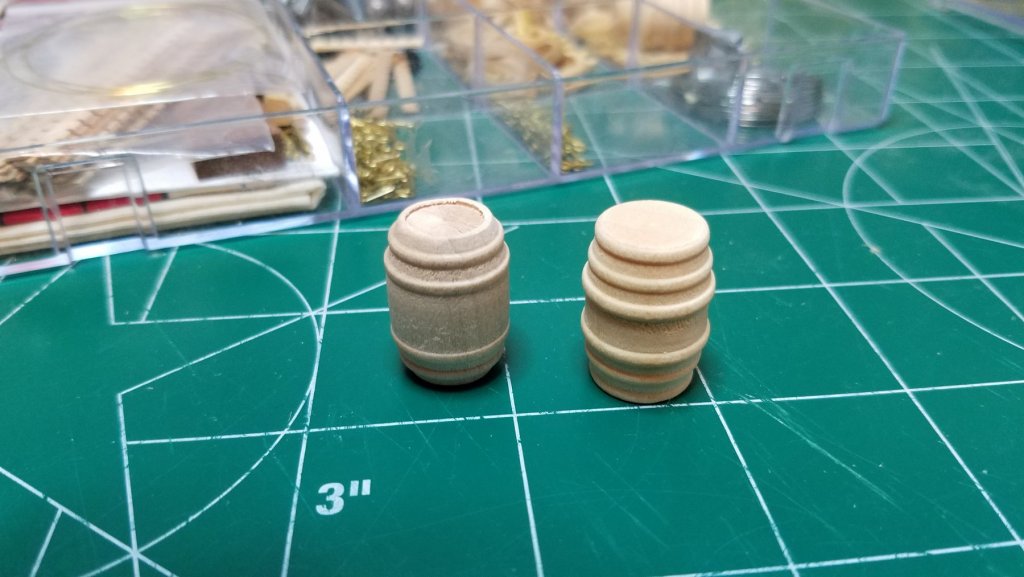
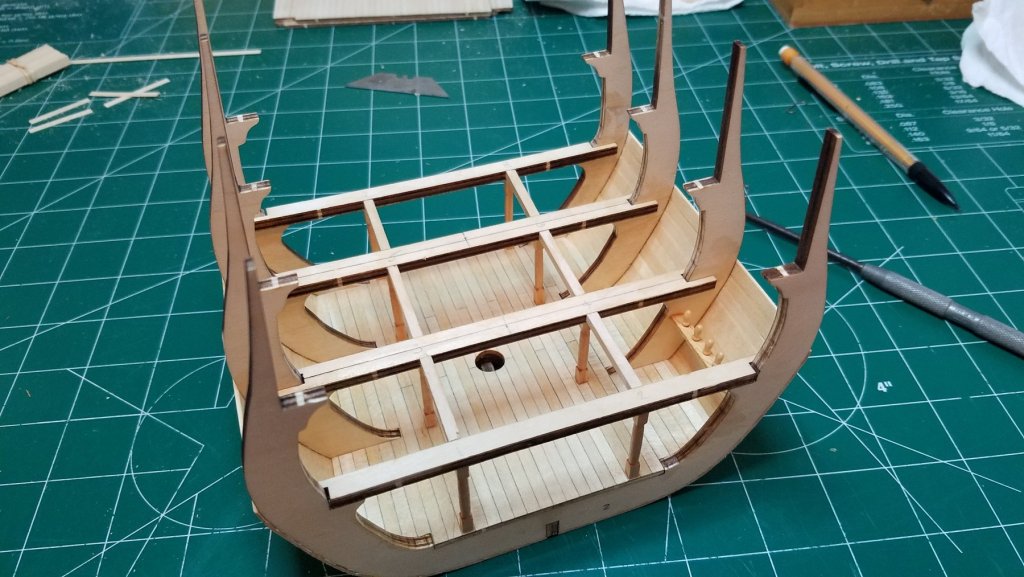
I finished the planking up to the point I wanted last night. Then I tried my hand at bending some 3/32" bass wood strips. I found that a Maxwell House plastic jug lid is exactly the diameter I needed to match the curve of the hull. I placed the strips in a pot of water and brought it to a boil for about 5 minutes, then turned off the stove and let them soak for about another 5 minutes. I let them sit over night. I still wound up with 1 or 2 kinks but overall I am happy with the result. I would still love to know how some guys get the tight bends they do. This morning after trimming the and sanding the ends of the planks. I made some tic marks where the top of the planking will meet the upper deck. Note the sheer making them all slightly different. I started with the aft most frames as there will not be a gun here on this deck. Cut and installed 2 "sub-frames" and started planking. I figured if I did not like it when I was done with this small section it would be easy enough to rip out without too much damage. Finished and trimmed to mate up to the deck above. Overall I don't think it looks too bad and I think it will produce the desired effect in the gun ports. I liked it so I did the opposite side as well. Then I took my Grand Daughter to Hobby Lobby for some new coloring books and while I was there for $1.99 each I picked up a package of the small wooden spools you can see in the above pic (more on them in a later post) and a package of 7/8" wooden barrels. The barrel on the right is the kit supplied one and the one on the left the Hobby Lobby product. I prefer the one on the left. Nine of them for $1.99 not bad. That's it for tonight Its back to work tomorrow so it is almost beddy bye time. Thanks for all the likes. To all you veterans out there like me I hope you had a great Veterans Day.


- 139 replies
-
- 5
-
-
- san francisco
- artesania latina
- (and 1 more)
-
I have been thinking about putting one of these on the admirals shopping list for Christmas.
-
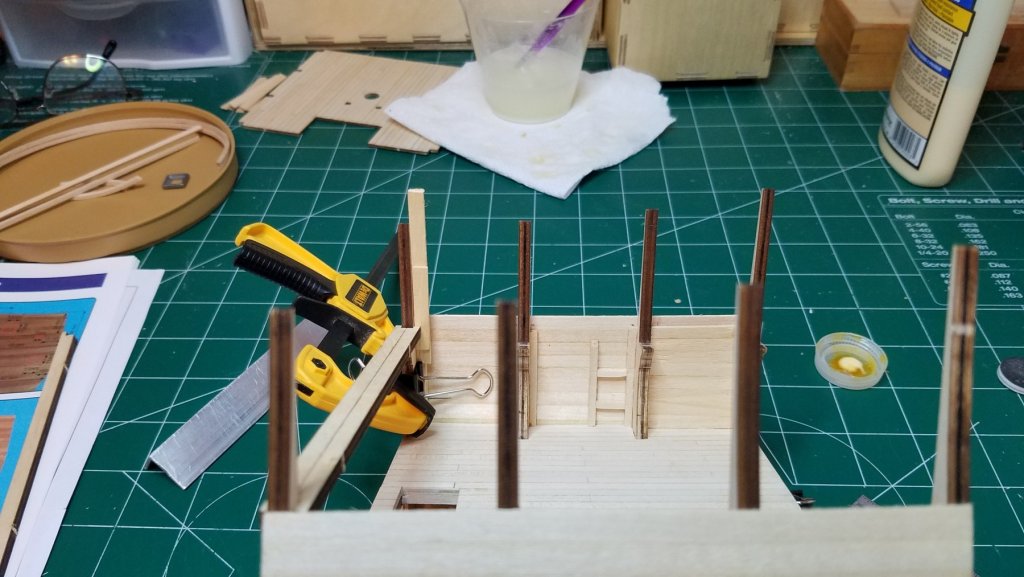
After our usual after church breakfast I resumed planking. I have decided that once I get the planking complete up to the main deck level I will add some 3/32" framing on the inside of the outer planking then plank the inside. This should only add about 1/8" to the bulkhead total thickness so it should not interfere with anything. I think it will allow a more realistic attachment for the cannon rigging as well as adding some depth to the gun ports. I also got started on the lower capstan. I used a slightly smaller dowel (3.5 vs 4) mm and reduced the number of vanes from 8 to 6. This is as far as the kit instructions would have you go. Just drill the holes for the levers in the dowel and install it. By reducing the number of vanes I will hopefully be able to add some fillets and a proper head for the levers to attach to. I also just ordered 12 black resin cannon barrels from Chuck at Syren Model Ship Co. Link Here. I got 12 because I will most likely trash a couple since I have never worked with them before and if not it never hurts to have extras laying about. It is time to add another course of planking so I will check with you all later. Regards


- 139 replies
-
- 2
-
-
- san francisco
- artesania latina
- (and 1 more)
-
Mind if I ride along for this one? I have the AL kit waiting but I am sure as always there will be lessons to learn.
-
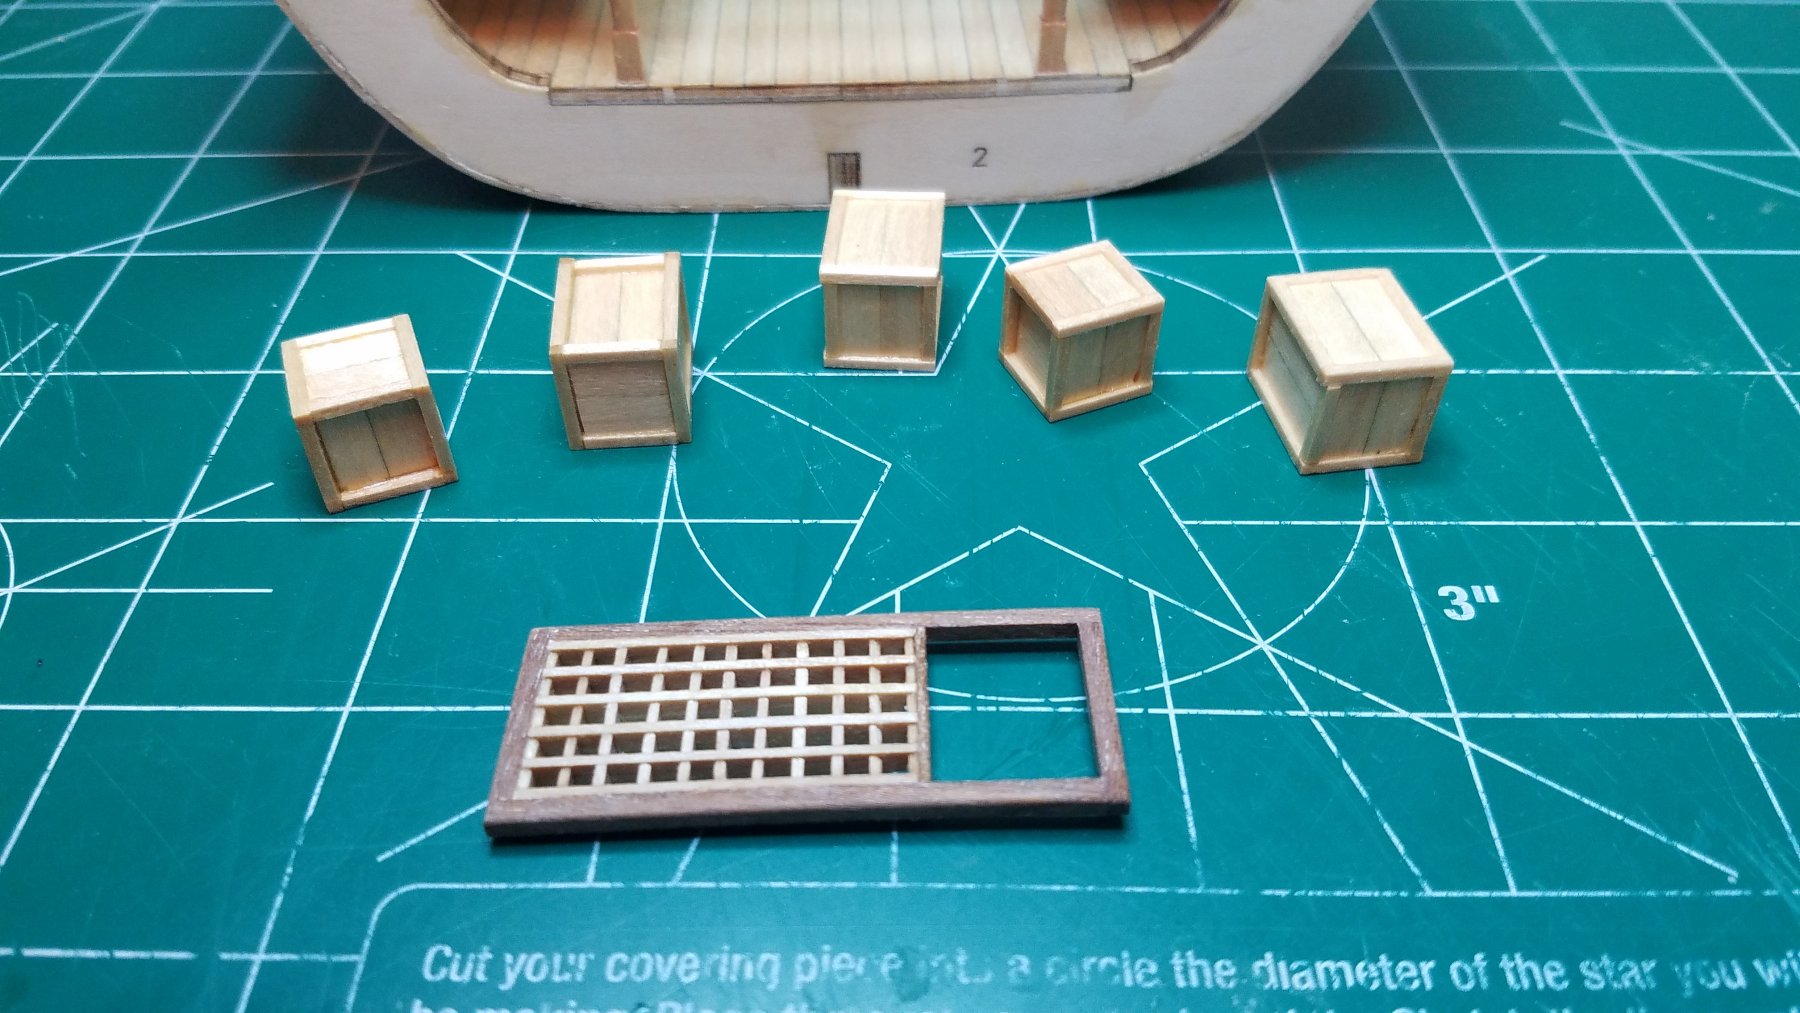
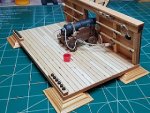
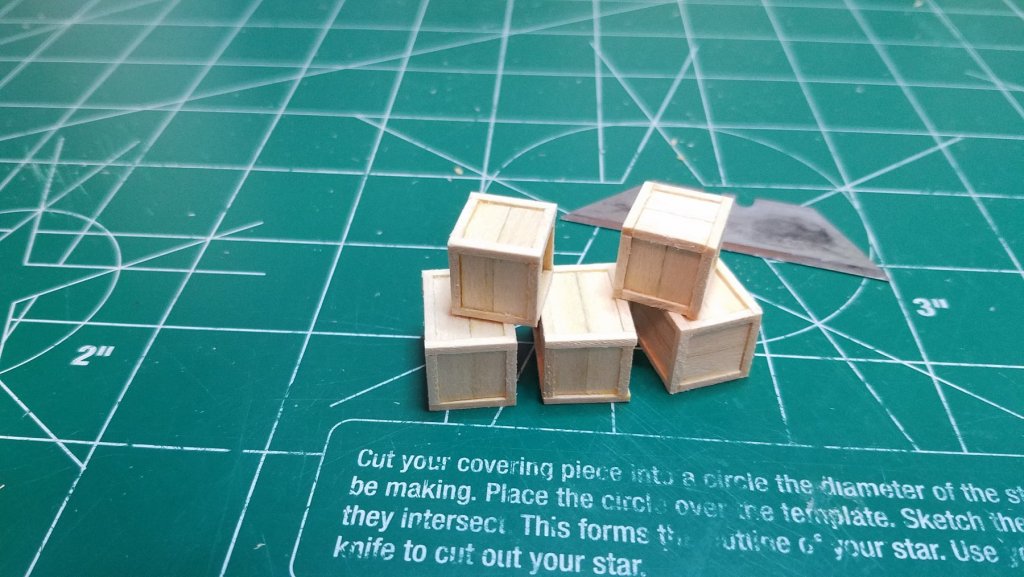
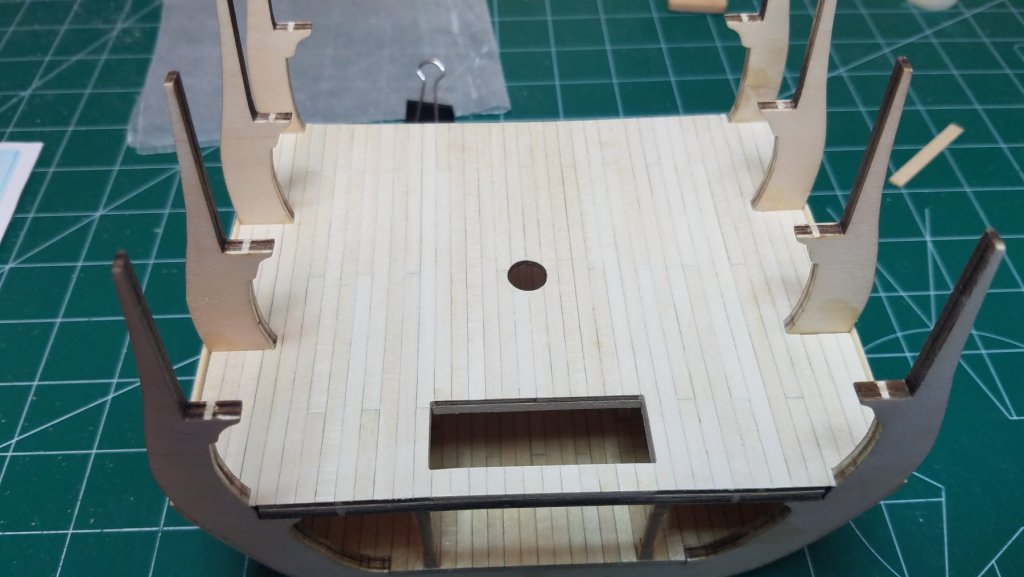
Did not get as much done today as I would have liked. The crates got a couple coats of poly and I managed to complete the coaming. Regards


- 139 replies
-
- 4
-
-
- san francisco
- artesania latina
- (and 1 more)
-
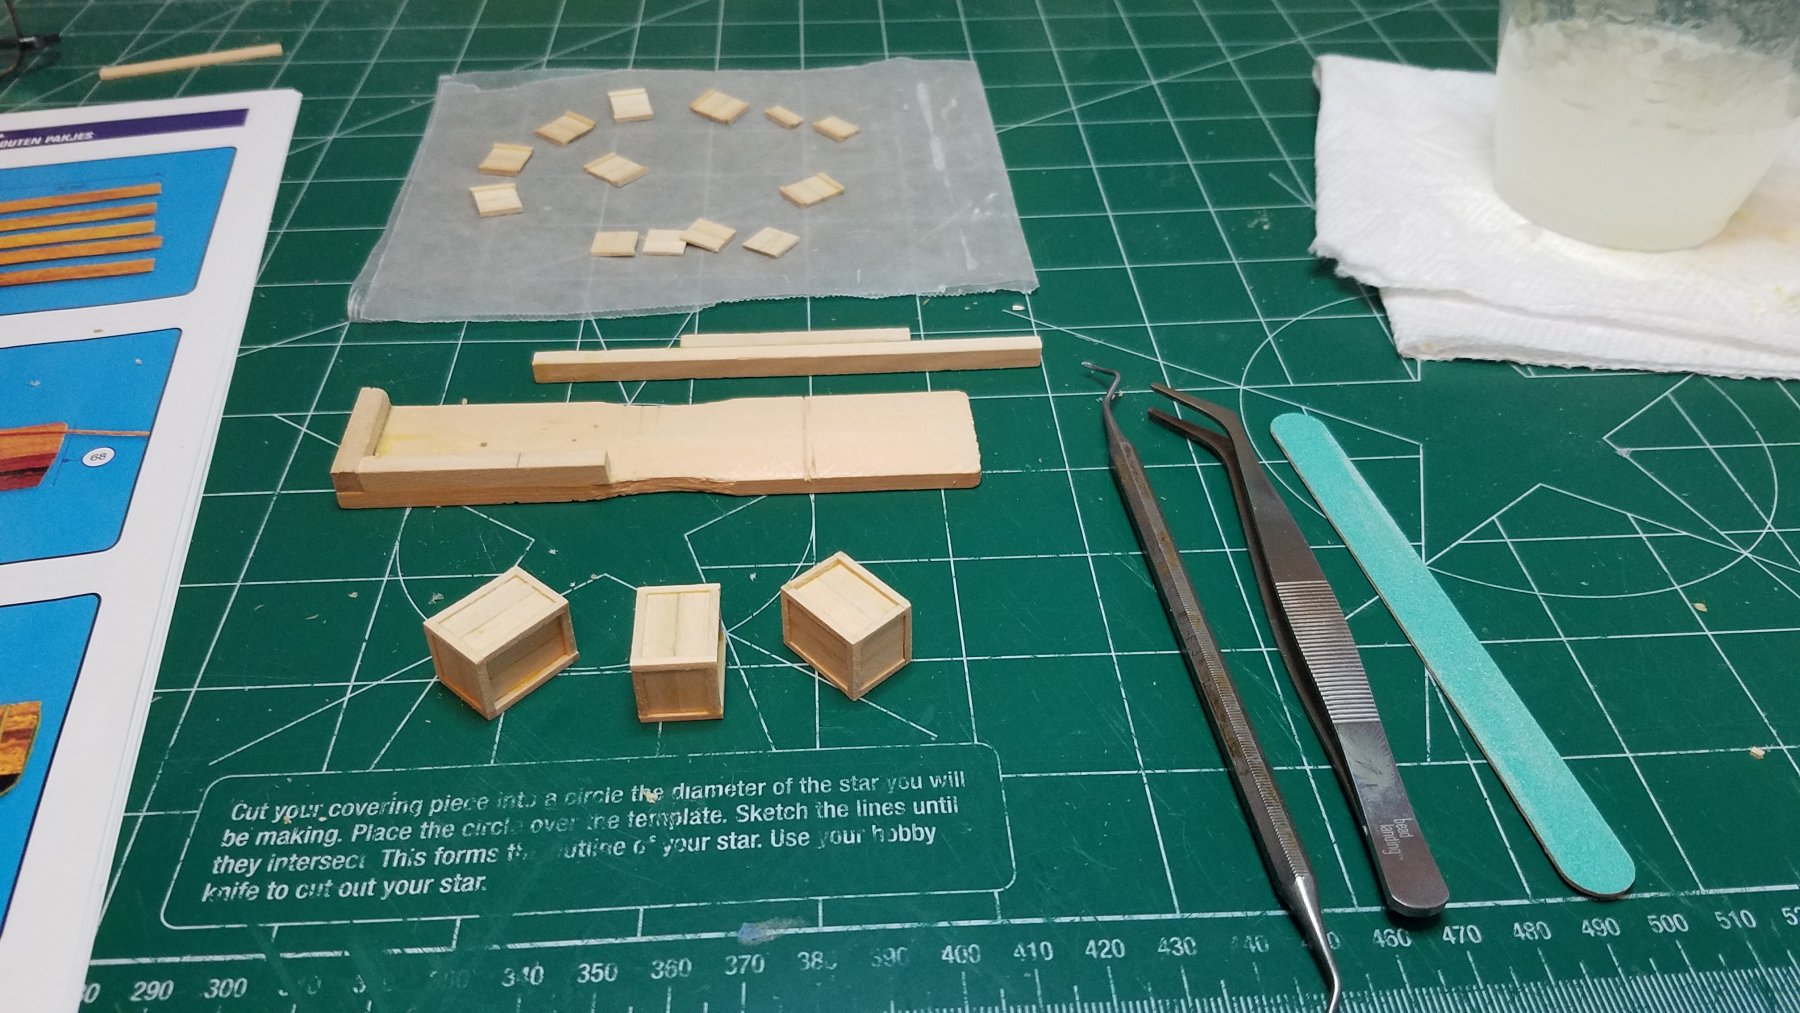
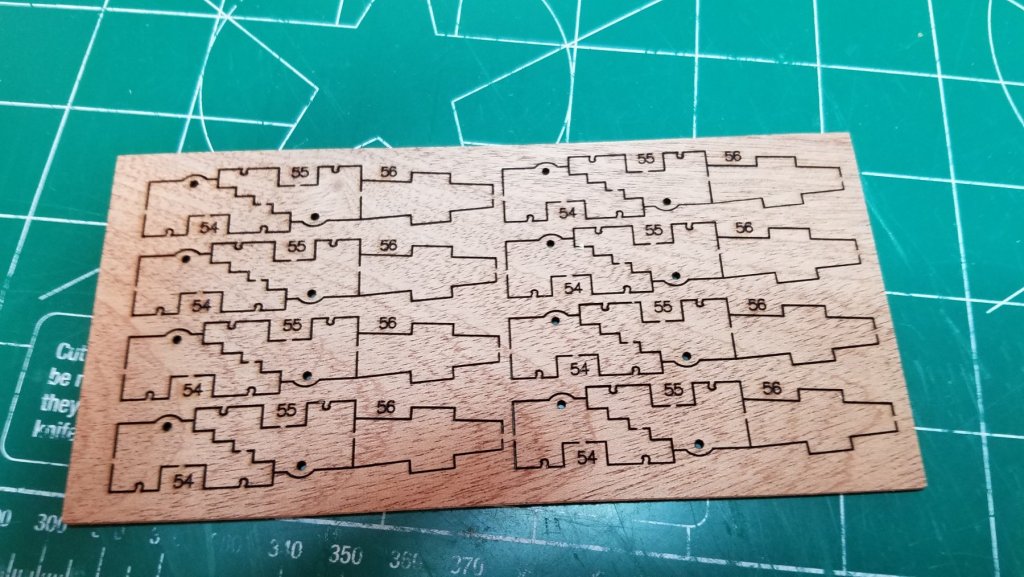
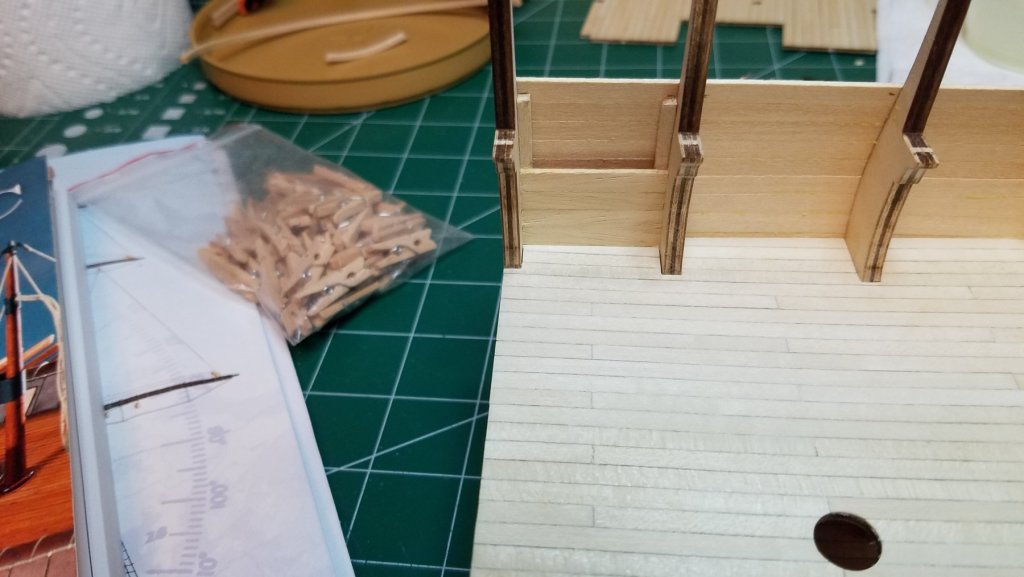
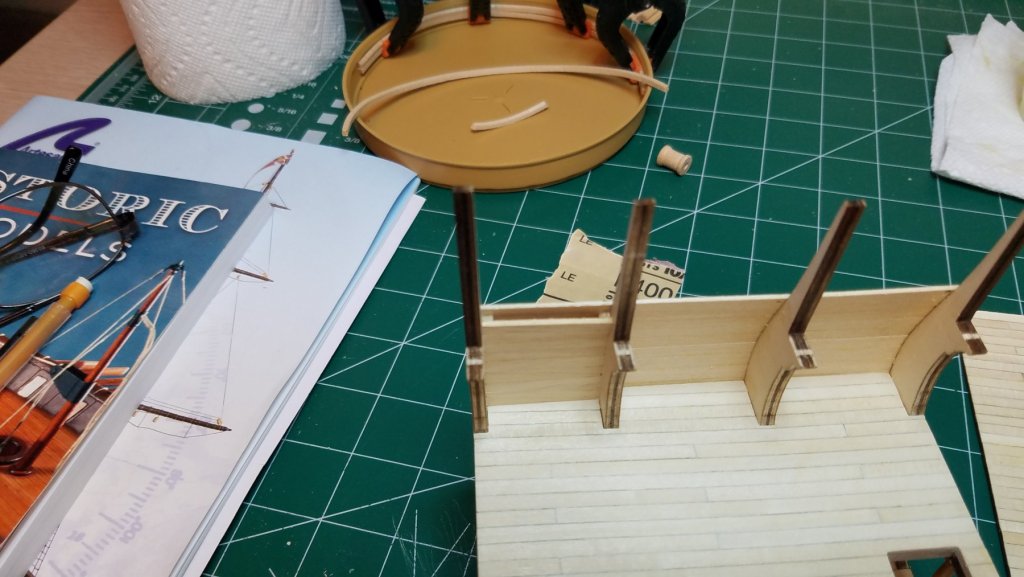
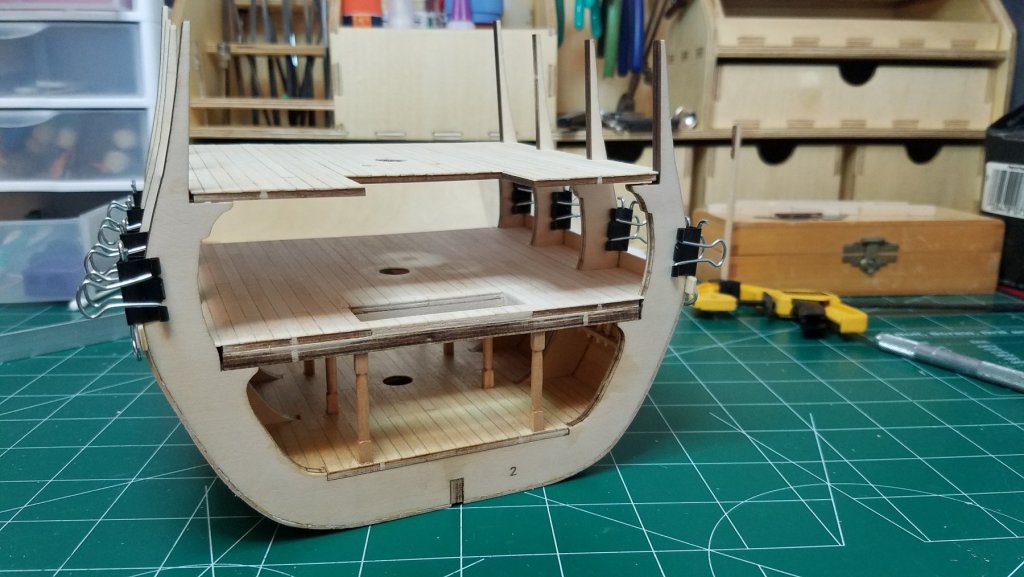
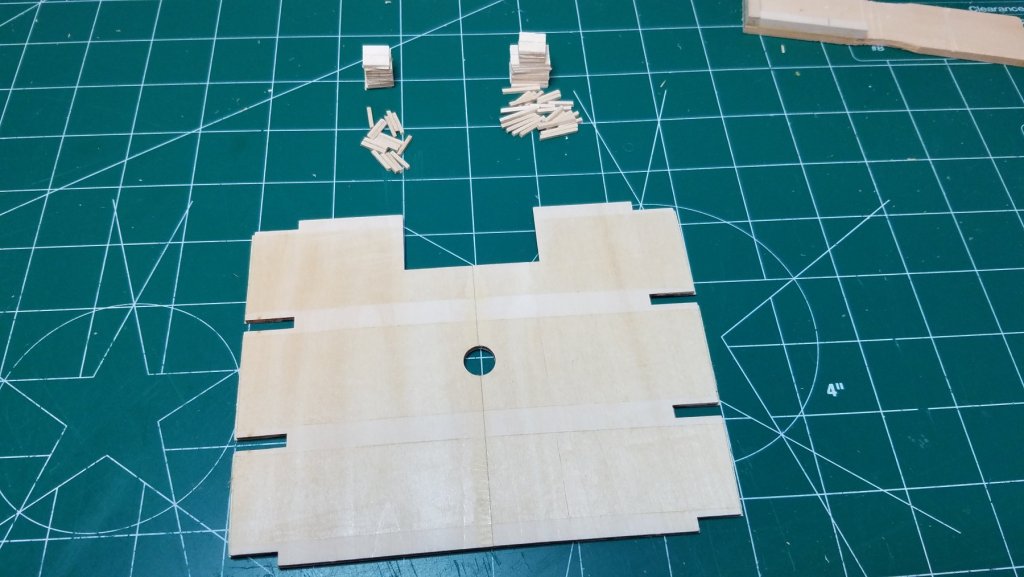
For the last couple of days I have been working on these. They really tested the limits of my fat fingers that is for sure. You can see the little fixture I made for holding the little pieces square while I worked on them. The pieces in the back are for 2 more even smaller ones. Some clean up and final sanding then it is off for a couple coats of wipe on poly. In the mean time I have run into a couple of other small problems. First the cannon. Besides needing a bit of work to remove the mold marks. The cascabel is missing a proper knob. The easy but rather costly fix is to order new cannon from Syren and be done with it. That would add 1/3 of the cost of the kit itself. Not out of the question but I will try some Yankee ingenuity first and see if there is not a way to attach small bead or something. The other issues are in the details provided or not provided with the kit. First there is no framing for the gun ports on the middle deck. This would not be an issue if the inside were planked like normal. As it is the instructions call for simply cutting a hole in the outer planks and that is it. No supporting structure inside. I have a couple of ideas to deal with this one. I an very much leaning towards building up some sort of framing and then planking the inside. Second the scale of the kit supplied capstan seems a little large to me and not very detailed. I plan on using most of the kit supplied parts and adding some details from the NRG paper on capstans as well as some other sources. At the same time reducing the size just a bit. But for now while the poly dries on the crates I am off to fabricate the coaming for the grating and ladder well. Thanks for all the likes. Regards


- 139 replies
-
- 2
-
-
- san francisco
- artesania latina
- (and 1 more)
-
Welcome aboard Dave. By the way it is never too late to start a build log. Best Regards
-
Adding the pintles and gudgeons to that rudder might be a small thing but you just made that ship your own. Great idea and nice work.
- 88 replies
-
- 1
-
-
- finished
- artesania latina
- (and 1 more)
-
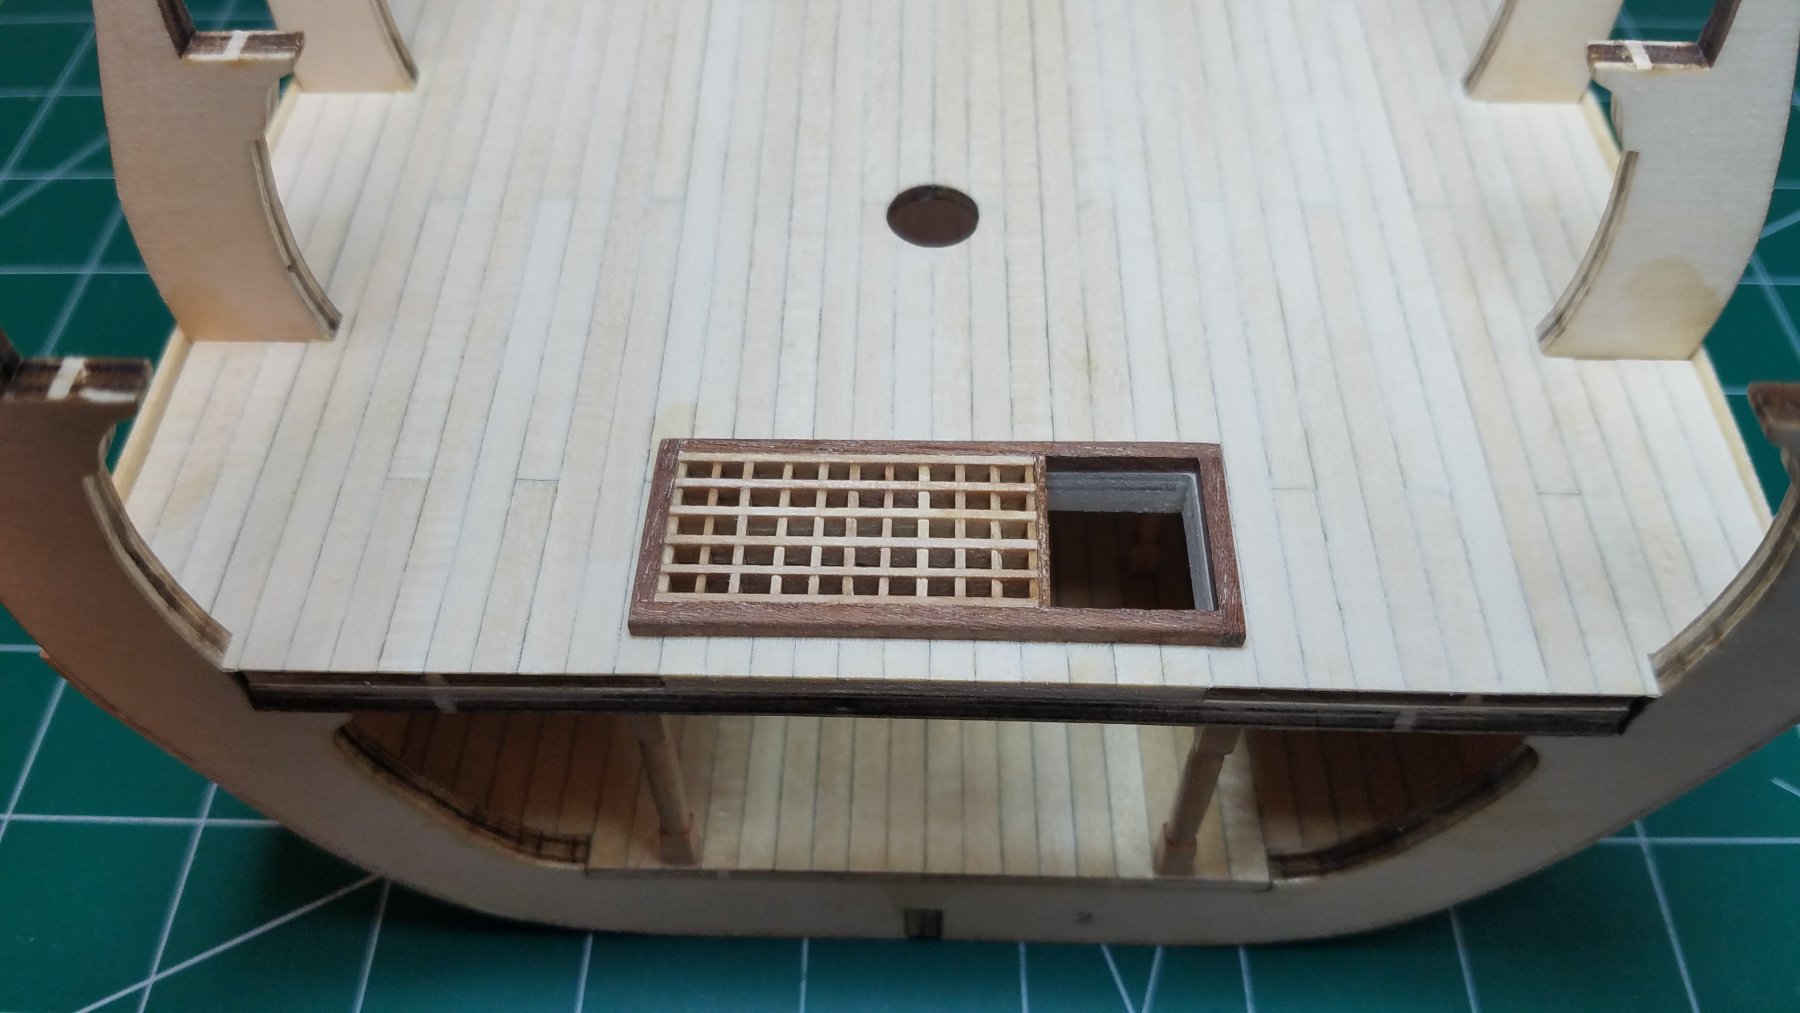
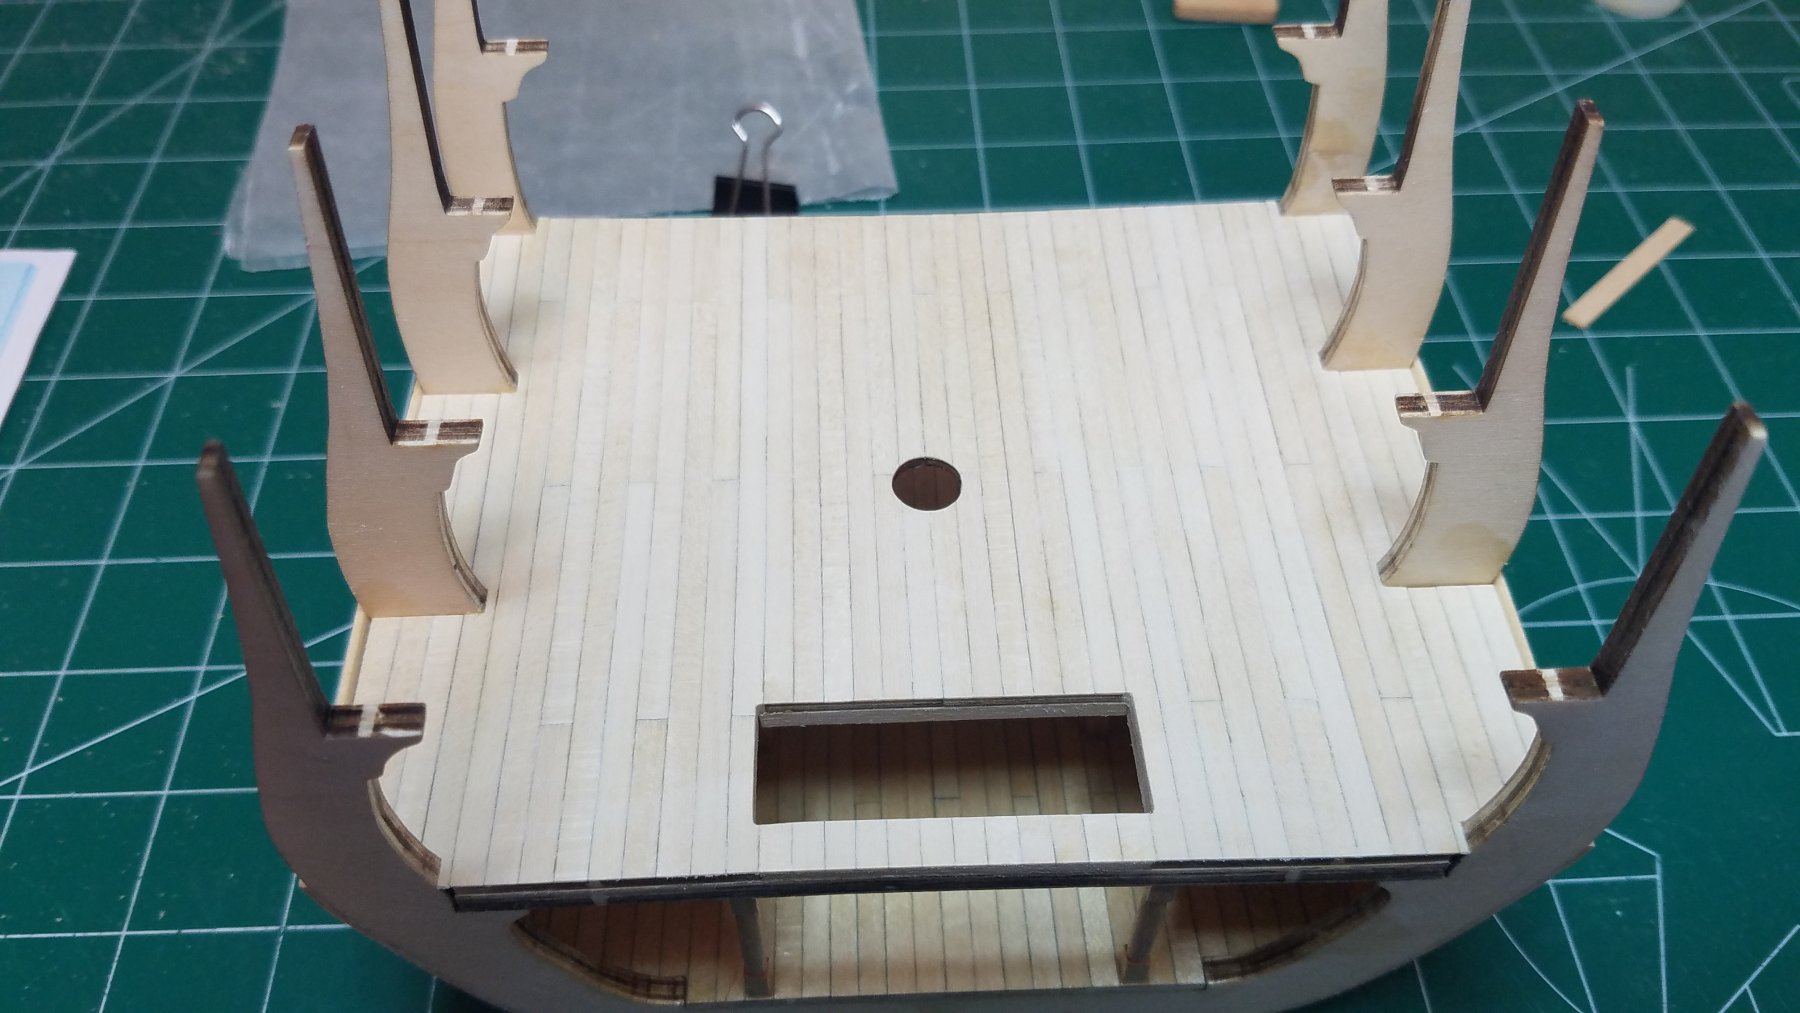
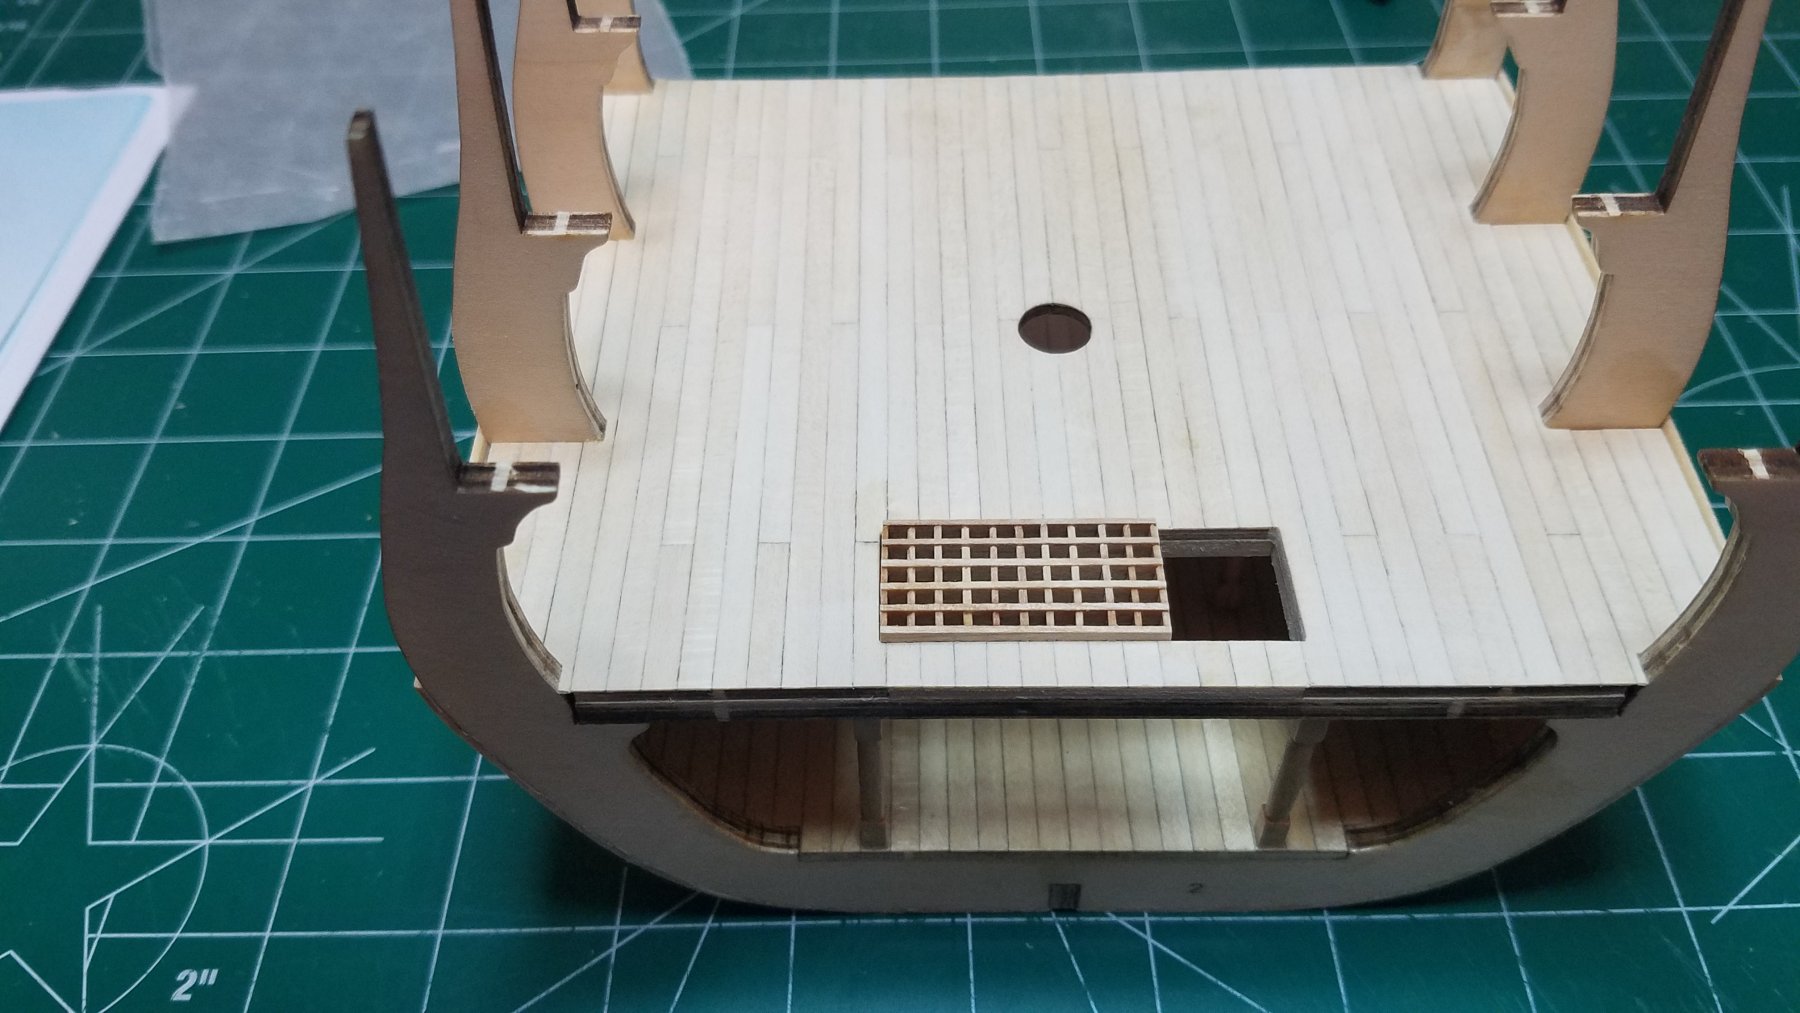
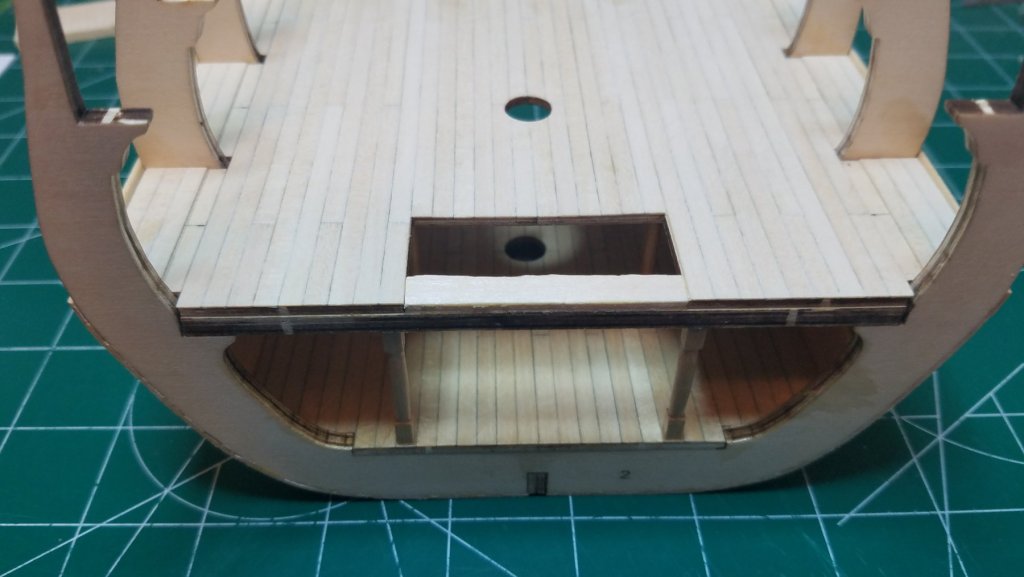
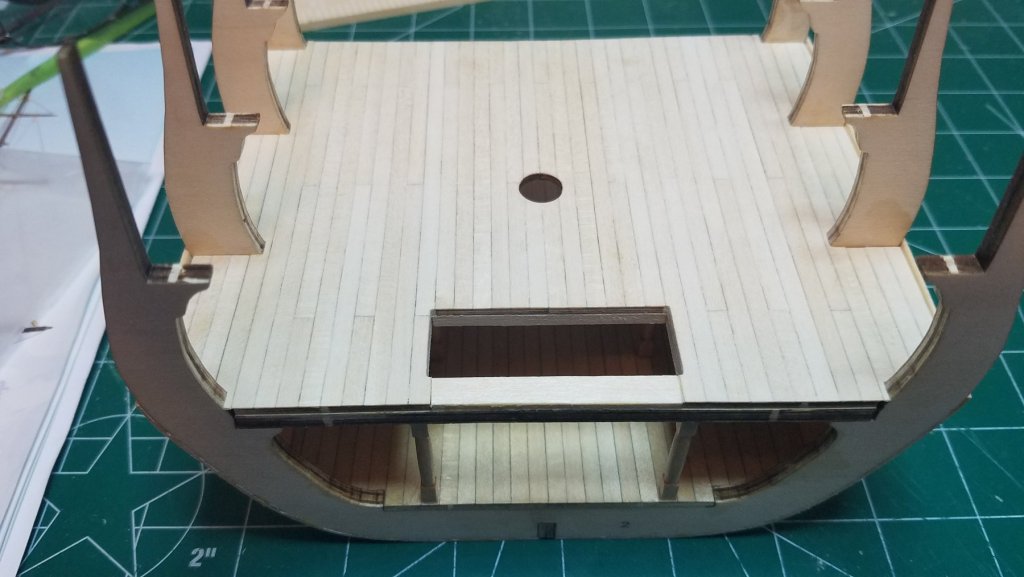
Another little detour from the instructions here. As I mentioned before I do not like the way the hatches, gratings, and ladders look in the plans. Here is why. If you take a look at the photo from the AL web site you can see that the ladders run athwart ships. Taking a closer look you will see that because of this the slope of the ladder is greatly exaggerated and not scale looking at all to my eye. So much so that it would seem that a man of normal height would almost need to sit on the steps and scoot down the ladder laying down. So I plan on having the ladders run fore and aft at a more reasonable slope than that shown. In order to accomplish this a few modifications need to be made. Again I have no historical data to base this decision on. Just my minds eye. After the clamps were removed from the deck I scabbed in a small piece of plywood from the edge of the deck sheet. Then I added the athwart framing rail under the edge of the grating opening. I also put in the two pre-cut strips of planking where the deck meets the frames. Once all that was dried I finished the hatch opening. Then I added small bits of planking to the plywood filler piece. Most of this will be covered by the coaming. My first grating ever. These actually went together very nice. Although they did not go all the way flush as you can see. once I got it all together I just wicked in some thin CA to hold it. Should I sand them until they are smooth? After trimming and sanding the edges to fit the opening I think it turned out pretty well. I still need to trim out the ladder opening and make the coaming. But that will have to wait until tomorrow. Thanks

- 139 replies
-
- 3
-
-
- san francisco
- artesania latina
- (and 1 more)
-
It is etched in there pretty deep. But a plan came to me while I was tossing and turning in bed last night.
-
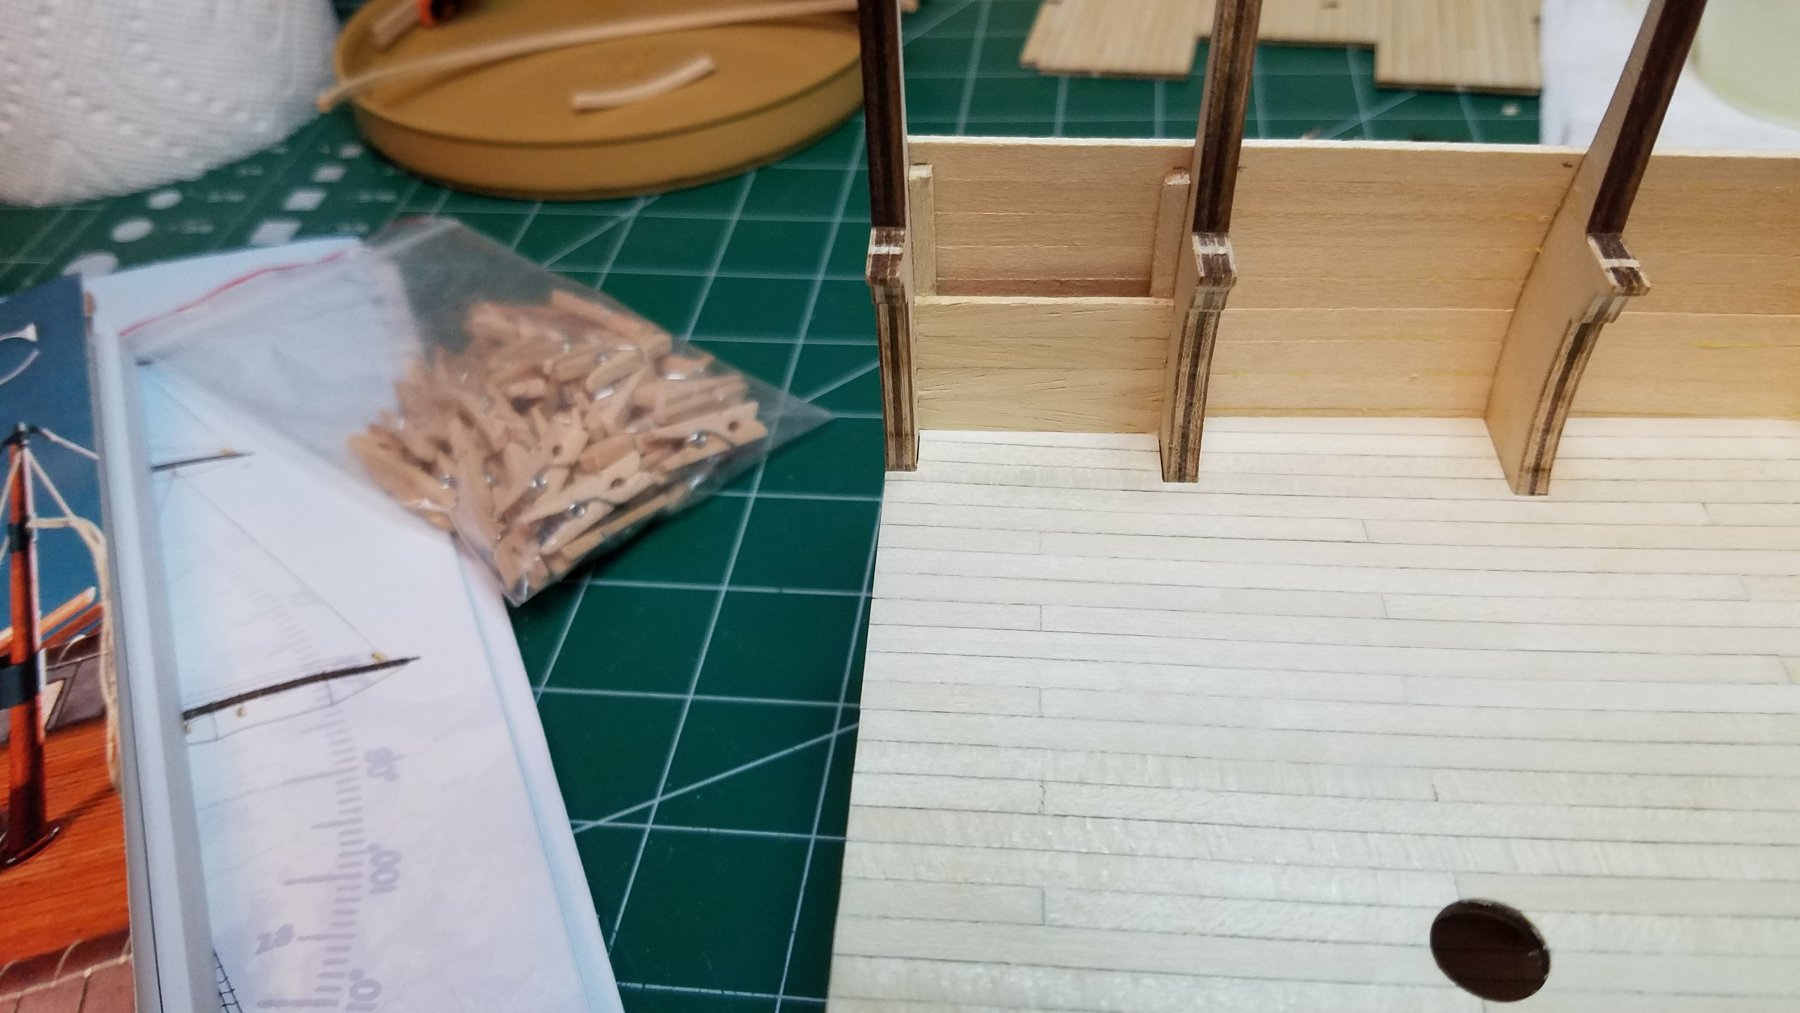
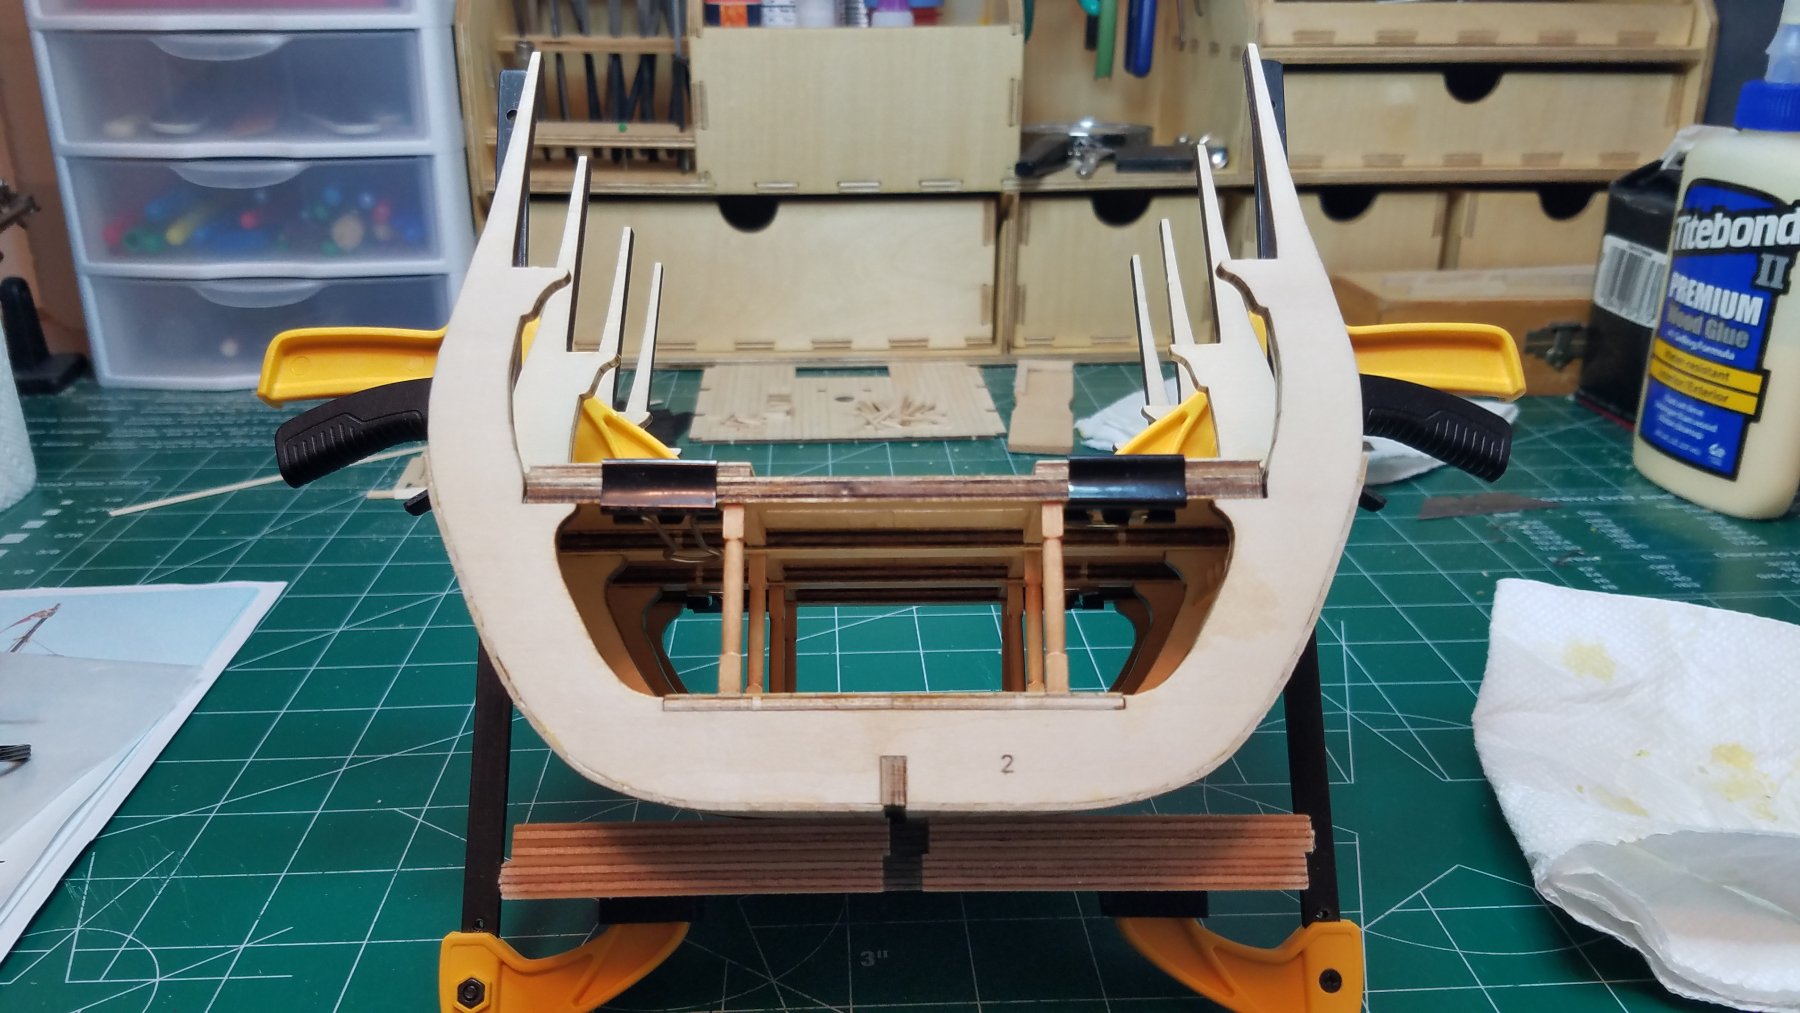
Well at last. The middle deck is glued in. I know it does not seem like such a big deal but for some reason I was nervous about getting it in place and clamped down before the glue started to set up. I wonder if I am going to be able to get rid of that big old #2. Guess I should have turned that frame around DUH! I will let that set up over night before unclamping it.


- 139 replies
-
- 2
-
-
- san francisco
- artesania latina
- (and 1 more)
-
Nice work so far. These are a lot of fun aren't they. I built the kit from model shipways in 1/24 scale and just had to build the carriage from scratch as theirs was not quite up to snuff. Can't wait to see yours finished. Keep the updates coming please. Regards
- 125 replies
-
- 3
-
-
- 9 pound naval cannon
- 3d cannon barrel
- (and 1 more)
-
Well I got up early and got the first coat of poly on the underside of the middle deck before leaving for work this morning. Then put the second coat on as soon as I got home. Also cut all the parts for the five crates that go in the hold. I will get started on them tomorrow night.
- 139 replies
-
- 4
-
-
- san francisco
- artesania latina
- (and 1 more)
-
I'm in. Keep posting. Believe me there is no shortage of help here. All of it friendly and all of it helpful.
-
Not much to update . I did manage to get a couple coats of wipe on poly on the Lower deck and bulkheads. But silly me forgot to mask and coat the underside of the middle deck. DUH! Oh well there is always tomorrow.
- 139 replies
-
- 4
-
-
- san francisco
- artesania latina
- (and 1 more)
-
Terrific restart after your extended wait. Looks like you didn't miss a beat.
- 359 replies
-
- 4
-
-
- prince de neufchatel
- model shipways
- (and 1 more)