


DPK
-
Posts
45 -
Joined
-
Last visited
Content Type
Profiles
Forums
Gallery
Events
Posts posted by DPK
-
-
-
-
Looks like you made some mistake: the toptimbers on the quarterdeck should be cut our, as I remember. Otherwise you will have wrong qurterdeck bulwark thickness and the gunwale will be too narrow.
-
39 minutes ago, bolin said:
It's curious that you did not get an English instruction. I bought my kit here in Sweden and I got a good English instruction in the kit.
I suppose he bought it from EBay, not from the official dealer. When you buy from EBay you get what you get, it is a lottery in some way.
-
11 hours ago, Wahka_est said:
My straight forward question. How would it be possible to get Polotsk or Phoenix in bigger scale? Maybe special order? As i live in Estonia at some point will get Phoenix also from Russia but small scale will challenge my big hands.
Unfortunately cannot be done. Remaking to another scale is similar do redesigning the whole kit, because many materials have standard thickness, not to mention all fittings.
-
1 minute ago, ccoyle said:
I would hardly expect the boys at MK to make such an admission! 😉
You are absolutely right
")
From the other hand, as I know, noone in Russia, except Eskadra and MK, currently produces bigger kits (not boats and not exotics)
-
1 hour ago, Wahka_est said:
Question do you know kit Eskadra Mercury brig-is it good like MK?
It has many flaws - both in manual and in the kit, especially in the rigging, but significantly better than many mainstream kits. Halfway to MK kits
Actually it was released only a year ago, so not many people have finished it, so the errors are still being corrected (I hope!).
-
It is better to use some other glue (which glues wood AND metal), which is less toxic and which dries slower, so you can adjust the position. In Russia we have for example BF-2.
-
I hope you did not glue the sternpost yet. Otherwise it will be very hard to cut the second planking' protruding parts.
-
Just a note: if you use PVA glue, it is much easier to use a hairdryer to melt the glue to remove the parts, instead of the acetone.
-
Some of archive images of ships of that age that were close by. Pay attention to the curvature of the deck planking.
- greenstone, ccoyle, chris watton and 3 others
-
 6
6
-
Hi Nazir,
1) The pear version (the X letter in the reference) of the Avos does not differ much from the non-pear version except for the material. But IF there is also a
letter N (N - for nails) letter in the reference, that means that there are also nails engraved on the planking, making the planking process much more difficult.
If you are a newbie, I suppose it is worth leaning to the non-nailed version. Also, the N-version is also not very widely available.
2) For the instruments it is necessary to have different small drill bits and a drill (a hand one is ok).
3) The main thing about selecting the right ship to build is that you should like it. You can consider other ships from Master-Korabel, I belive Ages of Sail carries
them. For example MK0401 Phoenix has also a complete set of building videos with English subtitles (voice in Russian):
- Matrim, mtaylor, Old Collingwood and 1 other
-
4
-
On 3/29/2020 at 9:21 PM, ccoyle said:
@greenstone or anyone else familiar with this kit,
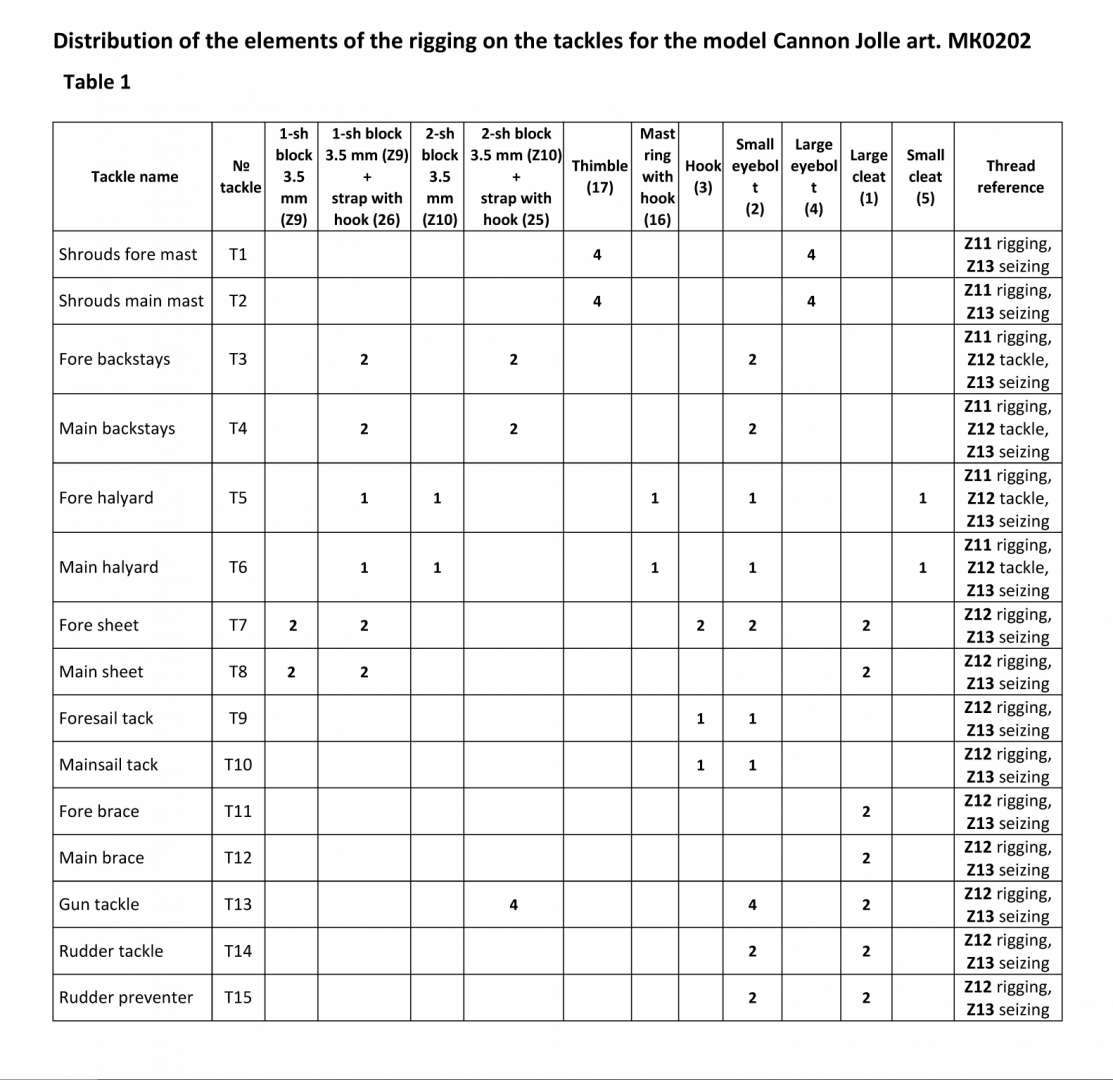
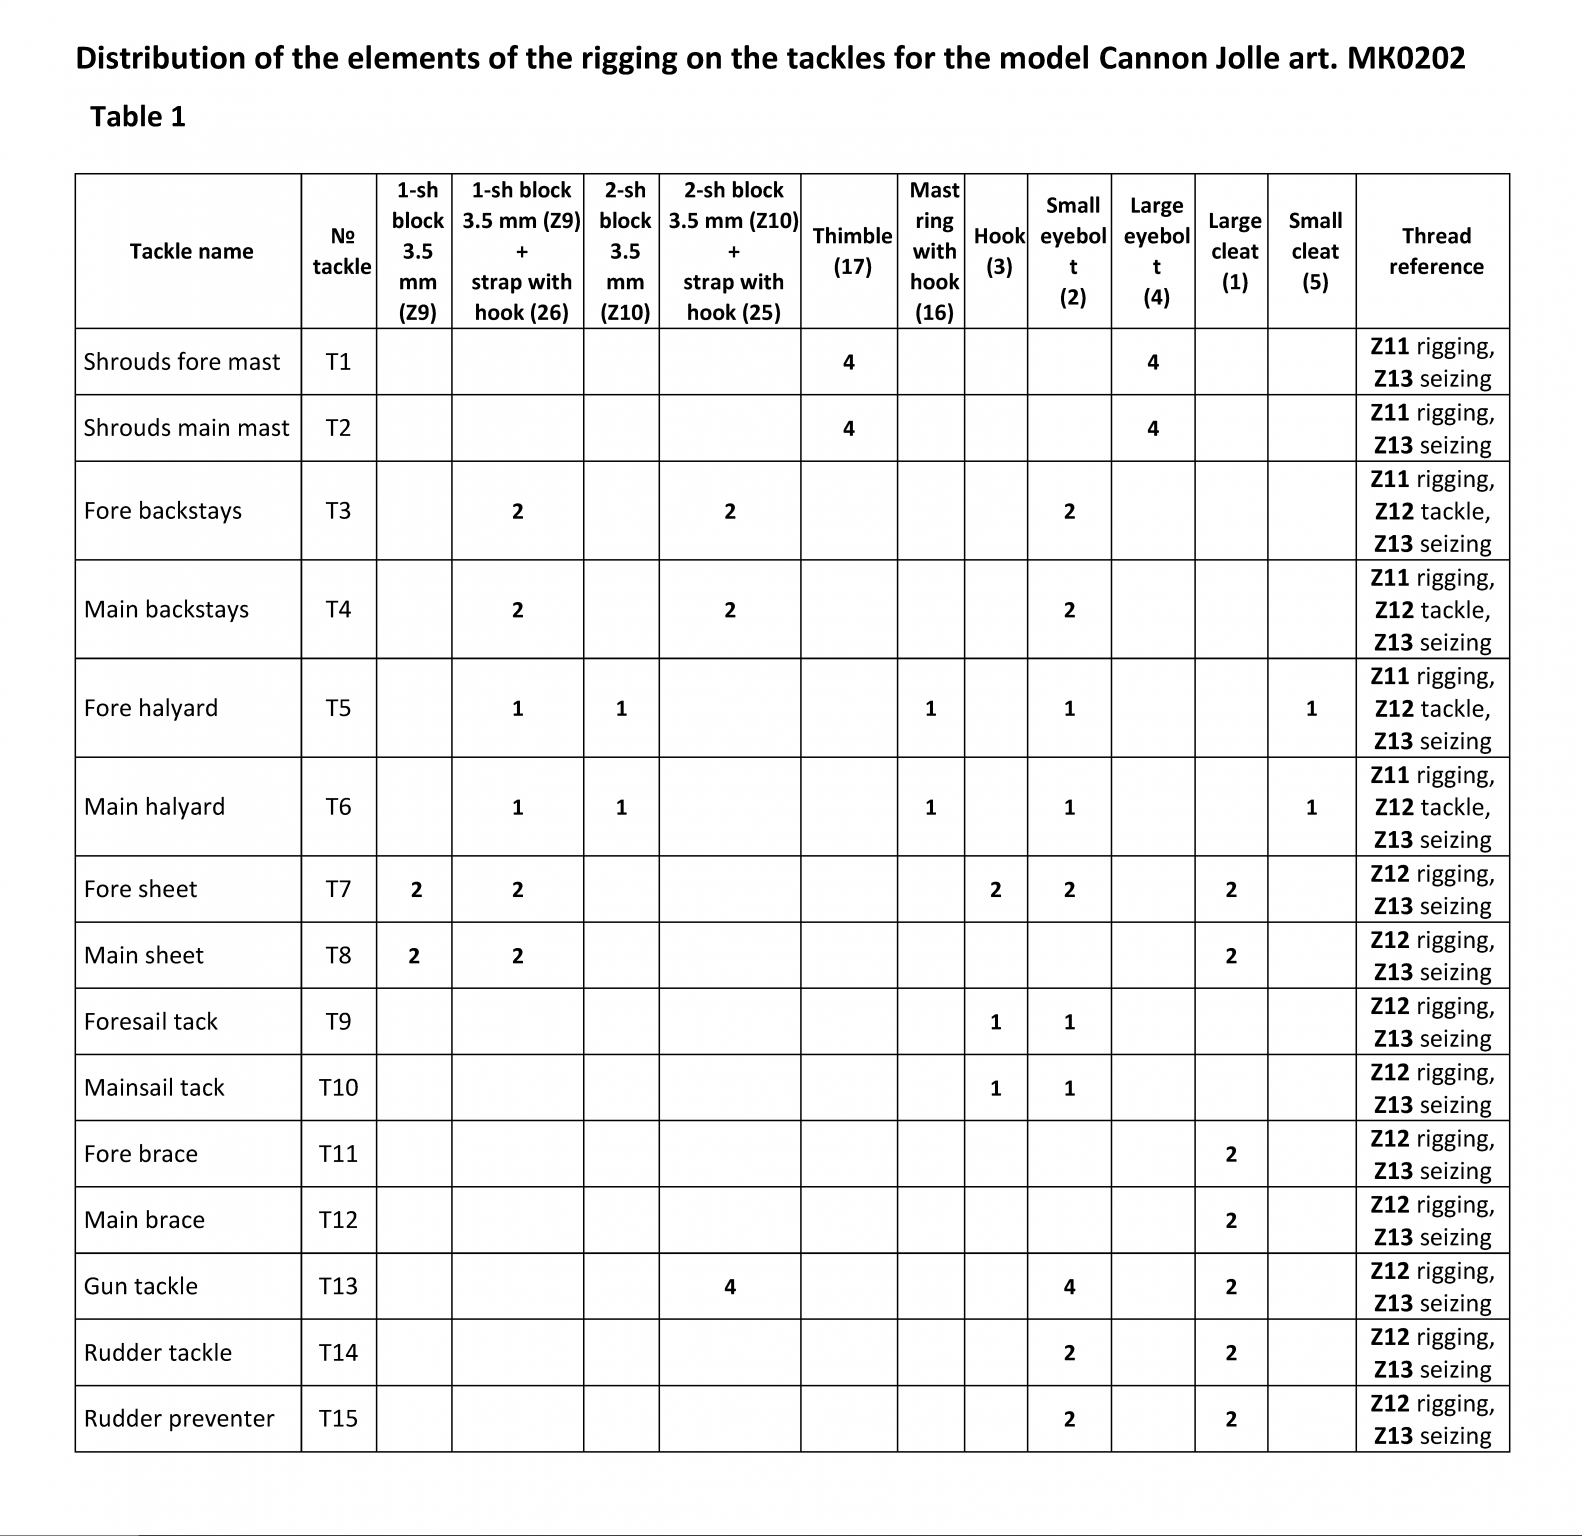
For the life of me, I can't find the rigging diameter specifications in the instructions or plans. There are three diameters of rigging in the kit, and so far I can only find where the 0.5 mm line is used for lanyards. I'm at the point of wanting to rig the gun tackles, but can't find the line specs. Help!
Here is the corrected rigging table with the column, containing the thread references.
The table has priority over the drawings: if the thread size differs, take it it from the table
http://master-korabel.com/manuals/MK0202_specification_2020_eng.pdf
P.S. If any more errors are found, please do tell.
-
4 hours ago, Justin P. said:
I only found this today and as I had been pretty aggressively trying to get my hands on the Master Korabel kit in the last few months am surprised I haven't come across it yet.
Crafty Sailor ( https://craftysailor.com/ ) should have them in stock. They are also a sponsor here.
-
-
Please pay attention, that the first variant was done in a way, mirrored from the one, presented in the drawings. You fastened the standing end not very close to the hilt. So obviously the fastening points on the bulwark have to be moved in this case. If done according to the drawings, no moving is required. Especially because the rudder rotation angle is not that great.
-
@Peta_V , the cleats you are referring to are not used. Currently the inner ladder is intended to be installed in that place.
You can either install the cleats (there are ALWAYS some not-used fastening places on the ships, for situational use) and find another place
for the ladders, or just ignore them and place the ladders onto that spots.
-
On 8/16/2019 at 7:37 PM, DPK said:
Thank you very much for pointing at these holes. Yes, they were previously designed for holding the anchor cable, but currently they are not used.
I think the best decision is to make the wooden plugs from the remains of the deck holding plate and shut these holes down.Obviously you can use them as intended, but you will have to count the eyebols first - maybe you should make your own,I cannot say now, there are different versions of photo etched plates, some of them contain spare eyebolts, some have just what needed.
Btw, the kit is out for about 8 months now, but noone has pointed us at this yet!
After final consideration, here is the conclusion: the holes for the anchor rope holding eyebolts are OK, the photo instruction lacks the images of the eyebolts installed. I shall fix it soon.
The number of eyebolts 18 is more than enough (at least 4 spare), so just install the pair and use as intended.
-
Thank you very much for pointing at these holes. Yes, they were previously designed for holding the anchor cable, but currently they are not used.
I think the best decision is to make the wooden plugs from the remains of the deck holding plate and shut these holes down.
Obviously you can use them as intended, but you will have to count the eyebols first - maybe you should make your own,
I cannot say now, there are different versions of photo etched plates, some of them contain spare eyebolts, some have just what needed.
Btw, the kit is out for about 8 months now, but noone has pointed us at this yet!
-
1) Calculate the final planking thickness depending on your scale. That should be done because some stern types require the butts of the planks to be shown at the aft area.
If nothing is to be seen, use veneer (0.5 - 0.6 mm, not thicker) for the final planking. So the shape of the hull will not be far from the 1-planked one.
2) Bulwark thickness. MAYBE the draft planking should be a little sanded down to achieve the proper bulwark thickness with the final planking.
3) The gun/oar ports. Think ahead about them and their shape (maybe the inner part should be smaller than the covered with final planking to imitate gun port lids cut-in).
4) The transition from the copper are to the wooden area. Also think ahead about the thickness there, especially if you are gonna paint the copper part.
5) Final thickness on the keel - but here may be ok, since there is a copper plating.
6) The taffrel area, if there are some pre-cut by the kit designer ornaments/elements etc. If they are meant to fit - the should fit. If not, sand down the draft planking.
Well, that is all I can think about now. Maybe someone will add more. Anyway, the use of the second planking is usualy more than welcome by a beginner,
because it allows the errors to be corrected easily.
-
Hi Christa.
You can also consider one of Master-Korabel kits. For example here: https://craftysailor.com/collections/model-ship-kits
Very detailed photo instructions and special construction make them easier to build than most of the other ones.
- mtaylor and pontiachedmark
-
2
-
As you probably know, small ships in 1/72 scale usually omit some detalization. For example the scuppers (if you would like to install them, here are historically accurate specs for cutters of that age: 3-4 pcs, 2.5 inch inner diameter, the middle one is 0.5 inch wider; the big syringe needle has adequate size for that)
As for the latrines, we are practicslly sure that no pipes were present. One of them was definitly used as a storage cabinet (only 16 ppl as a crew!!!). The other MAY be used as a toilet, but it depends on the captain's will.
- Beef Wellington, etsinko, Dubz and 1 other
-
4
-
-
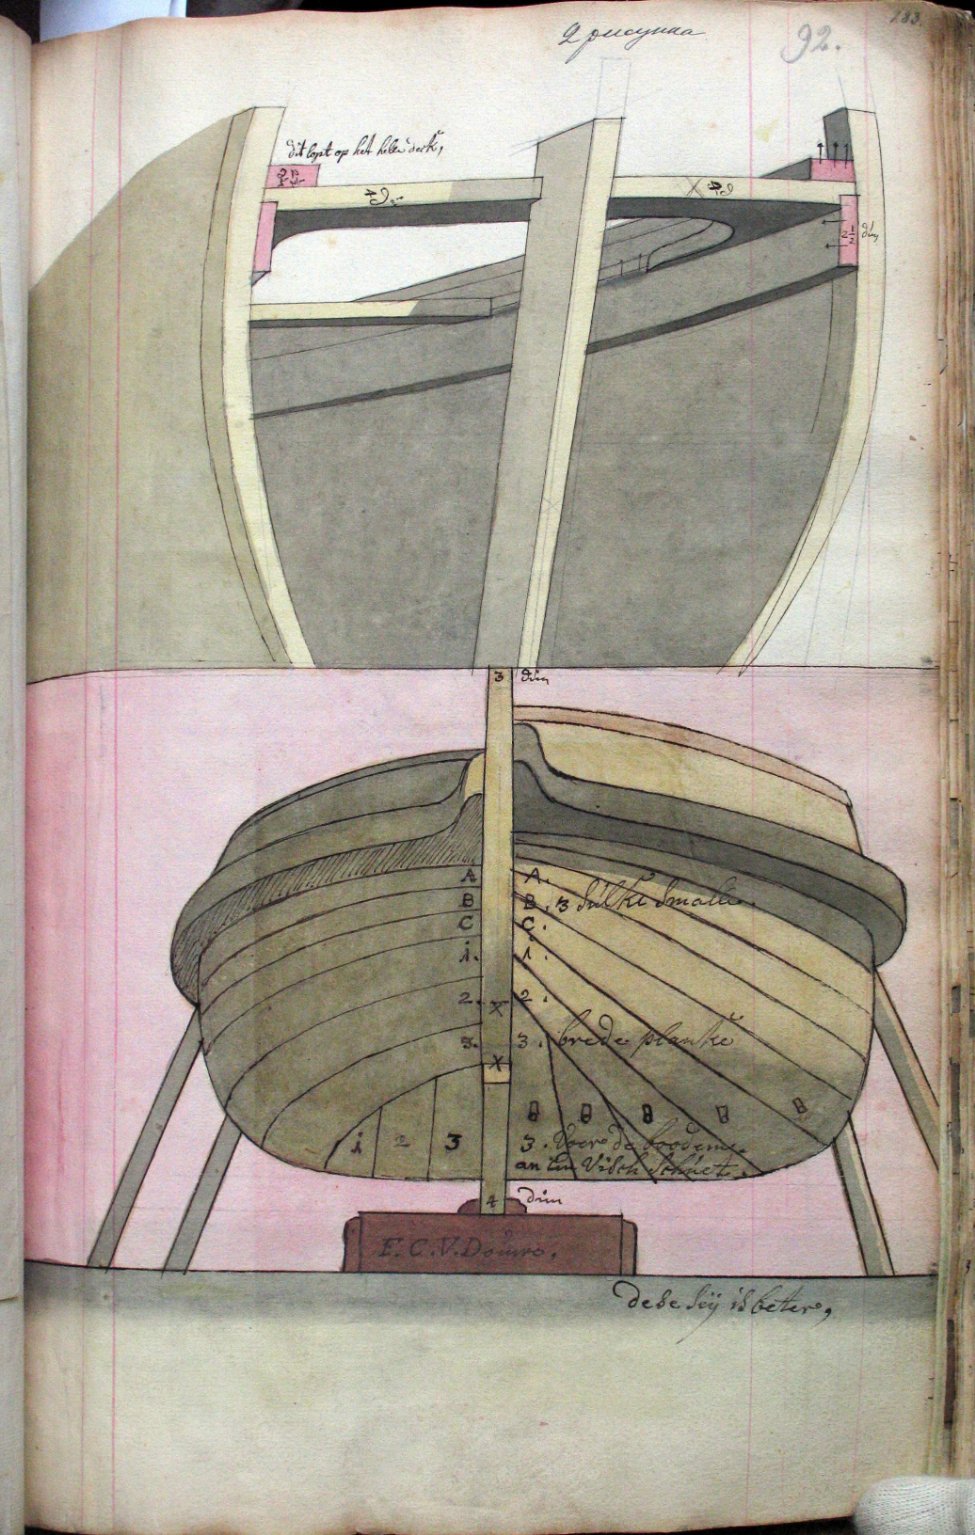
About the ports.
From the technical point of view everything is quite correct: on real ships planking is done from one type of wood; frames and inner structure from the other (for example pine for planks, oak for frames). And the frames and planks' butts are seen in the ports, as it should be.
Personally I see no reason replacing the frames' color with the same color as planking, as they should be different. If you do not like the plywood color it is better to paint or treat it to change the color. Also, as an option, the whole port can be painted. It is up to the builder.
I would like to mention, that this is not a very easy ship to build, especially compared to other our kits. @Peta_V is doing good job, it is not easy to follow his quality of the build, it just seems very easy. For example some people have troubles aligning the top-timbers following the ports on finishing planking. And if we cut that top-timbers and replace parts of them with other material, it will complicate things even more. So please be careful with what you are doing and think ahead!

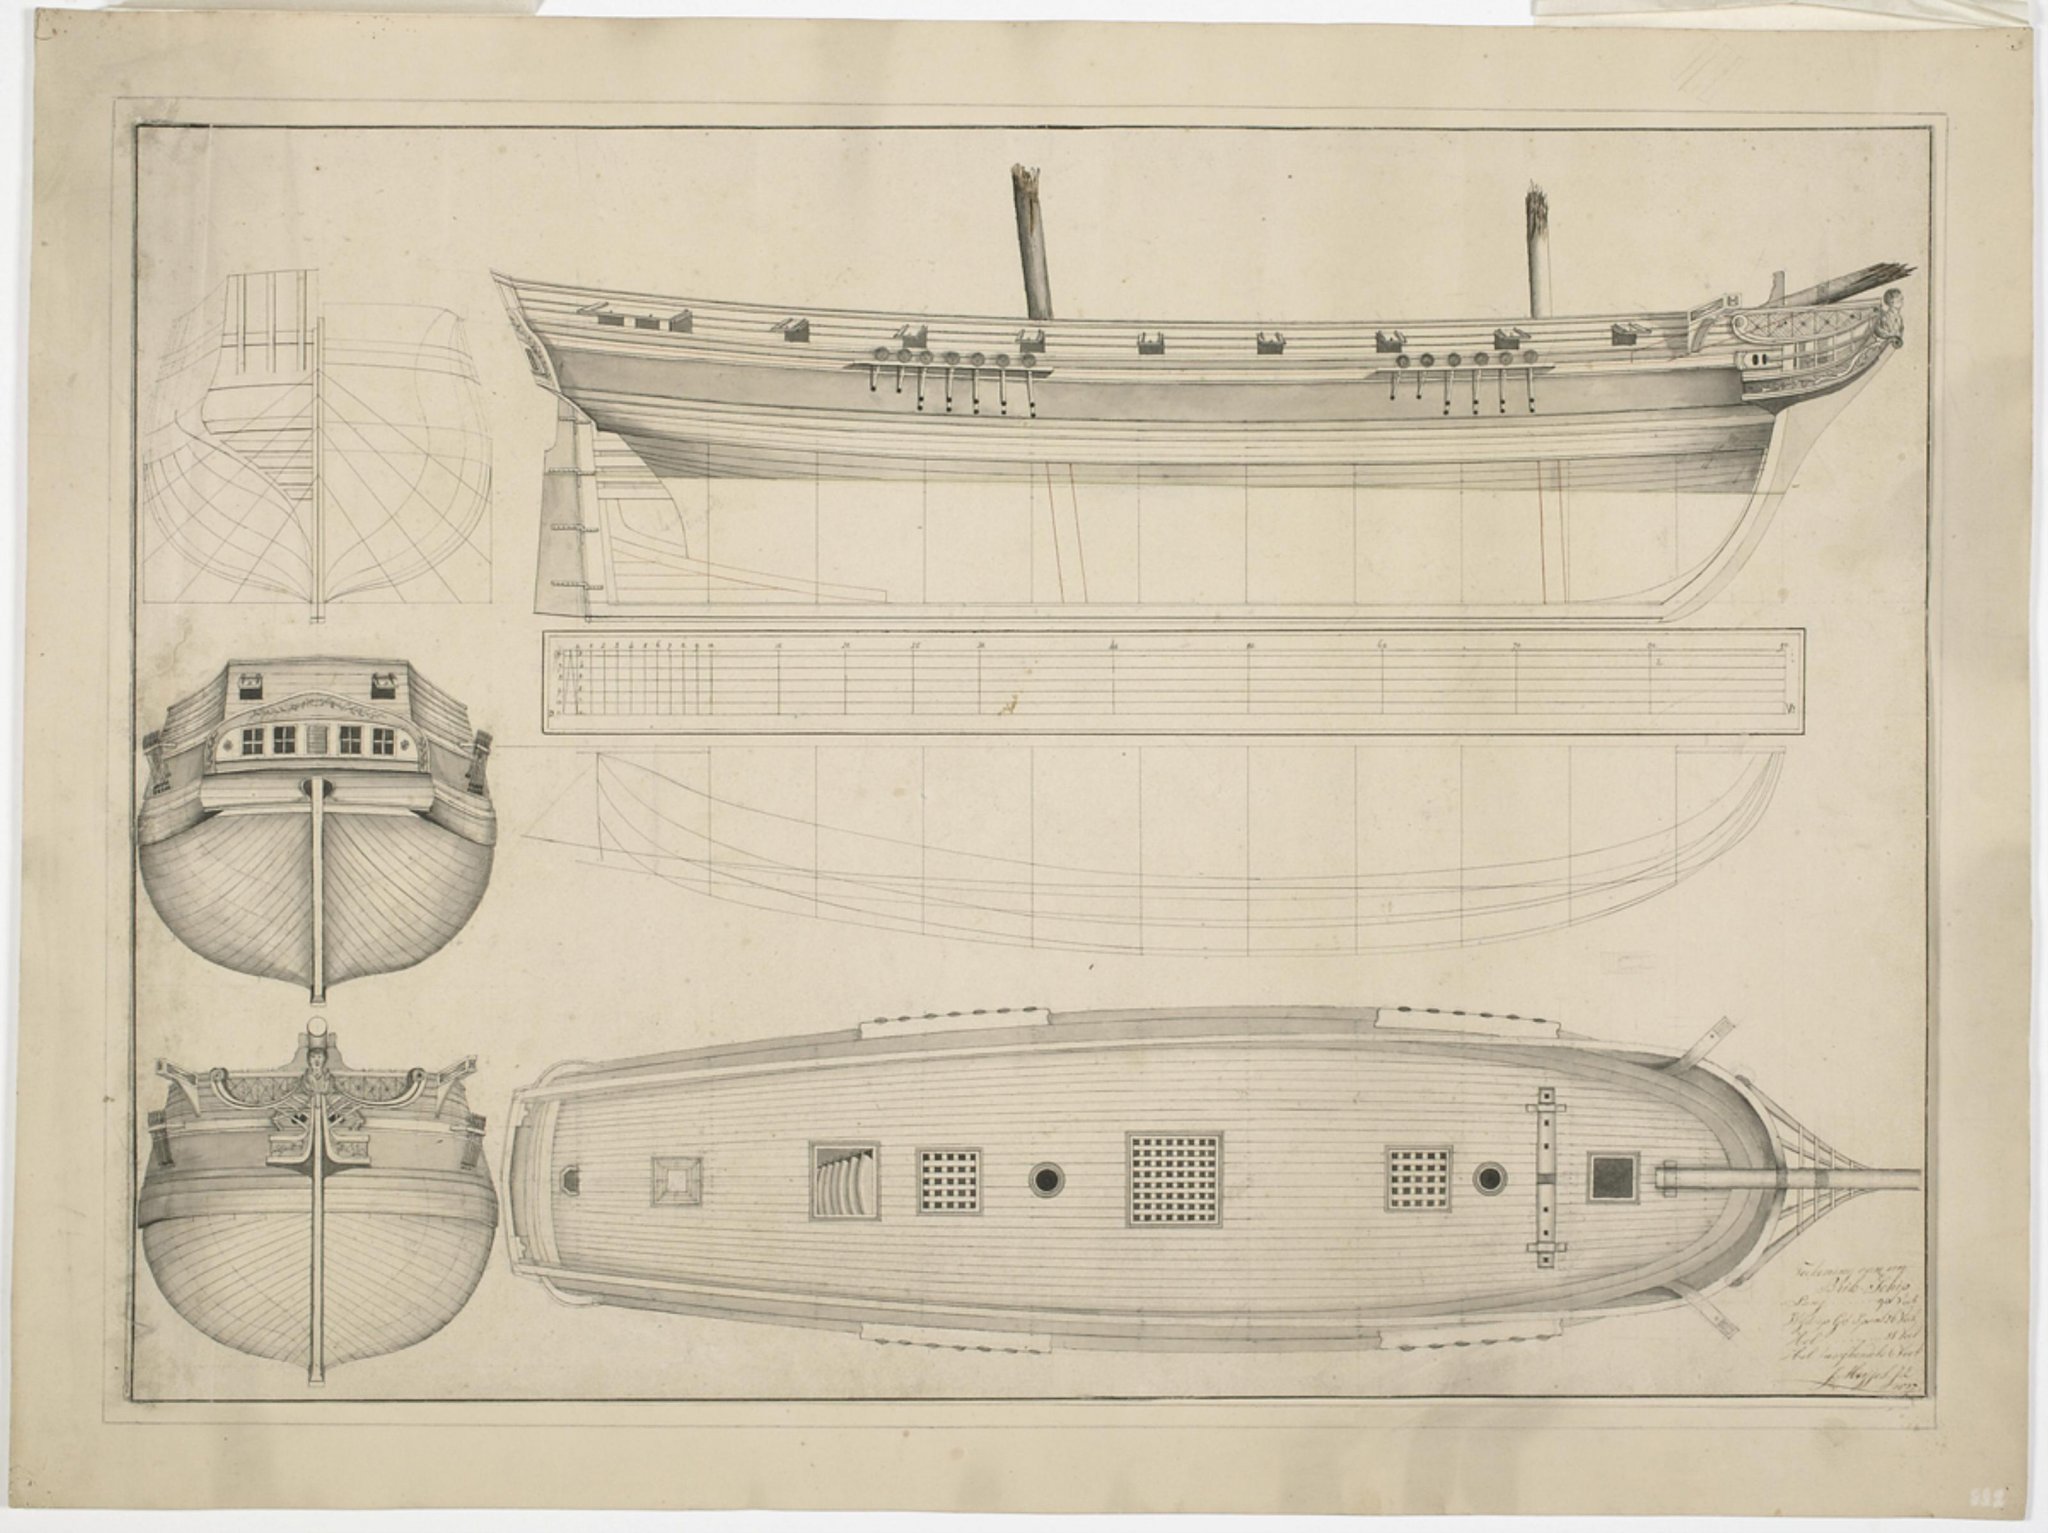

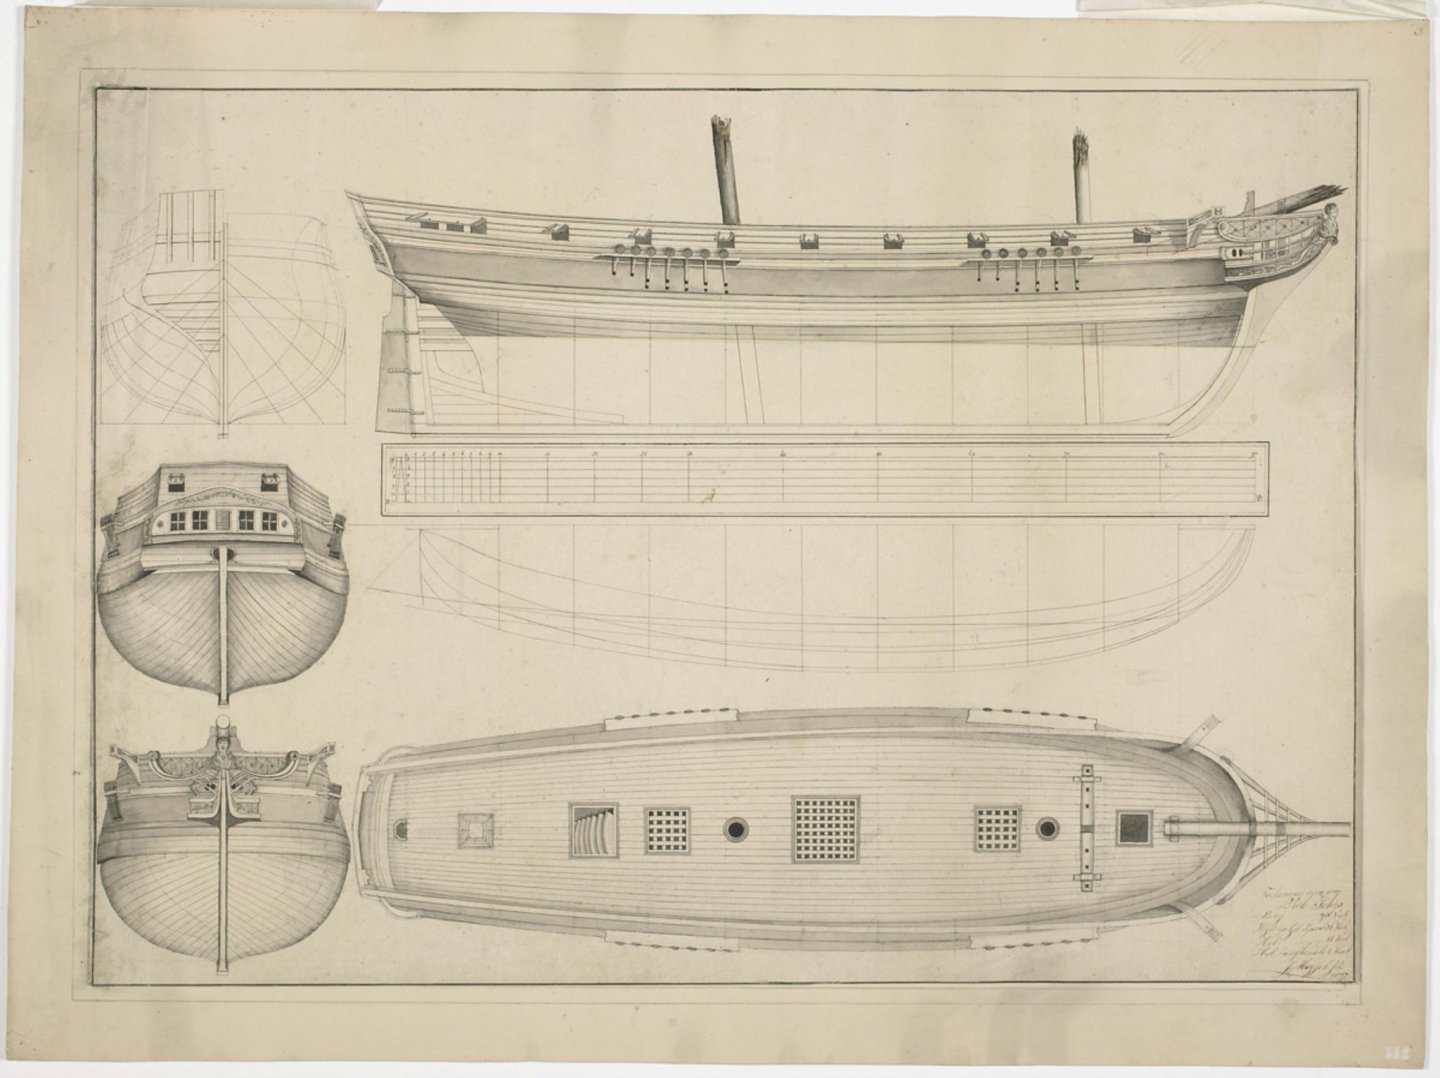
Polotsk by nehemiah - Master Korabel - 1:72 - Russian schooner
in - Kit build logs for subjects built from 1751 - 1800
Posted
Pay attention to the upper (bulwark) wide planks in the bow section. Especially in their meeting location. Looks like they need a little more bending.