JerseyCity Frankie
-
Posts
1,338 -
Joined
-
Last visited
Content Type
Profiles
Forums
Gallery
Events
Everything posted by JerseyCity Frankie
-
In what context is the term used? There’s a bunch of things on ships that use the word Head.
-
Knots or hitches; what is appropriate?
JerseyCity Frankie replied to Maury S's topic in Masting, rigging and sails
Are you asking about attaching the load to the hook? Any loop knot or eye splice. A specific knot for tying to the hook is the Blackwall Hitch but it only works when there’s a load on it, otherwise it falls right off. -
My technique is to PUT ON SAFETY GOGGLES then put on a thick work glove. I fold a pice of sandpaper in half, then in half again on the same axis. I fold it a third time to form a crease. I tuck the spar into the crease and fold the sandpaper over it. Now with the tool rotating I can cradle the whole spinning-spar within the sandpaper “taco” I’ve pinched around it. The sandpaper completely surrounds the spinning spar. I can squeeze my hand to bring more abrasive action to bear on the spar. Another techniqu is to use the same set up but instead of folding my hand around the sandpaper, I lay the spar inside the paper on a horizontal work surface and I use my hand to PRESS DOWN on the spinning spar. The solidity of the table and the pressure of my hand prevents wobble and whipping. in each case I’m using the hand holding the tool to move the tip of the spar in and out of the sandpaper bundle while at the same time varying the pressure with the gloved hand. This helps to make the taper eaven. on larger spars I rough out the taper with an exacto and this lessens the amount of material that needs to be removed. Like all sandpaper operations I use different grades of paper, finishing with fine. tapering yards is more difficult since you have to duplicate the same taper on each arm. I make homemade sanding sticks by gluing sandpaper onto pieces of lattice and I use these without the spinning tool to knock down the rough exacto cuts and to dress the tips of spars.
-
I’ve got some antique linen three-stranded fishing line and it’s FANTASTIC. However it’s thick so suitable only for large scale models or anchor cable or standing rigging on smaller ones. But it’s a beauty to behold with great (right-hand) lay, good color and ZERO fuzz.
-
Restoration of Old Model Ship
JerseyCity Frankie replied to Intex's topic in New member Introductions
It’s all just opinions for the most part but I think most will agree it’s a charming “decorative” model that is worth restoring. Not all old broken models are worth restoring! In my opinion it’s certainly not a kit. I’m guessing whoever built it wished it to evoke a generic fishing vessel, not a specific vessel despite its having a name. “Decorative” means, in the context of ship Models, a lack of realism in scale and detail. A decorative model builder isn’t concerned with a precise representation, details on decorative models are often toylike. Look at the portholes on the deck house: the builder had some off-the-shelf round parts so he incorporated them. So the size of the resulting portholes was determined by the availability of the part, not any measurement taken from an actual vessel. The life ring would suggest the size of a human but the boat suggests another scale, as does the stove. No doubt the model builder had the parts on hand and his vision did not necessitate that the scale of the parts needed to match precisely. had He intended a more serious representation the parts would match. Whaling vessels are typically the only ships with stoves exposed on deck so a case can be made that this is a whaler. However the other halmark of the whaler are multiple whaleboats, usually at LEAST three but often six boats with davits for each boat. Your model has only a pair. theres also a red navigation light in the Port Shrouds (not catwalk) and I’m guessing there was a green one in the Starboard Shrouds? This feature dates the model to a more modern era-I don’t know when nav lights came into widespread use but certainly late 1800’s but my impression is the builder was making a representation of a modern fishing vessel or yacht, the absence of big cargo hatches precludes a transport. -
Rigging Question - Virginia Privateer
JerseyCity Frankie replied to David Lester's topic in Masting, rigging and sails
Here’s some illustrations from the excellent Sailmakers Apprentice by Emiliano Marino.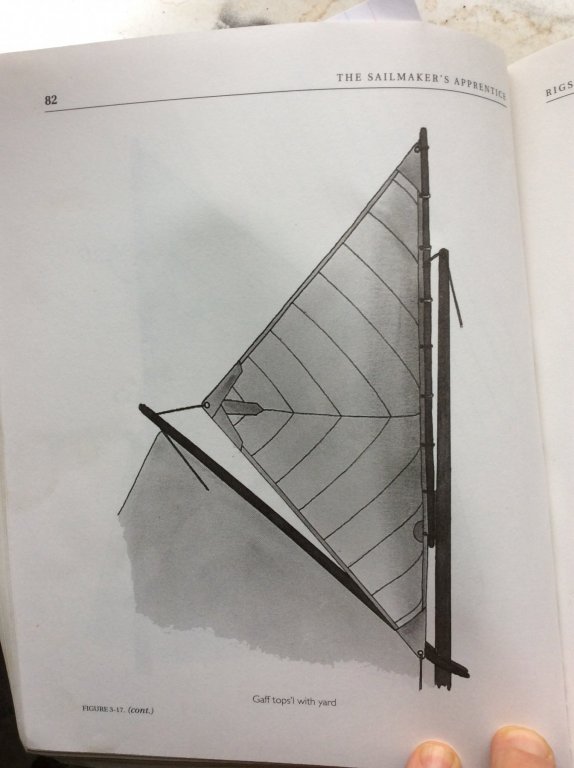
-
Shrouds are as tight as the crew can get them, all the time. Any slight bit of catinary can be measured in low single-digit inches on an actual ship and only very slightly noticeable if one sights along the shroud. I’m all for realistic catinary in the rigging, but if you’ve got visible catinary on your small scale model then you’re representing a shroud that is unrealistically absolutely slack. Underway, the leeward shrouds will be looser than the windward ones due to the effect of the wind but it’s the kind of thing you could only notice by putting your hand on the shroud and giving it a tug. On ships with natural fiber rigging, keeping the shrouds tight is a constant chore as this material expands and contracts with the weather, but keep them tight they did as if they did not the masts would work and pump.
-
I’m recommending the Constrictor knot too, it’s the perfect model building knot for tying around masts . But On smaller scale models I recommend the simple overhand knot for all the rest of the knots where a line terminates somewhere in the rig and the reason is it’s the least bulky knot. Real knots on small scale models are too bulky, they can’t be drawn down tight enough to shrink to a scale size. This problem intensifies the smaller you go. A case in point is the Clove Hitch used on ratlins. On smaller models the rows and rows of clove-hitches on the shrouds give them a too bulky look, the knots are big round bulges sometimes taking up a significant percentage of the space between ratlines. They are technically correct but they can’t be tied in scale below a certain size. On larger scale models you SHOULD use actual Bowlins Fisherman’s Bends Sheet Bends, etc since they’d be big enough to see. The trouble with the Overhand knot is that it’s so simple it won’t hold without a drop of glue. When I tie one I leave the tail long and clip a clothespin on this loose end to keep weight on it then I put a drop of white glue on the knot. Trim it flush afterwords when dry and the resulting tiny bump is a comfortably realistic representation.
-
It’s a pain in the butt to drop anchor on a schooner with chain. The chain is in the aforementioned wood box adjacent to the foremast. It leads out of the box and then takes three to four turns around the windlass THEN it’s lead forward and out the haws hole and back to the anchor on the bulwarks. To drop anchor the crew has to “throw chain”, they’ve got to pass all the chain they anticipate they’ll need for the depth they’re in around the turns on the windlass. So if you’re in 40 feet of water you need the forty PLUS the extra amount of scope required. Maybe sixty feet total? 80? Every foot of which must be manhandled out of the chain box and around the turns on the windlas THEN flaked out on deck forward of the windlass. It’s backbreaking as you can imagine. The anchor is dropped, in seconds the chain roars dramatically out the hawshole from the neat flake on deck. Note that the windlass plays no roll at all in the DROPPING of the anchor. It’s only used to raise the anchor. Tension from the train isn’t allowed to come onto the windlass untill it’s time to raise anchor. The rest of the time spent at anchor, a Devils Claw holds the tension of the chain inboard. The point I’m making is the three turns around the windlass. At no point is the chain NOT around the windlass, it’s always configured that way, and has to be.
-
Fore and aft rigging questions
JerseyCity Frankie replied to SardonicMeow's topic in Masting, rigging and sails
The tack will likely attach to a ring bolt on top of the boom close in to the jaws of the boom, but it’s possible to find tackle on the tack which allows the tack to be raised to spill wind or allow the helmsman to see ahead-you see this in MANY old paintings. the downhaul on the headsail can run directly attached only at the head of the sail down to the turning block but often there is a “lizard”, a very short bit of line with an eye in it midway down the luff of the sail, through which the downhaul is rove. If it were my vessel ide have two boom topping lifts but there are examples of single topping lifts (Joshua Sloakum’s Spray had only one). A single topping lift will always have a negative effect on sail shape on one tack since the sail will press against it, two topping lifts allows you to slack one to avoid this. Brails I don’t know much about. If it were me I’d want one on each side to help control the canvas but obviously one line would work, it’s just a question of subtleties. Finally, I never let an opportunity pass to warn people about Petersson’s “Fore and aft Craft” book. It’s FULL of nonsense rigging. True he gets much of the basics correct, there are ample problems in the minutiae. Approach with scepticism. -
I use thinned acrylic paint.i mix up four parts brown (burnt umber) with one part blue (ultramarine blue) which makes a good very dark brown color suitable for representing tarred rigging at full strength. When thinned with plenty of water it makes a stain that you can paint on with a brush and controls with a rag or q-tip. You can gauge the color as you go and if it’s too dark you can wipe it up or buff off some of it with a moistened rag. You can also lightly sand right through this very thin coat exposing highlights that are pleasing to the eye. Certainly, as with any coating technique, I would try it out on scrap wood first.
-
You could pin the coil in place with a needle until the glue dries? My advice though would be to abandon the literal replication of real-world use. Your coil hanging appears to be correct but as you note, the stiffness of the line itself is out of scale and it won’t drape properly. I’m in favor of simply gluing the pre-formed coil over the belayed line and if you want that short bit of line wrapped once through the top of the coil, that bit could be the tail of the actual line on the pin or it could just be a half-inch long scrap piece not attached to the pin or the coil, if it’s two ends disappear behind the coil nobody will know it’s a cheat.
-
How much rope do you leave after tying things off?
JerseyCity Frankie replied to RPaul's topic in Masting, rigging and sails
On a model, just enoughto get the line belayed and then for accuracy’s sake glue on a pre-formed coil afterwords. On an actual ship each line needs enough length for the use of the line. for instance hailyards need to be long enough to account for the fall of the tackle at its extreme length. But there also needs to be enough additional length to allow for the number of men needed to handle the line in any circumstance. so if the strain on the line caused by the weight of the load requires three men to hold it safely, you need enough length for three men to lay on to the line, roughly four feet for each person. How can you tell which line needs more extra length? Broadly the thicker heavier lines will be the ones requiring more people hauling. The hailyards sheets and braces will have much larger coils than other lines since they have longer tackle falls. -
Conventional wisdom is to use thin fabric in the proper color. Real-world fabric can’t make scale tinny wrinkles so conventional wisdom is to reduce the scale sized depth of the fabric so that when it is compacted into a bundle it will be a smaller size. Then soak the fabric in a water/white glue mixture, form it into the shape you want and allow to dry. When I do this I usually make the bundles of furled sails off the model using simple dowel jigs and bind the wet fabric with cheap thin wire. The wire tends to collect the fabric and concentrate the wrinkles in a way you can work to your advantage if you locate the wire in the spot where the ships rigging would bind the real sail. real woven fabric should be fine on a 1/48 scale model, most people use paper on smaller models.
-
Rigging for Dummies
JerseyCity Frankie replied to Kurt Johnson's topic in Masting, rigging and sails
It’s surprising there isn’t a simple but comprehensive book that would cover the basic list of running rigging anyone would be likely to find on any sailing vessel and how each line works. It’s honestly not THAT complex on the surface. -
When to attach sails to a model
JerseyCity Frankie replied to gthursby's topic in Masting, rigging and sails
It’s certainly easiest to lace the sails onto the gaffs booms and yards before attaching those elements to the masts. On my Consyitution I put all the shrouds on FIRST but not all the stays. I put the stays on as I added the yards from the deck up. If I’d put ALL the stays on first I couldn’t have as easily reached between the masts when I was fixing the yards in place. And I’m only doing the bow rigging now, last because Im sure I’d have snapped off the jibboom if I’d had it on since the start. -
OcCre Dos Amigos - foresail
JerseyCity Frankie replied to RPaul's topic in Masting, rigging and sails
I’m always surprised when manufacturers drop the ball on stuff that will CERTAINLY come up later when people start assembling their kits. Wouldn’t you assume they’d do their homework and observe existing examples of the rigs they are using? That they would have already had this conversation we are having now? Apparently they don’t count running rigging accuracy among their chief concerns. An odd turn of events since I’m CERTAIN all manufacturers bestow upon themselves words like “museum quality” and “historically accurate “. -
OcCre Dos Amigos - foresail
JerseyCity Frankie replied to RPaul's topic in Masting, rigging and sails
An existential question raised by these issues is: is she a Topsail schooner or is she a brigantine? If she’s a schooner her forsail will certainly have a gaff. If she’s a brigantine, I’m not sure she’s allowed a Main squarsail. Discuss. -
OcCre Dos Amigos - foresail
JerseyCity Frankie replied to RPaul's topic in Masting, rigging and sails
I love these ship model rig conundrums! Looks like the logical problems are in your documentation. But loose footed forsails with pairs of mainstays do exist in the real world, notably on the Pride of Baltimore II. When going about, the crew has to slack the leeward stay. Every time they go about! The sail always remains inside the two stays. when I look at photos of Pride, it looks like they sometimes slack both stays leaving only the springstay to support the Main. But only under certain points of sail. Moving on, the braces for the square sail on the Fore attached to the stay are clearly wrong in my opinion. If the stay is being slackened it would be an impossible location for a brace. If it was me I’d lead the braces to the mainmast hounds ABOVE THE HEIGHT OF THE PEAK OF THE FORSAIL, so it can clear. The sheet for the forsail must certainly lead aft from the Clew of the sail, in all circumstances. So the pin is the wrong pin OR the sail diagram is wrong and the foot of the sail is too long? There are certainly issues with the model photograph and how the square mainsail is touching the forsail, these two sails wouldn’t be set at the same time OR the forsail would be smaller to prevent the two sails fouling. -
Knights in 17th Century Ships
JerseyCity Frankie replied to anaxamander49's topic in Masting, rigging and sails
I’ve been fascinated with this topic for a while. On the one hand the weather deck must be able to be rendered watertight, all the hatches and openings can be sealed with covers and canvas. But a few bits of running rigging certainly passed through this deck. So I imagine the holes were no larger than necessary while at the same time not so small as to cause chafe. -
Rattlesnake Rigging Question
JerseyCity Frankie replied to David Lester's topic in Masting, rigging and sails
A photo of the plan would be helpful.i remember seeing this plan once and remember it was pretty good but all on a single sheet? -
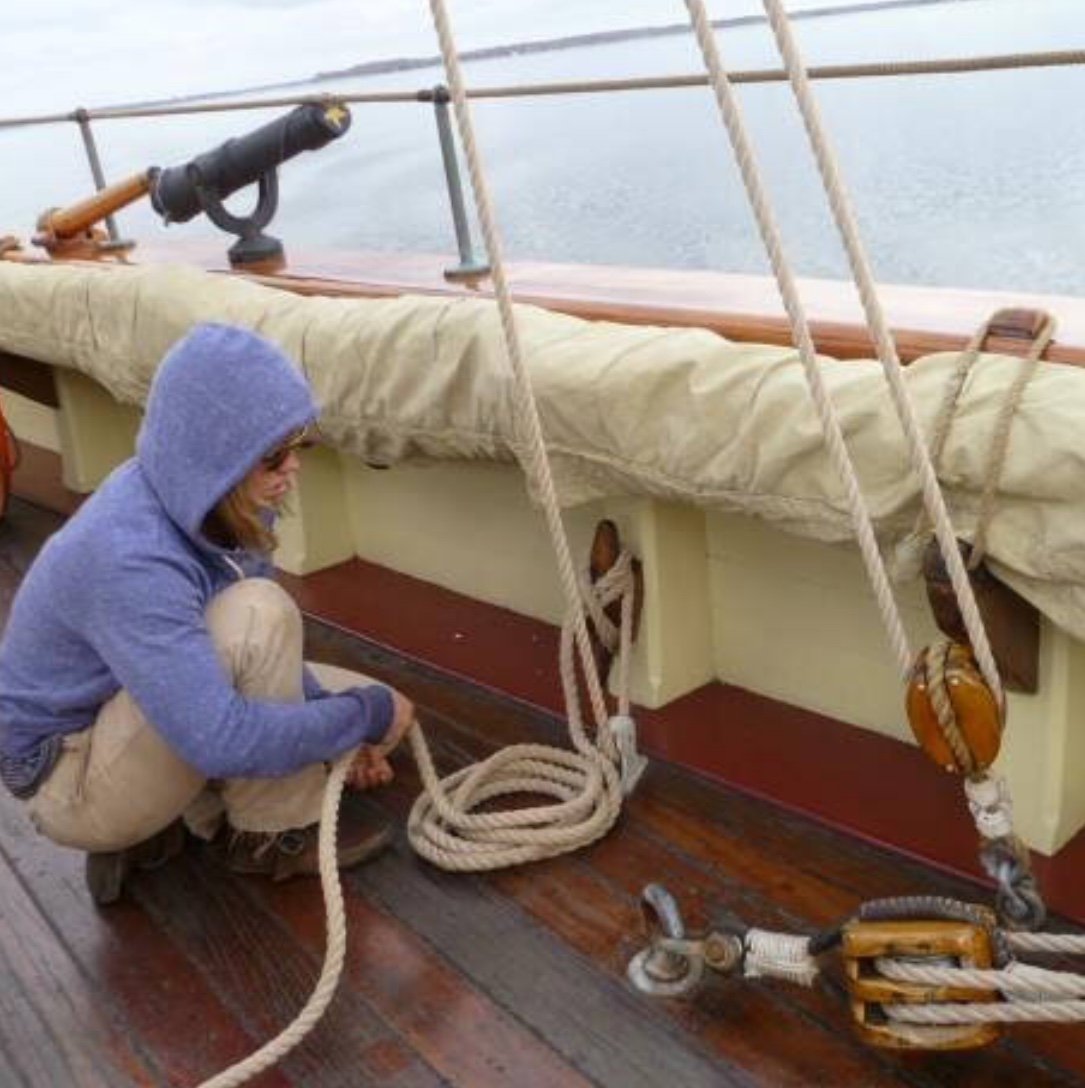
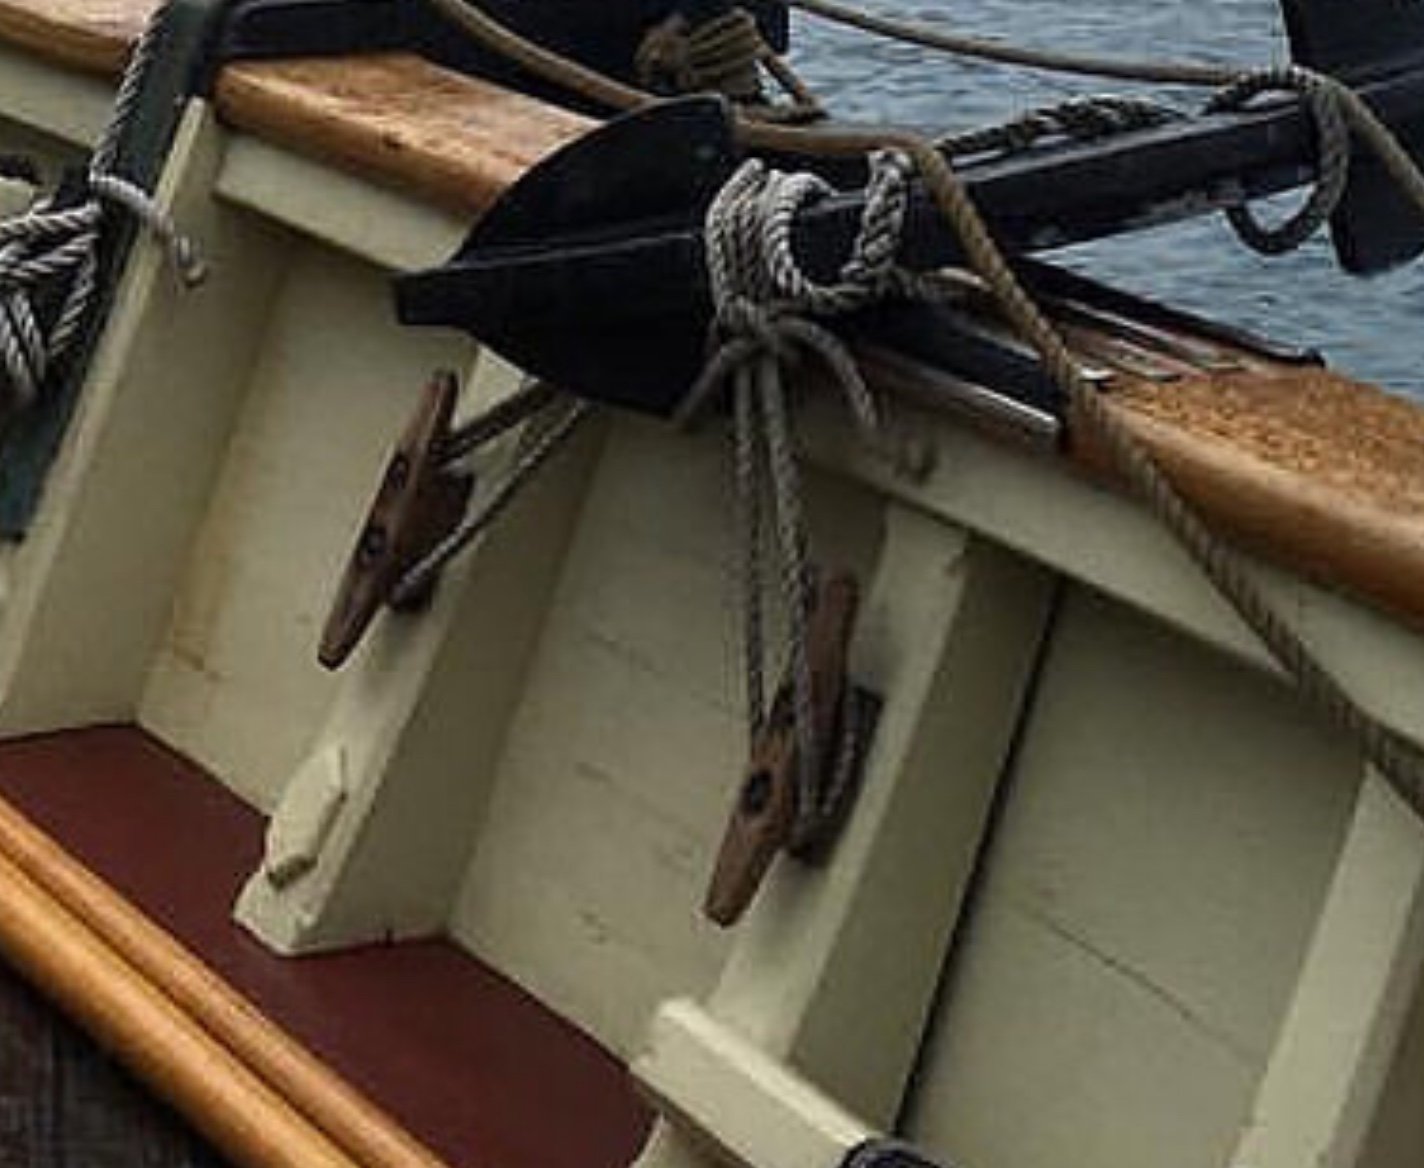
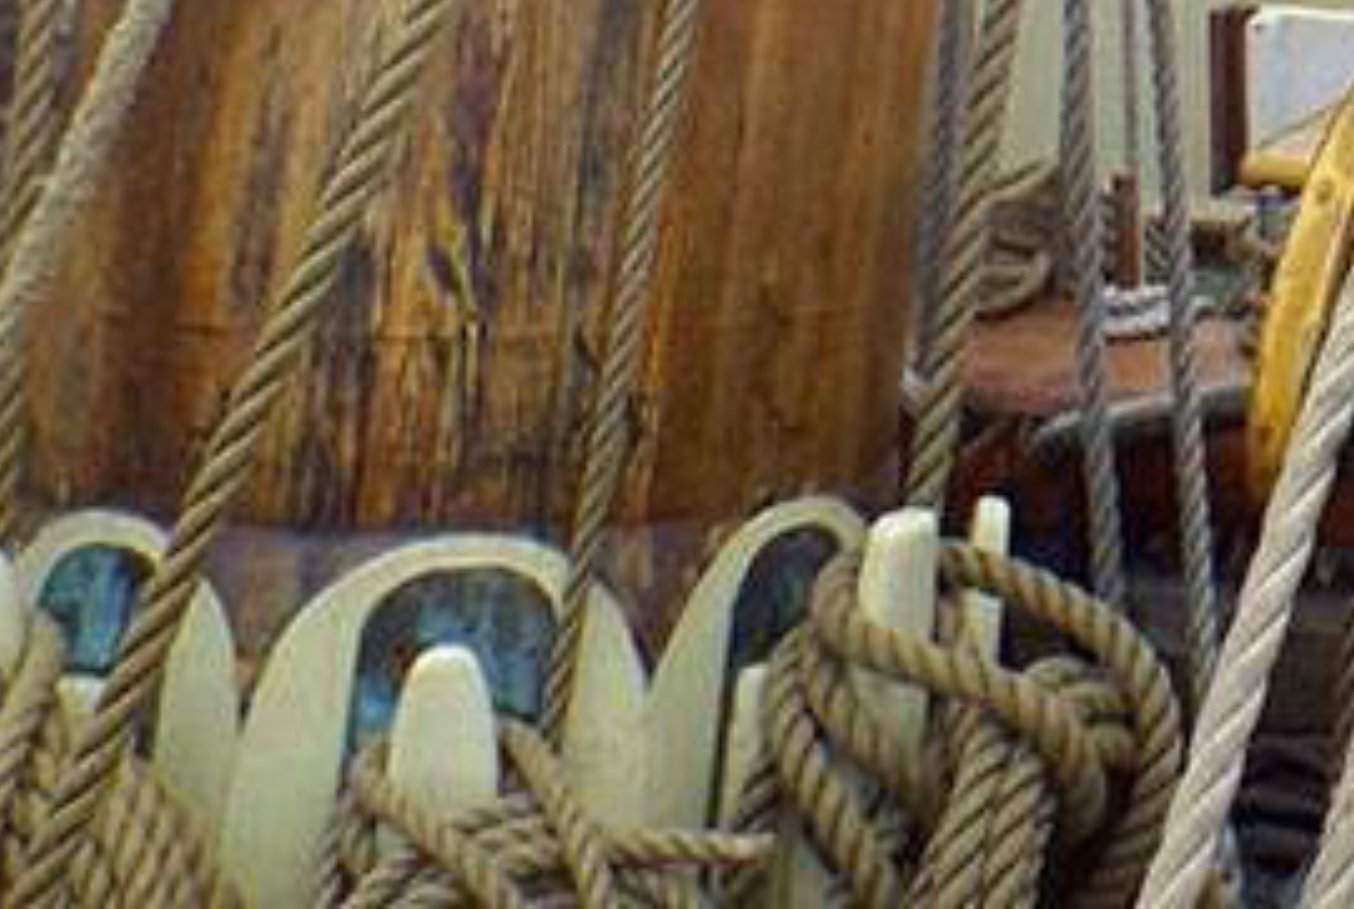
Either way. Paint will wear off but it’s not really very visible unless you cast off the line- the portions that the line chafes are always covered by the line. Here are two photos from Pride of Baltimore showing painted AND unpainted cleats on the same vessel.


-
Nevertheless I remember reading it. And not in a novel. Maybe the source will come back to me.
-
Where did I read about a French Ship -think it was French- which upon going into battle would hoist the nicer furniture high aloft into the rigging, to keep it safe from cannon fire and prevent its becoming more splinters in an engagement? Why they wouldn’t strike it into the hold I do not remember. It may have been John Keegan’s book The Price of Admiralty? Anyway I love the thought of including the incongruous furniture in the rigging on a model!
-
I certainly hope everyone has read the novel The Cruel Sea, which features the life of a Flower Class corvette in the North Atlantic in WWII. There’s a pretty good film version of the novel too.