HOLIDAY DONATION DRIVE - SUPPORT MSW - DO YOUR PART TO KEEP THIS GREAT FORUM GOING! (Only 13 donations so far - C'mon guys!)
×


VTHokiEE
-
Posts
1,528 -
Joined
-
Last visited
Content Type
Profiles
Forums
Gallery
Events
Everything posted by VTHokiEE
-
Welcome to the hobby and to MSW! I’m not familiar with that kit aside from a quick google search but it looks like a reasonable kit to start with. For the majority of the build you can use a wood glue from a hardware store (just remember that less is more when applying it). It’s be a great idea to start a build log so that you can ask questions and get help along the way. I look forward to seeing your build! Edit: I found a build log here that you may want to take a read through (it looks like they did some upgrades to the kit):
-
 Thank you very much that really means a lot! Looking forward to the rest of your build.
- 123 replies
-
- 2
-

-
- Model Shipways
- Pinnace
- (and 1 more)
-
It’s looking great and while this is much easier to say than to do, especially without looking at it in person, I kind of feel like adding the filler may be a little risky if it stands out (I can understand the concern about the gaps, it would bother me as well though). May I suggest a double planked model to start 😉, I think you’ll do great if you decide to do one and it may even be a little easier. I really had a miserable time with the start of my first planking (ripped it off and redid it when I was about 1/3 of the way in and had several sleepless nights), however I do think there is a lot more leeway in a double planked hull (and you won’t have to worry about interior gaps due to the deck). This looks like a tricky kit to start with and your are doing great!
- 123 replies
-
- 2
-
-
- Model Shipways
- Pinnace
- (and 1 more)
-
Is this model single or double planked? I assume single based on your comments. Also are you planing to paint the hull or leave it natural? If you’re going to paint it then maybe continue, but if you have an inclination to leaving it natural you may want to see how the walnut looks to make a comparison. While you’re waiting there may be some things that sit on the deck that you can build?
-
Did you move the location of the 18 foot cutter? At least on mobile I was unable to find it; simply looking to print the instructions off for when mine arrives. Thanks
-
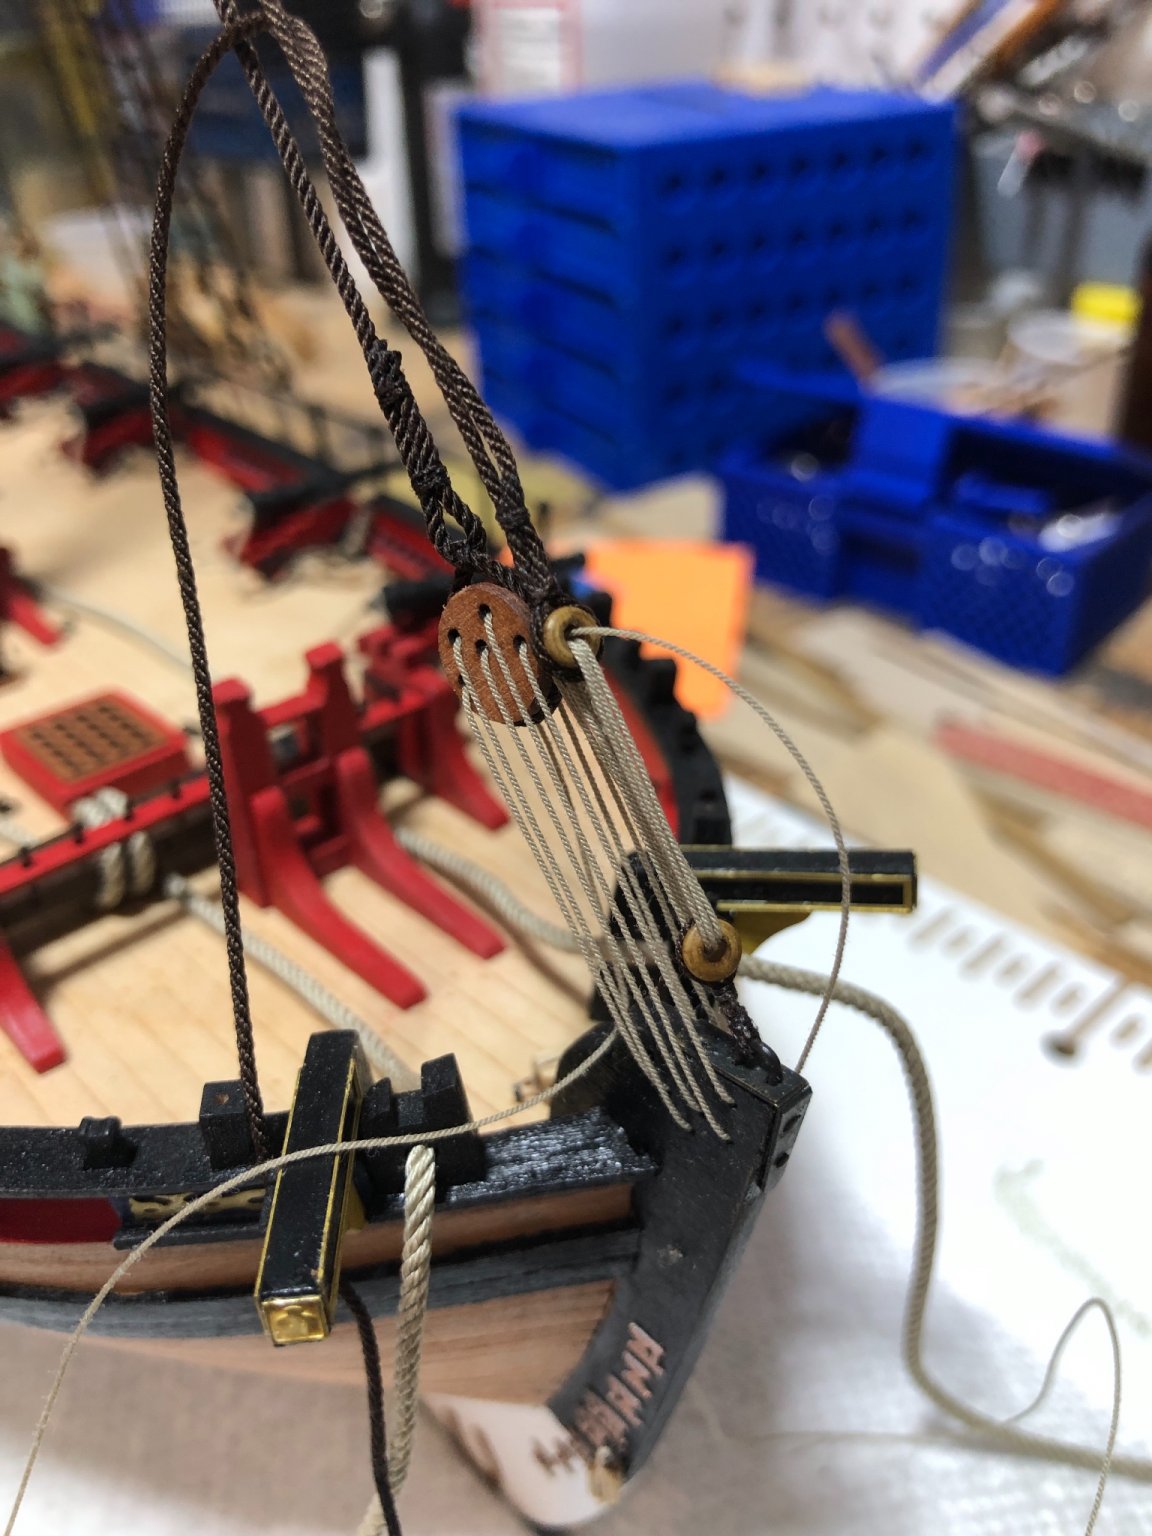
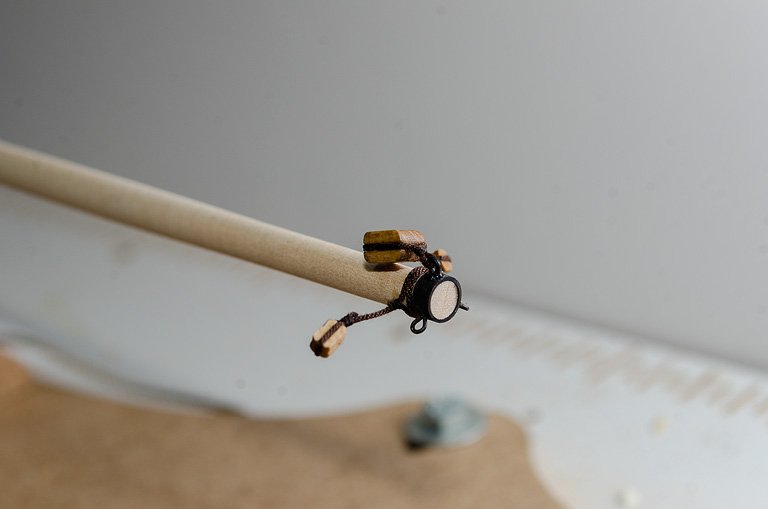
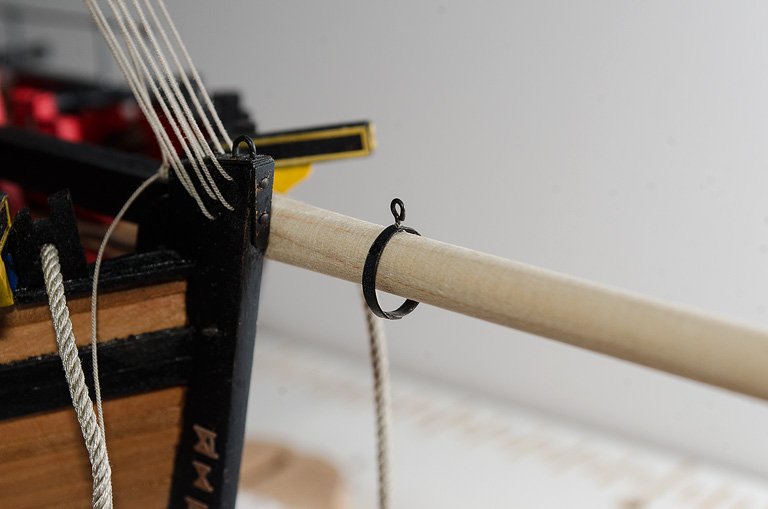
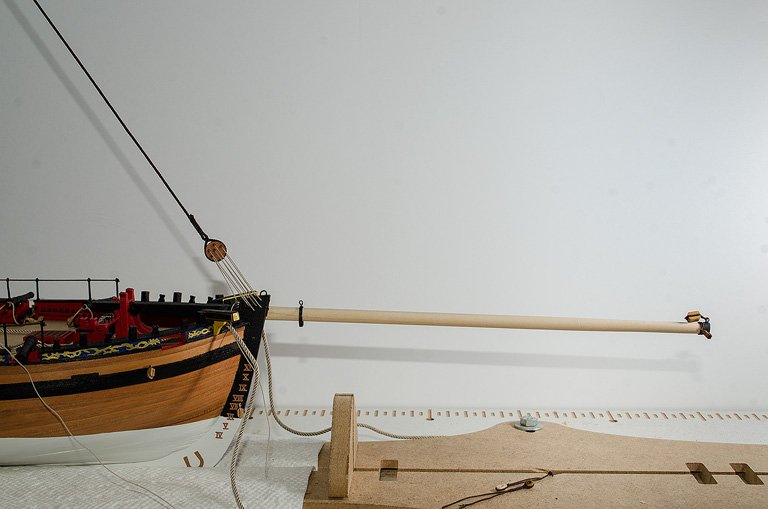
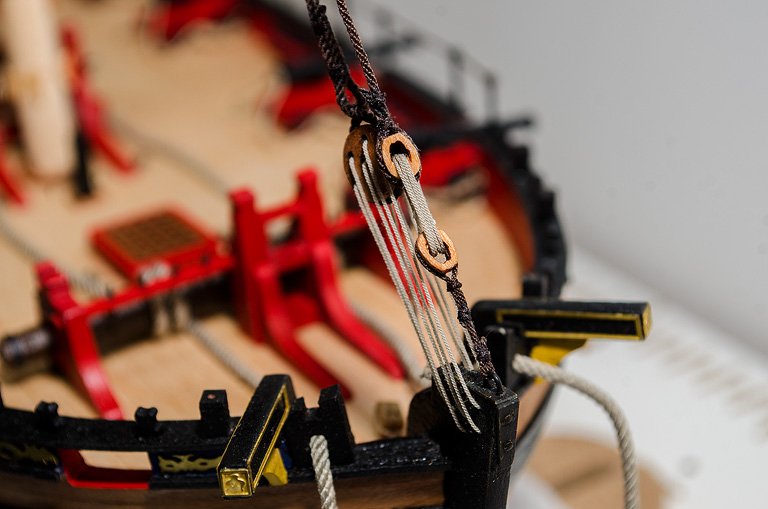
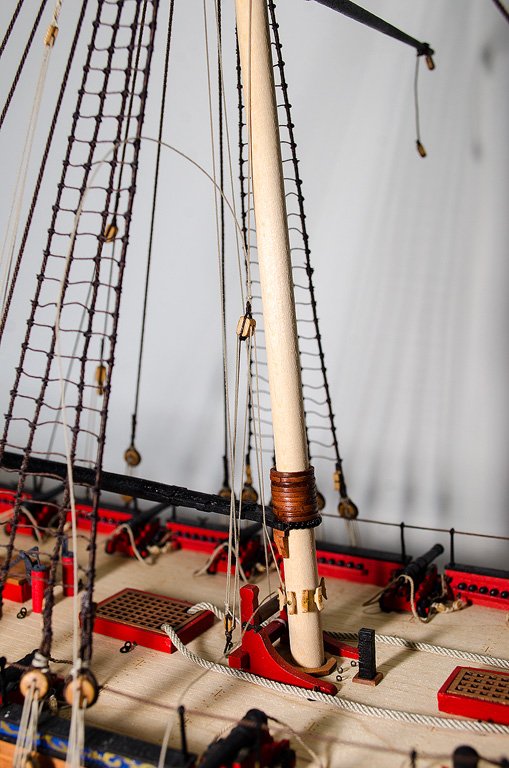
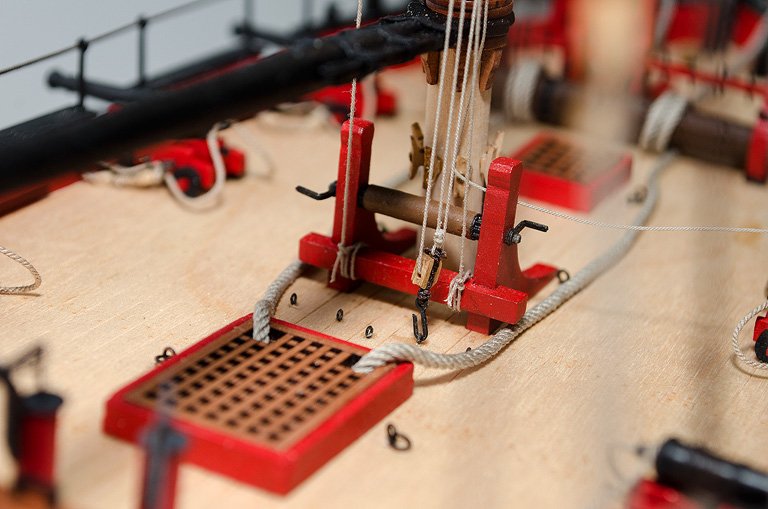
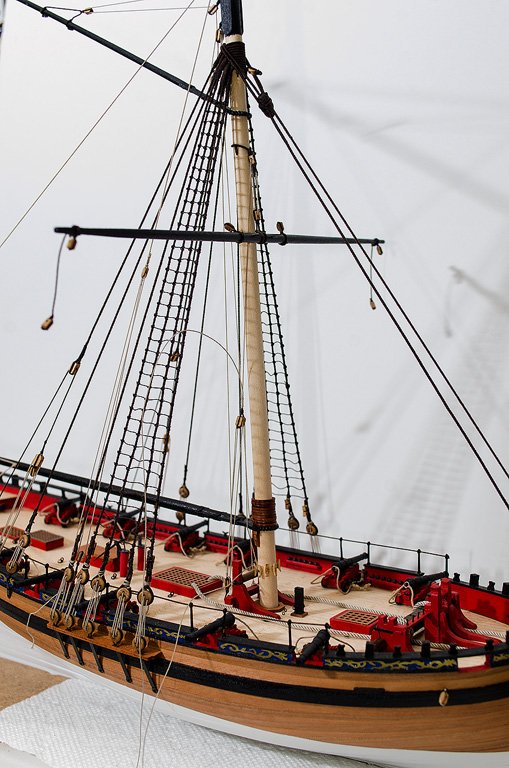
While I was waiting to receive the offered hearts I decided to take a crack at the bowsprit since it had been bugging me a little (should I go with the AotS configuration or the instructions?). I currently am planning on going with the AotS configuration for no real reason. Instead of using the kit provided PE for the cranse iron I decided to follow in BE's footsteps and use heat shirk tubing and some eyelets. I realize that some of this (all of this) would probably have been served but I left it unserved for no real reason. I cut a thin strip of brass sheet, silver soldered it together, then added an eyelet for the traveller (instead of the kit PE). This is my second attempt, in the first I mistakenly drilled the hole for the eyelet about 90 degrees away from the solder joint and the solder joint was not as well done. That made the joint to be too visible and I decided to redo. In this version the eyelet is 180 degrees away from the solder joint which made the joint much less visible. Here is the bowsprit dry fitted in all its glory. I then removed it so I could raise the yards without it in the way. Returning to my heart dilemma and in the end I couldn't say no to the hearts that I was given. My scratch built hearts would certainly have worked, but these looked much better (and the were in pear which matches my build!). I cleaned them up, added some WOP and away I went. Next up was raising the spreadyard and apparently I'm following too many of BE's build logs because I ended up going off piste. It seemed like the arrangement for the spreadyard tie tackle fall could be done in a handful of ways. It appears that the kit pictures (but not instructions) attached this line to a cleat on the mast (but I'm not 100%) while the kit instructions say to attach this to the jeer and topsail bitts cross piece. I decided to attach a block and tackle arrangement and connect it to a ringbolt on the deck. The line from this arrangement was then tied off on a cleat on the mast. My reasoning was that raising the yard seemed like it could benefit significantly from this arrangement (the winch on the jeer and topsail bitts probably would do the job as well, but here we are me without any experience deciding how it should've been done 😄). I haven't trimmed the lines in case I am way off base, but I like it so far. Oh, I did pin the yard to the mast, but I didn't glue it (...yet).
- 436 replies
-
- 15
-
-
- vanguard models
- alert
- (and 1 more)
-
Awesome shroud work! I was torn with that decision as well but decided to go with dark seizings. Historical accuracy aside I started feeling like the seizings would create too much contrast and become a focal point (also I’m not certain mine are quite good enough for that). Either way yours will look great so it sounds like you should show them off!
- 725 replies
-
- 1
-
-
- vanguard models
- speedy
- (and 1 more)
-
Awesome work Glenn! The winch came out spectacular (and I'm really enjoying your choice of red).
- 778 replies
-
- 1
-
-
- cheerful
- Syren Ship Model Company
- (and 1 more)
-
This (IMO) is the right idea, it’s a great opportunity to practice where mistakes won’t be seen. My first planking started off as a nightmare but I learned a whole lot. Keep up the good work!
-
I suppose it is possible that none of the bulkheads need fairing (especially in the middle of the hull), but I would be a little surprised if the planking runs didn't benefit from some fairing at the bow and stern. You may want to take a look at fairing here: http://modelshipworldforum.com/resources/Framing_and_Planking/plankingprojectbeginners.pdf Maybe it isn't useful, but I feel like the rear bulkhead (at least) will look like the unfaired image below if you leave them as is.

-
Did you glue them with wood glue/PVA? If so I’d recommend using isopropyl alcohol and removing the planks and then fairing the frames. I can point you to a link if needed on fairing. It is frustrating, but you’ll be happier in the long run doing it.
-
Looks like a very interesting build. Regarding your planking issues, did you fully fair the frames? I can't fully tell from the pictures, but there seems to be a good bit of laser char on the frames which may indicate that you need to fair the bulkheads more to get a better run for your planks.
-
Almost every time (probably every time) I try to speed things up I make a mess of it and revert to the slower more reliable way. The second planking looks good so far from that picture!
- 26 replies
-
- 1
-
-
- First Build
- lady nelson
- (and 2 more)
-
With your build log to follow I simply couldn’t resist I ordered one... 😁
- 70 replies
-
- 2
-
-
- 22ft Yawl
- Vanguard Models
- (and 2 more)
-
From my following of your work I’m curious - when faced with this decision how often have you stayed on piste? Looking forward to this. I was (am?) tempted to get one of these or similar and potentially have it trailing behind my Alert in the final display.
-
Thanks Derek! I’m going to see if I have a file small enough to touch it up (or maybe trim down a sanding stick) and see how it looks with the stain. It does really feel good to craft your own parts. I was also very generously offered a few closed hearts from another member with a laser cutter. This forum really is a wonderful place. This experience, even if I end up with the laser cut parts, was a very good exercise. Slowly demystifying scratch building for myself 😁. Have a Happy New Year everyone!
- 436 replies
-
- 5
-
-
- vanguard models
- alert
- (and 1 more)
-
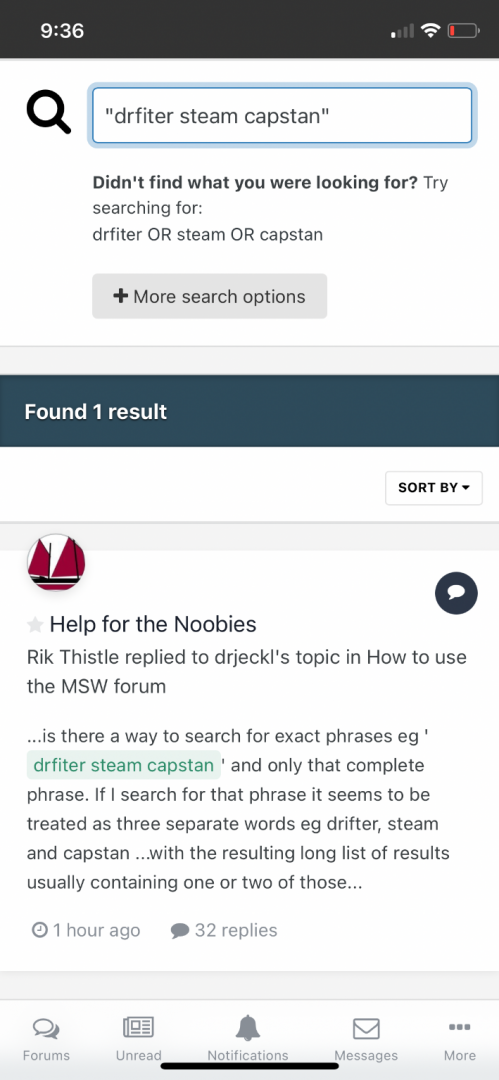
Help for the Noobies
VTHokiEE replied to drjeckl's topic in Using the MSW forum - **NO MODELING CONTENT IN THIS SUB-FORUM**
@Rik Thistle I’m certain there is a way to do it without the first search but here’s a quick two step process I did on mobile: After the first search click that phrase selection to get: Hope that helps
-
Beautiful work on that planking! Tough call to paint the waterline or not. While I do agree with Glenn if it was my build, but since it’s isn’t I’ll speak from the peanut gallery - I think that it would be very interesting to see what she looks like unpainted as there as several logs showing her waterline painted. Whichever way you go she’ll be stunning!
-
Does anyone (preferably in the US) have any of the Swan series that they are willing to part with? My first and main priority is Volume IV - Rigging a Sixth Rate Sloop of War 1767-1780, the next priority is Volume I, Volume II. Please send me a PM if you have either, both, or all. Thanks!
-
Is there any long term issues with this method? The results are awesome - is there a link to how/why this works?
- 201 replies
-
- 2
-
-
- Duchess of Kingston
- Vanguard Models
- (and 1 more)
-
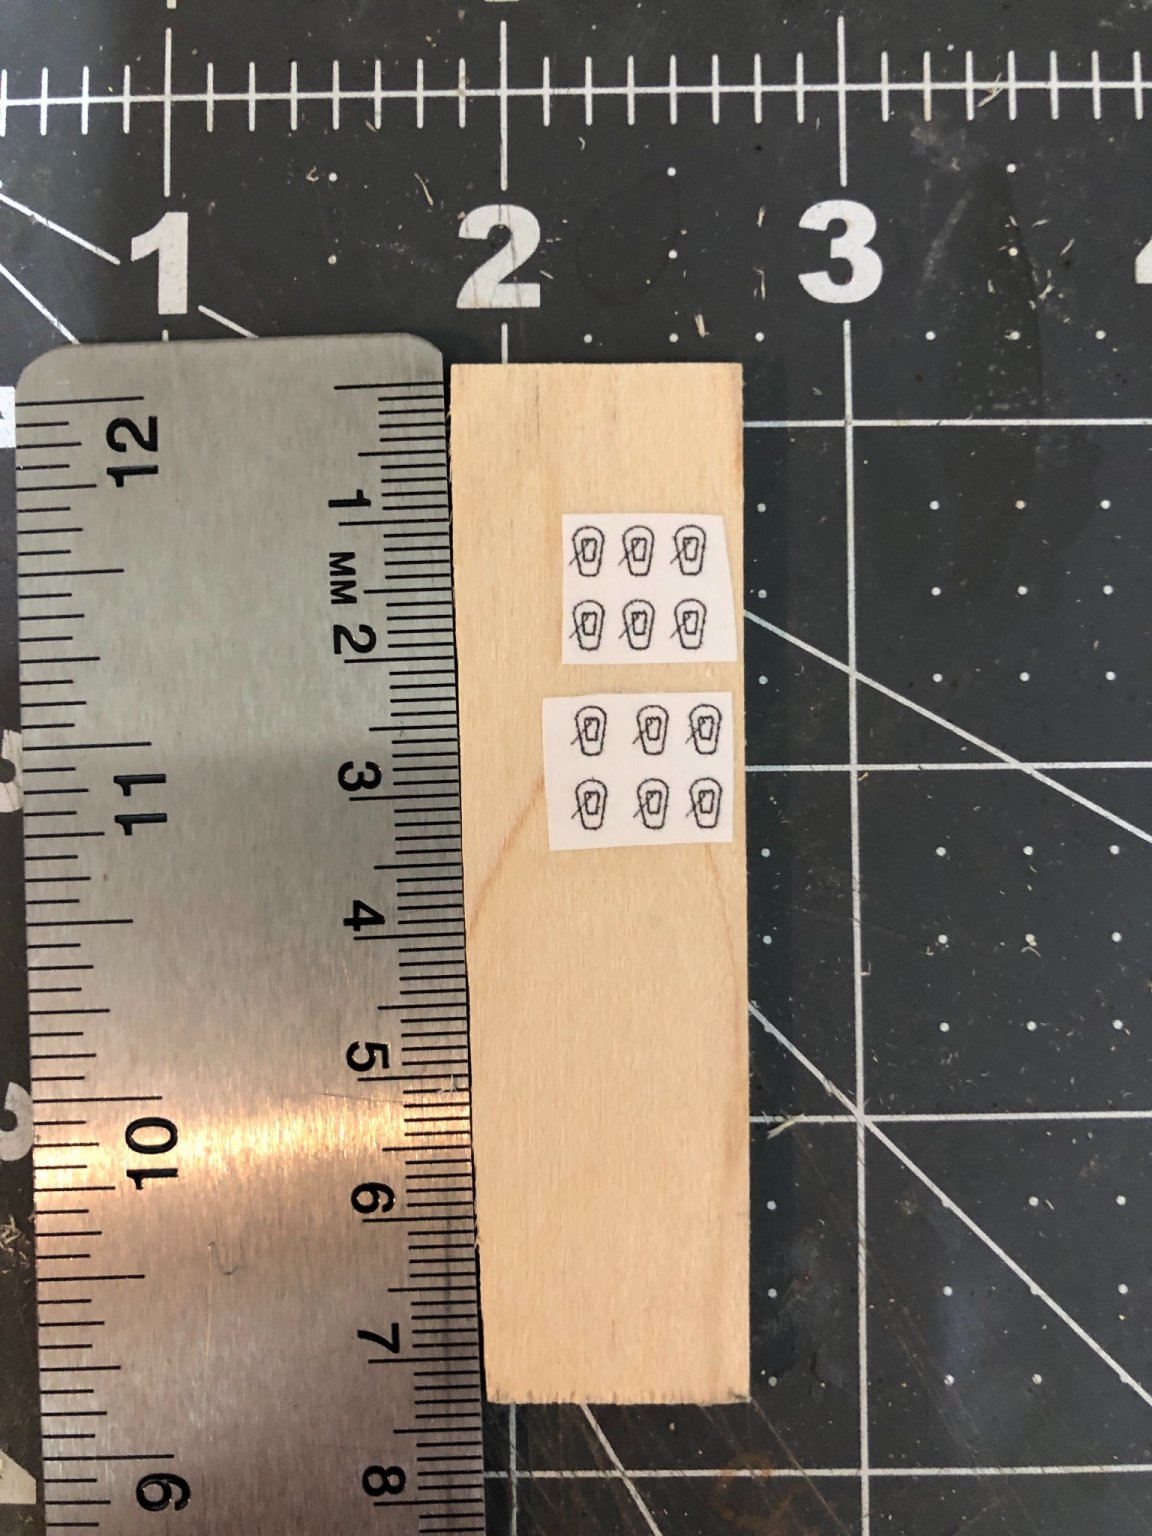
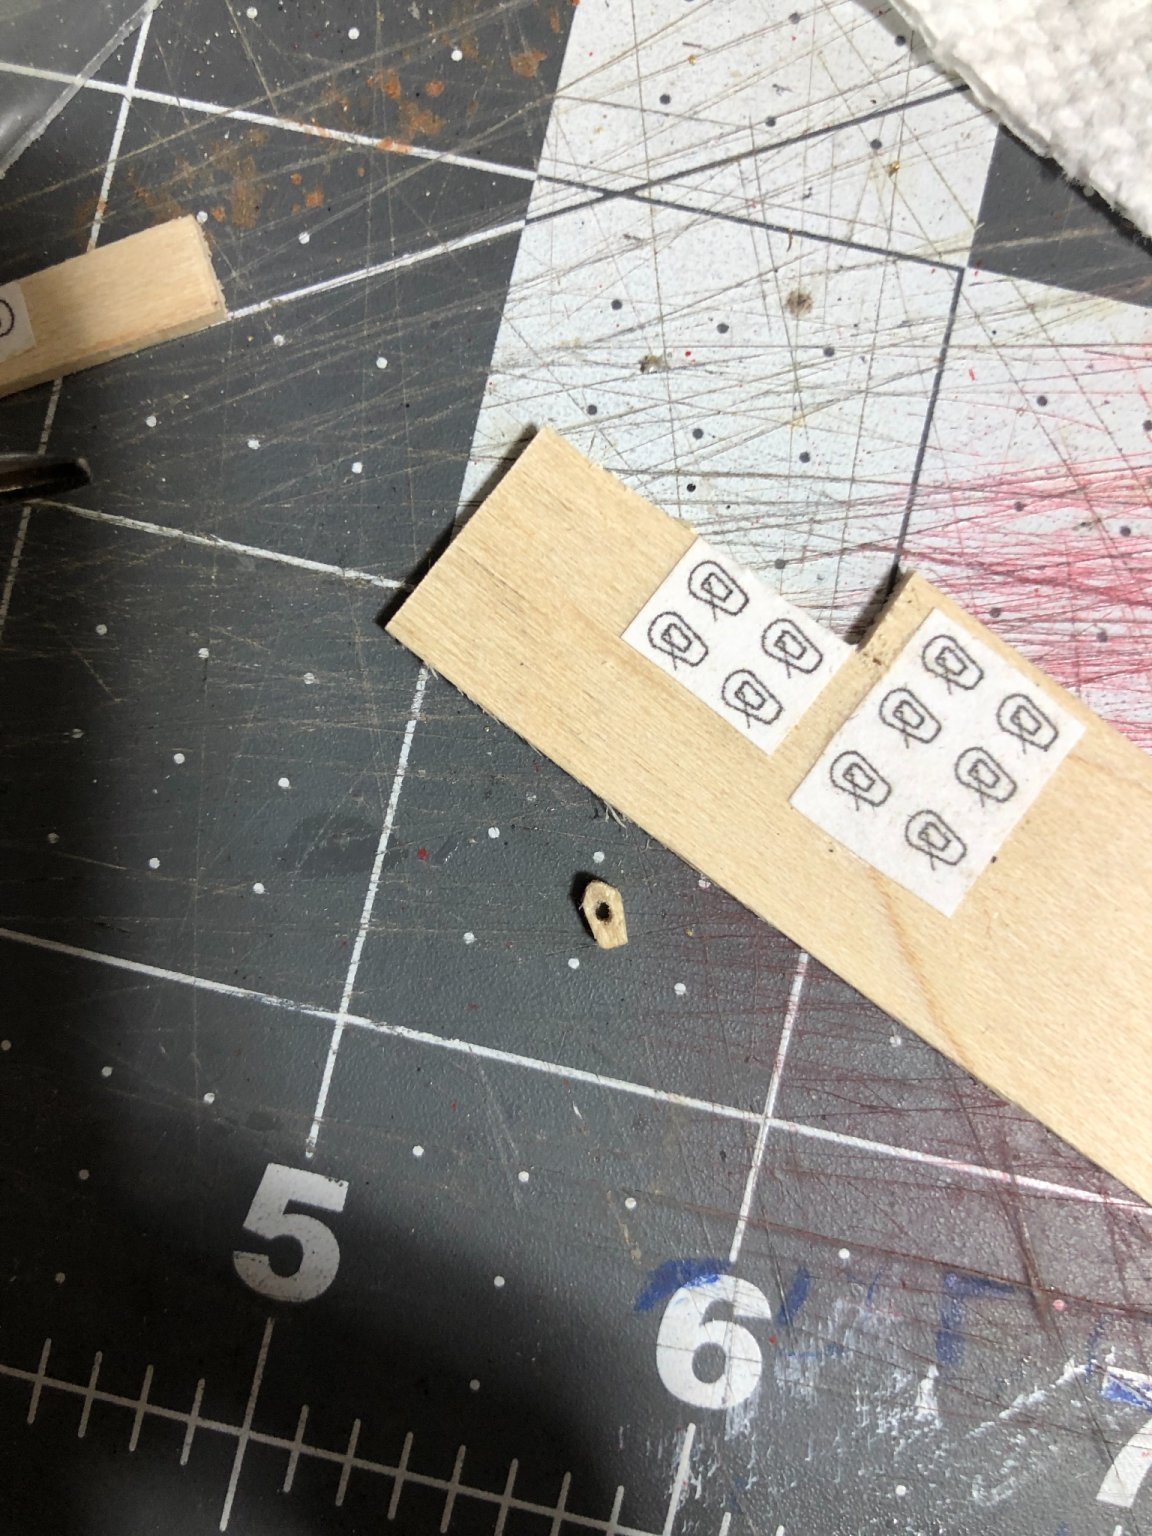
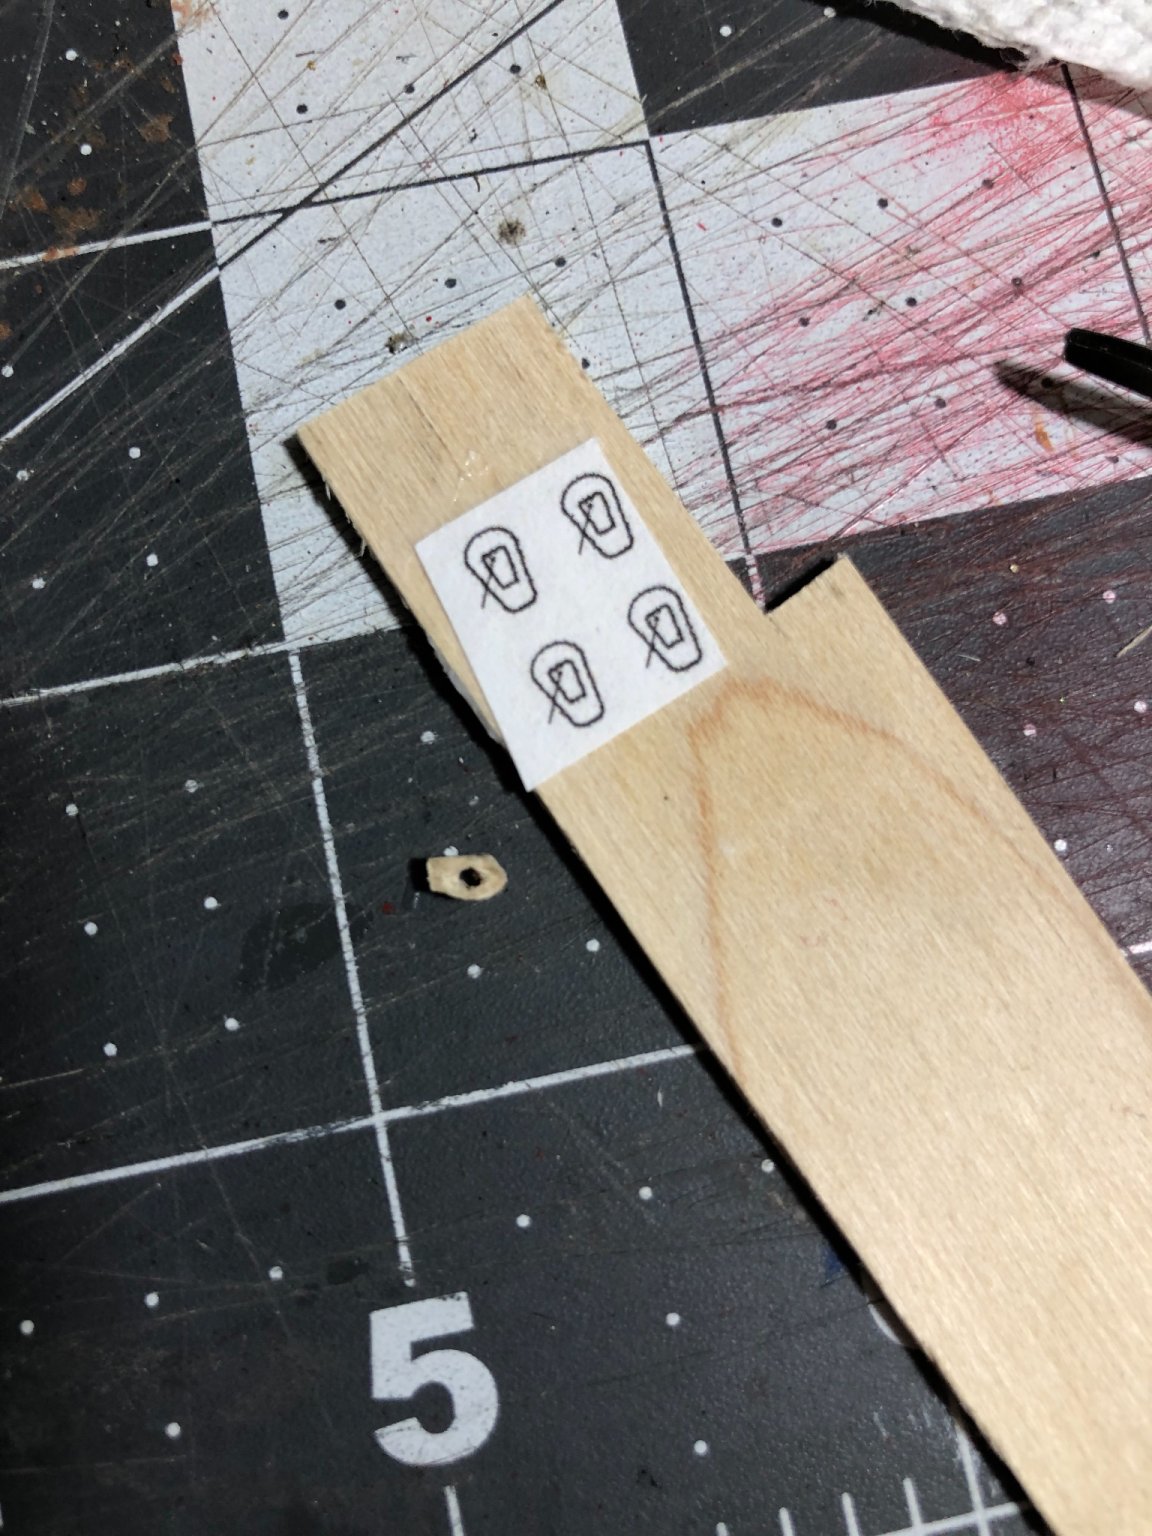
Thanks Bob and Richard! Quick poll/question: I was working on the preventer stay and mistakenly made the lanyard way too long. While discussing this and looking at the AotS I thought that may I should swap to more accurate closed hearts instead of the kit supplied fittings shown above. Unfortunately, Syren is closed for the holidays so I decide to try making two from scratch. Initially, I rescaled the plans from AotS from 1:24 to 1:64, but they looked too small to my eye (and I couldn’t make a good one). Oh I’m using some Hard Maple by the way for these (and man a band saw is looking useful compared to what I had to go through to get a small sheet). So I rescaled the plans to 1:48 and tried again. The picture below shows the large hearts to be made. Finally, here is where the rubber meets the road. What do you all think? Should I make a second heart? Wait for Syren to reopen? Or stick with the kit supplied fitting? My thought is that the scratch built heart is passable (and the more I look at it the more it is growing on me), but the wood is significantly lighter than the rest of the build (aside from the deck) and I may consider trying to stain it 😬.


- 436 replies
-
- 4
-
-
- vanguard models
- alert
- (and 1 more)
-
You're doing a great job! I feel like this all the time now that I'm working on rigging - each line and corresponding set of blocks seems to take a lot of time compared to the "noticeable" work. I'm constantly reminding myself that I'm not in a race and I hope you're enjoying all the small details as well!
-
Congratulations, it was a great build to follow and she looks wonderful!
- 261 replies
-
- 6
-
-
- muirneag
- vanguard models
- (and 2 more)
-
Thanks a lot @Rustyj @Old Collingwood @glbarlow! and everyone else thank you for the likes!
- 436 replies
-
- 1
-
-
- vanguard models
- alert
- (and 1 more)
-
Looks very nice! I really like the stand as well! Where did you get those figures (I looked through your log but I didn’t see if you mentioned it)?
- 40 replies
-
- 1
-
-
- sherbourne
- caldercraft
- (and 1 more)