HOLIDAY DONATION DRIVE - SUPPORT MSW - DO YOUR PART TO KEEP THIS GREAT FORUM GOING! (89 donations so far out of 49,000 members - C'mon guys!)
×


VTHokiEE
-
Posts
1,528 -
Joined
-
Last visited
Content Type
Profiles
Forums
Gallery
Events
Everything posted by VTHokiEE
-
 Thanks @druxey , I’m learning a lot on this build (the last frames I built were much better than the first ones). Marking out is certainly critical - I’ve tried a “finer” pencil frequently sharpened but I plan to switch to a mechanical pencil (or lead holder as I’m finding them sometimes called). Thanks for everyone’s advice, likes and comments - they are helping me get through it (and help me improve as I go).
 -
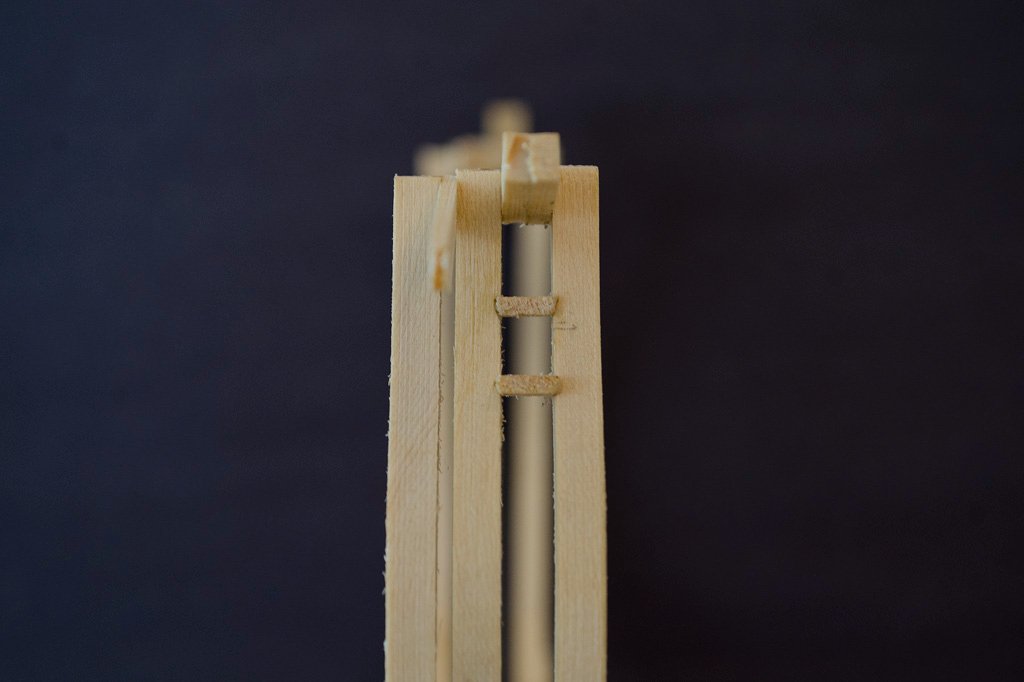
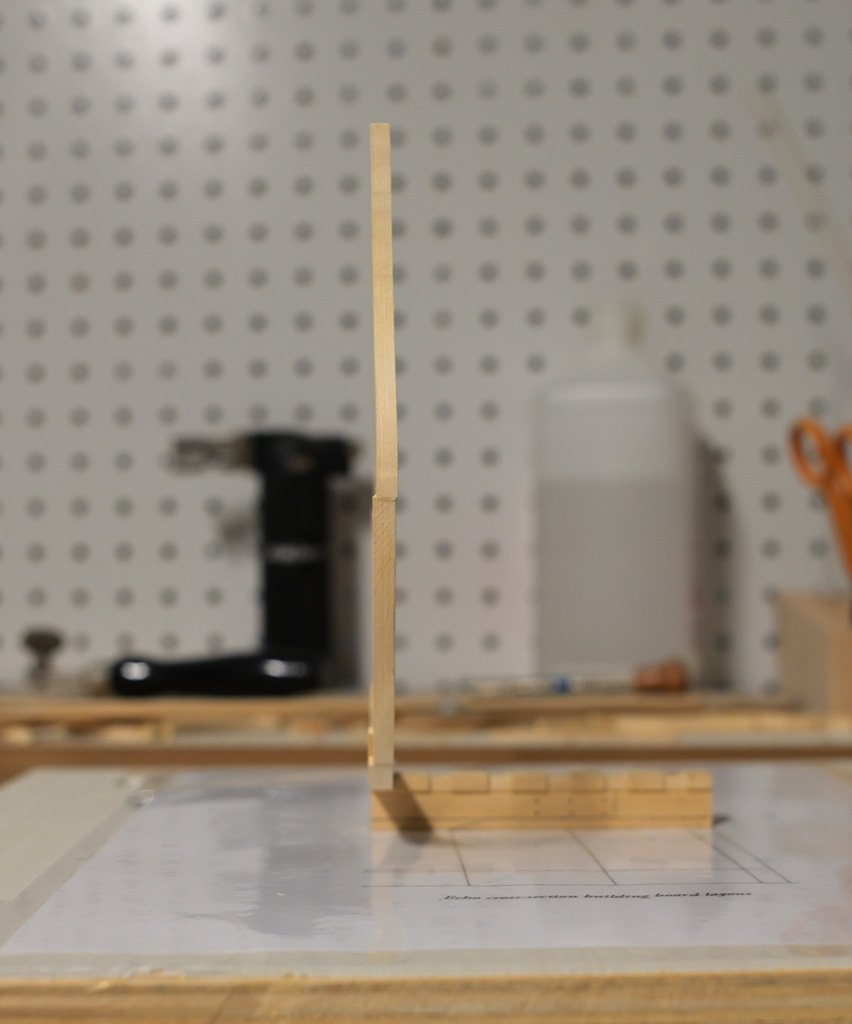
After raising frame 1 fore it was time to add the sweep port sills. The instructions reference either doing this prior to raising the frames (which requires a lot of precision in building and raising the frames) or doing it once the frames were raised (which probably is a little trickier to get a clean score and a level port). Considering my current set of skills I chose the later. I'm adding spacers as I go to provider support and allow for clamping (It was trickier to find space to clamp the second frame after the first was up). The I had to consider how to transfer some marks to the frames to indicate where to file away. I ended up clamping a wood batten perpendicular to the square that would reach into the space between the frames and allow me to (hopefully) accurately mark out heights for the sills. I'm not certain that I needed the bottom line for the sill, but decided to at least do the first set with it. I carefully, and very slowly, used a triangle file to notch in the angled score. I also found that I don't have anywhere near the appropriate light levels in my garage for this work, but since it wasn't too messy I felt safe bringing the building board inside to work (and I was the only one at home 🤫). I found the top angled score much easier to accomplish and then tweak for alignment compared to the lower birdsmouth score, but in the end I think it all worked out. I used a disc sander for the edges on the sills and quickly discovered that I'd like to upgrade that to a Byrnes sander - or I need some angle gauges and some better jigs to evenly run the edges of strips through. Wow, I can't believe that little sill took me the entire morning. Now on to the other side and see if I can do a better job on the scores.

-
Thank you!
-
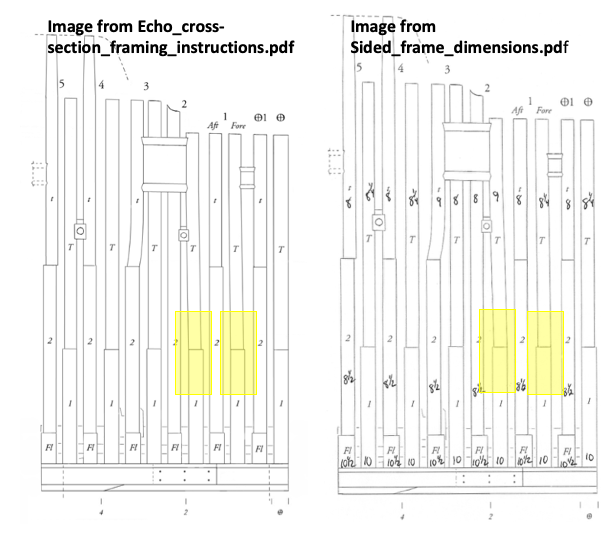
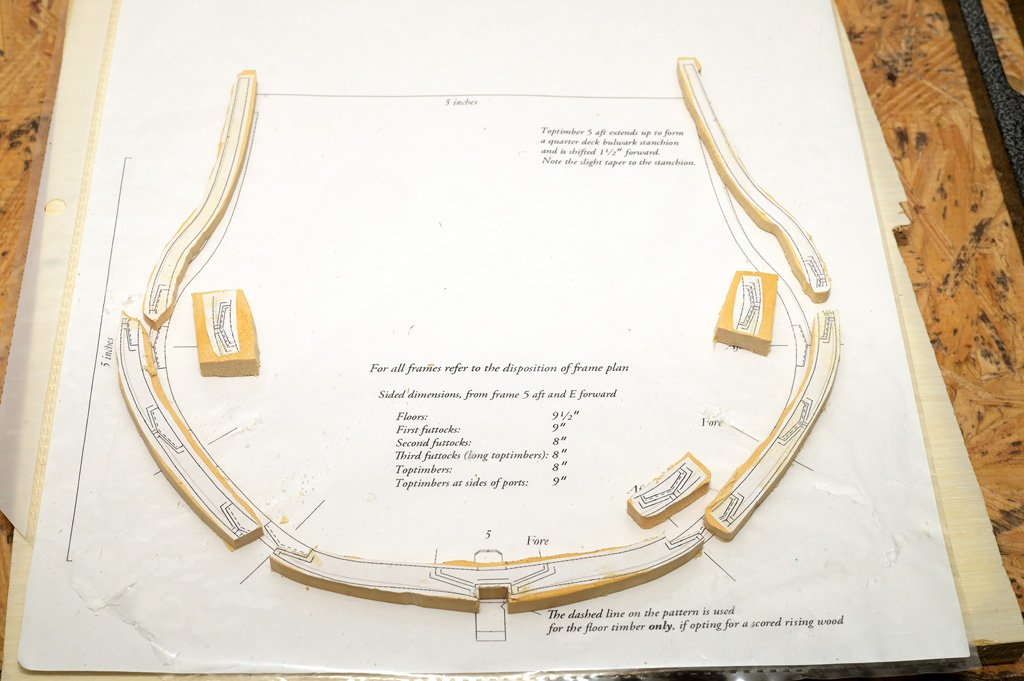
Thank you very much @captain_hook and everyone else for the likes and comments. I seem to have run into a discrepancy as I found two frame facing different directions depending on which file I was looking at highlighted in the following image. When I noticed the discrepancy I pulled off the 3rd frame which I had just aligned so I could think about things. After looking at few build logs the sided_frame_dimensions.pdf seems to be predominately used; the cross section in the framing guide looks like it used the other layout which was in the framing instructions. I suppose it doesn't really matter and I think I will follow the sided_frame_dimension.pdf layout as most have already done, but I was curious if that was correct. @dvm27 do you have an opinion on it? EDIT: Tried to look at the image at https://www.rmg.co.uk/collections/objects/rmgc-object-83627 (which I think is correct), and I can't quite make it out but it seems like the image in the framing instructions might match the drawing, but I realized that these both have special top timbers so they only go in one way :-).
-
I know my voice doesn’t hold any sway, but I’ve been using AYC on my cross section and find it very nice. Given the price difference I would choose the AYC version. I, sadly, think a boxwood model opportunity has passed me by; it will be neat to see a version in boxwood though!
-
Really excited for this project! Fingers crossed I’ll eventually get to build it as well!
-
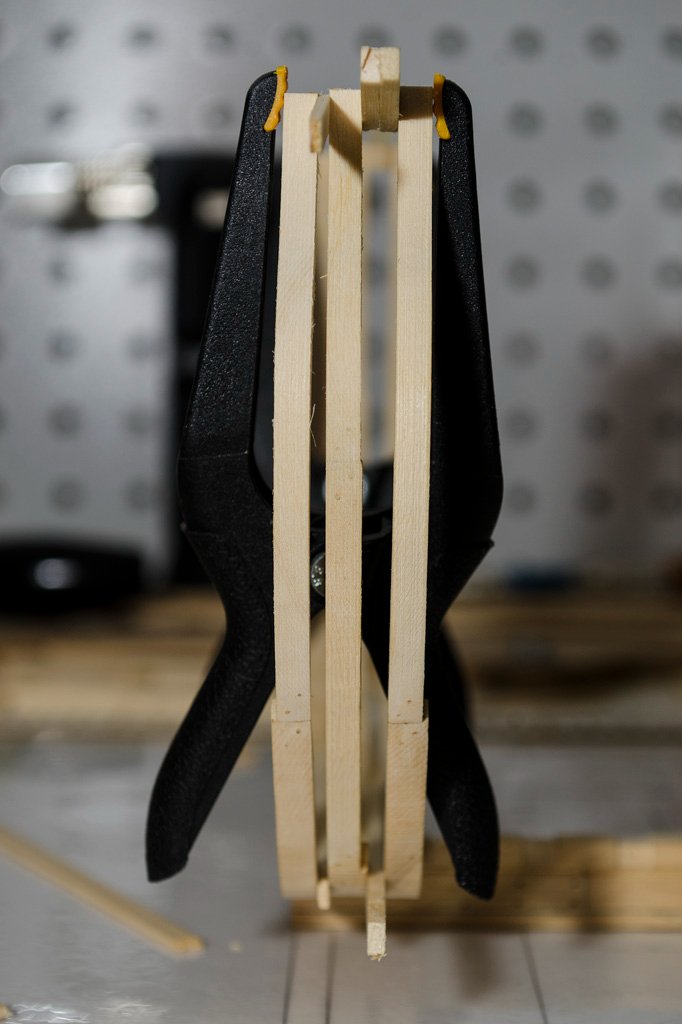
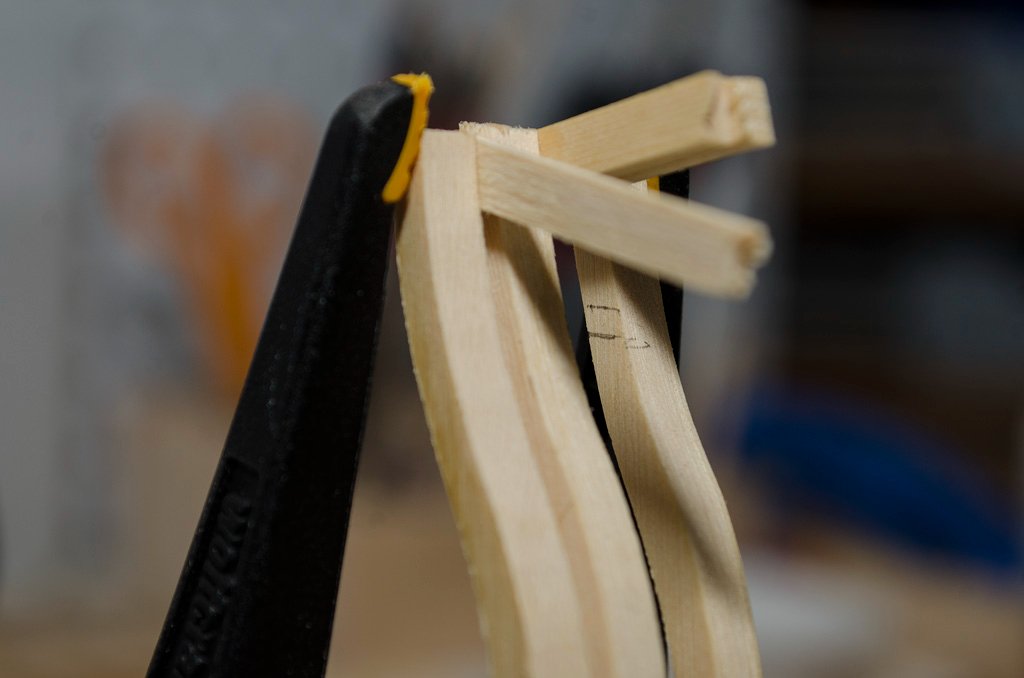
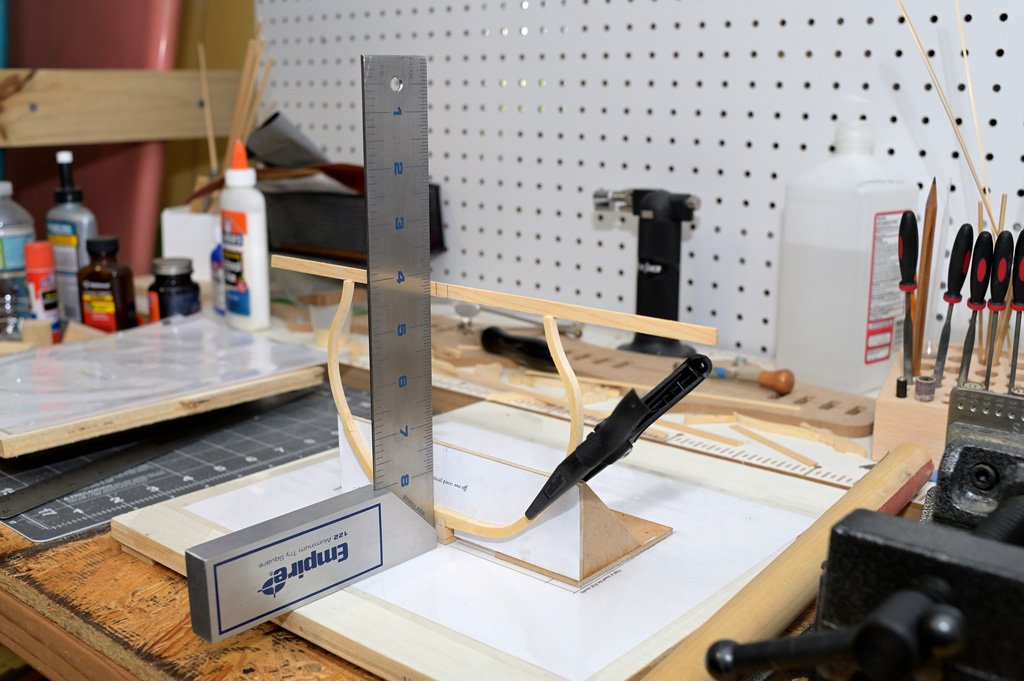
Thank you! Learning something new with every step - my next cross section is going to be great 😁 I think I found a path forward for me raising frames. First I attached a crossmember on the frame and then drew two parallel lines for the keel. Next using a square I lined up the frame (please excuse my inability to take a picture dead on). My 1-2-3 setup blocks helped to hold the brace down nicely while I fine tuned everything. I'm now staring at the frame and trying to decide if I'm ready for glue or not. I'll walk away for a little while and then come back if see if I'm still happy with all the different aspects of the alignment before committing to glue. Oh and don't forget to keep on eye on the keel rabbet and the bottom of the frame - almost forgot about that aspect. Of course once this frame is raised I'll need to immediately tweak the process as I need to align the frame from the rear (and I might not be able to use the brace, we'll have to see how it goes). I'm feeling a fair bit more confident about the process now.


-
Beautiful work, wonderful pictures and great descriptions… I don’t have your knack for build log posts 😂. Nor have I been devoting enough time to my build, I only have 12 frames and you have an entire hull!! 😁. I can’t wait to follow how year two goes for you - such a work of art!
- 840 replies
-
- 3
-

-
- winchelsea
- Syren Ship Model Company
- (and 1 more)
-
Have no fear, I won't trust them :-). I did see a handy tutorial in @Maury S build log (very grateful for it) here (Post 9 I believe): I think I'm going to give this a shot and see if I'm happy with the results - no need to rush so I'll do my best to be confident before gluing and if needed try another plan.
-
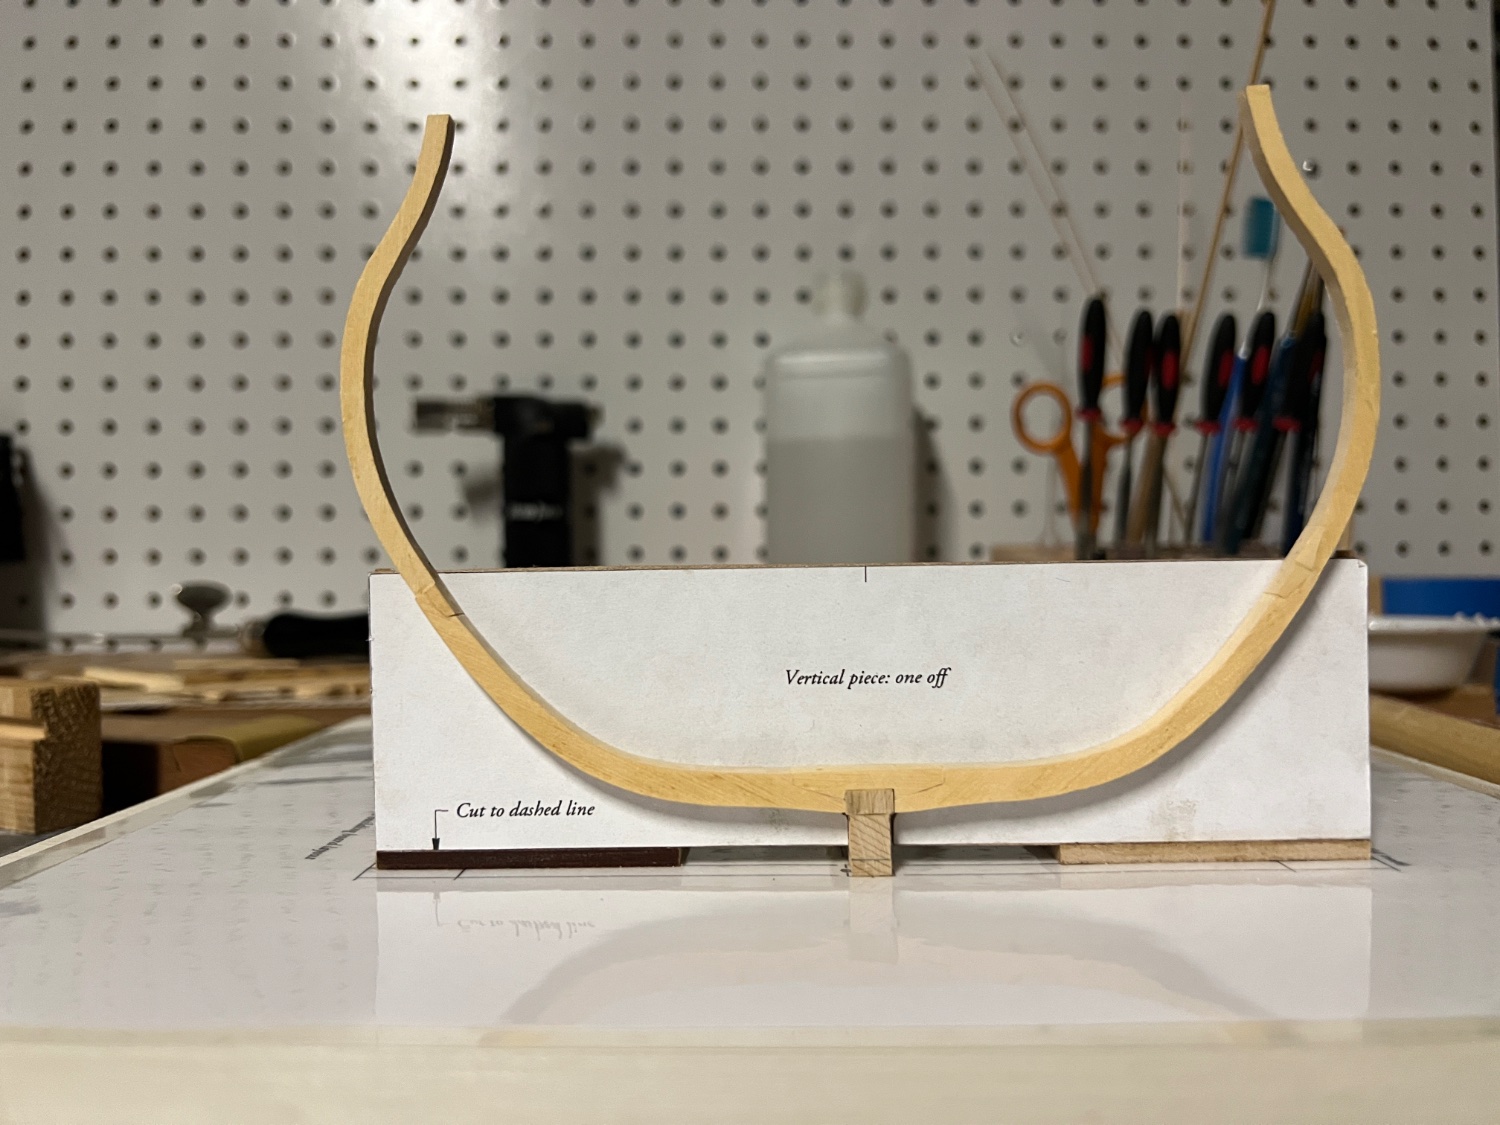
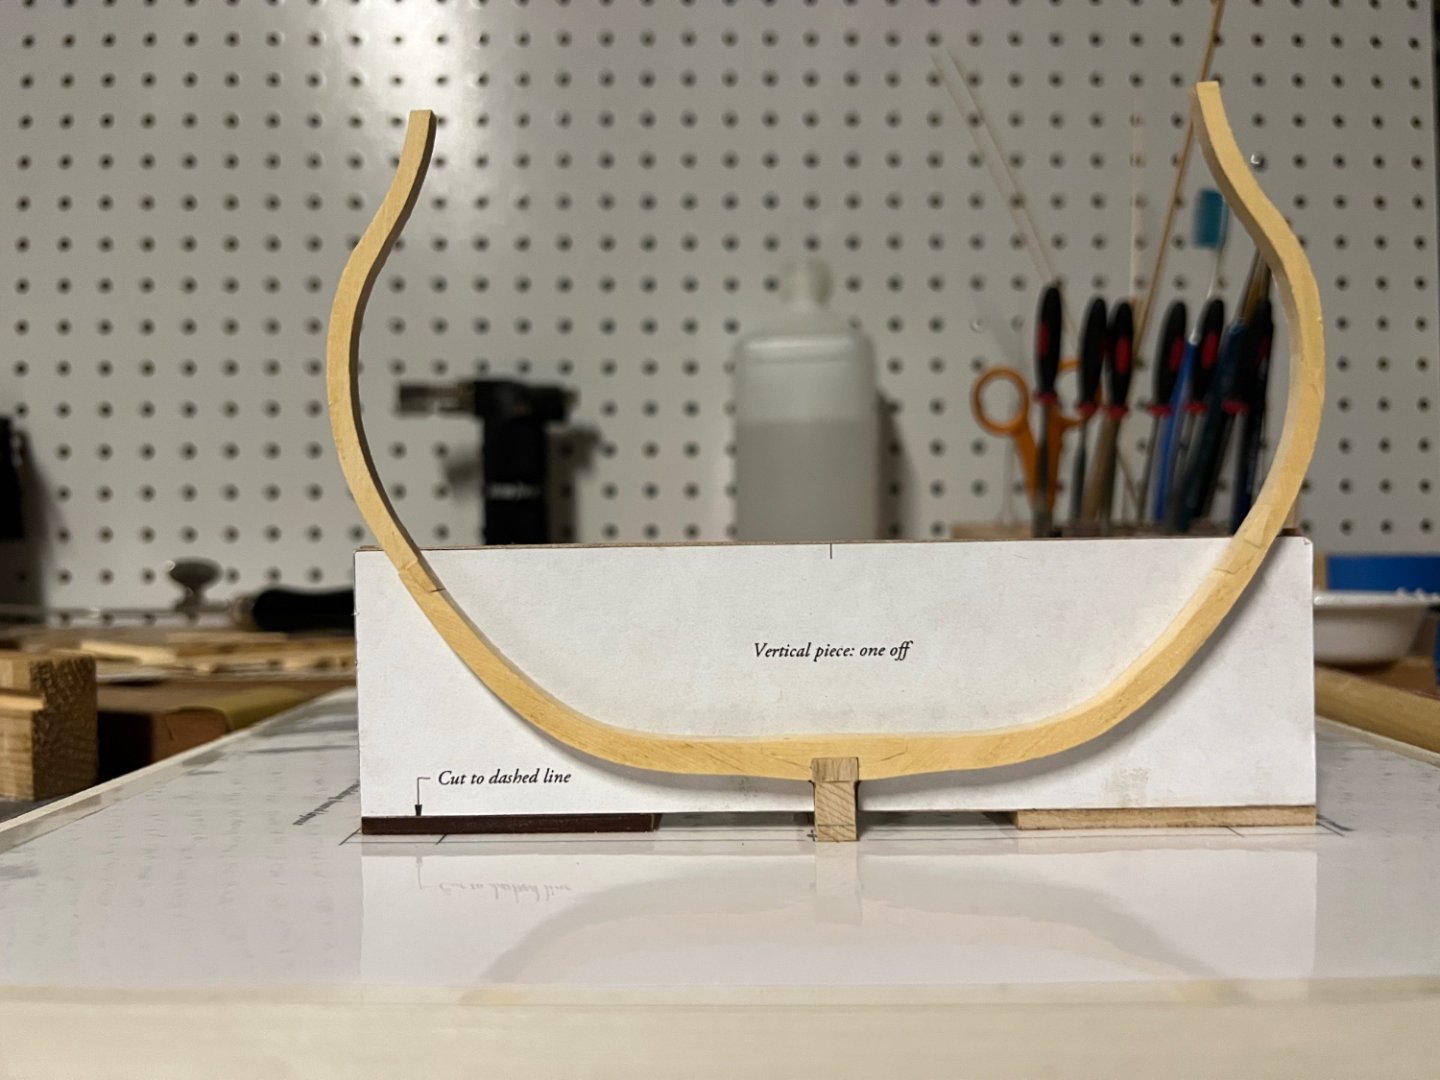
Thanks Greg, I think I'll have to either redo/rethink my jig (below) which I build from some MDF scrap - I based it off the templates included in the build but I think I need more height (which may require a longer base as well). When I tried to level the dead flat I wasn't confident that it was level - it looked okay to the eye (but I'm not certain that I can really trust my eyes :-). I'll need to think on this more, maybe some graph paper would help to show lines.

-
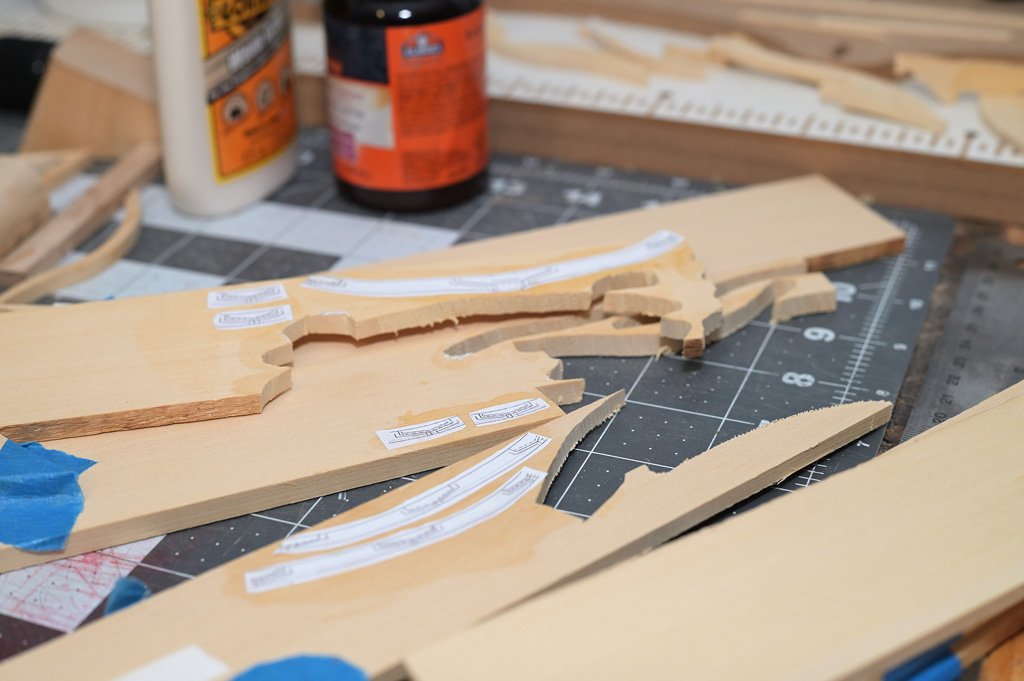
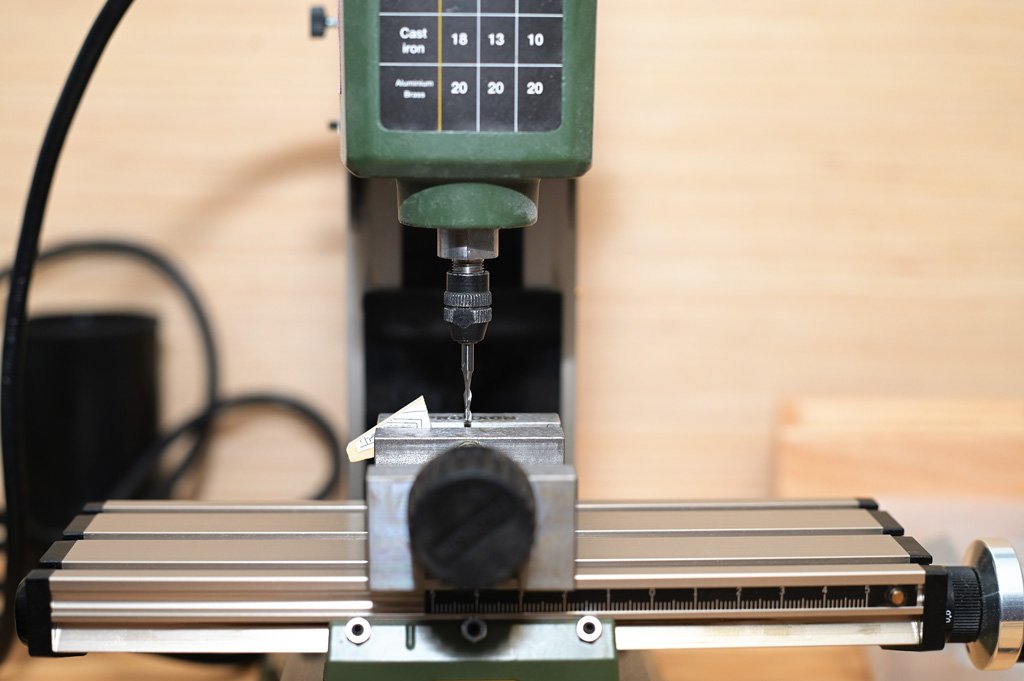
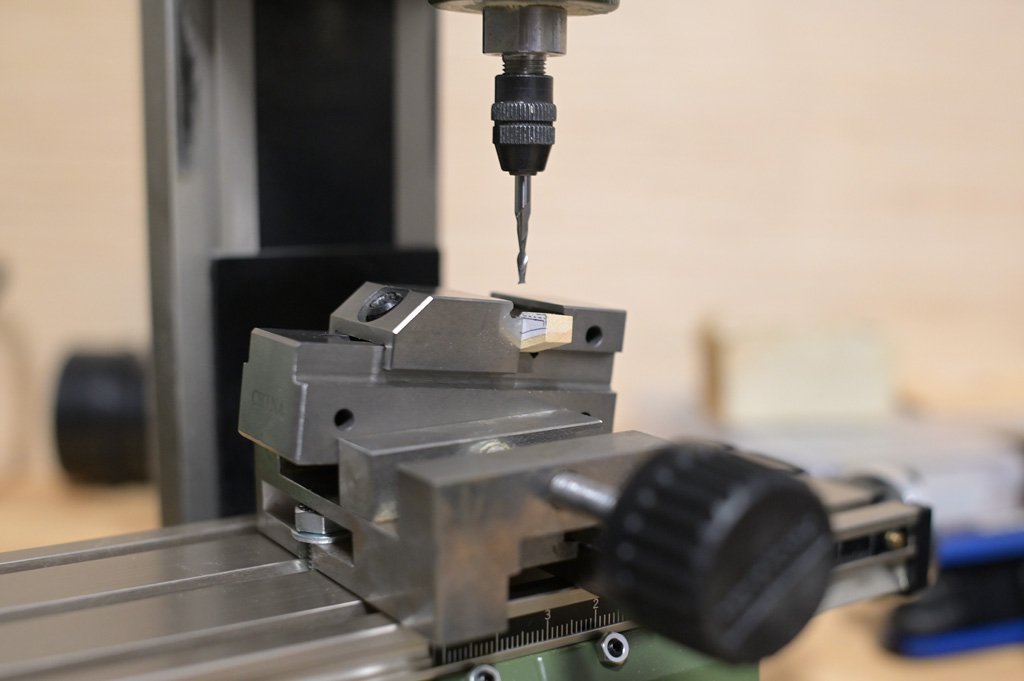
A little over a year and I finally arrived at a HUGE (to me) milestone - all the frames are finished! I wrapped up the twelfth frame today (what a journey). I decided to walk through (most of) the steps I wen through constructing the frame. I first did a little editing of the frame layouts to provide myself with some more lines for aligning parts in my mill vise, then I cut the components out and rubber cemented them to the appropriate width lumber stock. After the cement dried I used a jeweler's saw and cut each part out for milling and sanding. Next I went to work with my mill to try to fine tune the cutouts. As discussed previously I had to cut some parts at an angle, I've tried doing this simply filing by hand and then attempted to do it on the mill as well. I have to say I don't have a good way to set the vises up precisely so filing by hand worked better for me. Gluing everything up was rather straight forward. The only real trick was setting up the correct offsets for the top timbers which I cut with my Byrnes saw from some left over stock. Sadly, this went un-pictured but I was quite happy with the result. Next up was drawing some bamboo for treenails, drilling the holes (still not great at doing this straight by hand - will have to continue practicing), and voila! This has been quite the learning experience and I've got my fingers crossed that when I go to raise them I won't find out that they need to be re-done (😬). So I'm currently planning out how to raise these frames so they are level and parallel. I'm enjoying this project quite a bit; it has me really focusing on planning things out (of course not all my plans have played out, but c'est la vie).

-
I’ve been eying a CNC for quite some time now, but have been hesitant to pick one up (mainly because I don’t know if ky expectations are in line with what I’m willing to spend). I would love to hear what people are using; I’m also very curious if anyone can point out tips or tutorials for using flip jigs and double sided milling. I’m not certain I want to develop the skills needed to turn various columns and similar. Originally I was looking at 4-axis machines but I’m not ready for that investment and I think a flip jig would solve it. How do you like the prover XL?
-
Tilting mount for Proxxon Vise for MF70
VTHokiEE replied to ChrisLBren's topic in Modeling tools and Workshop Equipment
Hi Chris, I’ve been actively searching for the same thing. So far I keep coming back to this angle plate that @No Idea uses: https://www.renishaw.com/shop/Product.aspx?Product=R-PCA-135075-12-6 I’ve checked the tilting angle plate from Sherline but the mount holes are not the correct width apart (1.5”) as far as I can tell. I’ve also seen some adjustable angle plates that I think are for optics but I question their rigidity. I’m still window shopping but I think I’ll be asking for the Renishaw for Christmas if I don’t find a better solution. -
Depends who is hosting the website, but it’s not very difficult to get an SSL certificate (takes you from http to https), I’ve used https://letsencrypt.org/ for some self hosted sites but I’m sure there are other options. Then you can redirect any port 80 traffic (http) to port 443 (https). I may be making it sounds trickier than it is, but if Joe has an interest I can send him some tutorials and links.
-
@Joe V Hopefully this is useful but I can't access the site specifically from a Chrome browser on a Mac (OSX). It worked fine on Safari on Mac though and no issues with Edge/Chrome on Windows (sorry I don't have Firefox installed to try there) and I didn't have any issues from my iPhone browsers. Whether link or direct copy and paste of the URL from above I can't get there on OSX with Chrome.
-
Congratulations! Very nice pictures; she looks beautiful!
- 150 replies
-
- 3
-
-
- agamemnon
- caldercraft
- (and 1 more)
-
Doh, of course it’s there - sadly I read that post so apparently my reading comprehension is steadily falling 😉. I’ve always shied away from PVA with my synthetic rope (I use Mara as well - and will be tempted to try @BenD’s suggestion for making a cable someday to see if my eye can tell the difference). I suppose I’ll have to get back to experimenting eventually.
- 345 replies
-
- 1
-
-
- Duchess Of Kingston
- Vanguard Models
- (and 1 more)
-
I think it looks really well done (ratlines included). Enjoyed seeing the update - did you use the PVA mix with synthetic rope? I thought you switched to gutermann Mara thread.
-
Those are truly amazing. Do you have any tutorials on how to even approach doing painting like that? And the maps...wow, very impressive. Is your friend accepting applications for new friends 😉? Agreed on the maps, or maybe suggestions on paper and how to print them even.
- 488 replies
-
- 5
-
-
- Indefatigable
- Vanguard Models
- (and 1 more)
-
A guide to using MSW
VTHokiEE replied to James H's topic in Using the MSW forum - **NO MODELING CONTENT IN THIS SUB-FORUM**
Sounds similar to this thread, but it appears as if the issue simply resolved itself over time: -
Glad you made a build log for this one, I’ve been interested in the ironclad kits from Bluejacket.
- 113 replies
-
- 5
-
-
- Cairo
- BlueJacket Shipcrafters
- (and 1 more)
-
Simply wanted to comment that my books arrived today, everything was in great condition. It's a sad reason but I'm thankful that I had the opportunity to share in the collection (and my what a collection).
-
Last time I purchased some I bought it straight from the manufacturer and I believe you still can do that but I didn’t go through with a purchase (and shipping may be cost prohibitive depending where it’s going): https://sigmfg.com/products/sig-silkspan-tissue
-
Oh boy, I think I might need an extra bookcase after this (actually I think I showed some slight restraint). Thank you for passing along the details Chuck.
-
I think this was actually boxwood strips, not basswood, which I believe and @chris watton please correct me if I'm wrong would be replaced by the etched deck in your kit. Edit: Oh btw @flutlo6180 good luck with the build - I hope you enjoy it; I really enjoyed mine.
- 59 replies
-
- 1
-
-
- Alert
- Vanguard Models
- (and 1 more)