src
-
Posts
2,300 -
Joined
-
Last visited
Content Type
Profiles
Forums
Gallery
Events
Everything posted by src
-
Sikorsky CH-53 by mtaylor - FINISHED - Revell - 1:48 - PLASTIC
src replied to mtaylor's topic in Non-ship/categorised builds
Mark, good to see you getting some build time in until the weather decides to cooperate. That balsa dust can be unpleasant to be sure. The one that REALLY gets me going is Baltic Birch. Ken, back on the 16th you wondered if the old hangers are still there in Santa Anna. They are, it is hard to see them from I5 (the closest freeway) but sometimes if you look just right you can catch a gimps of them. I recall my brother has a photo of his 28 model A pickup with one of the hangers in the background from a car club trip. Monsters thos building are. Carry on Mark, airbrush or hand brush, looking forward to the results. Sam -
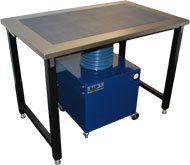
Mark, Dust can be a real bear once you are sensitized to it. Baltic Birch really gets to me, I have to leave my respirator on for several minutes and run the dust collection at work a few extra minutes or I end up sneezing repeatedly. Would something like this, but an a smaller scale help? Should be pretty easy to build one, just a simple box and some sort of grating on the top over the filters. Sam
-
Hi Jo!! Getting caught up here. You have come a long way since I last stopped by. It looks like you solved your weak spot issue. Thinned epoxy or thin CA can solve many issues. Luies idea of gluing a couple of battens on with pva would have given you some additional insurance until you were ready to add in your additional structure. Either way great job. Sam
-
Getting a chance to catch up here Jo. What can I say that the others have not? Well done my friend. Sam
-
Rich, been away for a while, you are making excellent progress. If you hadnt told us I wouldnt know your hands are not 100%. Sam
- 1,135 replies
-
- 3
-

-
- model shipways
- syren
- (and 2 more)
-
Finally getting a chance to catch up Mark. Looks great so far. Any progress since your last post? Sam
-
That looks really good. How on earth did you manage to cut your window lites out without turning your mullions into little tiny fragments???? Sam
-
Thanks Dennis. Nothing much going on here at the moment. She is sitting quietly on my work table collecting dust. 4 more weeks, 4 more weeks. LOL Sam
-
Looks good to my eyes Mark. At least you found out now and not later about the bulkheads. Sam
-
Well said.
-
Jo Mark and those who hit the Like button, Thank you. Baby Steps....Baby Steps... Sam
-
Jo, you're not dumb at all. Heck, I just figured out the difference between a yard and a yard arm!! The Yard is the whole thing, the Yard Arm is the part that extends past the cleats! (I think...)!! All along I thought they were the same. Its a learning curve and you learn by doing and asking questions. You are doing fine, relax and enjoy the ride. Sam
-
Well done, Jo. They matte looks much better to my eye. Sam
-
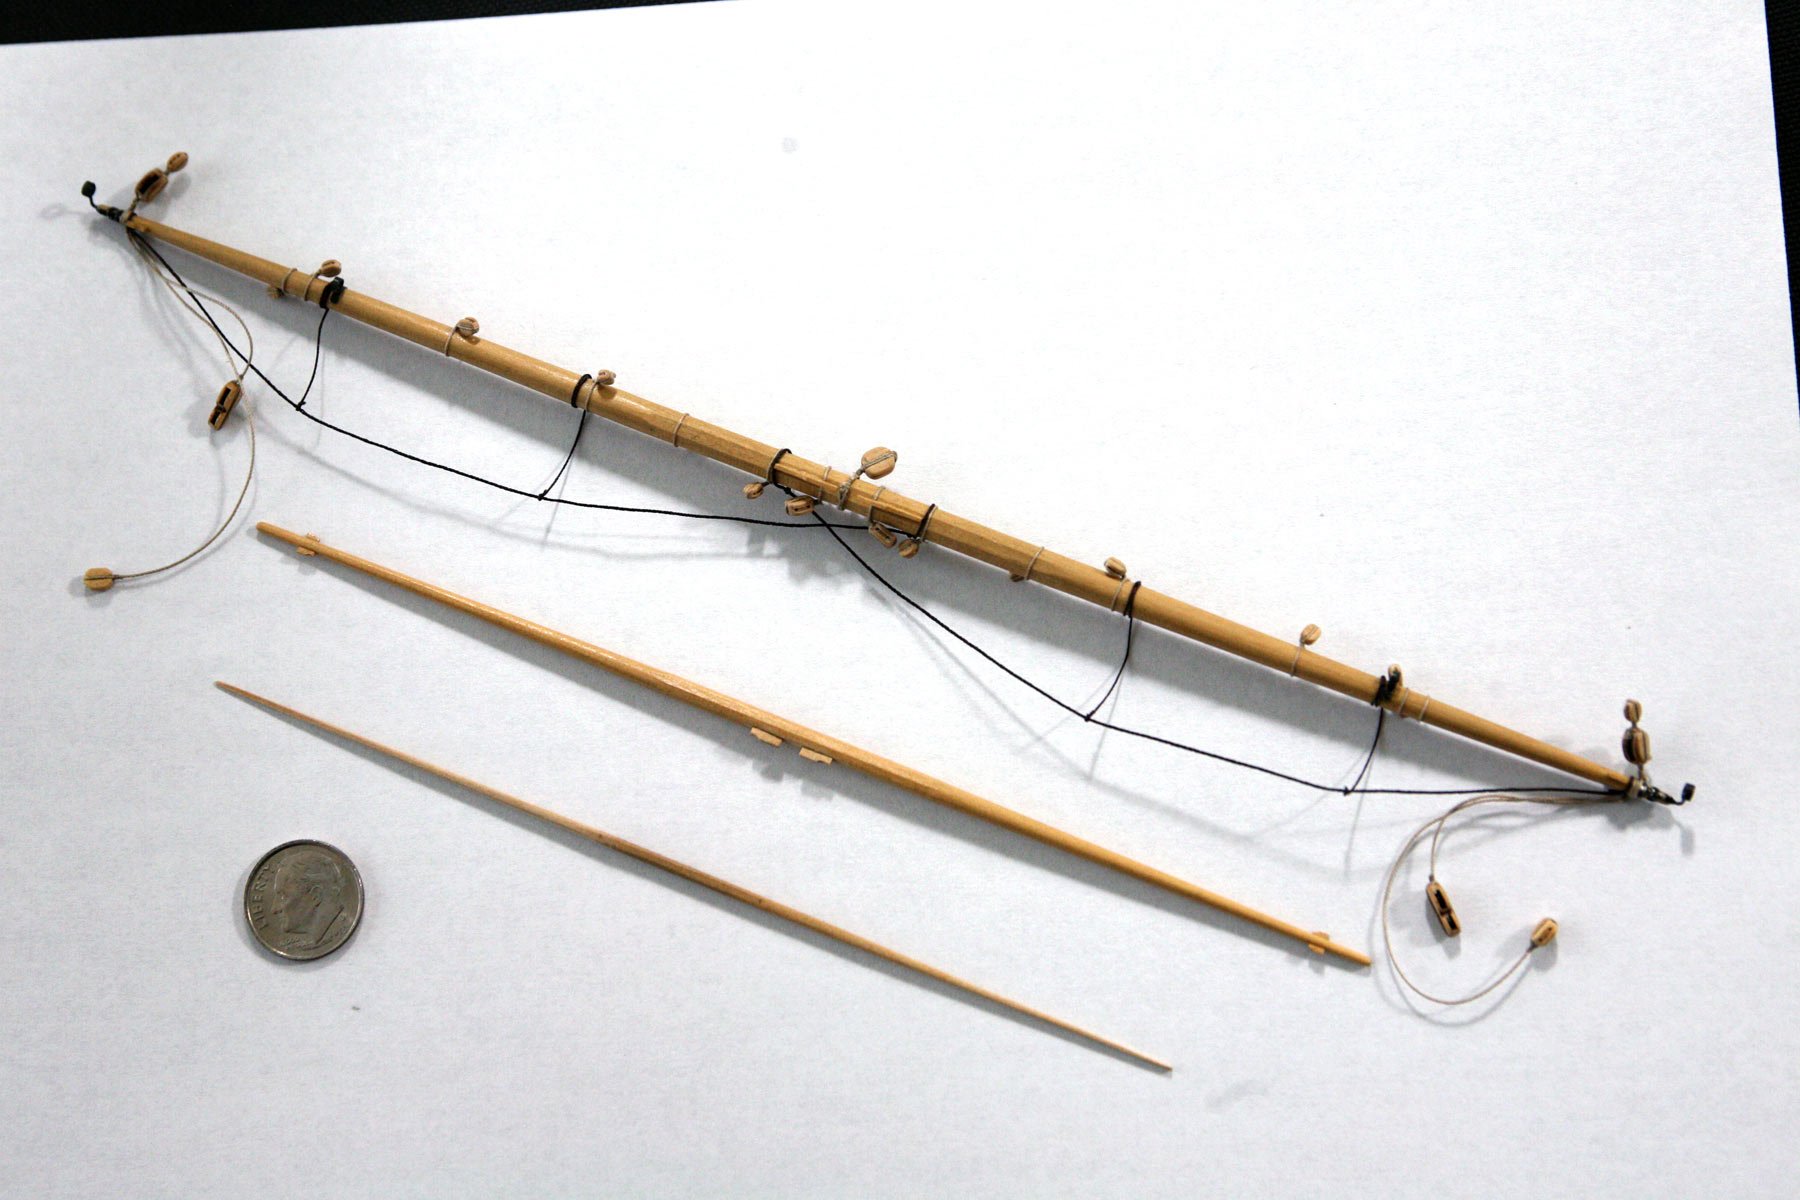
Hey all! I have a day off and some time to venture about here as well as get a bit of build time in. Over the last couple of months i have had some time to finish my Fore Yard as well as get started with the Fore Top and Fore T'Gallent yards. Current status below. I am not 100% satisfied with teh footropes and Lanyards? Slings? that support them. They are kind of misshapen. If I cant straighten them out I will have to re-do them. I believe the center portion of the yards were supposed to be 16 squared, I am finding it exceedingly difficult to 8 square stock at this size, I stopped there. I originally built the Stuns'l hardware completely from brass but the banding that mounts to the yard looked to thick even at 1/64" so I made those from the foil that caps wiskey and wine bottles. It worked well, but I need to prep/prime them better in the future, some of the paint peeled off and required a repaint. I suspect a more thorough cleaning with alcohal and maybe a brushing of vinegar to slightly etch the foil will work better. Thoughts anybody? That's all the news that is fit to print. Best guess is November before I get back on a more regular build schedule. (Murphy, you stay in your corner!!) Sam

-
Jo, Your progress is looking great! Barrels dont look bad at all, as Ulyses said, some fine sand paper or a fine nylon scrubby pad. will knock that shine right down. If you go the scrubby pad route dont use the kind you clean pots and pans with, go to an autobody finish suppler. 3m makes some, I think the light grey is the finest, check first though. Sam
-
Getting caught up J. Well done!!. I will have to try your knotting technique for the foot ropes one day. Every time I have tried to tie knots in a rope for this it gets all kinked up. Your way looks like a good method. Sam
-
Rich, good to hear you are healing up. Shrouds look good. Sam
- 1,135 replies
-
- 2
-
-
- model shipways
- syren
- (and 2 more)
-
Mark, good to see you building again. Looks good to my eye. In regards to OC suggestion about coating the delicate parts with CA, what about thinned epoxy? You would have more working time and use fewer brushes. Something like West Systems is already thin and I have thinned it down in the past. It is however expensive if this is the only thing you would be using it for. I have tried this with the 5 minute epoxies from the LHS, doesnt work as well, it cures but stays somewhat flexible. Sam
-
Well done Carl!! I know who to come to for advice should I ever get around to building the Mount Katmai (AE16) the ship my Father in law was on during the end of WWII. Sam
-
Jo, Getting caught up. Your doing great, build looks good to me. Johnothan, dont stress about how log it takes or what it looks like. When members see what you have done they can very gently give you tips on the next build. AS far as how long it takes, I am in my 10th year on my enterprise. It will get finished, one day. Hopefully before the glue deteriorates! Sam
-
J, Getting caught up. Looking good. Sam
-
Phll, The final assembly will be potted like you describe, not only degassed, but then put in a pressure pot and cured under pressure. We get the parts back from the laser cutter today, a little later than we wanted but better than not at all. Sam
-
Mark, I am so sorry to hear of your difficulties. As others have said, a tough choice but undoubtedly the right one. We are all here for you. Sam
-
Hi Phil, Thanks for replying. It is hard to describe in public what we are trying to do with out breaking my Non Disclosure agreement - we build theme park attractions and this client is very strict about intellectual property. The closest I can come, is imagine something with very fine detail like trace portions of a very detailed circuit board encased in a clear resin. Like a circuit board but not, no FRP core. What I am seeing on some of the WWII ships here is in line with what we are looking for. We only have to deliver one item but would have ended up having several etched as there is more to the end product than I have given here. I started here as I thought someone here might be more interested in the process and a small order as well as helping out a fellow ship modeler with a couple of bucks. As it has turned out, the guy who does our water jet cutting has a line on a laser cutter, we are having the parts laser cut as I type this. Thanks again, Sam