Kevin-the-lubber
-
Posts
1,215 -
Joined
-
Last visited
Content Type
Profiles
Forums
Gallery
Events
Everything posted by Kevin-the-lubber
-
 No, don’t let it sit; blacken asap. I have no idea how long it ought to sit for. I first followed the instructions, which was just for a minute or two, then went longer and longer and think I kind of gave up on it after 6 or 7 minutes. I’m sure there must be expert ‘blackeners’ on here that can put both of us straight. My pens of choice are Posca art pens https://www.posca.com/en/discover-posca/history-and-values/#:~:text=Its unrivalled ink%2C whose formulation,“magical” effect of POSCA., but only because that’s what they sell in my local crafts shop and they certainly do the job. But I imagine all acrylic art pens are much of a muchness. I just like how easy it is to get the very effect I expected, but didn’t get, l from the Birchwood blackened. As I may have mentioned elsewhere, I bought spare felt nibs and whittle these to a fine point and/or crush them to make them more like a brush. Just be sure to get art pens, not sharpie type black markers, as the latter go a bit bronze-ish after a little while. You’re doing incredibly well to get those smooth curves with that method. If I understood it correctly, it would be common to get flat spots at the start and end.
- 2,667 replies
-
- 2
-

-

-
- heller
- soleil royal
- (and 9 more)
-
Me and you both, Bill. Same with clothes. I can make a black suit look dirty within 5 minutes of putting it on. Marc, I've used Birchwood and had the same result, it would rub off and become more grey than black. Extrapolating from my welding background, I think you need to clean the surface and blacken before a new coat of oxidisation can form. If the brass behaves like sheet, we are talking hours here, not minutes, but neither is it days. (And I could be wrong, it's 40 years since I brazed brass in earnest). This is also where I took to using acrylic pens, the blacks work a treat. I guess you (or I) could also try that old kids trick of letting them soak in brown sauce or anything acidic for a while until they go bright, rinse, then blacken. How did you form the hooks? Whatever your technique, it warrants sharing because yours are so consistent they look machine made. Was it just winding around two pins and cutting to suit?
- 2,667 replies
-
- 2
-
-
-
- heller
- soleil royal
- (and 9 more)
-
Funny you should mention Blue Ensign (aka Maurice). I was very taken by his Pegasus back on the old Pete Coleman HMS Victory site and I’ve had his sail-making tutorial bookmarked for years. If only I had some finished yards to practice on! I too hope to move on to wood at some point, or being me, more likely mixed media. But I still have so many things to learn first. Retirement is only a few weeks away though, which will help.
- 2,667 replies
-
- 3
-

-
-
- heller
- soleil royal
- (and 9 more)
-
Marc, I can't remember if I've seen you commenting on Bruma's Cutty Sark, but if not, his sails are magnificent and more than worthy of your build. I know what you mean about wanting to maintain the standard all the way through and being unable to settle for less. I have found the facility to make 'better' parts to be a bit of a curse on both the CS and Victory, but especially regarding the masts, spars and rigging, in part because I am someone who has to understand what something does before I can make progress. Hence parking it for now. Quite frustrating as I'm usually a good completer/finisher, but all part of the journey. By the way.... I bought the SR kit on ebay a week or so back. They usually fetch quite a high price this side of the pond but as this one was at a reasonable buy-it-now price I took my chance. IIRC it's quite an old pressing, I hope so anyway. So I now have all the large plastic kits that I would ever want (Victory, Cutty Sark, Kearsarge, Constitution, Soliel Royale) and probably more than I will ever build unless I change tack.
- 2,667 replies
-
- 4
-
-
-
- heller
- soleil royal
- (and 9 more)
-
Block and Heart sizes question
Kevin-the-lubber replied to Kevin-the-lubber's topic in Masting, rigging and sails
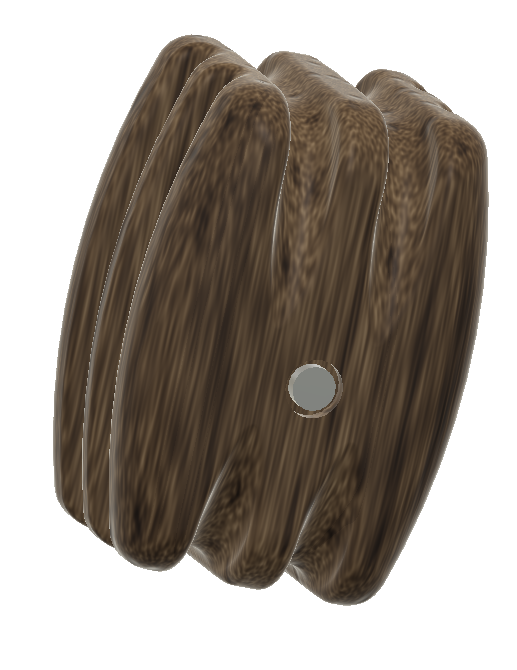
I'm finding it worthwhile to create them in CAD anyway, as I'm learning a few things about their design that I hadn't realised were the case i.e. that the pulley wheels are not central in the block, but slightly offset, and that the blocks are recessed to allow the ropes to run cleanly from the wheel. All obvious stuff really, from an engineering perspective, but not usually represented on plastic kit parts. How well these will print I have yet to find out - some of the sizes are extremely small at 1:100, but previous runs with generic, less carefully designed blocks have been broadly fine.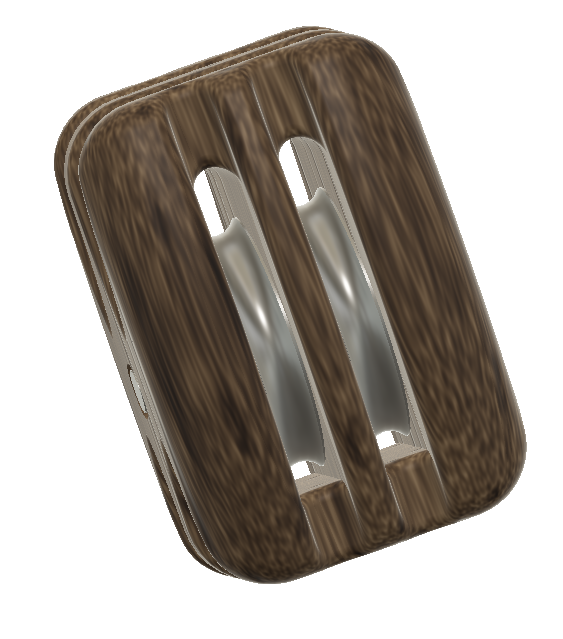
-
Block and Heart sizes question
Kevin-the-lubber replied to Kevin-the-lubber's topic in Masting, rigging and sails
Thanks Henry, that would more or less correspond with the drawings so I’ll stick with that. In passing, I had no idea thee were so many different fittings and sizes, and wonder does anyone stick to these when modelling. The typical plastic kit just gives four or five variants, versus the dozens in McKays tables. -
Block and Heart sizes question
Kevin-the-lubber replied to Kevin-the-lubber's topic in Masting, rigging and sails
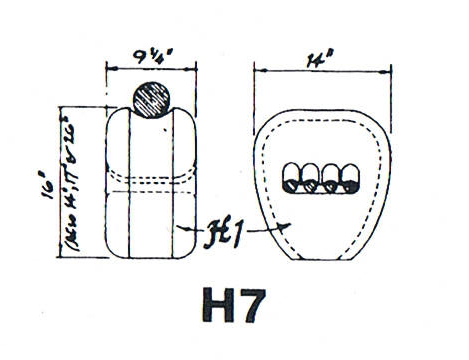
I'm going to partially answer my own question with respect to rope diameters; the 3 1/2" rope must go around the heart (slaps forehead), doesn't it. So what about the 4 through holes, does 0.4mm dia at 1:100 seem right?? -
I'm starting to work my way through making all of the rigging fittings listed in McKay's AOTS HMS Victory, and I have a simple query. On his drawings on pages 114 and 115, McKay typically gives basic dimensions and, underneath the height dimension, adds, in brackets other sizes. In the example here, a closed heart, he says "(also 14", 17" & 26")". My query is this - should all the other dimensions be scaled to suit? I suspect it is very obviously 'yes, of course', but thought I'd check anyway. While here, can I also sense check hole sizes. On this drawing, the implication is a rope diameter of about 1 1/2", whereas in his tables on pages 116 - 118, McKay says a 16" closed heart would be used for ropes of around 3 1/2" diameter (11 1/2" circumference). Which is true? There actually isn't anywhere near enough room for 4 x 3 1/2" rope holes, but equally, 1 1/2" ropes seem a bit on the skinny side. Or am I missing something?
-
Ps. I don’t use sharpies or any other kind of normal permanent marker pen, for that very reason (I use them all the time for plant pot labels and you’re right, they fade to grey within a year). I use Pentel acrylic art pens, I can’t say whether they have the same issue, only that none of the ‘pen-painted’ parts I’ve been handled this morning, at least some of which were painted a year or more back, have lost their blackness. BTW, as I’m writing, I also bought a pack of spare ‘nibs’ for the pens, so I can trim one to a very fine point. They go feathery quite quickly but I just trim off the feathers. I’ve found black and gold pens are excellent. Other colours seem to be less opaque so I stick with paints for these.
- 2,667 replies
-
- 5
-
-
- heller
- soleil royal
- (and 9 more)
-
I think that's come out very well indeed Marc. Your opening line about the coated wire resonated, I think I found the same on my CS cathead levers, the blacking just rubbed off, and I resorted to using a black acrylic marker pen. I like that it adds more or less zero 'paint' thickness, but the downside is that it has a sheen to it, though this can be made matt with lacquer.
- 2,667 replies
-
- 6
-
-
-
- heller
- soleil royal
- (and 9 more)
-
Redoing Oseberg
Kevin-the-lubber replied to KrisWood's topic in CAD and 3D Modelling/Drafting Plans with Software
Glad you’ve got it figured. That’s quite a different way to how I’d do this in F360 and it would probably just confuse the issue by getting into that. Can I ask, what are you aiming for as an end product? A CNC-milled kit, or something like that? -
Redoing Oseberg
Kevin-the-lubber replied to KrisWood's topic in CAD and 3D Modelling/Drafting Plans with Software
In what way are you stumped? I don’t use Rhino, only F360, but the principles are broadly the same. -
Just a brief note that I've parked the CS for now. The delicacy of some parts of the masts and yards was becoming a bit trying and I'll come back to it with fresh eyes at a later point.
- 444 replies
-
- 1
-
-
- Cutty Sark
- Revell
- (and 2 more)
-
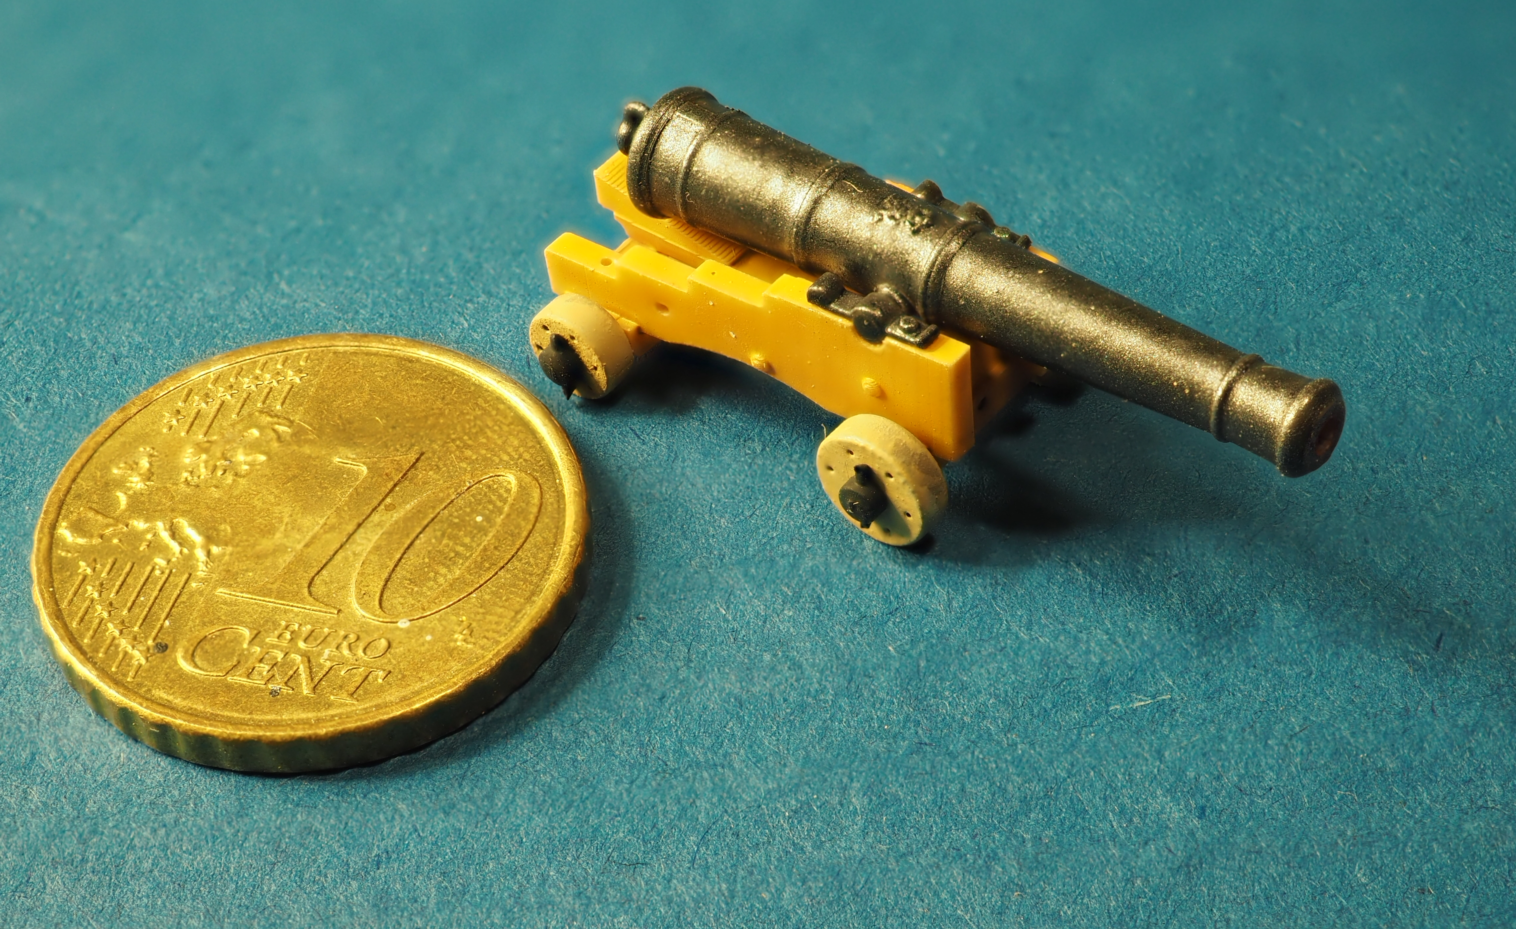
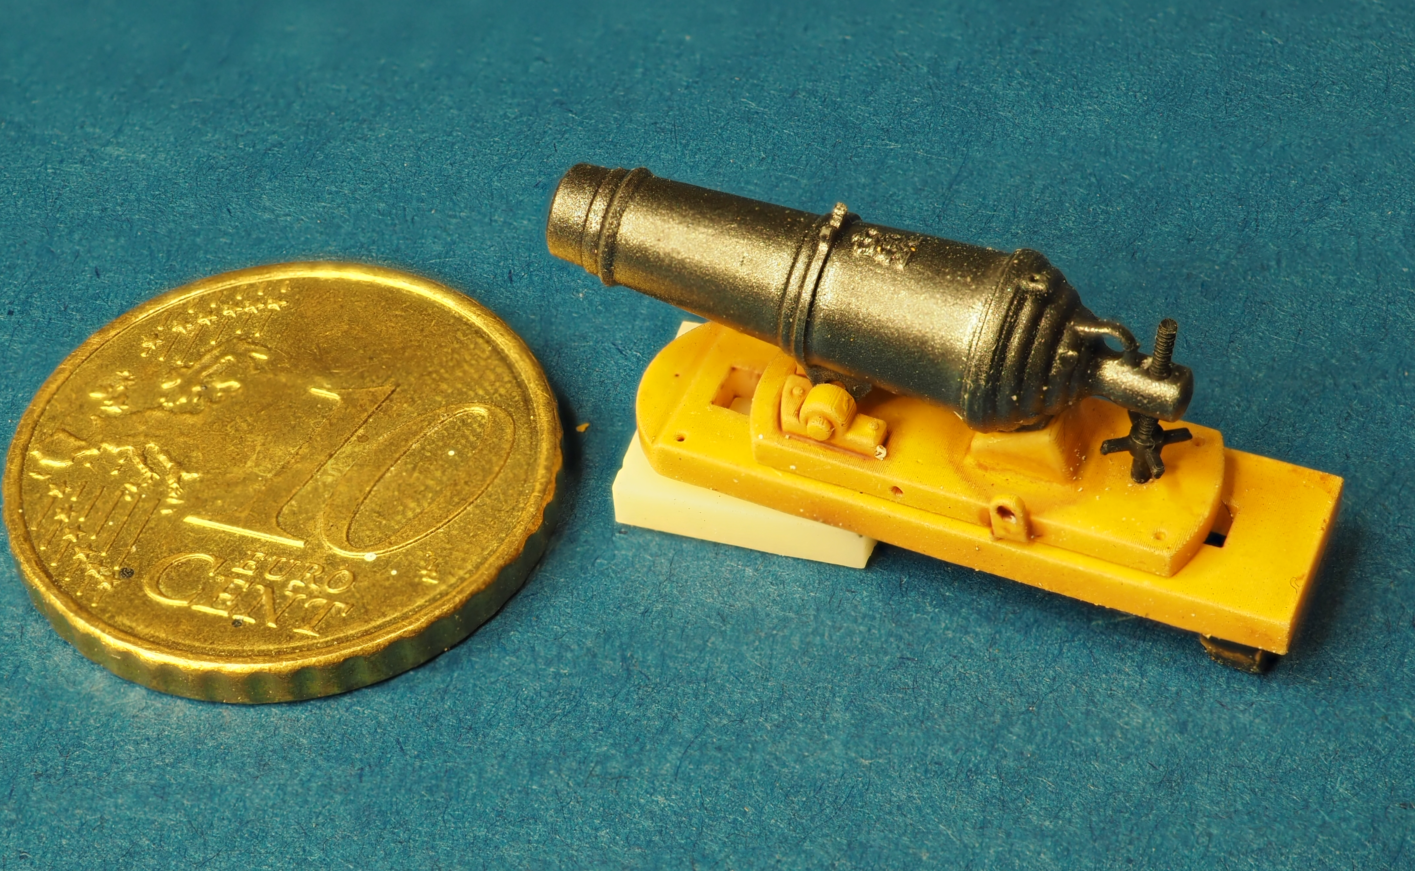
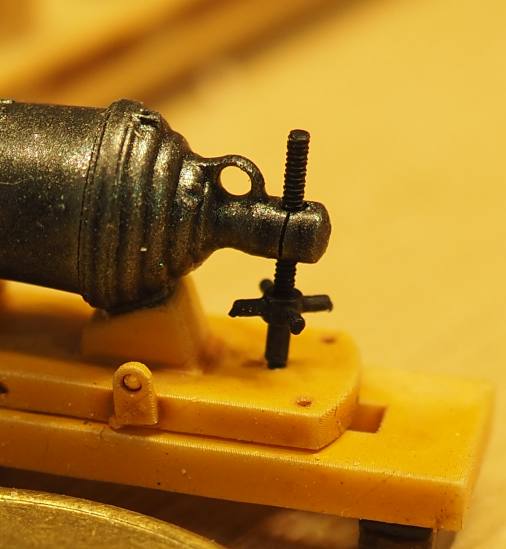
Despite semi-retiring recently, I still don't seem to make much progress on my models. However, I've completed the remaining 1:100 guns, being faithful to McKay. I changed the design of the carriage to get cleaner lines for cotter pins that go through the axles, I think that'll do now. The carronades were a nice little project and that really is a M0.6 threaded adjustment screw 🤪.


-
Ouch, hope you have a really great outcome without too much pain along the way.
- 114 replies
-
- 3
-
-
- Cutty Sark
- plastic
- (and 4 more)
-
This one can probably be filed under “teachings about the sucking of eggs”, but as a one-time metalworker can I add a little bit of info. The wire you’re using looks like cold-drawn brass stock, meaning it’s pulled through a former to get its diameter. This causes the grain crystals to get elongated (oh look at me, showing off that I paid attention at college!) which makes it springy and harder to shape. If you heat it to about “ouch, that hurt”, and let it cool it’ll be annealed and hold its form, but my memory is that brass work hardens very easily, so keep that in mind. Or you can fish out the little bundle of mild steel 0.5mm gunport lid wires in the Heller victory kit (so I assume also in the SR), which seemed to be already annealed. Either that or the quality was so poor that it worked in our favour.
- 2,667 replies
-
- 7
-
-
-
- heller
- soleil royal
- (and 9 more)
-
Apologies if I'm misunderstanding but isn't that table the wrong way round? I don't think the sail material would get thicker as the scale gets smaller! I don't know what the sailcloth thickness would be at 1:1 but if I assume roughly 1mm, then: Scale mm inch 1:1 1.000 0.0394 1:24 0.042 0.0016 1:48 0.021 0.0008 1:64 0.016 0.0006 1:72 0.014 0.0005 1:96 0.010 0.0004 1:200 0.005 0.0002 1:350 0.003 0.0001 Tissue is about 0.05mm so true to scale at 1:24, though it seems to give quite a credible representation at other scales.
- 114 replies
-
- 3
-
-
- Cutty Sark
- plastic
- (and 4 more)
-
I'd say listen to your gut. This is rich coming from me, but there it is. If I eventually decide to put sails on mine I will copy Marco's method (Bruma) as his sails are far and away the best that I've seen. But if you go down that road, take a look at the timeline on his log between starting to make the sails and finishing. My personal view is that cloth is no more realistic than the plastic. Even the thinnest fabric is too thick. But you may well get a good result by doing what your wife suggests but using EZE Tissue (you'll find it on ebay). However, I sense that you want to complete this kit and then see where you go next, and the quickest route is the plastic. The funny thing is that I don't think I've seen them on a single build here, so while we all think they'll look terrible, who knows, maybe they wouldn't look that bad.
- 114 replies
-
- 2
-
-
- Cutty Sark
- plastic
- (and 4 more)
-
That's very appealing but a fair bit more expensive. I guess you get what you pay for. However I fear it'll take something to persuade the admiral to sail again any time soon, more my thing that hers.
- 114 replies
-
- 1
-
-
- Cutty Sark
- plastic
- (and 4 more)
-
We’ve done a three cruises in the last few years, personally I think there’s a fine line between it being a glorified passenger ferry and a floating hotel. The last one (Norwegian fjords) was very much towards the ferry end of the spectrum and I doubt we’ll do another any time soon. Here in the UK there’s a much more affordable way of living onboard and seeing new places - canal boats! You’re making great progress David, I’d again say just plough ahead and use this as a fun starter. For the future, I can 100% confirm that bigger is better. I finished making some carronades yesterday, printed them and thought how fantastic they’ll look on my 1/100 victory, until I realised I’d forgotten to scale down from 1/48. But who has space for a 6 foot model! I think the sweet spot is about 3 feet long and the largest scale possible against that final length.
- 114 replies
-
- 1
-
-
- Cutty Sark
- plastic
- (and 4 more)
-
I've had a look at the file, nothing wrong with what you've done there. Though as often seemed to be the case with my own TinkerCad objects, the software says the components are not manifold (there are holes/gaps in the mesh, but the slicer is probably fixing these on the fly). A multi-part will print fine in resin but I think you'd struggle with the library printer. The frames would be about 0.5mm thick but if the finger cross section was like the sketch i.e. create a mortice and tenon, there would be enough heft in the frame for it to not be that delicate. It's ages since I used TinkerCad and I can't remember how much scope there is for dimension-driven design.

- 536 replies
-
- 5
-
-
- Quadrireme
- radio
- (and 1 more)
-
I bet most of us won’t see 60 again. David, great job so far and, at the risk of seeming contrarian, I’d say keep plowing ahead without getting distracted by detail or precision. There lies an enormous rabbit hole and once you start trying to be true to the ship or even true to scale, it’s very easy to become bogged down. I’d also point you at a build log of the Heller HMS Victory by Bill, and also his Soliel Royale (just search the forum), not because they will help with the CS, but because they demonstrate just how good a result you can get if you just crack on and keep the aftermarket’s and modifications to a minimum.
- 114 replies
-
- 4
-
-
- Cutty Sark
- plastic
- (and 4 more)
-
Tuppence from me: yes, print the fingers separately and, while you’re at it, think about splitting the fingers into two parts, the outer frame and inner insert. It’s not much work, design-wise, and you’ll get lovely sharp paint lines.
- 536 replies
-
- 3
-
-
- Quadrireme
- radio
- (and 1 more)
-
What an interesting project! And very nicely printed, I don’t see any supports scars anywhere. I couldn’t hear or see any gears grinding but have been told by a pro that candle wax is a great lubricant for 3d printed gears, if you are having that problem. I’ve been meaning to try it on my rope seizing machine but as I’ve parked the Cutty Sark for now that may be a while.
- 399 replies
-
- 2
-
-
-
- cutty sark
- revell
- (and 2 more)
-
Bill, is everything so far part of the kit, i.e. the boards, ring bolts? The re-washed deck was definitely a good choice, it looks very much like the deck on the actual Cutty Sark and I think you’ve got the colouring spot-on.