


ScottRC
-
Posts
559 -
Joined
-
Last visited
Content Type
Profiles
Forums
Gallery
Events
Everything posted by ScottRC
-
 Thank you Ian. I have the Underhill book, I guess I better start using it.
- 44 replies
-
- 1
-

-
- Thermopylae
- Revell
- (and 3 more)
-
Ah Daniel, those guns are soo authentic. The most frustrating, un-enjoyable part of the Revell Constitution build for me was trying to get the two piece barrels to align, then all the filing, filling, and sanding to make them look somewhat presentable. That was some years ago. Now onto your gun deck build. That looks like a fun project that would look good presented next to the fully built ship. As always, your attention to detail and scale is superb. Scott
- 58 replies
-
- 2
-
-
- Revell
- Constitution
- (and 1 more)
-
Wow Bill and Ian, your woodworking skills are very impressive. Bill, thank you for detailing how you built your case. I have been interested, well, actually ordered by the Admiralty and our four cats, to build a case for my Constitution or else its safety cannot be no longer guaranteed in my house. I have pretty much the same setup in my shop as yours, just lacking some experience with cabinet joinery. What were the size of Optix sheets did you get? This was a very good build log. Scott
-
I need some help with selecting rigging thread and block sizes. I have been shopping around and its confusing to the types of rope and diameter that would be the most efficient for this model and my skillset. So many choices. I have never used wooden blocks before and there are several styles and wood types. I have been reading the tutorials here on tying up the blocks and I think this is a good exercise for me to try my hand at. My plan is to rig the ship as in port, without sails. I am at a loss on selecting a good rope for the standing and running rig. For the standing rig, the current measures about .010" or .25mm. It looks thick. What would be an appropriate diameter for the running rig? About how much should I order for a 1/96 scale clipper, without sails, since the rope is sold in either a few feet or by a few yards. Would single block sizes be 3mm? I haven't yet decided if I am keeping the current plastic deadeye set up, or try making new ones along with chain plates. I have been going over the many threads here and there is a lot of techniques to look at. Deadeyes look to measure at 4mm. Scott
-
Still cleaning away, taking inventory, and working on a plan. Its taking a lot of time getting decades of dirt and dust out of all the corners and seeing how much rework will need to be done.
-
Rob, I have always been fascinated with clipper ships and have been a seasoned lurker of your build logs and use of both plastic and wood, and I am very impressed with your rigging and your detail of scale, so expect to hear from me with questions. I also will PM you in the future to take you up on your generous offer. I did the mast re-enforcements with steel rods on my Constitution and it worked very well.
- 44 replies
-
- 1
-
-
- Thermopylae
- Revell
- (and 3 more)
-
Thank you for your suggestions. I do need to get into the nooks and crannies with cotton swabs and get all the dirt out. I do not plan to to any repainting, but do want to re-mast and re-rig the model. My mother requested that I do it for she never liked rigging, especially trying ratlines.
-
This build log is a restoration of a model built by my mother. This model was what inspired me to pursue a lifelong hobby of model making and a fascination with tall ships and sailing. My mother is 87 and was diagnosed with Alzheimer's last summer and the past year was spent cleaning out her house and getting her affairs in order. Of the items I was entrusted with is her collection of model ships she had built back in the early 1970's. My mother was a professional artist who ran a commercial art studio and taught both fine art and life drawing. In 1975, she was commissioned to paint a series of nautical themed placards for some publication, I cannot remember what, and she started to build plastic model ships to use as reference. The first one was the Revell Thermopylae because she loved the color combinations she could use on it. The kit is not painted to represent the actual ship, but painted in a way to experiment with patina and color depth in 3D instead of on canvas. She got about as far as installing all the standing rigging before she got intimidated and frustrated with forming and tying the ratlines and moved onto a model she enjoyed building and finishing, the Revell Spanish Galleon. So for the past forty-six years, this model sat on top of a china cabinet, collecting dust, and taunting, no begging me to someday finish her. So, after moving it 2000 miles across country from her home to mine, in which the bowsprit got broken, and most of yards had fallen off, I now have it here in my studio and after washing off four decades of accumulated dust, have what I think a diamond in the rough, or a test of my sanity. A few things I will need help with and will need to consider. 1. How far do I want to go with restoring the masts? The main and mizzen lower masts are warped, from what looks like exposer to direct sunlight. Would I try to reform them, or do something I have been dying to do and try and make my own from scratch? 2. Paint restoration - This model was painted mostly with oils and I do not have access to the original paints, so I must be careful not to create any blemished I cannot touch up. 3. Originality - I am a stickler with detail and originality, so I must stay focused on restoring the model and accept many of the building defects that are in it. 4. Time - I have many other projects and things in my life going on, so I expect either this to be a fast moving project, or one that could take years. 5. I have four cats, one is still a kitten and one a teenager who is a shop cat in training. So rigging may be an adventure. Here she is after just coming home, The busted bowsprit. This is nothing new to me, I've busted the bowsprit off of both my Constitution and Alabama, so I'm quite good at repairing them. Stern end with the warped Mizzen mast. Midships and after a bath. The model is extremely well built, and the paint finish is protected with a varnish, so I put the whole model in the tub, sprayed it down with Windex, and sprayed her off. Lots and lots of dirt came off. Full view I put the bowsprit back in place. LOL The Bireme I built back when I was in High school and gave it to her for Christmas. It needed a little work from some damage during the move. And her beloved Spanish Galleon, with a lot of Artistic Licensing. I would love to here suggestions on how I should go about planning. I am a little overwhelmed at were to start. I guess systematically removing the spars and rigging. I do have the original box, all the parts, and instructions along with copious notes she took while she was building this model. Scott
- 44 replies
-
- 7
-
-
- Thermopylae
- Revell
- (and 3 more)
-
Squadron had a strong brand loyalty, so Chris may be able to make it work if he can bring it back to the level it once had before the investment firm bought it. Or, to stem off your analogy, it could be an "American Motors" type of investment and never again will take hold in the market.
-
Glad to see you back, I also took about a five year hiatus from working on my Connie. Your deck should look really good when your done with it. The hull turned out really good.
- 79 replies
-
- 2
-
-
- constitution
- revell
- (and 1 more)
-
Talk on Missouri River steamboat design & history, March 9, 2021
ScottRC replied to Cathead's topic in Nautical/Naval History
I really enjoyed this presentation. I grew up near Fort Benton, MT and now live south of KC, so I have always have had a strong interest in steamboat history and technology. -
Excellent tutorial Bruma on you sail technique. I have tried Silkspan and Modelspan, and like Rob, hadn't had good results from it giving an appearance of being too thin and opaque, so I have resorted to using paper on past projects. However, you seemed to have overcome the problem with some ingenuity and I really now want to try the way you made them on my next project. Thank you for such an informative build log. Scott
- 399 replies
-
- 6
-
-

-
- cutty sark
- revell
- (and 2 more)
-
Nice precision work Wes. I use Solidworks and ACAD at work, and have purchased TurboCad to use at home. Its quite affordable between $100 and $300, depending on what you want. It's also easy to pick up on if you are a ACAD user.
-
That is a repair I have gotten quite skilled at. I broke the bowsprite off my 1/96 scale Constitution and Alabama, and then my Mother did the same on her Thermopylae. Because of the frequency of breakage on the 1/96 scale ships, with hollow booms, I put a steel rod in the bowsprit boom to make if stiff enough to endure the casual bump while being moved.
- 11 replies
-
- 1
-
-
- cutty sark
- Revell
- (and 2 more)
-
New Member: Boats Billy, Wichita, KS
ScottRC replied to Boats Billy's topic in New member Introductions
Good to have another Kansan aboard Billy. I live about hour and half east of Wichita and have just finished the kit you are working on. -
Jesse, It has been a pleasure following your build log over the last five years. You have done a remarkable job and this log will be a valuable reference for others who will build this kit. Scott
- 1,306 replies
-
- 1
-
-
- syren
- model shipways
- (and 1 more)
-
Thank you everyone. I plan to post more updates when I start building the shadow box. Scott
-
Well, maybe I'm not finished. I am experimenting with water techniques (styrofoam, gels, and cotton) and decided to start building a shadow box display for my father's burial flag and Navy certifications and commendations. Here are some recent pics of my progress. Scott
-
Ditto! Looks like shes been in the Pacific exposed to sun, salt, and countless attempts to retouch and fight the rust by deck apes.
-
I like your thinking. Blue is such a tricky color when trying to pull it off a photo. Who knows if its due to the Kodachrome, faded from the weather, or how it was mixed and applied. You should go with what your eye tells you. I used the Navy Measure color codes more as a guide than a rule. I also built the Enterprise as she may had appeared at Midway. Talk about trying to figure out the correct gray or blue. It made my head about to explode. But its fun to try to experiment with these colors in order to put life into the model.
-
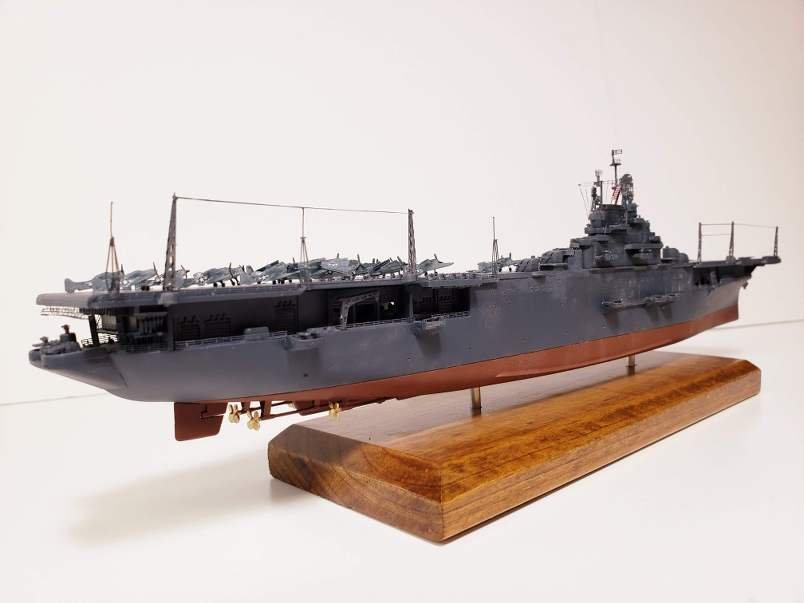
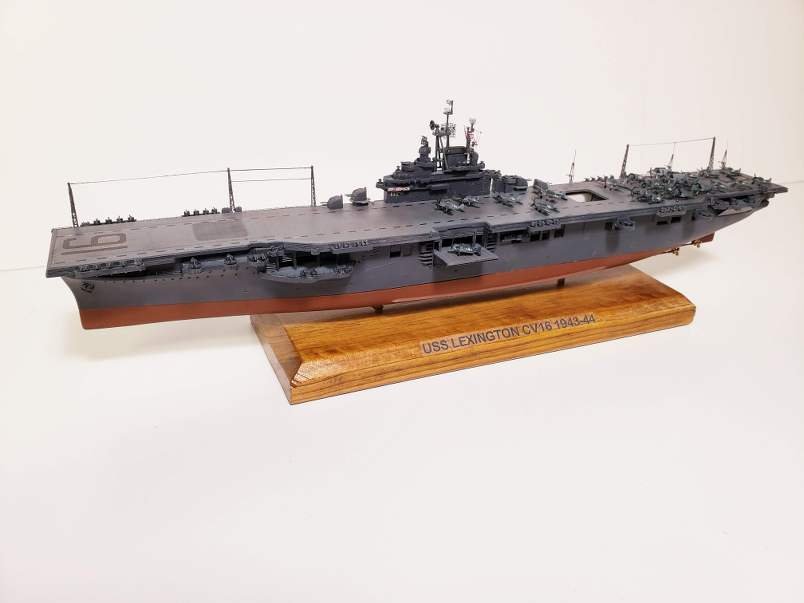
Hi Greg, I have been following your work. I just completed the Lexington in 1/700. If I recall, only the Lex and Essex stayed in the overall MS21 sea blue. I can say one thing, I really got to hate all that blue. In 1/700, it was a bugger to keep track of all the small details until I started my washes. I did notice in my research that along the starboard side, the paint seemed to fade to a flat finish that was a lighter shade. This was probably due to all the direct sun exposure on all that surface area. After weathering, I went in with a flat brush and added "touch up" areas to represent there areas may had been touched up while at sea. Anything to break up all that blue. Great work sir, Scott
-
Eric, Your paintwork is very good. The flat black seems to make everything look more to scale. Shotlocker, I do not know what to say, your rigging at 13 is better than what I can do after forty years. Scott
- 56 replies
-
- 1
-
-
- constitution
- revell
- (and 2 more)
-
I have been away for awhile and it seems a lot of great research materials and a wonderful build progress was added Jonathan. I think your jib arrangement will be fine and I thank you for posting the blue prints. The Alabama had such nice lines. Scott