Rik Thistle
-
Posts
864 -
Joined
-
Last visited
Content Type
Profiles
Forums
Gallery
Events
Everything posted by Rik Thistle
-
 Charlie, Thanks for the kind words. Dallas turned out OK considering she had been in cold storage for 25yrs 😉 I did learn I don't like rigging so I'll be confronting that 'fear' with my HM Flirt build! Looking forward to your Black Prince build. All the best, Richard
 -
Dust extractor - compact and quiet?
Rik Thistle replied to Rik Thistle's topic in Modeling tools and Workshop Equipment
I think the safest thing is to try to capture as much as you can at the tool as possible. Yes, that's the ideal scenario. I imagine we, the members, have a range of 'shipyard' layouts ranging from almost full blown commercial workshops with a wide range of machinery that is used most days, to a corner of a room in a house and a Dremel power tool that is used once a week. I don't think there is a one-size-fits-all dust extractor solution. I'll probably use my small lathe and disc sander in my shed whilst wearing a mask and with the door open. In my study I'd like to use some kind of quiet, compact dust extractor that captures dust from a Dremel without the dust getting in to the air in the room and then in to my lungs. Richard -
Dust extractor - compact and quiet?
Rik Thistle replied to Rik Thistle's topic in Modeling tools and Workshop Equipment
Mark, Yeah, a standard vacuum is a reasonable solution. I did try my Panasonic with a pair of Sony NC headphones but even they couldn't cope 😉 I suspect I'll muck though for the next while using a combination of holding my breath and tidying up after with my Dust Buster. But in the longer term I will keep my eye open for a compact, quiet solution. Cheers, Richard -
Spyglass, use a scrap of strip as a buffer for easy removal and it also come in handy to overlap I hadn't thought of that. It seems obvious when I read it but the good ideas always are. Thanks, Richard
-
Dust extractor - compact and quiet?
Rik Thistle replied to Rik Thistle's topic in Modeling tools and Workshop Equipment
Thanks Glenn, I'll add the Rabbit Air to the list I'm looking at. Regards, Richard -
Dust extractor - compact and quiet?
Rik Thistle replied to Rik Thistle's topic in Modeling tools and Workshop Equipment
OK mnl, thanks for the tip. Richard -
Dust extractor - compact and quiet?
Rik Thistle replied to Rik Thistle's topic in Modeling tools and Workshop Equipment
mnl, I was thinking of this one at $350 https://www.highlandwoodworking.com/festool-ct15e-hepa-dust-extractor.aspx To put it in perspective, a HEPA Meile vacuum cleaner, also nice a quiet, is $699. Thanks. The Festool is available in the UK for about £280 .... https://www.axminstertools.com/festool-ct-15-dust-extractor-106635 I'll read up on it. In a perfect world I'd like an L class, very quiet (<50dB A), 250mm x250mm x250mm cubic extractor, with a wide suction nozzle that could be positioned above the work area and cost less than £100 😉 Maybe there is a market gap for home hobbyists? Regards, Richard -
Dust extractor - compact and quiet?
Rik Thistle replied to Rik Thistle's topic in Modeling tools and Workshop Equipment
Hi Götz, That's useful info. If I do go for a proper dust extractor then I'm looking at an 'L Class' for my shipyard/study. Which, out of this list.... https://www.powertoolworld.co.uk/tools/vacuums-dust-extractors/l-class-rated-extractors?corded_voltage=414 points me towards the £230 Fein, 240V, 67dB (A) ... https://www.powertoolworld.co.uk/fein-dustex-25-22l-wet-dry-dust-extractor-machine At the moment, my mains powered, house vacuum is a Panasonic MC-E3002. It is very noisy but I cannot find a dB rating to use it as a benchmark. I also have a couple of quieter Dyson battery vacuums. I currently use a Black and Decker Dustbuster in the shipyard/study for cleaning up after hand sanding. Hand sanding tends to generate dust but (in a still room) gravity pulls most of it down to the desk. Power sanding tools tend to throw dust up in to the air and that would be of concern and where a dust extractor would be needed. OK, plenty of food for thought. If I buy an extractor I will post here on how it performs. Thanks again, Richard -
Dust extractor - compact and quiet?
Rik Thistle replied to Rik Thistle's topic in Modeling tools and Workshop Equipment
mnl, Thanks for the reply. Yes, the Festool industrial extractors aren't cheap (£400 - £800) but do look purpose built, albeit large .... https://www.screwfix.com/c/tools/dust-extraction/cat830940?brand=festool Fein also do similar but are a bit cheaper ... £320 - £590. Makita do a 72dB one for £190 ... https://www.amazon.co.uk/Makita-VC2012L-Class-Dust-Extractor/dp/B00YHG86VS/ref=as_li_ss_tl?crid=6JPUX5VFH86H&keywords=dust+extractor&qid=1554441892&refinements=p_72:419153031&rnid=419152031&s=gateway&sprefix=dust+ex,aps,155&sr=8-60&linkCode=ll1&tag=diy32-21&linkId=dd3a6baf3f87965b394880c4d9eeb63e&language=en_GB There is a Scheppach one for £106 ... https://www.amazon.co.uk/Scheppach-HD2P-Extractor-Collector-Attachments/dp/B00HVZ7OS8/ref=sr_1_4?dchild=1&keywords=Dust+Extractor&qid=1606122919&refinements=p_36%3A7500-&rnid=118657031&sr=8-4 And a domestic green Bosch vacuum cleaner (73dB) at £77 ... https://www.amazon.co.uk/Bosch-EasyVac-Compact-Vacuum-Cleaner/dp/B072B6SQZT/ref=pd_sbs_60_1/262-5849643-1925430?_encoding=UTF8&pd_rd_i=B072B6SQZT&pd_rd_r=38b47fc0-f5b8-43a8-9d86-35510732addb&pd_rd_w=cFnRc&pd_rd_wg=eoZSE&pf_rd_p=2304238d-df78-4b25-a9a0-b27dc7bd722e&pf_rd_r=T5ZXZAS4S0D2RPS2JNPE&psc=1&refRID=T5ZXZAS4S0D2RPS2JNPE Anyway, looking at criteria, in order of importance... a) Health - keeping lungs clean - ears undamaged (40dB average home noise, 60dB conversation and background music, 70dB office noise and inside a car). b) Functionality - equipment reliability, catches 'most' of the dust, fits under a desk/bench, mains powered (or battery?) c) Cost - £800 is way too expensive, but what price do we put on health? d) Size - nice if it could tuck under the desk and the tubes weren't cumbersome If I find anything of further interest, I'll post here. Or if anyone has experience of a cost-effective, functional quiet dust extractor it would be great to hear about it. Thanks, Richard -
Thanks Bob. I think I've been guilty of trying to short cut the work needed to get planks to fit. I had set myself a target of getting the first planking done in about 1 week, even though I wasn't working on it every day. Less haste, more speed. Thankfully my build log highlighted where I was cutting corners and the members have been great in advising me how to fix the issue and what to do in the future. All the best, Regards, Richard
-
Thanks Chuck. Noted and added to my mental data base. Regards, Richard
-
Thanks Eke. Lady Eleanor was a delight to work on. I hope she has a long, successful career feeding families up and down the coasts of the UK 😉 The black, red and white hull does look pretty good and as Chris says on his website, we are invited to expand on his kit and add our own touches. It greatly helps that there are a number of excellent build logs on this particular website and plenty books, and pics and info from other museum/preservation society websites. It's very satisfying that a number of these boats are still sailing - thank you to those who do that. Flirt is a big step up for me and I imagine it will see me through to next summer, at least. One of the reasons I bought it was that it has plenty rigging - something I'm not particularly comfortable doing. But, as they say, you need to confront your demons to overcome them... well, that what they say - we shall see. Catch you soon, Richard
-
Hi all, I tend to do my sanding by hand and also using a Proxxon disc sander TG 125/E in my garden shed (during the warm summer months) - this is to keep the dust out of my house. I also use a small Proxxon wood lathe in the shed, and that also produces dust. As winter approaches I have tried using the disc sander in my house attached to a mains powered Panasonic vacuum.... .. but the noise from the vacuum was unbearable. It is also large and the tubing is cumbersome. Question - is there a compact, very quiet dust extractor suitable for indoor use? Ideally it would attach directly by tube to the disc sander, but also have a suction tube that could be placed near the lathe or hand sanding area. Thanks, Richard
-
Never too late to adjust - here is a "late adjustment" as I put my Speedy garboards on a day or so ago !! Spyglass, Thanks for your suggestion. It has been added to my 'data bank'. I've slackened off some of the worst offending planks, reglued and squidged them down hard with clamps. And then done a bit of light sanding on them. They're looking a bit more acceptable than they were. All the best, Richard
-
Glenn, Thanks. It has been a gap in my knowledge...how to bend planks in two planes. But you and B.E. are getting me up to speed. It's one of the many things this website is very good at ... sharing knowledge. Yes, keep the fingers away from the iron 😉 ...even with my current bending method I'd had a few unplanned warm digits! regards, Richard
-
B.E. Yes, no cure now ...I've joined the ranks of the unsaveable ...at least I've got company, lots of it 😉 And I doubt if BigPharma is working on a vaccine! mark on the plank towards the stern where it starts not to lie flat, dampen it, put the strake in a vice, twist it using pliers whilst applying heat with a hair dryer Brilliant. That's what I was missing...makes sense and will be employed in future. I used to think planks were simple, straight things. Now I find they they are cut to profile, heated and curved in two planes, positioned and glued, pinned in position and then sanded smooth. And then painted. Life used to be so much more simple in Spring 2020. I've probably got about half a dozen 6" rules dotted around the premises, but only three or so are findable at any given time. I think 'coggle' may be Scots or Irish but I suspect the whole of the UK uses it. It's one of those words that kinda sounds like what it means - onomatopoetic - I remembered that word from school days but did have to Google to confirm spelling. Thanks again, Richard
-
Thanks James. Actually, now that you point it out the stern planks are most definitely not parallel with the false keel....hmm. Thanks for the heads-up. I think I had been relying on the fact that those planks will be heavily feathered as they reach the edge of the false keel, but even then they are a bit too squint. I'll see what I can do 😉 Regards, Richard
-
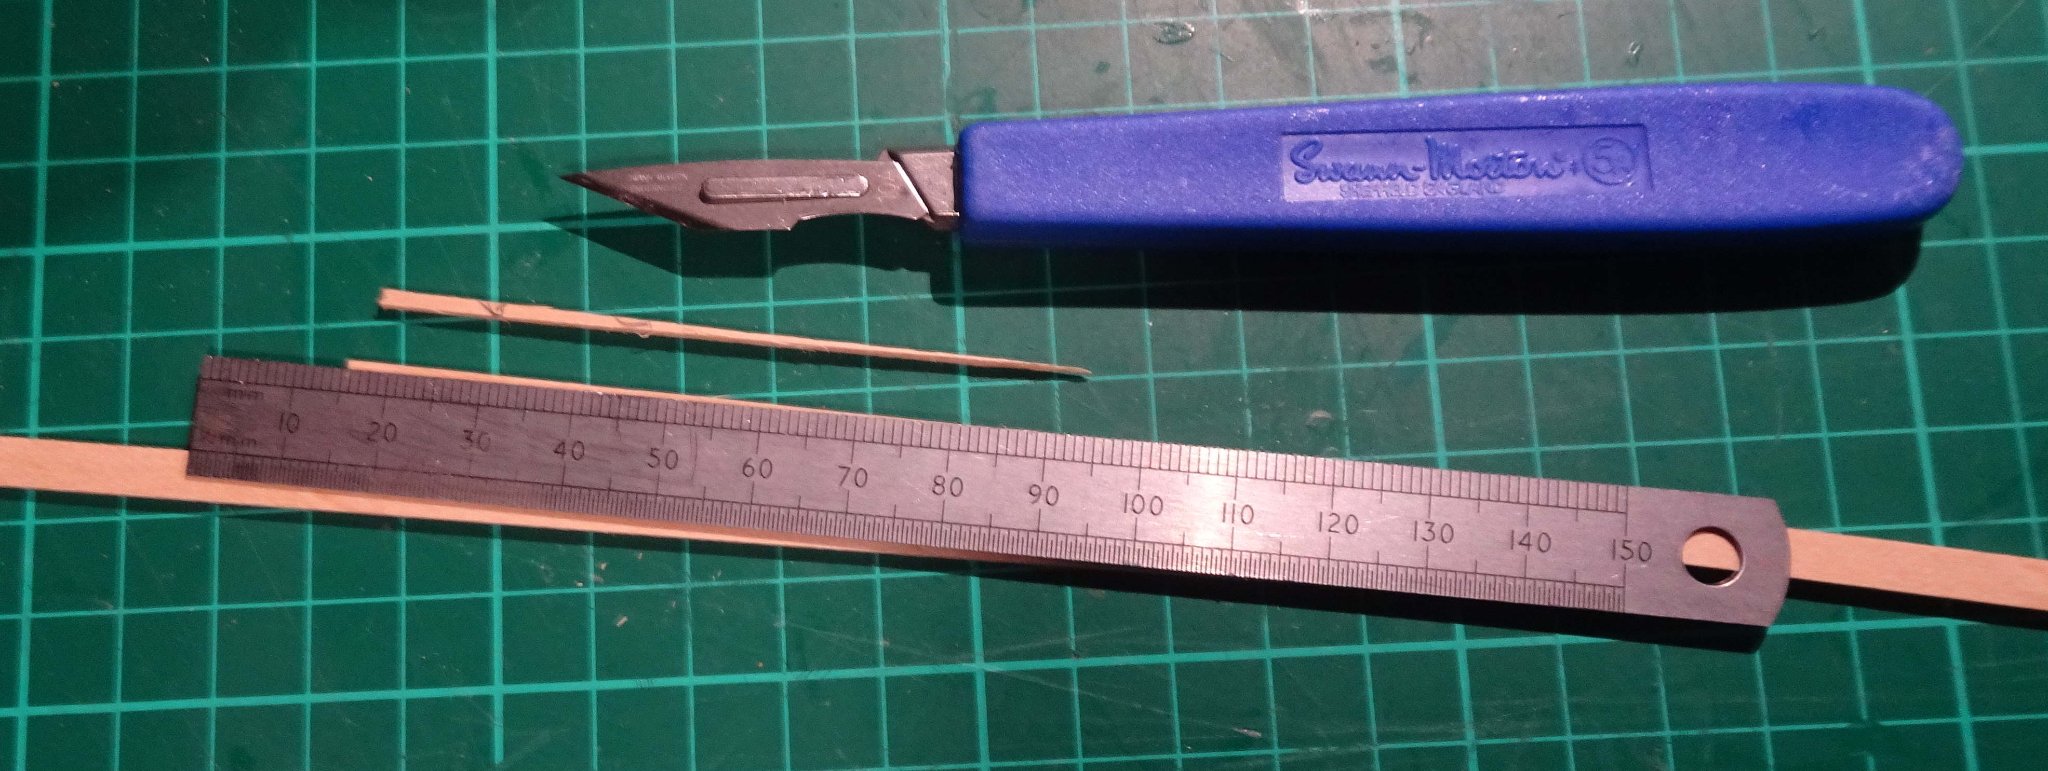
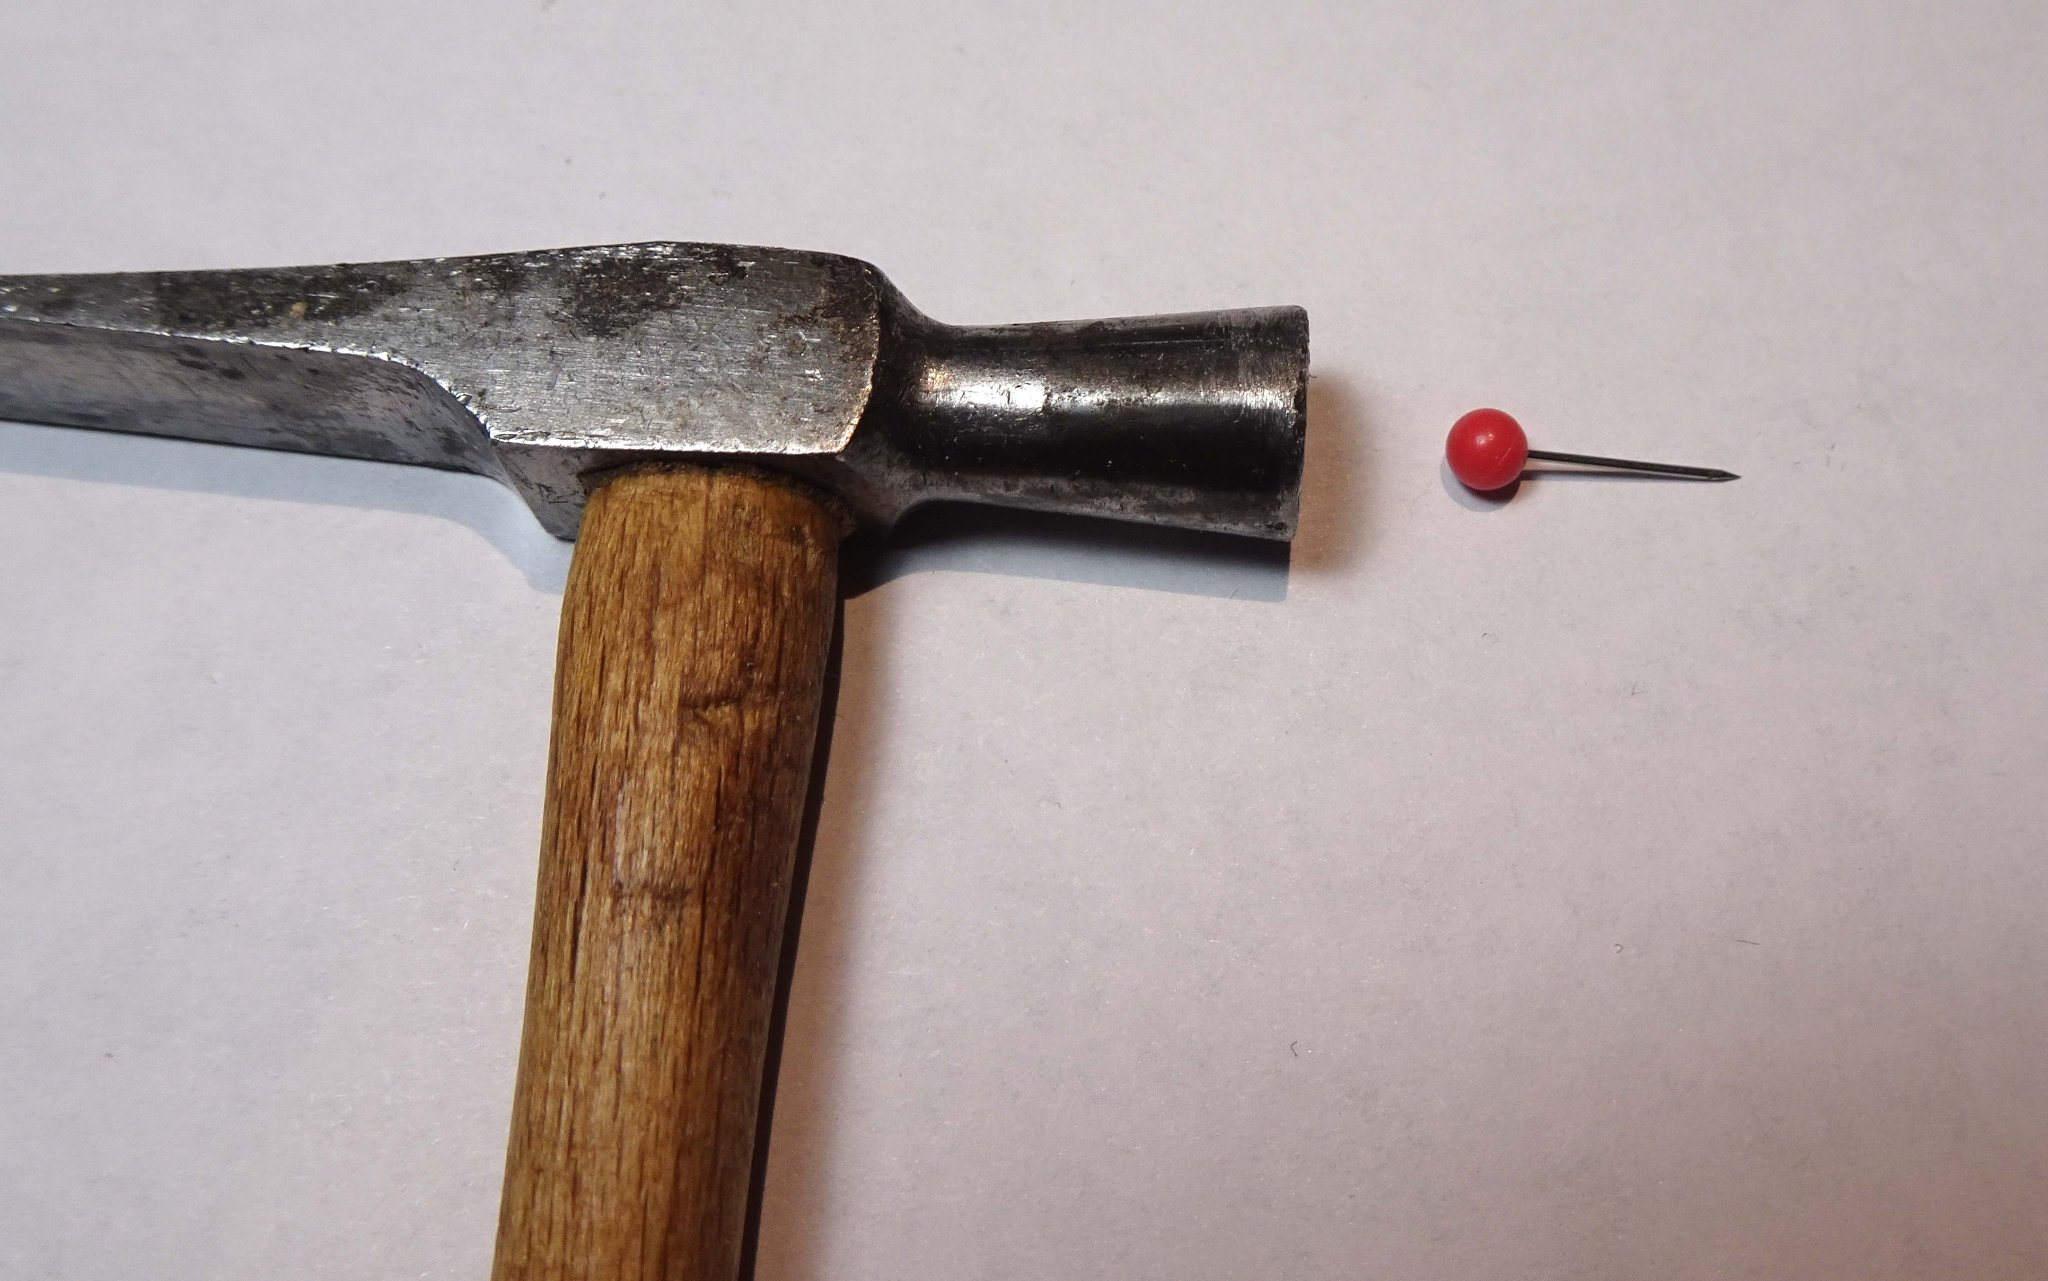
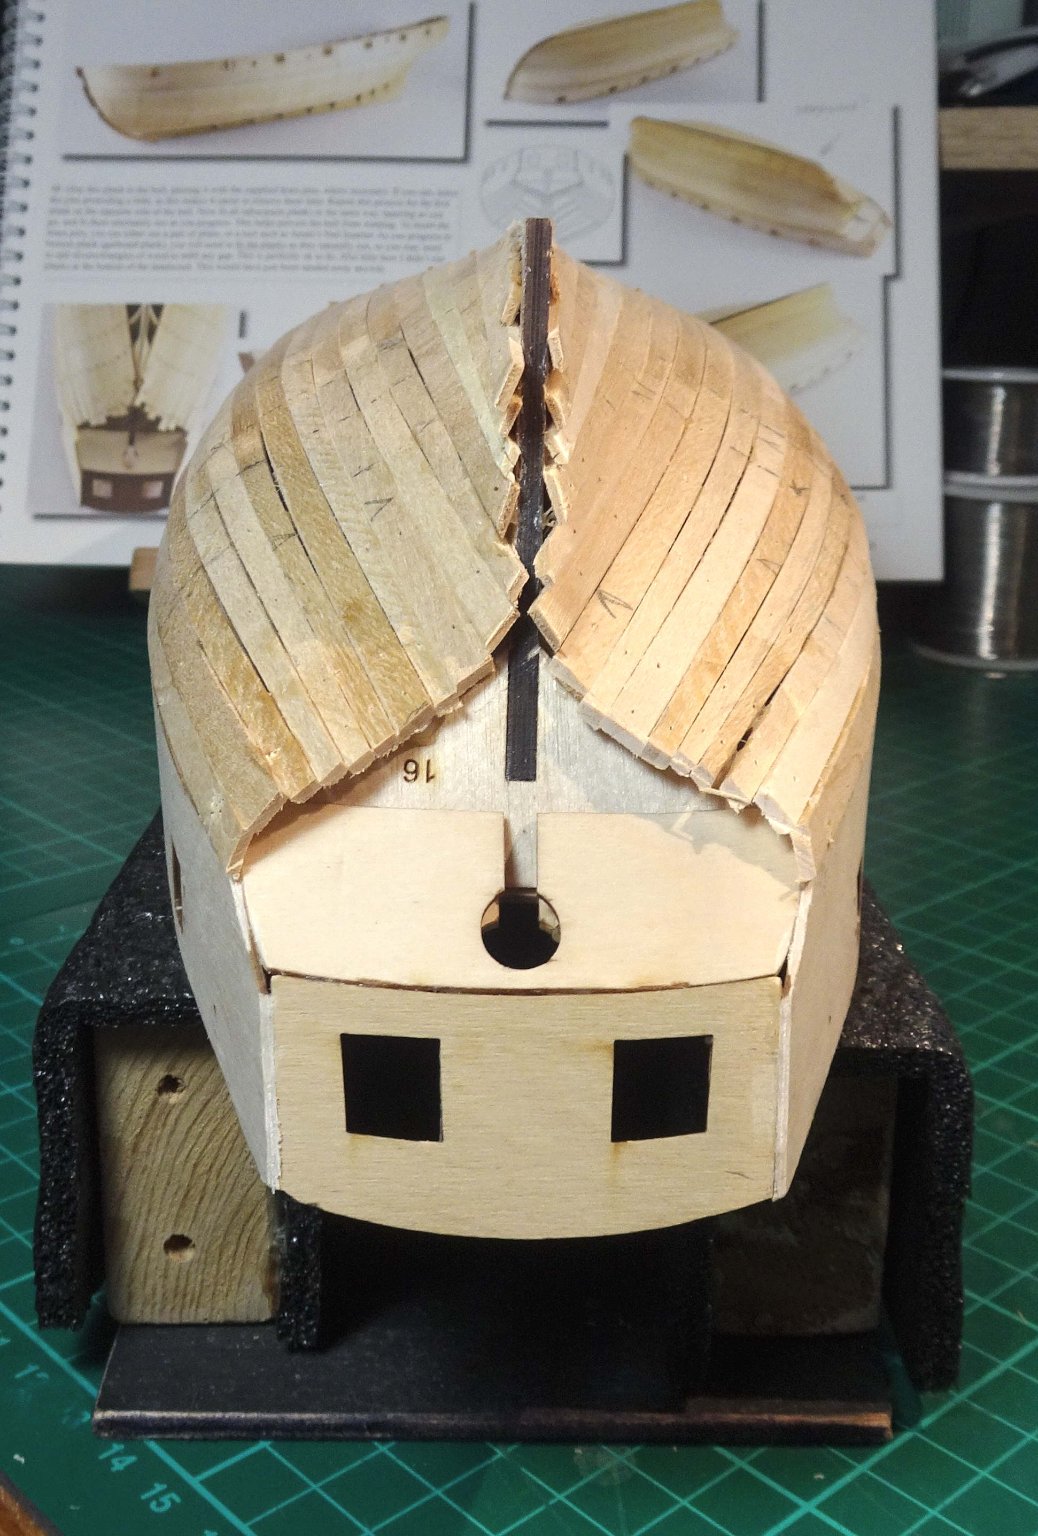
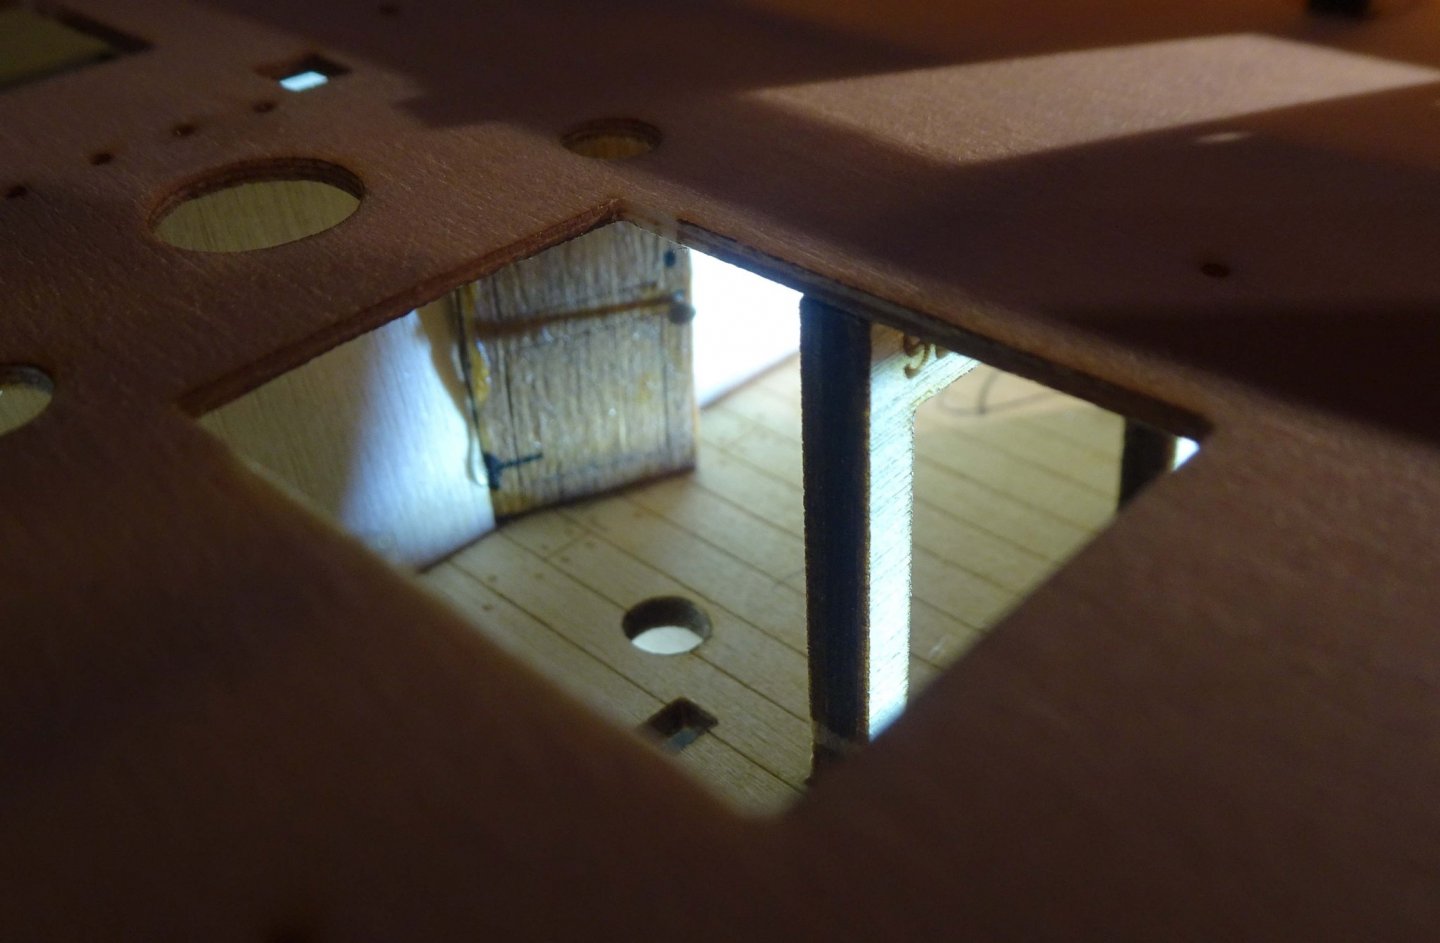
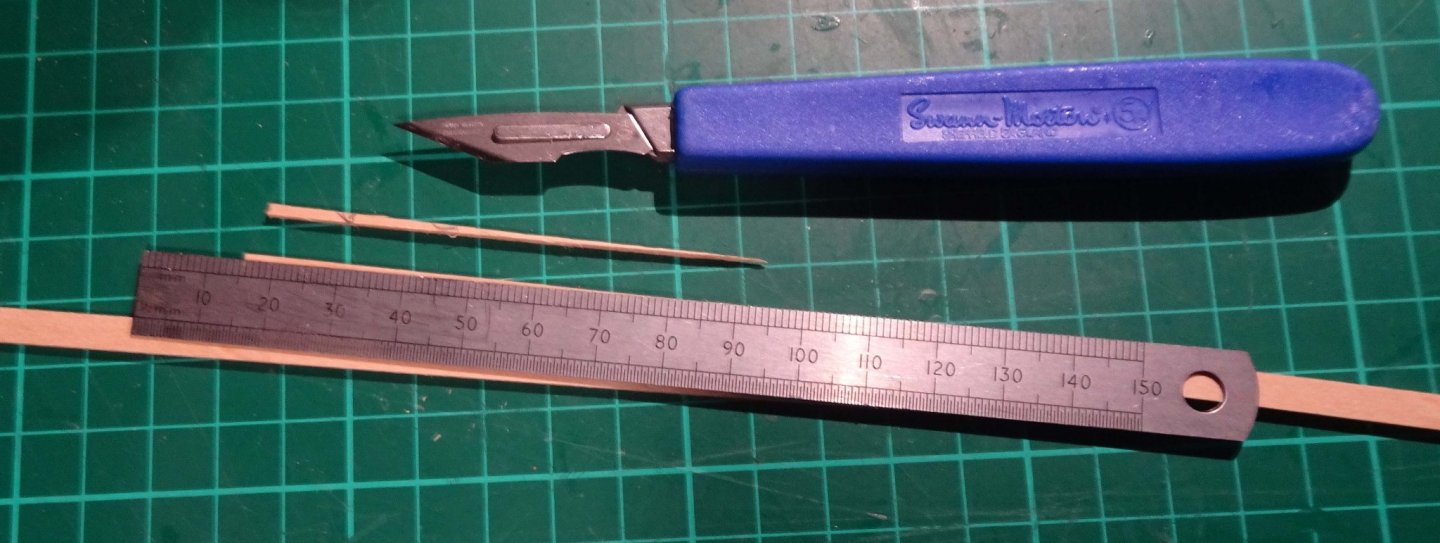
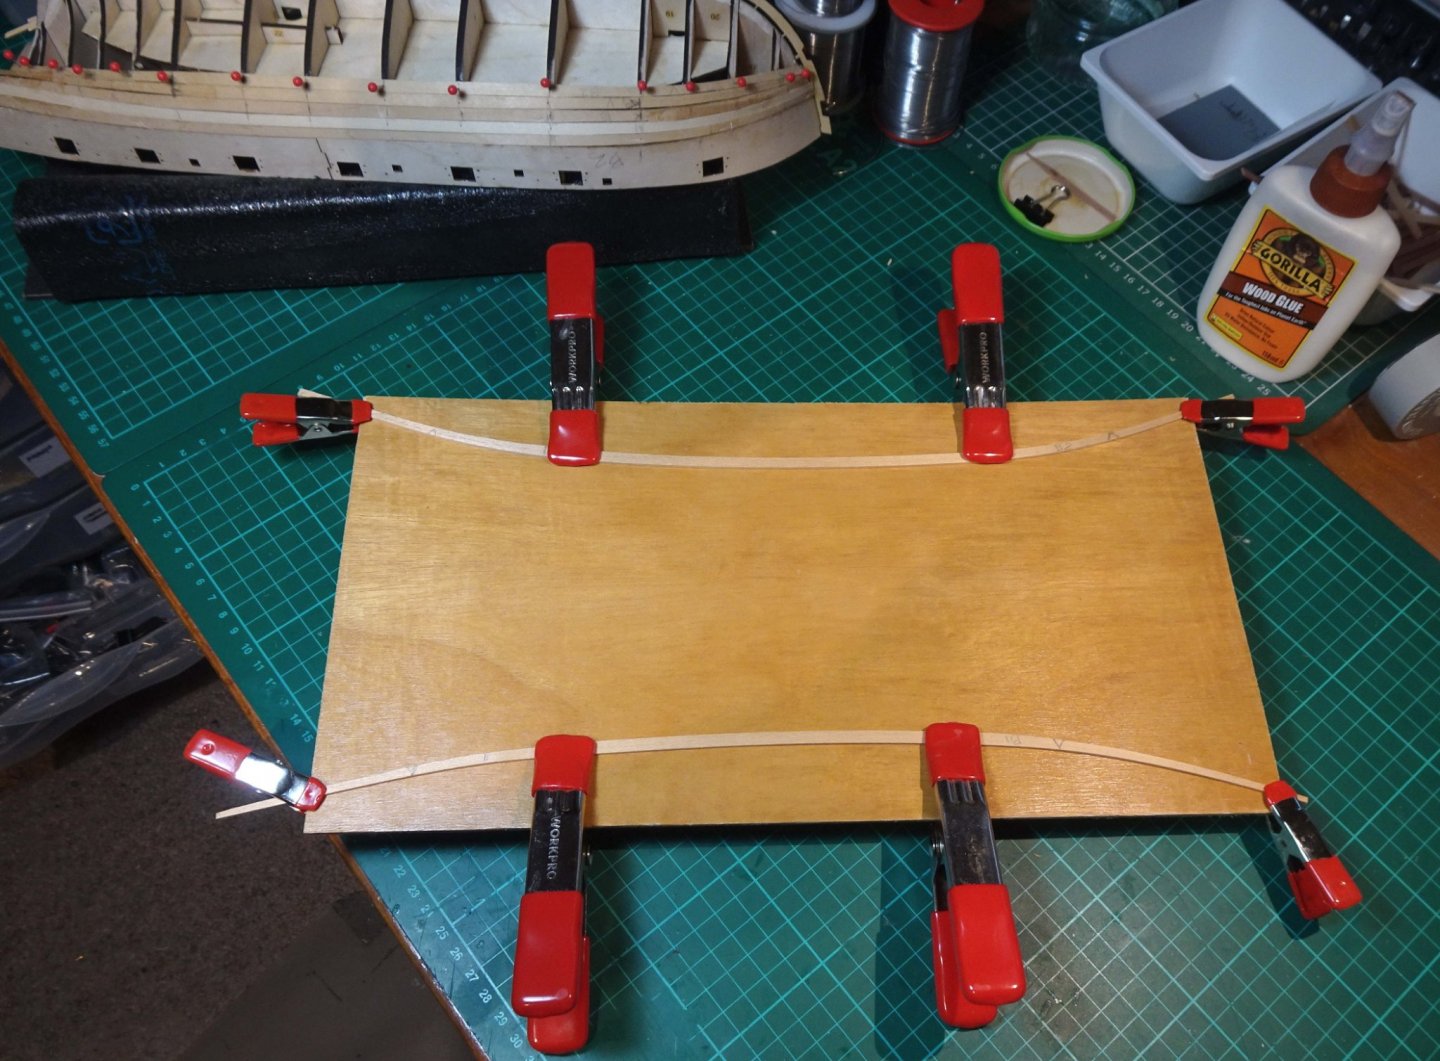
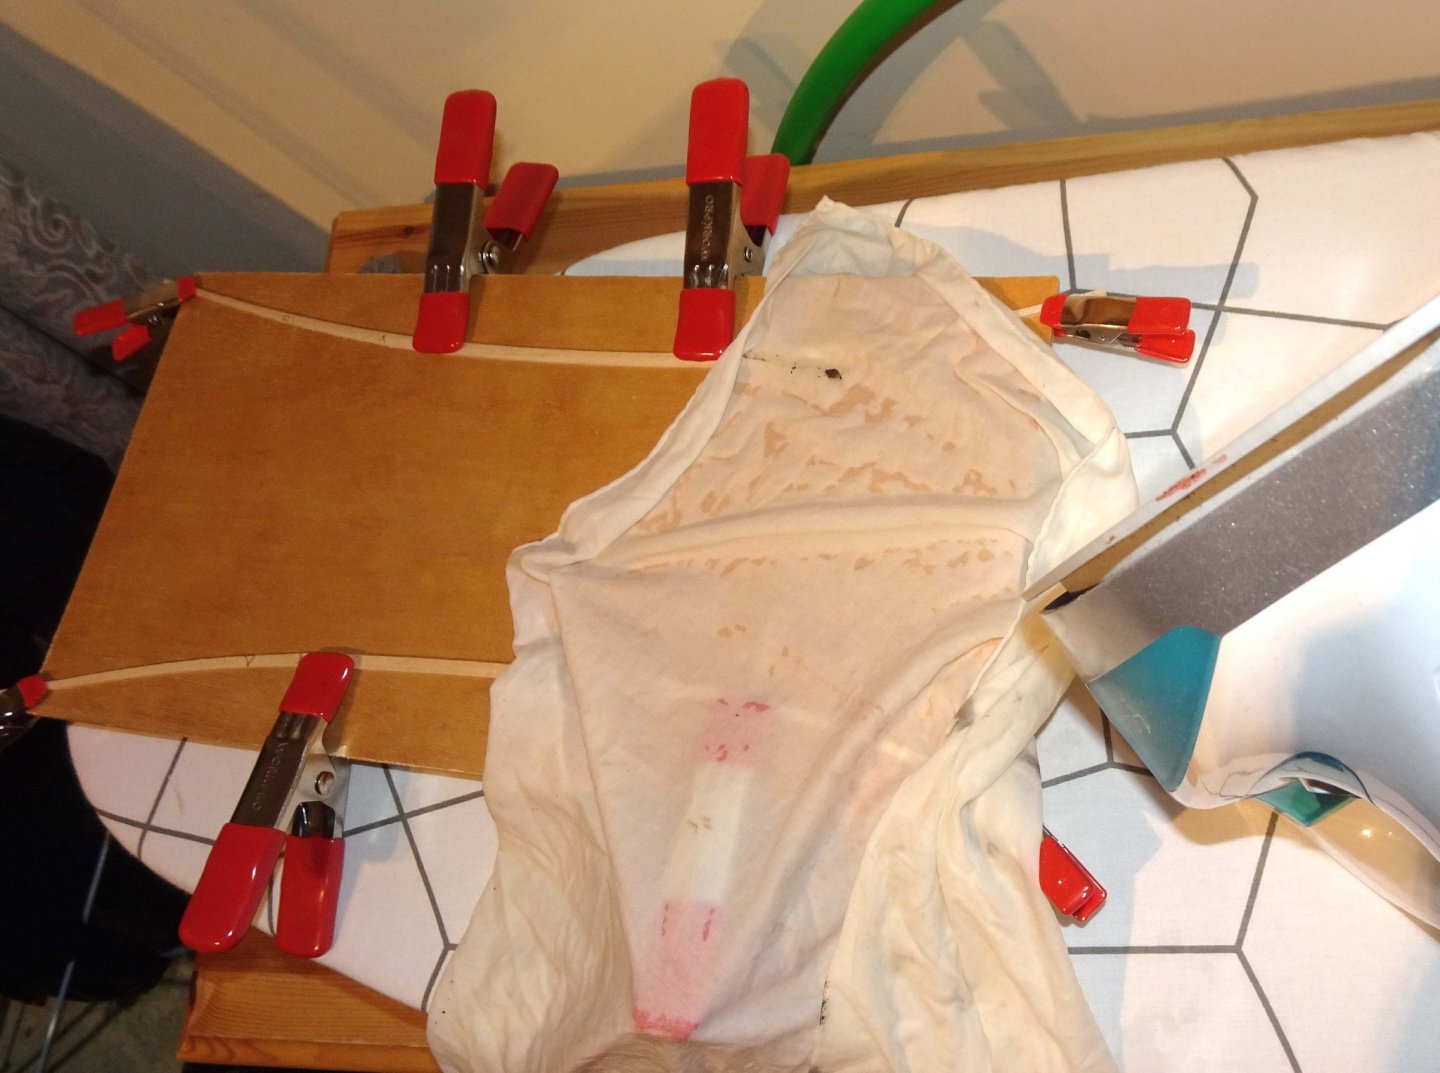
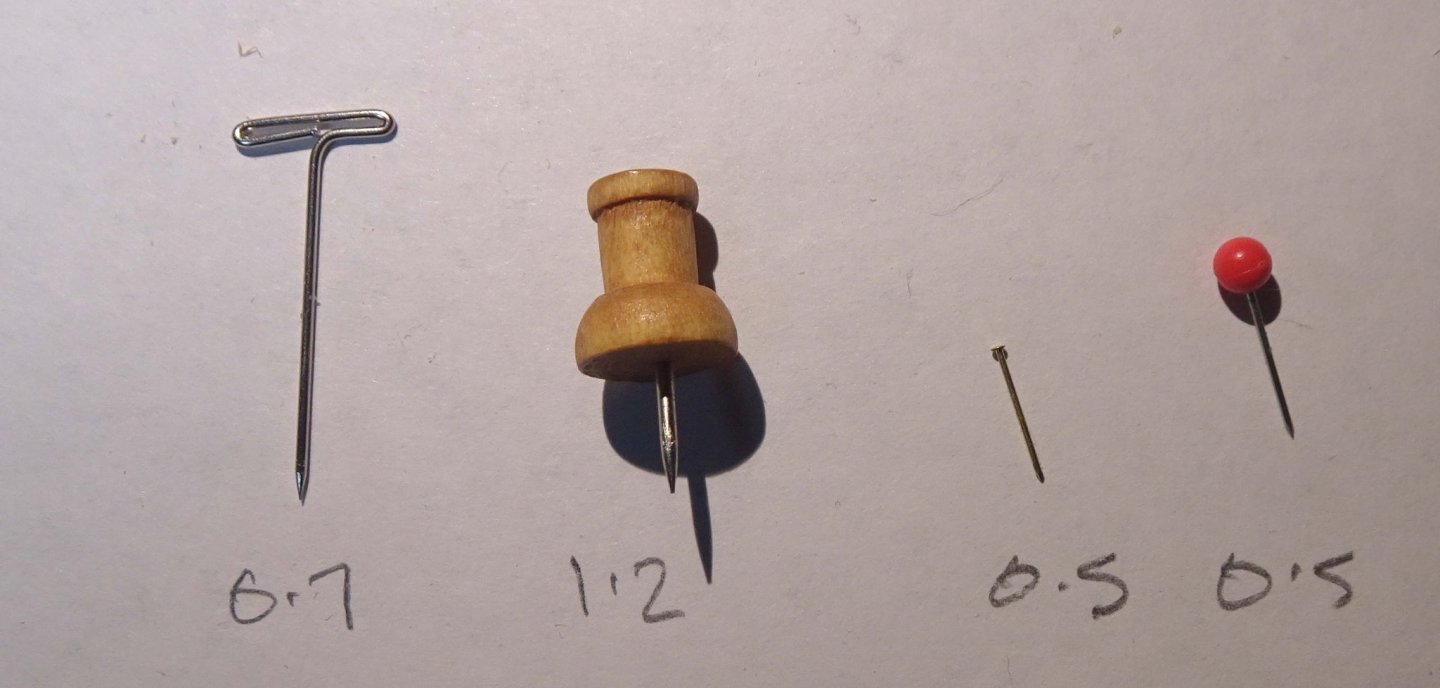
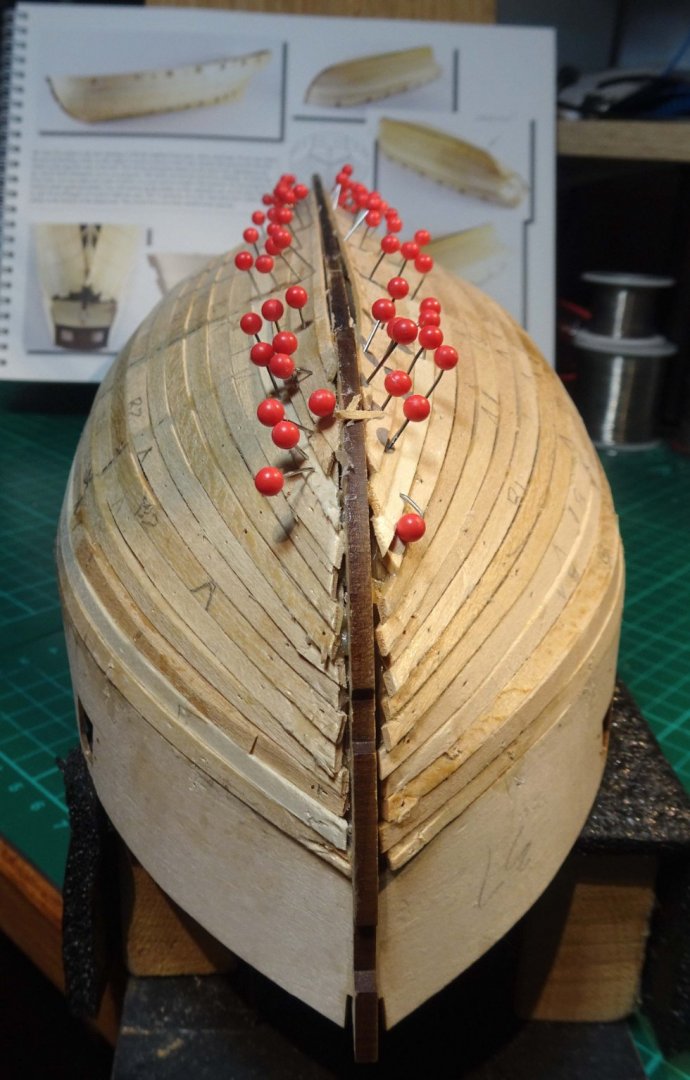
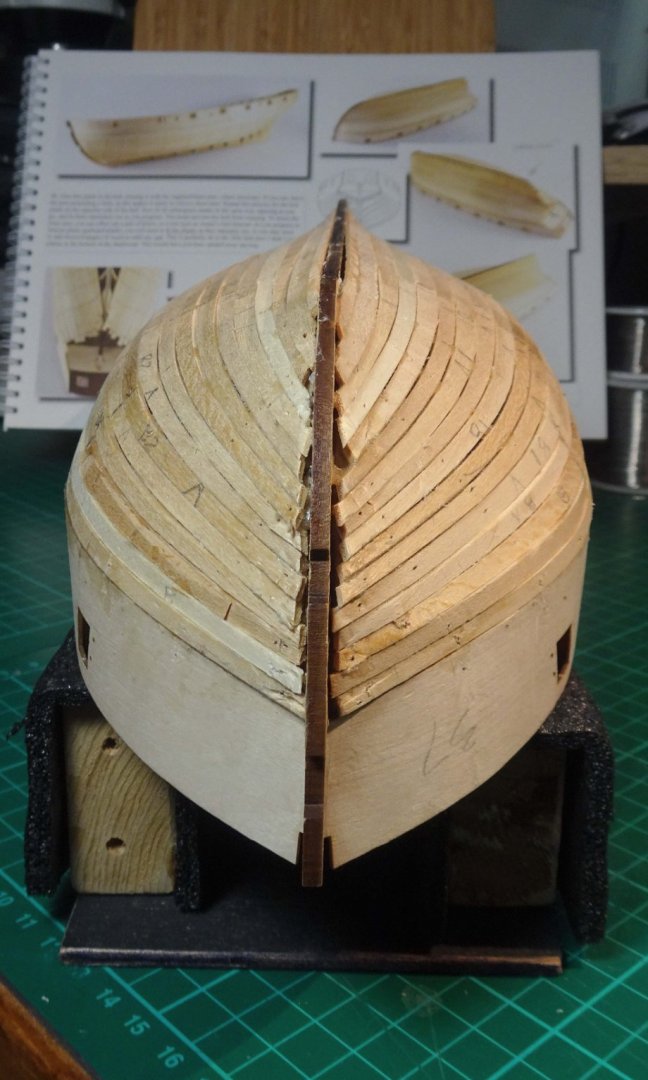
Hi all, Here's my weekly (or so) update on Flirt. Planking the hull with the first planking has been the main activity. But let's get the important stuff on first. The below-decks door that had fallen out has been glued back in position. Schrodie, the ship's cat, would probably be the only one that knew it was back but it's the thought that counts. Below, the door stuck back where it should be. A bit excess glue showing, but the door is ajar enough for the cat to wander about. Below. I've been using a 6" rule to cut planks etc but never felt comfortable with it for two reasons ... 1) my finger tips were dangerously close to the blade, and ... 2) the narrow width of the ruler caused it to tend to coggle over under pressure. Adding a scrap of wood on the opposite side stopped the coggling but reduced the clamping load on the part being cut. So I dug out my old 12" rule which has a nice finger-safe groove in the middle. Also, it's greater width reduces the coggling effect. So far it seems to be doing the trick. So, on with the hull planking. Below is my 'bending jig' - 1/4" ply. Ideally it needs to be a couple of inches longer since the Flirt planks hang over the ends, but it's good enough for now. And here is how I make the bends permanent. I use the same method for as for putting a sharp crease in trousers ie hot iron plus a wetted hankerchief. I'm still puzzling as to how to simply make bends in two planes, which is sometimes desirable on hulls. Below. I've also been looking at how the planks are pinned to the hulls. A comparison below shows some pin diameters (in mm....my schooling was at a time when the UK was switching from Imperial to Metric so I tend to switch between the two systems without thinking). 1.2mm is way too fat and splits wood too easily; 0.7mm is also just too fat; 0.5mm nails (as supplied with Flirt) are a perfect diameter but really need to be positioned with needle pliers, to be pushed in or tapped with a hammer. So I've ended up using 'Map Tack Push Pins 1/8"' (from Amazon), and am quite happy with them. The Map Pins can take a fair bit of hammering, and are also 'grippable' enough to be finger pushed into the (in this case) 1.5mm Lime planks. Below. Map Pins finger pushed into the plank and the plank glued onto the hull. Next is to tap the pins with a hammer into the bulkheads. The Map Pins can be easily reused by extracting with needle pliers (or if the red head comes off then gingerly use side cutters on the 2mm wire protrusion). Another benefit of the Map Pins is that if dropped on the floor they can't be missed! Anyway, back to the chase. The final hull planks held in position with the poppy field of pins. And below, two views of the hull before any cleaning up. It's a bit of an ugly duckling at the moment but hopefully it should brush up good enough. Bow view. Stern view. I now need to read up on what planks and where, there needs to be feathering before adding the second planking layer to the stern area and the hull. I feel I haven't progressed much since the last update but hull planking does take time. Fifie has a smaller hull so didn't seem to take too long. Ah well that's it for now. Hope everyone is fine, and that the 'vaccine competition' provides a worthy winner and soon. Regards, Richard


-
seeing a bit of the planking broadcasting through the paint, as I think it adds character and realism to the finish. Absolutely. I think seeing the 'joins' is all part of modelling the real life item. I'm fairly sure that straight after manufacture trawlers would not have smooth surfaces, and especially so after a few trips out to sea. And then there is the ongoing maintenance...painting, patching up damage, scrapes etc that happen in the course of the life of a trawler. Your Lady Isabella is looking great and I imagine you are having a fascinating, enjoyable time building her. Regards, Richard
- 222 replies
-
- 4
-

-
- First Build
- Lady Isabella
- (and 2 more)
-
Complete the machine plan
Rik Thistle replied to Bitao's topic in Modeling tools and Workshop Equipment
hyw, Thank you for answering all my questions. My only comment would be that it is usually best to have the emergency-off switch on the front side of the machine so that you (or a colleague) don't have to lean over anything....my left thumb can tell you why that is preferred 😉 But what an impressive piece of design and manufacture. Well done. Regards, Richard -
Thanks for the kind words Tom. As a noobie I was at first a bit apprehensive about putting up 'build logs' ...but once I got in to the swing of it I found it quite useful ie each post marks the end of a week or so of work, it gives me an opportunity to ask related questions and it provides me with a permanent record of what I did and that I can look back on in years to come. As you've possibly noticed, Flirt has self started her build (whilst I was busy looking for a non-ship project) so I have to continue work on her...which is no hardship. And probably good timing, what with the latest rounds of Lockdown. Take care, Richard
-
Complete the machine plan
Rik Thistle replied to Bitao's topic in Modeling tools and Workshop Equipment
Well, that just looks/is awesome! Ref: the last pic - All that capability mounted on a 2 foot (?) square table. What do you think the lathe's maximum acceptable depth of cut/feed rate -v- material is? Congratulations on constructing a stunning multi-function workshop in such a small volume. Best regards, Richard PS: Just out of curiosity, where is the 'emergency off' button? -
Hi Colin, Must've been very satisfying to have picked it up and completed it after all those years! You've hit the nail on the head. Dallas had been nagging me for 25yrs to finish her ...every time I went in to the attic I could feel her looking at me. On top of that I have a friend who bought a similar kit at the same time and we had planned to see the kits through to completion. My friend finished his about 15yrs after first buying the kit giving him bragging rights. So a number of things pushed me towards completing Dallas...the constant nagging feeling, letting my friend down and the pandemic lockdown. On top of all that I've always enjoyed 'making things' and learning new skills. And I think that is something I have in common with the members here, if not their skills and experience. This is a multi-faceted hobby ie making things, learning skills, working with materials, learning the history and culture of the vessel (a very big aspect as I'm beginning to realise), sharing thoughts/info with folks on here, research, setting your own pace, visiting museums and ships, reading books on the subject...OK, a looong list of pluses. Negatives?...well there is a strong impulse to buy new tools and machines, stock up on kits (for a rainy day)...and basically just spend money on things you want...actually, these are probably all pluses! That's enough rambling from me. Here's a good thread for future reference on kits to buy as you progress... https://modelshipworld.com/topic/18657-new-to-ship-modelling-but-what-do-you-build-first/ And/or just wander this website looking for projects that catch your eye. Your Revenue Cutter will give you many hours of concentration and enjoyment. Looking forward to the Build! Regards, Richard
-
Welcome Colin. Like you, I started an Artesania Latina kit (Dallas Cutter) 25 yrs ago and got as far as making the hull then gave up. Restarted her this summer and also joined this friendly and very helpful website...and am now pretty much addicted to the hobby. Looking forward to your SMSS Ranger build log. Regards, Richard
-
The level of research and detail is impressive. It certainly is. And very enjoyable to read and watch the progess plus the little diversions that invariably turn in to something special. I kinda hopes BE never finishes his journey with Muirneag 🙂 Richard
- 261 replies
-
- 3
-
-
- muirneag
- vanguard models
- (and 2 more)