


BANYAN
-
Posts
5,965 -
Joined
-
Last visited
Content Type
Profiles
Forums
Gallery
Events
Everything posted by BANYAN
-
 Interesting concept, look forward to seeing the results Rob. cheers Pat
 -
Keep plugging away mate; I fully understand the frustrations. I am experiencing the same woes with my current build Now that you have made a decision it should all come together. cheers Pat
-
Definition of 'Single' WRT rigging/ropes
BANYAN replied to BANYAN's topic in Masting, rigging and sails
Thanks Eberhard, that was my interpretation also but continue to be confounded by the Rigging Warrant entries - in this instance the very specific inclusions against the fore lower yard: @ line 1 "Lifts, single - 3.25ins hemp rope, 12.5 fathoms, associated with two 7" double blocks and two clip hooks." @ line 2 "Lifts, Tackle - 2.25ins hemp rope, 34 fathoms, associated with two 7" single blocks." The custom used through out is that the total number of blocks, hooks etc listed are used for both sides, BUT the lengths of rope are specific for an individual line (in this case each lift is 12.5 fathoms long etc). The other custom used is that the line immediately following is associated with that line (usually the tackle for that line - but in this case very clearly identified as such). If using the 'lift' alone (pure definition of single), the 75 foot length places its end about 15 feet above the deck - BUT, if then worked with a tackle, the tackle has sufficient length to be worked from a height of the lower yards - this suggests the tackle would be just some 15 feet with a very, very long working part? The ONLY other thought I have is that perhaps the upper lead block was placed much higher than the lower Cap (perhaps at the topmast stop?) - but this would be very unusual. In some ways this configuration makes a bit of sense as the working angle from the yardarm to the lower cap would be very shallow. In Victoria, the upper mast was a combined pole (top, topgallant and royal masts all in one). If I moved the lead block to such a point, the lengths make sense, but again no extra block is listed - perhaps again the top rope block could be reutilised (snatch block). What do you think? My first thoughts were that the tackles are used as purchases, but that leaves a very long length of the lift and a very short tackle (as shown in Keith's photo). However, if the lift is made up as a tackle as shown by Underhill (earlier illustration) the lengths of rope provided fit very well, but the number of blocks provided is short by one single 7" single block per side. All very confusing Thanks again for your suggestion. Pat -
Definition of 'Single' WRT rigging/ropes
BANYAN replied to BANYAN's topic in Masting, rigging and sails
Hi Keith thanks for the photo; not sure what I am looking at, but if you mean the line abaft the mast with the short purchase - yep that is about the only way I see it working with the listed items - but run into the same issue; the amount of line specified for the purchase is much to long. Thanks again. cheers Pat -
Definition of 'Single' WRT rigging/ropes
BANYAN replied to BANYAN's topic in Masting, rigging and sails
Hi Tony, thanks for your response and suggestion - yep - confirmed - we are talking about the lower yard lift. Agree ,it would not be worked much and may not require a purchase, and had accepted that. The core of the question I am trying to get an answer about is what is defined by 'Single' - Is it a single rope/line OR can a tackle qualify as single also (i.e. only one tackle provided rather than two per side) cheers Pat -
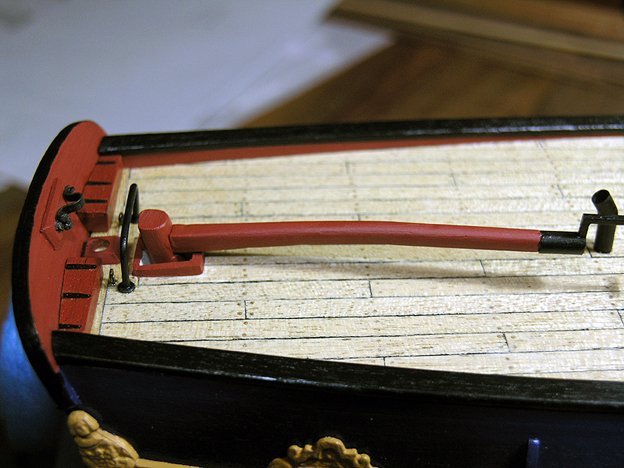
Don't get too dispirited; the feed back is offered to help and this is all part of the learning process. A kit 'bash' can be problematic and at times disheartening, especially if the parts are of poor quality or inappropriate to the model. I am not familiar with a Ritter Killer bar - is that some form of tiller or the European 'candy' bar? The best way to determine the appropriate sizes is to first determine the average size (height) of the crew for the period. Once you have established that, draw up a quick look-up or reference table that allows easy determination for various sizes (say in 3 inch increments; 1 inch would be better), and convert to metric for the scale you are working. Then search the internet for the types of items to reference against. For a tiller, do a search on mid-18th century tiller, or mid-18th century steering etc, and note from the resulting images the estimated height the tiller appears against the people/crew where that it is possible. The pictures should also provide some ideas on the configuration - usually a long tapered bar, some rounded towards its forward end, and that is morticed into the rudder head. Sometimes they have cleats, or maybe holes to accept tiller ropes, or even as for Endeavour have a metal end Unfortunately, a tiller would be something you may have to scratch build - using HM Bark Endeavour as a reference may help? This is a picture of the tiller I made for my HMB Endeavour which may give you some ideas - this was built at 1:60 scale. If this model is intended as a personal interpretation of a vessel you like, build it as you would like - the suggestions being offered are only intended to help with the way you present your choices; I don't think anyone is trying to change your mind on what you wish to use/build. The windlass/anchor cable suggestion for example, is simply a suggestion that only a single cable would be rigged. It is your choice whether to accept the suggestion. Cheers, and good luck. Please keep plugging away at it. cheers Pat
-
Definition of 'Single' WRT rigging/ropes
BANYAN replied to BANYAN's topic in Masting, rigging and sails
Thanks Mark, a possibility as there have been other entry errors but more to do with the association of blocks on the wrong line etc, not so much with rope length cheers Pat -
Agree it is a matter of choice, not sure of the origin of the name - may not haver arisen from its colour. If you're looking for a suggestion, my choice would be natural not black - definition looks a little better. cheers Pat
-
Definitely hand loaded in this era. Greg, do you have any guidance/evidence or whether some form of anti-slip treads or the like were fitted to the deck in the wake of the guns to assist the ammo loaders etc when working the guns in wet/slippery conditions? Not sure if I can detect some paint blemishes, divots or some form of small treads in a couple of those photos? Looking mighty fine. cheers Pat
-
Definition of 'Single' WRT rigging/ropes
BANYAN replied to BANYAN's topic in Masting, rigging and sails
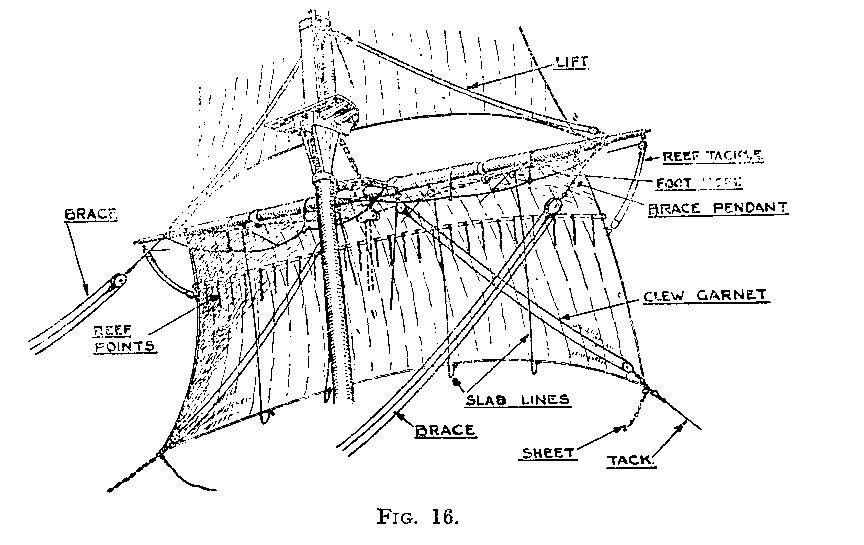
Hi John and Mark, appreciate the responses. John, they are certainly long enough to do just that, BUT the Rigging Warrant lists 7" double blocks not single + 2 clip hooks, AND also a lift tackle with enough rope such that it would easily work between the deck and just under the lower cap block even rigged as a luff tackle. This is the confusing part of it all. ???? Mark, yep had worked that bit out (Underhill in particular is clear and careful in discussing this) - the Rigging Warrant clearly states "Lifts, single" but it is the length of rope and odd block combo - this is what is confusing me. If I ignore the length of the lift rope, the most practical (and likely) rigging configuration would be a single rope lift clip hooked to the upper lug of the yardarm spiderband, rove through a single block (probably the top rope block) shackled to the forward lug of the lower mast cap (lift removed when the top rope is required) and let fall towards the deck. The Rigging Warrant has an established pattern of not including blocks with a line if another has already been provided/or can be repurposed). The double block is then spliced into (or seized into a soft eye in) the tail of the lift such that it hangs about two feet below the cap block (with the yard horizontal). The "Lift Tackle", which is listed with a 7" single block only, could then be made up as a luff tackle with the single block set-up as the standing block on deck. However, for that arrangement to work, the lifts would have to be made up as a gun tackle other wise there is simply too long a length of rope listed - but no single block is listed AND does not meet the 'single' definition as I understand it? THUS, the confusion 😧 cheers Pat -
Hi folks, I am hoping someone may be able to offer an explanation, or point me to a reference, that would help me determine what is meant by 'single' when referencing some aspects of rigging. I have tried my usual sources but there is no clear definition offered, although some authors describe some generalities but do not offer a specific rule. Specifically, I am currently looking at 'lifts' but I am also interested in a wider definition. The Rigging Warrant describes the lower lifts in HMCSS Victoria as 'single', but the amount of rope listed makes it difficult to determine how it was rigged. Option 1 - if rigged as a single line from the yard arm, through a block at the lower cap then let fall to the deck, the rope length is such that it would almost touch the deck. Option 2 - if rigged with a single block at the yard arm and a double at the lower cap (luff), the end of the rope would be just below the cap block. - as shown by Underhill in his "Masting and Rigging the Clipper Ship and Ocean Carrier" - fig 16 (below). This arrangement, if interpreted as a 'Single' lift would then work as the associated lift tackle is the right length to work the lift. However, in this case the Rigging Warrant does not list a single bloc for the yardarm. So does single lift mean a single rope/line 'arrangement' - attached at a single point only (yardarm) rather than separate lifts each made up as tackles (i.e. two separate lifts [no matter what rigging config] each side per yard). My understanding thus far would be a single rope arrangement. Very confusing If it is the first option as I simply do not see why so much rope was provided, whereas the second explains the length of rope but is shy two blocks. cheers Pat
-
Hi Rob, Clipper and others involved - your discussion re the bell had me intrigued and I had to look back several times to find the photo. Sorry to reopen the 'wrung discussion'. A bell abaft the foremast is not unusual - fog bell which was usually the ship's bell, and a smaller 'watch' bell was sometimes fitted near the conning position (usually near the binnacle, but sometimes abaft the mizen mast). The height is a bit odd, although it would depend on where the fore lifebuoy sentry would be stationed as he probably also had responsibility for sounding the bell in fog? So the height would be such that he had easy access to it. However, while at first look I also thought it was a bell, if you look at what might be a linear shadow on the bell running oblique and to the left aft, the angle is all wrong when viewed with other shadows, and to my eye appears to sharply defined to be a shadow. It also appears wrongly placed to be a bright reflection. Could that dark area be a gap between block sides? The general shape appears to me that it could be the front and back face of a 'monkey' block, with possibly a darker line running away upward at an angle almost in line with the linear shadow, from the top lug/eye (where the bell crown/fitting point would be)? I may be seeing things but might be worth another look? cheers Pat
-
Dave, that is a very effective and good looking display stand that mirrors some of the build components. cheers Pat
-
Really nice work on this build Richard; sorry for being a bit of a 'looker on' for so long. I have enjoyed following without making a comment. I managed to shave some nice 'kid' leather down for use at scale 1:64 so you should be OK if you tried? cheers Pat
-
Better to catch and fix it now mate; looking really good! Some excellent relief decoration on the after castle. cheers Pat
-
That last full length top view of her really shows the quality of your build Keith; that is some extraordinary detail you have included. A feast for the eyes! cheers Pat
-
Really nice job on those boat covers Rob, very realistic. cheers Pat
-
Love that birds-eye maple Dave; it will really look nice with a finish on it. cheers Pat
-
Hi Rob, that weathering looks great (very effective) - sorry to have not recognised your skills. Thanks also Clipper for your post. This is perhaps something I should look into, really brings the hull to life. cheers Pat
- 3,560 replies
-
- 1
-

-
- clipper
- hull model
- (and 2 more)
-
GoS is looking really good Rob, you're making remarkably fast progress. I like the 'probably unintentional' wear and tear on the black hull - are you repainting/cleaning or leaving it like that? cheers Pat
-
Looks good Steven, those levers look so much better tapered. What is it with you and castles? cheers Pat
-
Welcome back Eberhard; hopefully you had a great vacation. The paint work is looking grand! I look forward to the finished job with light weathering etc applied. cheers Pat
-
HMCSS Victoria 1855 by BANYAN - 1:72
BANYAN replied to BANYAN's topic in - Build logs for subjects built 1851 - 1900
Welcome to my build log Ras; it is a bit of slow progress at the moment while I continue to try and develop/sort-out the rigging plan. John, in re-reading your comment I think I misinterpreted - while the blocks were single, there is nothing to suggest they were not rigged double (which was the first way I was going). I may have found a lead which I am teasing out at the moment that these may have indeed been rigged double (a heavier guntackle with runner and lead block on one side, and a lighter guntackle or double whip on the other side). This arrangement would then fall into the guidance of the heavier (slower to use but more mechanical advantage) for when only one watch is on deck, and the lighter but faster to work tackle on the other when all hands were available. Thanks again for your suggestions. cheers Pat- 1,021 replies
-
- 3
-
-
- gun dispatch vessel
- victoria
- (and 2 more)
-
Just found your build Ras; a very interesting build subject. You're making good progress with it and should look great when complete. I had to make the same pumps and suction plate for my build of HMCSS Victoria (1855), and used PE for the plates, but turned the pumps on my lathe - mine start at post #326 in my log Look forward to seeing your pumps. cheers Pat

