

Gregory
-
Posts
2,720 -
Joined
-
Last visited
Content Type
Profiles
Forums
Gallery
Events
Posts posted by Gregory
-
-
Go to Windows search and type " snipping tool "..
You can copy any part of the screen you are looking at. It goes to the clip-board, so you can paste it directly into the discussion.
You can edit in "Paint", or do whatever you like.
Even though it's telling you to press all those keys, all you really need to do is press Ctr+N..
- thibaultron, mtaylor and Blue Ensign
-
 3
3
-
You don’t have the “Snipping Tool”?
- mtaylor and thibaultron
-
2
-
One of the images at the web site apparently serves as the instruction…
- thibaultron, mtaylor, chris watton and 1 other
-
4
-
Perhaps if you go over the lines with a brush using diluted white glue or clear/matte acrylic it will make it look a lot better.
I would dilute about 4 to 1..
Your model looks really great for a first time build.
- Ryland Craze and Keith Black
-
2
-
3 hours ago, Jaager said:
Malco seems to offer single blade purchase on these pages:
When I ordered from Malco in the past, they required a $100 minimum order. I like their blades. $100 buys several..
- Canute, cotrecerf, Ryland Craze and 1 other
-
4
-
1 hour ago, paul ron said:
but was rigging over the front of yards done and what could they be? ...
I think we would nee to see a picture to make an informed response.
I googled up quite a few images with " wavertree ship new york ", and I really didn't see anything that looked out of place.
- mtaylor and Chuck Seiler
-
2
-
2 hours ago, paul ron said:
but i do see ropes over the front of the yards. isnt that taboo?
It depends on which lines they are.
When it comes to rigging there is really no such thing as "taboo", it is either right or wrong.
The rigging is what ships of war and clippers have most in common as far as function goes, and it is not that different.
The rigging is part of a machine. The components have to be in the place they belong in order for the machine to work.
If it is not a working machine, then there could be any number of out of place elements.
-
On 5/14/2024 at 9:37 AM, Kevin said:
….. museum quality (whatever that means)
It means it qualifies to be sold in the gift shop of a museum..😁
Regarding comments on historical accuracy, if that were something most kit builders were concerned with, most kit manufacturers might as well close up shop.
For those who don’t care to lower their standards to build a kit, much less one with some historical inaccuracies, we shouldn’t discourage those who want to enjoy the hobby by building these kits.
Thanks for the review Kevin.
-
Is there any documentation of what references riggers referred to while working.
I suspect they pretty much knew what needed to be done, and did it.
I don’t visualize anyone carrying a measuring tape around with them.
- mtaylor and Thukydides
-
2
-
-
Here is one of my favorite references for making blocks from Mondfeld. I had just about got to the point of going forward with this method when Chuck started selling his blocks.
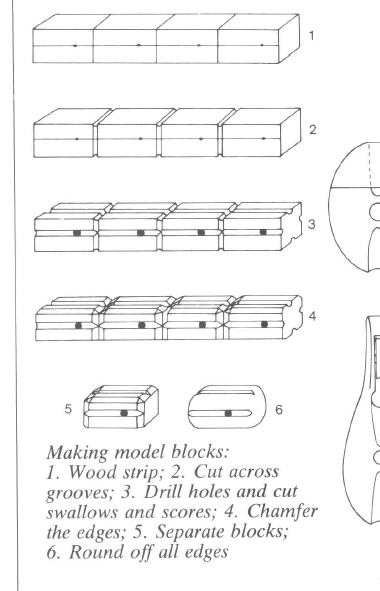
You can see that taking it down to very small size is possible.
If you have a small table saw, i.e., Proxxon, Byrnes, etc., it will really help with the grooves..
- catopower, Scottish Guy, allanyed and 5 others
-
8
-
Have you considered doing a 2nd planking with veneer?
You would have many options as to wood type.
-
-
2 hours ago, CPDDET said:
Sold under the Sears name. But manufactured by??
Just curious.
Atlas Press Tool Company
- Canute, kgstakes, thibaultron and 3 others
-
6
-
-
-
Steve, I use a small USB fan for that purpose. The dust settles in a corner of my shop, and I vacuum it up.
l was a little put off by the price of the MicroMark device, but really couldn’t comment from experience.
Your information is very useful.
- Ryland Craze, Canute and mtaylor
-
3
-
Interestingly, Bill Edgin’s build, mentioned above, has the green wood chips, and it doesn’t look bad. However, there doesn’t appear to be much detail about his method.
-
Good work on the edge bending. It looks like the planks are laying flat on the bulkheads.
are you foregoing tapering the planks at the bow for a reason?
It’s not so important with the first layer, but will make a big difference with the 2nd layer..
-
Went through my stuff and found I had saved the page from the catalog, because it was high on my wish list.
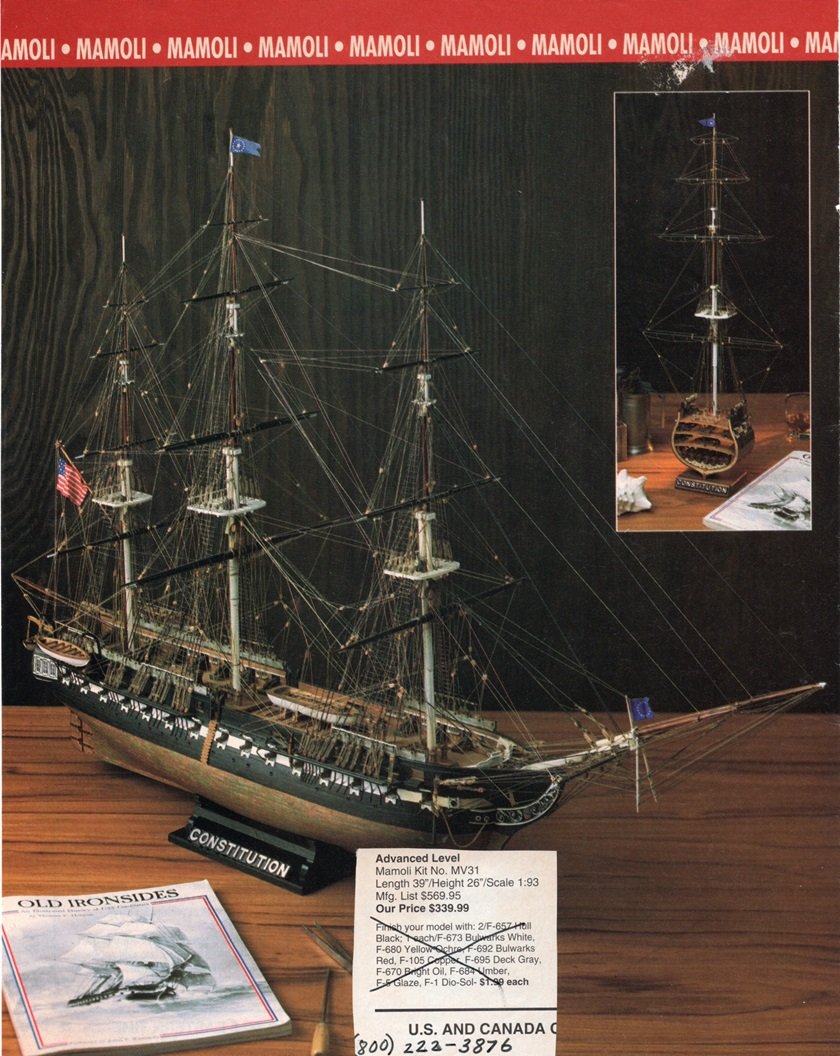
$339 would be about $700 today.. It was high on my wish list back then, but not in my budget.
-
7 hours ago, BruceWayne426 said:
The price tag on the box was $129.95 which is a little clue as to how old the kit is. Thanks for your reply.
I will have to look at my ModelExpo catalog from the 90s.. I’m pretty sure the price was at least twice that.
-
On 4/20/2024 at 9:43 AM, Scottish Guy said:
...the crew could be in a near tavern for a drink or some rest.
Except for someone left behind to guard the cargo?😁
- Scottish Guy and mtaylor
-
 2
2
-
The Mamoli kit had little competition when it was released. Mamoli had a lot of the best kits available at the time . Check some of the drawings for a date. I would like to remember, because I had that kit back in the early 90's, but sold it because life got in the way.
I believe the drawings are very good, but the kit itself may have it's detractors these days because kit quality in some areas has come a long way with laser cut parts and such.
My recollection is that the Mamoli kits really have everything you need in the box to build it to match the drawings. That has been my experience with a few other Mamoli kits I have built.
If I were going to go outside the box, I would consider a different coppering scheme than the little green wood chips they provide, other than that, I would be happy to build it as is.
I look forward to following your progress.
-
13 hours ago, Scottish Guy said:
……never have seen shiny wood to be honest.
But that is just my humble opinion.
Micha
I have seen any number of species, that when sanded with 400 or finer, then buffed with felt, develop a shine not unlike gloss varnish.

How to measure and line off at the bow
in Building, Framing, Planking and plating a ships hull and deck
Posted · Edited by Gregory
Do you have any illustration of what you mean by this?
It's basically a matter of dividing the space available by the number of planks.
Have you looked at the planking videos by Chuck? They show how to get a better fit of the planks by 'edge bending'.
Sometimes a " drop plank " at the bow will help you avoid planks that become too narrow at the stem.
A drop plank reduces two planks to one. The problem with doing this with a kit is that it requires wider stock than the basic planking stock, so it may not be practical with the kit you are building.
You should be able to work around this by just making the ends of the planking more narrow than the drop plank would provide.
I assume we are talking bout the Sherbourne you are building, so I think you could get some ideas by looking at Chuck's Cheerful. The lines are very similar.
It is a single plank model, but the run of the planking will be much the same as your 2nd planking on the Sherbourne.
Chuck has the instructions for Cheerful at his Syren Ship Model Co. Here is a link to Chapter 4 which covers the planking below the wales.