

Gregory
-
Posts
3,079 -
Joined
-
Last visited
Content Type
Profiles
Forums
Gallery
Events
Posts posted by Gregory
-
-
Another something you might try, is to sand the back of the Britannia piece and make it as thin as you can.
Heating it with a hair dryer while shaping on a curved surface might help.
- Dave_E, Keith Black, mtaylor and 2 others
-
 5
5
-
1 hour ago, glbarlow said:
I finally have one completed cannon, here being inspected by mini-me, I still have seven more to mount barrels and add the cap square and hinges.
Not aimed at you in particular, but just curious for Winchelsea builders in general, there is so much detail with the cap squares and all but the trucks are rather lacking in detail; no pins through the axles, no bolts .
Any thoughts?
- Dave_E and FrankWouts
-
2
-
1 hour ago, Blacklab said:
Another thing I am wrestling with is wood type.
My two favorites are:
One of our sponsors. Has somewhat limited species selection, but very nice stuff, particularly the Alaskan yellow cedar.
Ocooch Hardwoods While Ocooch does not have pear, boxwood or Alaskan yellow cedar, they have a greater variety of other woods. They do not have all the thickness options that Modelers Sawmill does.
-
1 hour ago, Blacklab said:
So don’t purchase Gorilla CA?
You can purchase whatever you like.
Glenn is recommending Bob Smith. He has used it successfully for many years and you can look at his build logs for examples of his fine work.
I really like the Bob Smith product also. I have also had very good results with a brand called 2P-10.
If you decide to use the Gorilla brand, you can let us know how it works for you. I don't recall that anyone else has talked about using it.
-
-
-
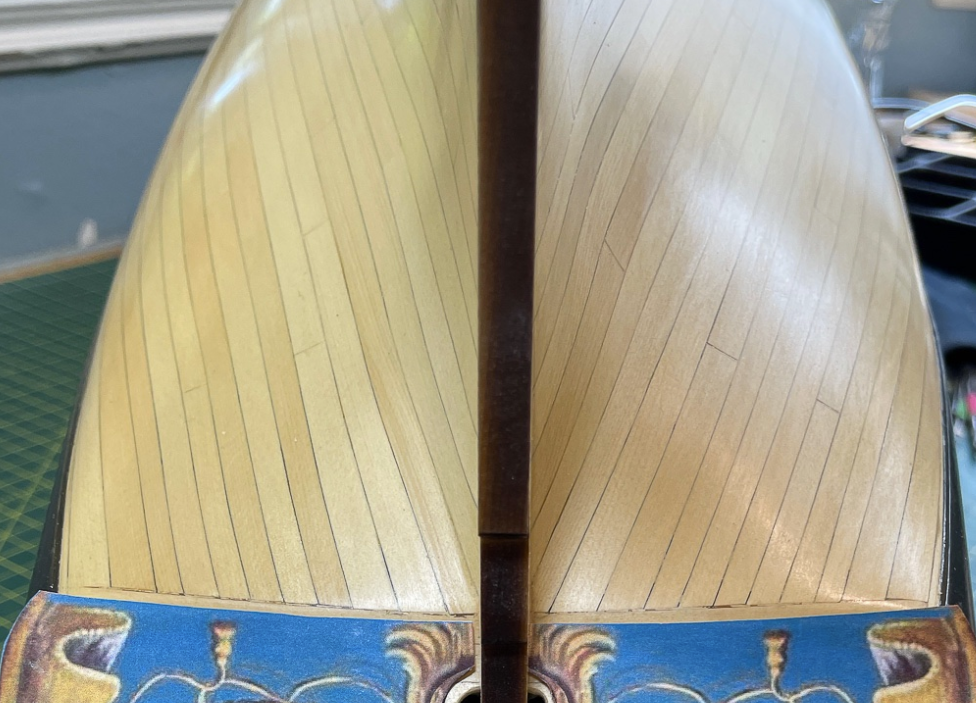
The clinker effect is because the planks are not laying flat on the bulkheads. The only way to achieve this is by edge bending or spiling.
Hve you looked at Chuck's planink videos.
They will show you all you need to know about edge bending.
This guide by David Antscherl will show you about spilling.
https://thenrg.org/resources/Documents/articles/APrimerOnPlanking.pdf
I meant to add that spiling can be problematic with kits, because it requires wider stock than the uniform width planks provided in the kit.
Since this is the first layer, it is a good opportunity to practice what you want to do with the second layer.
Now is the time to make mistakes, and correct them with lessons learned.
-
-
-
-
Your photo appears to be from the CAF kit of Granado
Creating such a jig for a particular build, that didn't include the plans for a jig, would be as much an endeavor as the model itself.
-
-
-
26 minutes ago, glbarlow said:
my logs show how heat bending works for me, i
Do tell..
- glbarlow and CaptnBirdseye
-
1
-
 1
1
-
52 minutes ago, navarcus said:
A very tiny drop of water will swell the wood closing the hole. Sorry if that was already mentioned.
Nailing and covering up the hole, will never solve the problems of trying to lay a straight plank on a curved surface
- CaptnBirdseye, allanyed and mtaylor
-
3
-
Scroll down for a couple of great videos by Chuck.
- CaptnBirdseye and mtaylor
-
2
-
Once you have the vertical bend, the lateral bend is usually easy to do in place with pressure.. At least that has been my experience.. Glenn might have other advice.
- mtaylor, rudybob and CaptnBirdseye
-
3
-
I'm really sold on Bob Smith also.
I recently gave this a try:

...And I really like it
- glbarlow, mtaylor and CaptnBirdseye
-
3
-
13 minutes ago, Snug Harbor Johnny said:
Be careful will CA, as it can go everywhere (including fingers) without a micro-tip applicator.
I think CA has got a bad rep because people think of bad experiences with really thin stuff that goes everywhere. Using a medium or thick CA in small amounts, in the right place, is as good as using nails.
Making sure the plank is the shape you want before you glue it down is another important consideration..
I also like the idea of partial filling to thicken the bulkheads to help with providing a larger surface.
Some people frown on double planking, but really, what's the difference in an extra layer of planks for smoothing and fairing or a lot more bulkheads or frames that provide a more continuous surface?
- CaptnBirdseye, catopower and mtaylor
-
3
-
Quote
best way to acheive a look without seeing the pin holes
Don't use pins/nails.😁
I would look at some of the Winchelsea builds, like Chuck's:
And Glenn Barlow's
They go into a lot of detail about how they plan and execute the planking. I believe they both use CA glue for planking.
Tapering, edge bending and spiling will be important.
You might be at a disadvantage with the relatively fewer bulkheads, unless you do some filling.
Fairing will also be important.
- mtaylor, CaptnBirdseye and glbarlow
-
2
-
1
-
Model Expo has these plans.
Model Shipways CHARLES MORGAN PLANS
Can't tell how closely they will match your model, but they should be a good place to start. They may add detail that your model didn't have.
-
10 minutes ago, Dfell said:
I realised I probably gave the impression the instructions are difficult
I didn't get that impression at all. And I hope Chris doesn't get the impression I feel his instructions are lacking.
I was just trying to make sure you did not feel your lack of knowledge about the shaping of the stem, other than what was provided in the kit was something to
feel worried about. There are details about these ships that 99% of kit builders will never be aware of.
-
5 hours ago, allanyed said:
Is there a reason the knee of the head is not tapered?
I suspect a good reason, is that it is not mentioned in the otherwise comprehensive instruction manual..
Great job, so far Doug.
It says a lot for Chris and Vanguard that people relatively new to the hobby can have such good results.
These kits are so much better than anything else out there, and few this side of Syren will mention tapering the stem...
- Mr Whippy, hollowneck and Dave_E
-
3
-
You would think there would be some below deck pictures.. Problems in that area?
- Keith Black, mtaylor and thibaultron
-
3
Rattlesnake by Dave_E - Model Shipways - 1:64
in - Kit build logs for subjects built from 1751 - 1800
Posted · Edited by Gregory
Something to keep in mind. The laser cut parts are perfect.
They are perfect copies of the files that are sent to the laser..😉
I am using the MS plans for my scratch build of Rattlesnake, and I am also seeing a problem with the symmetry and fairing of the bulkheads.