

Gregory
-
Posts
2,744 -
Joined
-
Last visited
Content Type
Profiles
Forums
Gallery
Events
Posts posted by Gregory
-
-
-
-
6 hours ago, DaveBaxt said:
I have tried a medium cutter wheel and a low teeth cutter
Not sure I recognize what blades you are using.
You might check out something like this from Amazon UK, which I believe will work on the FET..
Silverline 876132 TCT Mini Saw Blade 85 mm Dia - 10 mm Bore - 20T
-
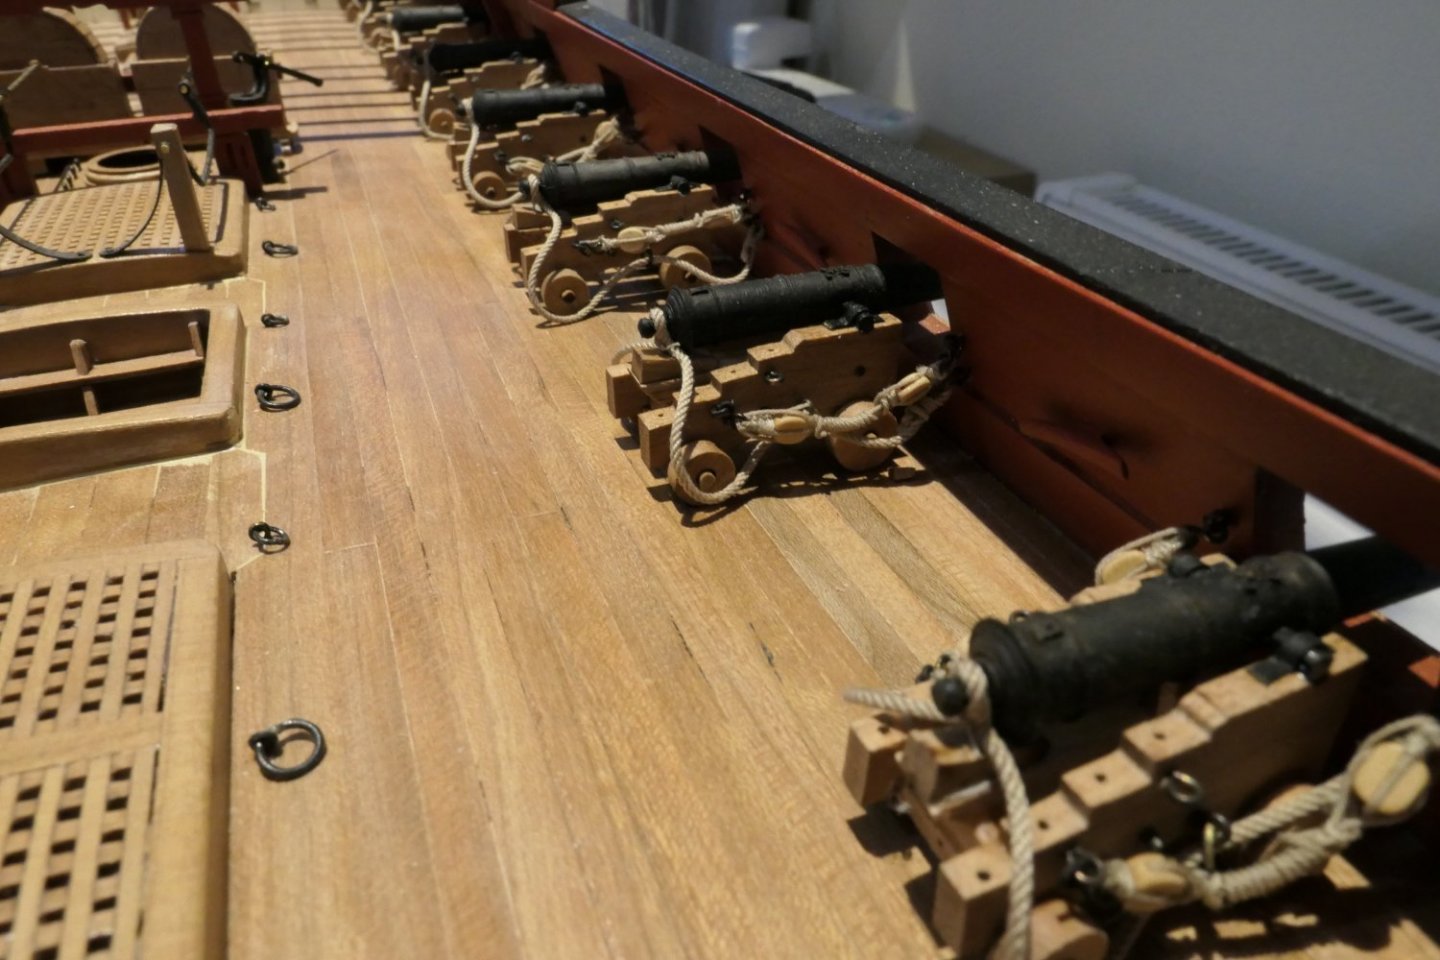
That looks very good.. Poor cannon rigging could spoil an otherwise great model, but yours is in no danger of doing that..
Your gun rigging sets a fine example that others may wish to follow..
PS
In this image, if I didn't know better, I would think I am looking down the deck of a real ship.
- Mldixon, CaptMorgan, hollowneck and 6 others
-
 9
9
-
2 hours ago, JayDee24ca said:
I am going to go with what Corell has provided in the kit.
I think that is a great decision..
Too many kits never get finished because the builder gets overwhelmed with " what is proper"..
Gaining experience and knowledge will be your greatest reward.
I hope you will share some of your work in the future..
- RegAuthority, Ryland Craze, LyleK1 and 3 others
-
6
-
Beautiful worK!
Just a thought about working the pumps.. Would the pump handlers be at the same point of the cycle/stroke, or might they be 180 degrees out? i.e. two pushing while two pull.
-
-
2 hours ago, jud said:
Stove sits on a brick bed, an approved and practical safety precaution, then that built in safety consideration was overcame and made moot by the placement of flammable and well dried wood so close to a hot iron surface radiating heat.
I wonder where on a wood ship you could avoid that problem? ( If it was a problem. )
FWIW, Lavery says the brick hearth was in disuse after 1757, but those bricks look more cool on a model..😀

-
-
14 hours ago, allanyed said:
IF possible JD, I would suggest getting Lees' Masting and Rigging. It covers a lot of years and is explicit in words and drawings for all rates of ship. I don't know about The Art of Rigging, but Rigging Period Ship models is based on one ship, Melampus (36) thus there may be discrepancies with Bounty, a much smaller ship.
Allan
Perhaps I should check before writing this, but can't get to my Lees' before tonight, but doesn't Lees just refer to dates and not the size of the ship?
So in this case we would be looking at 1787 for Bounty and 1785 for Melampus.
The main thing to keep in mind about the Peterson book is that he documented what he observed on a model, and can only be considered reliable when compared to a reliable source such as Lees'.
What I like about Petersson is that there is an index with every line on the ship, which you can easily find in the book, and then compare with another source if need be. Another point for the Petersson book is that he documents all the belaying points, which again, are only accurate as far as the model goes.
-
-
-
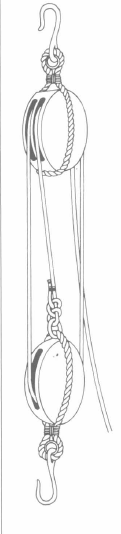
This is the basic run of a single/double tackle.. The hooks might not be present for your purposes.
The stropping of the blocks might be simplified for the purpose of a model.
The noose is a simplified version of how it is tied to the stem.. Actual practice would have been some type of splice and seizings..
A book like Historic Ship Models would be a lot of help with some basic rigging..
During a specific time period, how things were seized and tied off would not have changed a lot..
For the purpose of modeling, just making it look neat is a good place to start.
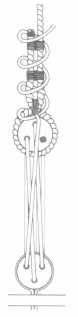
47 minutes ago, JayDee24ca said:If so where are the upper adjustable lines tied off?
Not sure what you are referring to, unless it is the running end of the tackle..
It would be handled similar to the lanyard on a deadeye arrangement..
-
Would be a nice touch..
It is shown for Royal Caroline in the AOTS book.
-
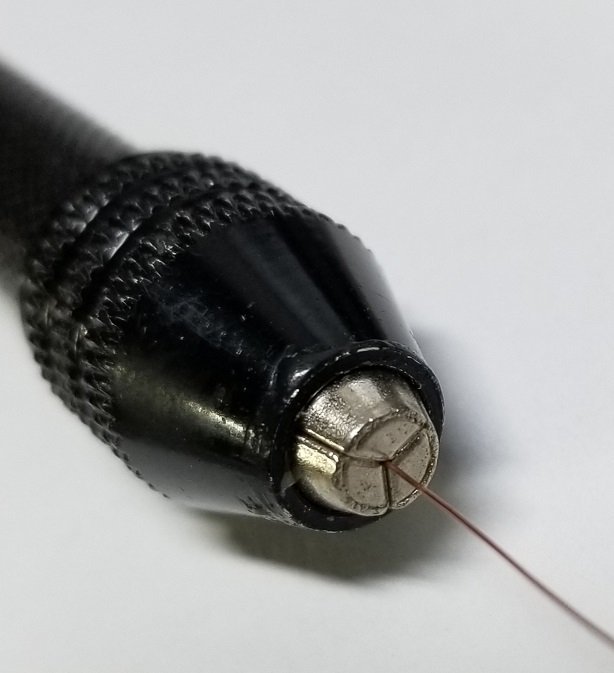
2 minutes ago, Dziadeczek said:
What if I use a 3 jaw chuck from Dremel (it looks like it does have hardened steel jaws
That should work.. Just a matter of getting it threaded..
The chuck on this pin vise is about the same size.. I agree the jaws should be steel..
Just as a test I was able to ding the jaws on mine with a diamond tip scribe, but it didn't seem to penetrate as much as I would expect for aluminum..
These on amazon say they are carbon steel.. Good deal at 2 for $10.49
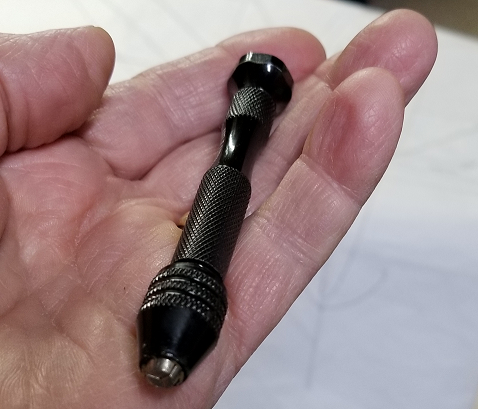
I would like to acknowledge at this point, that a possible downside to the chuck, is that it would be a little more crowding in tight spaces than a traditional pin vise.
-
I'm a little challenged when it comes to small diameters, in that I just have to eye ball it after .5 mm or so.
I see that #80 should be .0135.
This little 3 jaw chuck closes essentially to .000, so the #80 shouldn't be a problem..
Here is some copper wire that is about .01, and it's not going anywhere unless it comes out smaller than it went in.
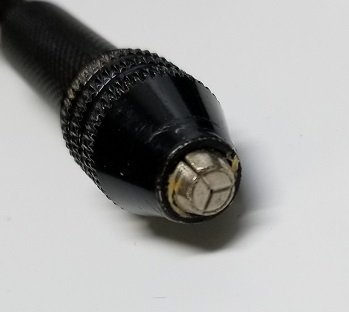
I think you would be surprised at the quality of these. Chances are a lot of different 'Brands' are coming from the same factory, the one I have doesn't seem to be available at Amazon right now, but any similar one should do as well.
PS
Just noticed the specs say this is made of aluminum, so I guess long term durability could be an issue.
I don't see any noticeable wear after over a year, but I mostly use the 1/8 shank micro bits..
-
Is there some reason why you feel I am not competent to judge the quality of this tool I am holding in my hand?
I need a good reason to spend $100 for a tool that is not as versatile or any better made than a $20 tool.
I judge a tool by it's ability to do the work I want to do, and a quality that means I don't expect to have to replace it any time soon.
I would have been real disappointed if I had spent $100 on a set of Starretts and subsequently found this tool for $20.
- Capella, Roger Pellett, Canute and 1 other
-
4
-
I don't see where the Starretts come with different size collets . Do you have to buy at least four of them to get the .04 to .187 pin range?
I'm sure they are well made, but doesn't ease of use count for something?
I used to have two of the double ended ones so I could have four different bits available without changing bits.
I threw them away after I acquired this:
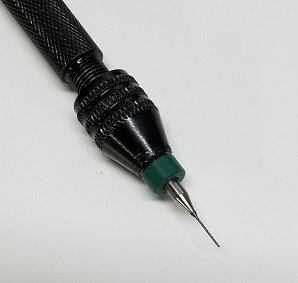
It will hold anything from a cat hair up to 1/8 ".. The 1/8 is really convenient for holding a lot of different Dremel type accessories & milling tools if the need arises.
Since I haven't had the opportunity to use some of the " higher quality " suggestions, I don't know how this compares in that regard, but it has some kind of baked or anodized finish that appears to be very well done.
-
I really like this one. The 3 jaw chuck is really useful for a wide range of sizes without changing collets
like a lot of traditional pin vise'..
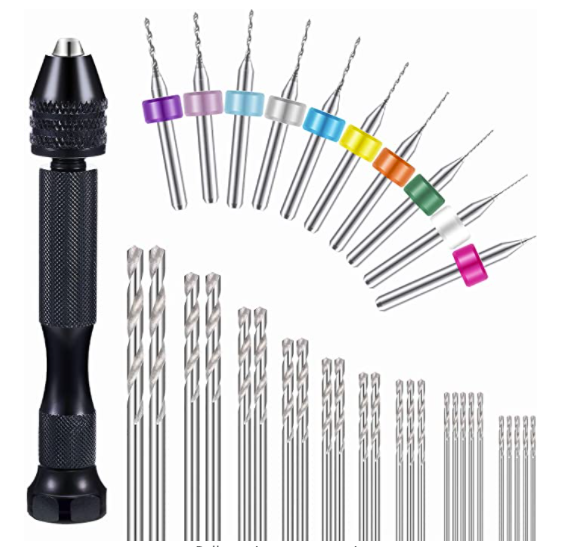
36 Pieces Vise Hand Drill for Jewelry Making Set
If you get something like this, be aware those burrs at the top are brittle and break easily, but it is
easy to get replacements.
- Capella, Ryland Craze, Dave_E and 3 others
-
6
-
I have read a lot of different sources regarding Bligh and the aftermath of the mutiny, and I don't recall any mention of the launch after the landing in Kupang..
Considering the times, there would have been nothing special about the boat.
- mtaylor, allanyed and thibaultron
-
3
-
-
Lot of rope making info here:
Did you check out Ropes of Scale? Another MSW sponsor.
Another sponsor is Crafty Sailor
Until you start making your own, stuff like Syren rope is still a bargain at $50.
-
For whatever reason, I was able to get a color change on 100% polyester rope with Fiebing's leather dye.
It seemed to be permanent and resisted wiping off after it was dry..
It was just an experiment, as I have no reason to change the color of the rope I make beyond changing the color of thread I use..
-
Have you seen the log by vossiewulf where he used red primer:
QuoteThe gun carriages have had their train tackle holes drilled out, casting plugs filed off, and seams sanded down. I then shot some Tamiya red primer over them, and drilled holes on each side for eyebolts for the breech rope and the gun tackles, but I don't think I will fit the latter.

They look pretty good IMO..
- Dave_E, mtaylor and Keith Black
-
2
-
 1
1

Proxxon Router Bits
in Modeling tools and Workshop Equipment
Posted · Edited by Gregory
Dave,
I have heard this may be a good source for slitting blades in UK
MSC Industrial Supply
I find their catalog a little difficult to navigate because they have so many products, but they would probably respond to an email with the specs you are looking for - arbor, diameter, kerf & etc..